Nginx开源版安装、启动
版本区别
Nginx开源版
Nginx plus 商业版
openresty
Tengine
安装
将.tar.gz放到linux系统下, 使用tar -zxvf减压
进入减压目录>>>命令安装指令:安装到usr/local/nginx路径下
./configure --prefix=/usr/local/nginxmake && make install
出现以下报错安装依赖包
-
checking for os
+ Linux3.10.0-693.e17.x86_64 x86_64
checking for c compiler ... not found/configure: error: C compiler cc is not found
安装gcc
yum install -y gcc -
/configure: error: the HTp rewrite module requires the PCRE library.
You can either disable the module by using --without-http_rewrite_moduleoption, or install the PCRE 1ibrary into the system, or build the PCRE library
staticaly from the source with nginx by using --with-pcre=<path> option.
安装perl库
yum install -y pcre pcre-devel -
/configure: error: the HTTP gzip module requires the zlib library.
You can either disable the module by using --without-http_gzip_moduleoption, or install the zlib library into the system, or build the zliblibrary
statically from the source with nginx by using --with-zlib=<path> option.
安装zlib库
yum install -y zlib zlib-devel
启动
进入安装好的目录/usr/local/nginx/sbin
./nginx 启动
./nginx -s stop 快速停止
./nginx -s quit 优雅关闭, 在退出前完成已接受的连接请求
./nginx -s reload 重新加载配置
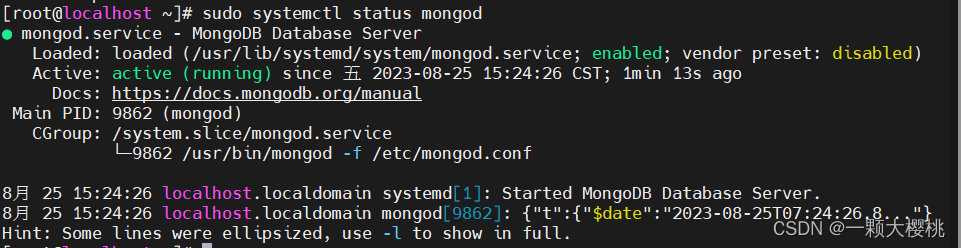
安装成系统服务
创建服务脚本
vim /usr/lib/systemd/system/nginx.service
服务脚本内容
脚本内容出现的路径为安装到的指定路径下,如有不同请手动修改
[Unit]
Description=nginx - web server
After=network.target remote-fs.target nss-lookup.target[Service]
Type=forking
PIDFile=/usr/local/nginx/logs/nginx.pid
ExecStartPre=/usr/local/nginx/sbin/nginx -t -c /usr/local/nginx/conf/nginx.conf
ExecStart=/usr/local/nginx/sbin/nginx -c /usr/local/nginx/conf/nginx.conf
ExecReload=/usr/local/nginx/sbin/nginx -s reload
ExecStop=/usr/local/nginx/sbin/nginx -s stop
ExecQuit=/usr/local/nginx/sbin/nginx -s quit
PrivateTmp=true[Install]
WantedBy=multi-user.target
服务命令说明
systemctl daemon-reload			重新加载系统服务
systemctl start nginx.service	启动服务
systemctl stop nginx.service	停止服务
systemctl status nginx.service	查看服务状态
systemctl reload nginx.service	重新启动(重新加载配置文件)
systemctl enable nginx.service	开机启动
目录结构
- conf
用来存放配置文件相关的目录 - html
用来存放静态文件的默认目录 - logs
日志文件目录 - sbin
nginx的主程序 - 后缀为_temp都是nginx启动后新建的目录
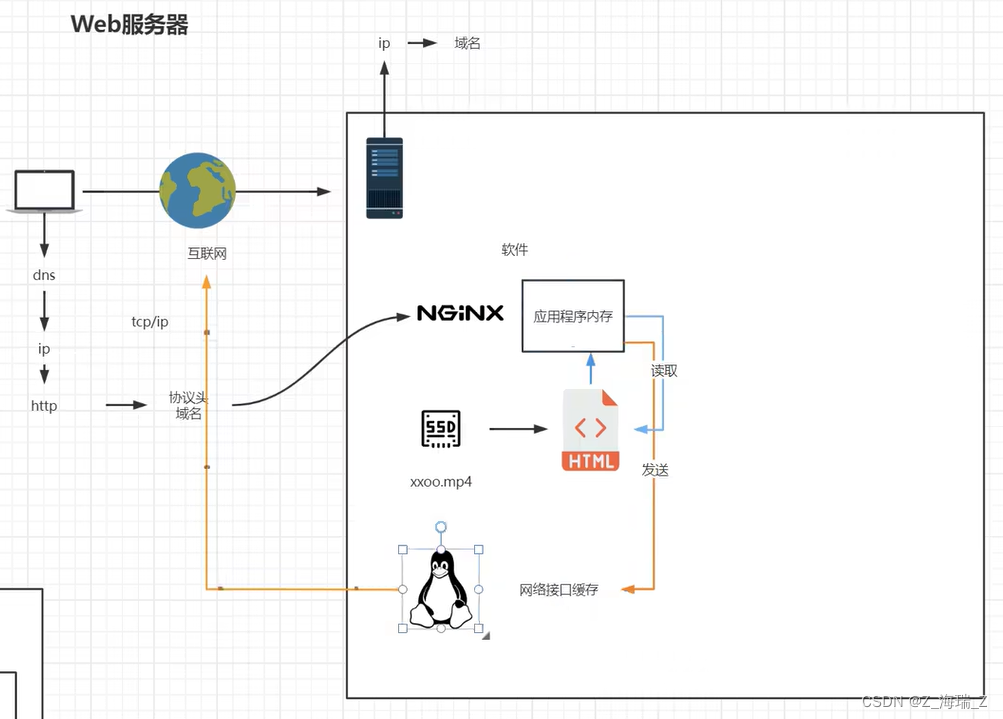
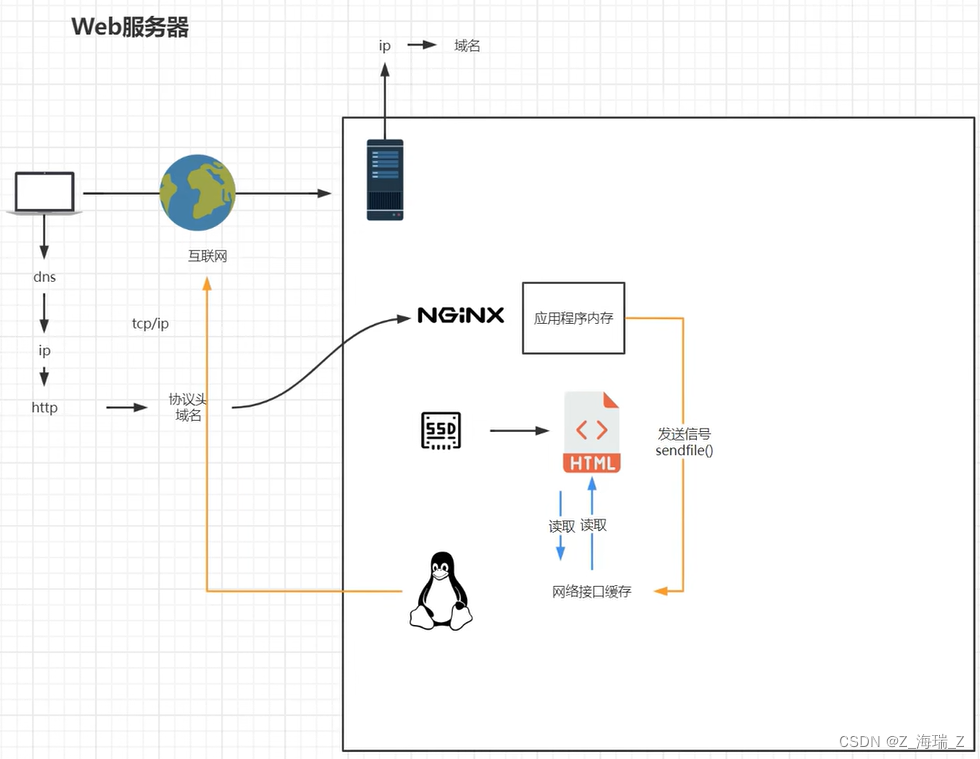
基本运行原理

Nginx基础配置

nginx.conf为主配置文件
最小配置文件
初始化配置文件nginx.conf
#user  nobody;
worker_processes  1;#error_log  logs/error.log;
#error_log  logs/error.log  notice;
#error_log  logs/error.log  info;#pid        logs/nginx.pid;events {worker_connections  1024;
}http {include       mime.types;default_type  application/octet-stream;#log_format  main  '$remote_addr - $remote_user [$time_local] "$request" '#                  '$status $body_bytes_sent "$http_referer" '#                  '"$http_user_agent" "$http_x_forwarded_for"';#access_log  logs/access.log  main;sendfile        on;#tcp_nopush     on;#keepalive_timeout  0;keepalive_timeout  65;#gzip  on;server {listen       80;server_name  localhost;#charset koi8-r;#access_log  logs/host.access.log  main;location / {root   html;index  index.html index.htm;}#error_page  404              /404.html;# redirect server error pages to the static page /50x.html#error_page   500 502 503 504  /50x.html;location = /50x.html {root   html;}# proxy the PHP scripts to Apache listening on 127.0.0.1:80##location ~ \.php$ {#    proxy_pass   http://127.0.0.1;#}# pass the PHP scripts to FastCGI server listening on 127.0.0.1:9000##location ~ \.php$ {#    root           html;#    fastcgi_pass   127.0.0.1:9000;#    fastcgi_index  index.php;#    fastcgi_param  SCRIPT_FILENAME  /scripts$fastcgi_script_name;#    include        fastcgi_params;#}# deny access to .htaccess files, if Apache's document root# concurs with nginx's one##location ~ /\.ht {#    deny  all;#}}# another virtual host using mix of IP-, name-, and port-based configuration##server {#    listen       8000;#    listen       somename:8080;#    server_name  somename  alias  another.alias;#    location / {#        root   html;#        index  index.html index.htm;#    }#}# HTTPS server##server {#    listen       443 ssl;#    server_name  localhost;#    ssl_certificate      cert.pem;#    ssl_certificate_key  cert.key;#    ssl_session_cache    shared:SSL:1m;#    ssl_session_timeout  5m;#    ssl_ciphers  HIGH:!aNULL:!MD5;#    ssl_prefer_server_ciphers  on;#    location / {#        root   html;#        index  index.html index.htm;#    }#}
}
将注释全部去掉后的文件
worker_processes  1;events {worker_connections  1024;
}http {include       mime.types;default_type  application/octet-stream;sendfile        on;keepalive_timeout  65;server {listen       80;server_name  localhost;location / {root   html;#访问80端口,找到nginx目录下的html目录下的index.htmlindex  index.html index.htm;	 }error_page   500 502 503 504  /50x.html;location = /50x.html {root   html;}}
}
文件配置说明
-
worker_processes : 工作的进程个数, 默认为1 , 表示开启一个子进程
-
events : 事件驱动模块
- worker_connections : 每个worker进程可以接受的连接数
-
http
-
include : 引用另外的配置文件, 空格后面跟配置文件名
mime.types文件为请求头说明的访问文件格式 -
default_type:
mime.types文件中没有的格式,默认为default_type的格式 -
sendfile : 文件零拷贝 默认 on (使用linux的 sendfile(socket, file, len) 高效网络传输)
-
keepalive_timeout : 保持连接的超时时间
-
server : 可以理解为一个虚拟主机(vhost)
- listen : 监听的端口号
- server_name : 主机名/域名
- location : URI
- root : 相对路径
/usr/local/nginx/下的某个目录 - index : 默认主页文件
- root : 相对路径
- error_page : 报错代码后跳转的路径
-
sendfile未启动
sendfile启动
虚拟主机
原本一台服务器只能对应一个站点,通过虚拟主机技术可以虚拟化成多个站点同时对外提供服务
nginx.conf中一个server可以理解为一个虚拟主机
多个server下listen存在相同端口会报错
server {listen       80;    					端口号server_name  localhost;					主机名/域名location / {root   html;# 访问80端口,找到nginx目录下的html目录下的index.htmlindex  index.html index.htm;	 }
}
nginx.conf配置文件中server下的server_name域名解析规则
server_name匹配规则
server_name匹配分先后顺序,写在前面的匹配上就不会继续往下匹配了。- 完整匹配
可以在同一server_name中匹配多个域名
server_name vod.mmban.com www1.mmban.com; - 通配符匹配
server_name *.mmban.com; - 通配符结束匹配
server_name vod.*; - 正则匹配
server_name ~^[0-9]+\.mmban\.com$;
正向代理、反向代理模型
反向代理
以代理服务器来接受连接请求,然后将请求转发给内部网络上的服务器,并将从服务器上得到的结果返回给请求连接的客户端,此时代理服务器对外就表现为一个反向代理服务器,而且整个过程对于客户端而言是透明的。

正向代理
一个位于客户端和原始服务器(origin server)之间的服务器,为了从原始服务器取得内容,客户端向代理发送一个请求并指定目标(原始服务器),然后由代理向原始服务器转交请求并将获得的内容返回给客户端。

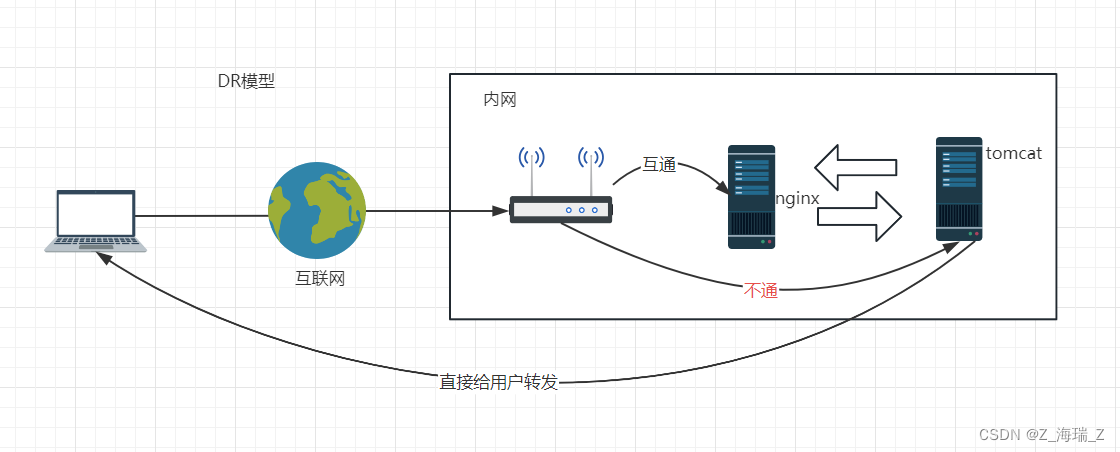
传统互联网项目

负载均衡
负载均衡也是Nginx常用的一个功能。简单而言就是当有2台或以上服务器时,根据规则随机的将请求分发到指定的服务器上处理,负载均衡配置一般都需要同时配置反向代理,通过反向代理跳转到负载均衡。
简单示例(关键字: proxy_pass)
修改nginx.conf配置文件中http>server>location部分(不支持https)
server {listen       80;    					端口号server_name  localhost;					主机名/域名location / {proxy_pass http://www.baidu.com;# 当使用proxy_pass负载均衡时, 以下内容不生效, 直接注释掉# root   html;# index  index.html index.htm;	 }
}
简单负载均衡(关键字: upstream)—轮询示例
修改nginx.conf配置文件>>http>upstream和server同级
upstream 自定义名称 {server 192.168.137.139:80;server 192.168.137.133:80;
}server {listen       80;server_name  localhost;location / {proxy_pass http://自定义名称;}
}
负载均衡策略
weight:权重down: 当前server暂不参与负载均衡(下线)backup: 预留的备份服务器; 其它所有的非backup机器down或者忙的时候,请求backup机器。max_fails: 请求失败次数限制fail_timeout: 经过max_fails后服务暂停时间max_conns: 限制最大的连接数
简单示例
upstrem 自定义名称{server 192.168.137.137:80 weight=1;server 192.168.137.137:8080 down;server 192.168.137.137:8081 backup;server 192.168.137.137:8082 max_fails=1 fail_timeout=10s max_conns=1024;server unix:/tmp/backend3;
}
负载均衡调度算法
- 轮询:默认算法按时间顺序逐一分配到不同的后端服务器;
- 加权轮询:Weight值越大,分配到访问几率越高;
- ip_hash:为每一个请求访问的IP的hash结果分配,可以将来自一个IP的固定访问一个后端服务器;
- url_hash:需要安装模块安装访问的URL的hash结果来分配,这样每个URL定向到同一个后端服务器
- least_conn:按照某台机器最少连接数的进行分配访问;
- hash关键数值: hash 自定义 KEY
轮询
权重
upstream 自定义名称{server 192.168.137.137:8081 weight=1;server 193.168.137.137:8080 weight=9;
}
ip_hash
ip_hash 会话粘连, 用户访问的时候请求可能分发到不同服务器,当我们的程序不是无状态的时候(采用了session保存数据),这时候就有一个很大的很问题了,比如把登录信息保存到了session中,那么跳转到另外一台服务器的时候就需要重新登录了,所以很多时候我们需要一个客户只访问一个服务器,那么就需要用iphash了,iphash的每个请求按访问ip的hash结果分配,这样每个访客固定访问一个后端服务器,可以解决session的问题。
# 会话粘连可以理解为用户持续访问一个后端机器
upstream 自定义名称 {ip_hash;server 192.168.137.137:8080;server 192.168.137.137:8081;
}
least_conn
将请求分配到连接数最少的服务上
upstream 自定义名称 {least_conn;server 192.168.137.137:8080;server 192.168.137.137:8081;
}
fail
fair(需要使用第三方软件)按后端服务器的响应时间来分配请求,响应时间短的优先分配。
upstream 自定义名称 {fair;server 192.168.137.137:8080;server 192.168.137.137:8081;
}
url_hash
url_hash(需要使用第三方软件):按访问url的hash结果来分配请求,使每个url定向到同一个后端服务器,后端服务器为缓存时比较有效。
upstream 自定义名称 {hash $request_uri;hash_method crc32;server 192.168.137.137:8080;server 192.168.137.137:8081;
}
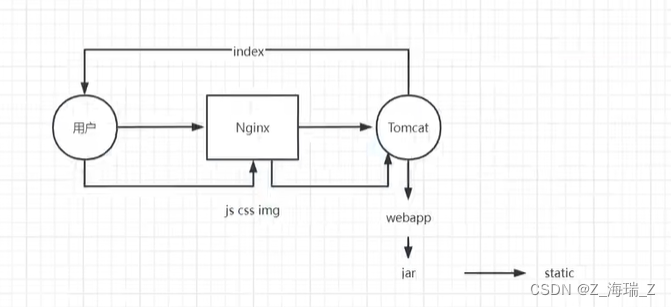
动静分离
动静分离是让动态网站里的动态网页根据一定规则把不变的资源和经常变的资源区分开来,动静资源做好了拆分以后,我们就可以根据静态资源的特点将其做缓存操作,这就是网站静态化处理的核心思路
简单示例
nginx所在服务器ip为192.168.137.139
137nginx配置文件修改如下(将137反向代理到139上, 将css/js/img静态文件静态化到139服务器中)
server {listen       80;server_name  localhost;location / {proxy_pass http://192.168.137.137:8080;}# 所有静态请求都由nginx处理,存放目录为nginx中的htmllocation ~*(css|js|css) {root   html;index  index.html;}error_page   500 502 503 504  /50x.html;location = /50x.html {root   500.html;}
}
location匹配顺序
- 多个正则location直接按书写顺序匹配,成功后就不会继续往后面匹配
- 普通(非正则)location会一直往下,直到找到匹配度最高的(最大前缀匹配)
- 当普通location与正则location同时存在,如果正则匹配成功,则不会再执行普通匹配
- 所有类型location存在时,“=”匹配 > “^~“匹配 > 正则匹配 > 普通(最大前缀匹配)
URLRewrite
rewrite是URL重写的关键指令, 根据regex(正则表达式)部分类容, 重定向到replacement, 结尾是flag标记rewrite <regex>	<replacement> [flag];
关键字	正则		替代内容		  flag标记关键字: 		其中关键rewrite不能改变
正则: 		perl兼容正则表达式语句进行规则匹配
替代内容: 	将正则匹配的内容替换成replacement
flag标记:	rewrite支持的flag标记rewrite参数的标签位置: server, location, ifflag标记说明:
last		#本条规则匹配完成后, 继续向下匹配新的location URI规则
break		#本条规则匹配完成即终止, 不再匹配后面的任何规则
redirect	#返回302临时重定向, 浏览器地址栏会显示跳转后的URL地址
permanent 	#返回301永久重定向, 浏览器地址栏会显示跳转后的URL地址
示例
实际url为: http://192.168.137.137/index.html?pageNum=111
浏览器url栏显示为: http://192.168.137.137/111.html
server {listen       80;server_name  localhost;location / {rewrite	^/([0-9]+).html$	/index.html?pageNum=$1	break;proxy_pass http://192.168.137.137:8080;}# 所有静态请求都由nginx处理,存放目录为nginx中的htmllocation ~*(css|js|css) {root   html;index  index.html;}error_page   500 502 503 504  /50x.html;location = /50x.html {root   e:wwwroot;}
}
负载均衡示例
server {listen       80;server_name  localhost;upstream test {server 192.168.137.139:80;server 192.168.137.133:80;}location / {rewrite	^/([0-9]+).html$	/index.html?pageNum=$1	break;proxy_pass http://test;}# 所有静态请求都由nginx处理,存放目录为nginx中的htmllocation ~*(css|js|css) {root   html;index  index.html;}error_page   500 502 503 504  /50x.html;location = /50x.html {root   e:wwwroot;}
}
防盗链
说明
当浏览器访问静态资源时, 会二次向服务器发送请求, 这时请求头会带上referer
如果服务器设置了防盗链配置, Referer中域名与服务器防盗链设置的域名不同时, 无法访问

配置
valid_referers none | blocked | server_names | strings ...;
- none: 检测Referer头域不存在的情况
- blocked: 检测Referer头域的值被防火墙或者代理服务器删除或伪装的情况. 这种情况该头域的值不以"http://"或"https://"开头.
- server_names: 设置一个或多个URL, 检测Referer头域的值是否是这些URL中的某一个
示例
server {listen       80;server_name  localhost;upstream test {server 192.168.137.139:80;server 192.168.137.133:80;}location / {rewrite	^/([0-9]+).html$	/index.html?pageNum=$1	break;proxy_pass http://test;}# 所有静态请求都由nginx处理,存放目录为nginx中的htmllocation ~*(css|js|css) {# 防盗链设置valid_referers none 域名;# 检测是否包含上述域名, 不包含上述域名, 返回403if($invalid_referer){return 403;}root   html;index  index.html;}error_page   500 502 503 504  /50x.html;location = /50x.html {root   e:wwwroot;}
}
高可用
将nginx所在服务器安装keepalived, 为服务器创建vip(虚拟ip), 当主服务dwon掉后, 虚拟ip就会移动到备用服务器, 这样可以保证同一个ip可以在不同服务器之间切换

安装Keepalived(此处为yum安装)
yum install -y keepalived# 如果遇以下报错 安装openssl-devel依赖
configure: error:
!!! OpenSSL is not properly installed on your system. !!!
!!! Can not include OpenSSL headers files. !!!# 安装openssl-devel依赖
yum install -y openssl-devel
配置
使用yum安装后, 配置文件所在路径为/etc/keepalived/keepalived.conf
完整的配置文件
! Configuration File for keepalivedglobal_defs {notification_email {acassen@firewall.locfailover@firewall.locsysadmin@firewall.loc}notification_email_from Alexandre.Cassen@firewall.locsmtp_server 192.168.200.1smtp_connect_timeout 30router_id LVS_DEVELvrrp_skip_check_adv_addrvrrp_strictvrrp_garp_interval 0vrrp_gna_interval 0
}vrrp_instance VI_1 {state MASTERinterface eth0virtual_router_id 51priority 100advert_int 1authentication {auth_type PASSauth_pass 1111}virtual_ipaddress {192.168.200.16192.168.200.17192.168.200.18}
}virtual_server 192.168.200.100 443 {delay_loop 6lb_algo rrlb_kind NATpersistence_timeout 50protocol TCPreal_server 192.168.201.100 443 {weight 1SSL_GET {url {path /digest ff20ad2481f97b1754ef3e12ecd3a9cc}url {path /mrtg/digest 9b3a0c85a887a256d6939da88aabd8cd}connect_timeout 3nb_get_retry 3delay_before_retry 3}}
}virtual_server 10.10.10.2 1358 {delay_loop 6lb_algo rr lb_kind NATpersistence_timeout 50protocol TCPsorry_server 192.168.200.200 1358real_server 192.168.200.2 1358 {weight 1HTTP_GET {url { path /testurl/test.jspdigest 640205b7b0fc66c1ea91c463fac6334d}url { path /testurl2/test.jspdigest 640205b7b0fc66c1ea91c463fac6334d}url { path /testurl3/test.jspdigest 640205b7b0fc66c1ea91c463fac6334d}connect_timeout 3nb_get_retry 3delay_before_retry 3}}real_server 192.168.200.3 1358 {weight 1HTTP_GET {url { path /testurl/test.jspdigest 640205b7b0fc66c1ea91c463fac6334c}url { path /testurl2/test.jspdigest 640205b7b0fc66c1ea91c463fac6334c}connect_timeout 3nb_get_retry 3delay_before_retry 3}}
}virtual_server 10.10.10.3 1358 {delay_loop 3lb_algo rr lb_kind NATpersistence_timeout 50protocol TCPreal_server 192.168.200.4 1358 {weight 1HTTP_GET {url { path /testurl/test.jspdigest 640205b7b0fc66c1ea91c463fac6334d}url { path /testurl2/test.jspdigest 640205b7b0fc66c1ea91c463fac6334d}url { path /testurl3/test.jspdigest 640205b7b0fc66c1ea91c463fac6334d}connect_timeout 3nb_get_retry 3delay_before_retry 3}}real_server 192.168.200.5 1358 {weight 1HTTP_GET {url { path /testurl/test.jspdigest 640205b7b0fc66c1ea91c463fac6334d}url { path /testurl2/test.jspdigest 640205b7b0fc66c1ea91c463fac6334d}url { path /testurl3/test.jspdigest 640205b7b0fc66c1ea91c463fac6334d}connect_timeout 3nb_get_retry 3delay_before_retry 3}}
}
主服务器最小配置文件
! Configuration File for keepalivedglobal_defs {# 配置idrouter_id lb137
}# keepalived内网通信协议
vrrp_instance test {# 配置主机(备用机)state MASTER# 配置所在网卡名称interface ens33virtual_router_id 51# 优先级, 主备竞选时, 哪个高哪个为主priority 100# 间隔检测时间advert_int 1# 设置分组 authentication {auth_type PASSauth_pass 1111}# 虚拟ip地址, 可配置多个virtual_ipaddress {192.168.137,200# 192.168.137.201}
}
备服务器最小配置文件
! Configuration File for keepalivedglobal_defs {# 配置idrouter_id lb139
}# keepalived内网通信协议
vrrp_instance test {# 配置主机(备用机)state BACKUP# 配置所在网卡名称interface ens33virtual_router_id 51# 优先级, 主备竞选时, 哪个高哪个为主priority 50# 间隔检测时间advert_int 1# 设置分组 authentication {auth_type PASSauth_pass 1111}# 虚拟ip地址, 可配置多个virtual_ipaddress {192.168.137.200# 192.168.137.201}
}
!!!需要注意
- vrrp_instance
- virtual_router_id
- authentication
- auth_type
- auth_pass
对应的内容需一致, 方能组成一组
启动、停止、重启、查看状态命令
systemctl start keepalived		# 启动
systemctl stop keepalived		# 停止
systemctl restart keepalived	# 重启
systemctl status keepalived		# 查看状态
systemctl reload keepalived		# 刷新配置
使用脚本检测nginx是否down, 同时让keepalived关闭
后续补充
Https证书配置
对称加密
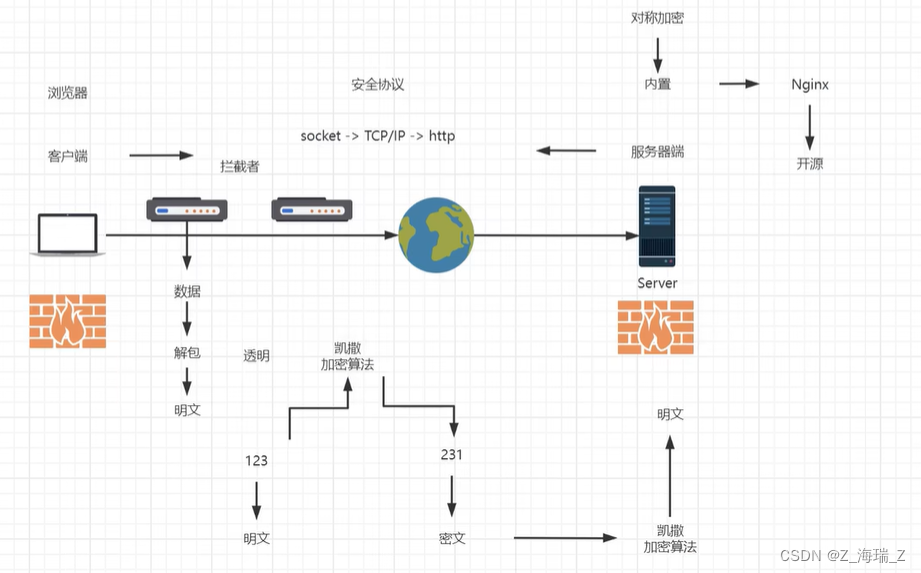
openssl
SSL协议库、应用程序以及密码算法库
证书申请
参考视频
证书安装
nginx.conf配置文件
server {listen 443 ssl;server_name 域名/主机名;ssl_certificate 上传到服务器中的.crt/.pem文件路径;# ssl_certificate /root/xxx/xxx.pem; 文件绝对路径# ssl_certificate xxx.pem; 文件相对路径 相对于 /usr/local/nginx/conf/ssl_certificate_key 上传到服务器中的.key文件路径;# ssl_certificate_key /root/xxx/xxx.key; 文件绝对路径# ssl_certificate_key xxx.key 文件相对路径 相对于 /usr/local/nginx/conf/}
http协议跳转https
return 301 https://$server_name$request_uri;
在配置文件中位置
http {include       mime.types;default_type  application/octet-stream;sendfile        on;keepalive_timeout  65;server {listen 443 ssl;server_name 域名/主机名;ssl_certificate	上传到服务器中的.crt/.pem文件路径;ssl_certificate_key 上传到服务器中的.key文件路径;}server {listen       80;server_name  localhost;location / {return 301 https://$server_name$request_uri;}error_page   500 502 503 504  /50x.html;location = /50x.html {root   html;}}
}