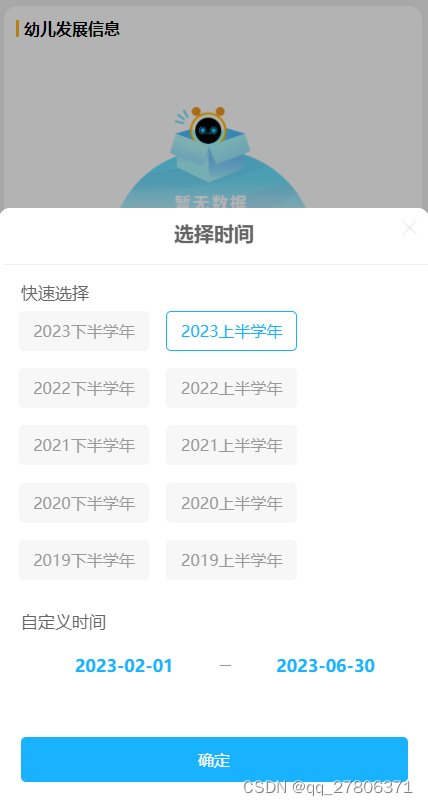
我的时间选择组件在common文件夹里
datePicker组件代码
html:
<view class="date_bg_view">
</view>
<view class="date_content"><view class="date_title"><image src="/image/icon_close_black.png" class="close" bindtap="onClose"></image><text class="date_title_txt">选择时间</text></view><view class="line"></view><!-- 快速选择 --><view class="date_quick_choose"><text class="date_quick_txt">快速选择</text><view class="date_quick_show"><view class="{{item.flag ? 'quick_cell_flag' : 'quick_cell'}}" wx:for="{{dateList}}" wx:key="id" bindtap="handleQuickChoose" data-index="{{index}}">{{item.name}}</view></view></view><!-- 自定义时间 --><view class="date_quick_choose"><text class="date_quick_txt">自定义时间</text><view class="date_picker"><picker mode="date" value="{{startDate}}" start="2015-09-01" end="2999-12-31" bindchange="bindDateChange" data-type="1"  mask-style=" color='#0A3E79'"><view class="picker">{{startDate?startDate:'开始时间'}}</view></picker> <text style="width: 20rpx;height: 1rpx;background-color: #999;"></text><picker mode="date" value="{{endDate}}" start="2015-09-01" end="2999-12-31" bindchange="bindDateChange"  data-type="2"><view class="picker">{{endDate?endDate:'结束时间'}}</view></picker></view></view><button class="sure_btn" bindtap="handleSure"> 确定 </button>
</view>css:
.date_bg_view{position: absolute;top: 0;left: 0;z-index: 10;width: 100%;height: 100%;background-color: #000;opacity: 0.3;
}
.date_content{  position: fixed;bottom: 0;  left: 0;  z-index: 11;display: flex;flex-direction: column;justify-content: flex-start;align-items: flex-start;width: 100%;height: 75%;background-color: #fff;      border-top-left-radius: 20rpx;border-top-right-radius: 20rpx;
}
.date_title{z-index: 11;width: 100%;display: flex;justify-content: center;height: 90rpx;line-height: 90rpx;
}
.close{  position: absolute;top: 20rpx;right: 20rpx;width: 30rpx;height: 30rpx;
}
.date_title_txt{font-size: 35rpx;font-weight: bold;
}
.line{margin: 10rpx;width: 100%;  height: 1rpx;background-color: #eee;
}
.date_quick_choose{z-index: 11;padding: 20rpx;width: 100%;
}
.date_quick_txt{z-index: 12;margin: 20rpx;    font-size: 30rpx;color: #666;
}
.date_quick_show{z-index: 12;  display: flex;justify-content: flex-start;flex-wrap: wrap;flex-direction: row;align-items: center;  width: 100%;
}
.quick_cell{z-index: 12;margin: 2%;padding: 5rpx;width: 29%;  height: 60rpx;text-align: center;line-height: 60rpx;      font-size: 28rpx;background-color: #F7F7F7;color: #999;border: 1rpx solid #F7F7F7;border-radius: 10rpx;
}
.quick_cell_flag{z-index: 12;margin: 2%;padding: 5rpx;width: 29%;  height: 60rpx;line-height: 60rpx;font-size: 28rpx;text-align: center;      background-color: #fff;color: #19b2ff;border: 1rpx solid #19b2ff;border-radius: 10rpx;
}
.date_picker{  margin-top: 30rpx;margin-left: 10%;display: flex;    justify-content: space-between;align-items: center;width: 80%;
}
.picker{  padding: 10rpx 40rpx;background-color: #fff;font-size: 30rpx;color: #19b2ff;font-weight: bold;
}
.sure_btn{margin-top: 80rpx;  font-size: 28rpx;width: 90%;    height: 80rpx;text-align: center;line-height: 80rpx;background-color: #19b2ff;color: #fff;
}js:const util = require('../../utils/util.js');
import {formatDate
} from "../../utils/date";
const app = getApp();
Component({lifetimes: {attached: function () {// 在组件实例进入页面节点树时执行var currentDate = new Date();// 获取当前年份和月份var currentYear = currentDate.getFullYear();// 计算五年内的上学期和下学期var semesters = [];for (var i = 0; i < 5; i++) {var years = currentYear - i;semesters.push({name: years + '下半学年',dates: [years + '-09-01', (years + 1) + '-01-31'],flag: false});     semesters.push({name: years + '上半学年',dates: [years + '-02-01', years + '-06-30'],flag: false});        }// 输出结果this.setData({dateList: semesters})},},properties: {},/*** 组件的初始数据*/data: {dateList: [],startDate: '',endDate: '',currentTime: formatDate(new Date()),oidx: null,},methods: {/*** 快速选择* @param {*} e */handleQuickChoose(e) {let that = this;let oidx = e.currentTarget.dataset.index;let odateList = that.data.dateList// 遍历数组,并修改flag属性为falseodateList.forEach(item => {item.flag = false;});odateList[oidx].flag = truethat.setData({startDate: odateList[oidx].dates[0],endDate: odateList[oidx].dates[1],oidx,dateList: odateList})      },bindDateChange(e) {//console.log('picker发送选择改变,携带值为', e)let that = this;let type = e.currentTarget.dataset.typeif (type == 1) {that.setData({startDate: e.detail.value})} else {that.setData({endDate: e.detail.value})}},/*** 顶部关闭按钮*/onClose() {this.triggerEvent('sync', {show: false})},/*** 确定*/handleSure() {let that = this;if (!that.data.startDate || !that.data.endDate) {util.alert('学期选择不能为空!');return false;}if (that.data.startDate <= that.data.endDate) {that.triggerEvent('sync', {show: false,startDate: that.data.startDate,endDate: that.data.endDate})} else {util.alert('结束时间不能小于开始时间');return false;}}},})json:
{"component": true,"usingComponents": {}
}
调用的页面:
json:
"usingComponents": {"datePicker":"../../common/datePicker/index"
},html:<view class="check-list"><view class="check-list-lef">学期选择</view><view class="check-list-rig"><view class="picker" bind:tap="openDatePicker">{{ startDate && endDate ? (startDate + ' - ' + endDate) : '请选择学期'}}</view><!-- 时间选择组件 bind:sync 子类回传数据的方法--><datePicker wx:if="{{show}}" bind:sync="syncGetDate"></datePicker>                    </view></view>js:
data:{startDate: '',endDate: '',show: false,//显示隐藏时间控件
}openDatePicker(e) {this.setData({hiddenChart: true,show:true})},syncGetDate(e){let that = this;let show = e.detail.show; if(!show){ // 子组件点击了关闭   关闭弹窗that.setData({show:false,startDate: e.detail.startDate,endDate: e.detail.endDate,//hiddenChart: false,})}//console.log("子组件:",e);    //this.getStatisticThemeActivitiesTrend()},