一、安装依赖
<dependency><groupId>com.deepoove</groupId><artifactId>poi-tl</artifactId><version>1.12.1</version></dependency>
二、定义工具类
package com.example.springbootmp.utils;import com.deepoove.poi.XWPFTemplate;
import com.deepoove.poi.config.Configure;import java.io.InputStream;
import java.io.OutputStream;
import java.net.HttpURLConnection;
import java.net.URL;
import java.util.Map;public class WordUtil {/*** 根据模板填充内容生成word,并下载** @param templatePath word模板文件路径* @param paramMap     替换的参数集合*/public static void downloadWord(OutputStream out, InputStream templatePath, Map<String, Object> paramMap, Configure config) throws Exception {/*// 生成本地文件Long time = System.currentTimeMillis();// 生成的word格式String formatSuffix = ".docx";// 拼接后的文件名String fileName = time + formatSuffix;//设置生成的文件存放路径,可以存放在你想要指定的路径里面String rootPath = "D:/tmp/" + File.separator + "file/word/";String filePath = rootPath + fileName;File newFile = new File(filePath);//判断目标文件所在目录是否存在if (!newFile.getParentFile().exists()) {//如果目标文件所在的目录不存在,则创建父目录newFile.getParentFile().mkdirs();}
*/// 读取模板templatePath并将paramMap的内容填充进模板,即编辑模板(compile)+渲染数据(render)XWPFTemplate template = XWPFTemplate.compile(templatePath, config).render(paramMap);// 生成本地文件//out = new FileOutputStream(filePath);//输出路径(下载到指定路径)// 将填充之后的模板写入filePath//将template写到OutputStream中template.write(out);out.flush();out.close();template.close();}/*** 远程文件url 转为输入流* @param urlOrPath 远程文件url* @return* @throws Exception*/public static InputStream byteByUrl(String urlOrPath) throws Exception {URL url = new URL(urlOrPath);HttpURLConnection conn = (HttpURLConnection) url.openConnection();//设置超时间为3秒conn.setConnectTimeout(3 * 1000);//防止屏蔽程序抓取而返回403错误//conn.setRequestProperty("User-Agent", "Mozilla/4.0 (compatible; MSIE 5.0; Windows NT; DigExt)");//得到输入流return conn.getInputStream();}
}
三、在resource文件夹下定义模板,如template.docx

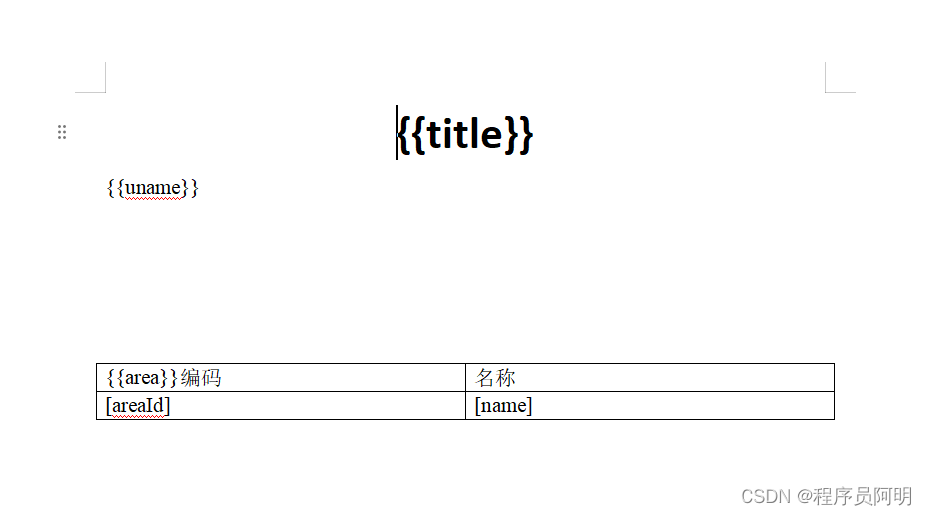
四、测试控制器代码
package com.example.springbootmp.controller;import com.deepoove.poi.config.Configure;
import com.deepoove.poi.plugin.table.LoopRowTableRenderPolicy;
import com.example.springbootmp.utils.WordUtil;
import org.springframework.web.bind.annotation.GetMapping;
import org.springframework.web.bind.annotation.RestController;import javax.servlet.http.HttpServletResponse;
import java.io.InputStream;
import java.util.ArrayList;
import java.util.HashMap;
import java.util.List;
import java.util.Map;@RestController
public class fileController {@GetMapping("/word-download")public void word(HttpServletResponse response) throws Exception {response.setContentType("application/octet-stream");//设置文件名称response.setHeader("Content-Disposition", "attachment;filename=" + System.currentTimeMillis() + ".docx");//获取 resources 目录 本地&打Jar包都可用 路径前不需要加///InputStream inputStream = getClass().getClassLoader().getResourceAsStream("word/template.docx");//路径前需要加/  具体区别请看https://www.cnblogs.com/geek233/p/15817853.htmlInputStream inputStream = getClass().getResourceAsStream("/word/template.docx");//获取远程文件//InputStream inputStream = WordUtil.byteByUrl("https://blog.52ipc.top/word/template.docx");// 创建用于插入数据的Map  实际开发要放在service层Map<String, Object> paramMap = new HashMap<>(18);paramMap.put("title", "Hi, Word模板");paramMap.put("uname", "小蜜蜂~");List<Map<String,Object>> voList = new ArrayList<>();for (int i = 0; i < 10; i++) {Map<String,Object> vo = new HashMap<>();vo.put("areaId" , String.valueOf(i));vo.put("name" ,  "北京"+ i);voList.add(vo);}paramMap.put("area", voList);// 循环行表渲染策略LoopRowTableRenderPolicy policy = new LoopRowTableRenderPolicy();// 插件绑定Configure config = Configure.builder()//area 变量名//policy 策略.bind("area", policy).build();WordUtil.downloadWord(response.getOutputStream(), inputStream, paramMap, config);}
}