一、Filter概述
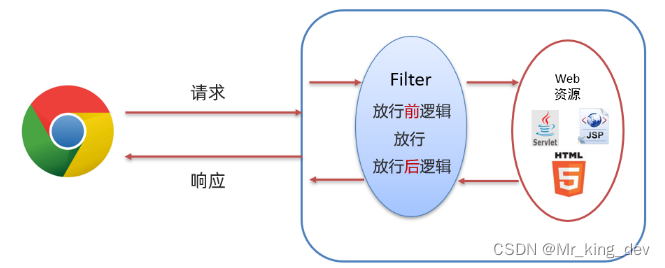
Filter 表示过滤器,是 JavaWeb 三大组件(Servlet、Filter、Listener)之一。 过滤器可以把对资源的请求拦截下来,从而实现一些特殊的功能。
如下图所示,浏览器可以访问服务器上的所有的资源(servlet、jsp、html等),在访问到这些资源之前可以使用过滤器拦截来下,也就是说在访问资源之前会先经过 Filter,如下图

二、Filter快速入门
2.1、pom.xml 配置文件内容如下:
<?xml version="1.0" encoding="UTF-8"?>
<project xmlns="http://maven.apache.org/POM/4.0.0"xmlns:xsi="http://www.w3.org/2001/XMLSchema-instance"xsi:schemaLocation="http://maven.apache.org/POM/4.0.0 http://maven.apache.org/xsd/maven-4.0.0.xsd"><modelVersion>4.0.0</modelVersion><groupId>org.example</groupId><artifactId>filter-demo</artifactId><version>1.0-SNAPSHOT</version><packaging>war</packaging><properties><maven.compiler.source>8</maven.compiler.source><maven.compiler.target>8</maven.compiler.target></properties><dependencies><dependency><groupId>javax.servlet</groupId><artifactId>javax.servlet-api</artifactId><version>3.1.0</version><scope>provided</scope></dependency></dependencies><build><plugins><plugin><groupId>org.apache.tomcat.maven</groupId><artifactId>tomcat7-maven-plugin</artifactId><version>2.2</version><configuration><port>80</port></configuration></plugin></plugins></build>
</project>2.2、hello.jsp 页面内容如下
<%@ page contentType="text/html;charset=UTF-8" language="java" %>
<html>
<head><title>Title</title>
</head>
<body><h1>hello JSP~</h1>
</body>
</html>
我们现在在浏览器输入 http://localhost/filter-demo/hello.jsp 访问 hello.jsp 页面,这里是可以访问到 hello.jsp 页面内容的。

2.3、编写过滤器
其中"/*"表示对所有的路径进行拦截
@WebFilter("/*")
public class FilterDemo implements Filter {@Overridepublic void doFilter(ServletRequest request, ServletResponse response, FilterChain chain) throws IOException, ServletException {System.out.println("FilterDemo...");}@Overridepublic void init(FilterConfig filterConfig) throws ServletException {}@Overridepublic void destroy() {}
}
重启启动服务器,再次重新访问 hello.jsp 页面,这次发现页面没有任何效果,但是在 idea 的控制台可以看到如下内容

上述效果说明 FilterDemo 这个过滤器的 doFilter() 方法执行了,但是在 doFilter() 方法中没有添加放行的方法 。
添加放行代码: chain.doFilter(request,response);
@WebFilter("/*")
public class FilterDemo implements Filter {@Overridepublic void doFilter(ServletRequest request, ServletResponse response, FilterChain chain) throws IOException, ServletException {System.out.println("1.FilterDemo...");//放行chain.doFilter(request,response);}@Overridepublic void init(FilterConfig filterConfig) throws ServletException {}@Overridepublic void destroy() {}
}
2.4、Filter执行流程
1、执行放行前逻辑
2、放行
3、访问资源
4、执行放行后逻辑
2.5、代码演示
在 doFilter() 方法前后都加上输出语句,如下

同时在 hello.jsp 页面加上输出语句,如下

启动服务器访问 hello.jsp 页面,在控制台打印的内容如下:

以后我们可以将对请求进行处理的代码放在放行之前进行处理,而如果请求完资源后还要对响应的数据进行处理时可以在放行后进行逻辑处理。
2.5、Filter拦截路径配置
拦截路径表示 Filter 会对请求的哪些资源进行拦截,使用 @WebFilter 注解进行配置。如:@WebFilter("拦截路径")
拦截路径有如下四种配置方式:
1、拦截具体的资源:/index.jsp:只有访问index.jsp时才会被拦截
2、目录拦截:/user/*:访问/user下的所有资源,都会被拦截
3、后缀名拦截:*.jsp:访问后缀名为jsp的资源,都会被拦截
4、拦截所有:/*:访问所有资源,都会被拦截
2.6、过滤器链
过滤器链是指在一个Web应用,可以配置多个过滤器,这多个过滤器称为过滤器链。

上图的执行流程如下:
1、执行 Filter1 的放行前逻辑代码
2、执行 Filter1 的放行代码
3、执行 Filter2 的放行前逻辑代码
4、执行 Filter2 的放行代码
5、访问到资源
6、执行 Filter2 的放行后逻辑代码
7、执行 Filter1 的放行后逻辑代码
2.6.1、代码演示
编写第一个过滤器 FilterDemo ,配置成拦截所有资源
@WebFilter("/*")
public class FilterDemo implements Filter {@Overridepublic void doFilter(ServletRequest request, ServletResponse response, FilterChain chain) throws IOException, ServletException {//1. 放行前,对 request数据进行处理System.out.println("1.FilterDemo...");//放行chain.doFilter(request,response);//2. 放行后,对Response 数据进行处理System.out.println("5.FilterDemo...");}@Overridepublic void init(FilterConfig filterConfig) throws ServletException {}@Overridepublic void destroy() {}
}
编写第二个过滤器 FilterDemo2 ,配置成拦截所有资源
@WebFilter("/*")
public class FilterDemo2 implements Filter {@Overridepublic void doFilter(ServletRequest request, ServletResponse response, FilterChain chain) throws IOException, ServletException {//1. 放行前,对 request数据进行处理System.out.println("2.FilterDemo...");//放行chain.doFilter(request,response);//2. 放行后,对Response 数据进行处理System.out.println("4.FilterDemo...");}@Overridepublic void init(FilterConfig filterConfig) throws ServletException {}@Overridepublic void destroy() {}
}
修改 hello.jsp 页面中脚本的输出语句
<%@ page contentType="text/html;charset=UTF-8" language="java" %>
<html>
<head><title>Title</title>
</head>
<body><h1>hello JSP~</h1><%System.out.println("3.hello jsp");%>
</body>
</html>
启动服务器,在浏览器输入 http://localhost/filter-demo/hello.jsp 进行测试,在控制台打印内容如下

从结果可以看到确实是按照2.6图中的流程执行的。
需要注意的是:
我们现在使用的是注解配置Filter,而这种配置方式的优先级是按照过滤器类名(字符串)的自然排序。
比如有如下两个名称的过滤器 : BFilterDemo 和 AFilterDemo 。那一定是 AFilterDemo 过滤器先执行。
三、Listener
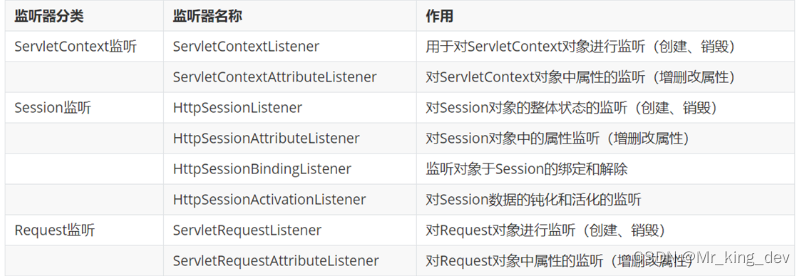
Listener 表示监听器,是 JavaWeb 三大组件(Servlet、Filter、Listener)之一。 监听器可以监听就是在 application,session,request 三个对象创建、销毁或者往其中添加修改删除属性时自动执行代码的功能组件。
application 是 ServletContext 类型的对象。ServletContext 代表整个web应用,在服务器启动的时候,tomcat会自动创建该对象。在服务器关闭时会自动销毁该对象。
3.1、监听器分类
JavaWeb 提供了8个监听器:
3.2、代码演示
演示 ServletContextListener 监听器
1、定义一个类,实现ServletContextListener 接口
2、重写所有的抽象方法
3、使用 @WebListener 进行配置
@WebListener
public class ContextLoaderListener implements ServletContextListener {@Overridepublic void contextInitialized(ServletContextEvent sce) {//加载资源System.out.println("ContextLoaderListener...");}@Overridepublic void contextDestroyed(ServletContextEvent sce) {//释放资源}
}
启动服务器,就可以在启动的日志信息中看到 contextInitialized() 方法输出的内容,同时也说明了 ServletContext 对象在服务器启动的时候被创建了。

