1.seata是什么?
Seata 是一款开源的分布式事务解决方案,致力于在微服务架构下提供高性能和简单易用的分布式事务服务。
2.seata的注解
@GlobalTransactional:全局事务注解,添加了以后可实现分布式事务的回滚和提交,用法与spring的@Transactional注解类似,注解参数的作用也基本一致
3.seata的事务模式
seata有四种事务模式,分别为AT模式、TCC模式、Saga模式、XA模式,此处只说明AT模式及TCC模式。
3.1.Seata AT 模式
3.1.1.概述
AT 模式是 Seata 创新的一种非侵入式的分布式事务解决方案,Seata 在内部做了对数据库操作的代理层,我们使用 Seata AT 模式时,实际上用的是 Seata 自带的数据源代理 DataSourceProxy,Seata 在这层代理中加入了很多逻辑,比如插入回滚 undo_log 日志,检查全局锁等。
本文中,我们将重点介绍 Seata AT 模式的使用,如果您对于 AT 模式原理感兴趣,还请阅读对应于本篇文章的开发者指南。
3.1.2.整体机制
两阶段提交协议的演变:
- 一阶段:业务数据和回滚日志记录在同一个本地事务中提交,释放本地锁和连接资源。
- 二阶段:
- 提交异步化,非常快速地完成。
- 回滚通过一阶段的回滚日志进行反向补偿。
3.1.3.基本使用
我们首先抽象一个使用场景,在用户购买行为的时候需要减少库存并减少账户余额,当库存表 stock_tbl 和 account_tbl 在同一个数据库时,我们可以使用关系数据库自身提供的能力非常容易实现事务。但如果这两个表分属于不同的数据源,我们就要使用 Seata 提供的分布式事务能力了。
观察下方的示例代码,
@GlobalTransactional
public void purchase(String userId, String commodityCode, int count, int money) {jdbcTemplateA.update("update stock_tbl set count = count - ? where commodity_code = ?", new Object[] {count, commodityCode});jdbcTemplateB.update("update account_tbl set money = money - ? where user_id = ?", new Object[] {money, userId});
}
如果您曾使用过 Spring 框架 @Transactional 注解的话,也可以根据命名类比理解 @GlobalTransactional 的功能。是的,这里只是引入了一个注解就轻松实现了分布式事务能力,使用 AT 模式可以最小程度减少业务改造成本。
同时,需要注意的是,jdbcTemplateA 和 jdbcTemplateB 使用了不同的数据源进行构造,而这两个不同的数据源都需要使用 Seata 提供的 AT 数据源代理类 DataSourceProxy 进行包装。有关数据源代理帮助我们做了什么,请阅读附录中的事务隔离。
3.2.Seata TCC 模式
3.2.1概述
TCC 模式是 Seata 支持的一种由业务方细粒度控制的侵入式分布式事务解决方案,是继 AT 模式后第二种支持的事务模式,最早由蚂蚁金服贡献。其分布式事务模型直接作用于服务层,不依赖底层数据库,可以灵活选择业务资源的锁定粒度,减少资源锁持有时间,可扩展性好,可以说是为独立部署的 SOA 服务而设计的。
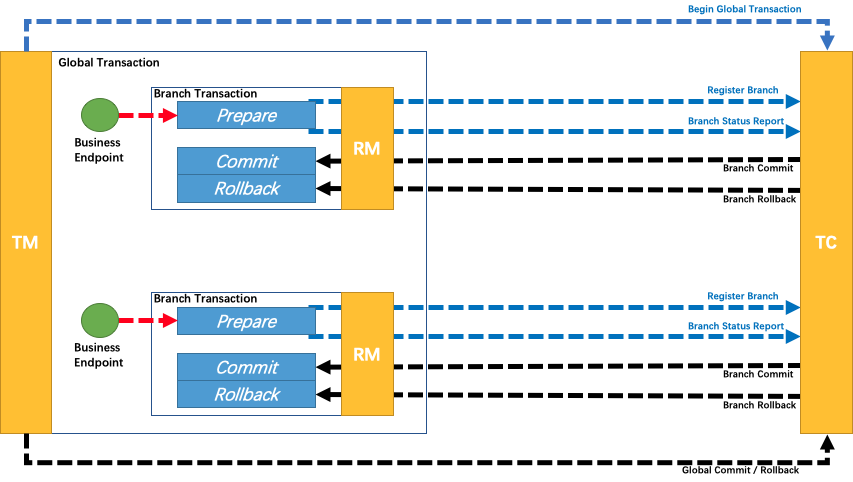
本文中,我们将重点介绍 Seata TCC 模式的使用,如果您对于 TCC 模式原理感兴趣,想要了解 Seata TCC 对于幂等、空回滚、悬挂问题的解决,还请阅读对应于本篇文章的开发者指南。
3.2.2.优势
TCC 完全不依赖底层数据库,能够实现跨数据库、跨应用资源管理,可以提供给业务方更细粒度的控制。
3.2.3.缺点
TCC 是一种侵入式的分布式事务解决方案,需要业务系统自行实现 Try,Confirm,Cancel 三个操作,对业务系统有着非常大的入侵性,设计相对复杂。
3.2.4.适用场景
TCC 模式是高性能分布式事务解决方案,适用于核心系统等对性能有很高要求的场景。
3.2.5.整体机制
在两阶段提交协议中,资源管理器(RM, Resource Manager)需要提供“准备”、“提交”和“回滚” 3 个操作;而事务管理器(TM, Transaction Manager)分 2 阶段协调所有资源管理器,在第一阶段询问所有资源管理器“准备”是否成功,如果所有资源均“准备”成功则在第二阶段执行所有资源的“提交”操作,否则在第二阶段执行所有资源的“回滚”操作,保证所有资源的最终状态是一致的,要么全部提交要么全部回滚。
资源管理器有很多实现方式,其中 TCC(Try-Confirm-Cancel)是资源管理器的一种服务化的实现;TCC 是一种比较成熟的分布式事务解决方案,可用于解决跨数据库、跨服务业务操作的数据一致性问题;TCC 其 Try、Confirm、Cancel 3 个方法均由业务编码实现,故 TCC 可以被称为是服务化的资源管理器。
TCC 的 Try 操作作为一阶段,负责资源的检查和预留;Confirm 操作作为二阶段提交操作,执行真正的业务;Cancel 是二阶段回滚操作,执行预留资源的取消,使资源回到初始状态。
3.2.6基本使用
区别于在 AT 模式直接使用数据源代理来屏蔽分布式事务细节,业务方需要自行定义 TCC 资源的“准备”、“提交”和“回滚” 。比如在下方的例子中,
public interface TccActionOne {@TwoPhaseBusinessAction(name = "DubboTccActionOne", commitMethod = "commit", rollbackMethod = "rollback")public boolean prepare(BusinessActionContext actionContext, @BusinessActionContextParameter(paramName = "a") String a);public boolean commit(BusinessActionContext actionContext);public boolean rollback(BusinessActionContext actionContext);
}
Seata 会把一个 TCC 接口当成一个 Resource,也叫 TCC Resource。在业务接口中核心的注解是 @TwoPhaseBusinessAction,表示当前方法使用 TCC 模式管理事务提交,并标明了 Try,Confirm,Cancel 三个阶段。name属性,给当前事务注册了一个全局唯一的的 TCC bean name。同时 TCC 模式的三个执行阶段分别是:
- Try 阶段,预定操作资源(Prepare) 这一阶段所以执行的方法便是被
@TwoPhaseBusinessAction所修饰的方法。如示例代码中的prepare方法。 - Confirm 阶段,执行主要业务逻辑(Commit) 这一阶段使用
commitMethod属性所指向的方法,来执行Confirm 的工作。 - Cancel 阶段,事务回滚(Rollback) 这一阶段使用
rollbackMethod属性所指向的方法,来执行 Cancel 的工作。
其次,可以在 TCC 模式下使用 BusinessActionContext 在事务上下文中传递查询参数。如下属性:
xid全局事务idbranchId分支事务idactionName分支资源id,(resource id)actionContext业务传递的参数,可以通过@BusinessActionContextParameter来标注需要传递的参数。
在定义好 TCC 接口之后,我们可以像 AT 模式一样,通过 @GlobalTransactional 开启一个分布式事务。
@GlobalTransactional
public String doTransactionCommit(){tccActionOne.prepare(null,"one");tccActionTwo.prepare(null,"two");
}
注意,如果 TCC 参与者是本地 bean(非远程RPC服务),本地 TCC bean 还需要在接口定义中添加 @LocalTCC 注解,比如,
@LocalTCC
public interface TccActionTwo {@TwoPhaseBusinessAction(name = "TccActionTwo", commitMethod = "commit", rollbackMethod = "rollback")public boolean prepare(BusinessActionContext actionContext, @BusinessActionContextParameter(paramName = "a") String a);public boolean commit(BusinessActionContext actionContext);public boolean rollback(BusinessActionContext actionContext);
}
4.seata服务启动
seata的服务可去官网下载。我使用seata和nacos集成在一起。
1. 解压seata-server-$version.zip,修改conf/registry.conf文件
registry {type = "nacos"nacos {application = "seata-server"serverAddr = "127.0.0.1:8848"group = "SEATA_GROUP"namespace = ""cluster = "default"username = "nacos"password = "nacos"}
}config {type = "nacos"nacos {serverAddr = "127.0.0.1:8848"namespace = ""group = "SEATA_GROUP"username = "nacos"password = "nacos"}
}2.由于使用nacos作为注册中心,所以conf目录下的file.conf无需理会。然后就可以直接启动bin/seata-server.bat,可以在nacos里看到一个名为seata-server的服务了。

3.由于seata使用mysql作为db高可用数据库,故需要在mysql创建一个dubbo-seata库,并导入数据库脚本。
-- -------------------------------- The script used when storeMode is 'db' --------------------------------
-- the table to store GlobalSession data
CREATE TABLE IF NOT EXISTS `global_table`
(`xid`                       VARCHAR(128) NOT NULL,`transaction_id`            BIGINT,`status`                    TINYINT      NOT NULL,`application_id`            VARCHAR(32),`transaction_service_group` VARCHAR(32),`transaction_name`          VARCHAR(128),`timeout`                   INT,`begin_time`                BIGINT,`application_data`          VARCHAR(2000),`gmt_create`                DATETIME,`gmt_modified`              DATETIME,PRIMARY KEY (`xid`),KEY `idx_gmt_modified_status` (`gmt_modified`, `status`),KEY `idx_transaction_id` (`transaction_id`)
) ENGINE = InnoDBDEFAULT CHARSET = utf8mb4;-- the table to store BranchSession data
CREATE TABLE IF NOT EXISTS `branch_table`
(`branch_id`         BIGINT       NOT NULL,`xid`               VARCHAR(128) NOT NULL,`transaction_id`    BIGINT,`resource_group_id` VARCHAR(32),`resource_id`       VARCHAR(256),`branch_type`       VARCHAR(8),`status`            TINYINT,`client_id`         VARCHAR(64),`application_data`  VARCHAR(2000),`gmt_create`        DATETIME(6),`gmt_modified`      DATETIME(6),PRIMARY KEY (`branch_id`),KEY `idx_xid` (`xid`)
) ENGINE = InnoDBDEFAULT CHARSET = utf8mb4;-- the table to store lock data
CREATE TABLE IF NOT EXISTS `lock_table`
(`row_key`        VARCHAR(128) NOT NULL,`xid`            VARCHAR(96),`transaction_id` BIGINT,`branch_id`      BIGINT       NOT NULL,`resource_id`    VARCHAR(256),`table_name`     VARCHAR(32),`pk`             VARCHAR(36),`gmt_create`     DATETIME,`gmt_modified`   DATETIME,PRIMARY KEY (`row_key`),KEY `idx_branch_id` (`branch_id`)
) ENGINE = InnoDBDEFAULT CHARSET = utf8mb4;-- for AT mode you must to init this sql for you business database. the seata server not need it.
CREATE TABLE IF NOT EXISTS `undo_log`
(`branch_id`     BIGINT(20)   NOT NULL COMMENT 'branch transaction id',`xid`           VARCHAR(100) NOT NULL COMMENT 'global transaction id',`context`       VARCHAR(128) NOT NULL COMMENT 'undo_log context,such as serialization',`rollback_info` LONGBLOB     NOT NULL COMMENT 'rollback info',`log_status`    INT(11)      NOT NULL COMMENT '0:normal status,1:defense status',`log_created`   DATETIME(6)  NOT NULL COMMENT 'create datetime',`log_modified`  DATETIME(6)  NOT NULL COMMENT 'modify datetime',UNIQUE KEY `ux_undo_log` (`xid`, `branch_id`)
) ENGINE = InnoDBAUTO_INCREMENT = 1DEFAULT CHARSET = utf8mb4 COMMENT ='AT transaction mode undo table';4.config.txt文件复制到seata目录
config.txt
service.vgroupMapping.ruoyi-system-group=default
store.mode=db
store.db.datasource=druid
store.db.dbType=mysql
store.db.driverClassName=com.mysql.jdbc.Driver
store.db.url=jdbc:mysql://127.0.0.1:3306/ry-seata?useUnicode=true
store.db.user=root
store.db.password=password
store.db.minConn=5
store.db.maxConn=30
store.db.globalTable=global_table
store.db.branchTable=branch_table
store.db.queryLimit=100
store.db.lockTable=lock_table
store.db.maxWait=50005.nacos-config.sh复制到seata的conf目录,window脚本请参考seata的config目录下的README-zh.md
nacos-config.sh
#!/usr/bin/env bash
# Copyright 1999-2019 Seata.io Group.
#
# Licensed under the Apache License, Version 2.0 (the "License");
# you may not use this file except in compliance with the License.
# You may obtain a copy of the License at、
#
#      http://www.apache.org/licenses/LICENSE-2.0
#
# Unless required by applicable law or agreed to in writing, software
# distributed under the License is distributed on an "AS IS" BASIS,
# WITHOUT WARRANTIES OR CONDITIONS OF ANY KIND, either express or implied.
# See the License for the specific language governing permissions and
# limitations under the License.while getopts ":h:p:g:t:u:w:" opt
docase $opt inh)host=$OPTARG;;p)port=$OPTARG;;g)group=$OPTARG;;t)tenant=$OPTARG;;u)username=$OPTARG;;w)password=$OPTARG;;?)echo " USAGE OPTION: $0 [-h host] [-p port] [-g group] [-t tenant] [-u username] [-w password] "exit 1;;esac
doneurlencode() {for ((i=0; i < ${#1}; i++))dochar="${1:$i:1}"case $char in[a-zA-Z0-9.~_-]) printf $char ;;*) printf '%%%02X' "'$char" ;;esacdone
}if [[ -z ${host} ]]; thenhost=localhost
fi
if [[ -z ${port} ]]; thenport=8848
fi
if [[ -z ${group} ]]; thengroup="SEATA_GROUP"
fi
if [[ -z ${tenant} ]]; thentenant=""
fi
if [[ -z ${username} ]]; thenusername=""
fi
if [[ -z ${password} ]]; thenpassword=""
finacosAddr=$host:$port
contentType="content-type:application/json;charset=UTF-8"echo "set nacosAddr=$nacosAddr"
echo "set group=$group"failCount=0
tempLog=$(mktemp -u)
function addConfig() {curl -X POST -H "${contentType}" "http://$nacosAddr/nacos/v1/cs/configs?dataId=$(urlencode $1)&group=$group&content=$(urlencode $2)&tenant=$tenant&username=$username&password=$password" >"${tempLog}" 2>/dev/nullif [[ -z $(cat "${tempLog}") ]]; thenecho " Please check the cluster status. "exit 1fiif [[ $(cat "${tempLog}") =~ "true" ]]; thenecho "Set $1=$2 successfully "elseecho "Set $1=$2 failure "(( failCount++ ))fi
}count=0
for line in $(cat $(dirname "$PWD")/config.txt | sed s/[[:space:]]//g); do(( count++ ))key=${line%%=*}value=${line#*=}addConfig "${key}" "${value}"
doneecho "========================================================================="
echo " Complete initialization parameters,  total-count:$count ,  failure-count:$failCount "
echo "========================================================================="if [[ ${failCount} -eq 0 ]]; thenecho " Init nacos config finished, please start seata-server. "
elseecho " init nacos config fail. "
fi6.执行命令,后面填写nacos的IP地址,我的是本机所以是127.0.0.1
sh nacos-config.sh 127.0.0.15.代码示例
代码示例仅展示AT模式。工程分为4个,分别为:接口工程(dubbo-demo-interface)、用户管理工程(dubbo-demo-user-provider)、组织机构管理工程(dubbo-demo-dept-provider)、消费者模块(dubbo-demo-consumer).
用户管理及组织机构管理为服务端,消费者模块远程调用组织机构新增和用户管理新增,使用seata的全局事务,保证数据的一致性。
dubbo的相关代码此处不再详细说明,有兴趣的可参考我的另一篇博客《dubbo的springboot集成》。
5.1.接口工程代码示例
1)实体类(Uesr.java):
package com.jc.shop.dubbo.demo.domain;/*** 用户表*/
public class User implements java.io.Serializable{/*** 主键ID*/private long id;/*** 用户名称*/private String name;/*** 所属部门*/private long deptId;/*** 岗位*/private String post;private Dept dept;public Dept getDept() {return dept;}public void setDept(Dept dept) {this.dept = dept;}public long getId() {return id;}public void setId(long id) {this.id = id;}public String getName() {return name;}public void setName(String name) {this.name = name;}public long getDeptId() {return deptId;}public void setDeptId(long deptId) {this.deptId = deptId;}public String getPost() {return post;}public void setPost(String post) {this.post = post;}
}
2)组织机构类(Dept.java)
package com.jc.shop.dubbo.demo.domain;import java.io.Serializable;/*** 部门*/
public class Dept implements Serializable {private long id;private String name;private long parentId = 0;public long getId() {return id;}public void setId(long id) {this.id = id;}public String getName() {return name;}public void setName(String name) {this.name = name;}public long getParentId() {return parentId;}public void setParentId(long parentId) {this.parentId = parentId;}
}
3)用户接口类:
package com.jc.shop.dubbo.demo.service;import com.jc.shop.dubbo.demo.domain.User;/*** 业务接口*/
public interface IUserService {public int insert(User user);
}
4)组织机构接口类:
package com.jc.shop.dubbo.demo.service;import com.jc.shop.dubbo.demo.domain.Dept;public interface IDeptService {public int insert(Dept dept);
}
5.2.用户管理工程示例代码
1)seata框架的maven依赖:
<!-- Seata对Spring Boot的支持 --><dependency><groupId>io.seata</groupId><artifactId>seata-spring-boot-starter</artifactId><!-- 同样请根据最新的Seata版本号替换此处 --><version>1.4.2</version></dependency><!-- 如果你的项目使用了Dubbo,则需要添加Seata对Dubbo的支持 --><dependency><groupId>com.alibaba.cloud</groupId><artifactId>spring-cloud-starter-alibaba-seata</artifactId><!-- 对应阿里云Spring Cloud Alibaba的Seata Dubbo starter版本 --></dependency>2)执行数据库脚本
执行用户管理和组织机构的数据库脚本,因为是demo,所以将两个工程的表放在一个库中,表分库存也是一样的,因为两个工程的数据源是分开的:
脚本中必须包含表:“undo_log”,如果分库,每个库中,都应该有该表,该表用于记录数据库操作的日志,用于事务回滚和提交。
/*Navicat Premium Data TransferSource Server         : 我的笔记本Source Server Type    : MariaDBSource Server Version : 110202Source Host           : 192.168.31.23:3306Source Schema         : dubbo-demoTarget Server Type    : MariaDBTarget Server Version : 110202File Encoding         : 65001Date: 09/01/2024 16:46:40
*/SET NAMES utf8mb4;
SET FOREIGN_KEY_CHECKS = 0;-- ----------------------------
-- Table structure for t_dept
-- ----------------------------
DROP TABLE IF EXISTS `t_dept`;
CREATE TABLE `t_dept`  (`t_id` bigint(20) NOT NULL AUTO_INCREMENT,`t_name` varchar(256) CHARACTER SET utf8mb4 COLLATE utf8mb4_general_ci NOT NULL,`t_parent_id` bigint(20) DEFAULT 0,PRIMARY KEY (`t_id`) USING BTREE
) ENGINE = InnoDB AUTO_INCREMENT = 4 CHARACTER SET = utf8mb4 COLLATE = utf8mb4_general_ci ROW_FORMAT = Dynamic;-- ----------------------------
-- Table structure for t_user
-- ----------------------------
DROP TABLE IF EXISTS `t_user`;
CREATE TABLE `t_user`  (`t_id` bigint(20) NOT NULL AUTO_INCREMENT,`t_name` varchar(256) CHARACTER SET utf8mb4 COLLATE utf8mb4_general_ci NOT NULL,`t_dept_id` bigint(20) DEFAULT NULL,`t_post` varchar(128) CHARACTER SET utf8mb4 COLLATE utf8mb4_general_ci DEFAULT NULL,PRIMARY KEY (`t_id`) USING BTREE
) ENGINE = InnoDB AUTO_INCREMENT = 1 CHARACTER SET = utf8mb4 COLLATE = utf8mb4_general_ci ROW_FORMAT = Dynamic;-- ----------------------------
-- Table structure for undo_log
-- ----------------------------
DROP TABLE IF EXISTS `undo_log`;
CREATE TABLE `undo_log`  (`branch_id` bigint(20) NOT NULL COMMENT 'branch transaction id',`xid` varchar(100) CHARACTER SET utf8mb4 COLLATE utf8mb4_general_ci NOT NULL COMMENT 'global transaction id',`context` varchar(128) CHARACTER SET utf8mb4 COLLATE utf8mb4_general_ci NOT NULL COMMENT 'undo_log context,such as serialization',`rollback_info` longblob NOT NULL COMMENT 'rollback info',`log_status` int(11) NOT NULL COMMENT '0:normal status,1:defense status',`log_created` datetime(6) NOT NULL COMMENT 'create datetime',`log_modified` datetime(6) NOT NULL COMMENT 'modify datetime',UNIQUE INDEX `ux_undo_log`(`xid`, `branch_id`) USING BTREE
) ENGINE = InnoDB CHARACTER SET = utf8mb4 COLLATE = utf8mb4_general_ci COMMENT = 'AT transaction mode undo table' ROW_FORMAT = Dynamic;SET FOREIGN_KEY_CHECKS = 1;
3)用户管理工程的yml配置(application.yml):
# seata配置
seata:enabled: true# Seata 应用编号,默认为 ${spring.application.name}application-id: ${spring.application.name}# Seata 事务组编号,用于 TC 集群名。tx-service-group: test-group# 开启自动代理,关闭自动代理,适用于TCC模式enable-auto-data-source-proxy: true# 服务配置项service:# 虚拟组和分组的映射vgroup-mapping:test-group: default  #此处的test-group需和tx-service-group的值一致# 分组和 Seata 服务的映射grouplist:default: 127.0.0.1:8091   #seata服务的地址config:type: nacosnacos:group: SEATA_GROUPserver-addr: 127.0.0.1:8848namespace:registry:type: nacosnacos:application: seata-serverserver-addr: 127.0.0.1:8848namespace:
4)UserServiceImpl.java实现上面定义的IUserService接口类
package com.jc.shop.dubbo.demo.service.impl;import com.jc.shop.dubbo.demo.domain.User;
import com.jc.shop.dubbo.demo.mapper.UserMapper;
import com.jc.shop.dubbo.demo.service.IUserService;
import io.seata.core.context.RootContext;
import org.apache.dubbo.config.annotation.DubboService;
import org.springframework.beans.factory.annotation.Autowired;
import org.springframework.stereotype.Service;@Service
@DubboService(version = "1.0.0")
public class UserServiceImpl implements IUserService {@Autowiredprivate UserMapper mapper;@Overridepublic int insert(User user) {//打印事务ID,在测试时,只要用户新增和组织机构新增的事务ID相同,就可以任务两个原子操作在同一个事务中。System.out.println("用户新增的事务ID为:"+ RootContext.getXID());return mapper.insert(user);}
}
5.3.组织机构工程示例代码
1)maven的依赖同5.2,此处不再赘述。
2)数据库与用户管理使用同一个库,此处不再赘述
3)用户管理工程的yml配置(application.yml):
# seata配置
seata:enabled: true# Seata 应用编号,默认为 ${spring.application.name}application-id: ${spring.application.name}# Seata 事务组编号,用于 TC 集群名tx-service-group: test-group# 开启自动代理enable-auto-data-source-proxy: true# 服务配置项service:# 虚拟组和分组的映射vgroup-mapping:test-group: default# 分组和 Seata 服务的映射grouplist:default: 127.0.0.1:8091config:type: nacosnacos:group: SEATA_GROUPserver-addr: 127.0.0.1:8848namespace:registry:type: nacosnacos:application: seata-serverserver-addr: 127.0.0.1:8848namespace:
4)DeptServiceImpl实现IDeptService接口
package com.jc.shop.dubbo.demo.service.impl;import com.jc.shop.dubbo.demo.domain.Dept;
import com.jc.shop.dubbo.demo.mapper.DeptMapper;
import com.jc.shop.dubbo.demo.service.IDeptService;
import io.seata.core.context.RootContext;
import org.apache.dubbo.config.annotation.DubboService;
import org.springframework.beans.factory.annotation.Autowired;
import org.springframework.stereotype.Service;@Service
@DubboService(version = "1.0.0")
public class DeptServiceImpl implements IDeptService {@Autowiredprivate DeptMapper mapper;@Overridepublic int insert(Dept dept) {int i = mapper.insert(dept);System.out.println("部门新增,影响行数:"+i);System.out.println("组织机构的事务ID为:"+RootContext.getXID());return i;}
}
5.4.消费端的代码示例
1)maven依赖与5.2一致,此处不再赘述
2)yml文件配置(application.yml)
# seata配置
seata:enabled: true# Seata 应用编号,默认为 ${spring.application.name}application-id: ${spring.application.name}# Seata 事务组编号,用于 TC 集群名tx-service-group: test-group# 开启自动代理enable-auto-data-source-proxy: true# 服务配置项service:# 虚拟组和分组的映射vgroup-mapping:test-group: default# 分组和 Seata 服务的映射grouplist:default: 127.0.0.1:8091config:type: nacosnacos:group: SEATA_GROUPserver-addr: 127.0.0.1:8848namespace:registry:type: nacosnacos:application: seata-serverserver-addr: 127.0.0.1:8848namespace:
2)远程调用+分布式事务的代码示例
package com.jc.shop.dubbo.demo.service.impl;import com.jc.core.exception.ServiceException;
import com.jc.shop.dubbo.demo.domain.Dept;
import com.jc.shop.dubbo.demo.domain.User;
import com.jc.shop.dubbo.demo.service.IConsumerService;
import com.jc.shop.dubbo.demo.service.IDeptService;
import com.jc.shop.dubbo.demo.service.IUserService;
import io.seata.core.context.RootContext;
import io.seata.spring.annotation.GlobalTransactional;
import org.apache.dubbo.config.annotation.DubboReference;
import org.springframework.stereotype.Service;@Service
public class ConsumerServiceImpl implements IConsumerService {@DubboReference(version = "1.0.0")private IDeptService deptService;@DubboReference(version = "1.0.0")private IUserService userService;@Override@GlobalTransactional(rollbackFor = {ServiceException.class})public int insertUser(User user) {System.out.println("消费端:"+ RootContext.getXID());Dept dept = user.getDept();int i = deptService.insert(dept);user.setDeptId(dept.getId());//此处在组织机构新增成功后,故意抛出异常,用于测试dept数据是否可以正常回滚。if(i>0){throw new ServiceException();}int j = userService.insert(user);System.out.println("用户新增,影响行数:"+j);return j;}
}
3)定义controller层接口,使用postman等工具进行测试
package com.jc.shop.dubbo.demo.controller;import com.jc.core.domain.AjaxResult;
import com.jc.shop.dubbo.demo.domain.User;
import com.jc.shop.dubbo.demo.service.IConsumerService;
import org.springframework.beans.factory.annotation.Autowired;
import org.springframework.web.bind.annotation.PostMapping;
import org.springframework.web.bind.annotation.RequestBody;
import org.springframework.web.bind.annotation.RequestMapping;
import org.springframework.web.bind.annotation.RestController;@RestController
@RequestMapping("/demo")
public class DemoController {@Autowiredprivate IConsumerService service;@PostMapping("/insert")public AjaxResult insert(@RequestBody User user){int i = service.insertUser(user);if(i>0) {return AjaxResult.success("success");}else{return AjaxResult.error();}}
}
使用postman进行接口调用
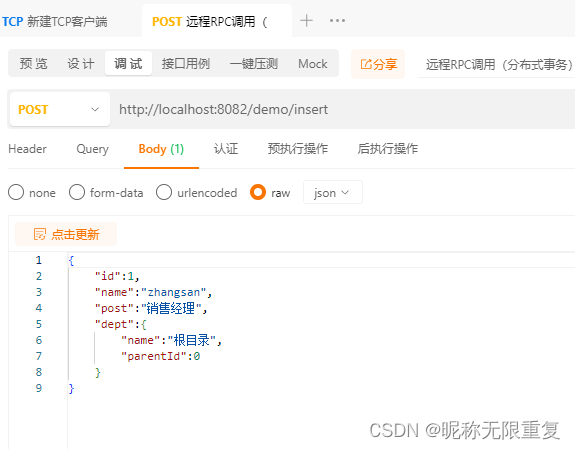
经过测试,发现dept表数据回滚成功,数据为空,若去掉抛异常的代码,则组织机构(t_dept)和用户表(t_user)均可以保存成功。







![[论文精读]Brain Network Transformer](https://img-blog.csdnimg.cn/direct/761e4c83e10e485a8657fd18c91792fc.png)
