文章目录
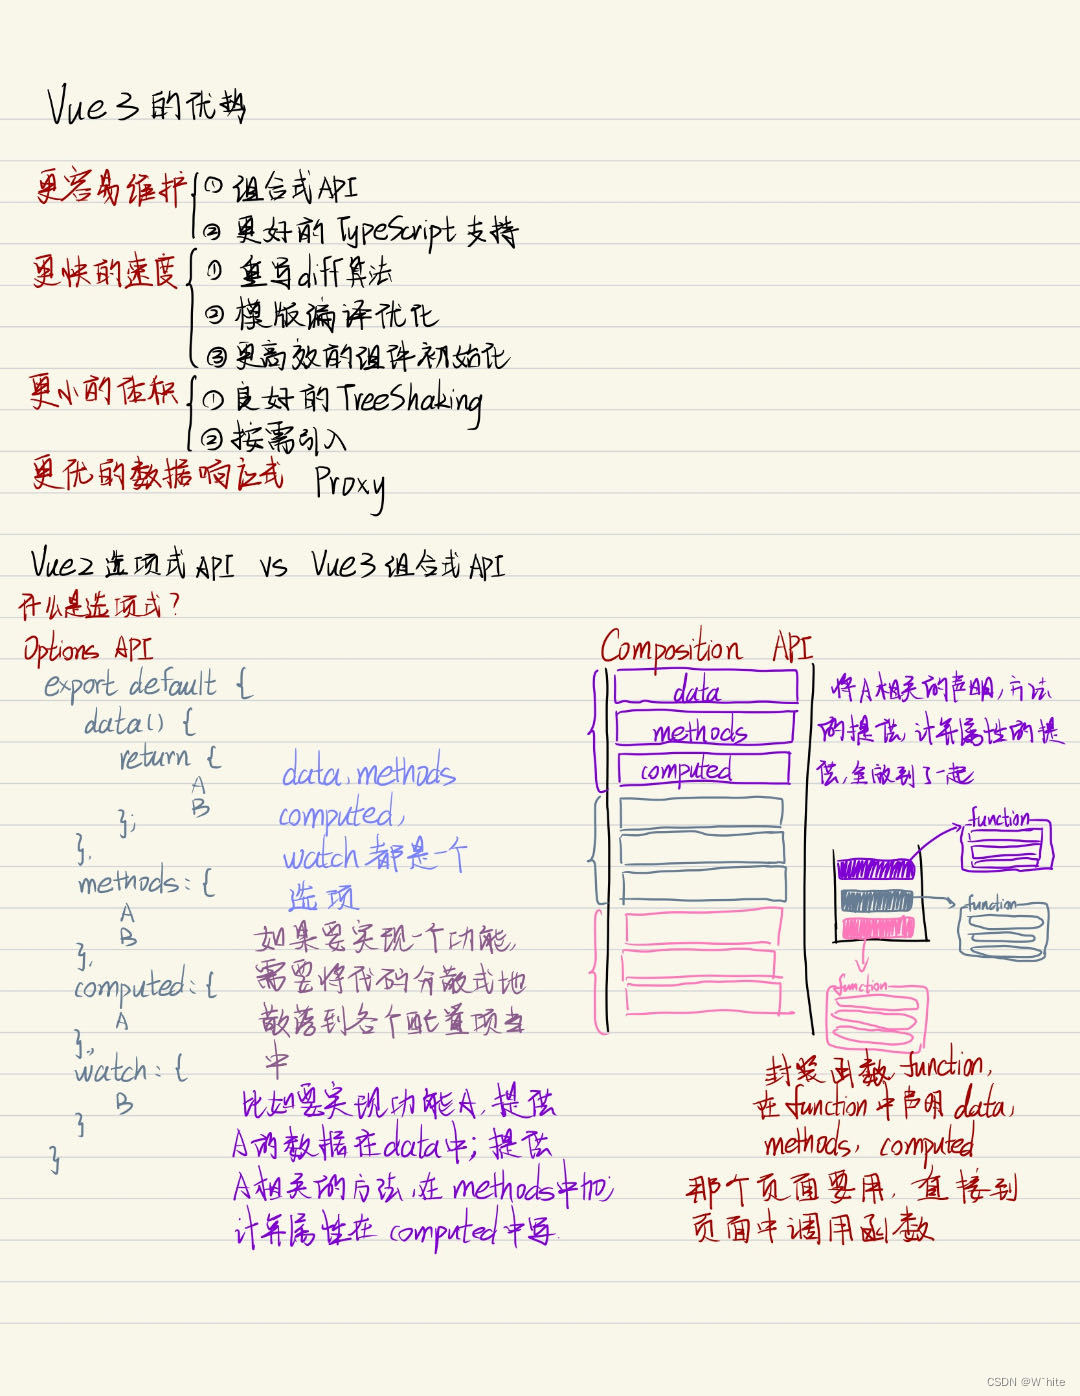
- 1.Vue3的好处
- 2.create-vue搭建vue3项目
- 3.项目目录和关键文件
- 4.组合式API - setup选项
- 5.组合式API - reactive和ref函数
- ①reactive
- ②ref()
- 6.组合式API - computed
- 7.组合式API - watch
- ①基础使用 - 侦听单个数据
- ②基础使用 - 侦听多个数据
- ③immediate
- ④精确侦听对象的某个属性
- 8.Vue3的生命周期函数
- 9.组合式API - 父子通信
- 10.组合式API - 模板引用
1.Vue3的好处
2.create-vue搭建vue3项目
create-vue是Vue官方新的手脚架工具,底层底层切换到了vite(下一代构建工具),为开发提供极速响应
-
前提环境条件
已安装16.0或更高版本的Node.js √ -
创建一个Vue应用
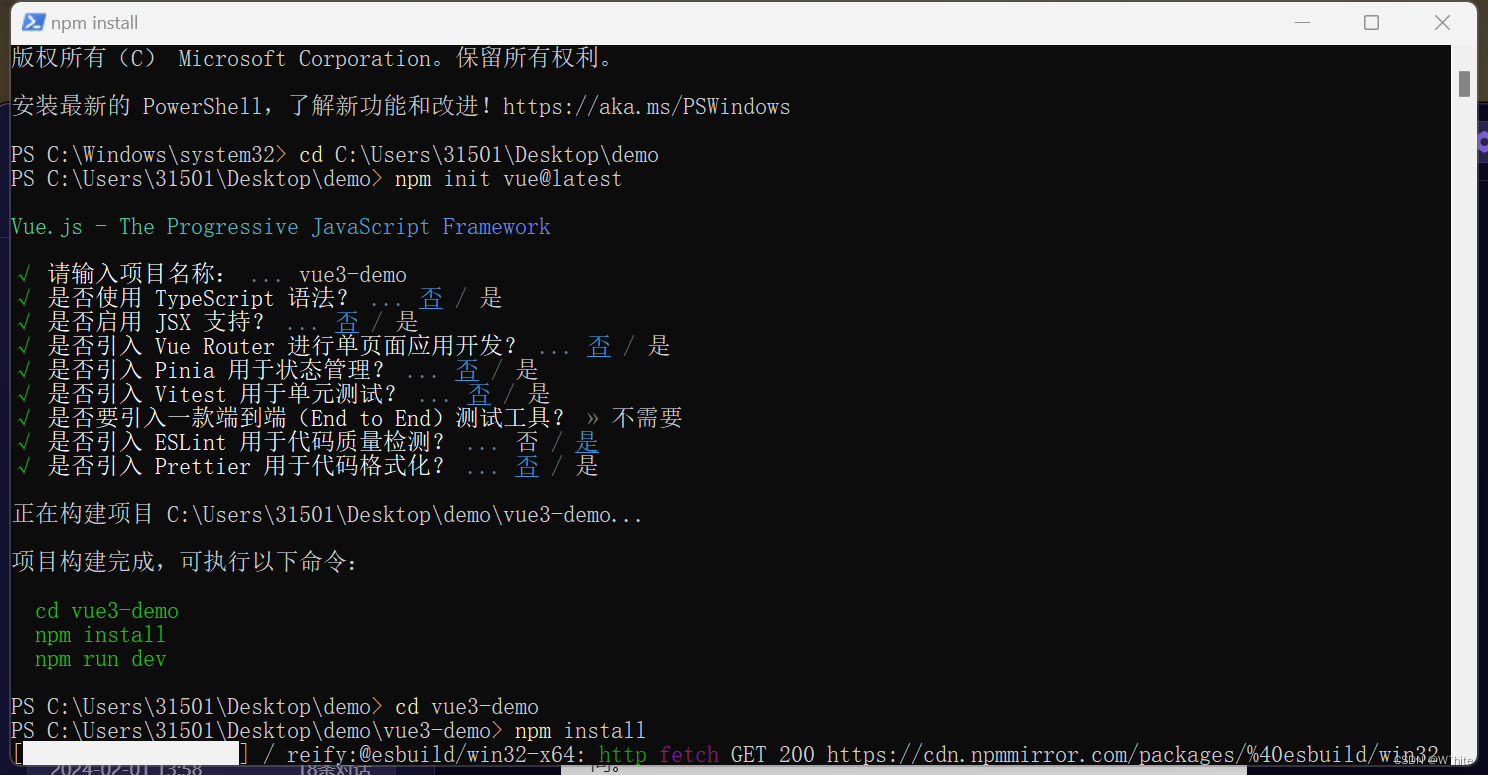
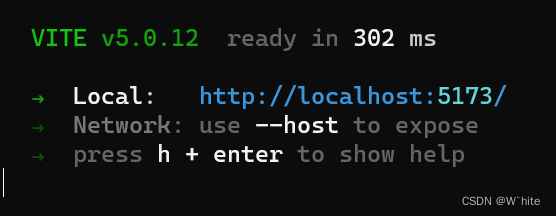
npm init vue@latest 这一指令将会安装并执行create-vue
因为npm的管理员权限问题,我这边不能直接在文件中右击执行windows power shall,所以要在管理员内执行,通过cd ~绝对路径进入文件内,然后再创建vue3👇
3.项目目录和关键文件
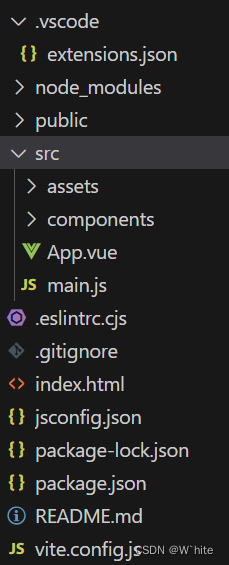
关键文件:
-
vite.config.js-项目的配置文件 基于vite的配置
-
package.json-项目包文件 核心依赖项变成了Vue3.x和vite
-
main.js-入口文件 createApp函数创建应用实例
-
app.vue-根组件SFC单文件组件 script-template-style
变化一:脚本script和模板template顺序调整
变化二:模板template不再要求唯一根元素
变化三:脚本script添加setup标识支持组合式API -
index.html-单页入口 提供id为app的挂载点
vue2的插件是Vetur
vue3的插件是Volar
①

②导入组件,没有组件注册,可以直接用
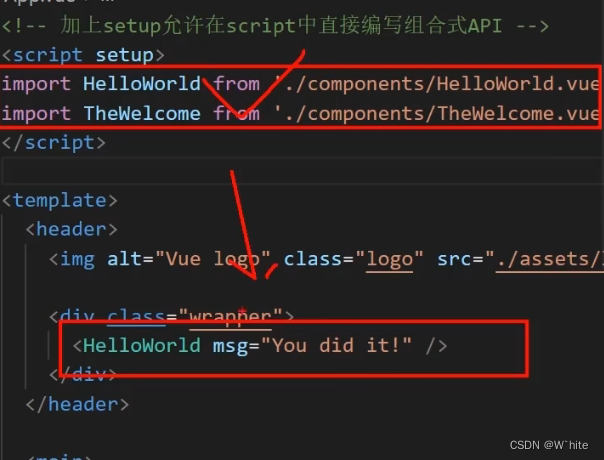
③template不再要求唯一根元素
④main.js
import './assets/main.css'// new Vue() 创建一个实例 => createApp()
// createRouter() createStore()
// 将创建实例进行了封装,保证每个实例的独立封闭性import { createApp } from 'vue'
import App from './App.vue'// 前半段是创建实例,后半段是将app往实例上挂载
// mount是设置挂载点#app的意思
createApp(App).mount('#app')
4.组合式API - setup选项
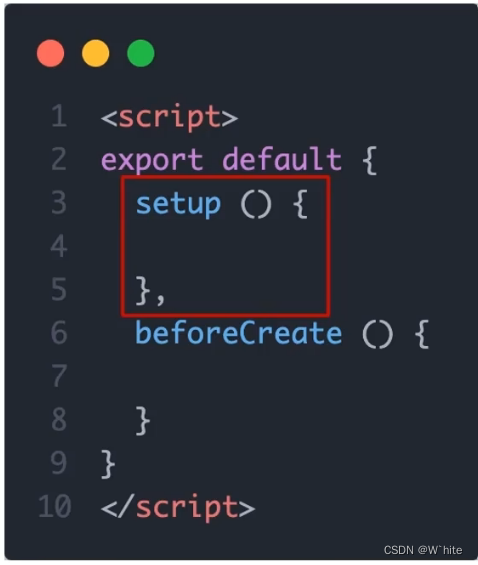
setup选项的写法和执行时机
setup需要写成一个函数,跟当前的生命周期钩子是类似的,直接往配置项里面去写
就可以了.将来里面就可以编写组合式的API,可以往里面调各种函数
通过下图可以看当前setup的执行时机👇
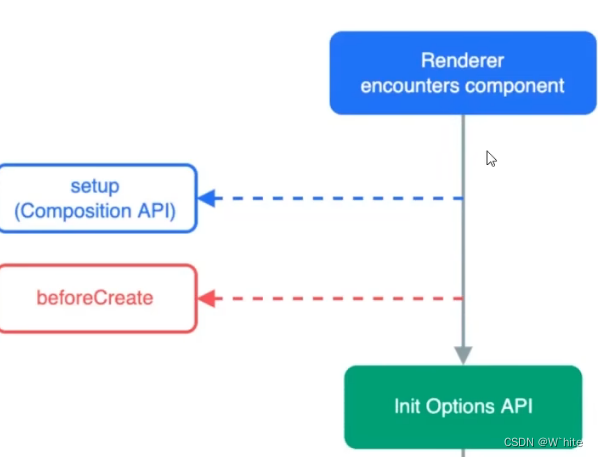
通过这张图可以看到,它的执行实际会比beforCreate这个生命周期钩子还要早
<script>
// setup
// 1. 执行时机, 比beforeCreate还要早
// 2.setup函数中,获取不到this(是undefined)
export default {setup () {console.log('setup函数')},beforeCreate () {console.log('beforeCreate函数')}
}
</script><template><div>学习vue3</div>
</template>
setup选项中写代码的特点
提供的任何数据或者函数想要在模板中应用,必须return.只有在对象当中return了,这个变量才能在页面当中应用
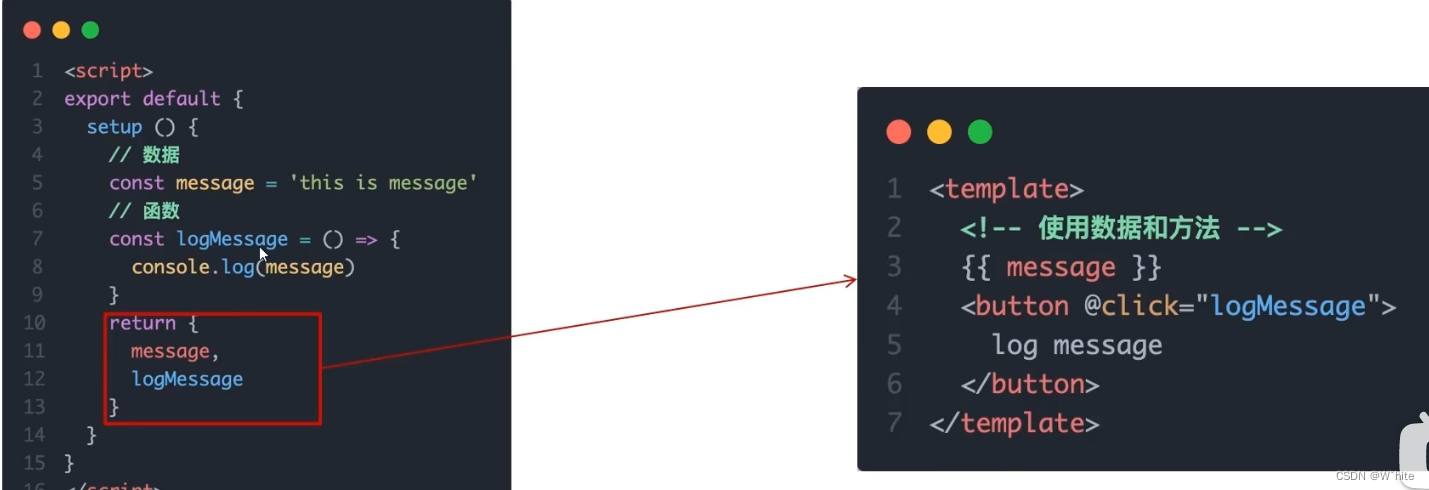
<script>
// setup
// 3.数据和函数需要在setup最后return,才能在模板中应用
export default {setup () {// 数据const message = 'hello vue3'// 函数const logMessage = () => {console.log(message)}return {message,logMessage}},beforeCreate () {console.log('beforeCreate函数')}
}
</script><template><div>{{ message }}</div><button @click="logMessage">按钮</button>
</template>
问题:问题是每次都要return,好麻烦
解答:<script setup>
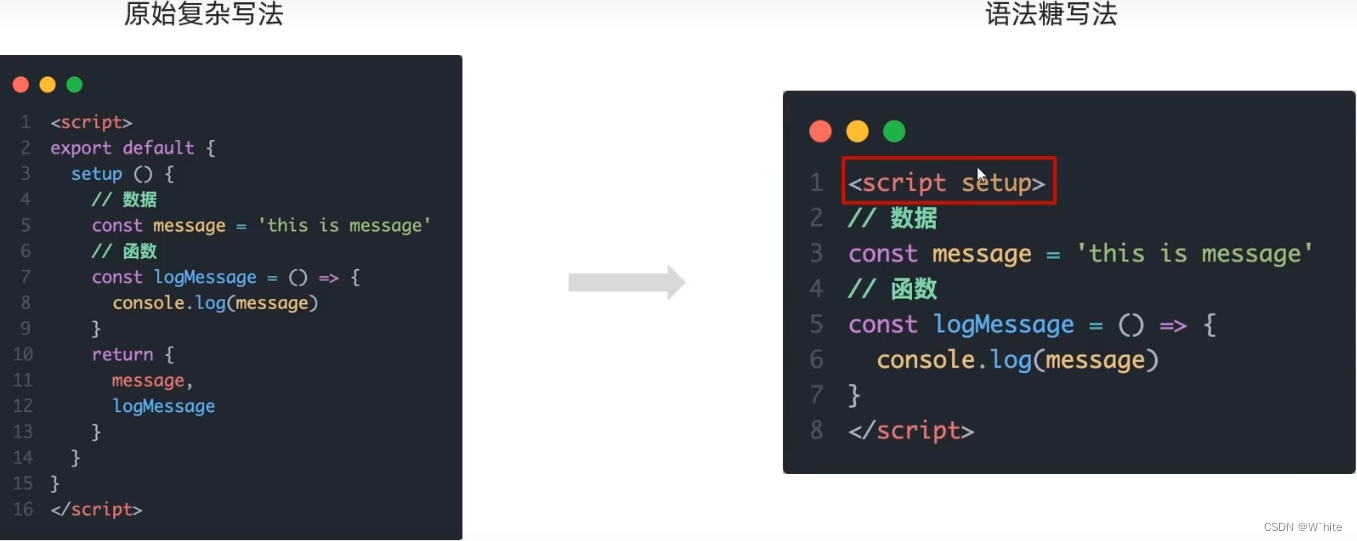
<script setup>
const message = 'this is a message'
const logMessage = () => {console.log(message)
}
</script><template><div>{{ message }}</div><button @click="logMessage">按钮</button>
</template>
5.组合式API - reactive和ref函数
①reactive
作用:接收对象类型数据的参数传入并返回一个响应式的对象
核心步骤:
<script setup>
// 导入
import { reactive } from 'vue'// 执行函数 传入参数 变量接收
const state = reactive(对象类型数据)
</script>
- 从vue包中导入 reactive函数
- 在
<script setup>中执行reactive函数并传入类型为对象的初始值,并使用变量接收返回值
<script setup>
// reactive:接收一个对象类型的数据,返回一个响应式的对象
import { reactive } from 'vue'
const state = reactive({count: 100
})
const setCount = () => {state.count++
}
</script><template><div><div>{{ state.count }}</div><button @click="setCount">+1</button></div>
</template>

②ref()
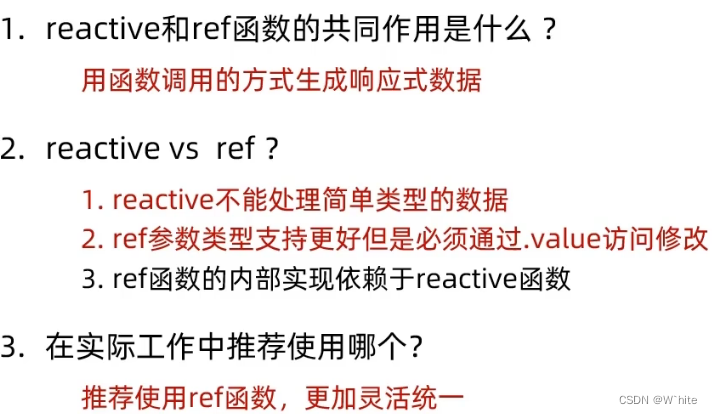
作用:接收简单类型或者对象类型的数据传入并返回一个响应式的对象
核心步骤:
<script setup>
// 导入
import { ref } from 'vue'// 执行函数 传入参数 变量接收
const count = ref(简单类型或者复杂类型数据)</script>
- 从vue包中导入ref函数
- 在
<script setup>中执行 ref 函数并传入初始值,使用变量接收 ref 函数的返回值
<script>
// ref:接收简单类型 或 复杂类型, 返回一个响应式的队形
// 本质:是在原有传入数据的基础上,外层包了一层对象,包成了复杂类型
// 底层,包成复杂类型之后,再借助 reactive 实现的响应式
// 注意点:
//       1. 访问数据,需要通过 .value
//       2. 在template中, .value 不需要加(帮我们扒了一层)// 推荐: 以后声明数据,统一用 ref => 统一了编码规范
import { ref } from 'vue'
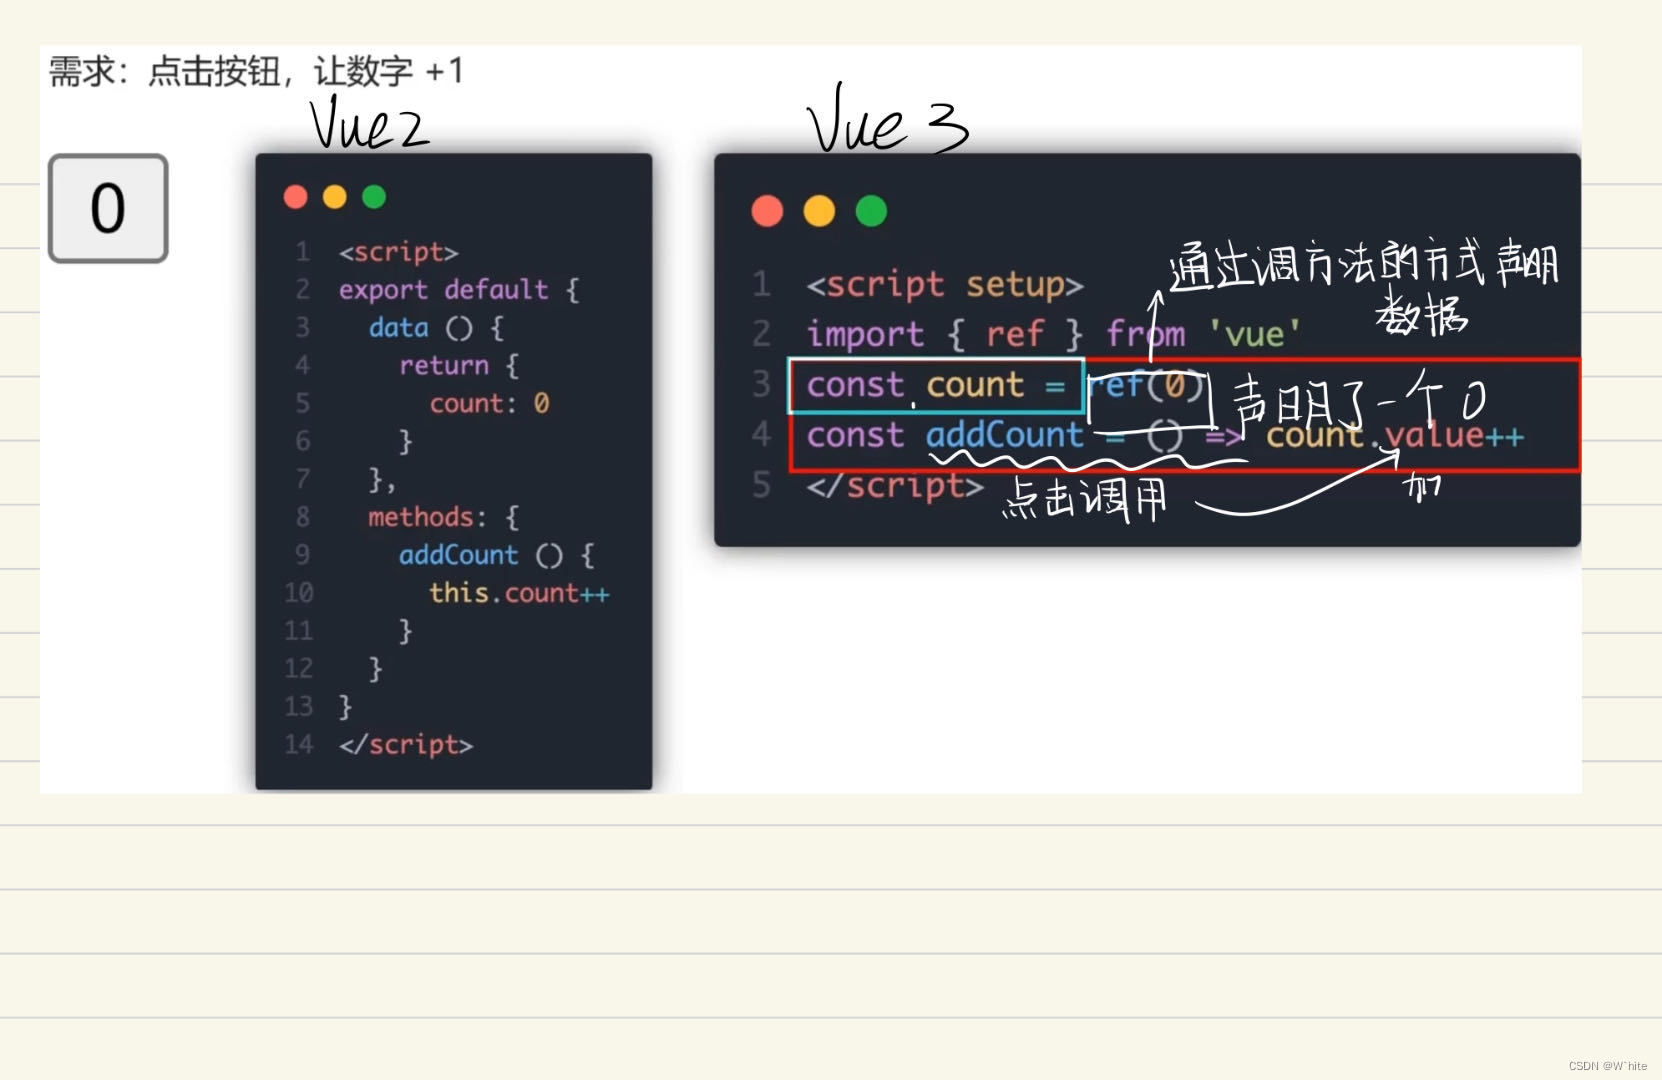
const count = ref(0)
//console.log(count)
const setCount = () => {count.value++
}
</script><template><div><div>{{ count }}</div><button @click="setCount">+1</button></div>
</template>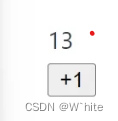
6.组合式API - computed
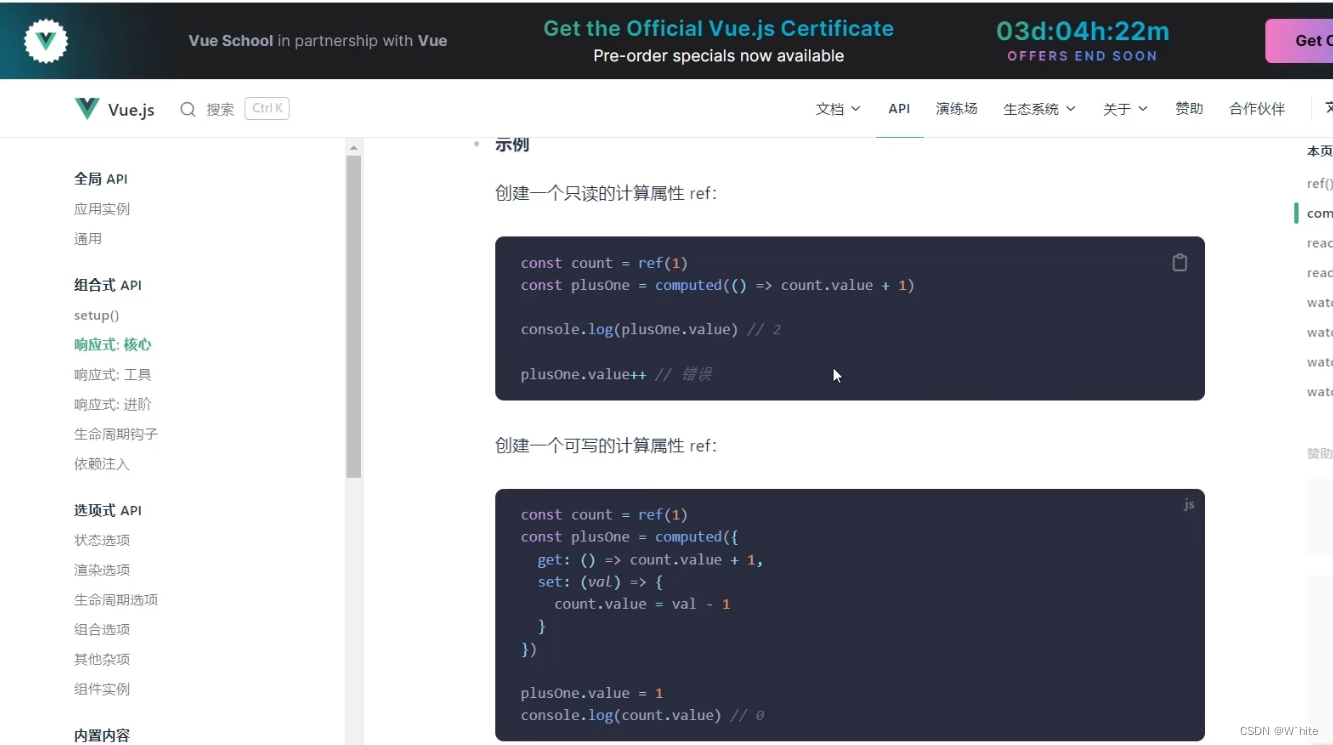
computed计算属性函数
计算属性基本思想和Vue2的完全一致,组合式API下的计算属性只是修改了写法
核心步骤:
- 导入computed函数
- 执行函数 在回调参数中return基于响应式数据做计算的值,用变量接收
<script setup>
// 导入
import { computed } from 'vue'// 执行函数 变量接受 在回调参数中return计算值
const computedState = computed(() => {return 基于响应式数据做计算之后的值
})
</script>
计算属性小案例
<script setup>
// const 计算属性 = computed(()=>{
// return 计算返回的结果
//})import { computed, ref } from 'vue'// 声明数据
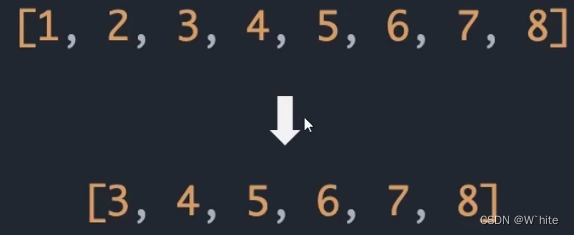
const list = ref([1, 2, 3, 4, 5, 6, 7, 8])// 基于list派生一个计算属性,从list中过滤出 >2
const computedList = computed(() => {return list.value.filter(item => item > 2) // 但凡是在script脚本中访问数据,都要通过 .value
})// 定义一个修改数组的方法
const addFn = () => {list.value.push(666)
}
</script><template><div><div>原始数据: {{ list }}</div><div>计算后的数据: {{ computedList }}</div><button @click="addFn" type="button">修改</button></div>
</template>

7.组合式API - watch
作用:侦听一个或多个数据的变化,数据变化时执行回调函数
两个额外参数:
- immediate (立刻执行)
- deep (深度侦听)
①基础使用 - 侦听单个数据
- 导入watch函数
- 执行watch函数传入要侦听的响应式数据 (ref对象) 和回调函数
<script setup>//1. 导入watch
import { ref, watch } from 'vue'
const count = ref(0)// 2. 调用watch 侦听变化// watch后面跟上一个ref对象(count),后面再去写一个回调
watch(count, (newValue, oldValue) => {console.log(`count发生了变化,老值为${oldValue},新值为${newValue}`)
})
// 上面代码的意思式:一旦当当前这个这个count变化了,就会执行后面的回调,后面的回调当中可以拿到新值和老值(即变化前和变化后的)</script>
②基础使用 - 侦听多个数据
说明:同时侦听多个响应式数据的变化,不管哪个数据变化都需要
<script setup>import { ref, watch } from 'vue'
const count = ref(0)
const name = ref('cp')//侦听多个数据源
watch([count, name],([newCount, newName], [oldCount, oldName]) => {console.log('count或者name变化了’,[newCount,newName],[oldCount,oldName])}
)
</script>
<script setup>
import { ref, watch } from 'vue'
const count = ref(0)
const nickname= ref('张三’)const changeCount = () => {count. value++
}const changeNickname = () => {nickname.value='李四'
}})//1. 监视单个数据的变化
//   watch(ref对象,(newValue,oldValue)=>{ …. })
// watch(count, (newValue, oldValue) => {
//   console.log(newValue, oldValue)
// })//2. 监视多个数据的变化
//   watch([ref对象1,ref对象2],(newArr,oldArr)=>{ …..
watch([count, nickname], (newArr, oldArr) => {console.log(newArr, oldArr)
})</script><template><div>{{ count }}</div><button @click="changeCount">改数字</button><div>{{ nickname }}</div><button @click="changeNickname">改昵称</button>
</template>
③immediate
说明:在侦听器创建时立刻触发回调,响应式数据变化之后继续执行回调
<script>
const count = ref(0)
watch(count, () => {console.log('count发生了变化变化')
}, {immediate: true
})
</script>
<script setup>
import { ref, watch } from 'vue'
const count = ref(0)
const nickname= ref('张三’)const changeCount = () => {count. value++
}const changeNickname = () => {nickname.value='李四'
}})I// 3. immediate 立刻执行
watch(count, (newValue, oldValue) => {console. log(newValue, oldValue)
}, {immediate: true})//4. deep 深度监视,默认 watch 进行的是 浅层监视
const ref1=ref(简单类型)可以直接监视
const ref2=ref(复杂类型)监视不到复杂类型内部数据的变化const userInfo = ref({name: 'zs',age: 18
})
const setUserInfo = () => {// 修改了 userInfo.value 修改了对象的地址,才能监视到// userInfo.value = { name: '1s', age: 50 }userInfo.value.age++
}
watch(userInfo, (newValue) => {console.log(newValue)
}, {deep: true
})</script><template><div>{{ count }}</div><button @click="changeCount">改数字</button><div>{{ nickname }}</div><button @click="changeNickname">改昵称</button><div>------------------------</div><div>{{ userInfo }}</div><button @click="setUserInfo">修改userInfo</button>
</template>
④精确侦听对象的某个属性
需求:在不开启deep的前提下,侦听age的变化,只有age变化时才执行回调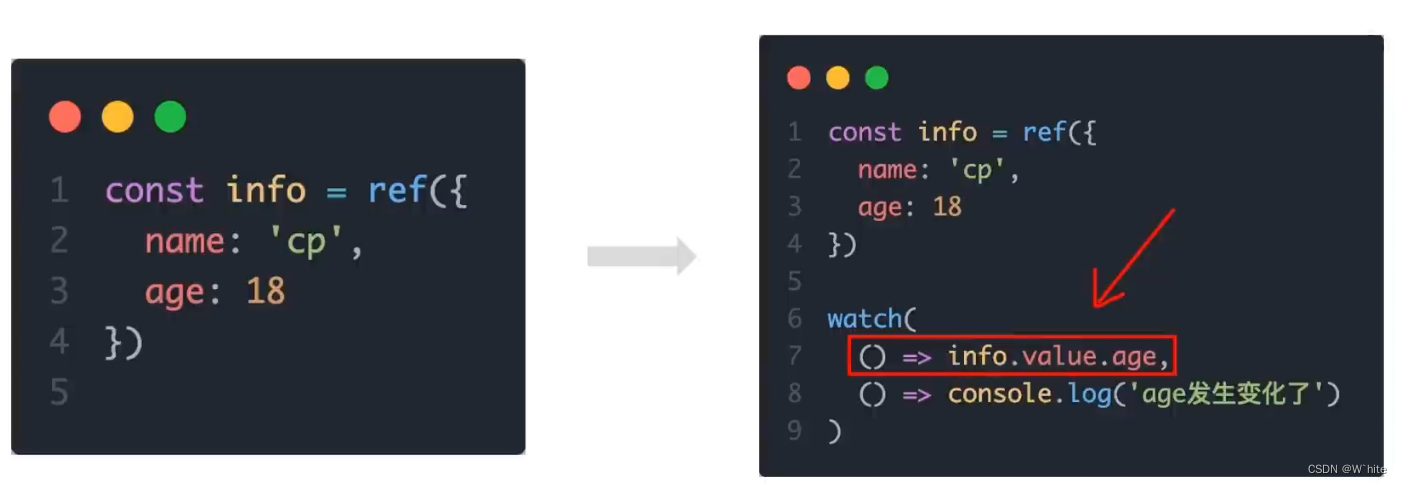

8.Vue3的生命周期函数
下面是 Vue 3 中的组合式 API 生命周期函数列表:
onBeforeMount:在组件挂载之前调用。
onMounted:在组件挂载后调用。
onBeforeUpdate:在组件更新之前调用,但在重新渲染之前。
onUpdated:在组件更新之后调用,但在重新渲染之后。
onBeforeUnmount:在组件卸载之前调用。
onUnmounted:在组件卸载后调用。
onErrorCaptured:在捕获子组件错误时调用。
onRenderTriggered:在组件渲染时调用。
onRenderTracked:在追踪组件渲染时调用。
这些函数在 setup 函数中以普通函数的形式使用,而不是作为 Vue 2.x 中的钩子函数的字符串属性。例如:
import { onMounted, onBeforeUnmount } from 'vue'export default {setup() {onMounted(() => {console.log('Component mounted')})onBeforeUnmount(() => {console.log('Component will be unmounted')})// ...其他的生命周期函数return {// ...}}
}
<script setup>
import { onMounted } from 'vue';//beforeCreate 和 created 的相关代码
//一律放在 setup 中执行const getList = () => {setTimeout(() => {console.log('发送请求,获取数据')},2000)
//一进入页面的请求
getList()//如果有些代码需要在mounted生命周期中执行
onMounted(() => {console.log('mounted生命周期函数 -逻辑1')
})//写成函数的调用方式,可以调用多次,并不会冲突,而是按照顺序依次执行
onMounted(() => {console.log('mounted生命周期函数 -逻辑2’)
})</script>
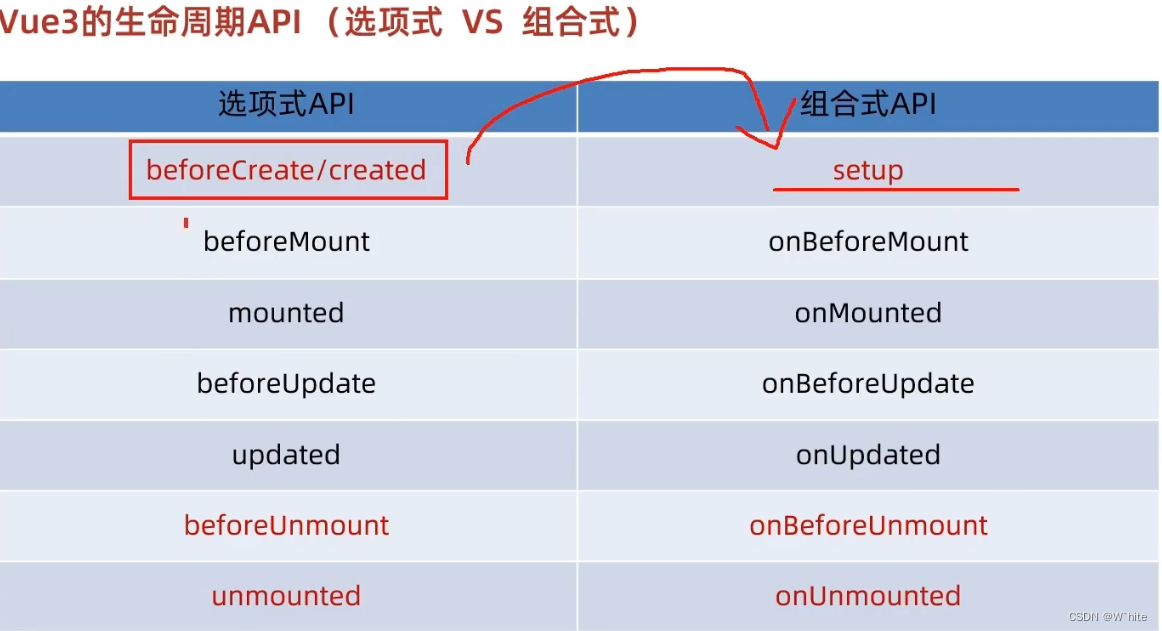
可以调用多次,如若调用多次,他会按照顺序依次执行
9.组合式API - 父子通信
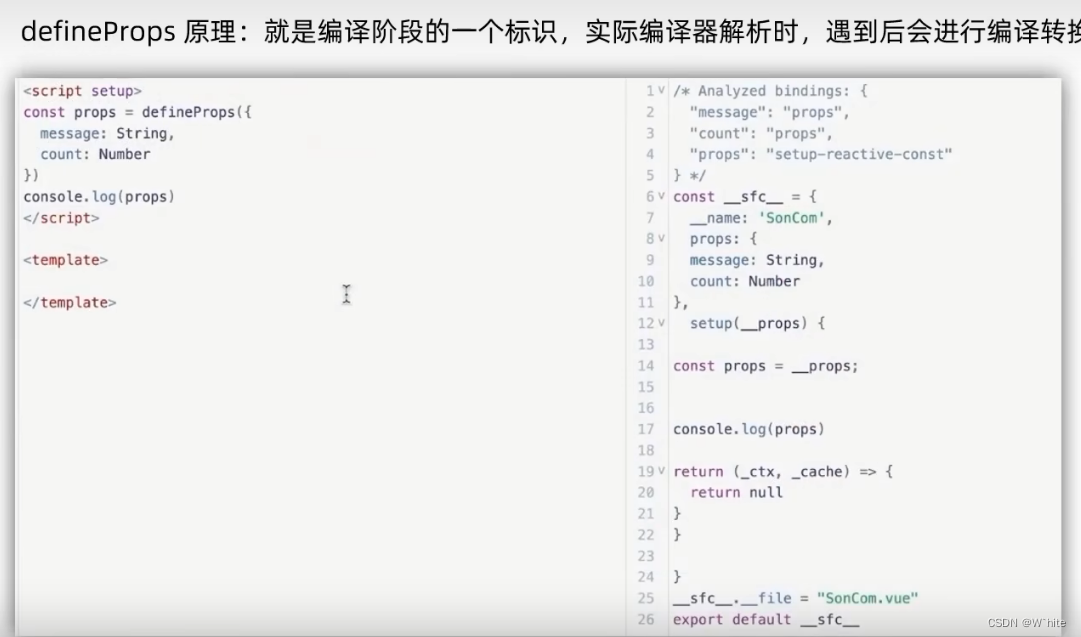
组合式API下的父传子
基本思想:
- 父组件中给子组件绑定属性
- 子组件内部通过props选项接收

组合式API下子传父
基本思想
- 父组件中给子组件标签通过@绑定事件
- 子组件内部通过emit方法触发事件
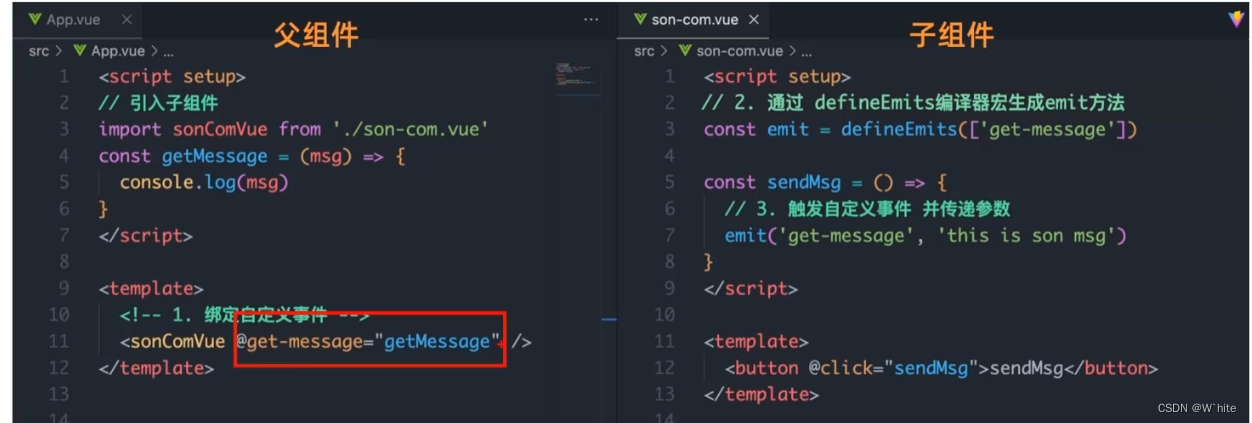
在组合式 API 中,父子组件之间的通信可以通过props和provide/inject来实现。
使用props,父组件可以通过props将数据传递给子组件。在子组件中,可以通过接
收props来获取父组件传递过来的数据。
下面是一个示例:
// Parent.vue
<template><div><Child message="Hello from parent!" /></div>
</template><script>
import Child from './Child.vue';export default {components: {Child}
}
</script>
// Child.vue
<template><div><p>{{ message }}</p></div>
</template><script>
export default {props: {message: {type: String,required: true}}
}
</script>
在上面的示例中,父组件通过props将message数据传递给子组件Child。子组件通
过在props中声明message,接收父组件传递过来的数据,并在模板中显示。
除了使用props,还可以使用provide/inject来实现父子组件之间的通信。通过
provide,在父组件中可以将数据提供给所有子组件。在子组件中使用inject可以获
取提供的数据。
下面是一个示例:
// Parent.vue
<template><div><Child /></div>
</template><script>
import { provide } from 'vue';
import Child from './Child.vue';export default {components: {Child},setup() {provide('message', 'Hello from parent!');}
}
</script>
// Child.vue
<template><div><p>{{ message }}</p></div>
</template><script>
import { inject } from 'vue';export default {setup() {const message = inject('message');return {message}}
}
</script>
在上面的示例中,父组件使用provide将message数据提供给子组件。在子组件
Child中,使用inject来获取提供的message数据,并在模板中显示。
通过这两种方式,父子组件之间可以方便地进行数据传递和通信。你可以根据你的
需求选择合适的方式来实现。
10.组合式API - 模板引用
通过ref表示获取真实的dom对象或者组件实例对象

如何使用( 以获取do为例 组件同理 )
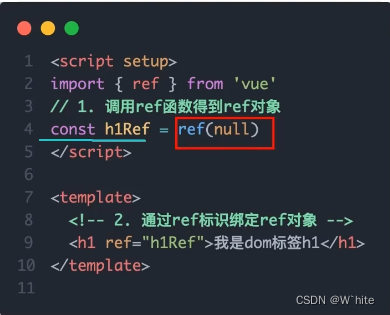
- 首先一同ref函数生成一个ref对象
- 创建完这个对象之后,页面中需要通过ref标识绑定ref对象到标签
App.vue<script setup>
import TestCom from '@/components/test-com. vue'
import { onMounted, ref } from 'vue'// 模板引用(可以获取dom,也可以获取组件)
//1. 调用ref函数,生成一个ref对象
//2. 通过ref标识,进行绑定
//3.通过ref对象.value即可访问到绑定的元素(必须渲染
const inp = ref(null)// 生命周期钩子 onMounted
onMounted(() => {//console. log(inp. value)//inp.value.focus()
})const clickFn = () => {inp.value.focus()
}//------------------------------------------------------
const testRef = ref(null)
const getCom = () => {console.log(testRef.value)
}</script><template><div><input ref="inp" type="text"><button @click="clickFn">点击让输入框聚焦</button>//点按钮聚焦</div><TestCom ref="testRef"></TestCom><button @click="getCom">获取组件</button> //点击按钮获取组件
</template>
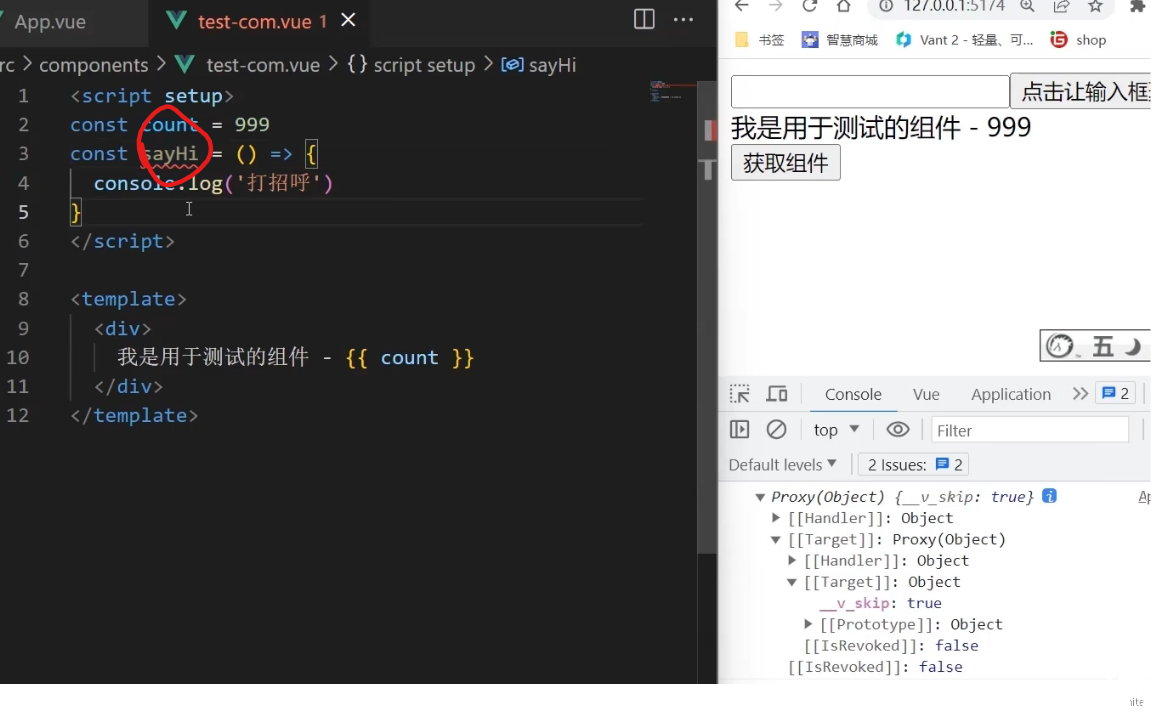
defineExpose()
在默认情况下<script setup>语法糖下组件内部的属性和方法是不开放给父组件访问的
可以通过defineExpose编译宏 指定哪些属性和方法允许访问
components/test-com.vue
<script setup>
const count = 999
const sayHi = () => {console.log('打招呼')
}defineExpose({count,sayHi
})</script><template><div>我是用于测试的组件 -{{ count }}</div>
</template>