文章目录
- 一、背景
- 二、微服务架构介绍
- 三、认证服务器
- 1. 数据库创建
- 2. 新建模块
- 3. 导入依赖和配置
- 4. 安全认证配置类
- 四、认证服务器测试
- 1. AUTHORIZATION_CODE(授权码模式)
- 1. 获取授权码
- 2. 获取JWT
- 2. CLIENT_CREDENTIALS(客户端凭证模式)
- 五、Gateway
- 1. 引入依赖
- 2. 添加白名单文件
- 3. 全局过滤器
- 4. 获取远程JWKS
- 5. 校验JWT
- 6. 测试(如何携带JWT)
- 六、后记
一、背景
Oauth2停止维护,基于OAuth 2.1 和 OpenID Connect 1.0的Spring Authorization Server模块独立于SpringCloud。
本文开发环境如下:
| Version | |
|---|---|
| Java | 17 |
| SpringCloud | 2023.0.0 |
| SpringBoot | 3.2.1 |
| Spring Authorization Server | 1.2.1 |
| Spring Security | 6.2.1 |
| mysql | 8.2.0 |
https://spring.io/projects/spring-security#learn
https://spring.io/projects/spring-authorization-server#learn
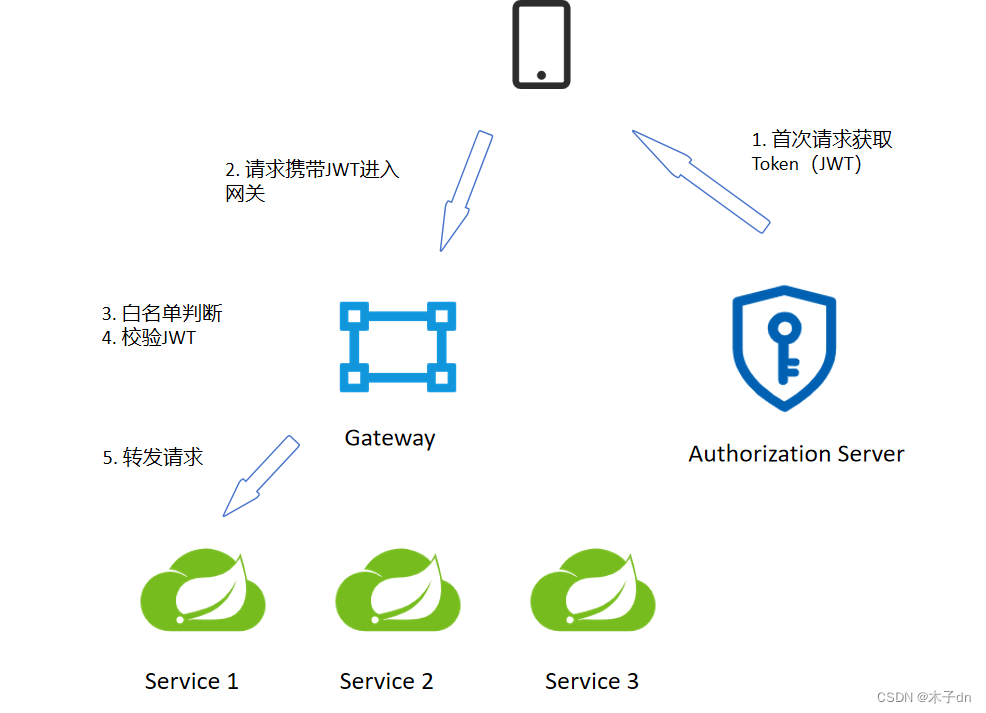
二、微服务架构介绍
一个认证服务器(也是一个微服务),专门用于颁发JWT。
一个网关(也是一个微服务),用于白名单判断和JWT校验。
若干微服务。
本文的关键在于以下几点:
- 搭建认证服务器
- 网关白名单判断
- 网关验证JWT
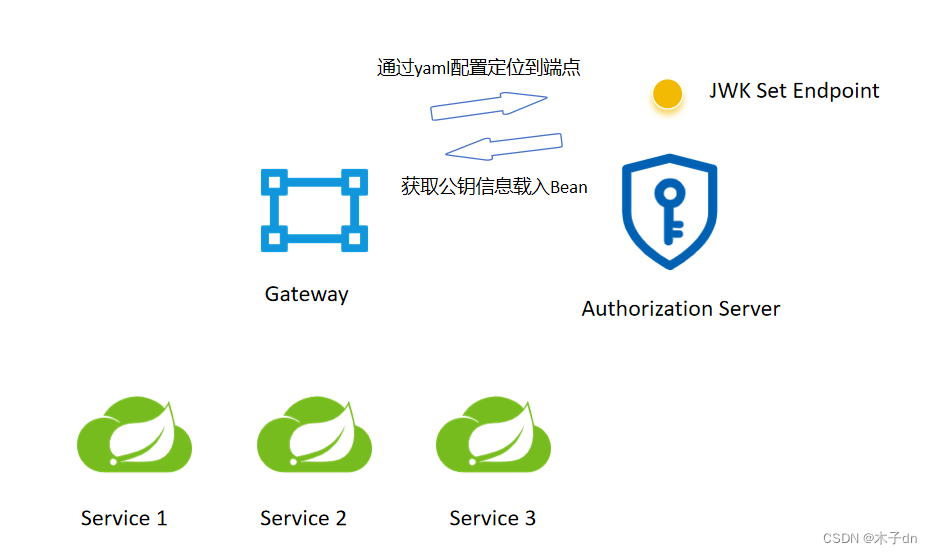
- 认证服务器如何共享公钥,让其余微服务有JWT自校验的能力。
三、认证服务器
这里是官方文档https://spring.io/projects/spring-authorization-server#learn
基本上跟着Getting Started写完就可以。
1. 数据库创建
新建一个数据库xc_users。
然后执行jar里自带的三个sql。
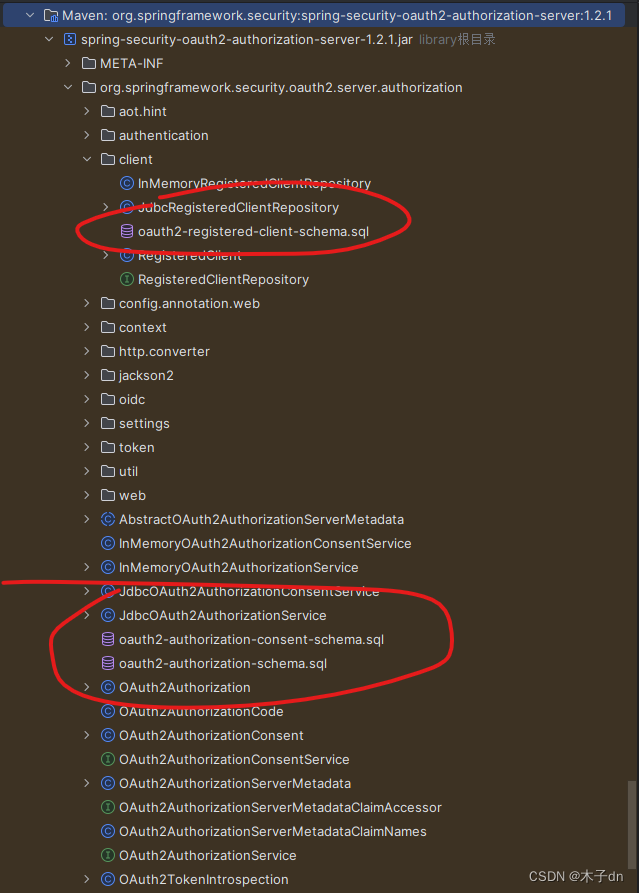
这一步官方并没有给出,大概因为可以使用内存存储,在简单demo省去了持久化。不建立数据库可能也是可行的,我没试过。
2. 新建模块
新建一个auth模块,作为认证服务器。
3. 导入依赖和配置
<dependency><groupId>com.mysql</groupId><artifactId>mysql-connector-j</artifactId></dependency><dependency><groupId>org.springframework.boot</groupId><artifactId>spring-boot-starter-security</artifactId></dependency><dependency><groupId>org.springframework.boot</groupId><artifactId>spring-boot-starter-oauth2-authorization-server</artifactId></dependency>
server:servlet:context-path: /authport: 63070
spring:application:name: auth-serviceprofiles:active: devdatasource:driver-class-name: com.mysql.cj.jdbc.Driverurl: jdbc:mysql://192.168.101.65:3306/xc_users?serverTimezone=UTC&userUnicode=true&useSSL=false&username: rootpassword: 1009
4. 安全认证配置类
@Configuration
@EnableWebSecurity
public class AuthServerSecurityConfig {}
里面包含诸多内容,有来自Spring Security的,也有来自的Spring Authorization Server的。
UserDetailsService的实例,用于检索用户进行身份验证。
@Beanpublic UserDetailsService userDetailsService() {UserDetails userDetails = User.withUsername("lisi").password("456").roles("read").build();return new InMemoryUserDetailsManager(userDetails);}
- 密码编码器(可选,本文不用)
    @Beanpublic PasswordEncoder passwordEncoder() {// 密码为明文方式return NoOpPasswordEncoder.getInstance();// 或使用 BCryptPasswordEncoder
//         return new BCryptPasswordEncoder();}
- 协议端点的
Spring Security过滤器链
@Bean@Order(1)public SecurityFilterChain authorizationServerSecurityFilterChain(HttpSecurity http)throws Exception {OAuth2AuthorizationServerConfiguration.applyDefaultSecurity(http);http.getConfigurer(OAuth2AuthorizationServerConfigurer.class).oidc(Customizer.withDefaults()); // Enable OpenID Connect 1.0http// Redirect to the login page when not authenticated from the// authorization endpoint.exceptionHandling((exceptions) -> exceptions.defaultAuthenticationEntryPointFor(new LoginUrlAuthenticationEntryPoint("/login"),new MediaTypeRequestMatcher(MediaType.TEXT_HTML)))// Accept access tokens for User Info and/or Client Registration.oauth2ResourceServer((resourceServer) -> resourceServer.jwt(Customizer.withDefaults()));return http.build();}
- 用于身份验证的
Spring Security过滤器链。
至于哪些要校验身份,哪些不用,根据自己需求写。
@Bean@Order(2)public SecurityFilterChain defaultFilterChain(HttpSecurity http) throws Exception {http.authorizeHttpRequests((authorize) ->authorize.requestMatchers(new AntPathRequestMatcher("/actuator/**")).permitAll().requestMatchers(new AntPathRequestMatcher("/login")).permitAll().requestMatchers(new AntPathRequestMatcher("/oauth2/**")).permitAll().requestMatchers(new AntPathRequestMatcher("/**/*.html")).permitAll().requestMatchers(new AntPathRequestMatcher("/**/*.json")).permitAll().requestMatchers(new AntPathRequestMatcher("/auth/**")).permitAll().anyRequest().authenticated()).formLogin(Customizer.withDefaults()).oauth2ResourceServer(oauth2 -> oauth2.jwt(jwt -> jwt.jwtAuthenticationConverter(jwtAuthenticationConverter())));return http.build();}
- 自定义验证转化器(可选)
private JwtAuthenticationConverter jwtAuthenticationConverter() {JwtAuthenticationConverter jwtConverter = new JwtAuthenticationConverter();// 此处可以添加自定义逻辑来提取JWT中的权限等信息// jwtConverter.setJwtGrantedAuthoritiesConverter(...);return jwtConverter;}
- 用于管理客户端的
RegisteredClientRepository实例
	@Beanpublic RegisteredClientRepository registeredClientRepository() {RegisteredClient registeredClient = RegisteredClient.withId(UUID.randomUUID().toString()).clientId("XcWebApp")
//                .clientSecret("{noop}XcWebApp").clientSecret("XcWebApp").clientAuthenticationMethod(ClientAuthenticationMethod.CLIENT_SECRET_BASIC).authorizationGrantType(AuthorizationGrantType.AUTHORIZATION_CODE).authorizationGrantType(AuthorizationGrantType.REFRESH_TOKEN).authorizationGrantType(AuthorizationGrantType.CLIENT_CREDENTIALS).redirectUri("http://www.51xuecheng.cn")
//                .postLogoutRedirectUri("http://localhost:63070/login?logout").scope("all").scope(OidcScopes.OPENID).scope(OidcScopes.PROFILE).scope("message.read").scope("message.write").scope("read").scope("write").clientSettings(ClientSettings.builder().requireAuthorizationConsent(true).build()).tokenSettings(TokenSettings.builder().accessTokenTimeToLive(Duration.ofHours(2))  // 设置访问令牌的有效期.refreshTokenTimeToLive(Duration.ofDays(3))  // 设置刷新令牌的有效期.reuseRefreshTokens(true)                   // 是否重用刷新令牌.build()).build();return new InMemoryRegisteredClientRepository(registeredClient);}
- 用于对访问令牌进行签名的实例
@Beanpublic JWKSource<SecurityContext> jwkSource() {KeyPair keyPair = generateRsaKey();RSAPublicKey publicKey = (RSAPublicKey) keyPair.getPublic();RSAPrivateKey privateKey = (RSAPrivateKey) keyPair.getPrivate();RSAKey rsaKey = new RSAKey.Builder(publicKey).privateKey(privateKey).keyID(UUID.randomUUID().toString()).build();JWKSet jwkSet = new JWKSet(rsaKey);return new ImmutableJWKSet<>(jwkSet);}private static KeyPair generateRsaKey() {KeyPair keyPair;try {KeyPairGenerator keyPairGenerator = KeyPairGenerator.getInstance("RSA");keyPairGenerator.initialize(2048);keyPair = keyPairGenerator.generateKeyPair();}catch (Exception ex) {throw new IllegalStateException(ex);}return keyPair;}
- 用于解码签名访问令牌的
JwtDecoder实例
@Beanpublic JwtDecoder jwtDecoder(JWKSource<SecurityContext> jwkSource) {return OAuth2AuthorizationServerConfiguration.jwtDecoder(jwkSource);}
- 用于配置
Spring Authorization Server的AuthorizationServerSettings实例
@Beanpublic AuthorizationServerSettings authorizationServerSettings() {return AuthorizationServerSettings.builder().build();}
这里可以设置各种端点的路径,默认路径点开builder()即可看到,如下
public static Builder builder() {return new Builder().authorizationEndpoint("/oauth2/authorize").deviceAuthorizationEndpoint("/oauth2/device_authorization").deviceVerificationEndpoint("/oauth2/device_verification").tokenEndpoint("/oauth2/token").jwkSetEndpoint("/oauth2/jwks").tokenRevocationEndpoint("/oauth2/revoke").tokenIntrospectionEndpoint("/oauth2/introspect").oidcClientRegistrationEndpoint("/connect/register").oidcUserInfoEndpoint("/userinfo").oidcLogoutEndpoint("/connect/logout");}
这里我必须吐槽一下,qnmd /.well-known/jwks.json,浪费我一下午。获取公钥信息的端点现在已经替换成了/oauth2/jwks。
四、认证服务器测试
基本上跟着Getting Started走就行。只不过端点的变动相较于Oauth2很大,还有使用方法上不同。
在配置RegisteredClient的时候,我们设置了三种GrantType,这里只演示两种AUTHORIZATION_CODE和CLIENT_CREDENTIALS。
1. AUTHORIZATION_CODE(授权码模式)
1. 获取授权码
用浏览器打开以下网址,
http://localhost:63070/auth/oauth2/authorize?client_id=XcWebApp&response_type=code&scope=all&redirect_uri=http://www.51xuecheng.cn
对应oauth2/authorize端点,后面的参数和当时设置RegisteredClient 保持对应就行。response_type一定是code。
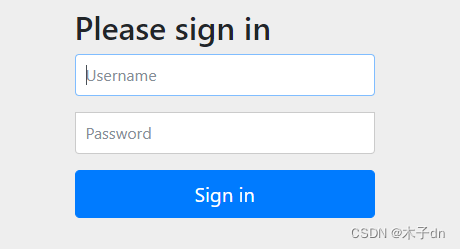
进入到登陆表单,输入lisi - 456登陆。
选择all,同意请求。
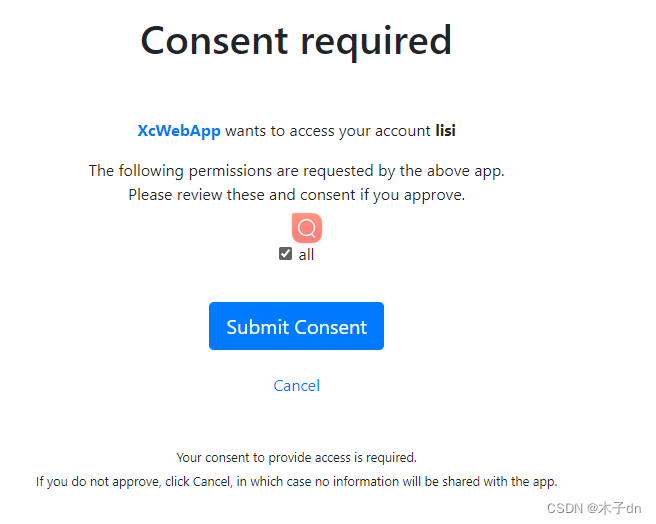
url被重定向到http://www.51xuecheng.cn,并携带一个code,这就是授权码。
http://www.51xuecheng.cn/?code=9AexK_KFH1m3GiNBKsc0FU2KkedM2h_6yR-aKF-wPnpQT5USKLTqoZiSkHC3GUvt-56_ky-E3Mv5LbMeH9uyd-S1UV6kfJO6znqAcCAF43Yo4ifxTAQ8opoPJTjLIRUC
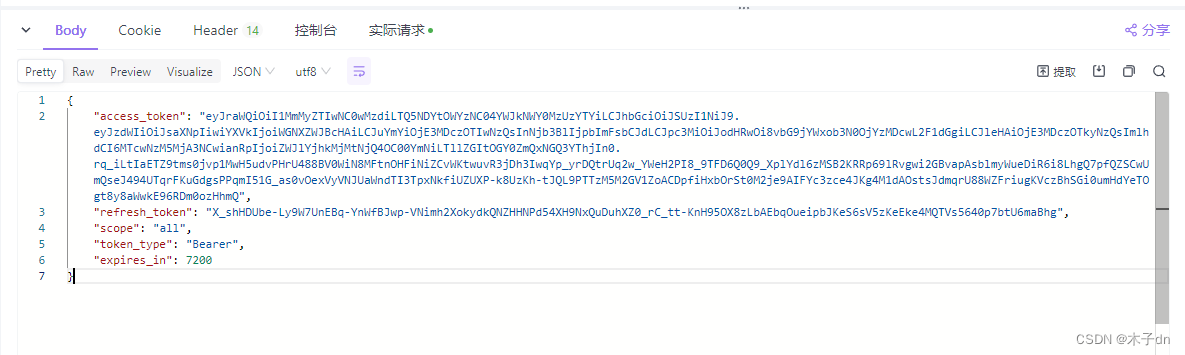
2. 获取JWT
使用apifox演示,postman,idea-http都可以。
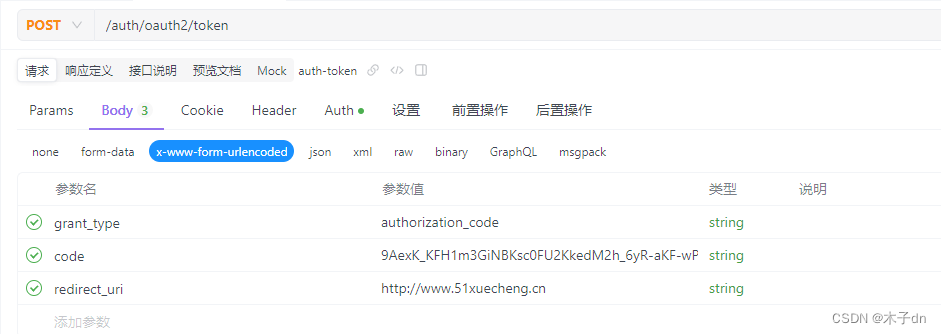
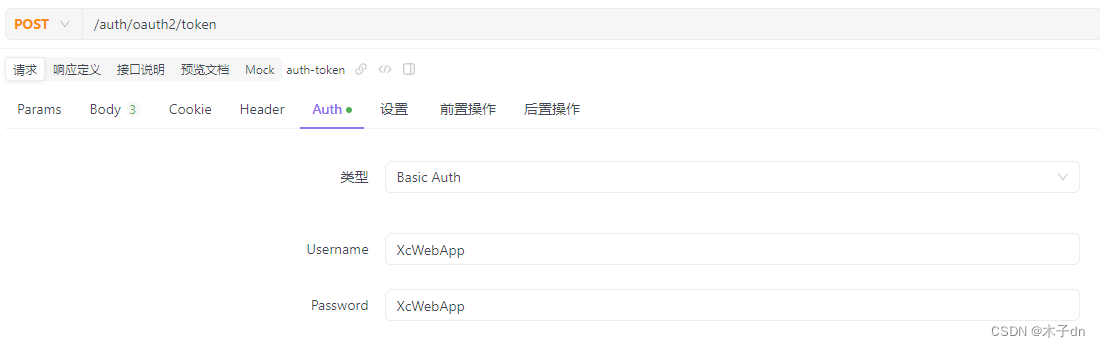
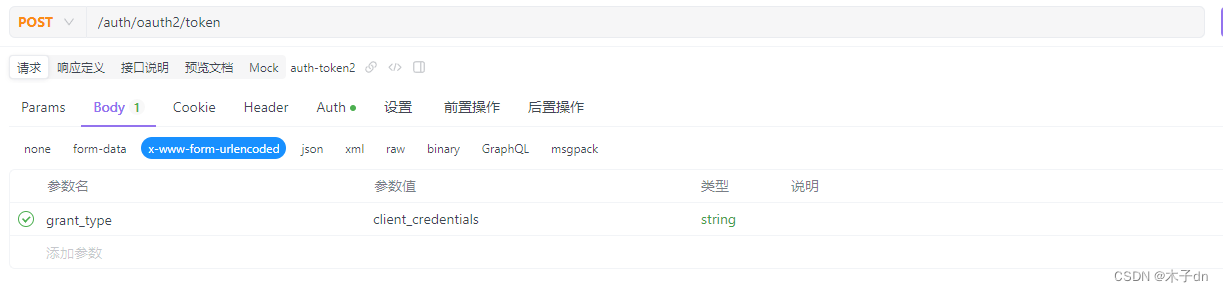
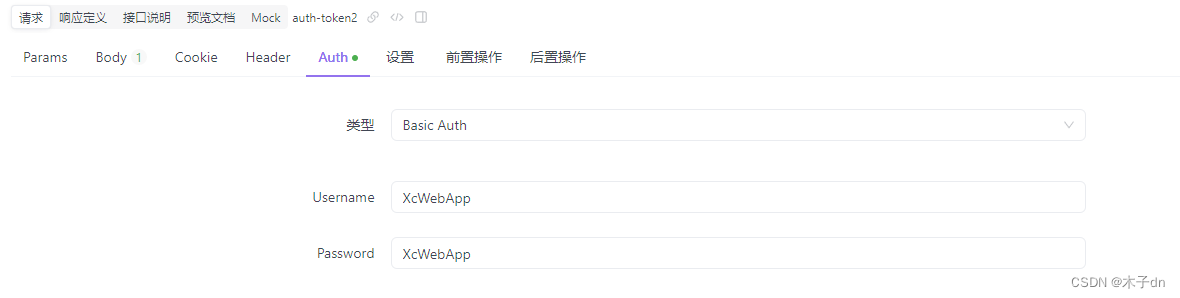
向localhost:63070/auth服务的/oauth2/token端点发送Post请求,同时需要携带认证信息。
认证信息可以如图所填的方法,也可以放到Header中,具体做法是将客户端ID和客户端密码用冒号(:)连接成一个字符串,进行Base64编码放入HTTP请求的Authorization头部中,前缀为Basic 。比如
Authorization: Basic bXlDbGllbnRJZDpteUNsaWVudFNlY3JldA==
得到JWT
2. CLIENT_CREDENTIALS(客户端凭证模式)
不需要授权码,直接向localhost:63070/auth服务的/oauth2/token端点发送Post请求,同时需要携带认证信息。

五、Gateway
至于gateway基础搭建步骤和gateway管理的若干微服务本文不做指导。
相较于auth模块(也就是Authorization Server),gateway的角色是Resource Server。
1. 引入依赖
<dependency><groupId>org.springframework.boot</groupId><artifactId>spring-boot-starter-oauth2-resource-server</artifactId></dependency><dependency><groupId>org.springframework.boot</groupId><artifactId>spring-boot-starter-security</artifactId></dependency>
2. 添加白名单文件
在resource下添加security-whitelist.properties文件。
写入以下内容
/auth/**=????
/content/open/**=??????????
/media/open/**=??????????
3. 全局过滤器
在全局过滤器中,加载白名单,然后对请求进行判断。
@Component
@Slf4j
public class GatewayAuthFilter implements GlobalFilter, Ordered {//白名单private static List<String> whitelist = null;static {//加载白名单try (InputStream resourceAsStream = GatewayAuthFilter.class.getResourceAsStream("/security-whitelist.properties");) {Properties properties = new Properties();properties.load(resourceAsStream);Set<String> strings = properties.stringPropertyNames();whitelist= new ArrayList<>(strings);} catch (Exception e) {log.error("加载/security-whitelist.properties出错:{}",e.getMessage());e.printStackTrace();}}@Overridepublic Mono<Void> filter(ServerWebExchange exchange, GatewayFilterChain chain) {String requestUrl = exchange.getRequest().getPath().value();log.info("请求={}",requestUrl);AntPathMatcher pathMatcher = new AntPathMatcher();//白名单放行for (String url : whitelist) {if (pathMatcher.match(url, requestUrl)) {return chain.filter(exchange);}}}private Mono<Void> buildReturnMono(String error, ServerWebExchange exchange) {ServerHttpResponse response = exchange.getResponse();String jsonString = JSON.toJSONString(new RestErrorResponse(error));byte[] bits = jsonString.getBytes(StandardCharsets.UTF_8);DataBuffer buffer = response.bufferFactory().wrap(bits);response.setStatusCode(HttpStatus.UNAUTHORIZED);response.getHeaders().add("Content-Type", "application/json;charset=UTF-8");return response.writeWith(Mono.just(buffer));}@Overridepublic int getOrder() {return 0;}
}
4. 获取远程JWKS
在yml配置中添加jwk-set-uri属性。
spring:security:oauth2:resourceserver:jwt:jwk-set-uri: http://localhost:63070/auth/oauth2/jwks
新建配置类,自动注入JwtDecoder。
@Configuration
public class JwtDecoderConfig {@Value("${spring.security.oauth2.resourceserver.jwt.jwk-set-uri}")String jwkSetUri;@Beanpublic JwtDecoder jwtDecoderLocal() {return NimbusJwtDecoder.withJwkSetUri(jwkSetUri).build();}
}
5. 校验JWT
在全局过滤器中补全逻辑。
@Component
@Slf4j
public class GatewayAuthFilter implements GlobalFilter, Ordered {@Lazy@Autowiredprivate JwtDecoder jwtDecoderLocal;@Overridepublic Mono<Void> filter(ServerWebExchange exchange, GatewayFilterChain chain) {String requestUrl = exchange.getRequest().getPath().value();log.info("请求={}",requestUrl);AntPathMatcher pathMatcher = new AntPathMatcher();//白名单放行for (String url : whitelist) {if (pathMatcher.match(url, requestUrl)) {return chain.filter(exchange);}}//检查token是否存在String token = getToken(exchange);log.info("token={}",token);if (StringUtils.isBlank(token)) {return buildReturnMono("没有携带Token,没有认证",exchange);}
//        return chain.filter(exchange);try {Jwt jwt = jwtDecoderLocal.decode(token);// 如果没有抛出异常,则表示JWT有效// 此时,您可以根据需要进一步检查JWT的声明log.info("token有效期至:{}", formatInstantTime(jwt.getExpiresAt()));return chain.filter(exchange);} catch (JwtValidationException e) {log.info("token验证失败:{}",e.getMessage());return buildReturnMono("认证token无效",exchange);}}/*** 从请求头Authorization中获取token*/private String getToken(ServerWebExchange exchange) {String tokenStr = exchange.getRequest().getHeaders().getFirst("Authorization");if (StringUtils.isBlank(tokenStr)) {return null;}String token = tokenStr.split(" ")[1];if (StringUtils.isBlank(token)) {return null;}return token;}/*** 格式化Instant时间** @param expiresAt 在到期* @return {@link String}*/public String formatInstantTime(Instant expiresAt) {// 将Instant转换为系统默认时区的LocalDateTimeLocalDateTime dateTime = LocalDateTime.ofInstant(expiresAt, ZoneId.systemDefault());// 定义日期时间的格式DateTimeFormatter formatter = DateTimeFormatter.ofPattern("yyyy-MM-dd HH:mm:ss");// 格式化日期时间并打印return dateTime.format(formatter);}}
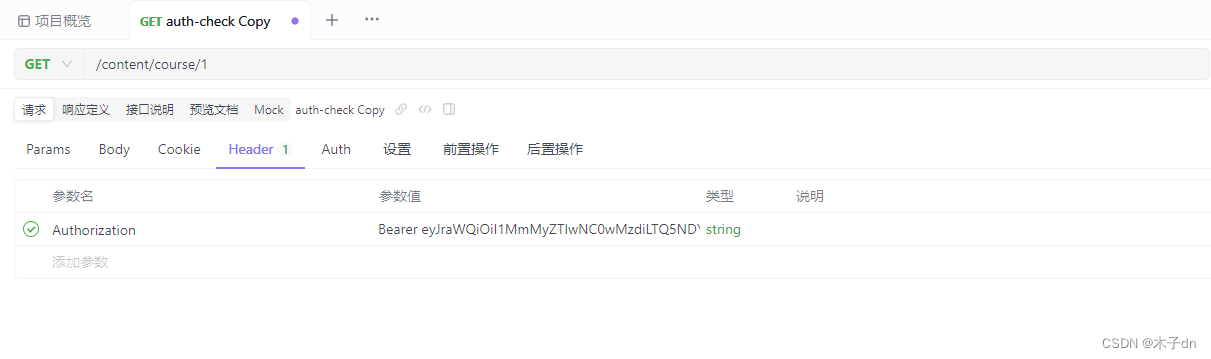
6. 测试(如何携带JWT)
携带一个正确的JWT向gateway发送请求。
把JWT写到Header的Authorization字段中,添加前缀Bearer(用空格隔开),向gateway微服务所在地址发送请求。
gateway日志输出。

六、后记
颁发JWT都归一个认证服务器管理,校验JWT都归Gateway管理,至于授权,则由各个微服务自己定义。耦合性低、性能较好。
关于授权,可以接着这篇文章。
微服务OAuth 2.1认证授权Demo方案(Spring Security 6)