目录
- 一、文献阅读:You Only Look Once: Unified, Real-Time Object Detection
- 1.1 摘要
- 1.2 背景
- 1.3 论文模型
- 1.4 网络设计
- 1.5 YOLO的局限性
- 1.6 实现代码
- target 7*7*30 值域为0-1
一、文献阅读:You Only Look Once: Unified, Real-Time Object Detection
1.1 摘要
YOLO是一种新的目标检测方法。先前的目标检测工作使用分类器来执行检测。相反,我们将目标检测框定为空间分离的边界框和相关类概率的回归问题。单个神经网络在一次评估中直接从完整图像中预测边界框和类别概率。由于整个检测管道是一个单一的网络,因此可以直接对检测性能进行端到端的优化。
YOLO的统一架构速度极快。我们的基础YOLO模型以每秒45帧的速度实时处理图像。该网络的一个较小的版本,快速YOLO,每秒处理一个惊人的155帧,同时还实现了其他实时探测器的mAP的两倍。与当前最先进的检测系统相比,YOLO的定位误差更大,但在背景上预测误报的可能性更低。最后,YOLO学习对象的非常一般的表示。当从自然图像推广到艺术品等其他领域时,它优于其他检测方法,包括DPM和R - CNN。
1.2 背景
随着计算机视觉技术的不断发展,目标检测作为其中的一个重要分支,已经广泛应用于各个领域,如自动驾驶、智能安防、医疗影像分析等。然而,传统的目标检测方法往往存在着计算量大、速度慢、精度不高等问题,难以满足实际应用中的需求。因此,研究一种快速且准确的对象检测算法具有重要意义。
传统的对象检测方法通常遵循一种分阶段、模块化的处理流程。这一流程主要包括候选区域选择、特征提取和分类器分类三个主要步骤。
首先,候选区域选择阶段的目标是从输入图像中选取可能包含待检测对象的区域。这一步骤可以通过诸如滑动窗口法或者更先进的Selective Search等方法来实现。滑动窗口法通过设定不同大小和比例的窗口,在图像上滑动并提取窗口内的图像块作为候选区域。而Selective Search则基于颜色、纹理、大小、形状等多种特征,采用一种自底向上的策略,合并相似的区域以生成候选对象位置。
接下来,特征提取阶段则是为了从候选区域中提取出能够表示对象特征的信息。这一步骤通常依赖于手工设计的特征提取器,如SIFT、SURF或者HOG等。这些特征提取器能够提取出图像中的关键信息,如边缘、角点、纹理等,并将这些信息编码成特征向量,以便后续的分类器使用。
最后,分类器分类阶段则是利用提取出的特征向量,通过训练好的分类器来判断候选区域是否包含目标对象,以及对象的类别。常用的分类器包括支持向量机(SVM)、随机森林等。分类器会根据训练时学习到的知识,对每一个候选区域进行打分,并根据得分的高低来确定最终的检测结果。
然而,这种传统的对象检测方法存在一些明显的缺点。首先,候选区域选择阶段会产生大量的冗余计算,导致检测速度较慢。其次,手工设计的特征提取器可能无法充分捕获到对象的复杂特征,导致检测精度受限。此外,这种分阶段、模块化的处理流程也使得整个检测系统的优化变得困难。
其次,近年来深度学习技术的快速发展为对象检测提供了新的解决思路。通过构建深度神经网络模型,可以自动学习图像中的特征表示,从而实现对象的自动检测和识别。YOLO算法正是基于这一思路,通过一种统一的模型将对象检测任务转化为回归问题,大大简化了检测流程,提高了检测速度和精度。
最后,虽然YOLO算法在对象检测领域取得了显著成果,但仍存在一些挑战和待解决的问题。例如,对于小目标或遮挡目标的检测精度仍然有待提升;同时,随着应用场景的不断扩展,对于算法的实时性和鲁棒性也提出了更高的要求。因此,进一步研究和改进YOLO算法,以满足实际应用中的需求,是当前研究的重要方向。
1.3 论文模型
我们将目标检测的各个组成部分统一到一个单一的神经网络中。我们的网络使用来自整个图像的特征来预测每个边界框。它同时预测图像中所有类别的所有边界框。这意味着我们的网络对整个图像和图像中的所有对象进行全局推理。YOLO设计可实现端到端训练和实时速度,同时保持高平均精度。
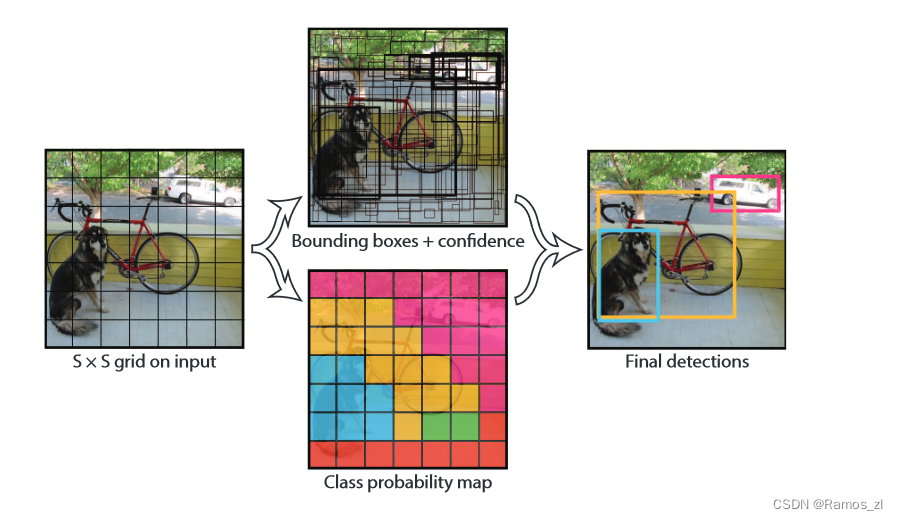
我们的系统首先将输入的图像划分为一个S × S的网格。这样的网格划分方式有助于我们更精确地定位和处理图像中的各个部分。当某个物体的中心落入某个网格单元时,这个网格单元就负责检测该物体。这样的设计可以确保每个物体都能被至少一个网格单元所覆盖,从而实现全面的物体检测。每个网格单元都会预测B个边界框(Bounding Boxes)以及这些边界框的置信度分数。边界框是用来标记物体在图像中位置的矩形框,而置信度分数则反映了模型对边界框内存在物体的确信程度,以及模型对预测边界框准确性的估计。置信度的正式定义是Pr(Object) ∗ IOUtruth pred,其中Pr(Object)表示该网格单元内存在物体的概率,而IOUtruth pred则表示预测边界框与真实边界框(即标注的物体实际位置)之间的交集除以并集(Intersection over Union,IOU)。IOU是一个衡量预测边界框与真实边界框重合程度的指标,值越接近1表示重合度越高,即预测越准确。如果某个网格单元内不存在物体,那么该网格单元预测的所有边界框的置信度分数都应为零。这是因为这些边界框没有正确地标记任何物体,所以它们的置信度应该很低。相反,如果网格单元内存在物体,我们希望预测的边界框能够尽可能准确地覆盖该物体,即预测的边界框与真实边界框之间的IOU值应该尽可能高。此时,置信度分数就等于这个IOU值,反映了模型对预测结果的信心程度。通过这种方式,我们的系统能够实现对图像中物体的精确检测和定位。每个网格单元都负责检测其覆盖区域内的物体,并输出相应的边界框和置信度分数。这些信息可以被后续的处理步骤利用,例如进行物体的分类、跟踪或者场景理解等任务。
每个边界框包含5个预测值:x,y,w,h和置信度。其中,(x, y)坐标表示边界框中心相对于网格单元边界的位置。宽度和高度是相对于整个图像的预测值。最后,置信度预测表示预测框与任何真实框之间的IOU(Intersection over Union,交并比)。每个网格单元还会预测C个条件类别概率,即Pr(Classi|Object)。这些概率取决于网格单元是否包含物体。无论边界框B的数量是多少,我们每个网格单元只预测一组类别概率。在测试时,我们将条件类别概率与单个框的置信度预测相乘,

1.4 网络设计
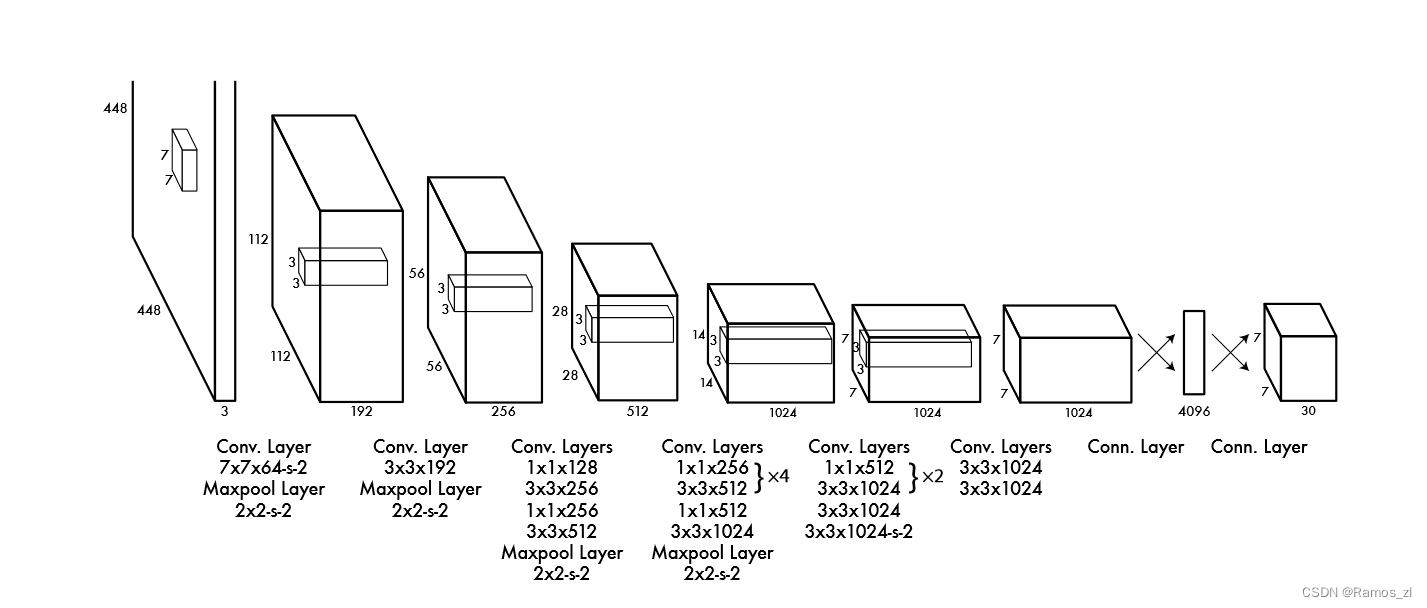
我们将此模型实现为一个卷积神经网络,并在PASCAL VOC检测数据集上进行评估。网络的初始卷积层从图像中提取特征,而全连接层则预测输出概率和坐标。
这个网络架构的设计灵感来源于GoogLeNet模型,用于图像分类任务。具体来说,该网络包含了24个卷积层,后面接着2个全连接层。与GoogLeNet中使用的inception模块不同,作者在这里简单地使用了1×1的降维层,随后是3×3的卷积层。然而,这个模型在预测边界框时遇到了一些挑战。由于模型是从数据中学习预测边界框的,因此它难以泛化到新的或不寻常的比例或配置的物体上。此外,由于网络架构中存在多个从输入图像进行的下采样层,模型在预测边界框时使用的特征相对较为粗糙。
在训练期间,我们优化以下多部分损失函数:
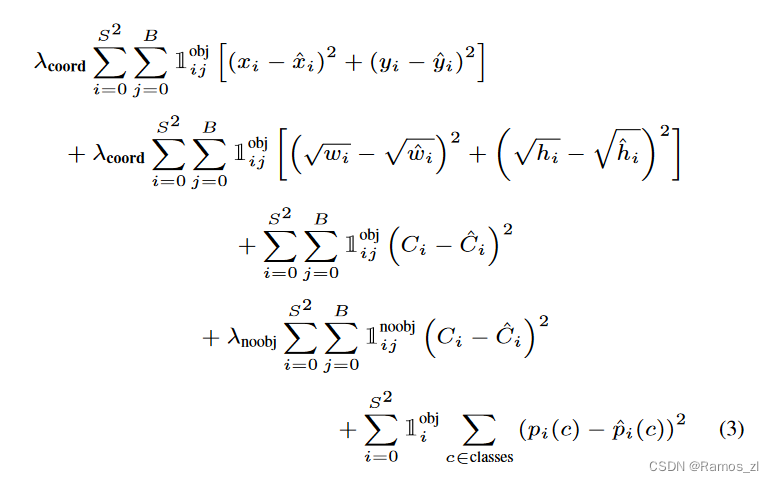
注意,如果目标存在于该网格单元中(前面讨论的条件类别概率),则损失函数仅惩罚(penalizes)分类错误。如果预测器“负责”实际边界框(即该网格单元中具有最高IOU的预测器),则它也仅惩罚边界框坐标错误。
我们用Pascal VOC 2007和2012的训练集和验证数据集进行了大约 135个epoch 的网络训练。因为我们仅在Pascal VOC 2012上进行测试,所以我们的训练集里包含了Pascal VOC 2007的测试数据。在整个训练过程中,我们使用:batch size=64,momentum=0.9,decay=0.0005。
我们的学习率(learning rate)计划如下:在第一个epoch中,我们将学习率从1 0 − 3 10^{-3}10−3慢慢地提高到 1 0 − 2 10^{-2}10−2。如果从大的学习率开始训练,我们的模型通常会由于不稳定的梯度而发散(diverge)。我们继续以 1 0 − 2 10^{-2}10−2 进行75个周期的训练,然后以 1 0 − 3 10^{-3}10−3 进行30个周期的训练,最后以 1 0 − 4 10^{-4}10−4 进行30个周期的训练。
为避免过拟合,我们使用了Dropout和大量的数据增强。 在第一个连接层之后的dropout层的丢弃率设置为0.5,以防止层之间的相互适应[18]。 对于数据增强(data augmentation),我们引入高达20%的原始图像大小的随机缩放和平移(random scaling and translations )。我们还在 HSV 色彩空间中以高达 1.5 的因子随机调整图像的曝光度和饱和度。
1.5 YOLO的局限性
由于每个格网单元只能预测两个框,并且只能有一个类,因此YOLO对边界框预测施加了很强的空间约束。这个空间约束限制了我们的模型可以预测的邻近目标的数量。我们的模型难以预测群组中出现的小物体(比如鸟群)。
由于我们的模型学习是从数据中预测边界框,因此它很难泛化到新的、不常见的长宽比或配置的目标。我们的模型也使用相对较粗糙的特征来预测边界框,因为输入图像在我们的架构中历经了多个下采样层(downsampling layers)。
最后,我们的训练基于一个逼近检测性能的损失函数,这个损失函数无差别地处理小边界框与大边界框的误差。大边界框的小误差通常是无关要紧的,但小边界框的小误差对IOU的影响要大得多。我们的主要错误来自于不正确的定位。
1.6 实现代码
import torch
import cv2
import os
import os.path
import random
import numpy as np
from torch.utils.data import DataLoader, Dataset
from torchvision.transforms import ToTensor
from PIL import ImageCLASS_NUM = 20  # 使用其他训练集需要更改class yoloDataset(Dataset):image_size = 448  # 输入图片大小def __init__(self, img_root, list_file, train, transform):   # list_file为txt文件  img_root为图片路径self.root = img_rootself.train = trainself.transform = transform# 后续要提取txt文件信息,分类后装入以下三个列表self.fnames = []self.boxes = []self.labels = []self.S = 7   # YOLOV1self.B = 2   # 相关self.C = CLASS_NUM  # 参数self.mean = (123, 117, 104)  # RGBfile_txt = open(list_file)lines = file_txt.readlines()   # 读取txt文件每一行for line in lines:   # 逐行开始操作splited = line.strip().split() # 移除首位的换行符号再生成一张列表self.fnames.append(splited[0])  # 存储图片的名字num_boxes = (len(splited) - 1) // 5  # 每一幅图片里面有多少个bboxbox = []label = []for i in range(num_boxes): # bbox四个角的坐标x = float(splited[1 + 5 * i])y = float(splited[2 + 5 * i])x2 = float(splited[3 + 5 * i])y2 = float(splited[4 + 5 * i])c = splited[5 + 5 * i]  # 代表物体的类别,即是20种物体里面的哪一种  值域 0-19box.append([x, y, x2, y2])label.append(int(c))self.boxes.append(torch.Tensor(box))self.labels.append(torch.LongTensor(label))self.num_samples = len(self.boxes)def __getitem__(self, idx):fname = self.fnames[idx]img = cv2.imread(os.path.join(self.root + fname))boxes = self.boxes[idx].clone()labels = self.labels[idx].clone()if self.train:  # 数据增强里面的各种变换用torch自带的transform是做不到的,因为对图片进行旋转、随即裁剪等会造成bbox的坐标也会发生变化,所以需要自己来定义数据增强img, boxes = self.random_flip(img, boxes)img, boxes = self.randomScale(img, boxes)img = self.randomBlur(img)img = self.RandomBrightness(img)# img = self.RandomHue(img)# img = self.RandomSaturation(img)img, boxes, labels = self.randomShift(img, boxes, labels)# img, boxes, labels = self.randomCrop(img, boxes, labels)h, w, _ = img.shapeboxes /= torch.Tensor([w, h, w, h]).expand_as(boxes)  # 坐标归一化处理,为了方便训练img = self.BGR2RGB(img)  # because pytorch pretrained model use RGBimg = self.subMean(img, self.mean)  # 减去均值img = cv2.resize(img, (self.image_size, self.image_size))  # 将所有图片都resize到指定大小target = self.encoder(boxes, labels)  # 将图片标签编码到7x7*30的向量for t in self.transform:img = t(img)return img, targetdef __len__(self):return self.num_samples# def letterbox_image(self, image, size):#     # 对图片进行resize,使图片不失真。在空缺的地方进行padding#     iw, ih = image.size#     scale = min(size / iw, size / ih)#     nw = int(iw * scale)#     nh = int(ih * scale)##     image = image.resize((nw, nh), Image.BICUBIC)#     new_image = Image.new('RGB', size, (128, 128, 128))#     new_image.paste(image, ((size - nw) // 2, (size - nh) // 2))#     return new_imagedef encoder(self, boxes, labels):  # 输入的box为归一化形式(X1,Y1,X2,Y2) , 输出ground truth  (7*7)grid_num = 7target = torch.zeros((grid_num, grid_num, int(CLASS_NUM + 10)))    # 7*7*30cell_size = 1. / grid_num  # 1/7wh = boxes[:, 2:] - boxes[:, :2] # wh = [w, h]  1*1# 物体中心坐标集合cxcy = (boxes[:, 2:] + boxes[:, :2]) / 2  # 归一化含小数的中心坐标for i in range(cxcy.size()[0]):cxcy_sample = cxcy[i]  # 中心坐标  1*1ij = (cxcy_sample / cell_size).ceil() - 1  # 左上角坐标 (7*7)为整数# 第一个框的置信度target[int(ij[1]), int(ij[0]), 4] = 1# 第二个框的置信度target[int(ij[1]), int(ij[0]), 9] = 1target[int(ij[1]), int(ij[0]), int(labels[i]) + 10] = 1  # 20个类别对应处的概率设置为1xy = ij * cell_size  # 归一化左上坐标  (1*1)delta_xy = (cxcy_sample - xy) / cell_size  # 中心与左上坐标差值  (7*7)# 坐标w,h代表了预测的bounding box的width、height相对于整幅图像width,height的比例target[int(ij[1]), int(ij[0]), 2:4] = wh[i]  # w1,h1target[int(ij[1]), int(ij[0]), :2] = delta_xy  # x1,y1# 每一个网格有两个边框target[int(ij[1]), int(ij[0]), 7:9] = wh[i]  # w2,h2# 由此可得其实返回的中心坐标其实是相对左上角顶点的偏移,因此在进行预测的时候还需要进行解码target[int(ij[1]), int(ij[0]), 5:7] = delta_xy  # [5,7) 表示x2,y2return target   # (xc,yc) = 7*7   (w,h) = 1*1# 以下方法都是数据增强操作def BGR2RGB(self, img):return cv2.cvtColor(img, cv2.COLOR_BGR2RGB)def BGR2HSV(self, img):return cv2.cvtColor(img, cv2.COLOR_BGR2HSV)def HSV2BGR(self, img):return cv2.cvtColor(img, cv2.COLOR_HSV2BGR)def RandomBrightness(self, bgr):if random.random() < 0.5:hsv = self.BGR2HSV(bgr)h, s, v = cv2.split(hsv)adjust = random.choice([0.5, 1.5])v = v * adjustv = np.clip(v, 0, 255).astype(hsv.dtype)hsv = cv2.merge((h, s, v))bgr = self.HSV2BGR(hsv)return bgrdef RandomSaturation(self, bgr):if random.random() < 0.5:hsv = self.BGR2HSV(bgr)h, s, v = cv2.split(hsv)adjust = random.choice([0.5, 1.5])s = s * adjusts = np.clip(s, 0, 255).astype(hsv.dtype)hsv = cv2.merge((h, s, v))bgr = self.HSV2BGR(hsv)return bgrdef RandomHue(self, bgr):if random.random() < 0.5:hsv = self.BGR2HSV(bgr)h, s, v = cv2.split(hsv)adjust = random.choice([0.5, 1.5])h = h * adjusth = np.clip(h, 0, 255).astype(hsv.dtype)hsv = cv2.merge((h, s, v))bgr = self.HSV2BGR(hsv)return bgrdef randomBlur(self, bgr):if random.random() < 0.5:bgr = cv2.blur(bgr, (5, 5))return bgrdef randomShift(self, bgr, boxes, labels):# 平移变换center = (boxes[:, 2:] + boxes[:, :2]) / 2if random.random() < 0.5:height, width, c = bgr.shapeafter_shfit_image = np.zeros((height, width, c), dtype=bgr.dtype)after_shfit_image[:, :, :] = (104, 117, 123)  # bgrshift_x = random.uniform(-width * 0.2, width * 0.2)shift_y = random.uniform(-height * 0.2, height * 0.2)# print(bgr.shape,shift_x,shift_y)# 原图像的平移if shift_x >= 0 and shift_y >= 0:after_shfit_image[int(shift_y):,int(shift_x):,:] = bgr[:height - int(shift_y),:width - int(shift_x),:]elif shift_x >= 0 and shift_y < 0:after_shfit_image[:height + int(shift_y),int(shift_x):,:] = bgr[-int(shift_y):,:width - int(shift_x),:]elif shift_x < 0 and shift_y >= 0:after_shfit_image[int(shift_y):, :width +int(shift_x), :] = bgr[:height -int(shift_y), -int(shift_x):, :]elif shift_x < 0 and shift_y < 0:after_shfit_image[:height + int(shift_y), :width + int(shift_x), :] = bgr[-int(shift_y):, -int(shift_x):, :]shift_xy = torch.FloatTensor([[int(shift_x), int(shift_y)]]).expand_as(center)center = center + shift_xymask1 = (center[:, 0] > 0) & (center[:, 0] < width)mask2 = (center[:, 1] > 0) & (center[:, 1] < height)mask = (mask1 & mask2).view(-1, 1)boxes_in = boxes[mask.expand_as(boxes)].view(-1, 4)if len(boxes_in) == 0:return bgr, boxes, labelsbox_shift = torch.FloatTensor([[int(shift_x), int(shift_y), int(shift_x), int(shift_y)]]).expand_as(boxes_in)boxes_in = boxes_in + box_shiftlabels_in = labels[mask.view(-1)]return after_shfit_image, boxes_in, labels_inreturn bgr, boxes, labelsdef randomScale(self, bgr, boxes):# 固定住高度,以0.8-1.2伸缩宽度,做图像形变if random.random() < 0.5:scale = random.uniform(0.8, 1.2)height, width, c = bgr.shapebgr = cv2.resize(bgr, (int(width * scale), height))scale_tensor = torch.FloatTensor([[scale, 1, scale, 1]]).expand_as(boxes)boxes = boxes * scale_tensorreturn bgr, boxesreturn bgr, boxesdef randomCrop(self, bgr, boxes, labels):if random.random() < 0.5:center = (boxes[:, 2:] + boxes[:, :2]) / 2height, width, c = bgr.shapeh = random.uniform(0.6 * height, height)w = random.uniform(0.6 * width, width)x = random.uniform(0, width - w)y = random.uniform(0, height - h)x, y, h, w = int(x), int(y), int(h), int(w)center = center - torch.FloatTensor([[x, y]]).expand_as(center)mask1 = (center[:, 0] > 0) & (center[:, 0] < w)mask2 = (center[:, 1] > 0) & (center[:, 1] < h)mask = (mask1 & mask2).view(-1, 1)boxes_in = boxes[mask.expand_as(boxes)].view(-1, 4)if (len(boxes_in) == 0):return bgr, boxes, labelsbox_shift = torch.FloatTensor([[x, y, x, y]]).expand_as(boxes_in)boxes_in = boxes_in - box_shiftboxes_in[:, 0] = boxes_in[:, 0].clamp_(min=0, max=w)boxes_in[:, 2] = boxes_in[:, 2].clamp_(min=0, max=w)boxes_in[:, 1] = boxes_in[:, 1].clamp_(min=0, max=h)boxes_in[:, 3] = boxes_in[:, 3].clamp_(min=0, max=h)labels_in = labels[mask.view(-1)]img_croped = bgr[y:y + h, x:x + w, :]return img_croped, boxes_in, labels_inreturn bgr, boxes, labelsdef subMean(self, bgr, mean):mean = np.array(mean, dtype=np.float32)bgr = bgr - meanreturn bgrdef random_flip(self, im, boxes):if random.random() < 0.5:im_lr = np.fliplr(im).copy()h, w, _ = im.shapexmin = w - boxes[:, 2]xmax = w - boxes[:, 0]boxes[:, 0] = xminboxes[:, 2] = xmaxreturn im_lr, boxesreturn im, boxesdef random_bright(self, im, delta=16):alpha = random.random()if alpha > 0.3:im = im * alpha + random.randrange(-delta, delta)im = im.clip(min=0, max=255).astype(np.uint8)return im# def main():
#     file_root = 'VOCdevkit/VOC2007/JPEGImages/'
#     train_dataset = yoloDataset(
#         img_root=file_root,
#         list_file='voctrain.txt',
#         train=True,
#         transform=[
#             ToTensor()])
#     train_loader = DataLoader(
#         train_dataset,
#         batch_size=2,
#         drop_last=True,
#         shuffle=False,
#         num_workers=0)
#     train_iter = iter(train_loader)
#     for i in range(100):
#         img, target = next(train_iter)
#         print(img.shape)
#
#
# if __name__ == '__main__':
#     main()
import torch
import torch.nn as nn
import torch.nn.functional as F
from torch.autograd import Variable
import warningswarnings.filterwarnings('ignore') # 忽略警告消息
CLASS_NUM = 20 # (使用自己的数据集时需要更改)class yoloLoss(nn.Module):def __init__(self, S, B, l_coord, l_noobj):# 一般而言 l_coord = 5 , l_noobj = 0.5super(yoloLoss, self).__init__()self.S = S # S = 7self.B = B # B = 2self.l_coord = l_coordself.l_noobj = l_noobjdef compute_iou(self, box1, box2): # box1(2,4) box2(1,4)N = box1.size(0) # 2M = box2.size(0) # 1lt = torch.max( # 返回张量所有元素的最大值# [N,2] -> [N,1,2] -> [N,M,2]box1[:, :2].unsqueeze(1).expand(N, M, 2),# [M,2] -> [1,M,2] -> [N,M,2]box2[:, :2].unsqueeze(0).expand(N, M, 2),)rb = torch.min(# [N,2] -> [N,1,2] -> [N,M,2]box1[:, 2:].unsqueeze(1).expand(N, M, 2),# [M,2] -> [1,M,2] -> [N,M,2]box2[:, 2:].unsqueeze(0).expand(N, M, 2),)wh = rb - lt # [N,M,2]wh[wh < 0] = 0 # clip at 0inter = wh[:, :, 0] * wh[:, :, 1] # [N,M] 重复面积area1 = (box1[:, 2] - box1[:, 0]) * (box1[:, 3] - box1[:, 1]) # [N,]area2 = (box2[:, 2] - box2[:, 0]) * (box2[:, 3] - box2[:, 1]) # [M,]area1 = area1.unsqueeze(1).expand_as(inter) # [N,] -> [N,1] -> [N,M]area2 = area2.unsqueeze(0).expand_as(inter) # [M,] -> [1,M] -> [N,M]iou = inter / (area1 + area2 - inter)return iou # [2,1]def forward(self, pred_tensor, target_tensor):'''pred_tensor: (tensor) size(batchsize,7,7,30)target_tensor: (tensor) size(batchsize,7,7,30) --- ground truth'''N = pred_tensor.size()[0] # batchsizecoo_mask = target_tensor[:, :, :, 4] > 0 # 具有目标标签的索引值 true batchsize*7*7noo_mask = target_tensor[:, :, :, 4] == 0 # 不具有目标的标签索引值 false batchsize*7*7coo_mask = coo_mask.unsqueeze(-1).expand_as(target_tensor) # 得到含物体的坐标等信息,复制粘贴 batchsize*7*7*30noo_mask = noo_mask.unsqueeze(-1).expand_as(target_tensor) # 得到不含物体的坐标等信息 batchsize*7*7*30coo_pred = pred_tensor[coo_mask].view(-1, int(CLASS_NUM + 10)) # view类似于reshapebox_pred = coo_pred[:, :10].contiguous().view(-1, 5) # 塑造成X行5列(-1表示自动计算),一个box包含5个值class_pred = coo_pred[:, 10:] # [n_coord, 20]coo_target = target_tensor[coo_mask].view(-1, int(CLASS_NUM + 10))box_target = coo_target[:, :10].contiguous().view(-1, 5)class_target = coo_target[:, 10:]# 不包含物体grid ceil的置信度损失noo_pred = pred_tensor[noo_mask].view(-1, int(CLASS_NUM + 10))noo_target = target_tensor[noo_mask].view(-1, int(CLASS_NUM + 10))noo_pred_mask = torch.cuda.ByteTensor(noo_pred.size()).bool()noo_pred_mask.zero_()noo_pred_mask[:, 4] = 1noo_pred_mask[:, 9] = 1noo_pred_c = noo_pred[noo_pred_mask] # noo pred只需要计算 c 的损失 size[-1,2]noo_target_c = noo_target[noo_pred_mask]nooobj_loss = F.mse_loss(noo_pred_c, noo_target_c, size_average=False) # 均方误差# compute contain obj losscoo_response_mask = torch.cuda.ByteTensor(box_target.size()).bool() # ByteTensor 构建Byte类型的tensor元素全为0coo_response_mask.zero_() # 全部元素置False bool:将其元素转变为布尔值no_coo_response_mask = torch.cuda.ByteTensor(box_target.size()).bool() # ByteTensor 构建Byte类型的tensor元素全为0no_coo_response_mask.zero_() # 全部元素置False bool:将其元素转变为布尔值box_target_iou = torch.zeros(box_target.size()).cuda()# box1 = 预测框 box2 = ground truthfor i in range(0, box_target.size()[0], 2): # box_target.size()[0]:有多少bbox,并且一次取两个bboxbox1 = box_pred[i:i + 2] # 第一个grid ceil对应的两个bboxbox1_xyxy = Variable(torch.FloatTensor(box1.size()))box1_xyxy[:, :2] = box1[:, :2] / float(self.S) - 0.5 * box1[:, 2:4] # 原本(xc,yc)为7*7 所以要除以7box1_xyxy[:, 2:4] = box1[:, :2] / float(self.S) + 0.5 * box1[:, 2:4]box2 = box_target[i].view(-1, 5)box2_xyxy = Variable(torch.FloatTensor(box2.size()))box2_xyxy[:, :2] = box2[:, :2] / float(self.S) - 0.5 * box2[:, 2:4]box2_xyxy[:, 2:4] = box2[:, :2] / float(self.S) + 0.5 * box2[:, 2:4]iou = self.compute_iou(box1_xyxy[:, :4], box2_xyxy[:, :4])max_iou, max_index = iou.max(0)max_index = max_index.data.cuda()coo_response_mask[i + max_index] = 1 # IOU最大的bboxno_coo_response_mask[i + 1 - max_index] = 1 # 舍去的bbox# confidence score = predicted box 与 the ground truth 的 IOUbox_target_iou[i + max_index, torch.LongTensor([4]).cuda()] = max_iou.data.cuda()box_target_iou = Variable(box_target_iou).cuda()# 置信度误差(含物体的grid ceil的两个bbox与ground truth的IOU较大的一方)box_pred_response = box_pred[coo_response_mask].view(-1, 5)box_target_response_iou = box_target_iou[coo_response_mask].view(-1, 5)# IOU较小的一方no_box_pred_response = box_pred[no_coo_response_mask].view(-1, 5)no_box_target_response_iou = box_target_iou[no_coo_response_mask].view(-1, 5)no_box_target_response_iou[:, 4] = 0 # 保险起见置0(其实原本就是0)box_target_response = box_target[coo_response_mask].view(-1, 5)# 含物体grid ceil中IOU较大的bbox置信度损失contain_loss = F.mse_loss(box_pred_response[:, 4], box_target_response_iou[:, 4], size_average=False)# 含物体grid ceil中舍去的bbox损失no_contain_loss = F.mse_loss(no_box_pred_response[:, 4], no_box_target_response_iou[:, 4], size_average=False)# bbox坐标损失loc_loss = F.mse_loss(box_pred_response[:, :2], box_target_response[:, :2], size_average=False) + F.mse_loss(torch.sqrt(box_pred_response[:, 2:4]), torch.sqrt(box_target_response[:, 2:4]), size_average=False)# 类别损失class_loss = F.mse_loss(class_pred, class_target, size_average=False)return (self.l_coord * loc_loss + contain_loss + self.l_noobj * (nooobj_loss + no_contain_loss) + class_loss) / Nfrom yoloData import yoloDataset
from yoloLoss import yoloLoss
from new_resnet import resnet50
from torchvision import models
import torchvision.transforms as transforms
from torch.utils.data import DataLoader
import torchdevice = 'cuda'
file_root = 'VOCdevkit/VOC2007/JPEGImages/'
batch_size = 2 # 若显存较大可以调大此参数 4,8,16,32等等
learning_rate = 0.001
num_epochs = 1train_dataset = yoloDataset(img_root=file_root, list_file='voctrain.txt', train=True, transform=[transforms.ToTensor()])
train_loader = DataLoader(train_dataset, batch_size=batch_size, shuffle=True, num_workers=0)
test_dataset = yoloDataset(img_root=file_root, list_file='voctest.txt', train=False, transform=[transforms.ToTensor()])
test_loader = DataLoader(test_dataset, batch_size=batch_size, shuffle=True, num_workers=0)
print('the dataset has %d images' % (len(train_dataset)))net = resnet50() # 自己定义的网络
net = net.cuda()
resnet = models.resnet50(pretrained=True) # torchvison库中的网络
new_state_dict = resnet.state_dict()
op = net.state_dict()# for i in new_state_dict.keys(): # 查看网络结构的名称 并且得出一共有320个key
# print(i)# 若定义的网络结构的key()名称与torchvision库中的ResNet50的key()相同则可以使用此方法
# for k in new_state_dict.keys():
# # print(k) # 输出层的名字
# if k in op.keys() and not k.startswith('fc'): # startswith() 方法用于检查字符串是否是以指定子字符串开头,如果是则返回 True,否则返回 False
# op[k] = new_state_dict[k] # 与自定义的网络比对 相同则把权重参数导入 不同则不导入
# net.load_state_dict(op)# 无论名称是否相同都可以使用
for new_state_dict_num, new_state_dict_value in enumerate(new_state_dict.values()):for op_num, op_key in enumerate(op.keys()):if op_num == new_state_dict_num and op_num <= 317: # 320个key中不需要最后的全连接层的两个参数op[op_key] = new_state_dict_value
net.load_state_dict(op) # 更改了state_dict的值记得把它导入网络中print('cuda', torch.cuda.current_device(), torch.cuda.device_count()) # 确认一下cuda的设备criterion = yoloLoss(7, 2, 5, 0.5)
criterion = criterion.to(device)
net.train() # 训练前需要加入的语句params = [] # 里面存字典
params_dict = dict(net.named_parameters()) # 返回各层中key(只包含weight and bias) and value
for key, value in params_dict.items():params += [{'params': [value], 'lr':learning_rate}] # value和学习率相加optimizer = torch.optim.SGD( # 定义优化器 “随机梯度下降”params, # net.parameters() 为什么不用这个???lr=learning_rate,momentum=0.9, # 即更新的时候在一定程度上保留之前更新的方向 可以在一定程度上增加稳定性,从而学习地更快weight_decay=5e-4) # L2正则化理论中出现的概念
# torch.multiprocessing.freeze_support() # 多进程相关 猜测是使用多显卡训练需要for epoch in range(num_epochs):net.train()if epoch == 60:learning_rate = 0.0001if epoch == 80:learning_rate = 0.00001for param_group in optimizer.param_groups: # 其中的元素是2个字典;optimizer.param_groups[0]: 长度为6的字典,包括[‘amsgrad’, ‘params’, ‘lr’, ‘betas’, ‘weight_decay’, ‘eps’]这6个参数;# optimizer.param_groups[1]: 好像是表示优化器的状态的一个字典;param_group['lr'] = learning_rate # 更改全部的学习率print('\n\nStarting epoch %d / %d' % (epoch + 1, num_epochs))print('Learning Rate for this epoch: {}'.format(learning_rate))total_loss = 0.for i, (images, target) in enumerate(train_loader):images, target = images.cuda(), target.cuda()pred = net(images)loss = criterion(pred, target)total_loss += loss.item()optimizer.zero_grad()loss.backward()optimizer.step()if (i + 1) % 5 == 0:print('Epoch [%d/%d], Iter [%d/%d] Loss: %.4f, average_loss: %.4f' % (epoch +1, num_epochs,i + 1, len(train_loader), loss.item(), total_loss / (i + 1)))validation_loss = 20.0net.eval()for i, (images, target) in enumerate(test_loader): # 导入dataloader 说明开始训练了 enumerate 建立一个迭代序列images, target = images.cuda(), target.cuda()pred = net(images) # 将图片输入loss = criterion(pred, target)validation_loss += loss.item() # 累加loss值 (固定搭配)validation_loss /= len(test_loader) # 计算平均lossbest_test_loss = validation_lossprint('get best test loss %.5f' % best_test_loss)torch.save(net.state_dict(), 'yolo.pth')
import numpy as np
import torch
import cv2
from torchvision.transforms import ToTensor
from new_resnet import resnet50
img_root = “VOCdevkit/VOC2007/JPEGImages/000007.jpg” # 需要预测的图片路径 (自己填入)
model = resnet50()
model.load_state_dict(torch.load(“yolo.pth”)) # 导入参数 (自己填入)
model.eval()
confident = 0.2
iou_con = 0.4
VOC_CLASSES = (
‘aeroplane’, ‘bicycle’, ‘bird’, ‘boat’,
‘bottle’, ‘bus’, ‘car’, ‘cat’, ‘chair’,
‘cow’, ‘diningtable’, ‘dog’, ‘horse’,
‘motorbike’, ‘person’, ‘pottedplant’,
‘sheep’, ‘sofa’, ‘train’, ‘tvmonitor’) # 将自己的名称输入 (使用自己的数据集时需要更改)
CLASS_NUM = len(VOC_CLASSES) # 20
target 7730 值域为0-1
class Pred():
def init(self, model, img_root):
self.model = model
self.img_root = img_root
def result(self):img = cv2.imread(self.img_root)h, w, _ = img.shapeprint(h, w)image = cv2.resize(img, (448, 448))img = cv2.cvtColor(image, cv2.COLOR_BGR2RGB)mean = (123, 117, 104) # RGBimg = img - np.array(mean, dtype=np.float32)transform = ToTensor()img = transform(img)img = img.unsqueeze(0) # 输入要求是4维的Result = self.model(img) # 1*7*7*30bbox = self.Decode(Result)bboxes = self.NMS(bbox) # n*6 bbox坐标是基于7*7网格需要将其转换成448if len(bboxes) == 0:print("未识别到任何物体")print("尝试减小 confident 以及 iou_con")print("也可能是由于训练不充分,可在训练时将epoch增大") for i in range(0, len(bboxes)): # bbox坐标将其转换为原图像的分辨率bboxes[i][0] = bboxes[i][0] * 64bboxes[i][1] = bboxes[i][1] * 64bboxes[i][2] = bboxes[i][2] * 64bboxes[i][3] = bboxes[i][3] * 64x1 = bboxes[i][0].item() # 后面加item()是因为画框时输入的数据不可一味tensor类型x2 = bboxes[i][1].item()y1 = bboxes[i][2].item()y2 = bboxes[i][3].item()class_name = bboxes[i][5].item()print(x1, x2, y1, y2, VOC_CLASSES[int(class_name)])cv2.rectangle(image, (int(x1), int(y1)), (int(x2), int(y2)), (144, 144, 255)) # 画框cv2.imshow('img', image)cv2.waitKey(0)def Decode(self, result): # x -> 1**7*30result = result.squeeze() # 7*7*30grid_ceil1 = result[:, :, 4].unsqueeze(2) # 7*7*1grid_ceil2 = result[:, :, 9].unsqueeze(2)grid_ceil_con = torch.cat((grid_ceil1, grid_ceil2), 2) # 7*7*2grid_ceil_con, grid_ceil_index = grid_ceil_con.max(2) # 按照第二个维度求最大值 7*7 一个grid ceil两个bbox,两个confidenceclass_p, class_index = result[:, :, 10:].max(2) # size -> 7*7 找出单个grid ceil预测的物体类别最大者class_confidence = class_p * grid_ceil_con # 7*7 真实的类别概率bbox_info = torch.zeros(7, 7, 6)for i in range(0, 7):for j in range(0, 7):bbox_index = grid_ceil_index[i, j]bbox_info[i, j, :5] = result[i, j, (bbox_index * 5):(bbox_index+1) * 5] # 删选bbox 0-5 或者5-10bbox_info[:, :, 4] = class_confidencebbox_info[:, :, 5] = class_indexprint(bbox_info[1, 5, :])return bbox_info # 7*7*6 6 = bbox4个信息+类别概率+类别代号def NMS(self, bbox, iou_con=iou_con):for i in range(0, 7):for j in range(0, 7):# xc = bbox[i, j, 0] # 目前bbox的四个坐标是以grid ceil的左上角为坐标原点 而且单位不一致# yc = bbox[i, j, 1] # (xc,yc) 单位= 7*7 (w,h) 单位= 1*1# w = bbox[i, j, 2] * 7# h = bbox[i, j, 3] * 7# Xc = i + xc# Yc = j + yc# xmin = Xc - w/2 # 计算bbox四个顶点的坐标(以整张图片的左上角为坐标原点)单位7*7# xmax = Xc + w/2# ymin = Yc - h/2# ymax = Yc + h/2 # 更新bbox参数 xmin and ymin的值有可能小于0xmin = j + bbox[i, j, 0] - bbox[i, j, 2] * 7 / 2 # xminxmax = j + bbox[i, j, 0] + bbox[i, j, 2] * 7 / 2 # xmaxymin = i + bbox[i, j, 1] - bbox[i, j, 3] * 7 / 2 # yminymax = i + bbox[i, j, 1] + bbox[i, j, 3] * 7 / 2 # ymaxbbox[i, j, 0] = xminbbox[i, j, 1] = xmaxbbox[i, j, 2] = yminbbox[i, j, 3] = ymaxbbox = bbox.view(-1, 6) # 49*6bboxes = []ori_class_index = bbox[:, 5]class_index, class_order = ori_class_index.sort(dim=0, descending=False)class_index = class_index.tolist() # 从0开始排序到7bbox = bbox[class_order, :] # 更改bbox排列顺序a = 0for i in range(0, CLASS_NUM):num = class_index.count(i)if num == 0:continuex = bbox[a:a+num, :] # 提取同一类别的所有信息score = x[:, 4]score_index, score_order = score.sort(dim=0, descending=True)y = x[score_order, :] # 同一种类别按照置信度排序if y[0, 4] >= confident: # 物体类别的最大置信度大于给定值才能继续删选bbox,否则丢弃全部bboxfor k in range(0, num):y_score = y[:, 4] # 每一次将置信度置零后都重新进行排序,保证排列顺序依照置信度递减_, y_score_order = y_score.sort(dim=0, descending=True)y = y[y_score_order, :]if y[k, 4] > 0:area0 = (y[k, 1] - y[k, 0]) * (y[k, 3] - y[k, 2])for j in range(k+1, num):area1 = (y[j, 1] - y[j, 0]) * (y[j, 3] - y[j, 2])x1 = max(y[k, 0], y[j, 0])x2 = min(y[k, 1], y[j, 1])y1 = max(y[k, 2], y[j, 2])y2 = min(y[k, 3], y[j, 3])w = x2 - x1h = y2 - y1if w < 0 or h < 0:w = 0h = 0inter = w * hiou = inter / (area0 + area1 - inter)# iou大于一定值则认为两个bbox识别了同一物体删除置信度较小的bbox# 同时物体类别概率小于一定值则认为不包含物体if iou >= iou_con or y[j, 4] < confident:y[j, 4] = 0for mask in range(0, num):if y[mask, 4] > 0:bboxes.append(y[mask])a = num + areturn bboxes
if name == “main”:
Pred = Pred(model, img_root)
Pred.result()
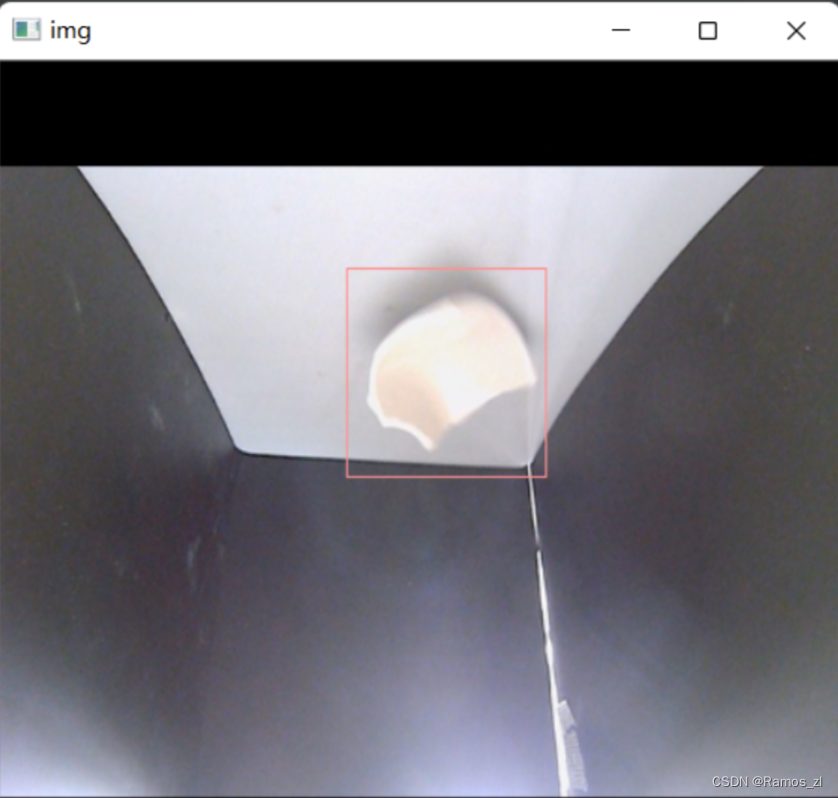
运行结果如下:
