1. 安装xtuner
#激活环境
source activate test_llm
# 安装xtuner
pip install xtuner#还有一些依赖项需要安装
future>=0.6.0
cython
lxml>=3.1.0
cssselect
mmengine
2. 创建一个ft-oasst1 数据集的工作路径,进入
mkdir ft-oasst1
cd ft-oasst1
3.XTuner 提供多个开箱即用的配置文件
# 列出所有内置配置
xtuner list-cfg
输出
==========================CONFIGS===========================
baichuan2_13b_base_qlora_alpaca_e3
baichuan2_13b_base_qlora_alpaca_enzh_e3
baichuan2_13b_base_qlora_alpaca_enzh_oasst1_e3
.....
chatglm2_6b_qlora_alpaca_e3
chatglm2_6b_qlora_alpaca_enzh_e3
chatglm2_6b_qlora_alpaca_enzh_oasst1_e3
.....
cohere_100b_128k_sp32
deepseek_coder_6_7b_base_qlora_code_alpaca_e3
deepseek_moe_16b_base_full_oasst1_e3
deepseek_moe_16b_base_qlora_oasst1_e3
.....
gemma_2b_full_alpaca_e3
gemma_2b_it_full_alpaca_e3
gemma_2b_it_qlora_alpaca_e3
.....
.....
internlm2_7b_qlora_oasst1_e3
internlm2_7b_qlora_sql_e3
internlm2_7b_w_tokenized_dataset
.....
llama2_70b_full_wizardlm_e1
llama2_70b_int8_lora_open_platypus_e1
llama2_70b_int8_lora_open_platypus_e1_hf
.....
llava_internlm2_chat_1_8b_clip_vit_large_p14_336_e1_gpu8_pretrain
llava_internlm2_chat_1_8b_qlora_clip_vit_large_p14_336_lora_e1_gpu8_finetune
llava_internlm2_chat_20b_clip_vit_large_p14_336_e1_gpu8_pretrain
.....
mistral_7b_full_finetune_custom_dataset_e1
mistral_7b_qlora_skypile_pretrain_e1
mistral_7b_w_tokenized_dataset
.....
qwen1_5_0_5b_chat_full_alpaca_e3
qwen1_5_0_5b_chat_qlora_alpaca_e3
qwen1_5_0_5b_full_alpaca_e3
.....
qwen_1_8b_chat_qlora_alpaca_e3
qwen_1_8b_chat_qlora_alpaca_enzh_e3
qwen_1_8b_chat_qlora_alpaca_enzh_oasst1_e3
.....
qwen_72b_qlora_alpaca_e3
qwen_72b_qlora_alpaca_enzh_e3
qwen_72b_qlora_alpaca_enzh_oasst1_e3
.....
starcoder_qlora_stack_exchange_example
yi_34b_qlora_alpaca_enzh_e3
yi_6b_qlora_alpaca_enzh_e3
zephyr_7b_beta_qlora_alpaca_e3
internlm_chat_7b_qlora_oasst1_e3含义
| 模型名 | internlm_chat_7b |
|---|---|
| 微调使用算法 | qlora |
| 数据集 | oasst1 |
| 把数据集跑几次 | 跑3次:e3 (epoch 3 ) |
拷贝一个配置文件到当前目录
xtuner copy-cfg internlm_chat_7b_qlora_oasst1_e3 .生成一个internlm_chat_7b_qlora_oasst1_e3_copy.py配置文件,修改配置文件
# PART 1中
#预训练模型存放的位置
pretrained_model_name_or_path = '/root/personal_assistant/model/Shanghai_AI_Laboratory/internlm-chat-7b'
#微调数据存放的位置
data_path='/root/personal_assistant/data/personal_assistant.json'
# 训练中最大的文本长度
max_length = 512
# 每一批训练样本的大小
batch_size = 2
#最大训练轮数
max_epochs = 3
# 验证的频率
evaluation_freq = 90
# 用于评估输出内容的问题(用于评估的问题尽量与数据集的question保持一致)
evaluation_inputs = ["请介绍一下你自己" ,"请做一下自我介绍"]# PART 3中
dataset=dict(type=load_dataset, path='json', data_files=dict(train=data path))
dataset_map_fn=None
4.下载internlm_chat_7b模型,下载到ft-oasst1文件夹中
详见:InternLM-Chat-7B部署调用-个人记录-CSDN博客
5.从 huggingface 下载数据集openassistant-guanaco到ft-oasst1文件夹中
git clone https://huggingface.co/datasets/timdettmers/openassistant-guanaco.git
6.微调模型
微调指令
xtuner train internlm_chat_7b_qlora_oasst1_e3_copy.py# 多卡
NPROC_PER_NODE=${GPU_NUM} xtuner train internlm_chat_7b_qlora_oasst1_e3_copy.py# 若要开启 deepspeed 加速,增加 --deepspeed deepspeed_zero2 即可
跑完训练后,当前路径应该长这样:
|-- internlm-chat-7b
|-- internlm_chat_7b_qlora_oasst1_e3_copy.py
|-- openassistant-guanaco
|   |-- openassistant_best_replies_eval.jsonl
|   `-- openassistant_best_replies_train.jsonl
`-- work_dirs`-- internlm_chat_7b_qlora_oasst1_e3_copy|-- 20231101_152923|   |-- 20231101_152923.log|   `-- vis_data|       |-- 20231101_152923.json|       |-- config.py|       `-- scalars.json|-- epoch_1.pth|-- epoch_2.pth|-- epoch_3.pth|-- internlm_chat_7b_qlora_oasst1_e3_copy.py`-- last_checkpoint
7.微调后参数转换/合并
训练后的pth格式参数转Hugging Face格式
xtuner convert pth_to_hf $CONFIG_NAME_OR_PATH $PTH $SAVE_PATH  例如:
xtuner convert pth_to_hf ./internlm_chat_7b_qlora_oasst1_e3_copy.py ./work_dirs/internlm_chat_7b_qlora_oasst1_e3_copy/epoch_1.pth ./hf
将base模型与loRA模型合并
xtuner convert merge $NAME_OR_PATH_TO_LLM $NAME_OR_PATH_TO_ADAPTER $SAVE_PATH --max-shard-size 2GB  例如:
xtuner convert merge ./internlm-chat-7b ./hf ./merged --max-shard-size 2GB
合并后

与原来的internlm的完全一样

与合并后的模型对话
# 加载 Adapter 模型对话(Float 16)
xtuner chat ./merged --prompt-template internlm_chat# 4 bit 量化加载
xtuner chat ./merged --prompt-template internlm_chat --bits 4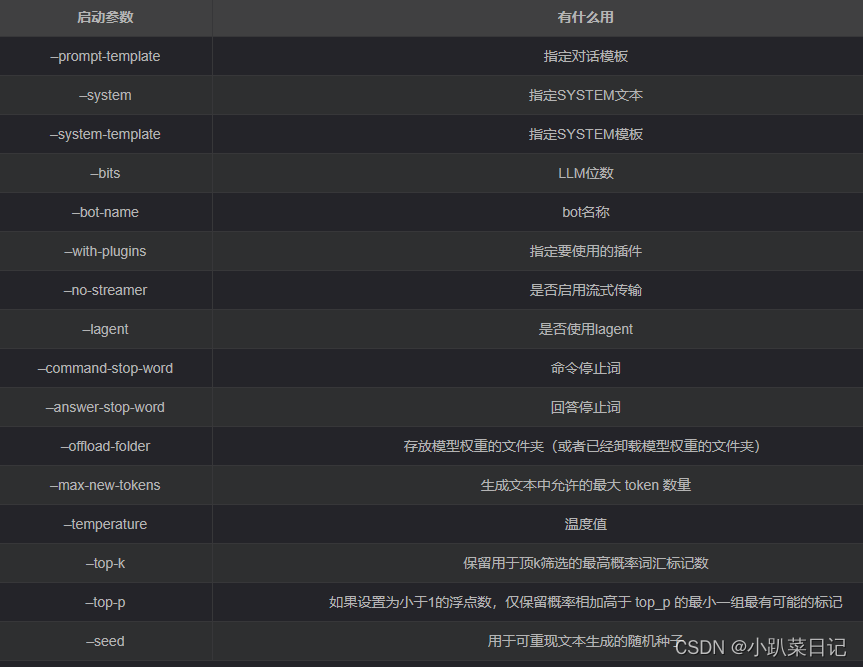
效果:

8.demo
创建文件demo.py
import torch
from transformers import AutoTokenizer, AutoModelForCausalLMmodel_name_or_path = "merged" # 这里请修改tokenizer = AutoTokenizer.from_pretrained(model_name_or_path, trust_remote_code=True)
model = AutoModelForCausalLM.from_pretrained(model_name_or_path, trust_remote_code=True, torch_dtype=torch.bfloat16, device_map='auto')
model = model.eval()system_prompt = """You are an AI assistant whose name is InternLM (书生·浦语).
- InternLM (书生·浦语) is a conversational language model that is developed by Shanghai AI Laboratory (上海人工智能实验室). It is designed to be helpful, honest, and harmless.
- InternLM (书生·浦语) can understand and communicate fluently in the language chosen by the user such as English and 中文.
"""messages = [(system_prompt, '')]print("=============Welcome to InternLM chatbot, type 'exit' to exit.=============")while True:input_text = input("User  >>> ")input_text.replace(' ', '')if input_text == "exit":breakresponse, history = model.chat(tokenizer, input_text, history=messages)messages.append((input_text, response))print(f"robot >>> {response}")
 微调前
微调前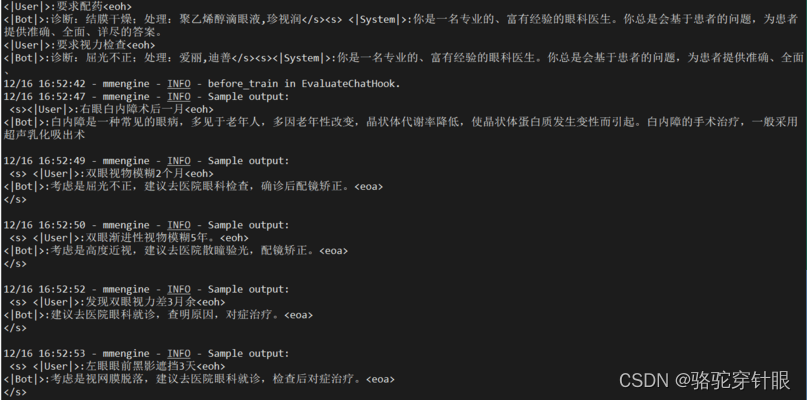
微调后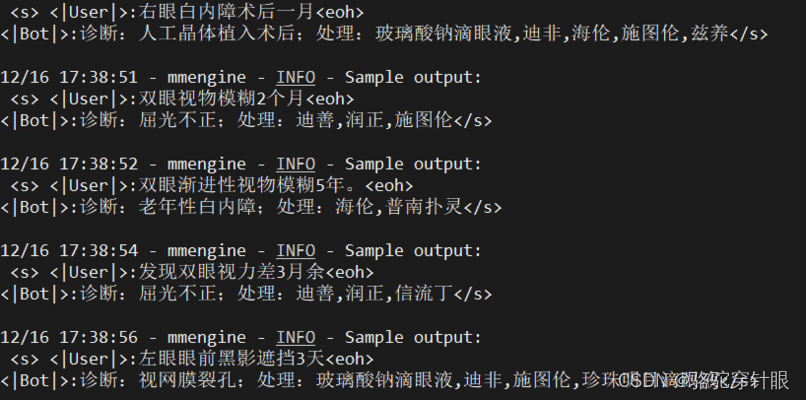
9.自定义数据集微调
Xtuner接受jsonl格式的数据,所以我们在实际微调时,常常将文本数据转化成相应的格式进行微调,这里利用chatgpt工具帮我们写python脚本进行数据格式转换,将原xlsx格式

转换为我们需要的格式 
再进行上述操作
结果展示

10.xtuner补充


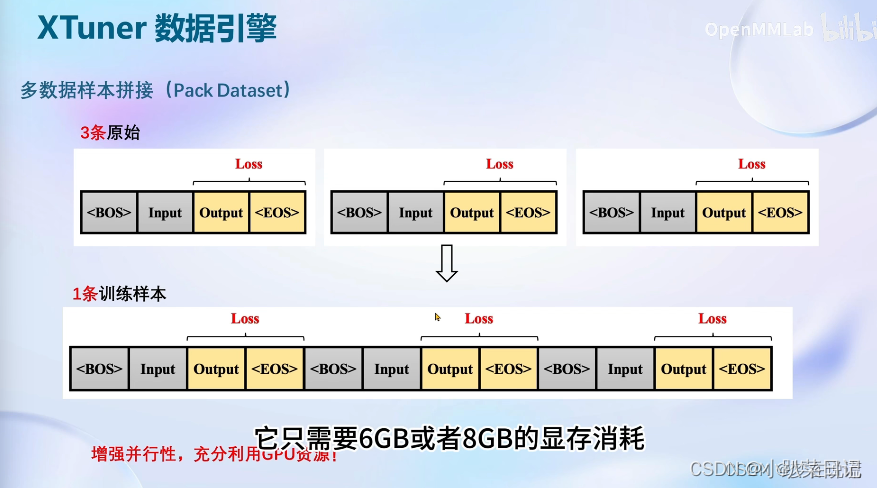


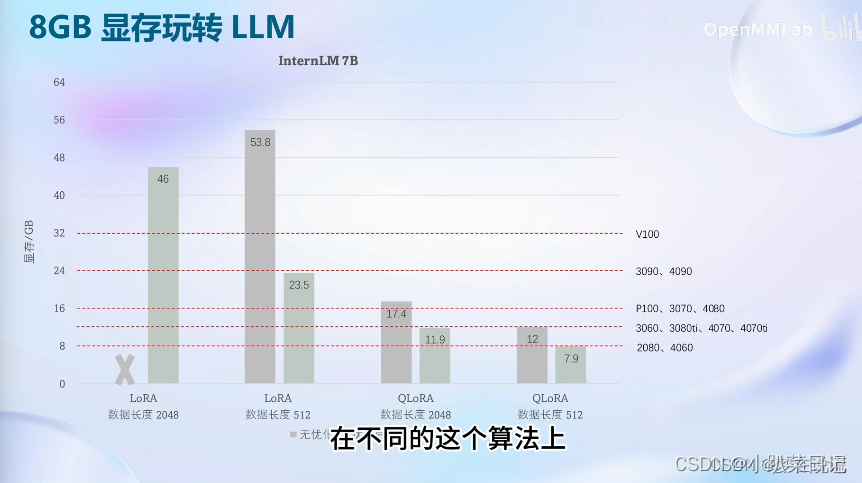
参考:XTuner大模型单卡低成本微调实战-CSDN博客
参考:XTuner 大模型单卡低成本微调之本地实战_本地大模型微调-CSDN博客
「浦语大模型四」Xtuner微调实战-CSDN博客


