相关技术
Spring + Spring Boot + Spring MVC + MyBatis
Html + Css + JS
pom 文件我就不放出来了, 之前用的 jdk8 做的, MySQL 用的 5.7, 都有点老了, 你们自己看着配版本就好
实现功能
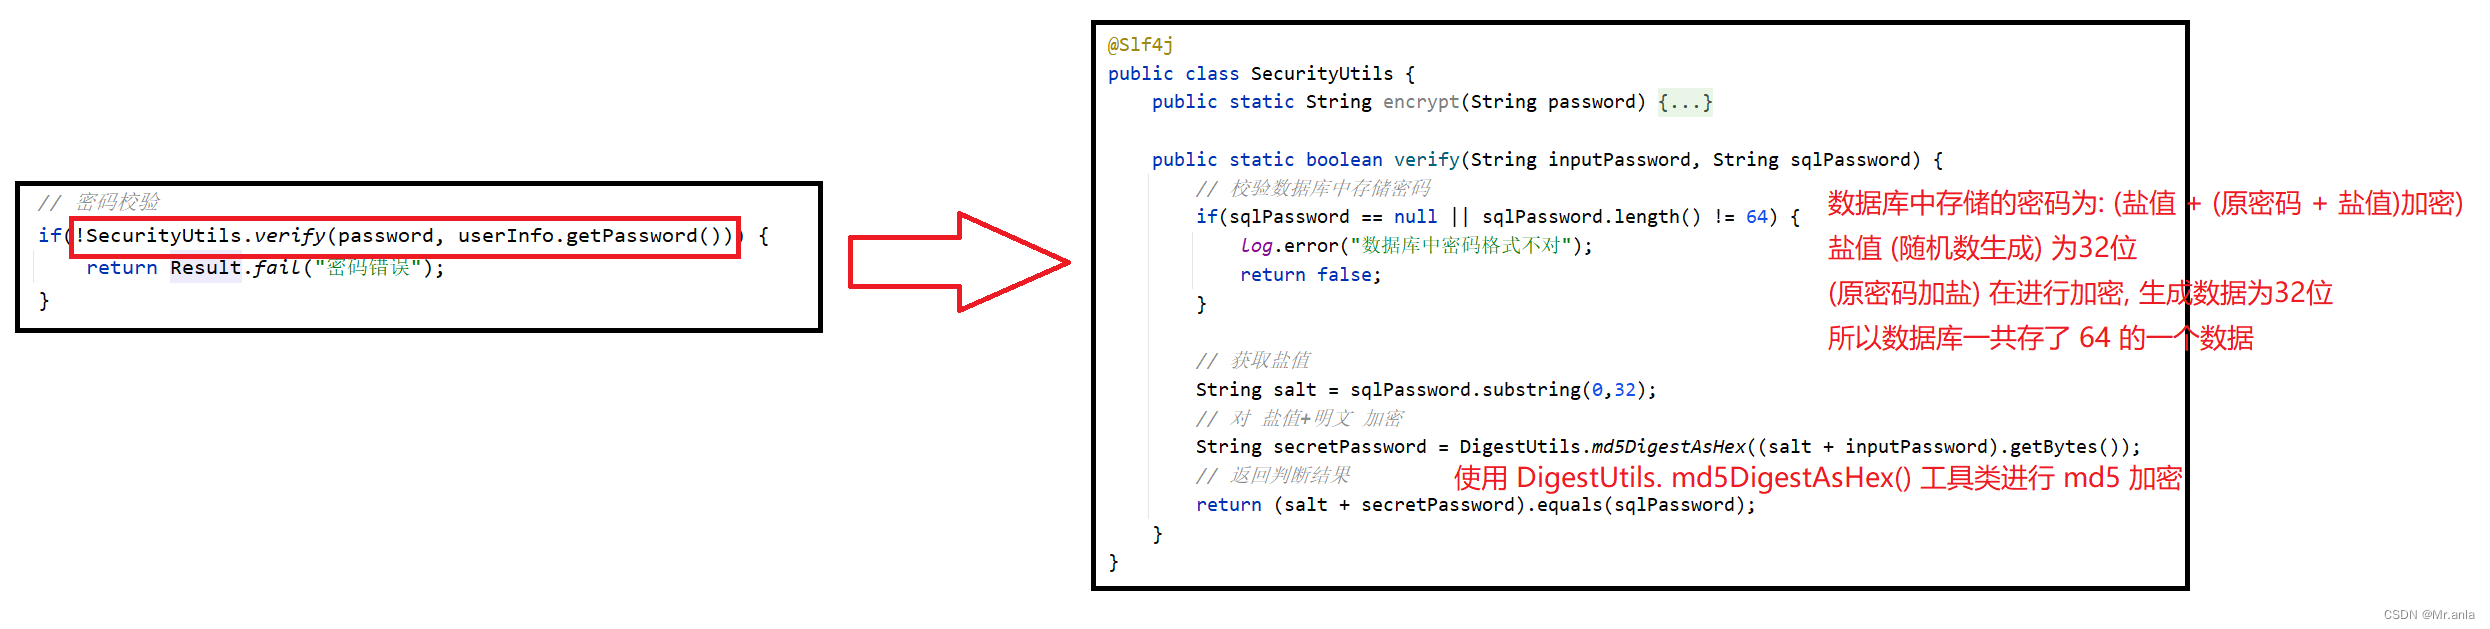
- 用户注册 - 密码加盐加密 (md5 加密)
- 前后端用户信息存储 - 令牌技术
- 用户登录 - (使用 拦截器 做登录校验)
- 博客的增删改查
- 后端数据返回前端, 采用 SpringBoot 做统一功能处理和统一异常处理
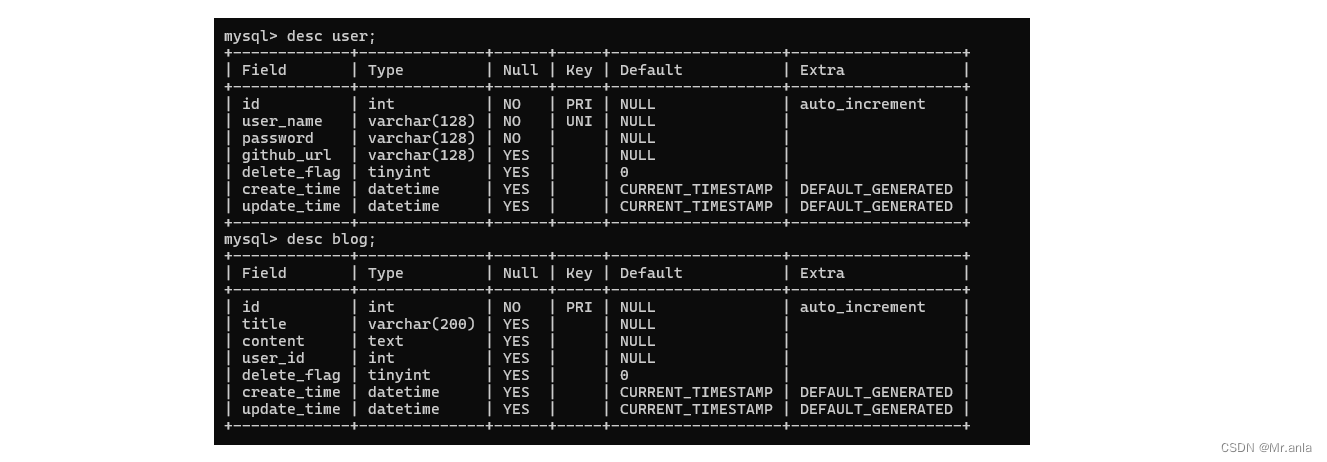
数据库设计
- 用户表
- 博客表
前端页面
博客登录页 (blog_login.html)

<!DOCTYPE html>
<html lang="en"><head><meta charset="UTF-8"><me_ta http-equiv="X-UA-Compatible" content="IE=edge"><meta name="viewport" content="width=device-width, initial-scale=1.0"><title>博客登陆页</title><link rel="stylesheet" href="css/common.css"><link rel="stylesheet" href="css/login.css"></head><body><div class="nav"><img src="pic/logo2.jpg" alt=""><span class="blog-title">我的博客系统</span><div class="space"></div><a class="nav-span" href="blog_list.html">主页</a><a class="nav-span" href="blog_edit.html">写博客</a></div><div class="container-login"><div class="login-dialog"><h3>登陆</h3><div class="row"><span>用户名</span><input type="text" name="username" id="username"></div><div class="row"><span>密码</span><input type="password" name="password" id="password"></div><div class="row"><button id="submit" onclick="login()">提交</button></div></div></div><script src="js/jquery.min.js"></script><script>function login() {// 发送 ajax 请求, 获取 token$.ajax({type: "post",url: "/user/login",data: {"userName": $("#username").val(),"password": $("#password").val()},success: function(result) {if(result.code == 200 && result.data != null) {// 存储 token 到本地localStorage.setItem("user_token", result.data);location.href = "blog_list.html";}else{alert("用户名或密码错误");}}});}</script>
</body></html>
用户登录成功之后, 会将用户信息, 生成令牌, 存储到 request 中, 前后端都能从中获取当前登录用户的信息
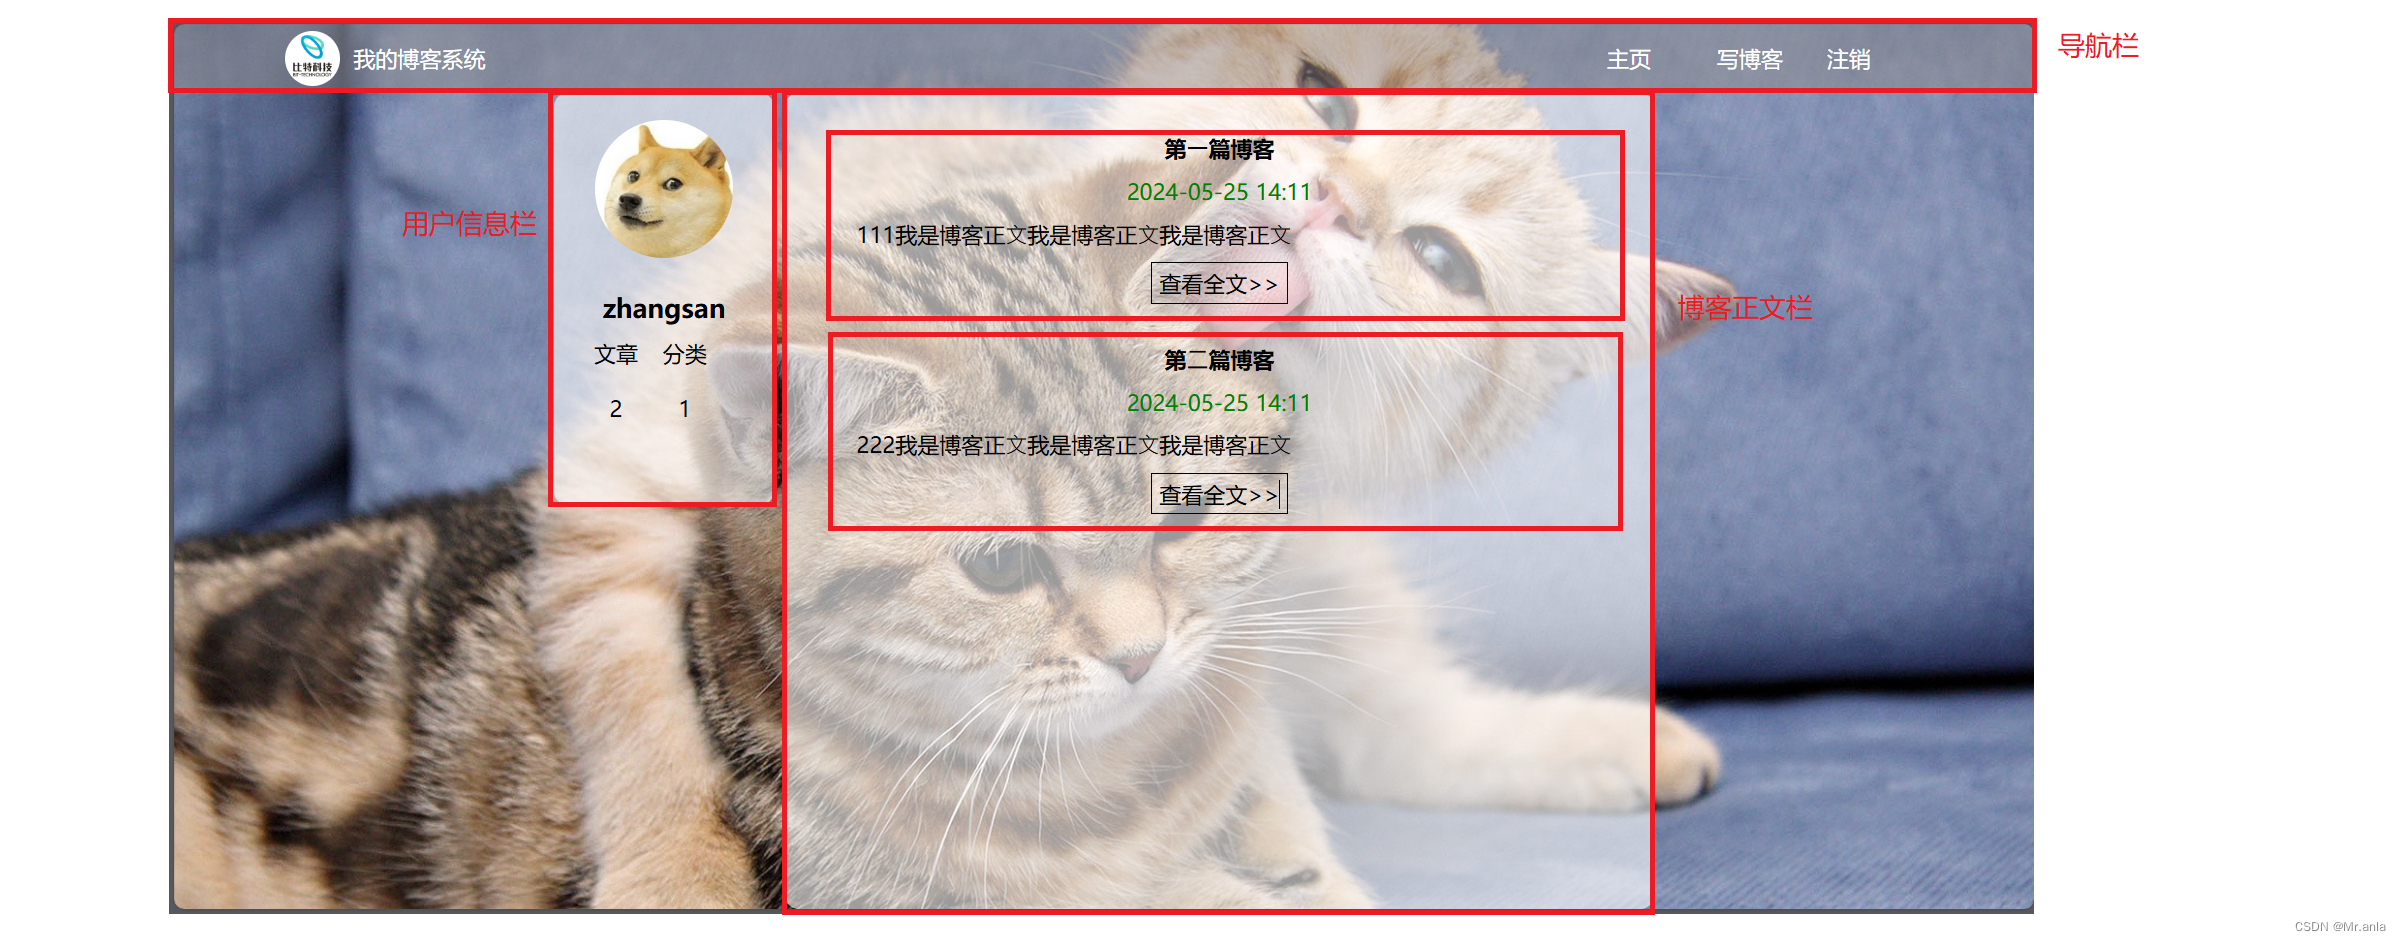
博客列表页 (blog_list.html)
<!DOCTYPE html>
<html lang="en">
<head><meta charset="UTF-8"><meta http-equiv="X-UA-Compatible" content="IE=edge"><meta name="viewport" content="width=device-width, initial-scale=1.0"><title>博客列表页</title><link rel="stylesheet" href="css/common.css"><link rel="stylesheet" href="css/list.css"></head>
<body><div class="nav"><img src="pic/logo2.jpg" alt=""><span class="blog-title">我的博客系统</span><div class="space"></div><a class="nav-span" href="blog_list.html">主页</a><a class="nav-span" href="blog_edit.html">写博客</a><a class="nav-span" href="#" onclick="logout()">注销</a></div><div class="container"><div class="left"><div class="card"><img src="pic/doge.jpg" alt=""><h3></h3><a href="#"></a><div class="row"><span>文章</span><span>分类</span></div><div class="row"><span>2</span><span>1</span></div></div></div><div class="right"></div></div><script src="js/jquery.min.js"></script><script src="js/common.js"></script><script>//显示用户信息var userUrl = "/user/getUserInfo";getUserInfo(userUrl);// 获取所有的博客信息$.ajax({type: "get",url: "/blog/getList",success: function(result) {console.log("result:" + result);if(result.code == 200 && result.data != null) {var finalHtml = "";for(var blog of result.data) {finalHtml += '<div class="blog">';finalHtml += '<div class="title">'+blog.title+'</div>';finalHtml += '<div class="date">'+blog.createTime+'</div>';finalHtml += '<div class="desc">'+blog.content+'</div>';finalHtml += '<a class="detail" href="blog_detail.html?blogId='+blog.id+'">查看全文>></a>';finalHtml += '</div>';}$(".right").html(finalHtml);}},error: function(error) {console.log("error:" + error);location.href = "blog_login.html";if(error != null && error.state == 401) {location.href = "blog_login.html";}}});</script>
</body>
</html>
当前页面会自动调用一个 ajax 请求, 用以获取数据库中 所有未删除博客 的信息进行展示 (博客正文会裁取前100字进行显示)
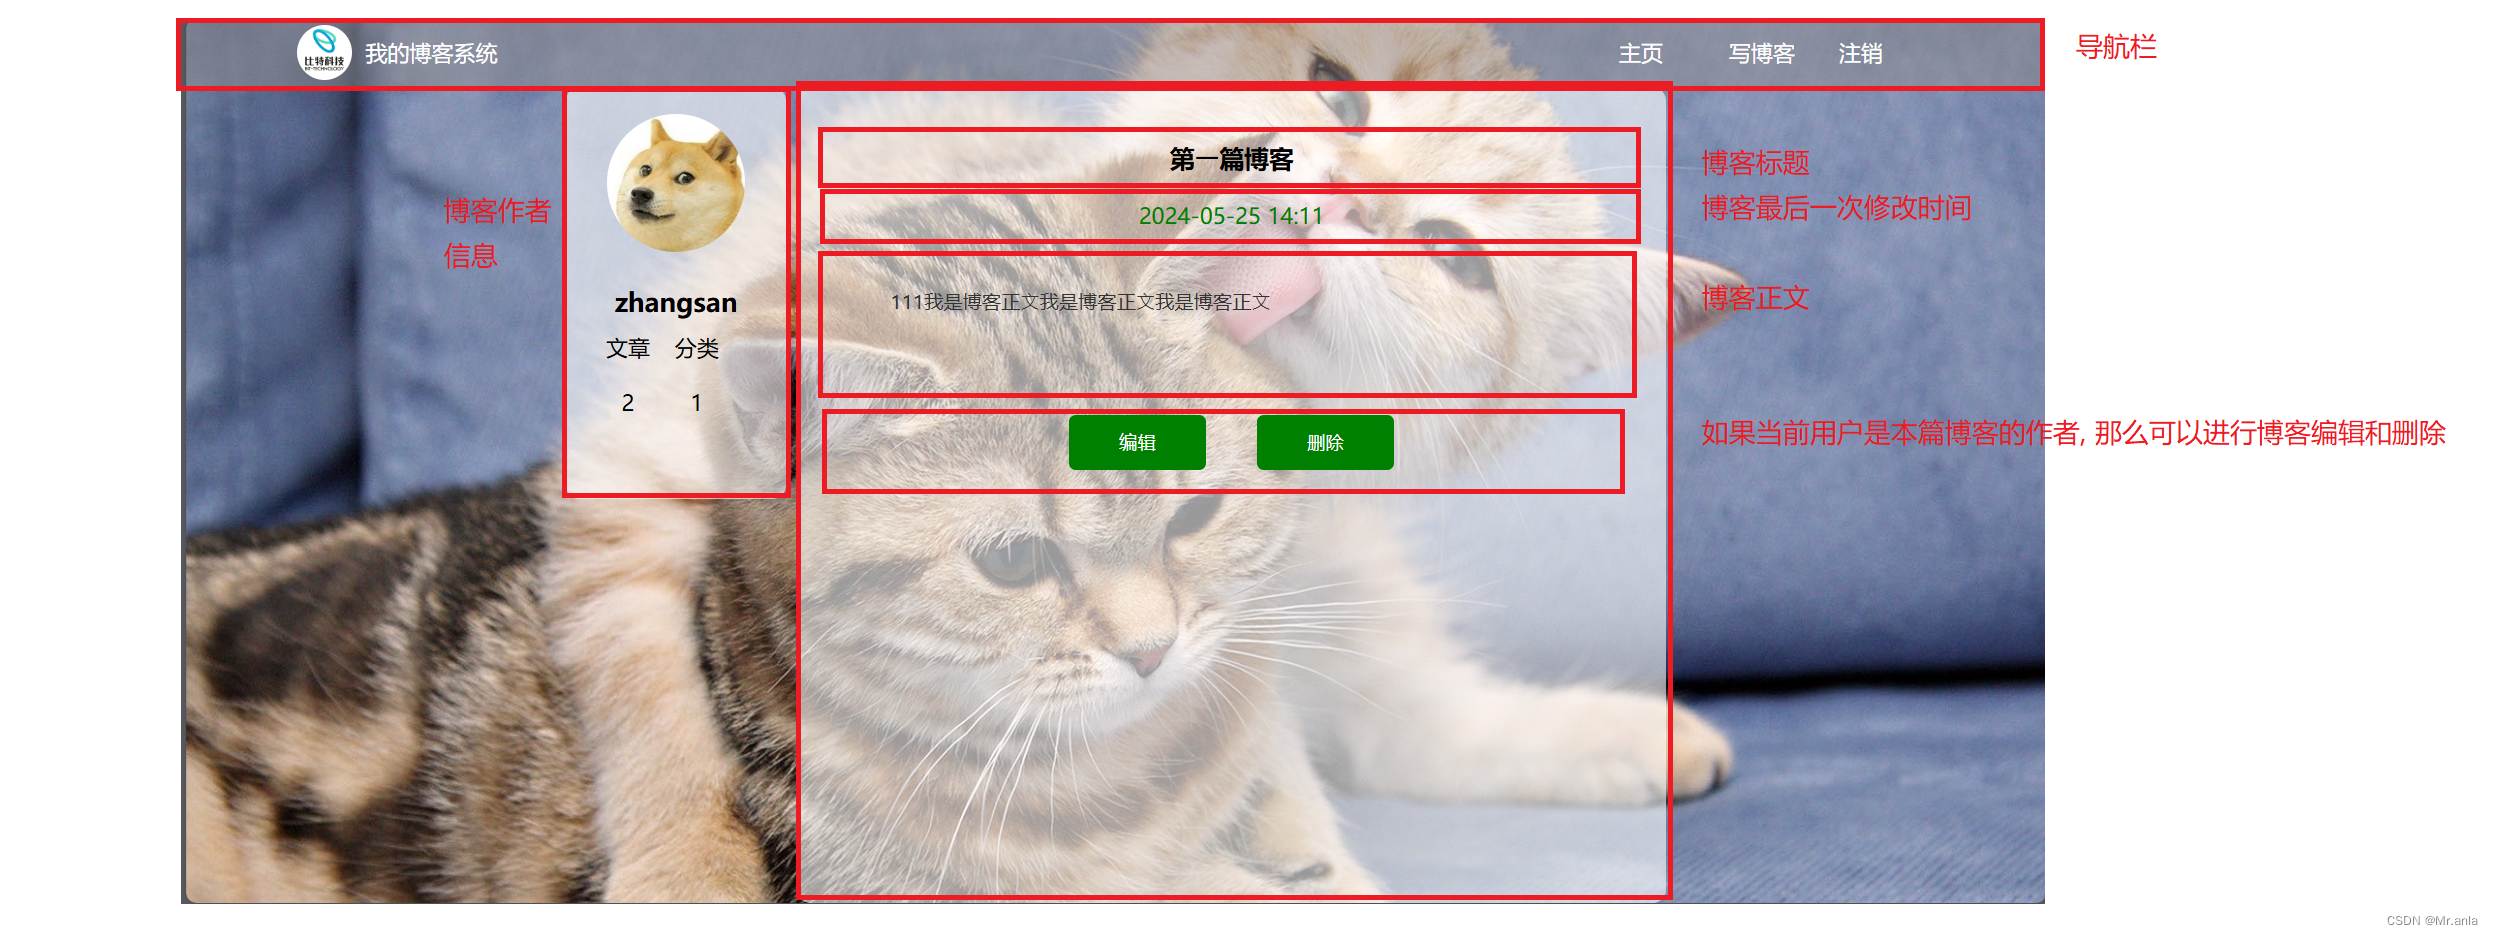
博客详情页 (blog_detail.html)
<!DOCTYPE html>
<html lang="en"><head><meta charset="UTF-8"><meta http-equiv="X-UA-Compatible" content="IE=edge"><meta name="viewport" content="width=device-width, initial-scale=1.0"><title>博客详情页</title><link rel="stylesheet" href="css/common.css"><link rel="stylesheet" href="css/detail.css"></head><body><div class="nav"><img src="pic/logo2.jpg" alt=""><span class="blog-title">我的博客系统</span><div class="space"></div><a class="nav-span" href="blog_list.html">主页</a><a class="nav-span" href="blog_edit.html">写博客</a><a class="nav-span" href="#" onclick="logout()">注销</a></div><div class="container"><div class="left"><div class="card"><img src="pic/doge.jpg" alt=""><h3></h3><a href="#"></a><div class="row"><span>文章</span><span>分类</span></div><div class="row"><span>2</span><span>1</span></div></div></div><div class="right"><div class="content"><div class="title"></div><div class="date"></div><div class="detail" id="detail" style="background-color: transparent;"></div><!-- <div class="operating"><button onclick="window.location.href='blog_update.html'">编辑</button><button onclick="deleteBlog()">删除</button></div> --></div></div></div><!-- 引入 editor.md 的依赖 --><link rel="stylesheet" href="blog-editormd/css/editormd.css" /><script src="js/jquery.min.js"></script><script src="blog-editormd/lib/marked.min.js"></script><script src="blog-editormd/lib/prettify.min.js"></script><script src="blog-editormd/editormd.js"></script><script src="js/common.js"></script><script>// 获取博客详情$.ajax({type: "get",url: "/blog/getBlogDetail"+location.search,success: function(result) {console.log(result);if(result.code == 200 && result.data != null) {console.log("abc" + result);var blog = result.data;$(".right .content .title").text(blog.title);$(".right .content .date").text(blog.createTime);// $(".right .content .detail").text(blog.content);editormd.markdownToHTML("detail", {markdown: blog.content,});// 是否显示 编辑/删除 按钮if(blog.isLoginUser == true) {var html = "";html += '<div class="operating">';html += '<button onclick="window.location.href=\'blog_update.html'+location.search+'\'">编辑</button>';html += '<button onclick="deleteBlog()">删除</button>';html += '</div>';$(".content").append(html);}}},error: function(error) {if(error != null && error.status == 401) {location.href = "blog_list.html";}}});//显示博客作者信息var userUrl = "/user/getAuthorInfo" + location.search;getUserInfo(userUrl);function deleteBlog() {$.ajax({type: "post",url: "/blog/delete" + location.search,success: function(result) {if(result.code == 200 && result.data != null && result.data == true) {location.href = "blog_list.html";}}});}</script>
</body></html>
对于每篇博客, 会显示博客信息 (标题, 最后一次的修改时间, 博客正文), 和博客作者的信息 (用户名) (TODO: 作者头像, 作者的总文章数量, 博客的分类所属)
页面会自动校验登录用户是否为当前博客的作者, 如果是, 那么可以对当前博客进行编辑和删除, 如果不是, 这两个按钮不会显示
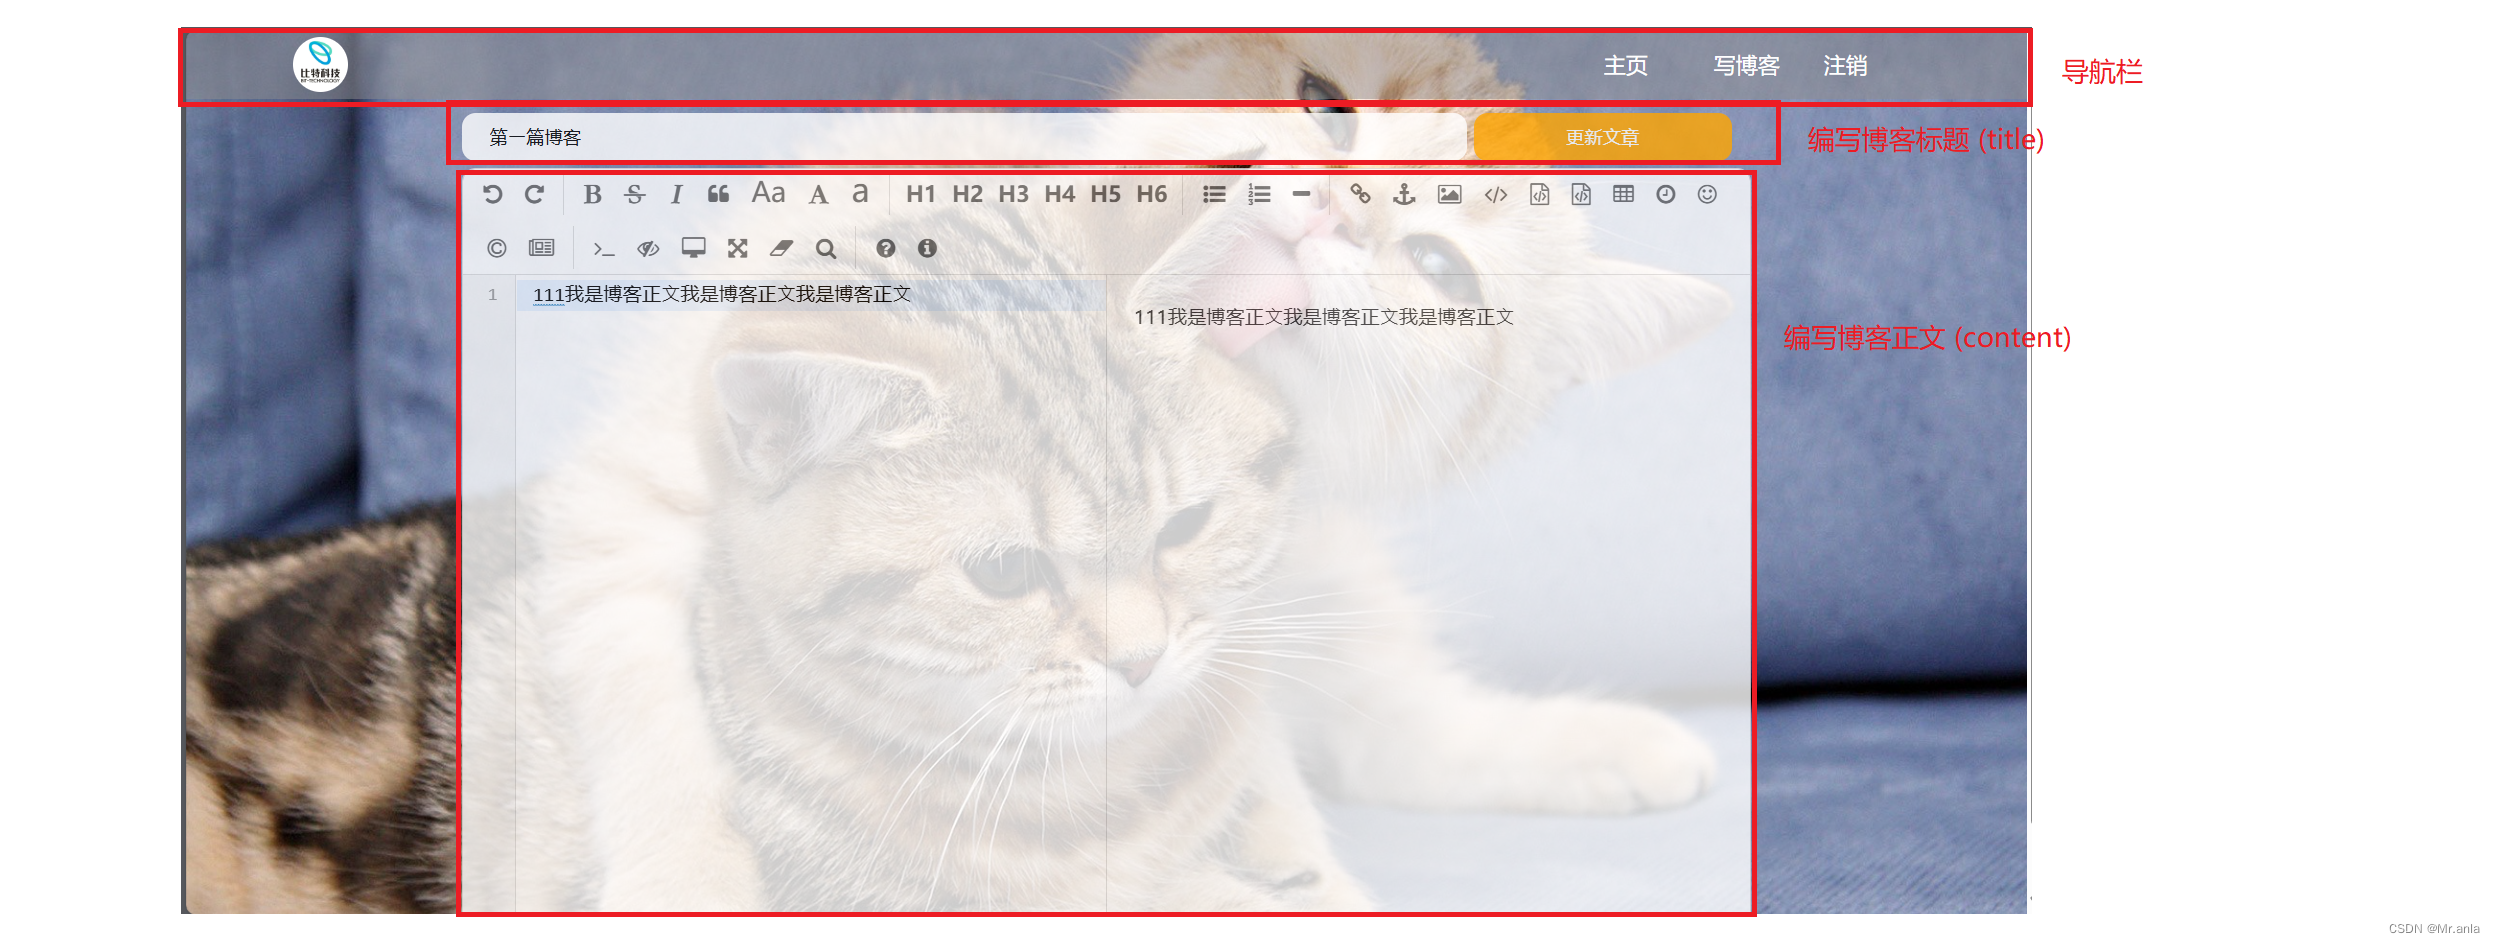
博客编辑页 (blog_edit.html)
<!DOCTYPE html>
<html lang="en"><head><meta charset="UTF-8"><meta http-equiv="X-UA-Compatible" content="IE=edge"><meta name="viewport" content="width=device-width, initial-scale=1.0"><title>博客编辑页</title><link rel="stylesheet" href="css/common.css"><link rel="stylesheet" href="css/edit.css"><link rel="stylesheet" href="blog-editormd/css/editormd.css" /></head><body><div class="nav"><img src="pic/logo2.jpg" alt=""><span class="blog-title">我的博客系统</span><div class="space"></div><a class="nav-span" href="blog_list.html">主页</a><a class="nav-span" href="blog_edit.html">写博客</a><a class="nav-span" href="#" onclick="logout()">注销</a></div><div class="content-edit"><div class="push"><input type="text" name="" id="title"><input type="button" value="发布文章" id="submit" onclick="submit()"></div><!-- markdown 插件 html代码 --><div id="editor"><textarea style="display:none;" id="content" name="content">##在这里写下一篇博客</textarea></div></div><script src="js/jquery.min.js"></script><script src="blog-editormd/editormd.min.js"></script><script src="js/common.js"></script><script type="text/javascript">$(function () {var editor = editormd("editor", {width: "100%",height: "550px",path: "blog-editormd/lib/"});});function submit() {$.ajax({type: "post",url: "/blog/add",data: {title: $("#title").val(),content: $("#content").val()},success: function(result) {if(result.code == 200 && result.data != null && result.data == true) {location.href = "blog_list.html";}else {alert("博客发布失败!");}}});}</script>
</body></html>
博客编辑页使用了 gittee 上的一个开源 markdown 组件
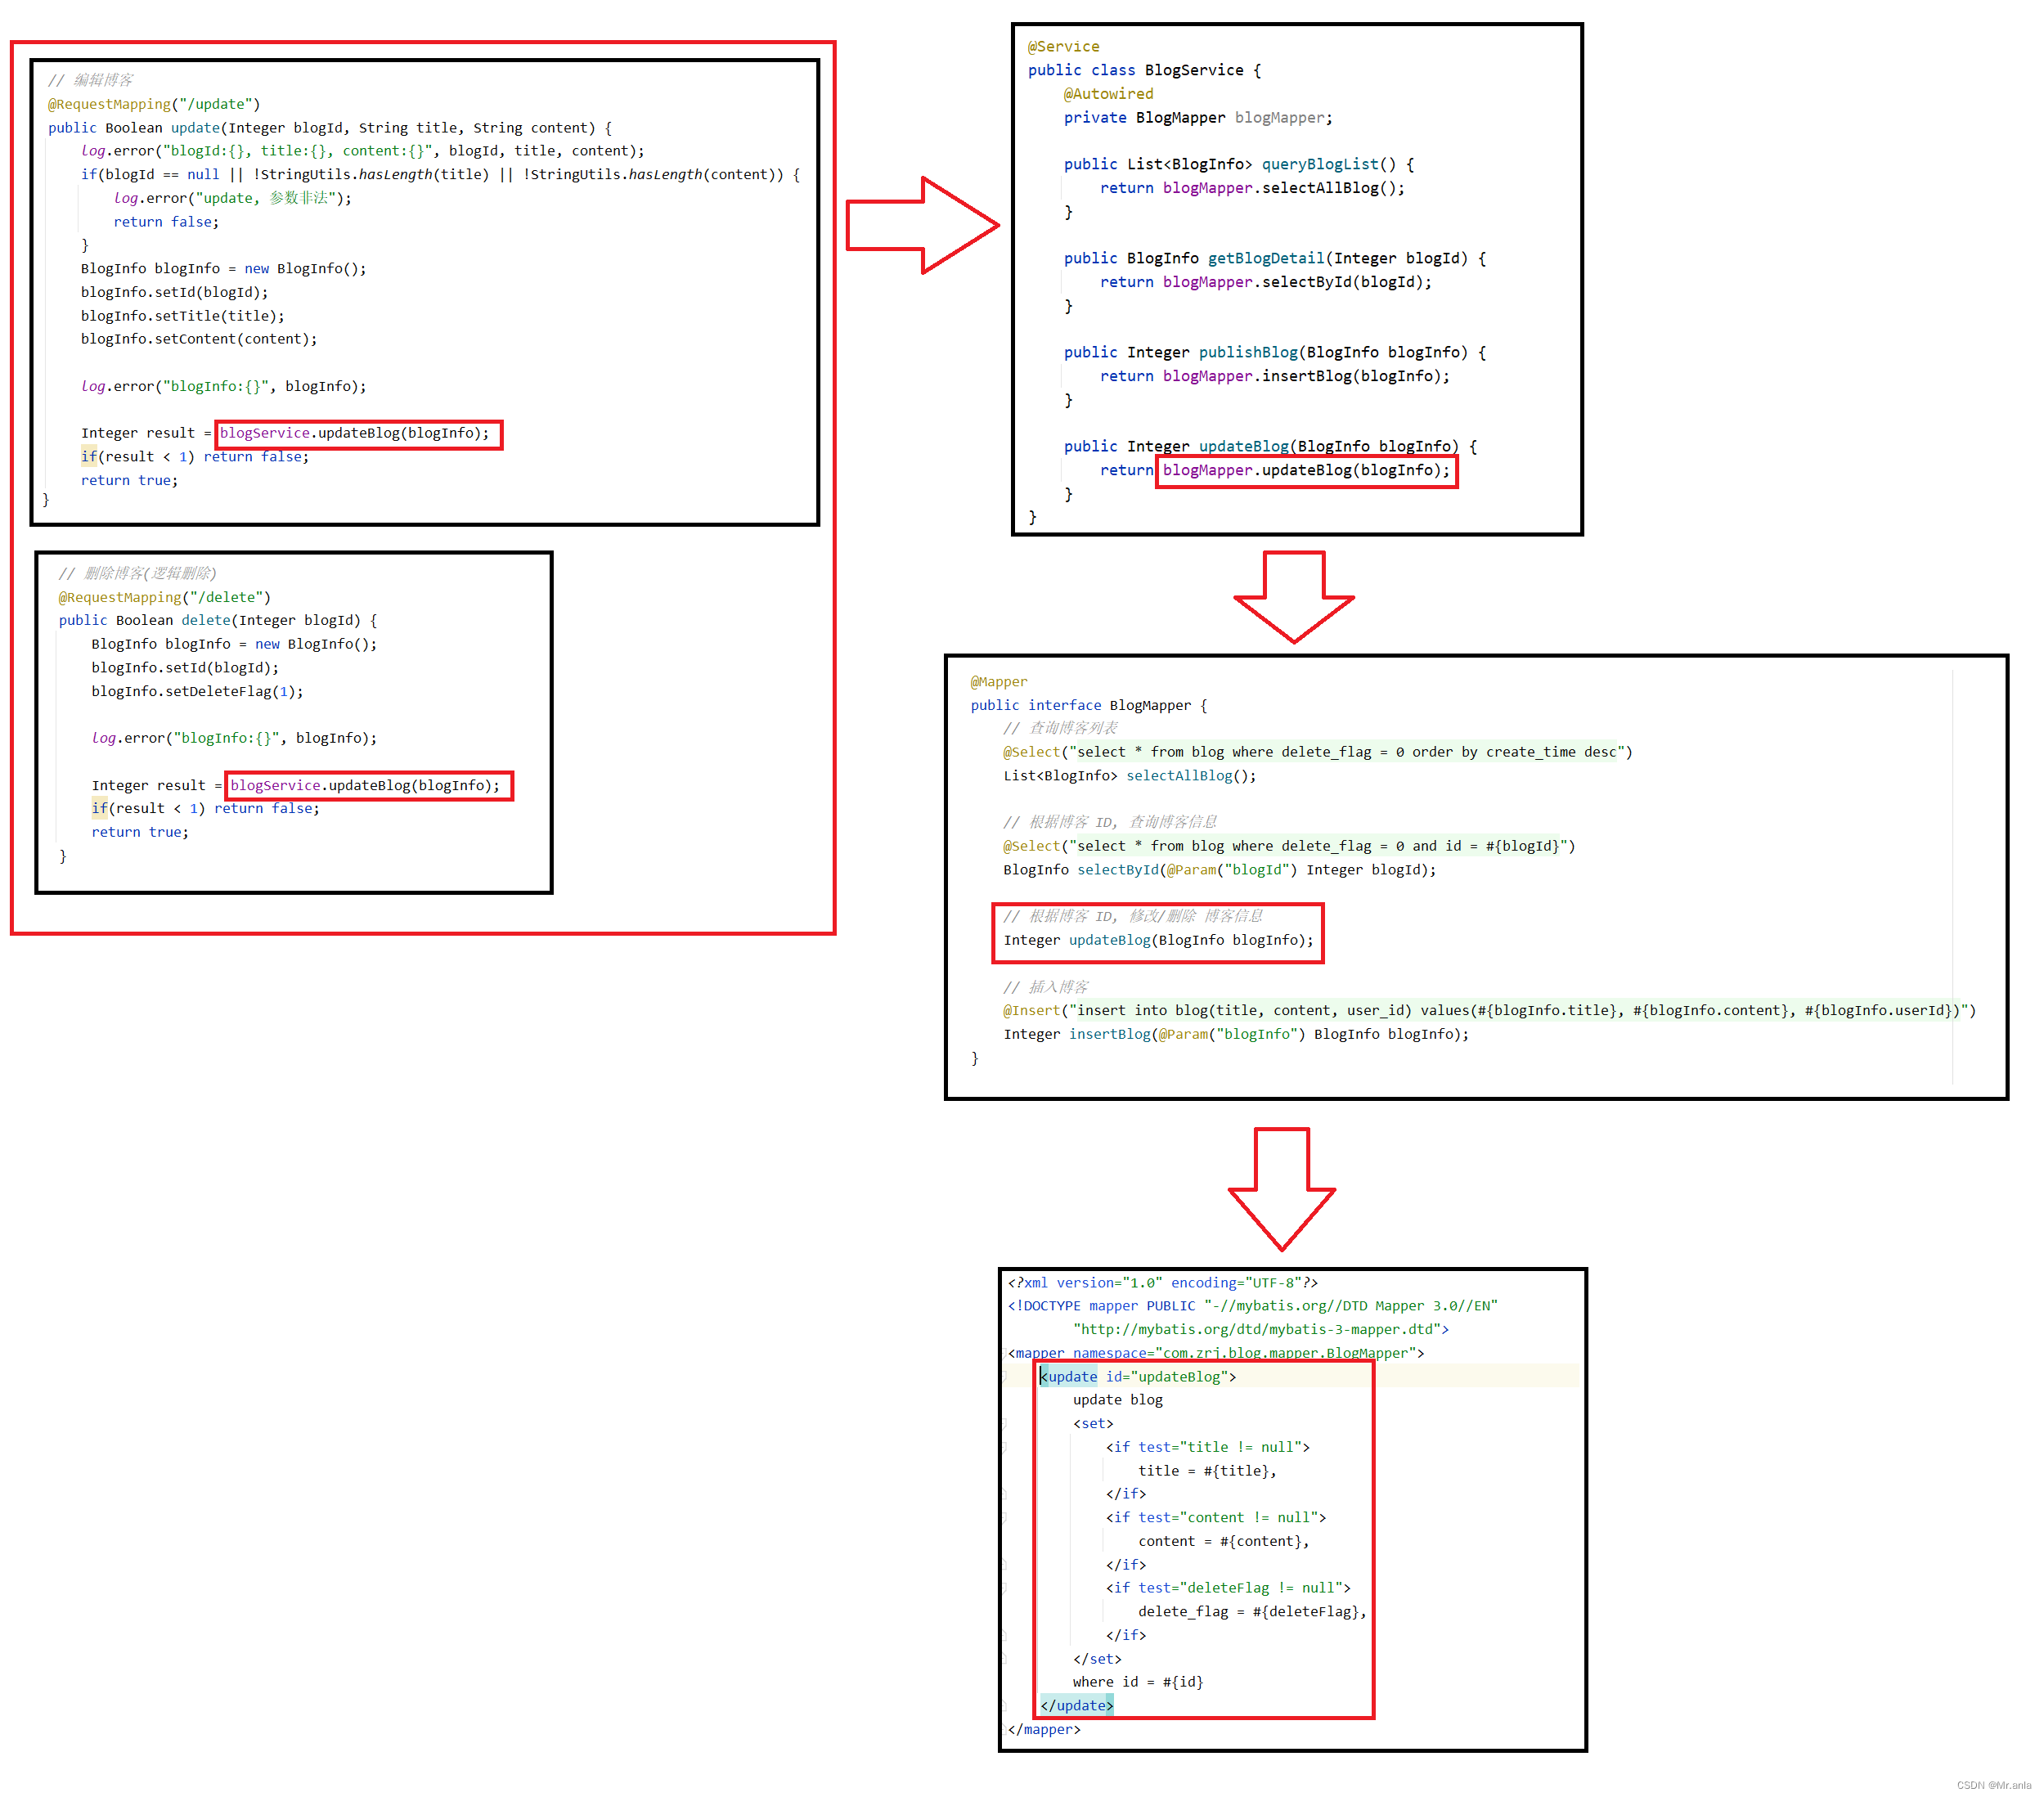
对于未有博客的 “写博客” , 调用的是 “插入操作”
对于已有博客的 “编辑博客” , 调用的是 “更新操作”
“删除博客” 操作是逻辑删除, 即修改数据库的某一字段, 所以调用的也是 “更新操作”
前端页面共同的 js (common.js)
$(document).ajaxSend(function(e, xhr, opt) {// 获取本地存储中的 tokenvar user_token = localStorage.getItem("user_token");// 将 token 设置到每个 ajax 请求的 header 中xhr.setRequestHeader("user_token_header", user_token);
});// 获取用户信息
function getUserInfo(url) {$.ajax({type: "post",url: url,success: function(result) {if(result.code == 200 && result.data != null) {$(".left .card h3").text(result.data.userName);$(".left .card a").attr("href", result.data.githubUrl);}}});
}// 用户退出
function logout() {localStorage.removeItem("user_token");location.href = "blog_login.html";
}
主要就是获取当前登录用户的信息, 以及退出登录的逻辑
后端代码
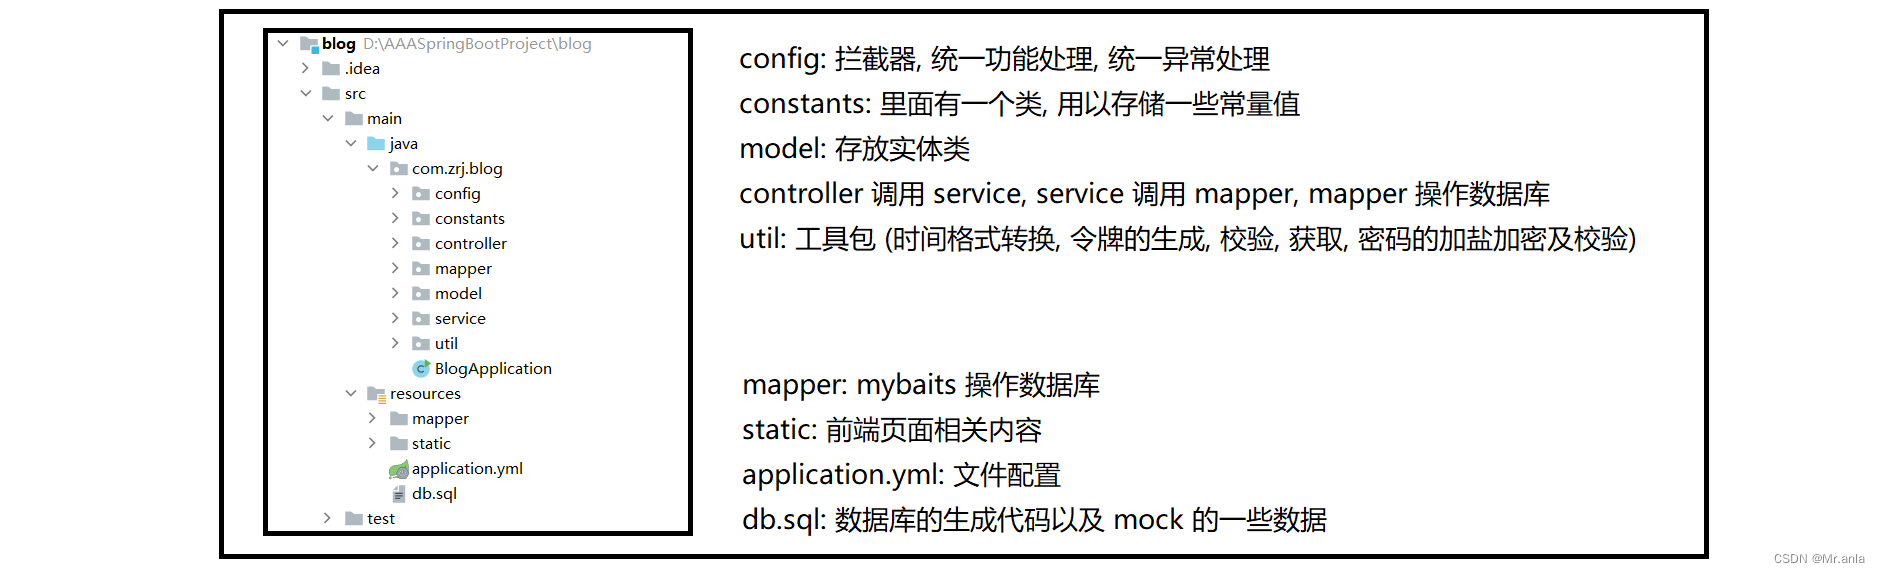
项目的基本框架
实体类
BlogInfo
@Data
public class BlogInfo {private Integer id;private String title;private String content;private Integer userId;private Integer deleteFlag;private Date createTime;private Date updateTime;private Boolean isLoginUser = false;// 返回 String 类型的数据 (BlogInfo 里面存储的是 Date 类型数据)public String getCreateTime() {return DateUtils.formateDate(createTime);}public String getUpdateTime() {return DateUtils.formateDate(updateTime);}
}
对应数据的 blog 表
UserInfo
@Data
public class UserInfo {private Integer id;private String userName;private String password;private String githubUrl;private Integer deleteFlag;private Date createTime;private Date updateTime;
}
对应数据的 user 表
Result
@Data
public class Result {private int code;  //200成功  -1失败  -2未登录private String errMsg;private Object data;public static Result success(Object data) {Result result = new Result();result.setCode(Constant.SUCCESS_CODE);result.setErrMsg("");result.setData(data);return result;}public static Result fail(String errMsg) {Result result = new Result();result.setCode(Constant.FAIL_CODE);result.setErrMsg(errMsg);result.setData(null);return result;}public static Result fail(String errMsg, Object data) {Result result = new Result();result.setCode(Constant.FAIL_CODE);result.setErrMsg(errMsg);result.setData(data);return result;}public static Result unlogin() {Result result = new Result();result.setCode(Constant.FAIL_CODE);result.setErrMsg("用户未登录");result.setData(null);return result;}public static Result unlogin(String errMsg) {Result result = new Result();result.setCode(Constant.UNLOGIN_CODE);result.setErrMsg("用户未登录");result.setData(null);return result;}
}
用于统一数据格式返回 (不知道可以看一下我的另一篇博客 Spring Boot统一功能处理(拦截器, 统一数据返回格式, 统一异常处理) )
Constant 类 (常量值存储)
public class Constant {public final static Integer SUCCESS_CODE = 200;public final static Integer FAIL_CODE = -1;public final static Integer UNLOGIN_CODE = -2;public final static String USER_TOKEN_HEADER = "user_token_header";public final static String USER_CLAIM_ID = "id";public final static String USER_CLAIM_NAME = "name";
}
Mapper 类
通过 MyBatis 操作数据库
BlogMapper
@Mapper
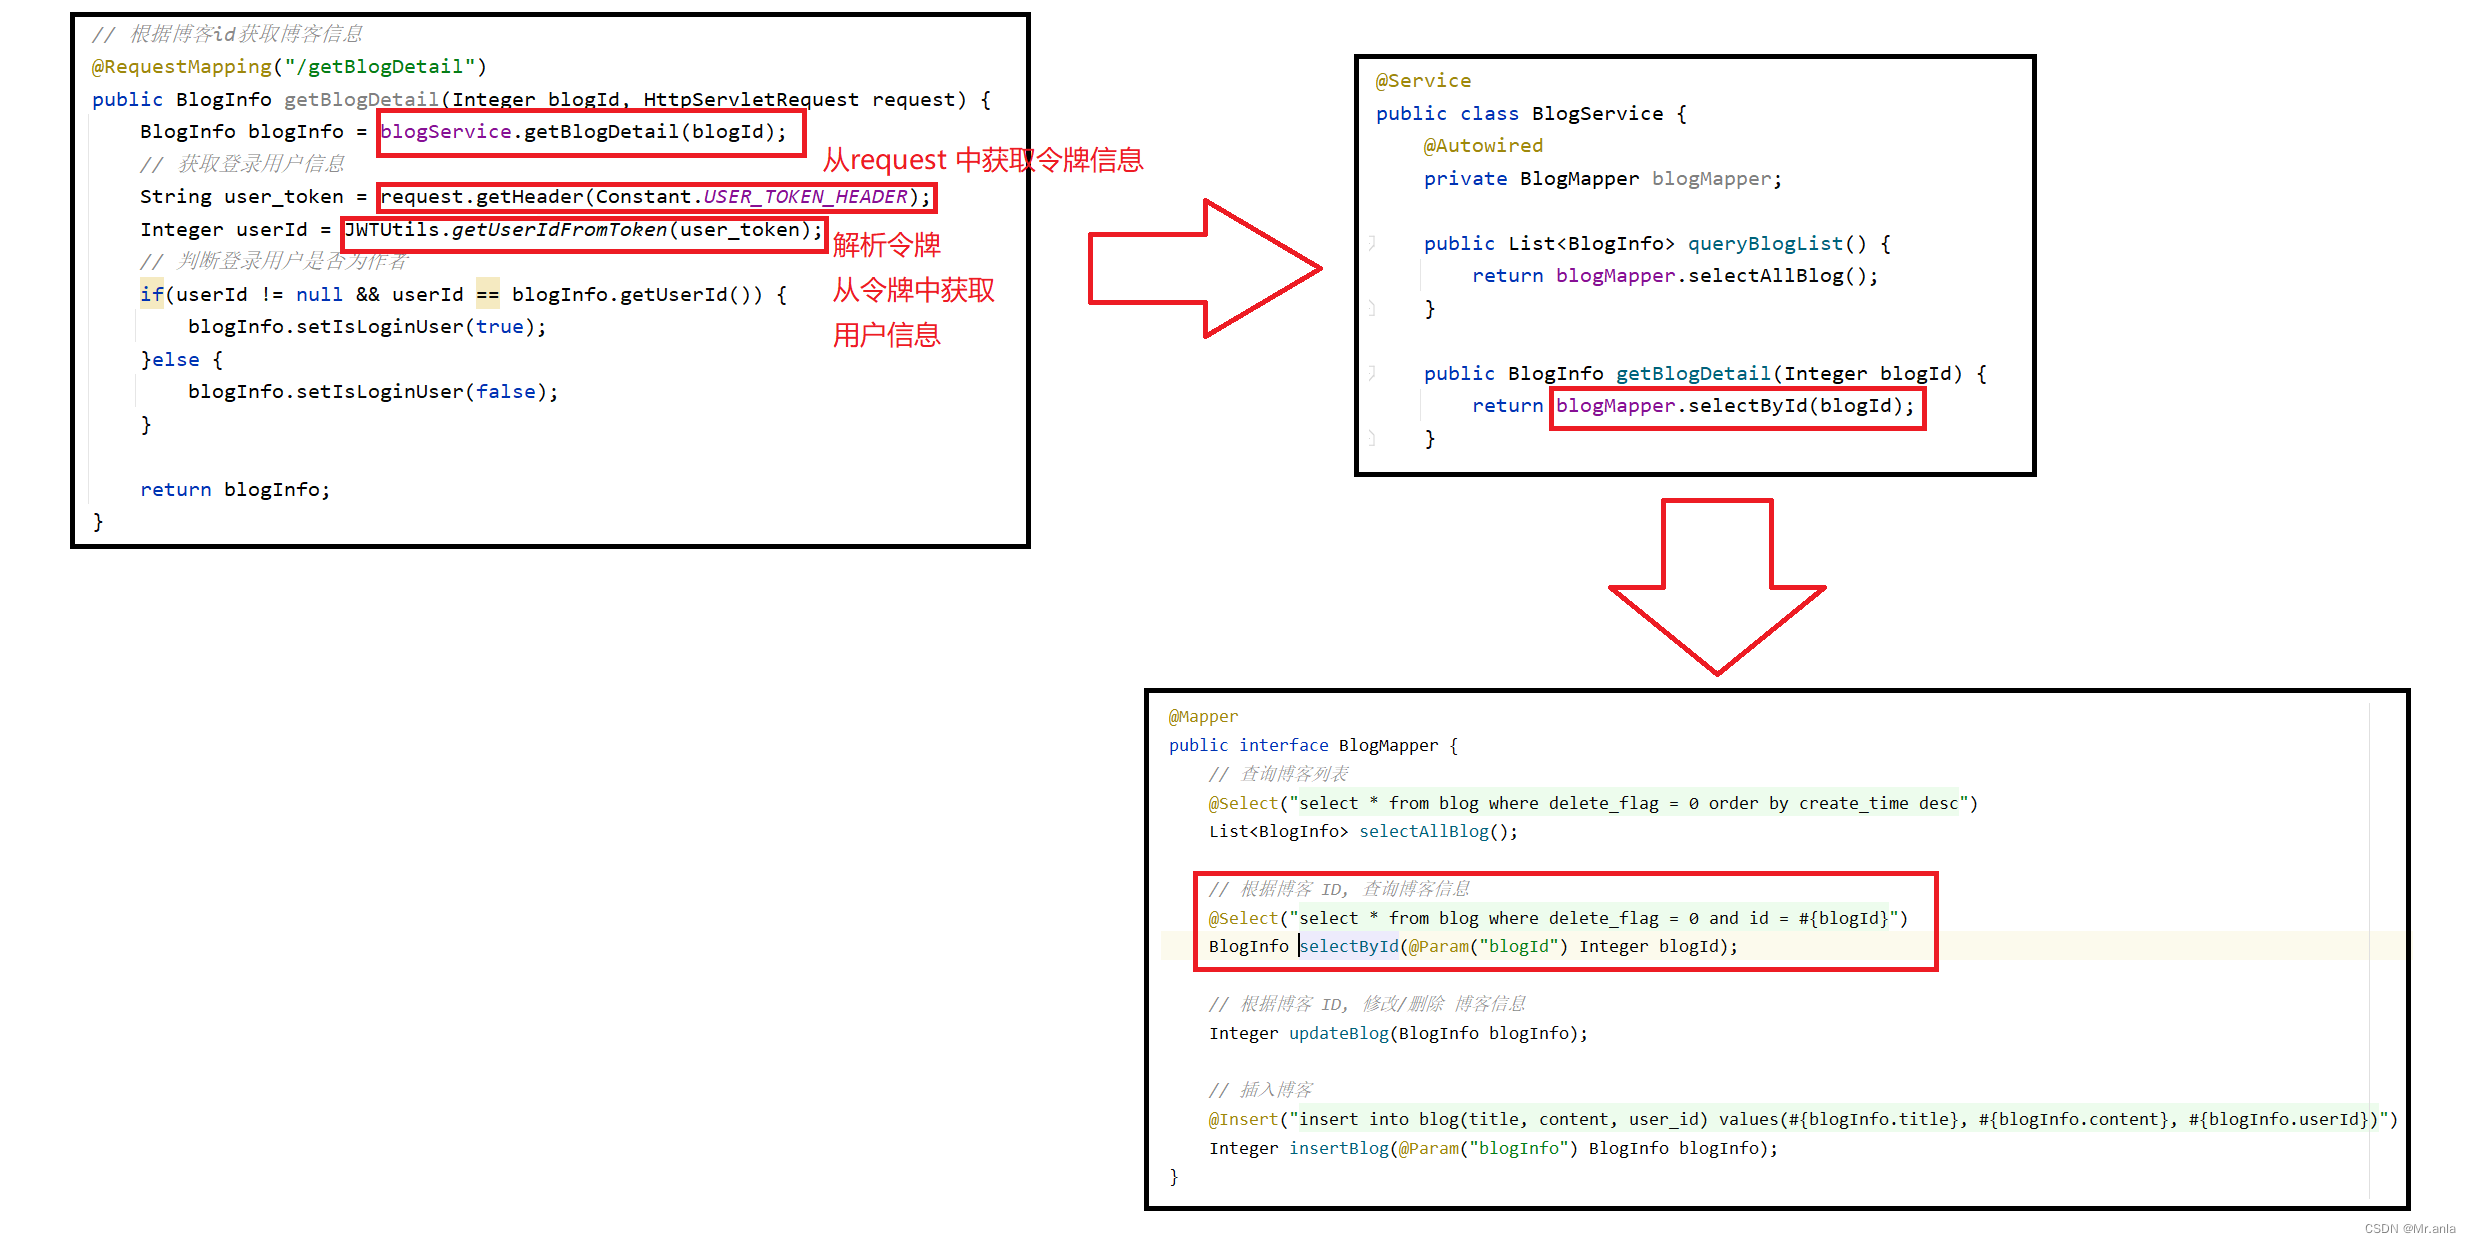
public interface BlogMapper {// 查询博客列表@Select("select * from blog where delete_flag = 0 order by create_time desc")List<BlogInfo> selectAllBlog();// 根据博客 ID, 查询博客信息@Select("select * from blog where delete_flag = 0 and id = #{blogId}")BlogInfo selectById(@Param("blogId") Integer blogId);// 根据博客 ID, 修改/删除 博客信息Integer updateBlog(BlogInfo blogInfo);// 插入博客@Insert("insert into blog(title, content, user_id) values(#{blogInfo.title}, #{blogInfo.content}, #{blogInfo.userId})")Integer insertBlog(@Param("blogInfo") BlogInfo blogInfo);
}
数据库操作 blog 表
UserMapper
@Mapper
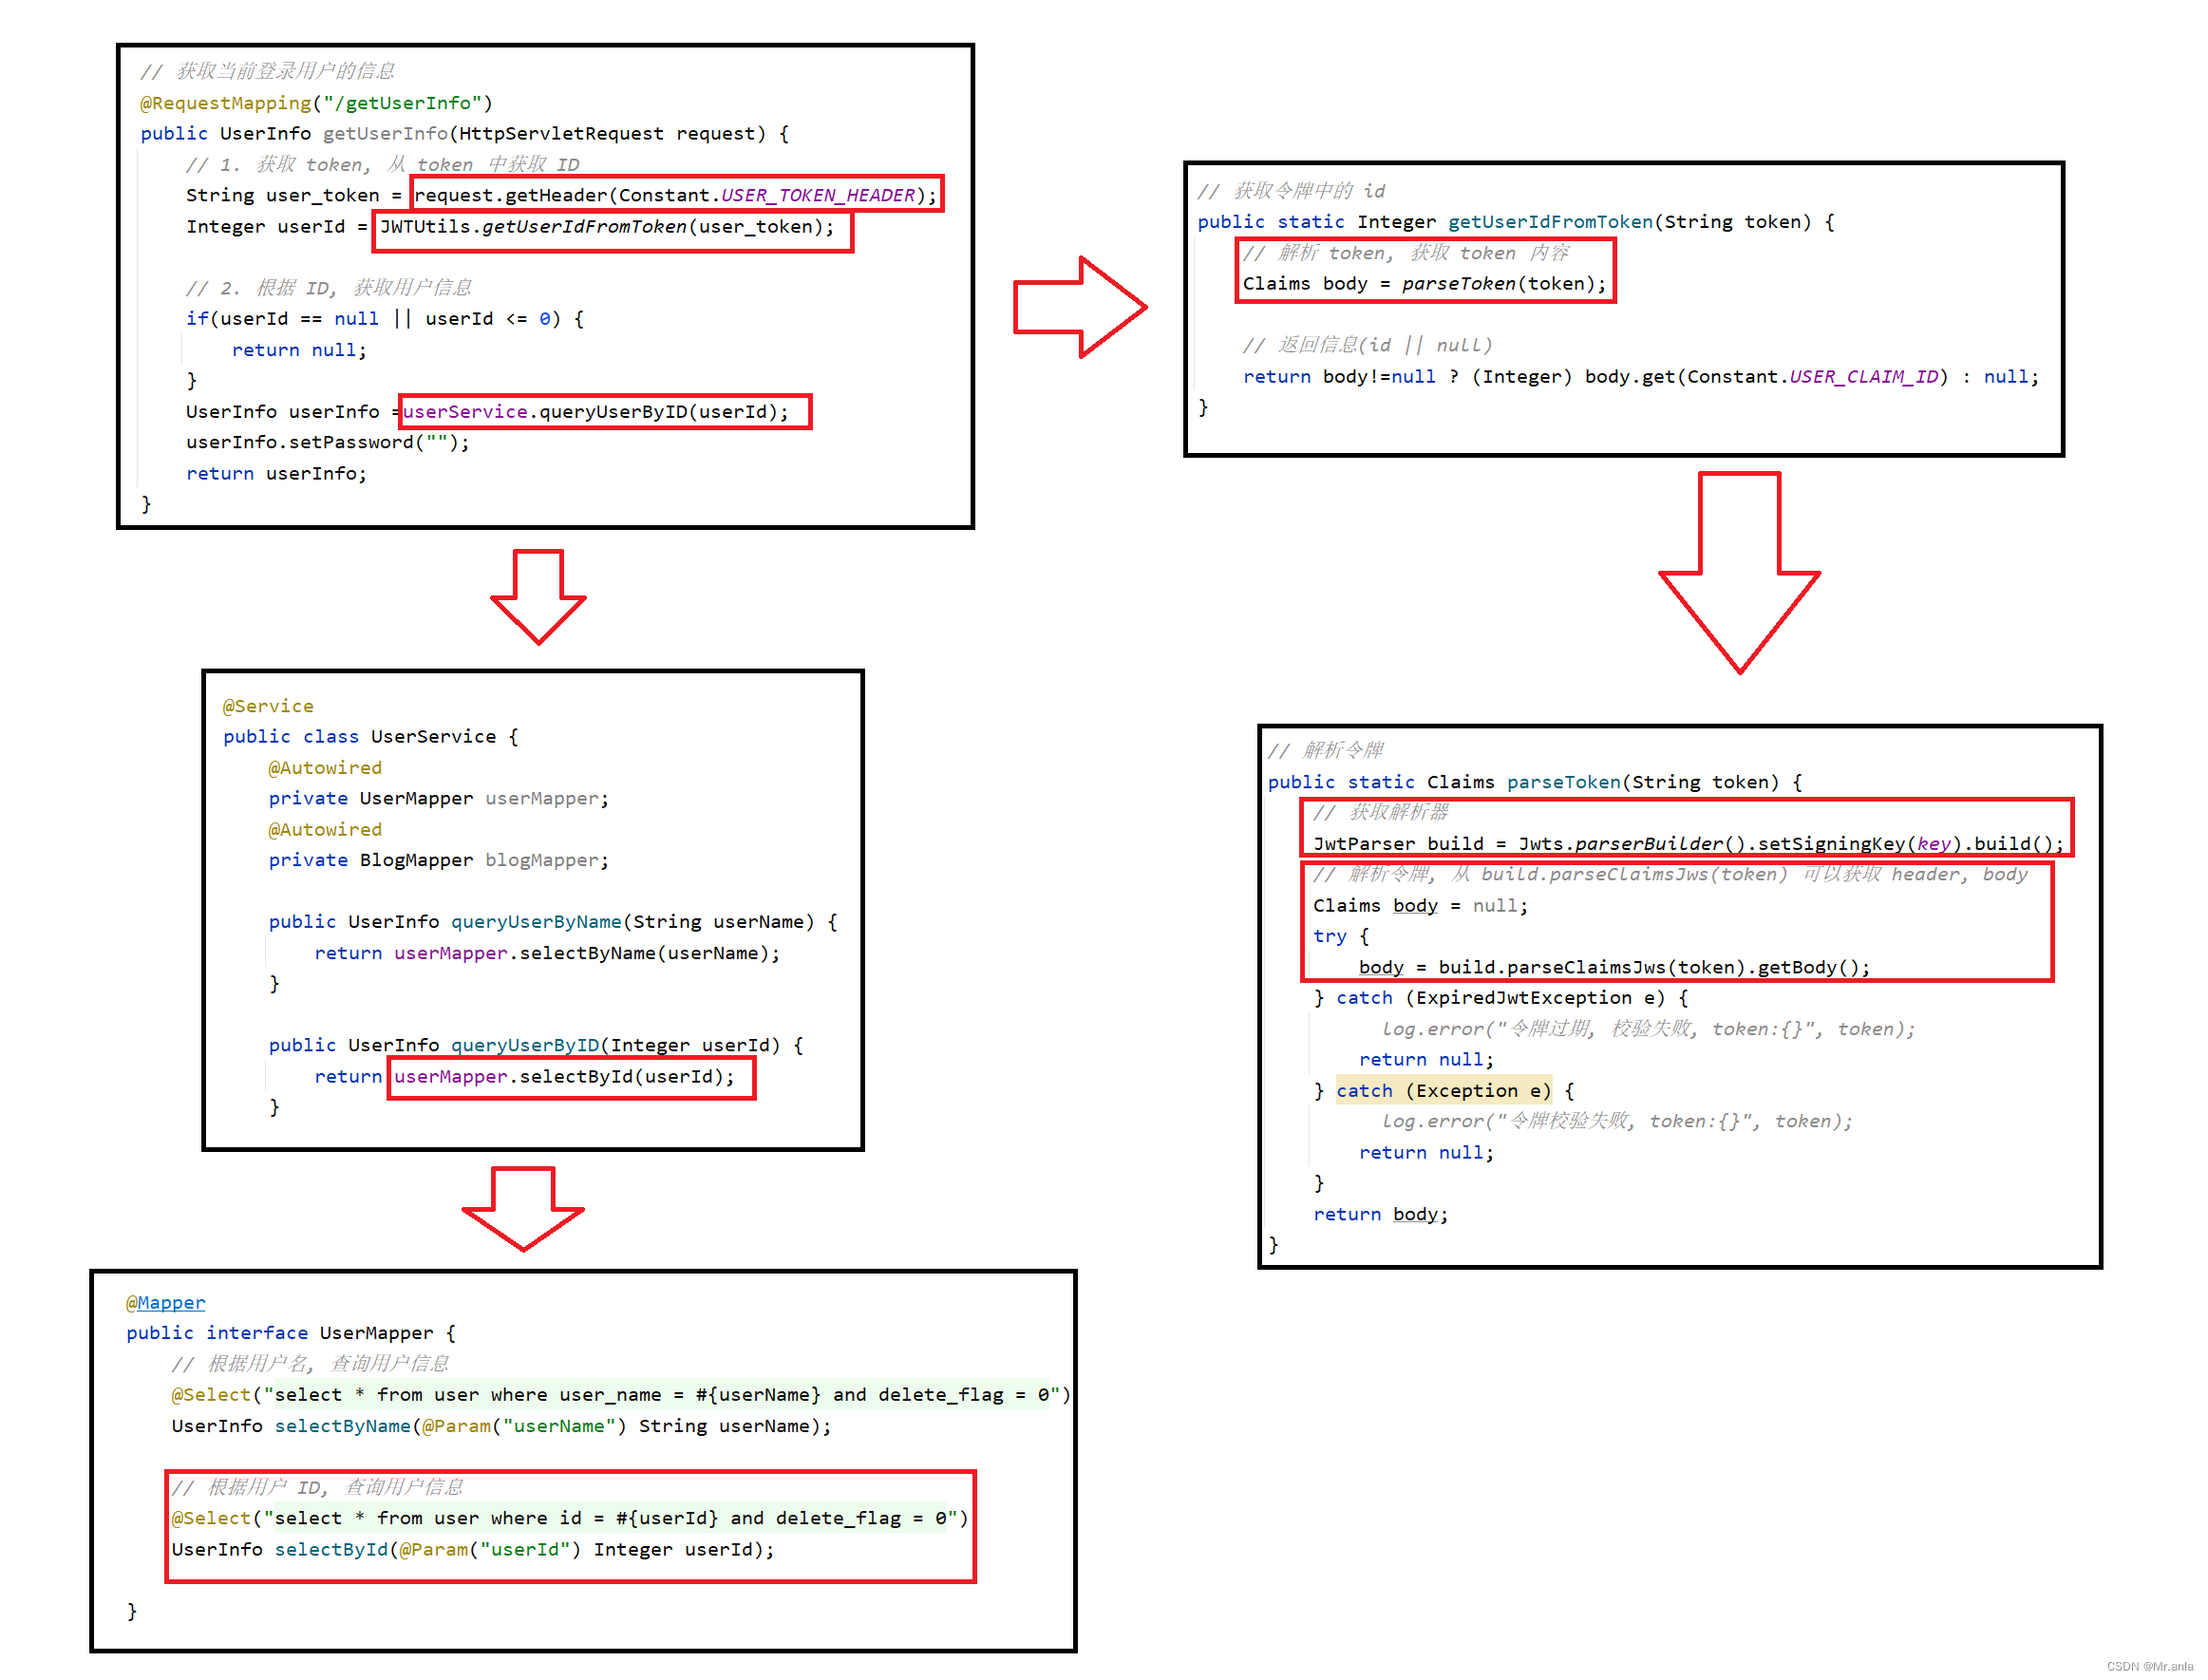
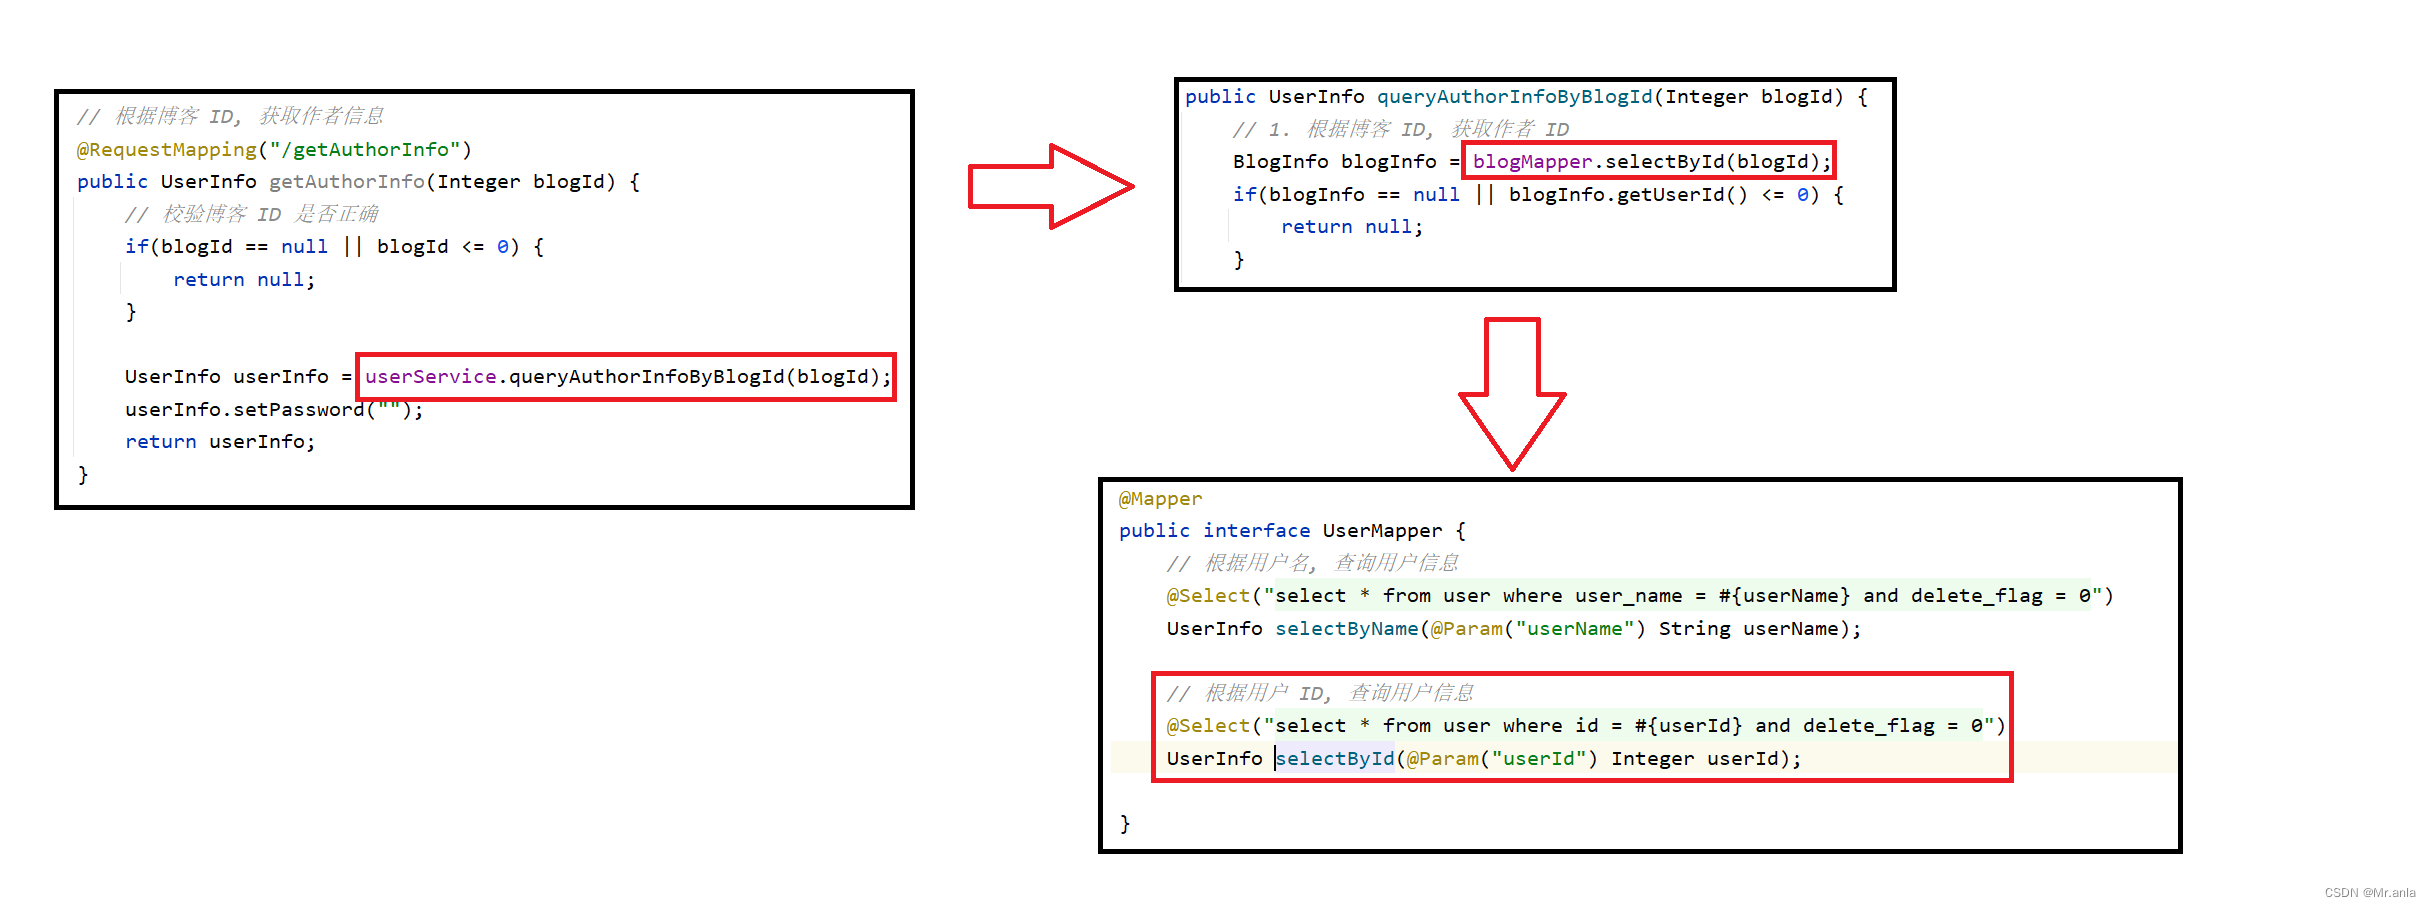
public interface UserMapper {// 根据用户名, 查询用户信息@Select("select * from user where user_name = #{userName} and delete_flag = 0")UserInfo selectByName(@Param("userName") String userName);// 根据用户 ID, 查询用户信息@Select("select * from user where id = #{userId} and delete_flag = 0")UserInfo selectById(@Param("userId") Integer userId);}
数据库操作 user 表
用户登录页
登录功能
登录页面点击登录按钮后, 触发 controller 层的 login 接口
@Autowiredprivate UserService userService;// 登录接口@RequestMapping("/login")public Result login(String userName, String password) {// 1.对参数进行校验// 2.对密码进行校验// 3.如果校验成功, 生成 tokenif(!StringUtils.hasLength(userName) || !StringUtils.hasLength(password)) {
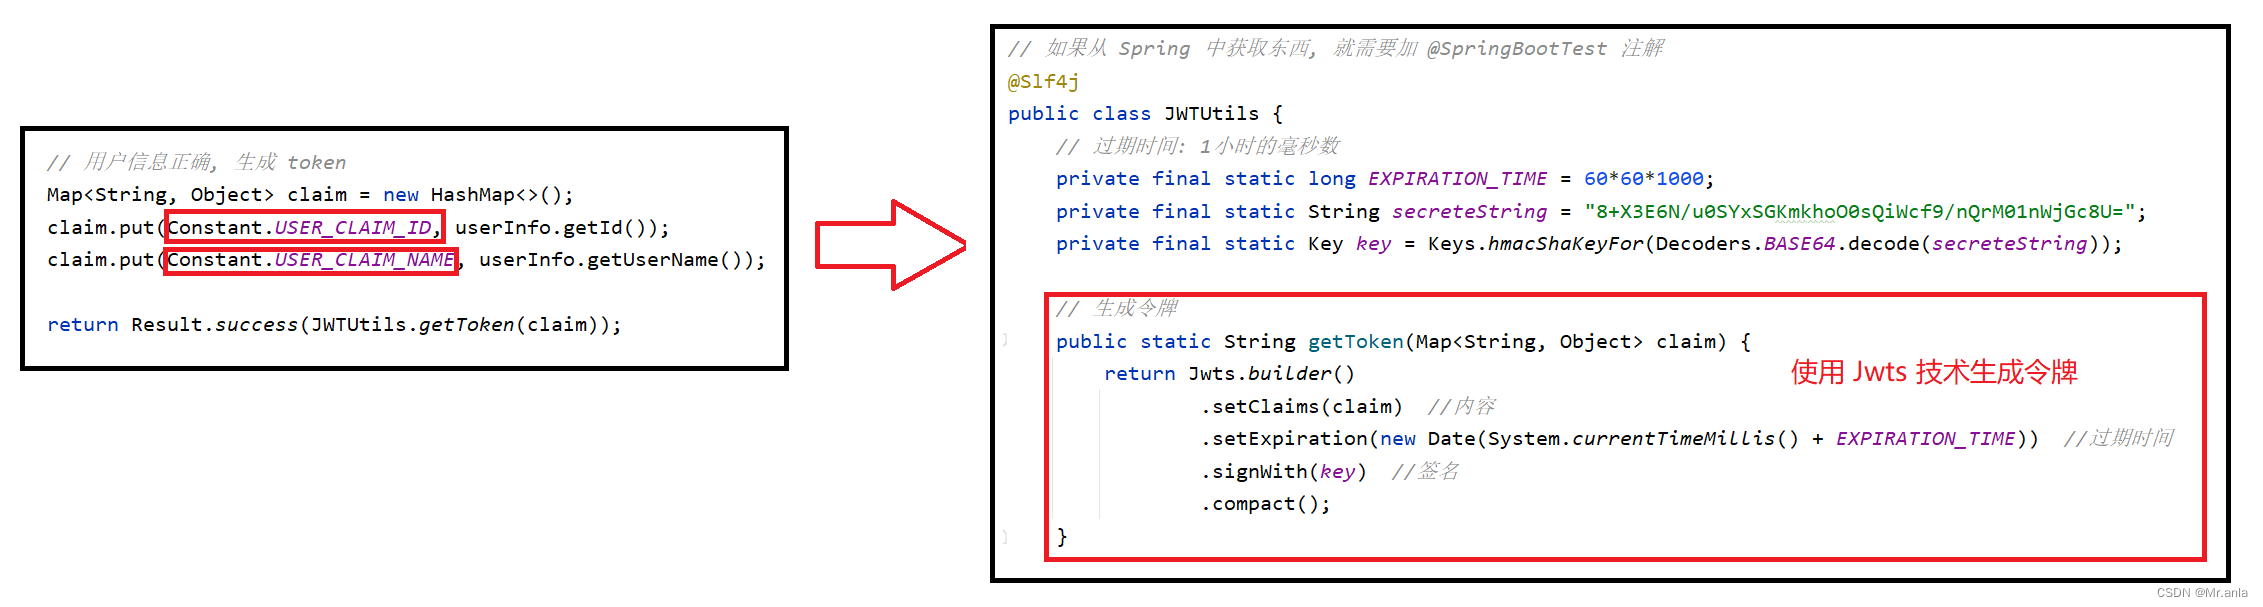
// throw new UnsupportedOperationException("用户名或密码不能为空");return Result.fail("用户名或密码不能为空");}// 获取用户信息UserInfo userInfo = userService.queryUserByName(userName);if(userInfo == null || userInfo.getId() <= 0) {return Result.fail("用户不存在");}// 密码校验if(!SecurityUtils.verify(password, userInfo.getPassword())) {return Result.fail("密码错误");}// 用户信息正确, 生成 tokenMap<String, Object> claim = new HashMap<>();claim.put(Constant.USER_CLAIM_ID, userInfo.getId());claim.put(Constant.USER_CLAIM_NAME, userInfo.getUserName());return Result.success(JWTUtils.getToken(claim));}
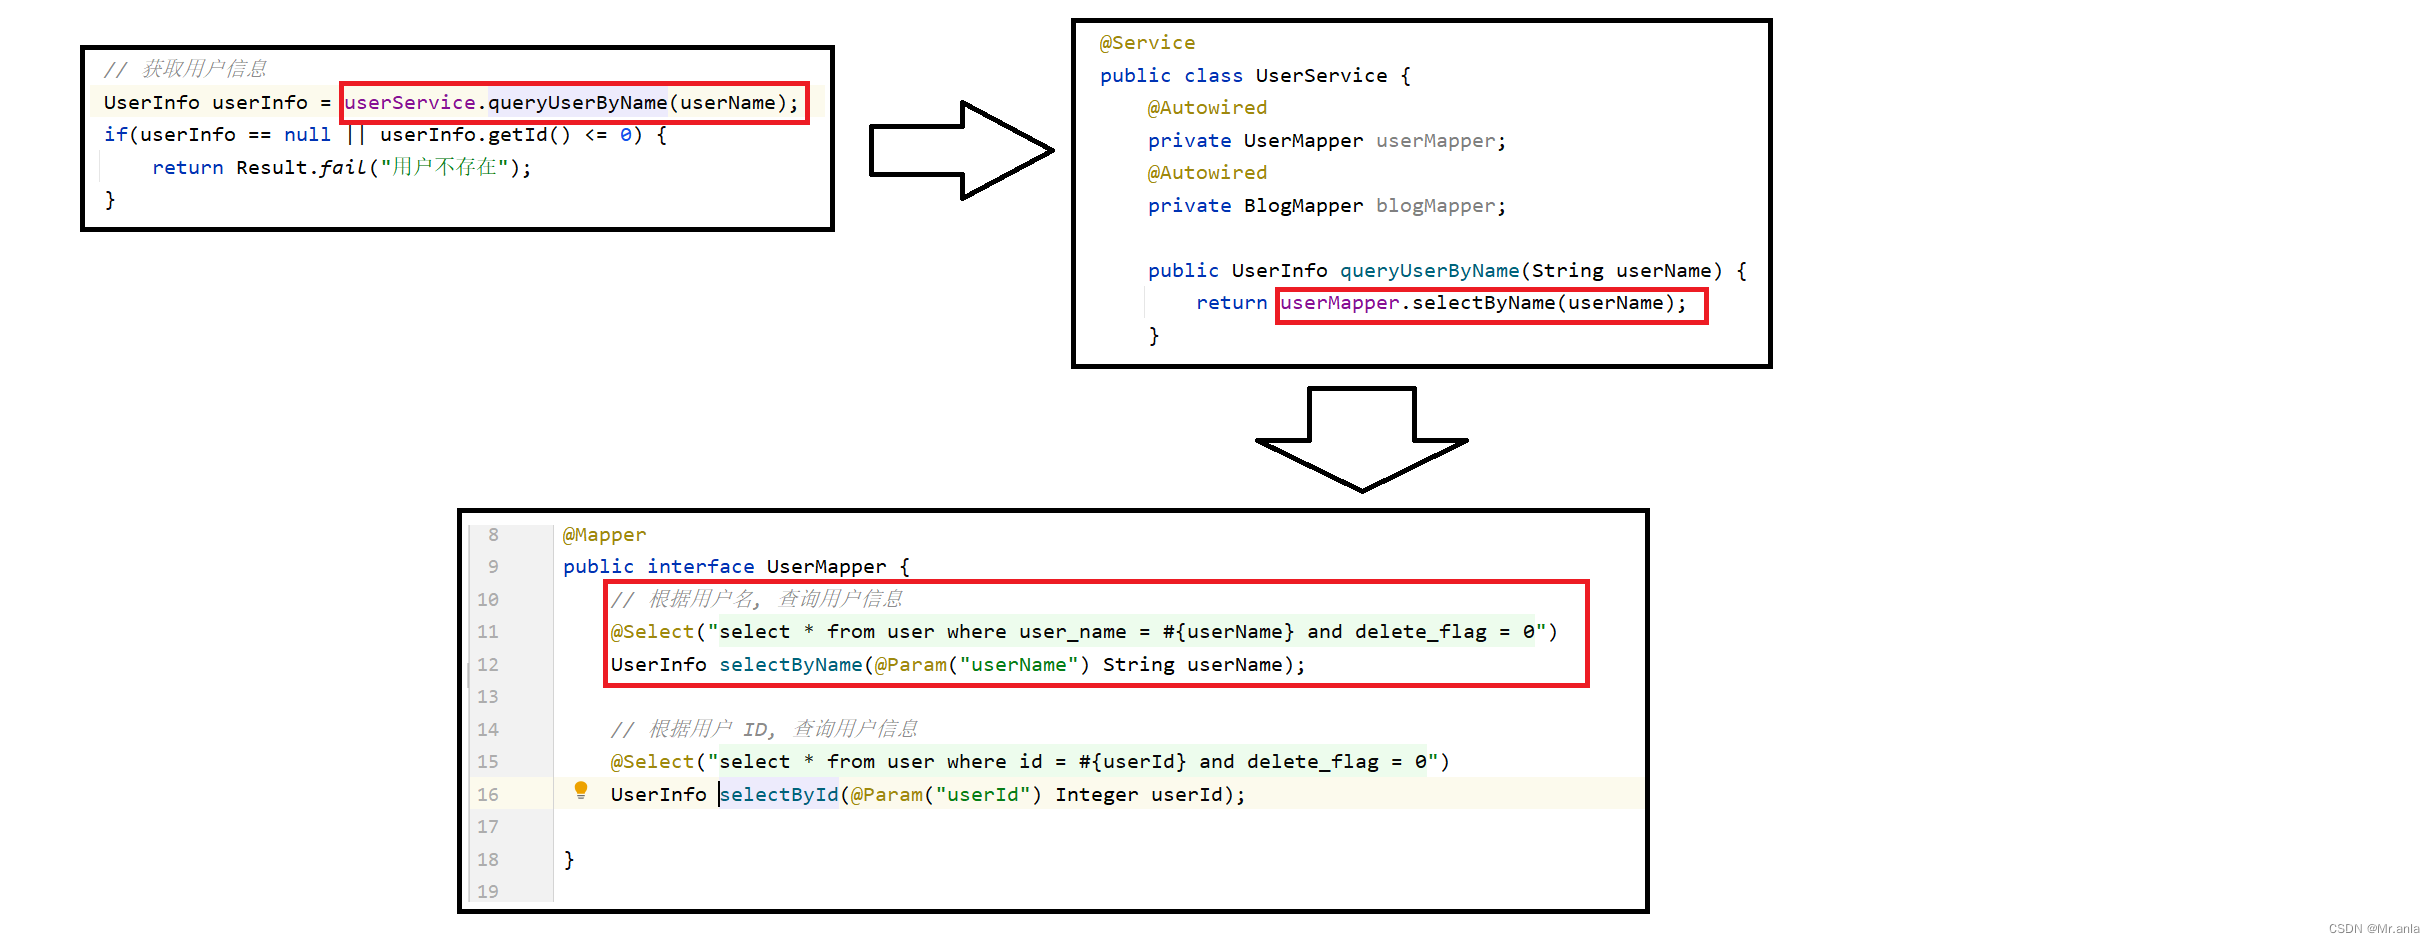
login 接口先对前端数据进行判空校验, 然后根据用户名 查询数据库中是否有对应的信息, 将获取信息与输入信息进行比对, 返回登录判定信息 (登录成功生成 token 令牌)
获取用户信息:
密码校验:
生成 token 令牌:
用户注销
用户注销是个前端功能
在 common.js 里面
function logout() {localStorage.removeItem("user_token");location.href = "blog_login.html";
}
博客列表页
博客列表页获取所有未删除博客的信息进行展示
调用接口 getList
@Autowired
private BlogService blogService;@RequestMapping("/getList")
public List<BlogInfo> queryBlogList() {return blogService.queryBlogList();
}

博客列表页左侧登录用户信息栏, 获取当前登录用户的信息进行展示
调用接口 getUserInfo
@RestController
@RequestMapping("/user")
public class UserController {@Autowiredprivate UserService userService;// 获取当前登录用户的信息@RequestMapping("/getUserInfo")public UserInfo getUserInfo(HttpServletRequest request) {// 1. 获取 token, 从 token 中获取 IDString user_token = request.getHeader(Constant.USER_TOKEN_HEADER);Integer userId = JWTUtils.getUserIdFromToken(user_token);// 2. 根据 ID, 获取用户信息if(userId == null || userId <= 0) {return null;}UserInfo userInfo =userService.queryUserByID(userId);userInfo.setPassword("");return userInfo;}
}
博客详情页
博客详情页右侧获取博客详情信息
调用接口 getBlogDetail
@Slf4j
@RestController
@RequestMapping("/blog")
public class BlogController {@Autowiredprivate BlogService blogService;// 根据博客id获取博客信息@RequestMapping("/getBlogDetail")public BlogInfo getBlogDetail(Integer blogId, HttpServletRequest request) {BlogInfo blogInfo = blogService.getBlogDetail(blogId);// 获取登录用户信息String user_token = request.getHeader(Constant.USER_TOKEN_HEADER);Integer userId = JWTUtils.getUserIdFromToken(user_token);// 判断登录用户是否为作者if(userId != null && userId == blogInfo.getUserId()) {blogInfo.setIsLoginUser(true);}else {blogInfo.setIsLoginUser(false);}return blogInfo;}
}
博客详情页左侧获取博客作者信息
调用接口 getAuthorInfo
@RestController
@RequestMapping("/user")
public class UserController {@Autowiredprivate UserService userService;// 根据博客 ID, 获取作者信息@RequestMapping("/getAuthorInfo")public UserInfo getAuthorInfo(Integer blogId) {// 校验博客 ID 是否正确if(blogId == null || blogId <= 0) {return null;}UserInfo userInfo = userService.queryAuthorInfoByBlogId(blogId);userInfo.setPassword("");return userInfo;}
}
博客详情页中, 编辑和删除功能
调用接口 update & delete
@Slf4j
@RestController
@RequestMapping("/blog")
public class BlogController {@Autowiredprivate BlogService blogService;// 编辑博客@RequestMapping("/update")public Boolean update(Integer blogId, String title, String content) {log.error("blogId:{}, title:{}, content:{}", blogId, title, content);if(blogId == null || !StringUtils.hasLength(title) || !StringUtils.hasLength(content)) {log.error("update, 参数非法");return false;}BlogInfo blogInfo = new BlogInfo();blogInfo.setId(blogId);blogInfo.setTitle(title);blogInfo.setContent(content);log.error("blogInfo:{}", blogInfo);Integer result = blogService.updateBlog(blogInfo);if(result < 1) return false;return true;}// 删除博客(逻辑删除)@RequestMapping("/delete")public Boolean delete(Integer blogId) {BlogInfo blogInfo = new BlogInfo();blogInfo.setId(blogId);blogInfo.setDeleteFlag(1);log.error("blogInfo:{}", blogInfo);Integer result = blogService.updateBlog(blogInfo);if(result < 1) return false;return true;}
}
博客编辑页
博客撰写后存入数据库
调用接口 add
@Slf4j
@RestController
@RequestMapping("/blog")
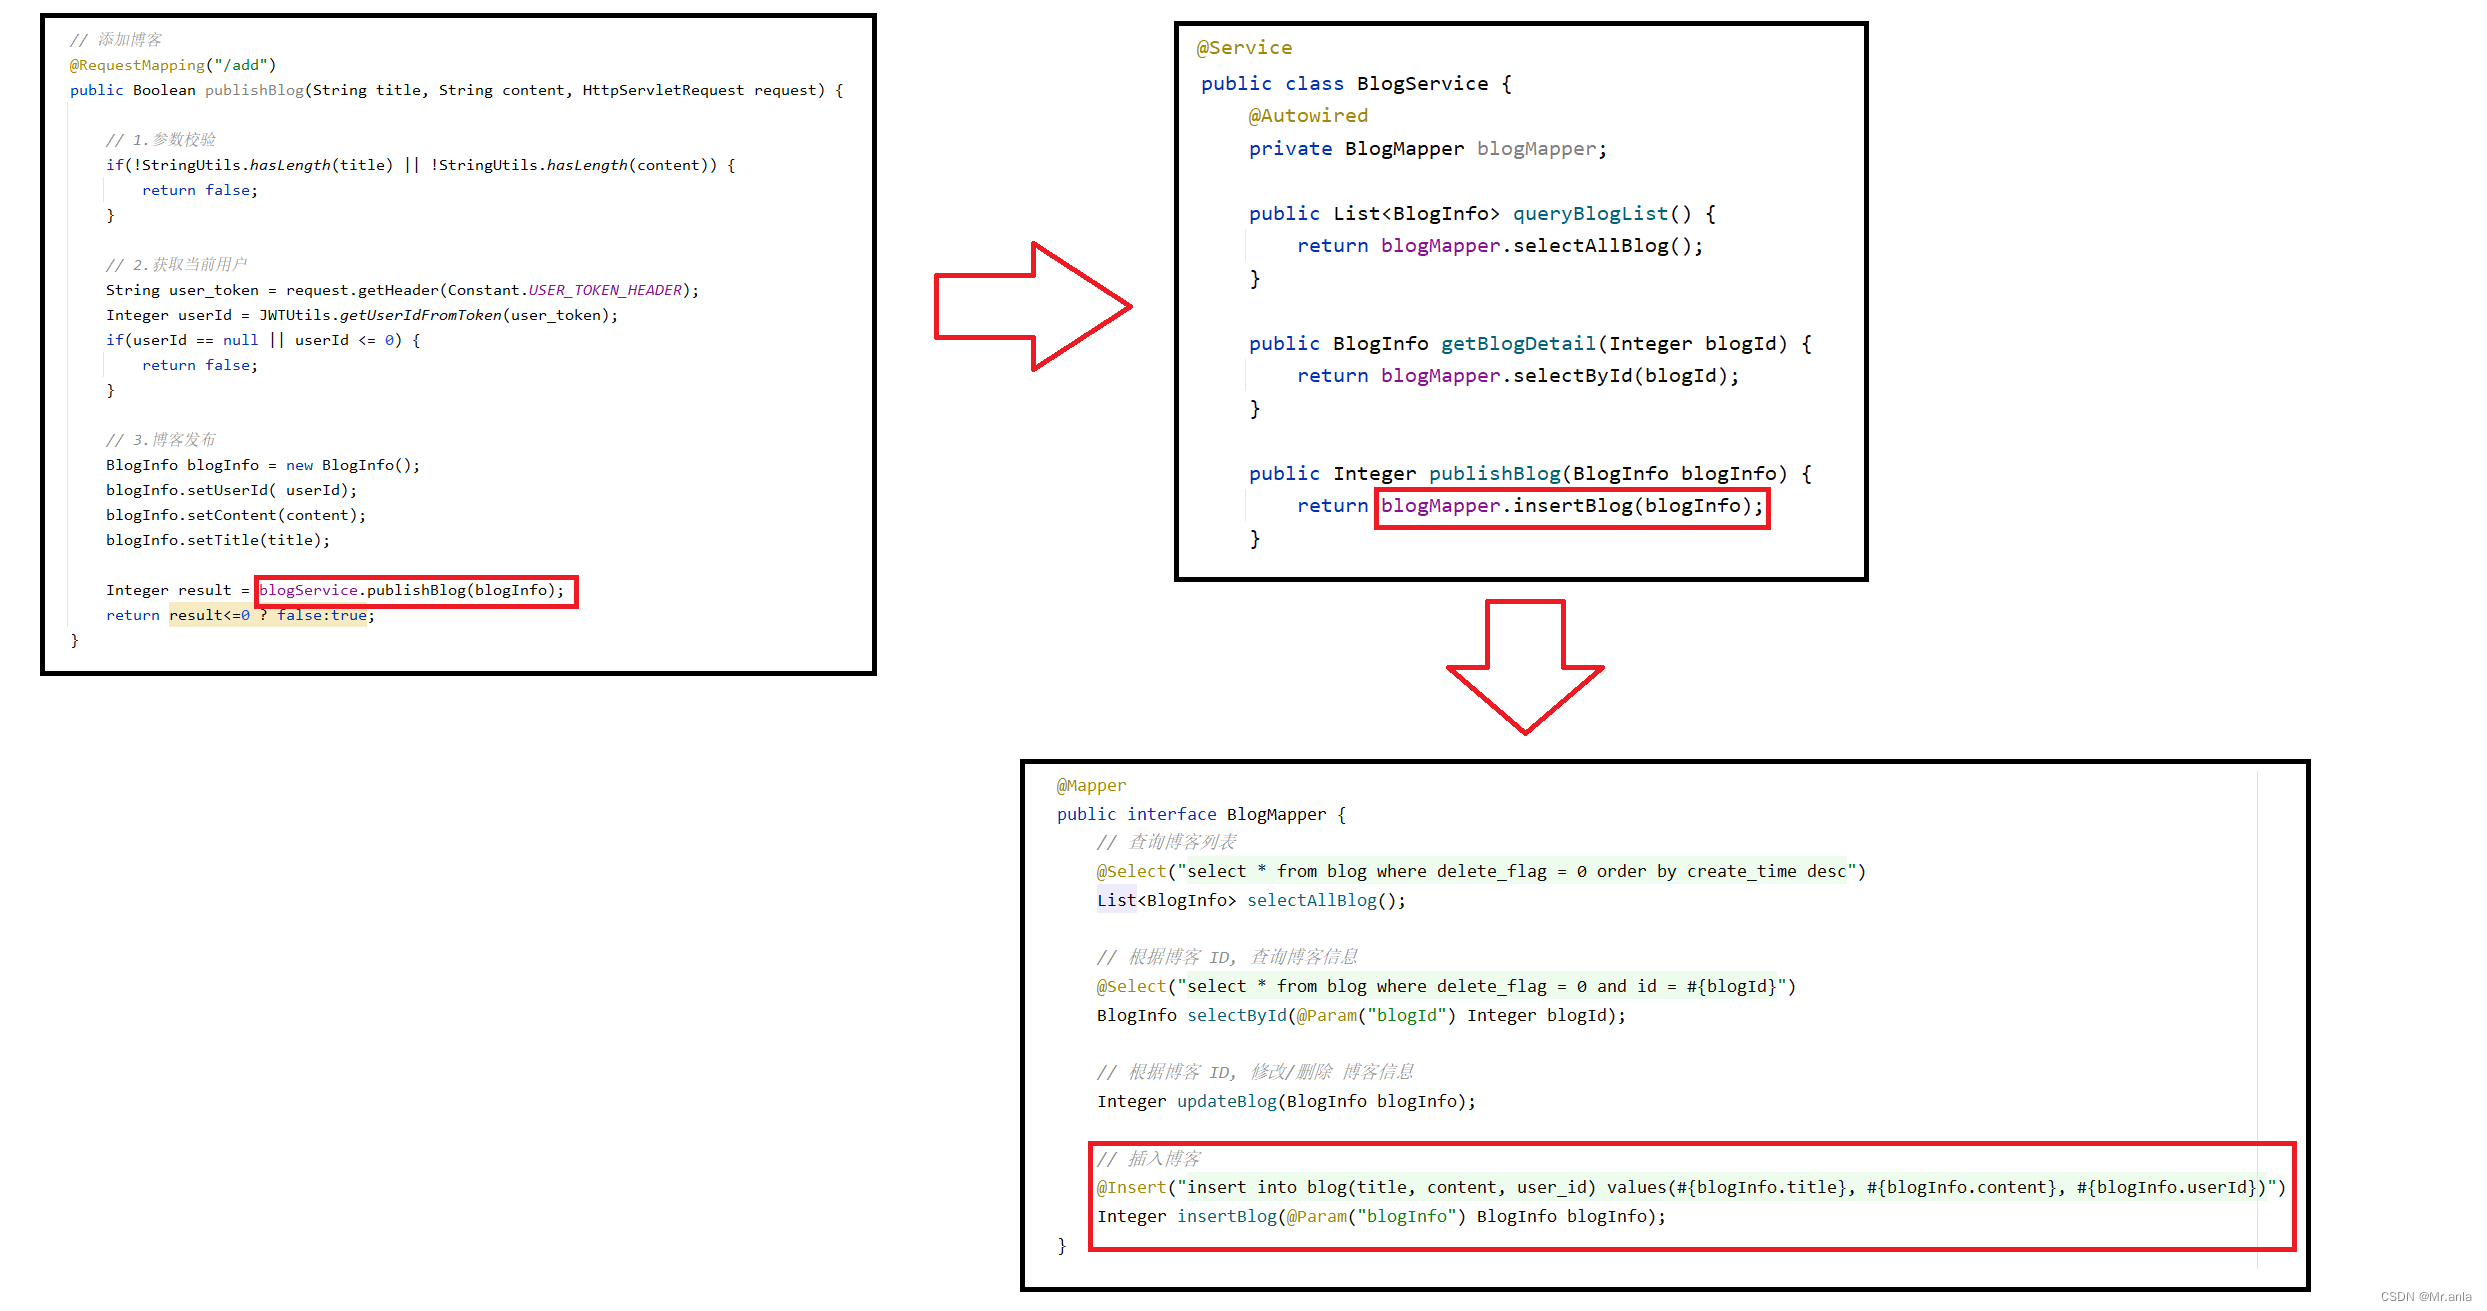
public class BlogController {@Autowiredprivate BlogService blogService;// 添加博客@RequestMapping("/add")public Boolean publishBlog(String title, String content, HttpServletRequest request) {// 1.参数校验if(!StringUtils.hasLength(title) || !StringUtils.hasLength(content)) {return false;}// 2.获取当前用户String user_token = request.getHeader(Constant.USER_TOKEN_HEADER);Integer userId = JWTUtils.getUserIdFromToken(user_token);if(userId == null || userId <= 0) {return false;}// 3.博客发布BlogInfo blogInfo = new BlogInfo();blogInfo.setUserId( userId);blogInfo.setContent(content);blogInfo.setTitle(title);Integer result = blogService.publishBlog(blogInfo);return result<=0 ? false:true;}
}