一、所需数据介绍
car1.h5 是训练后保存的模型
class_directionary 是0,1的分类
二、图像数据预处理
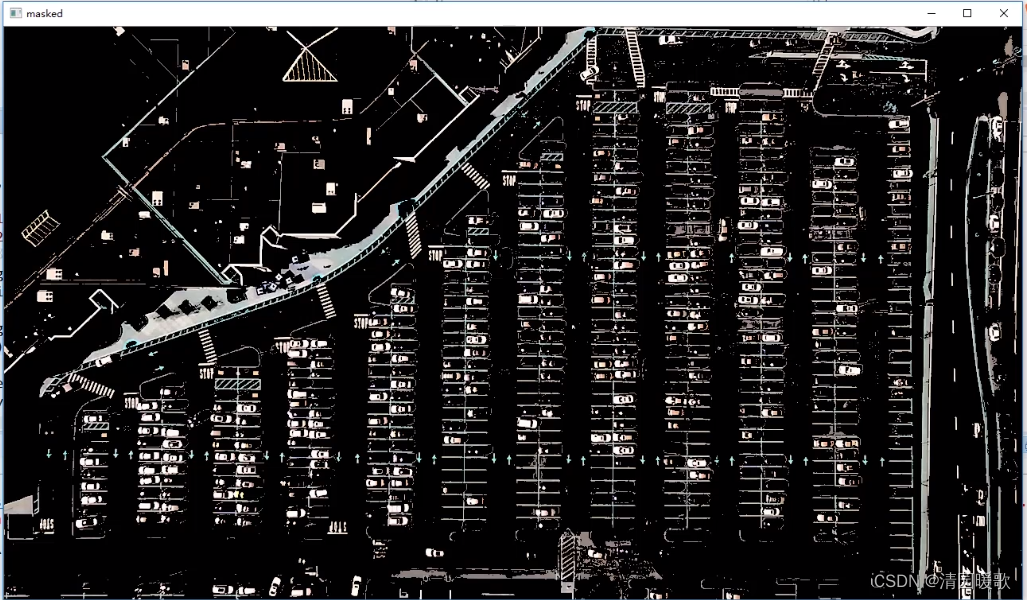
对输入图片进行过滤:
def select_rgb_white_yellow(self,image): #过滤掉背景lower = np.uint8([120, 120, 120])upper = np.uint8([255, 255, 255])# lower_red和高于upper_red的部分分别变成0,lower_red~upper_red之间的值变成255,相当于过滤背景white_mask = cv2.inRange(image, lower, upper)self.cv_show('white_mask',white_mask)masked = cv2.bitwise_and(image, image, mask = white_mask)self.cv_show('masked',masked)return masked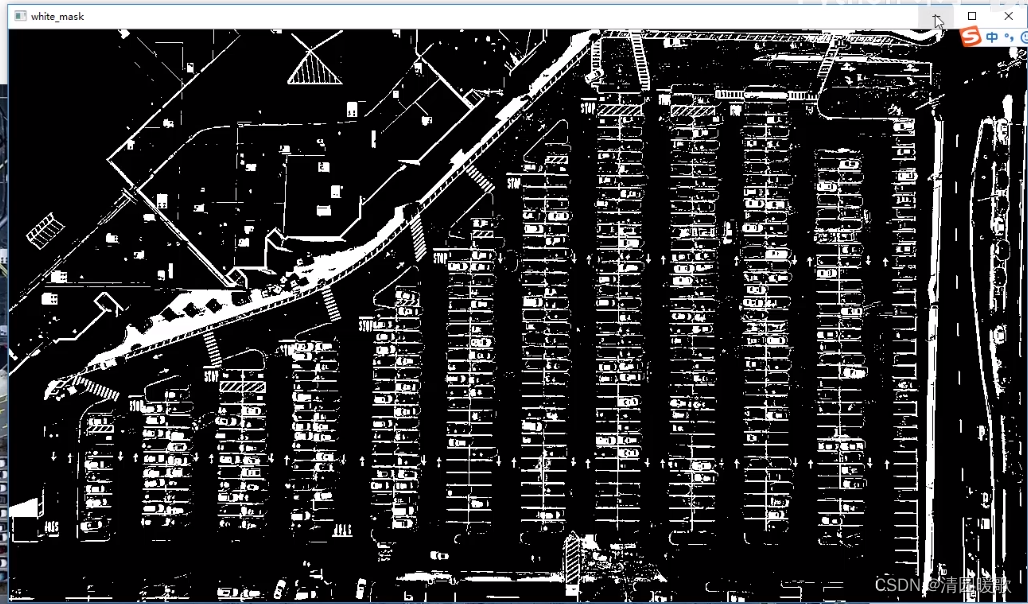
转为灰度图:
def convert_gray_scale(self,image):return cv2.cvtColor(image, cv2.COLOR_RGB2GRAY)边缘检测:
def detect_edges(self,image, low_threshold=50, high_threshold=200):return cv2.Canny(image, low_threshold, high_threshold)获取停车场的轮廓然后定为停车场位置,最后可以对停车场针对性操作
获取需要停车场的车位区域:
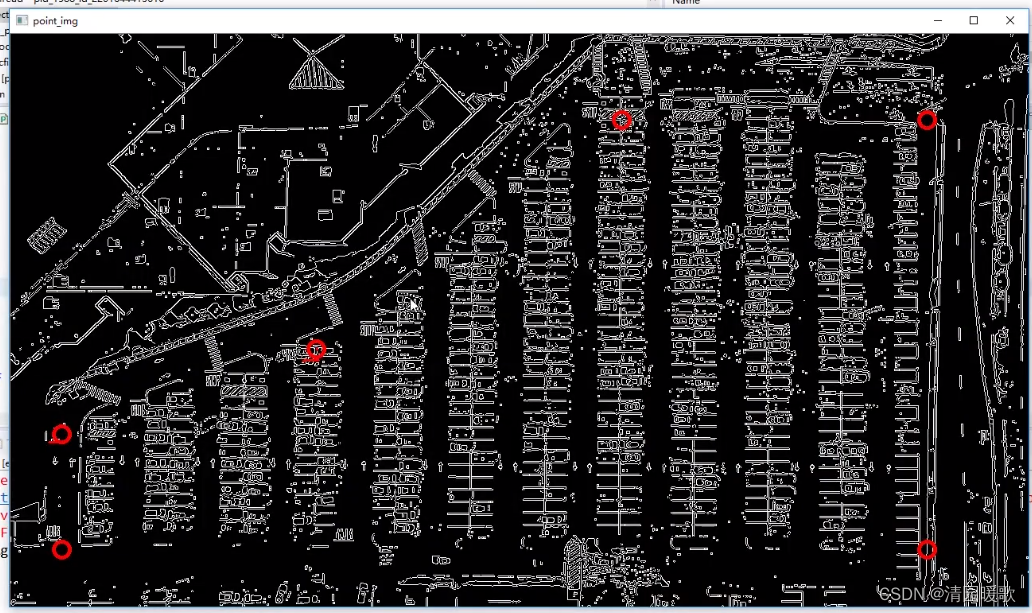
def select_region(self,image):"""手动选择区域"""# first, define the polygon by verticesrows, cols = image.shape[:2]pt_1 = [cols*0.05, rows*0.90]pt_2 = [cols*0.05, rows*0.70]pt_3 = [cols*0.30, rows*0.55]pt_4 = [cols*0.6, rows*0.15]pt_5 = [cols*0.90, rows*0.15] pt_6 = [cols*0.90, rows*0.90]vertices = np.array([[pt_1, pt_2, pt_3, pt_4, pt_5, pt_6]], dtype=np.int32) point_img = image.copy() point_img = cv2.cvtColor(point_img, cv2.COLOR_GRAY2RGB)# 画图最好转成RGB的,为了能化出红色的圈,而不是把原图的色彩重建for point in vertices[0]:cv2.circle(point_img, (point[0],point[1]), 10, (0,0,255), 4)self.cv_show('point_img',point_img)return self.filter_region(image, vertices)通过几个点框出区域

我们选择的点,用红圈画出来
过滤不需要的:
def filter_region(self,image, vertices):"""剔除掉不需要的地方"""mask = np.zeros_like(image)if len(mask.shape)==2:cv2.fillPoly(mask, vertices, 255)self.cv_show('mask', mask) return cv2.bitwise_and(image, mask)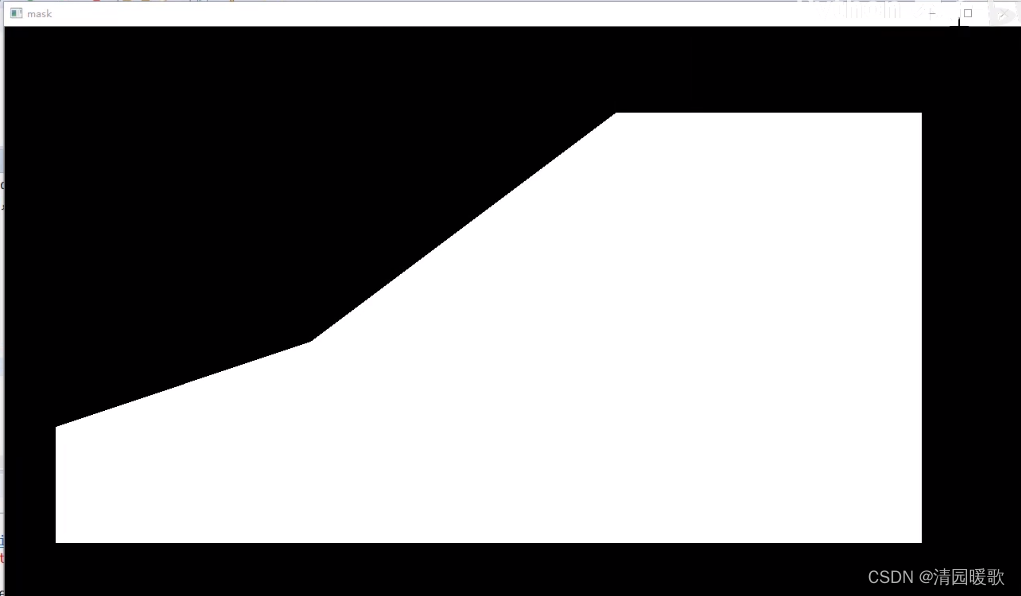
过滤后:
roi_images = list(map(park.select_region, edge_images))park.show_images(roi_images)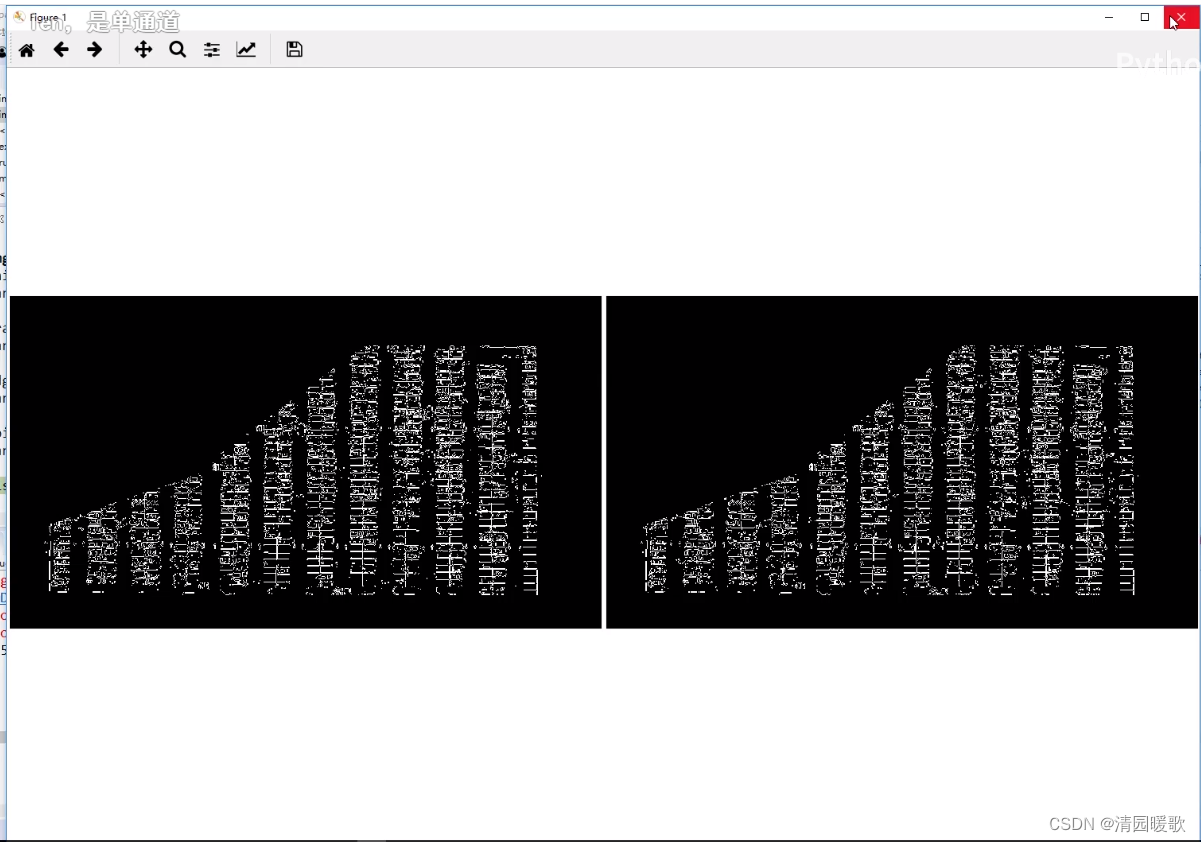
三、车位直线检测
霍夫变换:直线检测
检测所有的直线
list_of_lines = list(map(park.hough_lines, roi_images)) def hough_lines(self,image):#输入的图像需要是边缘检测后的结果#minLineLengh(线的最短长度,比这个短的都被忽略)和MaxLineCap(两条直线之间的最大间隔,小于此值,认为是一条直线)#rho距离精度,theta角度精度,threshod超过设定阈值才被检测出线段return cv2.HoughLinesP(image, rho=0.1, theta=np.pi/10, threshold=15, minLineLength=9, maxLineGap=4)cv2.HoughLinesP 不加 P 就是 cv2.HoughLines 也可以用,就是速度会慢一点,P 就是多了一个采样的操作
过滤出需要的线,并画出来:
line_images = []for image, lines in zip(test_images, list_of_lines):line_images.append(park.draw_lines(image, lines)) park.show_images(line_images) def draw_lines(self,image, lines, color=[255, 0, 0], thickness=2, make_copy=True):# 过滤霍夫变换检测到直线if make_copy:image = np.copy(image) cleaned = []for line in lines:for x1,y1,x2,y2 in line:if abs(y2-y1) <=1 and abs(x2-x1) >=25 and abs(x2-x1) <= 55: # 不要斜线和边界线cleaned.append((x1,y1,x2,y2))cv2.line(image, (x1, y1), (x2, y2), color, thickness) # 画线print(" No lines detected: ", len(cleaned)) # 打印线的数量return image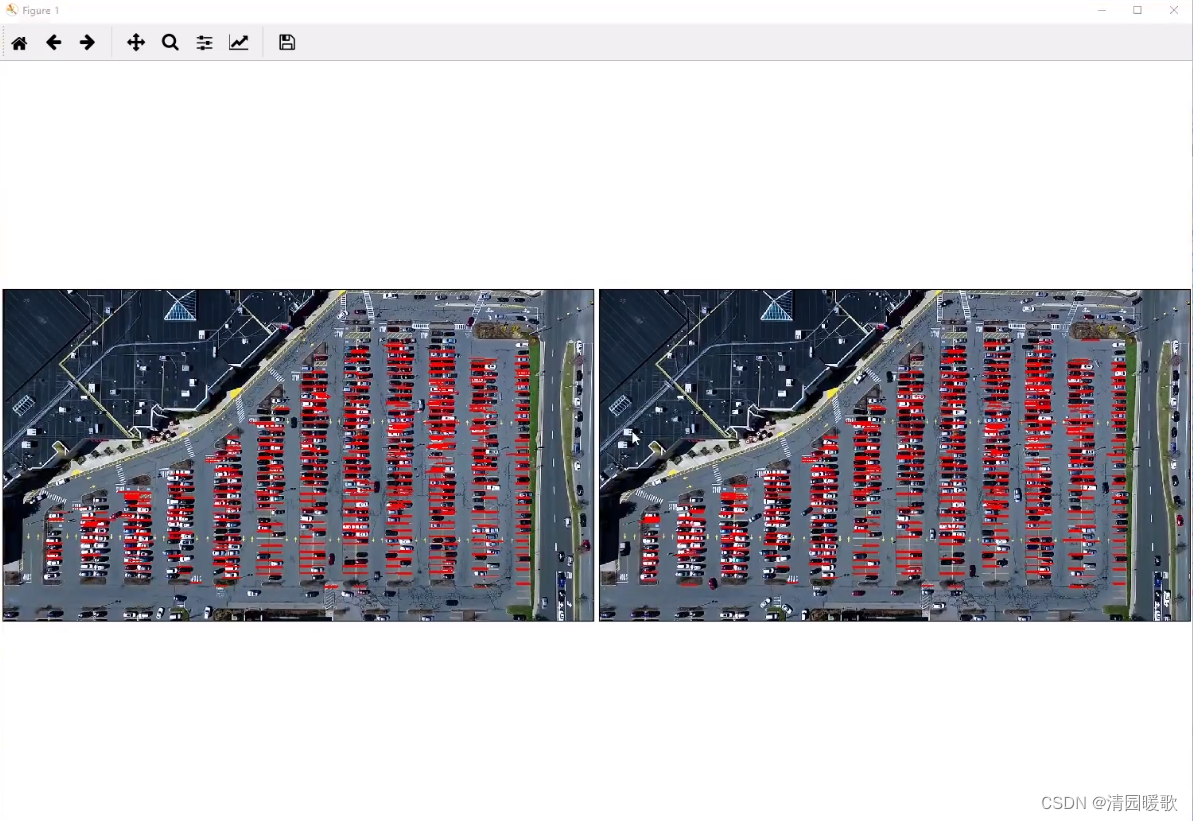

四、按列划分区域
画出每个列区域的矩形:
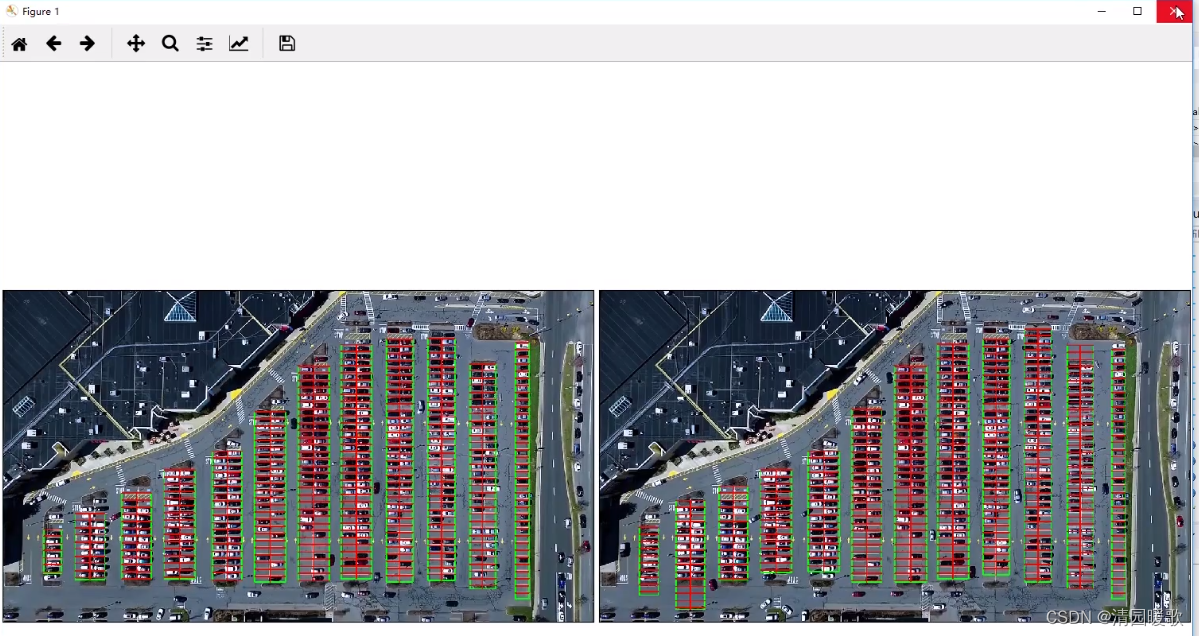
rect_images = []rect_coords = []for image, lines in zip(test_images, list_of_lines):new_image, rects = park.identify_blocks(image, lines) # 返回图片, 矩形框rect_images.append(new_image)rect_coords.append(rects)park.show_images(rect_images)def identify_blocks(self,image, lines, make_copy=True):if make_copy:new_image = np.copy(image)#Step 1: 过滤部分直线cleaned = []for line in lines:for x1,y1,x2,y2 in line:if abs(y2-y1) <=1 and abs(x2-x1) >=25 and abs(x2-x1) <= 55:cleaned.append((x1,y1,x2,y2))#Step 2: 对直线按照x1进行排序import operatorlist1 = sorted(cleaned, key=operator.itemgetter(0, 1)) # 多级排序,先按0:x1,再按1:y1#Step 3: 找到多个列,相当于每列是一排车clusters = {}dIndex = 0clus_dist = 10for i in range(len(list1) - 1):distance = abs(list1[i+1][0] - list1[i][0])if distance <= clus_dist:if not dIndex in clusters.keys(): clusters[dIndex] = [] # .key()返回字典的键值# list({'Chinasoft':'China', 'Microsoft':'USA'}.keys())# ['Chinasoft', 'Microsoft']clusters[dIndex].append(list1[i])clusters[dIndex].append(list1[i + 1]) # 字典clusters[dIndex]中有两个值# {dIndex:[list1[i], list1[i+1]]}# 这里 append(list1[i + 1]) 好像会导致重复添加,但是不加的话就添加不到每列的最后一个线else: # 下一条线和这一条线的x的距离大于 clusters 的话,就说明不再同一列,在新的一列,dIndex 就+1dIndex += 1 # dIndex 就是列的标号#Step 4: 得到坐标rects = {}i = 0for key in clusters:all_list = clusters[key]cleaned = list(set(all_list))if len(cleaned) > 5: # 大于5个就是一个列cleaned = sorted(cleaned, key=lambda tup: tup[1]) # 按y1排序,即第二维元素排列,(x1, y1, x2, y2)avg_y1 = cleaned[0][1]avg_y2 = cleaned[-1][1]avg_x1 = 0avg_x2 = 0 # 每一列的第一个和最后一个直线的y坐标,x先=0for tup in cleaned:avg_x1 += tup[0] # x1avg_x2 += tup[2] # x2# x可能检测到的有的直线长点,有的短点,所以这里x1,x2取个平均值avg_x1 = avg_x1/len(cleaned)avg_x2 = avg_x2/len(cleaned)rects[i] = (avg_x1, avg_y1, avg_x2, avg_y2) # 矩形坐标i += 1print("Num Parking Lanes: ", len(rects))#Step 5: 把列矩形画出来buff = 7for key in rects:tup_topLeft = (int(rects[key][0] - buff), int(rects[key][1])) # x1 - 7 , y1tup_botRight = (int(rects[key][2] + buff), int(rects[key][3])) # x1 + 7 , y2cv2.rectangle(new_image, tup_topLeft,tup_botRight,(0,255,0),3)return new_image, rects 可以看到右边的图效果好一点,可能后面就用右图了
五、车位区域划分
delineated = []spot_pos = []for image, rects in zip(test_images, rect_coords):new_image, spot_dict = park.draw_parking(image, rects) # 返回图片,字典{每列的每个的车位坐标:当前车位的序号}delineated.append(new_image)spot_pos.append(spot_dict)park.show_images(delineated)final_spot_dict = spot_pos[1] # 哪个好保存哪个,上面说右边的好,就是[1]的print(len(final_spot_dict)) def draw_parking(self,image, rects, make_copy = True, color=[255, 0, 0], thickness=2, save = True):if make_copy:new_image = np.copy(image)gap = 15.5 # 指定一个车位的两条直线间的距离spot_dict = {} # 字典:一个车位对应一个位置tot_spots = 0#微调,对12列每一列矩形框进行微调adj_y1 = {0: 20, 1:-10, 2:0, 3:-11, 4:28, 5:5, 6:-15, 7:-15, 8:-10, 9:-30, 10:9, 11:-32}adj_y2 = {0: 30, 1: 50, 2:15, 3:10, 4:-15, 5:15, 6:15, 7:-20, 8:15, 9:15, 10:0, 11:30}adj_x1 = {0: -8, 1:-15, 2:-15, 3:-15, 4:-15, 5:-15, 6:-15, 7:-15, 8:-10, 9:-10, 10:-10, 11:0}adj_x2 = {0: 0, 1: 15, 2:15, 3:15, 4:15, 5:15, 6:15, 7:15, 8:10, 9:10, 10:10, 11:0}for key in rects:tup = rects[key] # (x1, y1, x2, y2)x1 = int(tup[0] + adj_x1[key])x2 = int(tup[2] + adj_x2[key])y1 = int(tup[1] + adj_y1[key])y2 = int(tup[3] + adj_y2[key])cv2.rectangle(new_image, (x1, y1),(x2,y2),(0,255,0),2)num_splits = int(abs(y2-y1)//gap) # 一列可以停多少辆车,就是每一列有多少个车位for i in range(0, num_splits+1):y = int(y1 + i*gap)cv2.line(new_image, (x1, y), (x2, y), color, thickness)if key > 0 and key < len(rects) -1 : # 画竖直线,key>0 的列右边两列的中间画竖线x = int((x1 + x2)/2)cv2.line(new_image, (x, y1), (x, y2), color, thickness)# 计算数量if key == 0 or key == (len(rects) -1):tot_spots += num_splits +1else:tot_spots += 2*(num_splits +1)# 字典对应好if key == 0 or key == (len(rects) -1):for i in range(0, num_splits+1):cur_len = len(spot_dict)y = int(y1 + i*gap)spot_dict[(x1, y, x2, y+gap)] = cur_len +1 else:for i in range(0, num_splits+1):cur_len = len(spot_dict)y = int(y1 + i*gap)x = int((x1 + x2)/2)spot_dict[(x1, y, x, y+gap)] = cur_len +1spot_dict[(x, y, x2, y+gap)] = cur_len +2 print("total parking spaces: ", tot_spots, cur_len)if save:filename = 'with_parking.jpg'cv2.imwrite(filename, new_image)return new_image, spot_dict
结果保存:
with open('spot_dict.pickle', 'wb') as handle:pickle.dump(final_spot_dict, handle, protocol=pickle.HIGHEST_PROTOCOL) # 结果保存提取车位上有车和无车的数据,以待导入模型训练:
park.save_images_for_cnn(test_images[0],final_spot_dict) def save_images_for_cnn(self,image, spot_dict, folder_name ='cnn_data'):for spot in spot_dict.keys(): # 裁剪车位有车和没车的数据,然后准备导入模型(x1, y1, x2, y2) = spot(x1, y1, x2, y2) = (int(x1), int(y1), int(x2), int(y2))#裁剪spot_img = image[y1:y2, x1:x2]spot_img = cv2.resize(spot_img, (0,0), fx=2.0, fy=2.0) # 放缩一下spot_id = spot_dict[spot]filename = 'spot' + str(spot_id) +'.jpg'print(spot_img.shape, filename, (x1,x2,y1,y2))cv2.imwrite(os.path.join(folder_name, filename), spot_img)六、模型构建与训练
train.py
import numpy
import os
from keras import applications
from keras.preprocessing.image import ImageDataGenerator
from keras import optimizers
from keras.models import Sequential, Model
from keras.layers import Dropout, Flatten, Dense, GlobalAveragePooling2D
from keras import backend as k
from keras.callbacks import ModelCheckpoint, LearningRateScheduler, TensorBoard, EarlyStopping
from keras.models import Sequentialfrom keras.layers.normalization.batch_normalization_v1 import BatchNormalization
# from keras.layers.normalization import BatchNormalization
from keras.layers.convolutional import Conv2D
from keras.layers.convolutional import MaxPooling2D
from keras.initializers import TruncatedNormal
from keras.layers.core import Activation
from keras.layers.core import Flatten
from keras.layers.core import Dropout
from keras.layers.core import Densefiles_train = 0
files_validation = 0cwd = os.getcwd()
folder = 'train_data/train'
for sub_folder in os.listdir(folder):path, dirs, files = next(os.walk(os.path.join(folder,sub_folder)))files_train += len(files)folder = 'train_data/test'
for sub_folder in os.listdir(folder):path, dirs, files = next(os.walk(os.path.join(folder,sub_folder)))files_validation += len(files)print(files_train,files_validation)img_width, img_height = 48, 48
train_data_dir = "train_data/train"
validation_data_dir = "train_data/test"
nb_train_samples = files_train
nb_validation_samples = files_validation
batch_size = 32
epochs = 15
num_classes = 2model = applications.VGG16(weights='imagenet', include_top=False, input_shape = (img_width, img_height, 3))for layer in model.layers[:10]:layer.trainable = Falsex = model.output
x = Flatten()(x)
predictions = Dense(num_classes, activation="softmax")(x)# model_final = Model(input = model.input, output = predictions)
model_final = Model(inputs = model.input, outputs = predictions)model_final.compile(loss = "categorical_crossentropy", optimizer = optimizers.SGD(lr=0.0001, momentum=0.9), metrics=["accuracy"]) train_datagen = ImageDataGenerator(
rescale = 1./255,
horizontal_flip = True,
fill_mode = "nearest",
zoom_range = 0.1,
width_shift_range = 0.1,
height_shift_range=0.1,
rotation_range=5)test_datagen = ImageDataGenerator(
rescale = 1./255,
horizontal_flip = True,
fill_mode = "nearest",
zoom_range = 0.1,
width_shift_range = 0.1,
height_shift_range=0.1,
rotation_range=5)train_generator = train_datagen.flow_from_directory(
train_data_dir,
target_size = (img_height, img_width),
batch_size = batch_size,
class_mode = "categorical")validation_generator = test_datagen.flow_from_directory(
validation_data_dir,
target_size = (img_height, img_width),
class_mode = "categorical")checkpoint = ModelCheckpoint("car1.h5", monitor='val_acc', verbose=1, save_best_only=True, save_weights_only=False, mode='auto', period=1)
early = EarlyStopping(monitor='val_acc', min_delta=0, patience=10, verbose=1, mode='auto')# history_object = model_final.fit_generator(
# train_generator,
# samples_per_epoch = nb_train_samples,
# epochs = epochs,
# validation_data = validation_generator,
# nb_val_samples = nb_validation_samples,
# callbacks = [checkpoint, early])history_object = model_final.fit_generator(
train_generator,
steps_per_epoch = nb_train_samples,
epochs = epochs,
validation_data = validation_generator,
validation_steps = nb_validation_samples,
callbacks = [checkpoint, early])
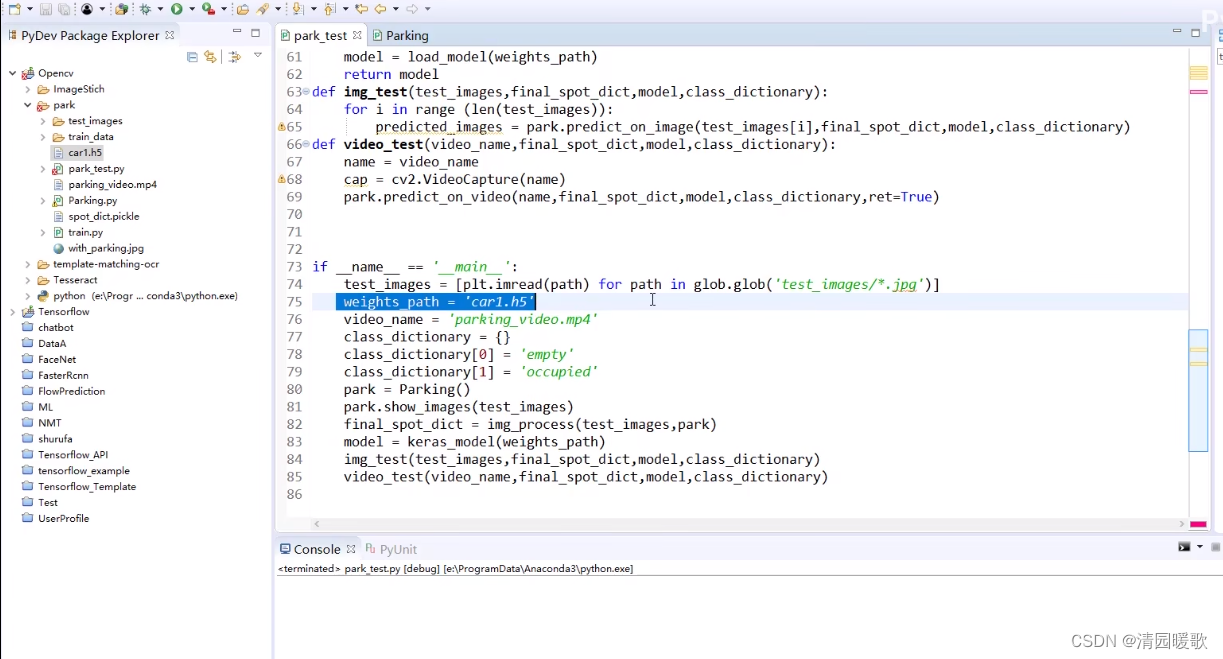
主函数
if __name__ == '__main__':test_images = [plt.imread(path) for path in glob.glob('test_images/*.jpg')]weights_path = 'car1.h5'video_name = 'parking_video.mp4'class_dictionary = {}class_dictionary[0] = 'empty'class_dictionary[1] = 'occupied'park = Parking()park.show_images(test_images)final_spot_dict = img_process(test_images,park) # 返回字典{每个车位坐标:序号}model = keras_model(weights_path)img_test(test_images,final_spot_dict,model,class_dictionary)video_test(video_name,final_spot_dict,model,class_dictionary)1. cv2.line()-画线条
它有五个参数:
img:要划的线所在的图像;
pt1:直线起点
pt2:直线终点 (坐标分别为宽、高,opencv中图像的坐标原点在左上角)
color:直线的颜色
thickness=1:线条粗细,默认是1.如果一个闭合图形设置为-1,那么整个图形就会被填充。
如:cv2.line(img, (0, 0), (511, 511), (0, 0, 255), 5)
2. cv2.circle()-画圆
和cv2.line()大致相同,第2、3个参数分别代表圆的圆心坐标和半径.
如: cv2.circle(img,(447,63), 63, (0,0,255), -1)
3. cv2.rectangle()-画矩形
和cv2.line()大致相同,第2、3个参数分别代表矩阵的左上顶点和右下顶点.
如:cv2.rectangle(img,(384,0),(510,128),(0,255,0),3)
4. cv2.ellipse()-画椭圆
1.要画的椭圆所在的位置 2.椭圆中心点的坐标 3.长轴和短轴的长度 4.椭圆沿逆时针选择角度5.椭圆沿顺时针方向起始角度和结束角度 6.颜色 7.线条的粗细
如:cv2.ellipse(img,(256,256),(100,50),0,0,180,255,-1)
5. cv2.putText()-添加文字
参数如下: 1. 添加文字所在的图像 2.文字内容 3.坐标 4. 字体 5.大小 6. 颜色 7.粗细
如:cv2.putText(img, 'OpenCV', (10, 500), font, 4, (255, 255, 255), 2)
6. cv2.polylines()-画多边形
参数如下:
img:要在上面画多边形的图像
pts:包含多边形上点的数组
isClosed:标志,决定所绘制的多边形是否闭合。若为 True ,则画若干个闭合多边形;若为 False ,则画一条连接所有点的折线
color:多边形颜色
thickness:多边形线的粗细
lineType:多边形线的类型
shift:坐标精确到小数点后第几位
pts = np.array([[10, 5], [20, 30], [70, 20], [50, 10]], np.int32)
pts = pts.reshape((-1, 1, 2))
cv.polylines(img,pts=pts,isClosed=True, color=(255, 255, 255), thickness=3)
cv2.fillPoly(mask, vertices, 255)
cv2.bitwise_and(image, mask)
cv2.HoughLinesP


![壁纸动态-Mac电脑-4K超高清[po破]动态壁纸[解]Dynamic WallPaper 安装使用教程](https://img-blog.csdnimg.cn/direct/019eac9ca68d450ba70375365c1b13ef.png#pic_center)