在大规模列表控件的显示需求中,必须解决2个问题才能获得较好的性能:
- 第一就是数据存在哪里, 避免出现数据的副本。
- 第二就是如何展示Item,如何复用或避免创建大量的Item控件。
在QListView体系里,QAbstractListModel解决的是“数据存哪”,解决的是第一个问题,而QAbstractItemDelegate解决的是数据“如何展示”,解决的是第二个问题。
因此,在大规模列表的编写代码中,高效的数据存储和高效的数据UI展示,需要用到这两个类。接下来,我们通过三个例子,循序渐进地介绍QListView,使读者掌握QListView的使用技巧和设计思想。
示例 1: 使用 QListWidget 的基本用法
QListWidget 是一个方便的控件,它内部管理了一个项目列表,并提供了一些简单的接口来添加、删除和修改这些项目。但没有对数据存储和数据展示进行过多的优化,这种方式适合于简单的应用场景,其中列表的大小不会很大,因为每个项目都会被存储为一个 QListWidgetItem 对象。
#include <QApplication>
#include <QListWidget>int main(int argc, char *argv[]) {QApplication app(argc, argv);    QListWidget* listWidget = new QListWidget;for (int i = 0; i < 100; ++i) {listWidget->addItem(QString("项目 %1").arg(i));}listWidget->show();    return app.exec();
}
尽管这种方式使用起来非常简单,但它并不适合处理大量数据。因为 QListWidget 会为每个项目创建一个 QListWidgetItem 对象,这将导致大量的内存消耗。
示例 2: 使用 QListView 和 QAbstractItemDelegate(解决数据存哪的问题)
在这个示例中,我们将直接从 QAbstractListModel 派生一个Model类,而不是使用 addItem构造大量的ItemData。这样,我们就无需存储这些数据。这个方法在处理具有可预知数据模式的大量数据时特别有用,因为它避免了冗余的数据存储和内存开销。
首先,我们定义一个 SyntheticListModel 类,它继承自 QAbstractListModel。这个模型将根据索引动态生成数据项:
#include <QAbstractListModel>
#include <QVariant>
#include <QModelIndex>class SyntheticListModel : public QAbstractListModel {Q_OBJECTpublic:SyntheticListModel(int numItems, QObject *parent = nullptr): QAbstractListModel(parent), m_numItems(numItems) {}int rowCount(const QModelIndex &parent = QModelIndex()) const override {// 在顶层,返回项的数量;否则返回0,因为这是一个列表,没有子项return parent.isValid() ? 0 : m_numItems;}QVariant data(const QModelIndex &index, int role = Qt::DisplayRole) const override {if (index.isValid() && index.row() < m_numItems) {if (role == Qt::DisplayRole) {// 根据行号动态生成数据return QString("项目 %1").arg(index.row());}// 可以根据需要添加其他角色的处理}return QVariant(); // 无效索引或角色时返回无效的QVariant}private:int m_numItems; // 列表中项目的数量
};
然后,我们创建一个简单的 QStyledItemDelegate,这个委托可以根据需要自定义项的显示方式:
#include <QStyledItemDelegate>
#include <QPainter>class SimpleDelegate : public QStyledItemDelegate {Q_OBJECTpublic:using QStyledItemDelegate::QStyledItemDelegate; // 继承构造函数// 重写 paint 方法以自定义项目显示方式void paint(QPainter *painter, const QStyleOptionViewItem &option, const QModelIndex &index) const override {// 调用基类的 paint 方法进行默认的绘制QStyledItemDelegate::paint(painter, option, index);// 可以添加额外的绘制代码,如绘制边框、背景等}// 如果需要,可以重写 createEditor、setEditorData、setModelData 等方法以自定义编辑行为
};
最后,我们在 main 函数中创建 QListView,并将其与我们的自定义模型和委托相连接:
#include <QApplication>
#include <QListView>int main(int argc, char *argv[]) {QApplication app(argc, argv);// 创建列表视图QListView listView;// 创建模型,这里我们创建了 100000 个假数据项SyntheticListModel model(100000);// 创建委托SimpleDelegate delegate;// 将模型和委托设置到列表视图listView.setModel(&model);listView.setItemDelegate(&delegate);listView.show();return app.exec();
}
在这个示例中,我们展示了如何使用 QListView 和自定义的 QAbstractListModel 来动态生成数据,而不需要在内存中维护一份数据存储的副本。在实际业务中,数据可以直接从业务模块中获取,这样避免出现数据的两个副本。SimpleDelegate 负责定制列表项的视觉呈现,但在这个简化的例子中,我们仅使用了默认的绘制逻辑。如果需要更复杂的项显示或编辑功能,可以在委托中进一步扩展 paint 和其他相关方法。这些内容我们在示例3中展现。
示例 3: 使用 QListView 和自定义 QAbstractListModel(解决数据如何展示问题)
实例2中没有展开SimpleDelegate 的实现,在实际开发场景中,界面展示的需求往往更加复杂,特别是QListView的View模型采用的是paint函数来呈现,和其他图形界面框架(如AndroidFramework)构造一个QWidget*控件的形式不同,paint的形式用起来更复杂,但性能天花板更高。
下面是一个使用自定义模型 LargeListModel 和委托 SimpleDelegate 的例子。在这个示例中,我们将创建一个自定义的 QAbstractListModel 类,名为 LargeListModel,它将处理大量数据项。此外,我们还将扩展 SimpleDelegate 类来自定义 QListView 中项的视觉呈现。这个委托将负责绘制项的背景、文本和一些装饰元素,从而提供更丰富的用户界面。
首先,我们定义 LargeListModel 类,该类派生自 QAbstractListModel:
#include <QAbstractListModel>class LargeListModel : public QAbstractListModel {Q_OBJECT
public:explicit LargeListModel(int numItems, QObject *parent = nullptr): QAbstractListModel(parent), m_numItems(numItems) {}int rowCount(const QModelIndex &parent = QModelIndex()) const override {return parent.isValid() ? 0 : m_numItems;}QVariant data(const QModelIndex &index, int role = Qt::DisplayRole) const override {if (!index.isValid() || index.row() >= m_numItems)return QVariant();switch (role) {case Qt::DisplayRole:// 动态生成显示的数据return QStringLiteral("Item %1").arg(index.row());// 这里可以根据需要添加对其他角色的处理default:return QVariant();}}private:int m_numItems; // 数据项的数量
};
接下来,我们将自定义 SimpleDelegate 类,以便在 QListView 中渲染更复杂的项:
#include <QStyledItemDelegate>
#include <QPainter>class SimpleDelegate : public QStyledItemDelegate {
public:using QStyledItemDelegate::QStyledItemDelegate; // 继承构造函数void paint(QPainter *painter, const QStyleOptionViewItem &option, const QModelIndex &index) const override {// 保存当前的绘图状态painter->save();// 绘制项的背景if (option.state & QStyle::State_Selected) {painter->fillRect(option.rect, option.palette.highlight());} else {painter->fillRect(option.rect, option.palette.base());}// 绘制自定义内容,例如文本QString text = index.data(Qt::DisplayRole).toString();painter->drawText(option.rect, Qt::AlignLeft | Qt::AlignVCenter, text);// 还原绘图状态painter->restore();}// 如果需要项的大小不是默认值,可以重写 sizeHint 方法QSize sizeHint(const QStyleOptionViewItem &option, const QModelIndex &index) const override {return QSize(option.rect.width(), 50); // 设置项的高度为50}
};
最后,我们在 main 函数中创建 QListView,设置自定义的模型和委托,并显示它们:
#include <QApplication>
#include <QListView>int main(int argc, char *argv[]) {QApplication app(argc, argv);// 创建自定义模型和委托LargeListModel *model = new LargeListModel(100000); // 假设有 10 万个数据项SimpleDelegate *delegate = new SimpleDelegate();// 创建并设置 QListViewQListView listView;listView.setModel(model);listView.setItemDelegate(delegate);// 设置其他视图属性,如果需要listView.setSelectionMode(QAbstractItemView::SingleSelection);listView.setAlternatingRowColors(true); // 设置交替行颜色listView.show();return app.exec();
}
在这个示例中,LargeListModel 负责提供数据项,而 SimpleDelegate 负责自定义每个项的绘制。这种方法使得处理大量数据项时能够保持高性能,同时提供了丰富的视觉呈现和用户交互能力。通过委托的 paint 方法,我们可以绘制文本、图标、背景或任何其他图形元素来增强用户界面的视觉效果。通过重写 sizeHint 方法,我们可以为每个项定制大小,以适应不同的内容和设计需求。
这种模型-视图-委托的方法为高效地处理和展示大型数据集提供了灵活的解决方案,使得开发者可以在保持应用程序性能的同时,实现复杂且具有吸引力的用户界面。
进一步优化:处理大量动态数据
以上示例已经展示了如何使用 QListView 和自定义模型以及委托来处理静态数据。但在实际应用中,我们可能需要处理动态变化的数据集,其中项目可能会被添加、移除或更新。为了保持UI的响应性和数据的一致性,我们需要在模型中正确地处理这些变化。
数据添加示例
假设我们的 LargeListModel 需要动态添加数据,我们可以在模型中实现添加数据的逻辑,并通知视图更新:
class LargeListModel : public QAbstractListModel {// ...(省略已有代码)public:// ...(省略已有代码)// 添加新项的方法void addItem(const QString &title) {const int index = itemCount;beginInsertRows(QModelIndex(), index, index);titles.append(title);checkedItems.insert(index, false);itemCount++;endInsertRows();}// ...(省略已有代码)
};// 使用示例:
int main(int argc, char *argv[]) {QApplication app(argc, argv);// ...(省略已有代码)LargeListModel* model = new LargeListModel(0); // 初始时没有数据// ...(省略已有代码)// 动态添加数据for (int i = 0; i < 100000; ++i) {model->addItem(QString("动态项目 %1").arg(i));}// ...(省略已有代码)return app.exec();
}
在这个例子中,我们通过 addItem 方法在模型中添加新的数据项。在添加数据之前和之后,我们分别调用 beginInsertRows 和 endInsertRows 方法,这样 QListView 就会自动更新显示新添加的数据。
数据更新示例
如果我们需要更新现有数据,我们同样需要确保视图能够得到通知:
class LargeListModel : public QAbstractListModel {// ...(省略已有代码)public:// ...(省略已有代码)// 更新某项的方法void updateItem(int index, const QString &newTitle) {if(index >= 0 && index < itemCount) {titles[index] = newTitle;QModelIndex modelIndex = createIndex(index, 0);emit dataChanged(modelIndex, modelIndex);}}// ...(省略已有代码)
};
在这里,我们通过 updateItem 方法更新一条数据,并通过 dataChanged 信号告知视图特定项的数据已经改变。createIndex 方法用来创建一个指向已更新项的 QModelIndex 对象,这是发出 dataChanged 信号所必需的。
性能注意事项
处理大量数据时,以下是一些提高性能的常见做法:
- 使用
beginInsertRows和endInsertRows(或对应的删除和更新版本)时,请确保避免同时进行大量的单独插入或删除操作,因为这会导致视图频繁更新,从而降低性能。相反,应该批量插入或删除。 - 避免在
data方法中执行耗时的计算。如果需要,可以将数据缓存或使用后台线程来准备数据。 - 如果列表项的大小是固定的,使用
setUniformItemSizes(true)可以提高滚动和渲染的性能。 - 如果数据的读取是昂贵的操作,考虑实现延迟加载或数据分页,这样只有当数据真正需要显示时才读取。
一个更复杂的完整例子
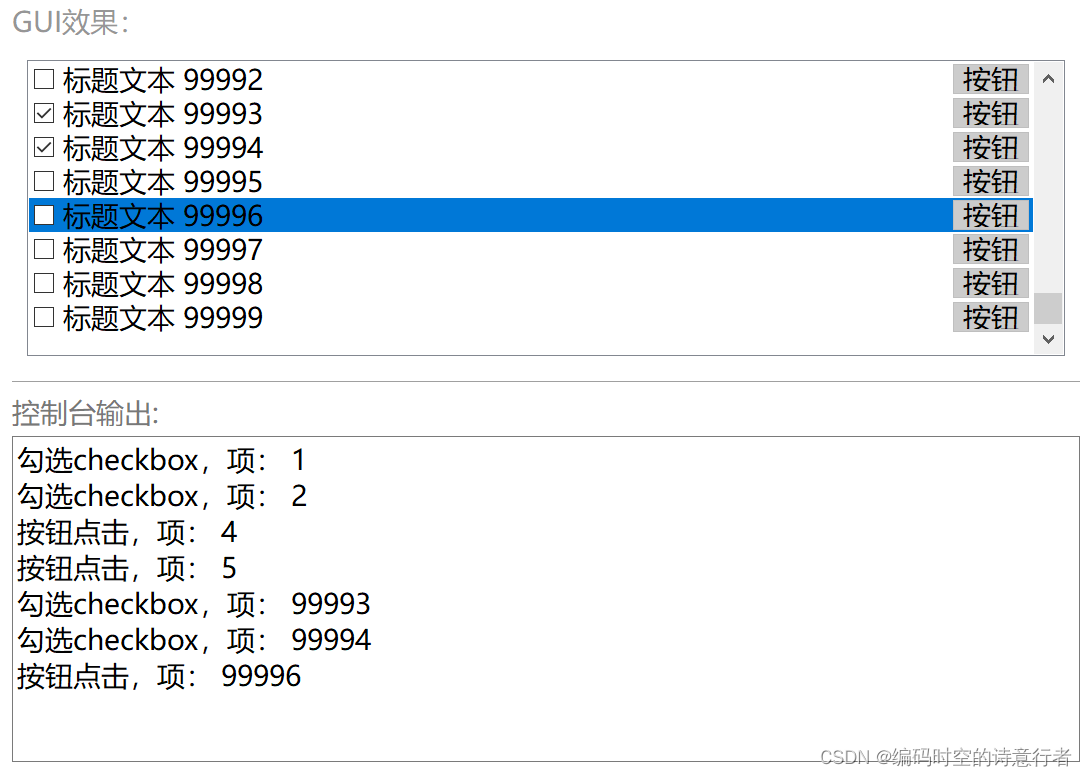
刚刚我们循序渐进地了解了QListView高性能大规模列表的设计思想和实现步骤,接下来我们实现一个稍微复杂的例子,这个例子在列表的每一项中增加了一个复选框和一个按钮,表示这是一个复杂列表项的呈现。
#include <QApplication>
#include <QCheckBox>
#include <QListView>
#include <QPainter>
#include <QPushButton>
#include <QStandardItemModel>
#include <QStyledItemDelegate>
#include <QAbstractListModel>
#include <QHash>
#include <QVariant>class LargeListModel : public QAbstractListModel {
public:LargeListModel(int numItems, QObject* parent = nullptr): QAbstractListModel(parent), itemCount(numItems) {titles.resize(itemCount); // 初始化标题数组for (int i = 0; i < itemCount; ++i) {titles[i] = QString("标题文本 %1").arg(i); // 生成初始标题文本}}int rowCount(const QModelIndex& parent = QModelIndex()) const override {if (parent.isValid()) {return 0;}return itemCount;}QVariant data(const QModelIndex& index, int role = Qt::DisplayRole) const override {if (!index.isValid() || index.row() >= itemCount || index.row() < 0) {return QVariant();}switch (role) {case Qt::DisplayRole:return titles.at(index.row());case Qt::CheckStateRole:{auto it = checkedItems.find(index.row());if (it != checkedItems.end()) {return QVariant(it.value() ? Qt::Checked : Qt::Unchecked);}return QVariant(Qt::Unchecked);}case Qt::EditRole: // 处理编辑角色return titles[index.row()];default:return QVariant();}}bool setData(const QModelIndex& index, const QVariant& value, int role = Qt::EditRole) override {if (!index.isValid() || index.row() >= itemCount || index.row() < 0)return false;switch (role) {case Qt::CheckStateRole:// 更新 checkedItems,记录复选框的状态checkedItems[index.row()] = (value.toBool());emit dataChanged(index, index, { role });return true;case Qt::EditRole:// 更新标题文本titles[index.row()] = value.toString();emit dataChanged(index, index, { role });return true;default:return false;}}Qt::ItemFlags flags(const QModelIndex& index) const override {if (!index.isValid())return Qt::NoItemFlags;// 添加 Qt::ItemIsEditable 以支持编辑return Qt::ItemIsEnabled | Qt::ItemIsSelectable | Qt::ItemIsUserCheckable | Qt::ItemIsEditable;}private:int itemCount;mutable QHash<int, bool> checkedItems; // 存储复选框的状态QVector<QString> titles; // 存储标题文本
};// 自定义委托来绘制和处理列表项
class CustomDelegate : public QStyledItemDelegate {
public:CustomDelegate(QObject* parent = nullptr) : QStyledItemDelegate(parent) {}// 绘制列表项void paint(QPainter* painter, const QStyleOptionViewItem& option, const QModelIndex& index) const override {QStyleOptionButton buttonOption;QRect buttonRect = QRect(option.rect.right() - 80, option.rect.y() + 1, 78, option.rect.height() - 2);buttonOption.rect = buttonRect;QStyleOptionButton checkboxOption;QRect checkboxRect = QRect(option.rect.x() + 5, option.rect.y() + 5, option.rect.height() - 10, option.rect.height() - 10);checkboxOption.rect = checkboxRect;checkboxOption.state |= QStyle::State_Enabled;if (index.data(Qt::CheckStateRole).toBool()) {checkboxOption.state |= QStyle::State_On;} else {checkboxOption.state |= QStyle::State_Off;}painter->save();if (option.state & QStyle::State_MouseOver) {painter->fillRect(option.rect, option.palette.light());}// 根据是否有鼠标悬停,绘制高亮背景if (option.state & QStyle::State_MouseOver) {QRect highlightRect = option.rect;painter->fillRect(highlightRect, option.palette.highlight());}// 绘制复选框QApplication::style()->drawControl(QStyle::CE_CheckBox, &checkboxOption, painter);// 绘制按钮buttonOption.text = "按钮";QApplication::style()->drawControl(QStyle::CE_PushButton, &buttonOption, painter);// 绘制文本QRect textRect = option.rect.adjusted(checkboxRect.width() + 10, 0, -buttonRect.width() - 10, 0);painter->drawText(textRect, Qt::AlignVCenter, index.data().toString());painter->restore();}// 处理事件,如复选框的点击bool editorEvent(QEvent* event, QAbstractItemModel* model, const QStyleOptionViewItem& option, const QModelIndex& index) override {if (event->type() == QEvent::MouseButtonRelease) {QMouseEvent* mouseEvent = static_cast<QMouseEvent*>(event);QRect buttonRect = QRect(option.rect.right() - 80, option.rect.y() + 5, 70, option.rect.height() - 10);QRect checkboxRect = QRect(option.rect.x() + 5, option.rect.y() + 5, option.rect.height() - 10, option.rect.height() - 10);if (buttonRect.contains(mouseEvent->pos())) {// 按钮被点击qDebug() << "按钮点击,项:" << index.row();} else if (checkboxRect.contains(mouseEvent->pos())) {// 切换复选框状态bool checked = !index.data(Qt::CheckStateRole).toBool();model->setData(index, checked ? Qt::Checked : Qt::Unchecked, Qt::CheckStateRole);qDebug() << "勾选checkbox,项:" << index.row();}return true; // 事件已处理}return QStyledItemDelegate::editorEvent(event, model, option, index);}// 提供项的大小提示QSize sizeHint(const QStyleOptionViewItem& option, const QModelIndex& index) const override {return QSize(option.rect.width(), 34); // 调整为所需的大小}
};int main(int argc, char *argv[]) {QApplication app(argc, argv);QListView* listView = new QListView;auto insertCount = 100000;// 构造展示10w条数据CustomDelegate* delegate = new CustomDelegate(listView);listView->setModel(new LargeListModel(insertCount));listView->setItemDelegate(delegate);// 优化性能listView->setUniformItemSizes(true);listView->setSelectionMode(QAbstractItemView::SingleSelection);listView->show();return app.exec();
}
展示效果:
结语
通过遵循上述模式和性能最佳实践,可以更好地创建强大的、响应迅速的 Qt 应用程序。
简而言之,在QListView体系里,QAbstractListModel解决的是“数据存哪”,而QAbstractItemDelegate解决的是数据“如何展示”。这种模型/视图和委托的架构是 Qt 高效数据处理的基石,使得复杂的UI设计和数据操作变得可管理和可扩展。


![[FFmpeg学习]windows环境sdl播放音频试验](https://img-blog.csdnimg.cn/direct/27cb970f1fca4730bc9aa2eb638f10a5.png)
