(接上文《软件设计不是CRUD(22):在流式数据处理系统中进行业务抽象落地——设计思考》)
4、详细设计
项目开发初期,有两种测速雷达和对应的摄像头需要接入,分别是STC500型测速雷达和TTS400型测速雷达。
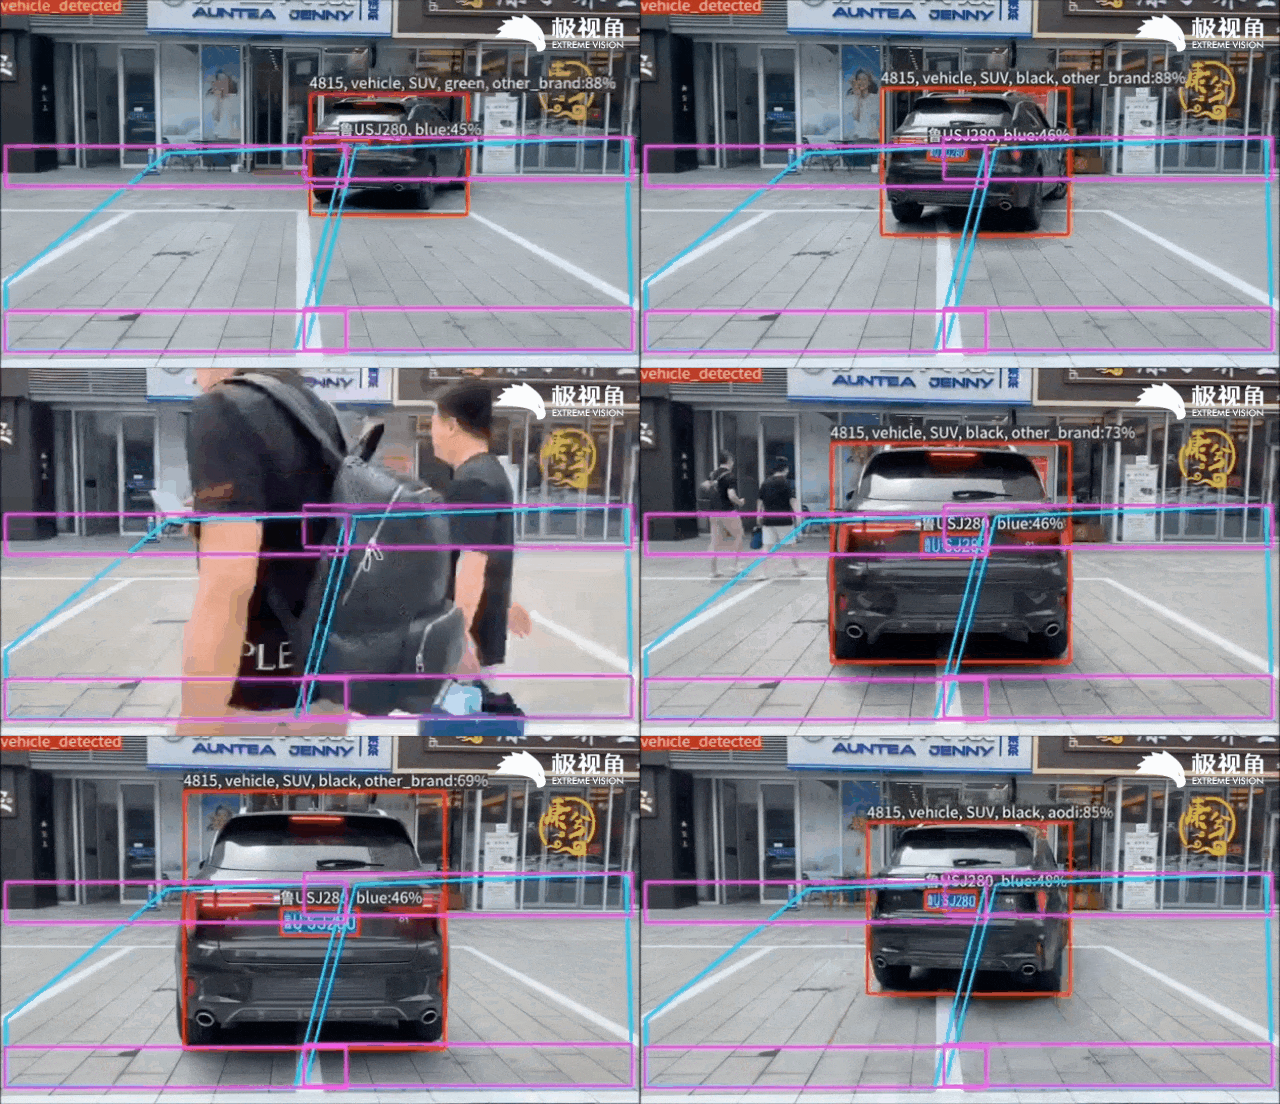
STC500型测速雷达,外联了一个拍照摄像头。当测速雷达检测到超速车辆后,会激活摄像头,摄像头会在2秒内拍摄3张照片。照片会被存储在网络摄像头本地,然后由外部程序通过4G/G5网络主动调用取回。TTS400型测速雷达发现超速车辆后,不会激活外部摄像头进行拍照,因为它内部有一个内置摄像头,TTS400可以根据拍摄的照片自动识别车牌号码。识别到的车牌会和TTS400型测速雷达的其它信息一同传递到上级采集系统。
4.1、控制逻辑的设计
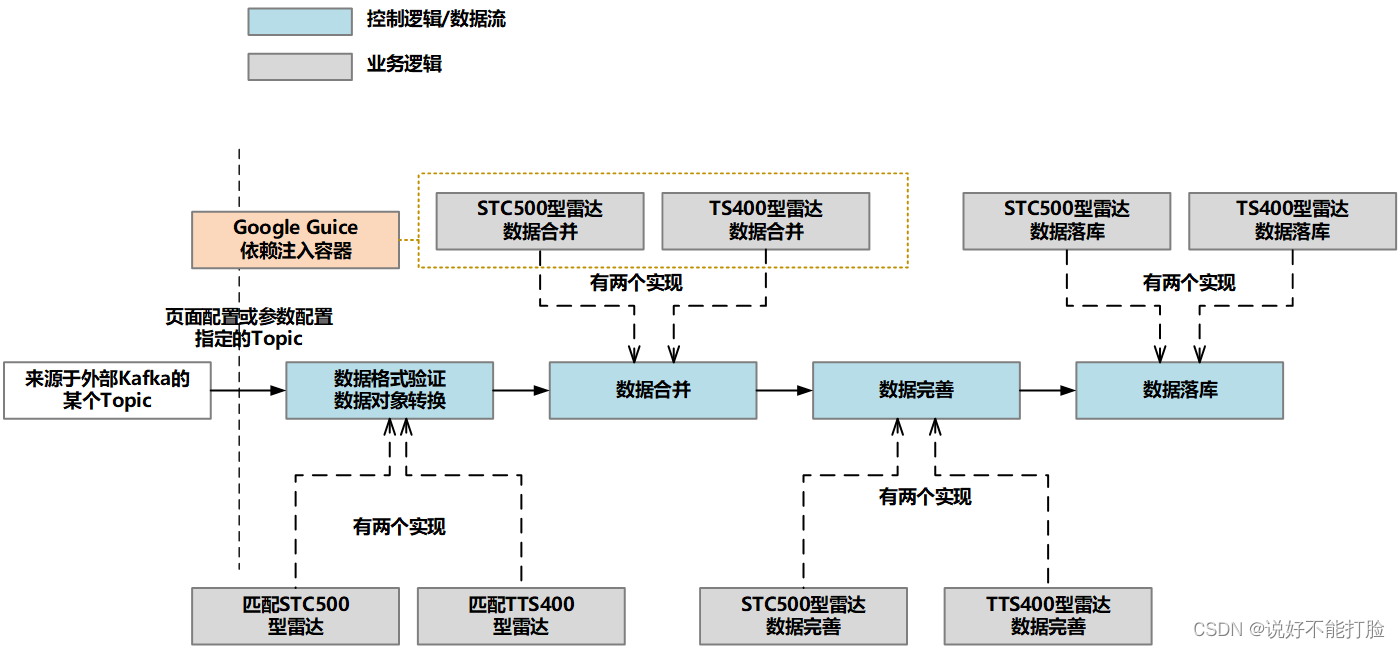
在上文中我们已经进行了讨论,为了保证采集系统的二次开发性,Flink的数据流脚本中只存在控制逻辑。所以对控制逻辑的设计就是对Flink数据流的设计。除此之外,同样是为了满足二次开发性,保证运维团队可以根据实际的设备情况实现新型号的测速雷达接入,设计人员在控制逻辑设计时加入了Google Guice依赖注入容器来管理具体的业务实现。
下面我们就对控制逻辑的信息代码设计进行讨论。需要说明的是,由于这部分详细设计的代码特别多,所以这里只提取关键代码进行代码展示和讲解。整个Flink流处理过程可以概括为:
- 首先建立一个超轻量级依赖注入容器——基于Google Guice,这个容器将帮助设计人员有效降低各模块的耦合度
- 验证目前存在的各个具体业务处理行为,为其定义的type不存在重复
- 定义Flink流处理过程,具体流程(图)参见上图
- 初始化Google Guice依赖注入容器
public static void main(String[] args) throws Exception {  // 1、==========// 由于存在二次开发,所以二次开发定义的Google Guice中的Module所在包通过外部参数传入// 默认情况下,只有当前工程的工程包路径需要加入到依赖注入容器的扫描范围final List<Module> moduleInstances = Lists.newArrayList();String defaultPackageName = "flink.velocity.module[你的默认包]";String[] packageNames = null;if(args == null || args.length == 0) {packageNames = new String[] {defaultPackageName};} else {packageNames = ArrayUtils.add(args , defaultPackageName);}for (String packageName : packageNames) {Reflections reflections = new Reflections(packageName);// 取得这个包下,所有Module的配置信息Set<Class<? extends Module>> moduleClasses = reflections.getSubTypesOf(Module.class);if(!CollectionUtils.isEmpty(moduleClasses)) {moduleClasses.stream().forEach(item -> {try {moduleInstances.add(item.newInstance());} catch (InstantiationException | IllegalAccessException e) {e.printStackTrace(System.out);System.exit(-1);}});}}// 现在可以初始化所有的Module设置了final Injector injector = Guice.createInjector(moduleInstances);// 2、==========List<Binding<VelocityStrategy>> velocityStrategieBindings = injector.findBindingsByType(TypeLiteral.get(VelocityStrategy.class));List<VelocityStrategy<? extends VelocityPojo>> velocityStrategies = Lists.newArrayList();List<String> existTyps = Lists.newArrayList();Validate.isTrue(!CollectionUtils.isEmpty(velocityStrategieBindings) , "启动Flink流处理脚本时,没有发现任何具体业务处理行为,请检查VelocityStrategy接口实现情况,并检查启动参数是否正确");for (Binding<VelocityStrategy> binding : velocityStrategieBindings) {Provider<VelocityStrategy> provider = binding.getProvider();VelocityStrategy velocityStrategy = provider.get();String type = velocityStrategy.type();Validate.isTrue(StringUtils.isNotBlank(type) , "启动Flink流处理脚本时,至少发现一个具体的业务处理行为没有设定全系统唯一的type信息,请检查");Validate.isTrue(!StringUtils.equalsAny(type, existTyps.toArray(new String[] {})) , "启动Flink流处理脚本时,发现type为[%s]的业务类型重复,请检查" , type);existTyps.add(type);velocityStrategies.add(velocityStrategy);}// 3、=============
// 见后文
// ......
}
以上代码中velocityStrategies集合就是目前由依赖注入容器管理的,所有可用的具体数据采集处理过程。之所以要最先将这些采集处理过程从依赖注入容器中取出,就是因为依赖注入容器本身不能被序列化,不能传入到任何算子中。
- 接着可以通过以下代码建立Kafka的特定Topic作为数据源(使用Source算子)
public static void main(String[] args) throws Exception {// ======== 接上文// ......// 从Kafka的特定Topic中读取信息,所有满足抽象模型要求的数据,都是从这个topic开始System.setProperty("user.timezone","UTC+8");StreamExecutionEnvironment env = StreamExecutionEnvironment.getExecutionEnvironment();// 为了更好观察各算子,这里禁用Operator Chaining。实际生产环境不建议这样做。// 本文默认读者都清楚Kafka的基本使用,所以kafka的安装、设置要求就不再本文赘述了。env.disableOperatorChaining();String brokers = "ip1:9092,ip2:9092,ip3:9092";KafkaSource<String> source = KafkaSource.<String>builder().setBootstrapServers(brokers).setTopics("yourtopic").setGroupId("your-group").setValueOnlyDeserializer(new SimpleStringSchema()).build();DataStreamSource<String> dataStreamSource = env.fromSource(source, WatermarkStrategy.noWatermarks(), "Kafka Source");// ......
}
- 接着通过以下代码为每条传入的数据验证和匹配具体的数据采集处理逻辑,并进行对象转换
public static void main(String[] args) throws Exception {// ======== 接上文// ......// dataStreamSource 就是经过上文处理的数据流// 判定数据是否有处理的具体业务策略,没有任何策略处理的数据将被丢掉。转换成正确的对象SingleOutputStreamOperator<VelocityPojo> currentStreamOperator = dataStreamSource.flatMap(new MyRichFlatMapFunction(velocityStrategies)).setParallelism(3);// ......
}// 实现的FlatMap,用于进行数据验证和对象转换
class MyRichFlatMapFunction extends RichFlatMapFunction<String, VelocityPojo> {// 有依赖注入容器管理的具体处理过程private List<VelocityStrategy<? extends VelocityPojo>> velocityStrategies;public MyRichFlatMapFunction(List<VelocityStrategy<? extends VelocityPojo>> velocityStrategies) {this.velocityStrategies = velocityStrategies;}@Overridepublic void flatMap(String value, Collector<VelocityPojo> out) throws Exception {VelocityStrategy<? extends VelocityPojo> current = null;for (VelocityStrategy velocityStrategy : velocityStrategies) {if(velocityStrategy.match(value)) {current = velocityStrategy;break;}}if(current == null) {return;}// 获取上下文中的数据采集匹配策略,激活具体的数据对象转换VelocityPojo velocityPojo = current.transform(value);if(velocityPojo == null || StringUtils.isBlank(velocityPojo.type())) {throw new IllegalArgumentException("转换的具体视频对象信息,没有找到type属性,请检查");}// 发送数据到数据流的下一个处理算子out.collect(velocityPojo);}
}
注意,转换出来的对象中都必须有type属性值,以便能够进行后续处理
- 下一步是进行数据合并,这是由于一部分具体的雷达采集数据,完整的数据就需要多条数据合并起来
public static void main(String[] args) throws Exception {// ======== 接上文// ......// currentStreamOperator 就是经过上文处理的数据流// 按照eventId进行分组SingleOutputStreamOperator<VelocityPojo> reduceStream = currentStreamOperator.keyBy(new KeySelector<VelocityPojo , String>(){@Overridepublic String getKey(VelocityPojo value) throws Exception {return value.eventId();}})// 使用传来的数据中的事件id,注意,不同的具体业务数据,其业务事件的描述字段是不一样的.window(ProcessingTimeSessionWindows.withGap(Time.seconds(3l)))// 累加变化为一个新的json,格式见方法中的明细说明.reduce(new MyReduceFunction(velocityStrategies)).setParallelism(3);// ......
}// 实现的reduce算子,用于进行对象的合并
class MyReduceFunction implements ReduceFunction<VelocityPojo> {private List<VelocityStrategy<? extends VelocityPojo>> velocityStrategies;public MyReduceFunction(List<VelocityStrategy<? extends VelocityPojo>> velocityStrategies) {this.velocityStrategies = velocityStrategies;}@Overridepublic VelocityPojo reduce(VelocityPojo oldPojo, VelocityPojo newPojo) throws Exception {VelocityStrategy<? super VelocityPojo> current = Utils.findVelocityStrategy(oldPojo, velocityStrategies);// 进行对象合并VelocityPojo reduced = current.reduce(oldPojo, newPojo);if(reduced == null) {return oldPojo;}return reduced;}
}
注意,并不是所有具体的测速雷达数据,都需要进行数据合并。有的雷达数据就是一次超速发送一条数据,类似这样的情况就不需要进行数据合并,所以Flink的数据流必须兼容所有的合并请情况。当然,以上示例代码就是兼容任何合并情况的。
- 然后进行数据完善
public static void main(String[] args) throws Exception {// ======== 接上文// ......// reduceStream 就是经过上文处理的数据流// 进行数据完善,由于不同的具体业务过程完善数据的方式、时间、复杂度都不一样,所以完善数据的步骤由异步算子负责currentStreamOperator = AsyncDataStream.unorderedWait(reduceStream, new MyRichAsyncFunction(velocityStrategies), 2, TimeUnit.SECONDS).setParallelism(3);// ......
}// 实现的async异步处理算子,用于进行对象数据完善
class MyRichAsyncFunction extends RichAsyncFunction<VelocityPojo, VelocityPojo> {private List<VelocityStrategy<? extends VelocityPojo>> velocityStrategies;public MyRichAsyncFunction(List<VelocityStrategy<? extends VelocityPojo>> velocityStrategies) {this.velocityStrategies = velocityStrategies;}@Overridepublic void asyncInvoke(VelocityPojo input, ResultFuture<VelocityPojo> resultFuture) throws Exception {VelocityStrategy<? super VelocityPojo> current = Utils.findVelocityStrategy(input, velocityStrategies);// 开始正式进行工作,这里可以使用一个线程池,也可以直接使用诸如CompletableFuture这样的工具。// 然后通过resultFuture告知异步算子是否执行成功CompletableFuture.supplyAsync(new Supplier<VelocityPojo>() {@Overridepublic VelocityPojo get() {// 正式情况下,由于CompletableFuture是可以进行取消操作的,所以这里还应该进行InterruptedException异常的处理current.perfectMess(input);return input;}}).thenAccept(new Consumer<VelocityPojo>() {// 接受到完善后的数据,该方法被激活@Overridepublic void accept(VelocityPojo t) {resultFuture.complete(Collections.singleton(t));}});}
}
AsyncFunction算子是编码人员经常在Fink处理脚本中使用的一种提高性能的手段,读者应该重点了解一下AsyncFunction算子和诸如CompletableFuture这种的异步工具。
- 最后进行数据输出。数据输出的建立比较复杂,因为采集到的不同数据对于数据输出的要求不一样。有的是写入一张数据表,有的是写入多张数据表
public static void main(String[] args) throws Exception {// ======== 接上文// ......// currentStreamOperator 就是经过上文处理的数据流// 我们首先为所有已知的具体处理策略,分别建立一个旁流标签。STC500型测速雷达一个旁流标签、TTS400型测速雷达一个旁流标签......// 日后如果有新接入的另外型号测速雷达,也会建立旁流标签。Map<String , OutputTag<VelocityPojo>> outputTags = Maps.newHashMap();for (VelocityStrategy velocityStrategy : velocityStrategies) {String type = velocityStrategy.type();OutputTag<VelocityPojo> velocitySinkStreamTag = new OutputTag<VelocityPojo>(type , TypeInformation.of(VelocityPojo.class)){};outputTags.put(type , velocitySinkStreamTag);} currentStreamOperator = currentStreamOperator.process(new MySideProcessFunction(outputTags)).setParallelism(3);// =============================// 接着为每个具体的处理策略,基于已经建立好的旁流标签进行数据分流,分成A、B、C等数据旁流// 每一个旁流又可以指定一个或者多个Sink,最终实现不同数据,不同落库逻辑的需求。for (VelocityStrategy velocityStrategy : velocityStrategies) {String type = velocityStrategy.type();SinkFunction<VelocityPojo>[] sinks = velocityStrategy.buildSink();if(sinks == null || sinks.length == 0) {continue;}OutputTag<VelocityPojo> velocitySinkStreamTag = outputTags.get(type);// 一个分支的处理因子,可以根据实际情况,建立多个sink// 这是因为某个具体的业务模型落库时,可能涉及多个数据表。多个数据表必须要有多个sink进行处理,但业务模型是同样的数据SideOutputDataStream<VelocityPojo> velocitySinkDataStream = currentStreamOperator.getSideOutput(velocitySinkStreamTag);for (SinkFunction<VelocityPojo> sinkFunction : sinks) {velocitySinkDataStream.addSink(sinkFunction).setParallelism(3);}}// ......
}// 这是具体的分流过程,一句话就可以说明:按照数据的type值,将之前处理好的数据送入不同的旁流
class MySideProcessFunction extends ProcessFunction<VelocityPojo, VelocityPojo> {private Map<String , OutputTag<VelocityPojo>> outputTags;public MySideProcessFunction(Map<String , OutputTag<VelocityPojo>> outputTags) {this.outputTags = outputTags;}@Overridepublic void processElement(VelocityPojo velocityPojo, ProcessFunction<VelocityPojo, VelocityPojo>.Context context, Collector<VelocityPojo> collector) throws Exception {// 按照不同的tag,为不同的业务处理线建立不同的处理流分支String type = velocityPojo.type();OutputTag<VelocityPojo> velocitySinkStreamTag = outputTags.get(type);context.output(velocitySinkStreamTag, velocityPojo);}
}
需要注意,具体业务数据处理策略对于数据输出的设计,无法完全和Flink特性解耦,必须符合Flink-Sink算子的描述规范——也就是实现Fink-Sink算子的SinkFunction接口。
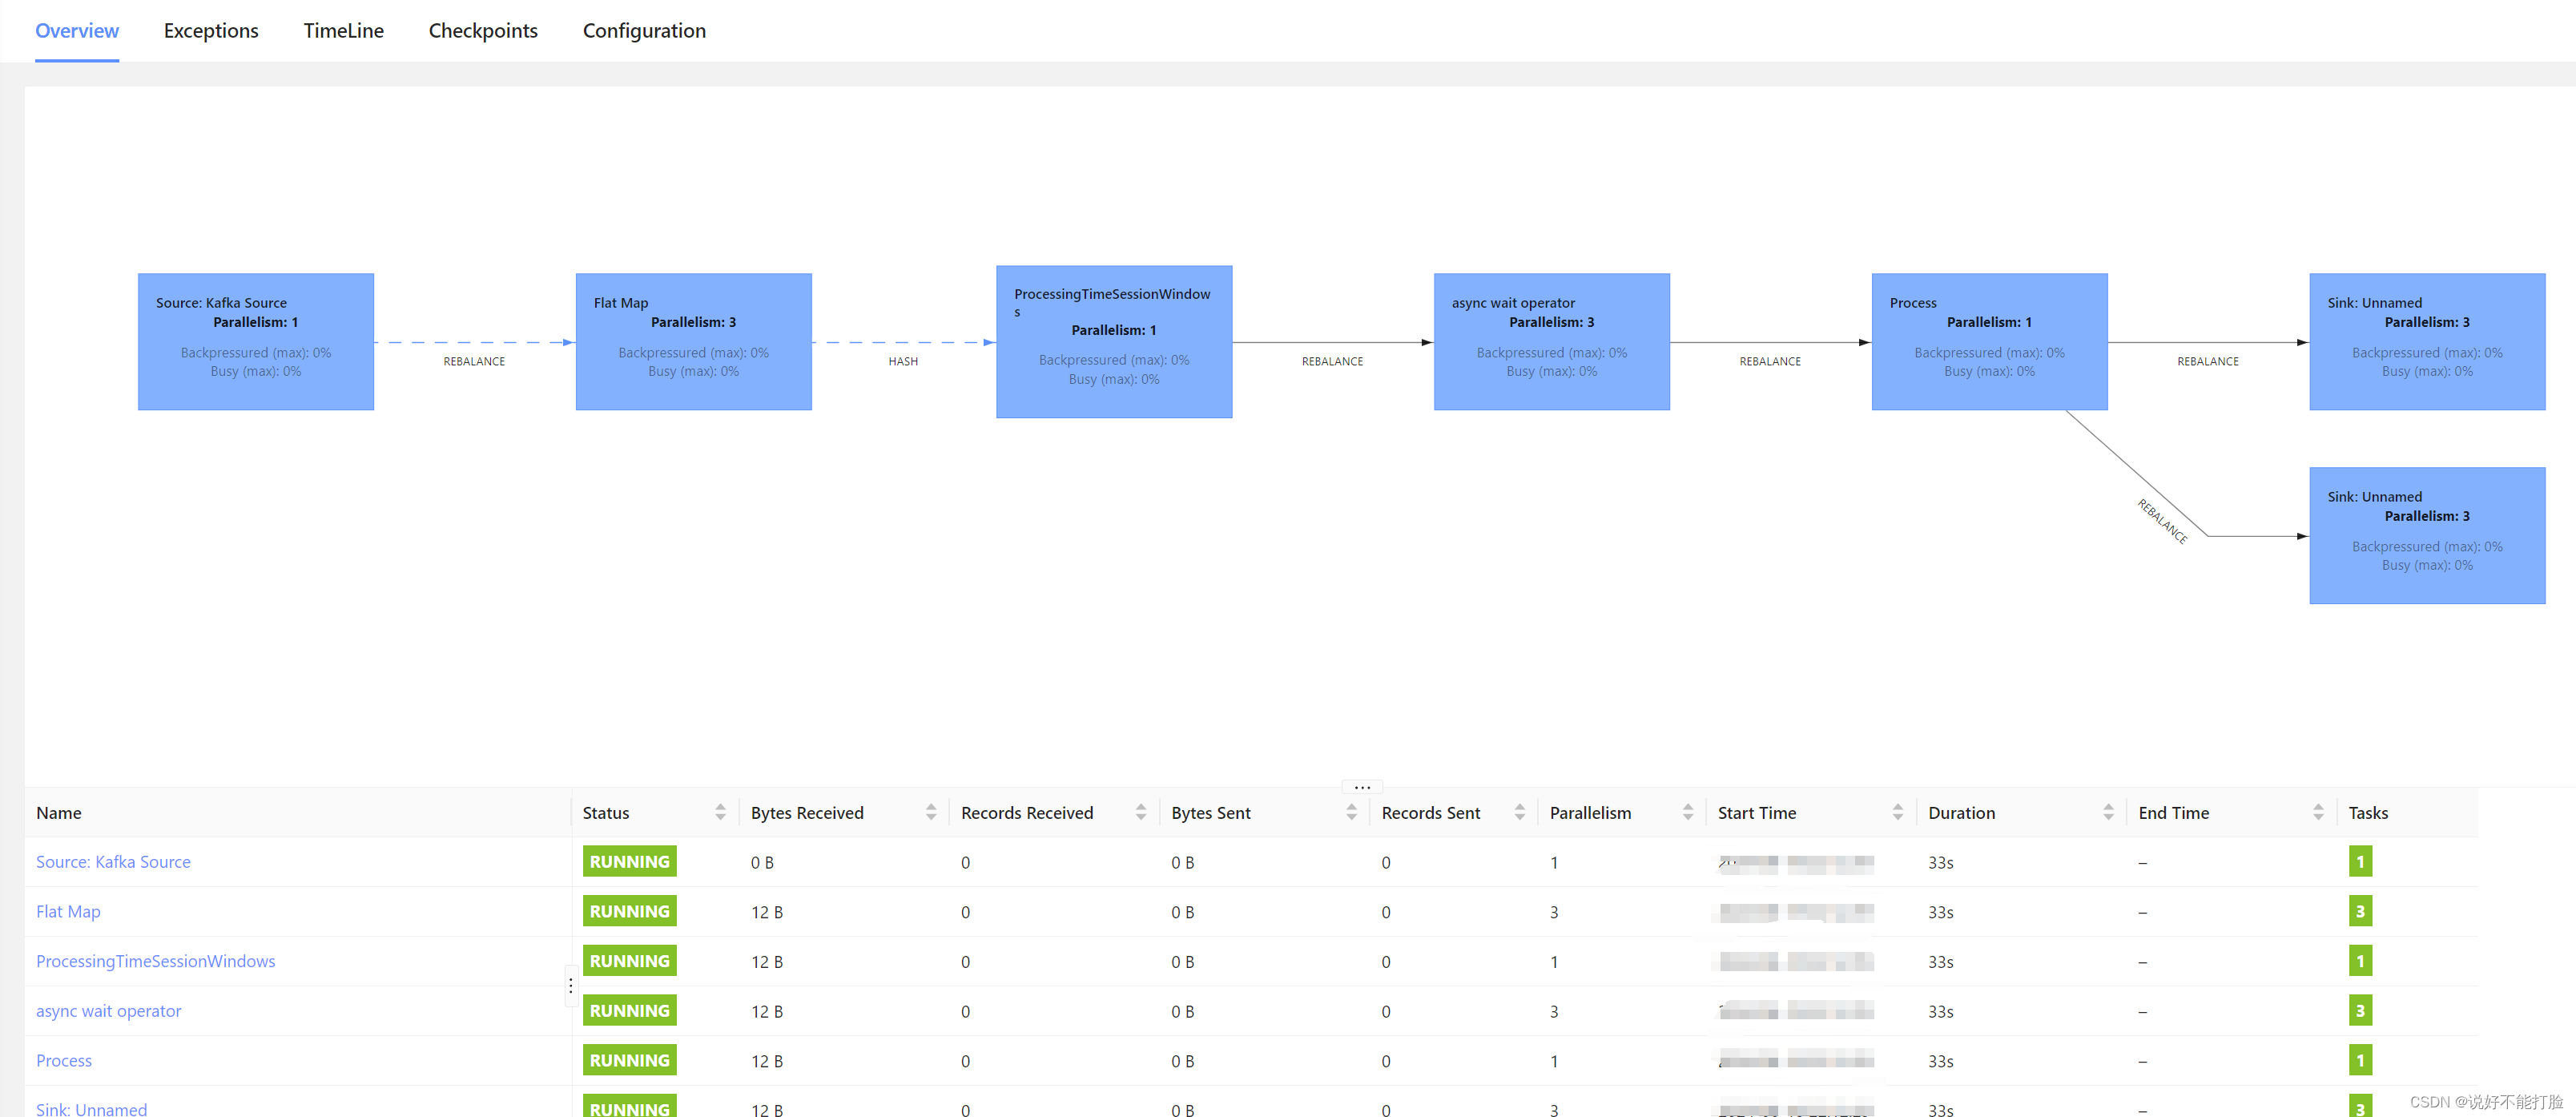
可以看到,在整个控制逻辑的编写过程中,我们主要从Kafka指定的Topic中接收所有已知类型的测速雷达传来的超速数据(Source数据源算子)。在数据的处理过程中,我们使用了Flink中的多个算子,包括使用flatMap对象转换算子来进行数据匹配和对象转换;使用reduce合并算子来进行数据中eventId一致的多个数据对象进行合并;使用async异步处理算子进行各采集数据的完善工作;使用process基础处理算子进行旁流拆分以便为不同雷达数据准备不同的Sink输出算子。
4.2、对具体模型进行设计
我们主要来看一下STC500型测速雷达的具体业务模型设计,如下代码片段所示:
/*** STC500测速雷达,外联了一个拍照摄像头。* 当测速雷达检测到超速车辆后,会激活摄像头,摄像头会在2秒内拍摄3张照片。* 照片会被存储在本地,然后由4G/G5网络由外部程序主动调用取回*/
@Getter
@Setter
public class STC500Velocity implements VelocityPojo ,Serializable {private static final long serialVersionUID = 575153595101559653L;// 在系统中唯一的类型private String type;// 事件编号private String eventId;// 只会有一个激活时间private Date eventTime;// 实时速度private Integer speed;// 摄像头拍摄的图片完整地址,图片内容需要通过这个地址进行取回private String[] cameraUrl;// 车牌信息,车牌信息不会由测速雷达数据返回,需要通过取回的图片自己识别private String licensePlate;@Overridepublic String eventId() {return this.getEventId();}@Overridepublic String type() {return this.type;}
}
4.3、对具体行为进行设计
接着我们看一下对STC500型测速雷达的数据进行采集时,具体的行为实现情况:
// STC500测速雷达数据处理策略
public class VelocityStrategyForSTC500 implements VelocityStrategy<STC500Velocity> , Serializable {// ============================== 以下方法和数据匹配有关public String type() {return "STC500";}public boolean matchType(String type) {return StringUtils.equals(type, this.type());}@Overridepublic boolean match(String mess) {// 1、字符串必须是JSON结构// 2、属性中必须存在eventid、eventTime、speed和cameraUrl(一个或者多个)信息// 只有满足以上两个情况,才说明是STC500型测速雷达传来的数据if(!isJson(mess)) {return false;}JSONObject messJson = JSONObject.parseObject(mess);String eventId = messJson.getString("eventId");Date eventTime = messJson.getDate("eventTime");Integer speed = messJson.getInteger("speed");String cameraUrl = messJson.getString("cameraUrl");// 只有以下成立,才返回trueif(StringUtils.isNoneBlank(eventId , cameraUrl) && eventTime != null && speed != null) {return true;}return false;}// ============================== 以上方法和数据匹配有关// ============================== 以下方法和对象转换、合并、完善有关public STC500Velocity transform(String mess) {// STC500型雷达进行数据完善,主要是通过图片地址,识别图片后,得到车牌信息JSONObject messJson = (JSONObject)JSONObject.parse(mess);String eventId = messJson.getString("eventId");Date eventTime = messJson.getDate("eventTime");Integer speed = messJson.getInteger("speed");String cameraUrl = messJson.getString("cameraUrl");// 注意分多次传来的多个数据信息中,每次都只携带一个图片地址STC500Velocity stc500 = new STC500Velocity();stc500.setEventId(eventId);stc500.setEventTime(eventTime);stc500.setCameraUrl(new String[] {cameraUrl});stc500.setSpeed(speed);stc500.setType(this.type());return stc500;}public STC500Velocity reduce(STC500Velocity current, STC500Velocity newPojo) {// 进行数据累加,主要就是进行其中多张照片地址的累加,其它数据都不会改变String newCameraUrl = newPojo.getCameraUrl()[0];String[] oldCameraUrls = current.getCameraUrl();current.setCameraUrl(ArrayUtils.add(oldCameraUrls, newCameraUrl));return current;}public void perfectMess(STC500Velocity velocity) {// 完善信息就是通过第三方的图片识别系统,识别照片上的车牌信息String newCameraUrl = velocity.getCameraUrl()[0];URI cameraUrl = URI.create(newCameraUrl);String licensePlate = analysisPlate(cameraUrl);velocity.setLicensePlate(licensePlate);}// ============================== 以上方法和对象转换、合并、完善有关// ============================== 以下方法和数据输出落库有关public SinkFunction<STC500Velocity>[] buildSink() {/** 由于这个具体的业务需要写入两张表,一张是违章数据主表,主要就记录XXX车牌,在XXX时间超速,超速多少* 另外一张是辅助数据,记录照片信息等* * 注意:很多数据库直接支持MySQL的数据库驱动,例如推荐使用的starrocks* */// 以下是主表信息SinkFunction<STC500Velocity> mainSink = JdbcSink.sink("insert into violate (id , event_id , event_time , speed , licensePlate) values (? , ? , ? , ? , ?)",new JdbcStatementBuilder<STC500Velocity>() {@Overridepublic void accept(PreparedStatement t, STC500Velocity v) throws SQLException {String uuid = Uuid.randomUuid().toString();t.setString(1, uuid);t.setString(2, v.getEventId());t.setDate(3, new java.sql.Date(v.getEventTime().getTime()));t.setInt(4, v.getSpeed());t.setString(5, v.getLicensePlate());}},JdbcExecutionOptions.builder().withBatchSize(10).withBatchIntervalMs(5000).withMaxRetries(1).build(),new JdbcConnectionOptions.JdbcConnectionOptionsBuilder().withUrl("jdbc:mysql://ip:port/xxxxxx?useSSL=false&useUnicode=true&characterEncoding=utf-8").withDriverName("com.mysql.cj.jdbc.Driver").withUsername("XXXXXX").withPassword("XXXXXX").build());// 以下是附属的明细信息,多条明细信息需要用一个对象进行添加,主要是其中的cameraUrl需要形成多条数据JdbcRowOutputFormat jdbcRowOutputFormat = JdbcRowOutputFormat.buildJdbcOutputFormat().setDBUrl("jdbc:mysql://ip:port/xxxxxx?useSSL=false&useUnicode=true&characterEncoding=utf-8").setDrivername("com.mysql.cj.jdbc.Driver").setUsername("XXXXXX").setPassword("XXXXXX").setQuery("insert into violate_item (id , event_id , camera_url) values (? , ? , ?)").setSqlTypes(new int[] {Types.STRING.getArity() , Types.STRING.getArity() , Types.STRING.getArity()}).finish();SinkFunction<STC500Velocity> itemSink = new RichSinkFunction<STC500Velocity>() {@Overridepublic void invoke(STC500Velocity value, Context context) throws Exception {// 生成多条数据String[] cameraUrls = value.getCameraUrl();String eventId = value.getEventId();jdbcRowOutputFormat.setRuntimeContext(this.getRuntimeContext());jdbcRowOutputFormat.open(0, 1);try {// 一条记录一条记录的,对应JdbcRowOutputFormat设定的插入信息,进行操作for (int index = 0 ; index < cameraUrls.length ; index++) {String uuid = Uuid.randomUuid().toString();Row record = Row.of(uuid , eventId , cameraUrls[index]);jdbcRowOutputFormat.writeRecord(record);}jdbcRowOutputFormat.flush();} finally {jdbcRowOutputFormat.close();}}};// 一共是两个sinkreturn new SinkFunction[] {mainSink , itemSink};}// ============================== 以上方法和数据输出落库有关// 分析车牌的一个工具,用于生成测试数据private static String analysisPlate(URI cameraUrl) {Integer intRandom = RandomUtils.nextInt(10, 9999);DecimalFormat format = new DecimalFormat("0000");String numberPlate = format.format(intRandom);return StringUtils.join("AB" , numberPlate);}// 判断一个格式是否是json对象格式private static boolean isJson(String str) {try {JSON.parseObject(str);return true;} catch (RuntimeException e) {// 这个异常可以视情况吃掉return false;}}
}
4.4、注意事项
1、Flink的执行是可以集成Spring的(注意是可以而不是推荐),但是在进行打包部署时需要注意包兼容性的问题。如果读者使用的是maven进行打包,那么可以使用maven-shade-plugin组件进行打包。
2、如果不集成Spring / Spring Boot,自然也就没有IOC容器的运行支持,这会大量增加设计人员维护模块耦合性的难度——所有实例化过程都必须知道实际类型(使用new进行具体业务逻辑的创建)。所以设计人员需要一种新的可以进行实现类注册的方式。
3、设计人员可以使用Google提供的一种轻量级注册容器Goodle Guice,来解决这个问题。Google Guice的使用在本篇文章中不做讨论,不清楚的读者可以参考笔者另一篇专门的文章:《Google Guice超轻量级依赖注入容器》。
4、算子必须能进行序列化(这就是所有算子都实现了Serializable接口的原因),但是Google Guice本身的工具类、操作类是不能被序列化的,例如Injector容器管理器。所以Goolge Guice本身不能传入到Flink的各个操作因子中,只能提前于操作因子实例化过程,从容器中取出需要的实例对象传入到操作因子中。
在Flink中的运行效果如下:
(注:完整的示例代码已经被上传到以下链接【点击进行源代码下载】,以便于读者进行阅读/调试)
