Vue3中的常见组件通信
概述
在vue3中常见的组件通信有props、mitt、v-model、 r e f s 、 refs、 refs、parent、provide、inject、pinia、slot等。不同的组件关系用不同的传递方式。常见的撘配形式如下表所示。
| 组件关系 | 传递方式 |
|---|---|
| 父传子 | 1. props 2. v-model 3. $refs 4. 默认插槽、具名插槽 |
| 子传父 | 1. props 2. 自定义事件 3. v-model 4. $parent 5. 作用域插槽 |
| 祖传孙、孙传祖 | 1. $attrs 2. provide、inject |
| 兄弟间、任意组件间 | 1. mitt 2. pinia |
以下是各个组件通信方式的详细用法。
1.props
1.1 准备父子组件
首先准备一个简单的父子组件的样式,如下是父组件代码:
<template><div class="father"><h2>这是父组件</h2><Child/></div>
</template><script setup lang="ts" name="Father">//引入子组件import Child from './Child.vue';</script><style scoped>.father{margin: 5px;background-color:rgb(205, 165, 32);padding: 20px;color: white;}
</style>
以下是子组件代码:
<template><div class="child"><h2>这是子组件</h2></div>
</template><script setup lang="ts" name="Child"></script><style scoped>.child{margin: 5px;background-color: rgba(93, 135, 20, 0.224);border: 1px solid;border-color: white;box-shadow: 0 0 5px;padding: 10px;color: #000;}
</style>
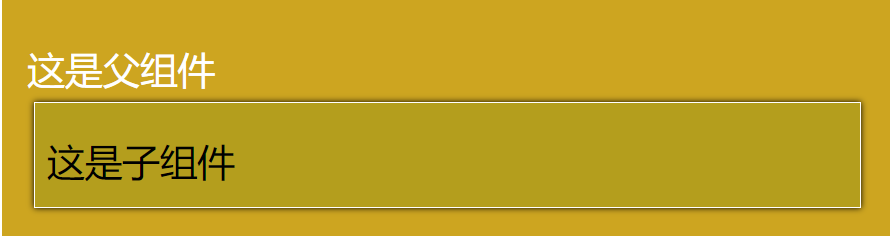
运行结果如下所示:

1.2 父传子通信的实现
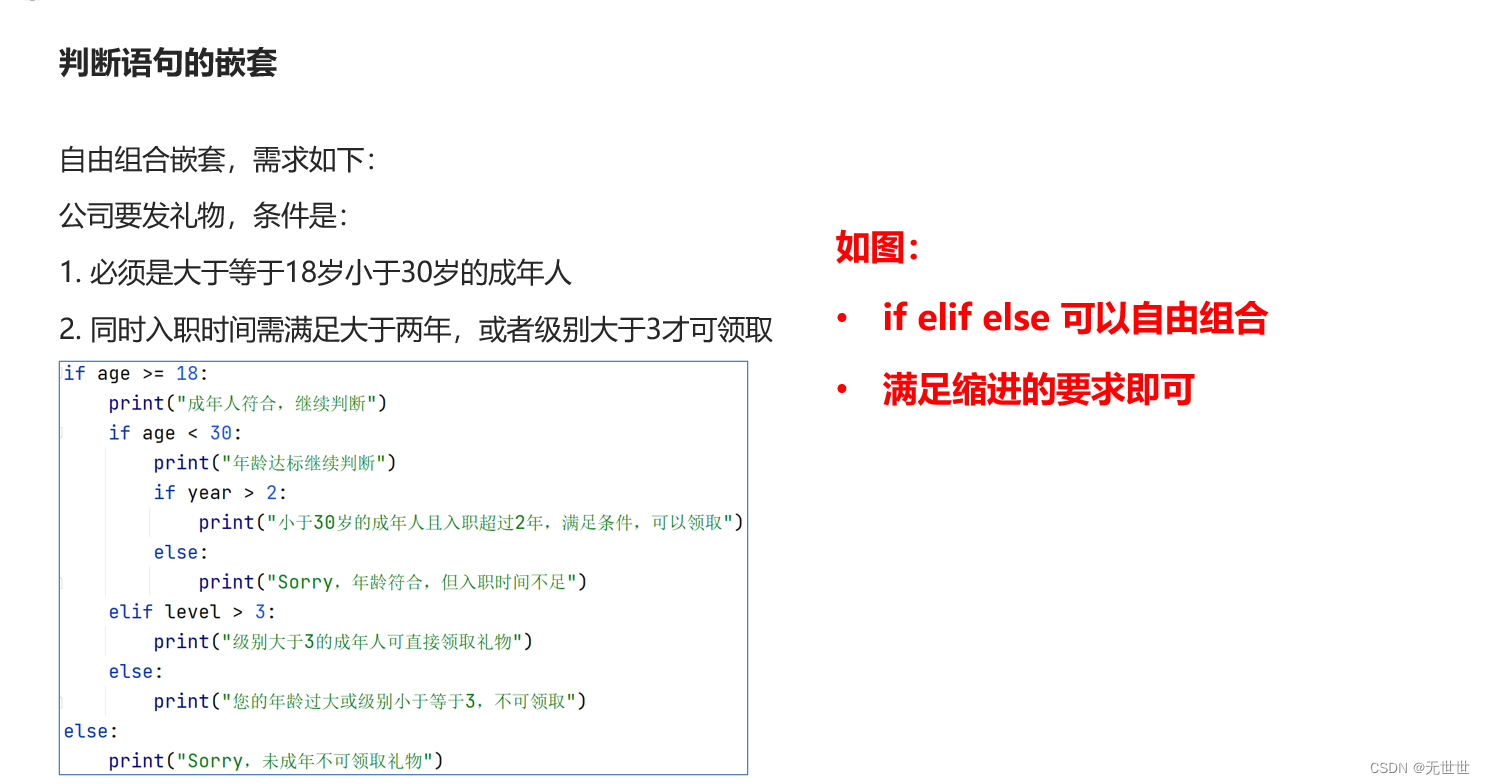
用props实现父传子通信,可以用标签中的属性值直接传递数据,父组件代码中只需要在子组件标签上添加属性值即可,如下代码,传递两个数据:
<Child :f2CMsg="f2CMsg" :f2CObj="f2CObj"/>
定义传递的数据内容,两个数据分别是ref定义的基本类型的响应式数据和reactive定义的对象类型的响应式数据。
//引入ref和reactive
import {ref,reactive} from 'vue'//数据,ref定义的基本类型的响应式数据
let f2CMsg =ref('你好,子组件。')//数据,reactive定义的对象类型的响应式数据
let f2CObj = reactive({
id:"asdfg01",
name:"张三",
age:18,
detail:"这是父组件中的对象信息"
})
在子组件中需要声明接收数据props,注意接收的数据格式是数组,哪怕是只传递一个数据也要写成数组的形式。
//声明接收数据props
defineProps(['f2CMsg','f2CObj'])
子组件中在页面展示接收的数据,如下代码:
<h4>父组件传递的信息:{{ f2CMsg }}</h4>
<h4>父组件传递的对象:</h4>
<ul><li>姓名:{{f2CObj.name}}</li><li>年龄:{{f2CObj.age}}</li><li>详情:{{f2CObj.detail}}</li>
</ul>
然后运行结果如下:

1.3 子传父通信的实现
用props实现子传父的通信需要父组件先向子组件传递一个函数,然后传递的数据以参数的形式传递给函数,父组件中先定义子传父的数据变量和函数或者方法如下:
//定义子传父的数据变量
let c2FMsg = ref('')
//定义方法传递给子组件
function getMsg(value:string){c2FMsg.value = value
}
在标签中把方法传给子组件:
<Child :f2CMsg="f2CMsg" :f2CObj="f2CObj" :sendMsg="getMsg"/>
在子组件中接收数据,并定义数据内容:
defineProps(['f2CMsg','f2CObj','sendMsg'])
let c2FMsg = ref('你好,父组件。')
在子组件中设置一个按钮,给按钮绑定点击事件,点击事件触发sendMsg方法,并传递参数:
<button @click="sendMsg(c2FMsg)">点我向父组件传递信息</button>
现在数据应该已经传递给了父组件,在父组件可以用如下代码展示:
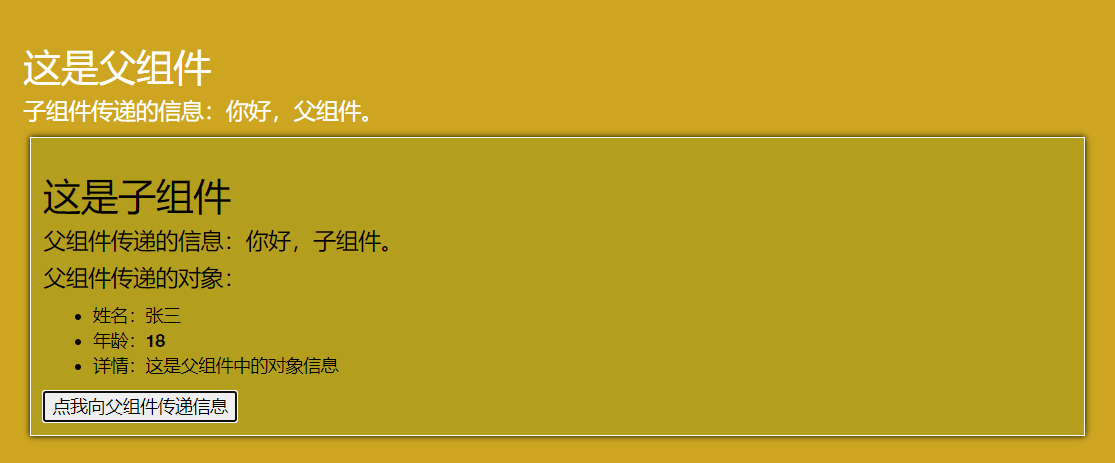
<h4 v-show="c2FMsg">子组件传递的信息:{{ c2FMsg }}</h4>
运行结果如下:

点击按钮后运行结果如下:
至此我们已经用props实现了子传父的通信功能。当然子传父也可以传递对象。此处不再展示。如下是完整代码:
父组件中的代码:
<template><div class="father"><h2>这是父组件</h2><h4 v-show="c2FMsg">子组件传递的信息:{{ c2FMsg }}</h4>	<Child :f2CMsg="f2CMsg" :f2CObj="f2CObj" :sendMsg="getMsg"/>	</div>
</template><script setup lang="ts" name="Father">//引入子组件import Child from './Child.vue';//引入ref和reactiveimport {ref,reactive} from 'vue'//数据,ref定义的基本类型的响应式数据let f2CMsg =ref('你好,子组件。')//数据,reactive定义的对象类型的响应式数据let f2CObj = reactive({id:"asdfg01",name:"张三",age:18,detail:"这是父组件中的对象信息"})//定义子传父的数据变量let c2FMsg = ref('')//定义方法传递给子组件function getMsg(value:string){c2FMsg.value = value		}
</script><style scoped>.father{margin: 5px;background-color:rgb(205, 165, 32);padding: 20px;color: white;}
</style>
子组件的代码:
<template><div class="child"><h2>这是子组件</h2><h4>父组件传递的信息:{{ f2CMsg }}</h4><h4>父组件传递的对象:</h4><ul><li>姓名:{{f2CObj.name}}</li><li>年龄:{{f2CObj.age}}</li><li>详情:{{f2CObj.detail}}</li></ul><button @click="sendMsg(c2FMsg )">点我向父组件传递信息</button></div>
</template><script setup lang="ts" name="Child">
import { ref,reactive } from 'vue';//声明接收数据props
defineProps(['f2CMsg','f2CObj','sendMsg'])let c2FMsg = ref('你好,父组件。')</script><style scoped>.child{margin: 5px;background-color: rgba(93, 135, 20, 0.224);border: 1px solid;border-color: white;box-shadow: 0 0 5px;padding: 10px;color: #000;}
</style>
1.4 小结
用props实现父子通信的步骤是这样的:
父传子:父组件中定义传递的数据–>标签中用属性值直接传递数据–>子组件中声明接收数据–>用插值语法展示数据。
子传父: 父组件先定义接收数据的变量–>父组件中定义函数–>将函数传递给子组件–>子组件中声明接收数据,接收的数据为函数–>子组件中定义传递的数据–>子组件中调用接收的函数,将定义的要传递的数据作为参数进行传递–>父组件中收到数据,可以在页面中展示。
最后总结如下:
父传子:标签中的属性值是非函数
子传父:标签中的属性值是函数
2. 自定义事件
自定义事件通常用于子传父,需要注意在原生事件中事件名是特定的,比如click,keyup等,在自定义事件中事件名是任意的;在原生事件中事件对象 e v e n t 是包含事件相关信息的对象( ‘ p a g e X ‘ 、 ‘ p a g e Y ‘ 、 ‘ t a r g e t ‘ 、 ‘ k e y C o d e ‘ ),在定义事件中事件对象 event是包含事件相关信息的对象(`pageX`、`pageY`、`target`、`keyCode`),在定义事件中事件对象 event是包含事件相关信息的对象(‘pageX‘、‘pageY‘、‘target‘、‘keyCode‘),在定义事件中事件对象event是调用emit所提供的数据,可以是任意类型。
2.1 准备父子组件
父子组件代码与样式与本文中1.1中的完全相同,此处不再赘述。
2.2 自定义事件实现子传父通信
首先在子组件中定义要传递的数据,此次依然已字符串为例,如下代码:
let c2FMsg = ref('你好,父组件。')
然后在父组件中定义接收的数据变量,并声明函数,用来保存接收的数据。
let c2FMsg = ref('')//声明函数saveMsg,用来保存接收的数据
function saveMsg(value:string){c2FMsg.value = value
}
之后给子组件绑定自定义事件,事件名为send-message,同时将函数saveMsg传进去,注意自定义事件名的命名规范官方建议采用肉串形式的命名方式。
<!-- 给子组件绑定自定义事件 -->
<Child @send-message="saveMsg"/>
在子组件中需要声明事件
//声明事件
let emit = defineEmits(['send-message'])
触发事件的代码如下:
emit('send-message')
只要在子组件中写出上面触发事件的代码,就可以实现子传父的通信,这次以子组件挂载3秒后自动触发事件为例,如下代码:
//组件挂载3秒后触发事件
onMounted(()=>{setTimeout(()=>{//触发事件send-message,并传c2FMsgemit('send-message',c2FMsg)},3000)
})
此时已经实现了子传父的通信,最后在父组件中展示出来,如下代码:
<h3 v-show="c2FMsg">子组件传递的信息:{{ c2FMsg }}</h3>
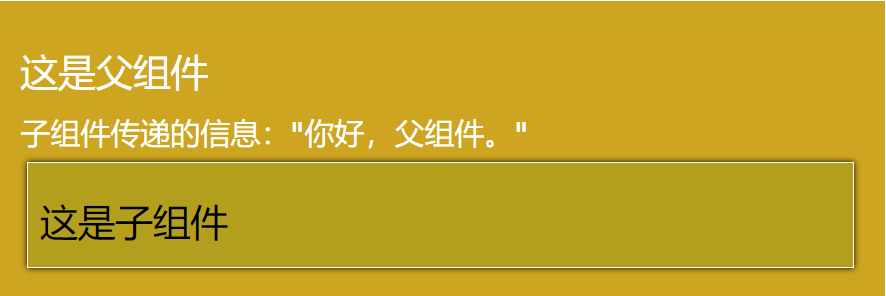
最后运行页面效果如下,在刚启动页面是如下效果:
3秒钟之后看下的效果如下图所示:
以下是完整代码:
父组件代码:
<template><div class="father"><h2>这是父组件</h2><h3 v-show="c2FMsg">子组件传递的信息:{{ c2FMsg }}</h3><!-- 给子组件绑定自定义事件 --><Child @send-message="saveMsg"/></div></template><script setup lang="ts" name="Father">//引入子组件import Child from './Child.vue';import { ref } from 'vue';let c2FMsg = ref('')//声明函数,用来保存接收的数据function saveMsg(value:string){c2FMsg.value = value}</script><style scoped>.father{margin: 5px;background-color:rgb(205, 165, 32);padding: 20px;color: white;}</style>
以下是子组件代码:
<template><div class="child"><h2>这是子组件</h2></div></template><script setup lang="ts" name="Child">import {ref,onMounted} from 'vue'let c2FMsg = ref('你好,父组件。')//声明事件let emit = defineEmits(['send-message'])//组件挂载3秒后触发事件onMounted(()=>{setTimeout(()=>{//触发事件send-message,并传c2FMsgemit('send-message',c2FMsg)},3000)})</script><style scoped>.child{margin: 5px;background-color: rgba(93, 135, 20, 0.224);border: 1px solid;border-color: white;box-shadow: 0 0 5px;padding: 10px;color: #000;} </style>
2.3 小结
以上便是自定义事件的基本用法,在实际开发中是比较常用的用来实现子传父的通信方式。
3.mitt
mitt与pubsub订阅消息与发布消息功能类似,它可以实现在任意组件间的通信。
3.1安装mitt及引入mitt
mitt需要安装,在终端中输入命令npm i mitt来安装。
mitt安装好之后按照工程化的管理需要在src的文件下新建文件夹utils,然后在utils文件夹中新建文件emitter.ts。
在emitter.ts文件中引入mitt,并创建emitter,同时暴露emitter,如下代码:
//引入mitt
import mitt from 'mitt'//调用mitt,得到emitter,emitter可以绑定事件和触发事件
const emitter = mitt()//暴露emitter
export default emitter
之后需要再在main.ts中引入emitter,如下代码:
import emitter from '@/utils/emitter'
3.2 emitter基本用法
emitter身上有四个方法,分别是
- **on():**用来绑定事件,接收两个参数,第一个参数是事件名,第二个参数是事件触发时的回调函数;
- **emit():**用来触发事件,参数为事件名;
- **off():**用来解绑事件,参数为事件名;
- **all:**all有clear属性,直接调用clear()属性可以解绑全部事件。
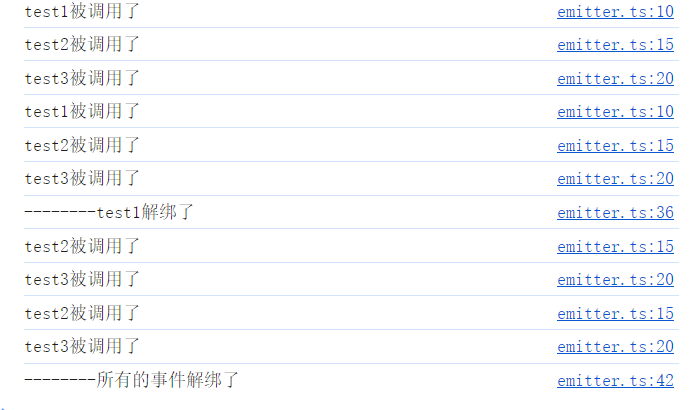
以下代码为展示emitter的基本用法:
//绑定事件test1,当事件触发时执行回调
emitter.on('test1',()=>{console.log('test1被调用了')
})//绑定事件test2,当事件触发时执行回调
emitter.on('test2',()=>{console.log('test2被调用了')
})//绑定事件test3,当事件触发时执行回调
emitter.on('test3',()=>{console.log('test3被调用了')
})//触发事件,每间隔1秒触发一次
setInterval(()=>{//触发事件test1emitter.emit('test1')//触发事件test2emitter.emit('test2')//触发事件test3emitter.emit('test3')
},1000)//解绑事件,2秒后解绑test1
setTimeout(()=>{emitter.off('test1')console.log('--------test1解绑了')
},2000)//解绑事件,4秒后解绑所有事件
setTimeout(()=>{emitter.all.clear()console.log('--------所有的事件解绑了')
},4000)
运行后在控制台输出如下内容:
3.3emitter在组件中的用法
首先创建一个父组件,两个子组件,父组件代码如下:
<template><div class="father"><h3>父组件</h3><Child1/><Child2/></div>
</template><script setup lang="ts" name="Father">import Child1 from './Child1.vue'import Child2 from './Child2.vue'
</script><style scoped>.father{margin: 5px;background-color:rgb(79, 186, 111);padding: 20px;color: white;}
</style>
子组件1代码:
<template><div class="child1"><h3>子组件1</h3></div>
</template><script setup lang="ts" name="Child1"></script><style scoped>.child1{margin: 5px;background-color: rgba(7, 7, 7, 0.224);border: 1px solid;border-color: white;box-shadow: 0 0 5px;padding: 10px;color: #760e0e;}
</style>
子组件2代码:
<template><div class="child2"><h3>子组件2</h3></div>
</template><script setup lang="ts" name="Child2"></script><style scoped>.child2{margin: 5px;background-color: rgba(255, 255, 255, 0.224);border: 1px solid;border-color: white;box-shadow: 0 0 5px;padding: 10px;color: #05035f;}
</style>
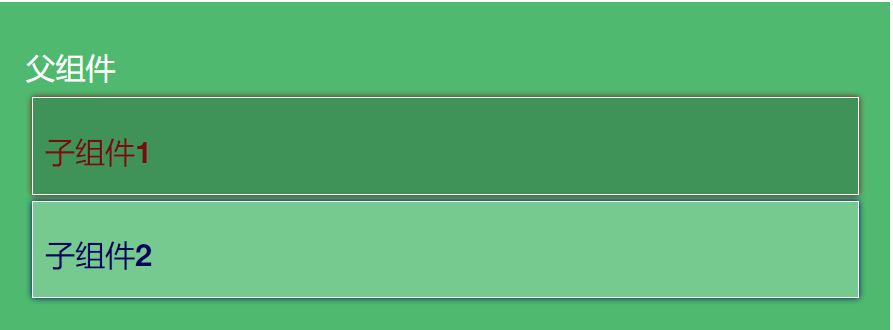
运行效果如下:
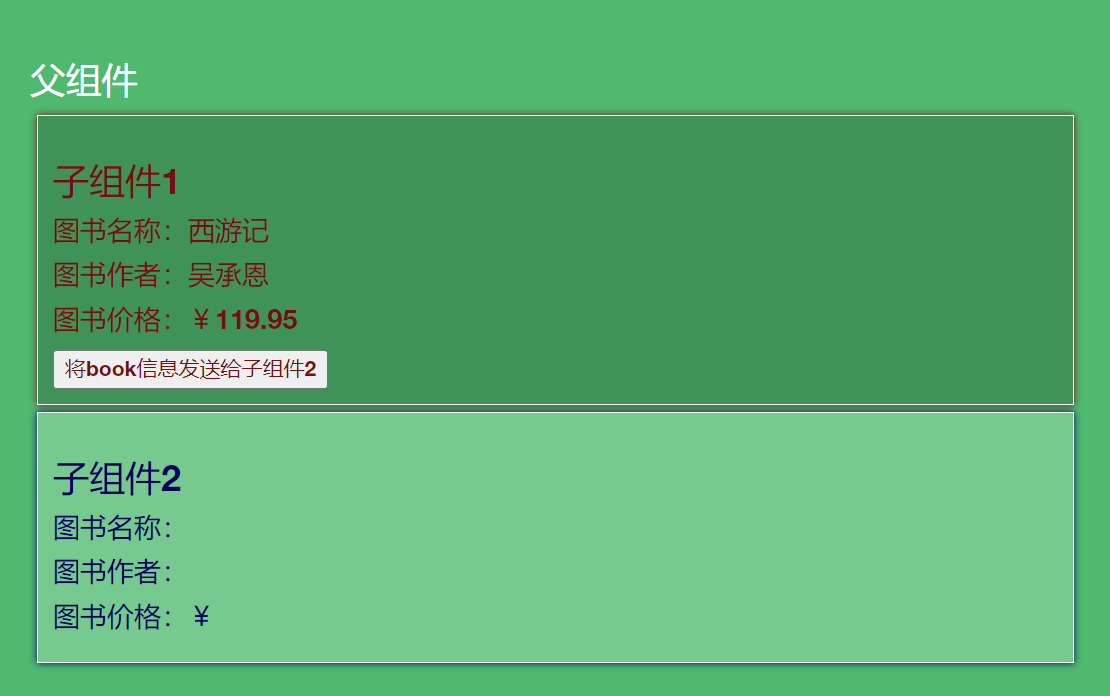
然后我们在子组件1中准备一些数据如下:
//数据
let book = reactive({name:'西游记',author:'吴承恩',price:119.95
})
然后在页面中展示:
<!-- 展示 -->
<h4>图书名称:{{ book.name }}</h4>
<h4>图书作者:{{ book.author }}</h4>
<h4>图书价格:¥{{ book.price }}</h4>
运行效果如下:

接下来在子组件2中引入emitter,然后创建book数据,给emitter绑定事件,并传入回调函数:
//引入emitterimport emitter from '@/utils/emitter';import { reactive } from 'vue';//数据let book = reactive({name:'',author:'',price:null})//给emitter绑定getBook事件,传入回调函数,回调函数接收一个参数emitter.on('getBook',(value:any)=>{// console.log(value)book.name = value.namebook.author = value.authorbook.price = value.price})
然后在子组件1中创建一个按钮,绑定click事件,触发getBook事件,并传递book参数:
<button @click="emitter.emit('getBook',book)">将book信息发送给子组件2</button>
最后在子组件2中展示接收的到的信息:
<!-- 展示 --><h4>图书名称:{{ book.name }}</h4><h4>图书作者:{{ book.author }}</h4><h4>图书价格:¥{{ book.price }}</h4>
最后运行后页面效果如下:
点击按钮后效果如下:
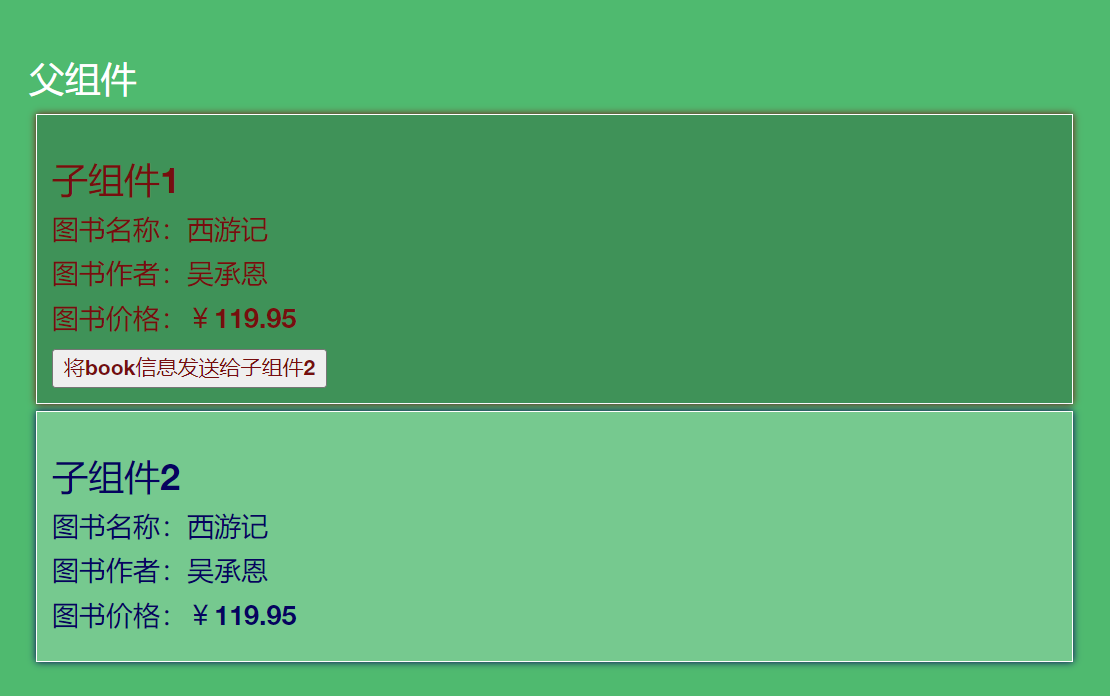
至此已经完成了子组件1向子组件2通信。
子组件1完整代码如下:
<template><div class="child1"><h3>子组件1</h3><!-- 展示 --><h4>图书名称:{{ book.name }}</h4><h4>图书作者:{{ book.author }}</h4><h4>图书价格:¥{{ book.price }}</h4><button @click="emitter.emit('getBook',book)">将book信息发送给子组件2</button></div>
</template><script setup lang="ts" name="Child1">import emitter from '@/utils/emitter';import { reactive } from 'vue';//数据let book = reactive({name:'西游记',author:'吴承恩',price:119.95})
</script><style scoped>.child1{margin: 5px;background-color: rgba(7, 7, 7, 0.224);border: 1px solid;border-color: white;box-shadow: 0 0 5px;padding: 10px;color: #760e0e;}
</style>
子组件2 的完整代码如下:
<template><div class="child2"><h3>子组件2</h3><!-- 展示 --><h4>图书名称:{{ book.name }}</h4><h4>图书作者:{{ book.author }}</h4><h4>图书价格:¥{{ book.price }}</h4></div>
</template><script setup lang="ts" name="Child2">//引入emitterimport emitter from '@/utils/emitter';import { reactive } from 'vue';//数据let book = reactive({name:'',author:'',price:null})//给emitter绑定getBook事件,传入回调函数,回调函数接收一个参数emitter.on('getBook',(value:any)=>{// console.log(value)book.name = value.namebook.author = value.authorbook.price = value.price})
</script><style scoped>.child2{margin: 5px;background-color: rgba(255, 255, 255, 0.224);border: 1px solid;border-color: white;box-shadow: 0 0 5px;padding: 10px;color: #05035f;}
</style>
3.4 小结
接收数据的组件必须要先绑定事件(订阅),发送数据的组件要触发事件,只要组件中引入了emitter,并执行了emitter.emit()代码并传递参数,即可实现任意组件间的通信。
4.v-model
v-model常用于普通html标签中的双向绑定,这个绑定用法无法实现跨组件通信,v-model用在组件标签中的时候,可以实现父子间的组件通信,而这样通信方式常用于UI组件库。要理解UI组件库的v-model的双向通信原理,需要先明白普通html标签中的v-model的底层原理。
4.1 普通HTML标签中v-model实现双向绑定的底层原理
在普通html标签中用v-model可以实现数据的双向绑定,如下代码所示是把input输入框里的数据与username进行双向绑定:
<template><div class="father"><h3>父组件</h3>    <br><input id="input1" type="text" v-model="username"></div>
</template><script setup lang="ts" name="Father">import { ref } from "vue"; // 数据let username = ref('zhansan')</script><style scoped>
.father {height: 300px;padding: 20px;color: #ffffff;  text-align:center; background-image: url(https://xyyhxxx.oss-cn-beijing.aliyuncs.com/picGoImg/202406041301030.png);background-size: cover
}
#input1{color: #000;
}
</style>
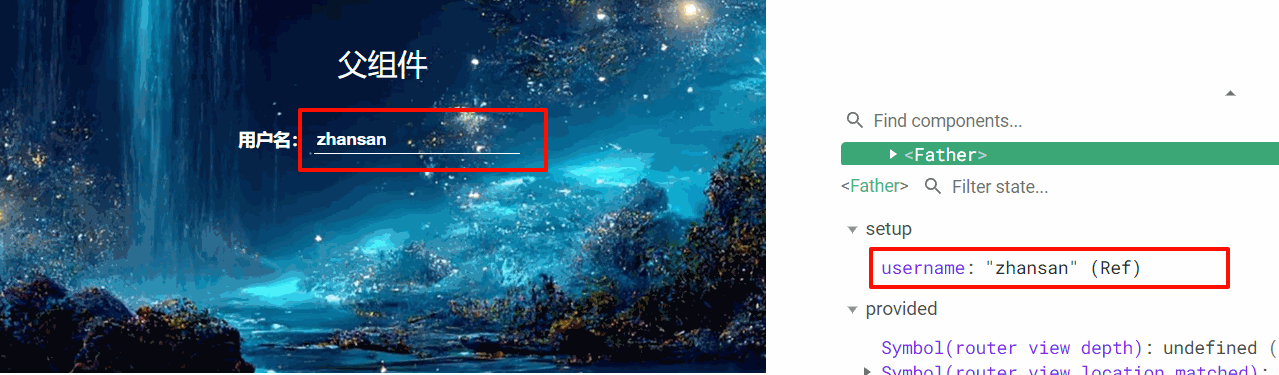
运行后在浏览器打开vue开发者工具,如下图所示:
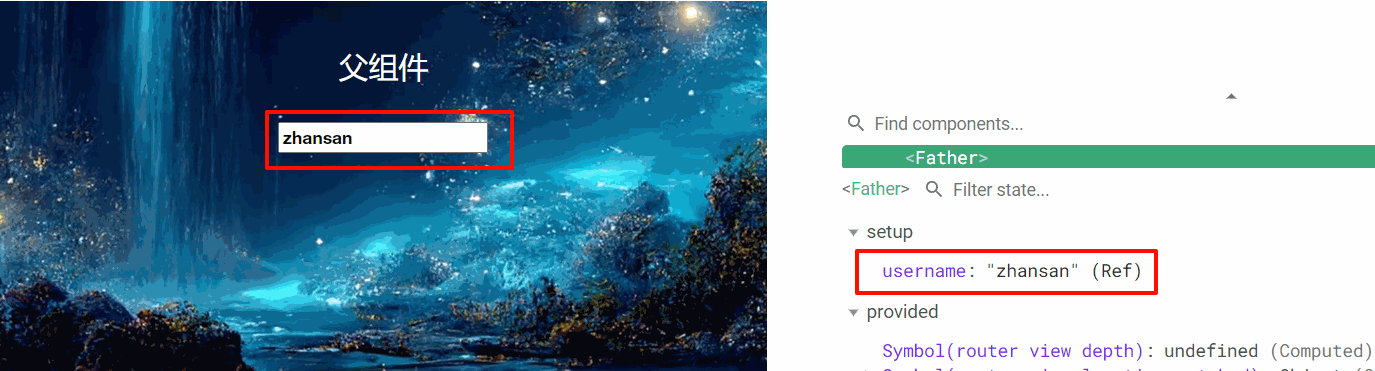
上图中更改vue开发者工具中的username的值页面也会跟着发生变化,这个实现的是把数据呈现在页面,如果修改input输入框中的内容,username的数据也会跟着发生改变,这个实现的是页面传向数据,这就双向绑定中的双向,而实现这个双向绑定的关键就是在于input标签中写了v-model,如下所示:
<input id="input1" type="text" v-model="username">
而上面的代码实现的底层原理是这样的,先把上面的代码改成如下图所示:
<input id="input1" type="text" :value="username">
这样可以实现数据呈现在页面,数据修改页面也会跟着修改,但是修改页面,数据却不会变化,这只实现了一个方向的数据绑定,接着再给input标签增加属性,如下代码:
<input id="input1" type="text" :value="username" @input="username=$event.target.value">
这样再测试,就会发现页面中的数据也可以传向数据了,修改input标签中的内容,数据也会变化。
注意上面代码中@input="username= e v e n t . t a r g e t . v a l u e " 这句代码 t s 会报警,我们需要处理一下,对 event.target.value"这句代码ts会报警,我们需要处理一下,对 event.target.value"这句代码ts会报警,我们需要处理一下,对event.target进行断言,报警就会消失:
<input id="input1" type="text" :value="username" @input="username=(<HTMLInputElement>$event.target).value">
普通input标签中v-model实现双向绑定的底层原理就是:value+@input事件。
4.2组件标签中v-model中实现双向绑定
首先准备一个自己的UI组件,作为子组件,代码如下:
<template><input type="text">
</template><script setup lang="ts" name="MyInput"></script><style scoped>input{background-color:transparent;color: #ffffff;border: 0px;border-bottom: 1px solid #ffffff ;margin: 5px;}
</style>
然后在父组件中引入:
//引入MyInput组件import MyInput from "./MyInput.vue";
在父组件中把MyInput组件呈现在页面中:
<label>用户名:<MyInput/></label>
运行效果如下:

这样效果出来了,但是没有还没有实现数据绑定,首先在MyInput组件标签上增加:modelValue属性和绑定@update:model-value事件,如下代码:
<MyInput :modelValue="username" @update:model-value="username=$event"/>
然后需要在MyInput组件中声明props和声明事件来接收数据和事件:
//接收props
defineProps(["modelValue"])
//声明事件
let emit = defineEmits(['update:model-value'])
最后在MyInput组件中的普通html标签中添加:value属性和绑定@input事件:
<input type="text" :value="modelValue"@input="emit('update:model-value',(<HTMLInputElement>$event.target).value)"
>
至此,已经实现了父组件和子组件MyInput组件的双向通信,如下图所示:
最后在父组件中的MyInput组件标签上可以直接简写为如下代码:
<MyInput v-model="username"/>
实现的效果是完全一样的。
我们在用UI组件库的时候可以直接这样写,前提是UI组件库已经处理好了底层逻辑。
以下是完整代码:
父组件:
<template><div class="father"><h3>父组件</h3>    <br><!-- <input id="input1" type="text" v-model="username"> --><!-- 下面是v-model 的本质 --><!-- <input id="input1" type="text" :value="username" @input="username=(<HTMLInputElement>$event.target).value"> --><!-- 下面是v-model 的本质 --><!-- <label>用户名:<MyInput :modelValue="username" @update:model-value="username=$event"/></label> --><label>用户名:<MyInput v-model="username"/></label></div>
</template><script setup lang="ts" name="Father">import { ref } from "vue"; //引入MyInput组件import MyInput from "./MyInput.vue";// 数据let username = ref('zhansan')</script><style scoped>
.father {height: 300px;padding: 20px;color: #ffffff;  text-align:center; background-image: url(https://xyyhxxx.oss-cn-beijing.aliyuncs.com/picGoImg/202406041301030.png);background-size: cover
}
#input1{color: #000;
}
</style>
MyInput组件:
<template><input type="text" :value="modelValue"@input="emit('update:model-value',(<HTMLInputElement>$event.target).value)">
</template><script setup lang="ts" name="MyInput">//声明propsdefineProps(["modelValue"])//声明事件let emit = defineEmits(['update:model-value'])
</script><style scoped>input{background-color:transparent;color: #ffffff;border: 0px;border-bottom: 1px solid #ffffff ;margin: 5px;}
</style>
4.3一个UI组件实现多个数据传送
在父组件中可以改value,比如改成usName,如下代码所示:
<MyInput v-model:usName="username"/>
这个代码的本质是如下代码:
<MyInput :usName="username" @update:usName="username=$event"/>在MyInput组件代码中就需要改成如下代码:
<template><input type="text" :value="usName"@input="emit('update:usName',(<HTMLInputElement>$event.target).value)">
</template><script setup lang="ts" name="MyInput">//声明propsdefineProps(["usName"])//声明事件let emit = defineEmits(['update:usName'])
</script>
这样改完后运行效果跟之前是完全一样的,接下来再扩展一下,父组件中的MyInput标签改成如下代码:
<MyInput v-model:usName="username" v-model:paword="password"/>
然后在MyInput组件中代码改成如下:
<template><input type="text" :value="usName"@input="emit('update:usName',(<HTMLInputElement>$event.target).value)"><br><input type="text" :value="paword"@input="emit('update:paword',(<HTMLInputElement>$event.target).value)">
</template><script setup lang="ts" name="MyInput">//声明propsdefineProps(["usName",'paword'])//声明事件let emit = defineEmits(['update:usName','update:paword'])
</script>
这样就实现一个组件内双向绑定两个数据了,如下图所示:

4.4小结
v-model可以实现父子间的通信,v-model即可以设置在普通html标签中,也可以设置在组件标签中,设置在组件标签中可以实现父子间的双向通信,前提是子组件底层做了处理。
5.$attrs
$attrs用于当前组件的父组件与当前组件的子组件相互通信,也就是祖孙间通信。
5.1准备三个组件
首先准备三个组件,Father组件代码如下:
<template><div class="father"><h3>父组件</h3><Child/></div>
</template><script setup lang="ts" name="Father">import Child from './Child.vue'	</script><style scoped>.father{background-color: rgb(74, 108, 110);padding: 20px;color: #fff;}
</style>
Child组件代码如下:
<template><div class="child"><h3>子组件</h3><GrandChild/></div>
</template><script setup lang="ts" name="Child">import GrandChild from './GrandChild.vue'
</script><style scoped>.child{margin-top: 20px;background-color: rgb(213, 217, 219);padding: 20px;color: #000;}
</style>
GrandChild组件代码如下:
<template><div class="grand-child"><h3>孙组件</h3>		</div>
</template><script setup lang="ts" name="GrandChild"></script><style scoped>.grand-child{margin-top: 20px;background-color: rgb(164, 85, 31);padding: 20px;color: #fff;		}
</style>
运行后效果如下:

5.2祖传孙的实现
首先给父组件添加一些数据:
import {ref} from 'vue'//数据let a = ref(100)let b = ref(200)let c = ref(300)
然后在父组件页面上呈现出来:
<ul><li>a: {{ a }}</li><li>b: {{ b }}</li><li>c: {{ c }}</li>
</ul>
同时将数据传给Child组件:
<Child :a="a" :b="b" :c="c"/>
接下来再写Child组件的代码,首先要接收数据:
//接收props
defineProps(['a'])
页面呈现出来如下:
<ul><li>a: {{ a }}</li>
</ul>
呈现效果如下:
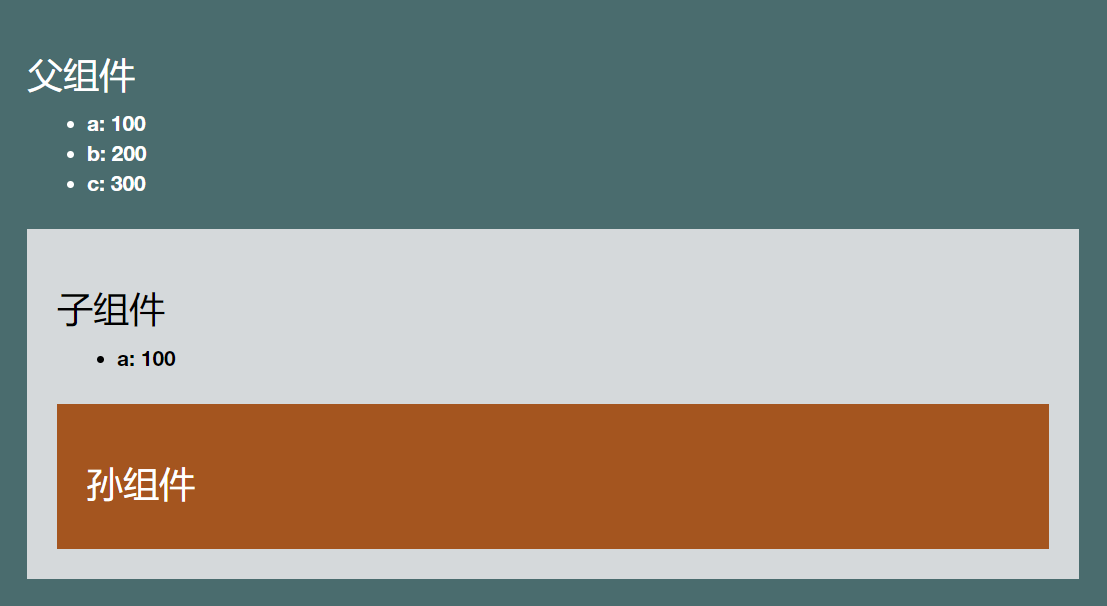
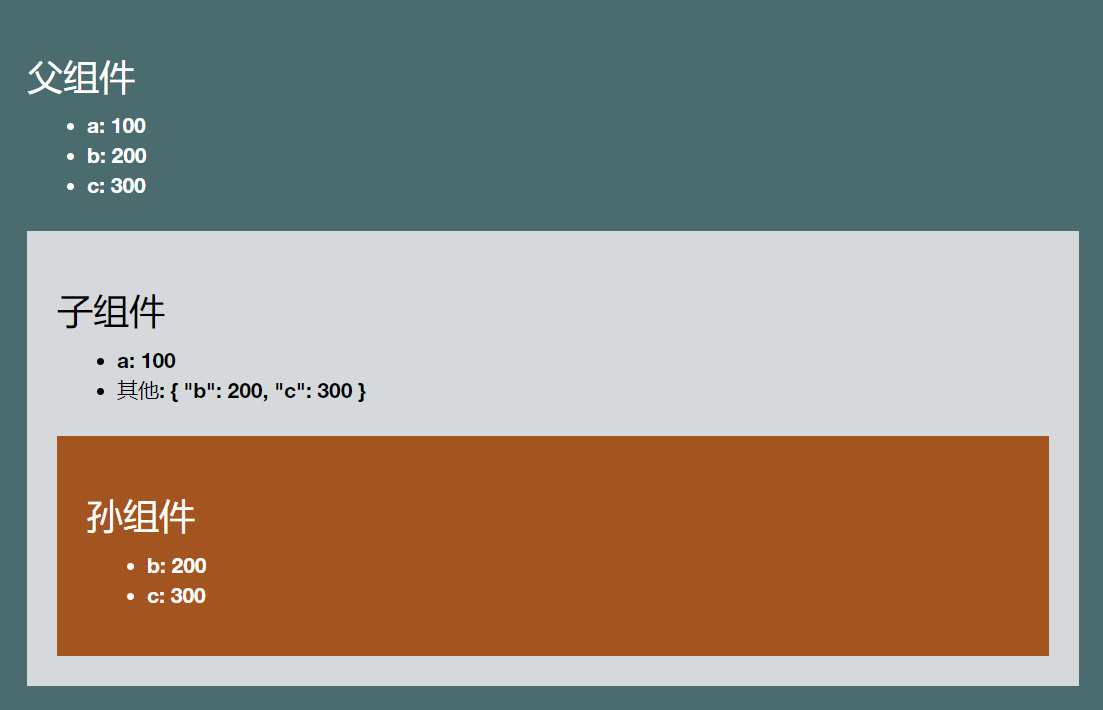
注意父组件给子组件传递了abc三个数据,但是子组件只接收了一个数据a,那么剩下的两个bc数据去哪里了呢?此时需要借助浏览器的vue开发者工具,打开后可以看到b和c的数据在attrs里。
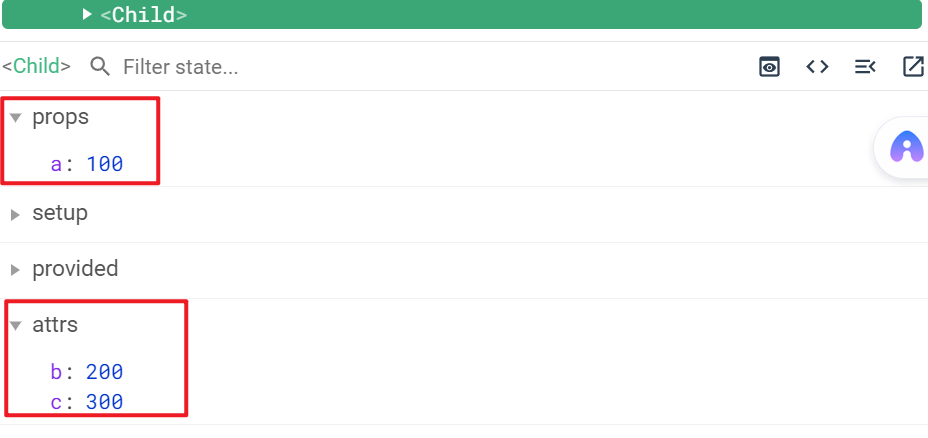
在页面呈现一下attrs:
<ul><li>a: {{ a }}</li><li>其他: {{ $attrs }}</li>
</ul>
页面效果如下:
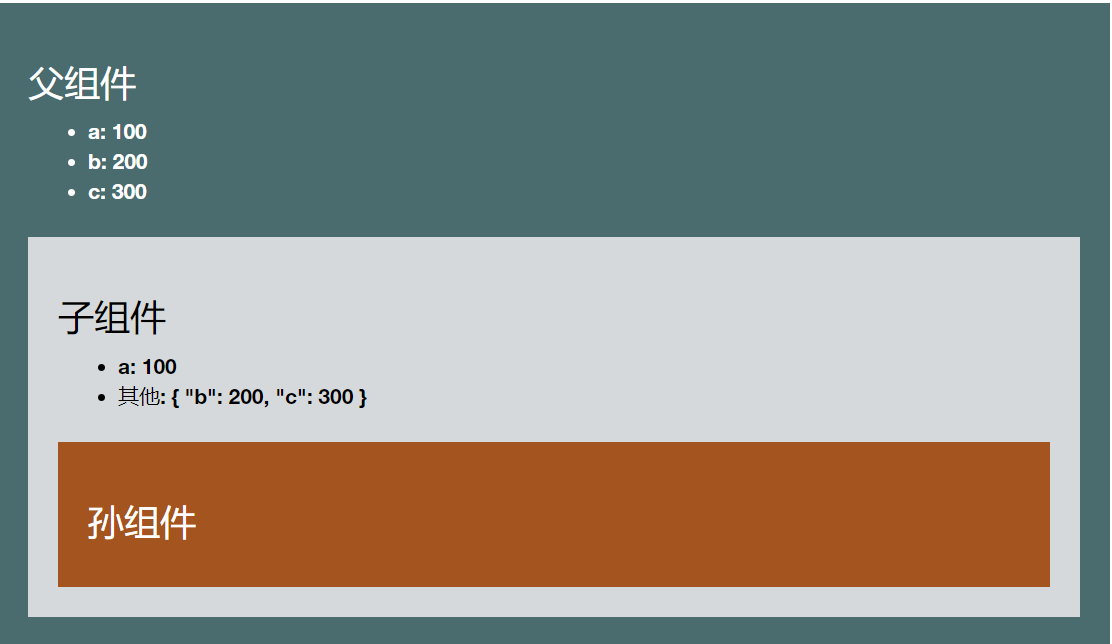
可以看出来$attrs是个对象格式的数据,这样Child组件就可以把attrs的数据传递给GrandChild组件:
<!-- 将attrs传给GrandChild -->
<GrandChild :="$attrs"/>
**注意:**上面的代码等价于下面的代码:
<GrandChild v-bind="$attrs"/>
由于$attrs的值是对象{‘‘b’’:200,“c”:300},所以上的代码又等价于:
<GrandChild :b="b" :c="c"/>
然后在GrandChild组件中接收b和c:
defineProps(['b','c'])
并在页面呈现:
<ul>    <li>b: {{ b }}</li><li>c: {{ c }}</li>
</ul>
运行结果如下:
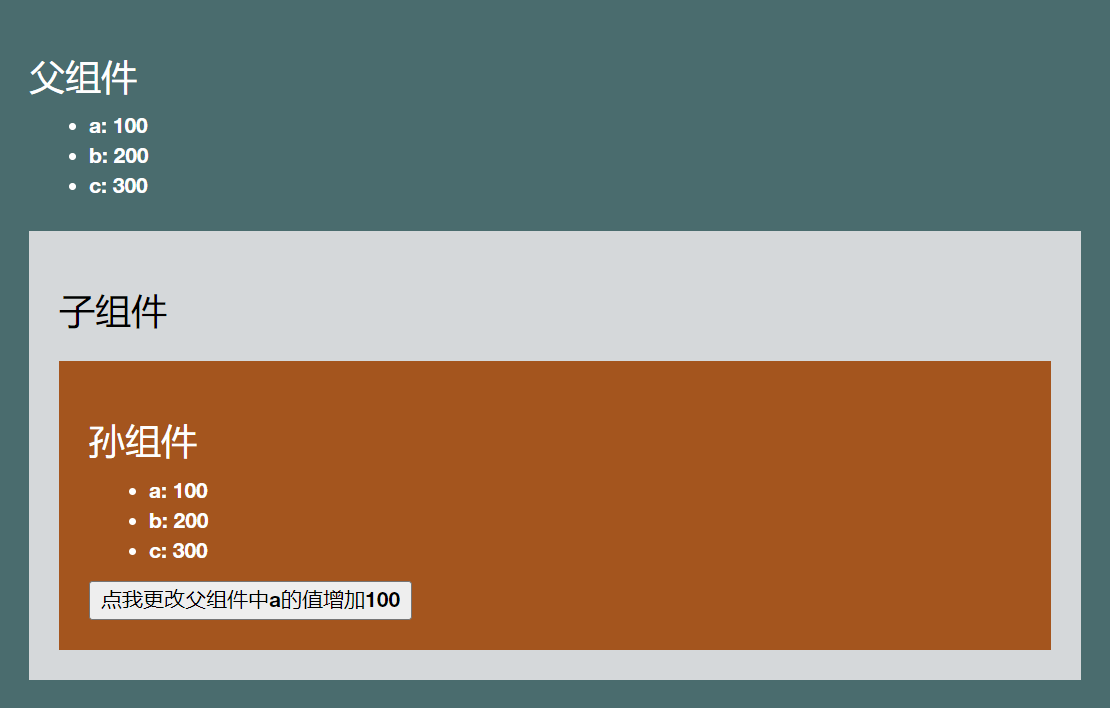
这样就实现了祖传孙的过程,在上面的代码中,Child组件也可以不接收任何props,Father组件传的所有的数据都通过$attrs传给GrandChild组件,运行效果如下:

5.3孙传祖的实现
如果实现孙传祖的效果,需要在Father组件中给Child传递一个函数,GrandChild组件接收后触发这个函数,与props实现子传父的做法一致,如下是在Father组件中定义函数如下:
function changeA(value:number){a.value += value
}
传给Child组件:
<Child :a="a" :b="b" :c="c" :changeA="changeA"/>
在GrandChild组件中接收:
defineProps(['a','b','c','changeA'])
再添加一个按钮,绑定定click事件,触发函数,并传递参数:
<button @click="changeA(100)">点我更改父组件中a的值增加100</button>
这样就实现了孙传祖的过程,当点击按钮时,Father组件中的a值会增加100,每点击一次增加100,这个新的值也会再传给GrandChild,实现的效果就是点击按钮后Father组件和GrandChild组件中的a值会同时变化,如下图所示:
以下是各个组件的完整代码:
Father组件:
<template><div class="father"><h3>父组件</h3><ul><li>a: {{ a }}</li><li>b: {{ b }}</li><li>c: {{ c }}</li></ul><Child :a="a" :b="b" :c="c" :changeA="changeA"/></div>
</template><script setup lang="ts" name="Father">import Child from './Child.vue'	import {ref} from 'vue'//数据let a = ref(100)let b = ref(200)let c = ref(300)function changeA(value:number){a.value += value}</script><style scoped>.father{background-color: rgb(74, 108, 110);padding: 20px;color: #fff;}
</style>
Child组件:
<template><div class="child"><h3>子组件</h3><!-- <ul><li>a: {{ a }}</li><li>其他: {{ $attrs }}</li></ul> --><!-- 将attrs传给GrandChild --><GrandChild :="$attrs"/></div>
</template><script setup lang="ts" name="Child">import GrandChild from './GrandChild.vue'//接收props// defineProps(['a'])
</script><style scoped>.child{margin-top: 20px;background-color: rgb(213, 217, 219);padding: 20px;color: #000;}
</style>
GrandChild组件
<template><div class="grand-child"><h3>孙组件</h3>		<ul><li>a: {{ a }}</li><li>b: {{ b }}</li><li>c: {{ c }}</li></ul><button @click="changeA(100)">点我更改父组件中a的值增加100</button></div>
</template><script setup lang="ts" name="GrandChild">//接收props
defineProps(['a','b','c','changeA'])</script><style scoped>.grand-child{margin-top: 20px;background-color: rgb(164, 85, 31);padding: 20px;color: #fff;		}button{color: #000;}
</style>
5.4小结
$attrs用于祖孙间的通信,$attrs是一个对象,包含所有父组件传入的标签属性。
6. r e f s 、 refs、 refs、parent
$refs用于父传子,$parent用于子传父。
6.1准备组件
准备三个组件,一个父组件,两个子组件。
父组件代码:
<template><div class="Father"><div id="d1"><h3>这是父组件</h3>存款:{{ money }} 万元</div><Child1/><Child2/></div>
</template><script setup lang="ts" name="Father">
import Child1 from './Child1.vue'
import Child2 from './Child2.vue'
import {ref} from 'vue'//数据
let money = ref(100)</script><style scoped>.Father{background-color: rgb(155, 162, 168);padding: 10px;margin: 10px;}#d1{margin-left: 10px;}
</style>
子组件1代码:
<template><div class="Child1"><h3>这是子组件1</h3><ul><li>书籍:{{ book }} 本</li><li>玩具:{{ toy }}</li></ul></div></template><script setup lang="ts" name="Child1">
import {ref} from 'vue'//数据
let book = ref(10)
let toy = ref('滑板车')</script><style scoped>.Child1{background-color: rgb(132, 114, 148);margin: 10px 0;padding: 10px;color: white;}
</style>
子组件2代码:
<template><div class="Child2"><h3>这是子组件2</h3><ul><li>书籍:{{ book }} 本</li><li>玩具:{{ toy }}</li></ul></div>
</template><script setup lang="ts" name="Child2">
import {ref} from 'vue'//数据
let book = ref(6)
let toy = ref('水枪')</script><style scoped>.Child2{background-color: rgb(128, 132, 31);margin-top: 10px;padding: 10px;color:white}
</style>
运行效果如下:

6.2$refs实现父传子通信
需要先了解标签的ref属性的基本知识,ref用在普通DOM标签上,获取的是DOM节点;ref用在组件标签上,获取的是组件实例对象。
了解上面的基础知识后,要在父组件中创建c1和c2,用来存储ref标记的内容:
//创建c1和c2,用于存储ref标记的内容
let c1 = ref()
let c2 = ref()
在CHild1和Ch2组件标签上添加ref属性:
<Child1 ref="c1"/>
<Child2 ref="c2"/>
在Child1和Child2的组件内需要添加以下代码,用来把数据交出去:
//把数据交出去
defineExpose({book,toy})
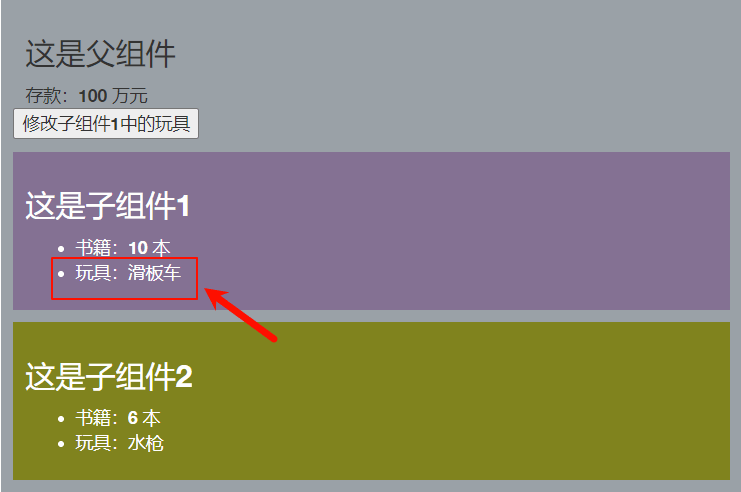
此时,在父组件中已经拿到了子组件中的数据,可以对这些数据进行操作,如下代码定义一个函数,用来改变子组件1中的toy的值:
function changeC1Toy(){c1.value.toy = '积木'
}
在父组件创建按钮,并绑定click事件,用来触发 changeC1Toy函数:
<button @click="changeC1Toy">修改子组件1中的玩具</button>
运行后效果如下:
$refs可以在父组件中获取所有的用ref标记的子组件的实例对象,如果没有用ref标记,则获取不到,例如再增加一个子组件Child3,代码如下:
<template><div class="Child3"><h3>这是子组件3</h3><ul><li>书籍:{{ book }} 本</li><li>玩具:{{ toy }}</li></ul></div></template><script setup lang="ts" name="Child3">
import {ref} from 'vue'//数据
let book = ref(30)
let toy = ref('毛绒玩具')//把数据交出去
defineExpose({book,toy})
</script><style scoped>.Child3{background-color: rgb(120, 148, 114);margin: 10px 0;padding: 10px;color: white;}
</style>
在父组件中引入子组件3:
import Child3 from './Child3.vue'
在页面呈现,但是不添加ref属性
<Child3 />
接下来给父组件创建一个按钮,并绑定click事件,触发changeAllBook()函数,并传入$refs:
<button @click="changeAllBook($refs)">修改子组件的书籍数量</button>
changeAllBook的函数代码如下:
function changeAllBook(refs:any){console.log(refs)for (let key in refs){refs[key].book += 1}
}
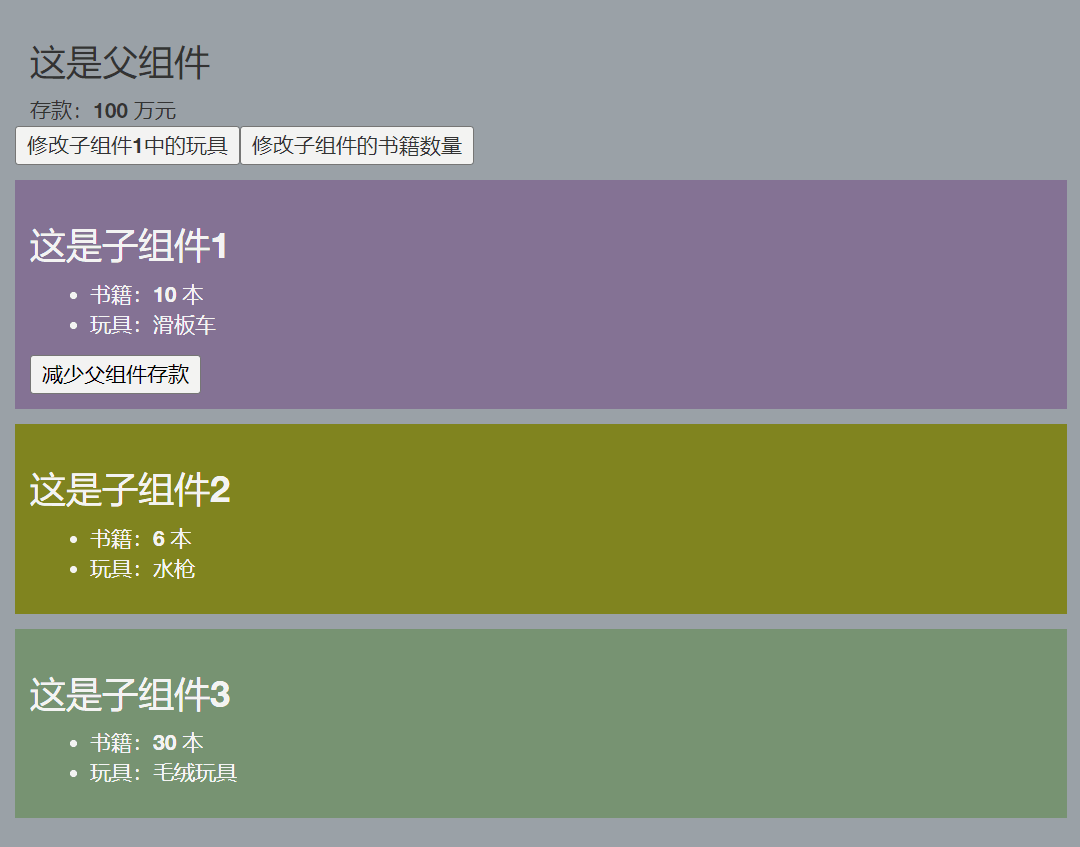
运行后点击按钮,控制台打印的内容如下:

可以看到$refs是一个响应式的对象,对象内是c1和c2,没有子组件3的实例对象。通过遍历把c1和c2中的book增加1,运行效果如下图:
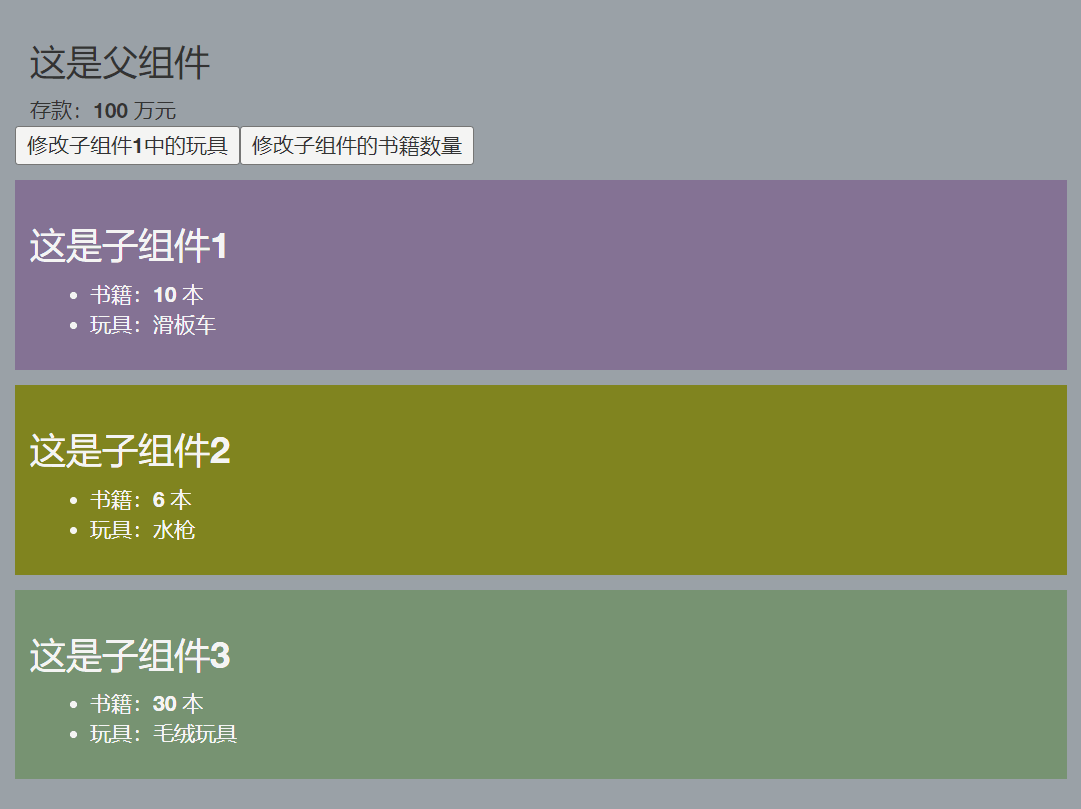
以上通过操控父组件的按钮,实现改变子组件中书籍的数量,这便是父传子通信的一种。
6.3$parent实现子传父通信
$parent的用法与$refs用法类似,$parent获取的是父组件的实例对象,如下在子组件1中添加一个按钮,并绑定单击事件,触发minusMoney方法,实现减少父组件中的存款:
<button @click="minusMoney($parent)">减少父组件存款</button>
minusMoney的代码如下:
function minusMoney(parent:any){	parent.money -= 1
}
父组件需要写个宏函数把数据交出去:
//将数据交出去
defineExpose({money})
至此已经完成了子传父的通信,点击子组件中的按钮,可以对父组件中的数据进行操控,如下图:
6.4小结
以上便是$refs和$parent实现父子间通信的用法,小结如下:
**$refs:**用来获取所有用ref标记的子组件的实例对象,得到的是响应式对象数据类型,不能获取没有用ref标记的子组件实例对象。
**$parent:**用来获取父组件的实例对象。
注意:组件中需要用宏函数defineExpose()把数据交出去,不然获取不到数据。
以下是完整代码:
父组件:
<template><div class="Father"><div id="d1"><h3>这是父组件</h3>存款:{{ money }} 万元</div><button @click="changeC1Toy">修改子组件1中的玩具</button><button @click="changeAllBook($refs)">修改子组件的书籍数量</button><!-- 组件标签的ref属性获取的是组件的实例对象 --><Child1 ref="c1"/><Child2 ref="c2"/><Child3 /></div>
</template><script setup lang="ts" name="Father">
import Child1 from './Child1.vue'
import Child2 from './Child2.vue'
import Child3 from './Child3.vue'
import {ref} from 'vue'//数据
let money = ref(100)//创建c1和c2,用于存储ref标记的内容
let c1 = ref()
let c2 = ref()//方法
function changeC1Toy(){c1.value.toy = '积木'
}function changeAllBook(refs:any){// console.log(refs)for (let key in refs){refs[key].book += 1}
}//将数据交出去
defineExpose({money})
</script><style scoped>.Father{background-color: rgb(155, 162, 168);padding: 10px;margin: 10px;}#d1{margin-left: 10px;}
</style>
子组件1
<template><div class="Child1"><h3>这是子组件1</h3><ul><li>书籍:{{ book }} 本</li><li>玩具:{{ toy }}</li></ul><button @click="minusMoney($parent)">减少父组件存款</button></div>
</template><script setup lang="ts" name="Child1">
import {ref} from 'vue'//数据
let book = ref(10)
let toy = ref('滑板车')//方法
function minusMoney(parent:any){	parent.money -= 1
}//把数据交出去
defineExpose({book,toy})
</script><style scoped>.Child1{background-color: rgb(132, 114, 148);margin: 10px 0;padding: 10px;color: white;}button{color: #000;}
</style>
子组件2
<template><div class="Child2"><h3>这是子组件2</h3><ul><li>书籍:{{ book }} 本</li><li>玩具:{{ toy }}</li></ul></div>
</template><script setup lang="ts" name="Child2">
import {ref} from 'vue'//数据
let book = ref(6)
let toy = ref('水枪')//把数据交出去
defineExpose({book,toy})
</script><style scoped>.Child2{background-color: rgb(128, 132, 31);margin-top: 10px;padding: 10px;color:white}
</style>
7.provide和inject
provide和inject用于当前组件向其后代组件直接通信,需要先在祖先组件中通过provide配置向后代组件提供数据,然后在后代组件中通过inject配置声明接收数据。
7.1准备三个组件
先准备三个组件,分别为父组件、子组件和孙组件,具体代码如下:
父组件代码:
<template><div class="father"><h3>父组件</h3><h4>用户订单详情</h4><ul><li>订单编号:{{ oderDetail.id }}</li><li>订单用户:{{ oderDetail.username }}</li><li>订单商品:{{ oderDetail.goods }}</li><li>订单价格:{{ oderDetail.price }}</li></ul><Child/></div>
</template><script lang="ts" setup name="Father">
import Child from './Child.vue'
import {reactive} from 'vue'let oderDetail = reactive({id:"abc01",username:'xiaopeng',goods:"神仙水",price:998
})
</script><style scoped>.father{background-color: rgb(112, 150, 66);margin: 10px;padding: 10px;border-radius: 5px;}
</style>
子组件代码:
<template><div class="child"><h3>子组件</h3><GrandChild/></div>
</template><script lang="ts" setup name="Child">import GrandChild from './GrandChild.vue'</script><style scoped>.child{background-color: burlywood;margin: 10px;padding: 10px;border-radius: 10px;}
</style>
孙组件代码:
<template><div class="grandChild"><h3>这是孙组件</h3></div>
</template><script lang="ts" setup name="GrandChild"></script><style scoped>.grandChild{background-color: aqua;margin: 10px;padding:10px;border-radius: 5px;}
</style>
运行效果如下:
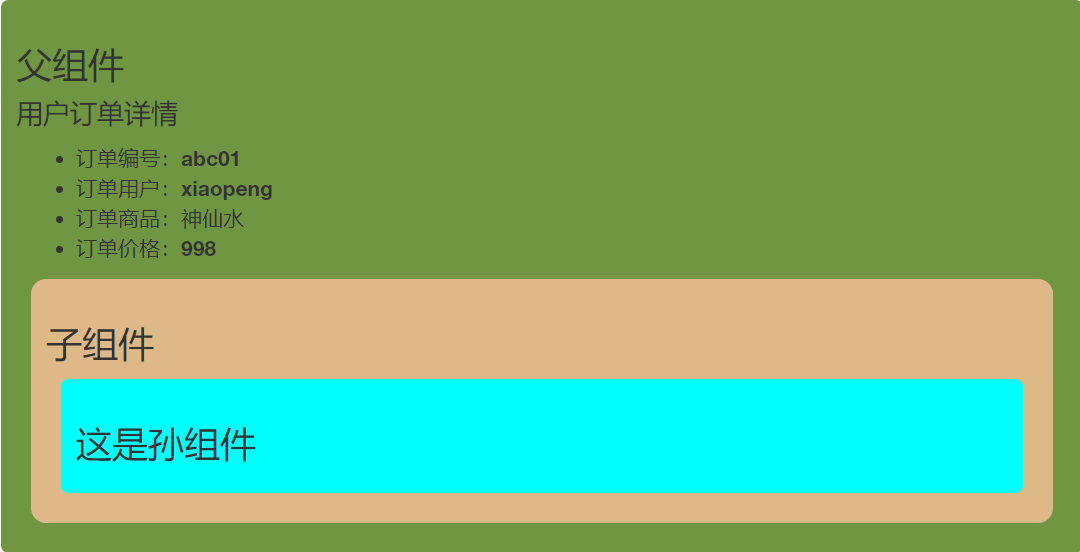
7.2 祖传孙通信的实现
在父组件中引入provide,并提供数据
import {reactive,provide} from 'vue'
//提供数据
provide('oderDetail',oderDetail)
注意此处第一个参数的名字可以是任意的,第二个参数为数据,如果是多个数据,可以为对象格式的数据。
在后代组件中(以孙组件为例)引入inject,并注入数据:
import { inject } from 'vue';//注入数据
let oderDetail = inject('oderDetail')
注意inject中的第一个参数必须与祖组件中provide中第一个参数相同,第二个参数为默认值,即当父组件中没有传递'oderDetail',那么孙组件中的oderDetail的值就是procide中的第二个参数。
孙组件中在页面中呈现:
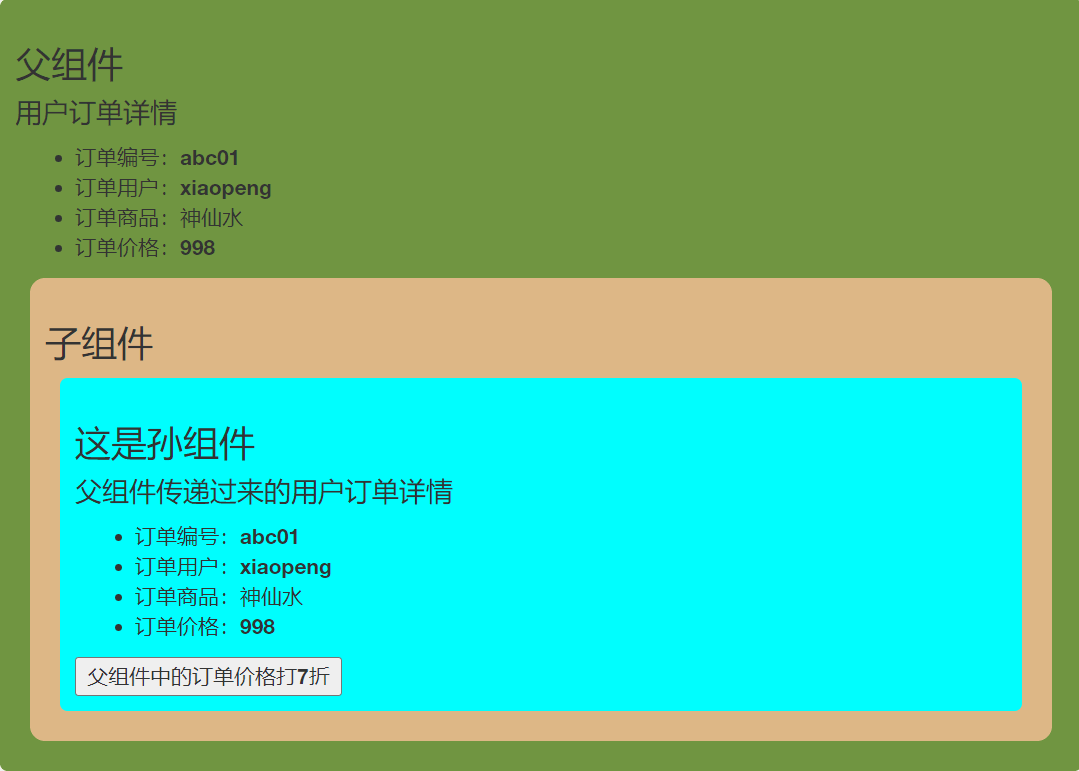
<h4>父组件传递过来的用户订单详情</h4><ul><li>订单编号:{{ oderDetail.id }}</li><li>订单用户:{{ oderDetail.username }}</li><li>订单商品:{{ oderDetail.goods }}</li><li>订单价格:{{ oderDetail.price }}</li></ul>
注意上面代码中VS Code进行TS检查,会提示oderDetail有错误,但是实际不影响页面呈现,运行结果如下:

接下来需要处理ts的问题,ts显示oderDetail类型为未知,那么可以在定义oderDetail的时候给个默认值,如下代码:
let oderDetail = inject('oderDetail',{id:'',username:'',goods:'',price:0})
此时VS Code就不再报错,并且运行结果一样。
7.3 孙传祖通信的实现
provide和inject也可以实现孙传祖通信,需要在父组件中定义一个函数,并传递给后代:
//方法
function discount(value:number){oderDetail.price = oderDetail.price * value/10
}
//提供方法
provide('discount',discount)
孙组件中接收方法:
let discount = inject('discount',(value:number)=>{})
孙组件中添加按钮并绑定单击事件触发接收的方法,并传递参数:
<button @click="discount(7)">父组件中的订单价格打7折</button>
运行后单击按钮可以实现更改父组件中的价格,由于孙组件中接收的数据为相应式的,因此更改父组件中的价格,孙组件中的订单价格也会相应变化,如下图所示:
至此以及实现了孙传祖通信。
不过上面代码还可以简化,之前提到过provide第二个参数如果是多个数据,可以为对象格式的数据,这样就可以把数据和对象同时传递和接收,如下代码所示:
//提供数据和方法
provide('oderContent',{oderDetail,discount})
let {oderDetail,discount} = inject('oderContent',{oderDetail:{id:'',username:'',goods:'',price:0},discount:(value:number)=>{}})
这样运行的结果是完全一样的。
7.4 小结
provide和inject用于当前组件向其后代组件直接通信,需要先在祖先组件中通过provide配置向后代组件提供数据,然后在后代组件中通过inject配置声明接收数据。这个过程是完全不打扰中间的子组件,实现的是祖孙间的直接通信。
下面是完整代码:
父组件:
<template><div class="father"><h3>父组件</h3><h4>用户订单详情</h4><ul><li>订单编号:{{ oderDetail.id }}</li><li>订单用户:{{ oderDetail.username }}</li><li>订单商品:{{ oderDetail.goods }}</li><li>订单价格:{{ oderDetail.price }}</li></ul><Child/></div>
</template><script lang="ts" setup name="Father">
import Child from './Child.vue'
import {reactive,provide} from 'vue'//数据
let oderDetail = reactive({id:"abc01",username:'xiaopeng',goods:"神仙水",price:998
})//方法
function discount(value:number){oderDetail.price = oderDetail.price * value/10
}
// //提供数据
// provide('oderDetail',oderDetail)
// 提供方法
// provide('discount',discount)//提供数据和方法
provide('oderContent',{oderDetail,discount})</script><style scoped>.father{background-color: rgb(112, 150, 66);margin: 10px;padding: 10px;border-radius: 5px;}
</style>
子组件:
<template><div class="child"><h3>子组件</h3><GrandChild/></div>
</template><script lang="ts" setup name="Child">import GrandChild from './GrandChild.vue'</script><style scoped>.child{background-color: burlywood;margin: 10px;padding: 10px;border-radius: 10px;}
</style>
孙组件:
<template><div class="grandChild"><h3>这是孙组件</h3><h4>父组件传递过来的用户订单详情</h4><ul><li>订单编号:{{ oderDetail.id }}</li><li>订单用户:{{ oderDetail.username }}</li><li>订单商品:{{ oderDetail.goods }}</li><li>订单价格:{{ oderDetail.price }}</li></ul><button @click="discount(7)">父组件中的订单价格打7折</button></div>
</template><script lang="ts" setup name="GrandChild">
import { inject } from 'vue';// // 注入数据
// let oderDetail = inject('oderDetail',{id:'',username:'',goods:'',price:0})
// let discount = inject('discount',(value:number)=>{})let {oderDetail,discount} = inject('oderContent',{oderDetail:{id:'',username:'',goods:'',price:0},discount:(value:number)=>{}})</script><style scoped>.grandChild{background-color: aqua;margin: 10px;padding:10px;border-radius: 5px;}
</style>
8.pinia
pinia是一个集中式状态管理工具,是符合直觉的集中式状态管理工具。
8.1准备组件
首先准备3个组件,父组件代码如下:
<template><div class="father"><Header/><Content/></div>
</template><script setup lang="ts" name="Index">
import Header from './Header.vue';
import Content from './Content.vue';</script><style scoped>.father{height: 300px;width: 800px;background-color: rgb(169, 169, 169);margin: 5px;padding: 0;}
</style>
Header组件代码如下:
<template><div class="header"><img class="thoto" :src="user.thoto" alt="头像"><span>{{ user.name }}</span></div>
</template><script setup lang="ts" name="Header">
import {ref,reactive} from 'vue'let user = reactive({id:'m0_63165331',name:'m0_63165331',thoto:'https://xyyhxxx.oss-cn-beijing.aliyuncs.com/picGoImg/202406111305778.jpg'
})
</script><style scoped>.header{height: 50px;background-color: #3b818c;border-bottom: 1px solid rgb(255, 255, 255);overflow: hidden;font-size: 0;text-align: center;line-height: 50px;}span{font-size: 16px;vertical-align: middle;color: #fff;}.thoto{height: 35px;border-radius: 50%;vertical-align: middle;margin-right: 5px;}
</style>
Content组件代码如下:
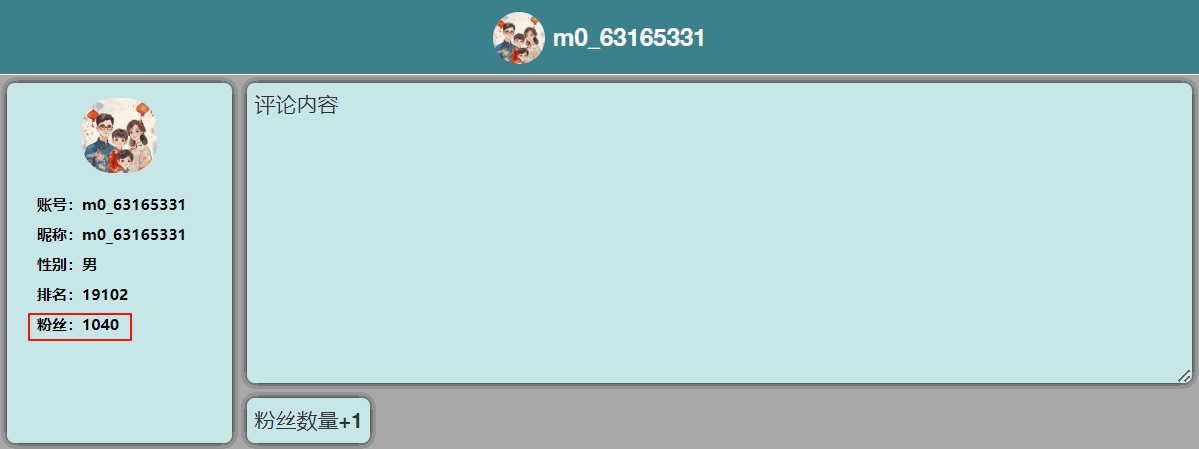
<template><div class="outer"><div class="user">        <img class="thoto" :src="user.thoto" alt="头像">  <br><div class="user-inf"><span>账号:{{ user.id }}</span> <br><span>昵称:{{ user.name }}</span><br><span>性别:{{ user.gender }}</span><br><span>排名:{{ user.rank }}</span> <br><span>粉丝:{{ user.fans }}</span>  </div>      </div><div class="content"><textarea name="msg" >评论内容</textarea></div></div>
</template><script setup lang="ts" name="Content">
import {ref,reactive} from 'vue'let user = reactive({id:'m0_63165331',name:'m0_63165331',gender:'男',rank:19102,fans:1040,thoto:'https://xyyhxxx.oss-cn-beijing.aliyuncs.com/picGoImg/202406111305778.jpg'
})
</script><style scoped>.outer{height: 250px;overflow: hidden;}.user{height: 240px;width: 150px;margin: 5px;background-color: #c6e6e8;text-align: center;float: left;border-radius: 5px;box-shadow: 0 0 5px black;}.user-inf{width: 150px;text-align: left;padding: 0 20px;}span{font-size: 16px;color: #000;font-size: 10px;font-family: 微软雅黑;font-weight: 600;        }.thoto{height: 50px;border-radius: 40%;margin: 10px;}.content{width:630px;height: 240px;/* background-color: #c7d2d4; */float: right;margin: 5px;        }textarea{width:630px;height: 240px;background-color: #c6e6e8;border: none;padding: 5px;border-radius: 5px;box-shadow: 0 0 5px black;}
</style>
呈现效果如下:

8.2 搭建pinia环境
第一步先安装pinia
npm indtall pinia
第二步在src/main.ts中引入createPinia并创建pinia,然后再安装pinia插件,如下代码:
import {createApp} from 'vue'
import App from './App.vue'
//1.引入createPinia,用于创建pinia
import {createPinia} from 'pinia'// 创建应用
const app = createApp(App)// 2.创建pinia
const pinia = createPinia()// 3.安装pinia插件
app.use(pinia)// 挂载应用
app.mount('#app')
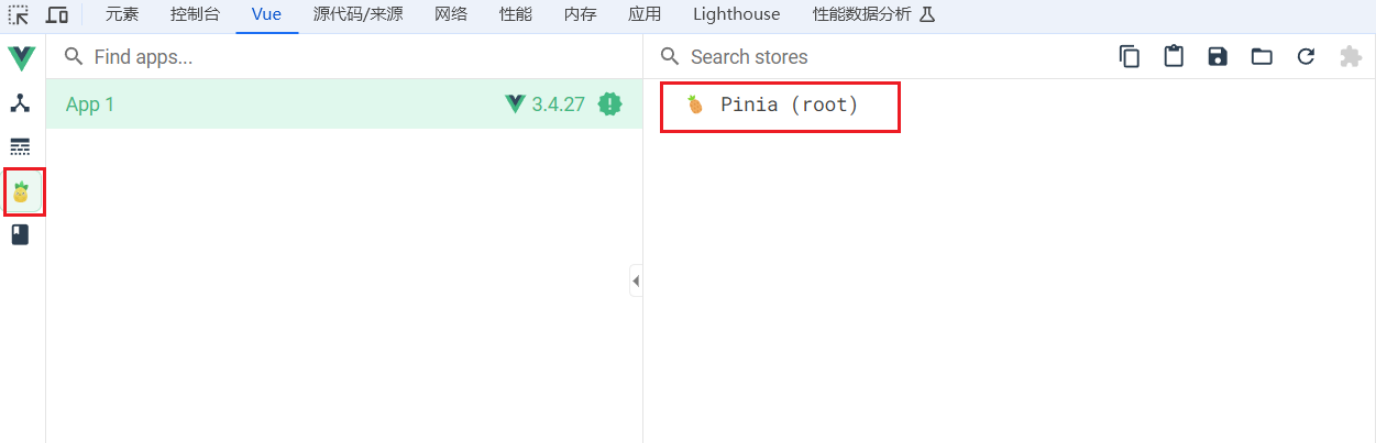
此时我们已经创建了pinia环境,在浏览器开发者工具中能看到pinia
8.3存储和读取数据
pinia是一个轻量化的状态管理工具,一般把组件中共用的数据存储在store中,不适合把所有的数据都用pinia来管理。前面创建的例子中user数据是共用的,可以放入到store中。
Store是一个保存:状态、业务逻辑 的实体,每个组件都可以读取、写入它。
它有三个概念:state、getter、action,相当于组件中的: data、 computed 和 methods。
在src文件夹下新建stoer文件夹,然后在文件夹下新建文件user.ts。这个文件用于存储user相关的数据、逻辑。
在user.ts文件中先//引入defineStore,用于创建store。
//引入defineStore,用于创建store
import {defineStore} from 'pinia'
store的变量名建议以use开头Srore结尾的大驼峰式命名。如下代码创建useUserStore,并暴露。defineStore接收两个参数,第一个参数是id值,官方建议与文件名保持一致,第二个参数有两种写法,第一种是选项式写法,参数是配置对象,第二种是组合式写法,是函数。
如下代码是选项式写法:它有一个state配置项,state必须写成函数,内部return一个对象,对象内部写具体的数据,如下:
export const useUserStore = defineStore('user',{//状态state() {return {user:{id:'m0_63165331',name:'m0_63165331',gender:'男',rank:19102,fans:1040,thoto:'https://xyyhxxx.oss-cn-beijing.aliyuncs.com/picGoImg/202406111305778.jpg'}}},
})
这样写完就拥有了一个用于存储user相关内容的仓库,接下来需要在组件中引入仓库,引入后可直接调用便可得到对应的store,如下代码:
// 引入对应的useXxxxxStore
import { useUserStore } from '../store/user';
// 调用useXxxxxStore得到对应的store
const userStore = useUserStore()
那个这个userStore具体是什么,可以在控制台打印输出得到如下内容:

从上面控制台打印的信息可以得到,userStore是个响应式对象,它身上有user对象,还有 s t a t e , state, state,state身上也有user对象,说明有两种方式可以拿到user对象的数据,如下:
console.log(userStore.user)
console.log(userStore.$state.user)
控制台结果如下:

可以看到两种拿数据的方法得到的结果是完全一样的,所以我们使用简单的方式来拿数据,在页面中展示用如下代码:
<div class="user">        <img class="thoto" :src="userStore.user.thoto" alt="头像">  <br><div class="user-inf"><span>账号:{{ userStore.user.id }}</span> <br><span>昵称:{{ userStore.user.name }}</span><br><span>性别:{{ userStore.user.gender }}</span><br><span>排名:{{ userStore.user.rank }}</span> <br><span>粉丝:{{ userStore.user.fans }}</span>  </div>
</div>
运行后结果跟没有用pinia之前是完全一样的,不再附图。
8.4 修改数据
pinia修改数据有三种方式。
**第一种修改方式:**是符合直觉的方式,拿到数据后就直接修改,如下代码,先创建一个方法用来更改粉丝数量:
function addFans(){userStore.user.fans += 1
}
然后在组件中添加按钮并绑定事件:
<button @click="addFans">粉丝数量+1</button>
运行后效果如下:
**第二种修改方式:**是批量修改方式,用$path,它只需要把要修改的数据传递即可,如下代码:
function changeInf(){userStore.$patch( {user : {name:'一叶知秋',rank:5000,fans:10000,}})
}
添加按钮并绑定事件,如下:
<button @click="changeInf">更改数据</button>
运行效果如下:

**第三种修改方式:**借助pinia的action修改。在user.ts文件中的defineStore第二个参数中增加如下配置项:
//动作
actions:{changeRankAddFans(){if (this.user.fans<10000){this.user.fans += 1000};if (this.user.rank>10000){this.user.rank -= 1000}}
},
在组件中引入过userStore后可以直接调用,如下代码添加按钮并绑定事件:
<button @click="userStore.changeRankAddFans">粉丝数量+1000,排名往前1000</button>
运行后如下效果:

8.5 getters
pinia中的getters类似计算属性,如下代码所示,在user.ts中添加getters配置项:
getters:{changeRank(state){if (state.user.rank > 10000){return Math.floor(state.user.rank / 10000) + "万+"}else{return state.user.rank}}
}
在组件页面中调整显示内容如下:
<span>排名:{{ userStore.changeRank }}</span>
运行后效果如下,排名超过1万时显示1万+,在1万名以内显示具体数字:

8.6 $subscribe
pinia中的$subscribe可以对pinia仓库中的数据进行监视,与watch类似,如下代码:
userStore.$subscribe(()=>{console.log('userStore中的数据发生变化了')
})
$subscribe是一个函数,需要调用,调用的同时要传入一个函数,可以用箭头函数。上面代码运行后,当数据发生变化的时候这句话就会打印,如下图示意:

$subscribe函数传入的函数中可以接收两个参数,第一个参数是数据变化的信息,第二个参数是变化后的数据。如下代码示意:
userStore.$subscribe((mutate,state)=>{console.log('userStore中的数据发生变化了')console.log(mutate)console.log(state)
})
8.7 store组合式写法
前面8.3小节提到过store有两种写法,一种是选项式,一种是组合式,前面演示的均为选项式,下面代码为组合式写法。
export const useUserStore = defineStore('user',()=>{let user = reactive({id:'m0_63165331',name:'m0_63165331',gender:'男',rank:19102,fans:1040,thoto:'https://xyyhxxx.oss-cn-beijing.aliyuncs.com/picGoImg/202406111305778.jpg'})function changeRankAddFans(){if (user.fans<10000){user.fans += 1000};if (user.rank>10000){user.rank -= 1000}}let changeRank = computed(()=>{if (user.rank > 10000){return Math.floor(user.rank / 10000) + "万+"}else{return user.rank}})return {user,changeRankAddFans,changeRank}
})
8.8 小结
pinia是符合直接的vue.js的状态管理工具。
Store是一个保存:状态、业务逻辑 的实体,每个组件都可以读取、写入它。
它有三个概念:state、getter、action,相当于组件中的: data、 computed 和 methods。
它可以按照选项式风格来编写代码,也可以按照组合式风格来编写代码。
以下是完整代码:
src/main.ts中代码如下
import {createApp} from 'vue'
import App from './App.vue'//引入createPinia,用于创建pinia
import {createPinia} from 'pinia'// 创建应用
const app = createApp(App)// 创建pinia
const pinia = createPinia()// 安装pinia插件
app.use(pinia)// 挂载应用
app.mount('#app')
src/store/user.ts中代码如下:
//引入defineStore,用于创建store
import {defineStore} from 'pinia'
import {reactive,computed} from 'vue'//创建seUserStore并暴露
//选项式写法
// export const useUserStore = defineStore('user',{
//     //状态
//     state() {
//         return {
//             user:{
//                 id:'m0_63165331',
//                 name:'m0_63165331',
//                 gender:'男',
//                 rank:19102,
//                 fans:1040,
//                 thoto:'https://xyyhxxx.oss-cn-beijing.aliyuncs.com/picGoImg/202406111305778.jpg'
//             }
//         }
//     },
//     //动作
//     actions:{
//         changeRankAddFans(){
//             if (this.user.fans<10000){
//                 this.user.fans += 1000
//             };
//             if (this.user.rank>10000){
//                 this.user.rank -= 1000
//             }
//         }
//     },
//     //计算
//     getters:{
//         changeRank(state){
//             if (state.user.rank > 10000){
//                 return Math.floor(state.user.rank / 10000) + "万+"
//             }else{
//                 return state.user.rank
//             }
//         }
//     }// })//组合式写法
export const useUserStore = defineStore('user',()=>{let user = reactive({id:'m0_63165331',name:'m0_63165331',gender:'男',rank:19102,fans:1040,thoto:'https://xyyhxxx.oss-cn-beijing.aliyuncs.com/picGoImg/202406111305778.jpg'})function changeRankAddFans(){if (user.fans<10000){user.fans += 1000};if (user.rank>10000){user.rank -= 1000}}let changeRank = computed(()=>{if (user.rank > 10000){return Math.floor(user.rank / 10000) + "万+"}else{return user.rank}})return {user,changeRankAddFans,changeRank}
})
Father组件中代码:
<template><div class="father"><Header/><Content/></div>
</template><script setup lang="ts" name="Index">
import Header from './Header.vue';
import Content from './Content.vue';</script><style scoped>.father{height: 300px;width: 800px;background-color: rgb(169, 169, 169);margin: 5px;padding: 0;}
</style>
Header组件代码:
<template><div class="header"><img class="thoto" :src="userStore.user.thoto" alt="头像"><span>{{ userStore.user.name }}</span></div>
</template><script setup lang="ts" name="Header">
// 引入对应的useXxxxxStore
import { useUserStore } from '../store/user';
// 调用useXxxxxStore得到对应的store
const userStore = useUserStore()</script><style scoped>.header{height: 50px;background-color: #3b818c;border-bottom: 1px solid rgb(255, 255, 255);overflow: hidden;font-size: 0;text-align: center;line-height: 50px;}span{font-size: 16px;vertical-align: middle;color: #fff;}.thoto{height: 35px;border-radius: 50%;vertical-align: middle;margin-right: 5px;}
</style>
Content组件:
<template><div class="outer"><div class="user">        <img class="thoto" :src="userStore.user.thoto" alt="头像">  <br><div class="user-inf"><span>账号:{{ userStore.user.id }}</span> <br><span>昵称:{{ userStore.user.name }}</span><br><span>性别:{{ userStore.user.gender }}</span><br><span>排名:{{ userStore.changeRank }}</span> <br><span>粉丝:{{ userStore.user.fans }}</span>  </div>      </div><div class="content"><textarea name="msg" >评论内容</textarea><button @click="addFans">粉丝数量+1</button><button @click="changeInf">更改数据</button><button @click="userStore.changeRankAddFans">粉丝数量+1000,排名往前1000</button></div></div>
</template><script setup lang="ts" name="Content">
import {ref,reactive,toRefs} from 'vue'
// 引入对应的useXxxxxStore
import { useUserStore } from '../../store/user';
// 调用useXxxxxStore得到对应的store
const userStore = useUserStore()userStore.$subscribe((mutate,state)=>{console.log('userStore中的数据发生变化了')console.log(mutate)console.log(state)
})//修改数据第一种方式
function addFans(){userStore.user.fans += 1
}//修改数据第二种方式
function changeInf(){userStore.$patch( {user : {name:'一叶知秋',rank:5000,fans:10000,}})
}</script><style scoped>.outer{height: 250px;overflow: hidden;}.user{height: 240px;width: 150px;margin: 5px;background-color: #c6e6e8;text-align: center;float: left;border-radius: 5px;box-shadow: 0 0 5px black;}.user-inf{width: 150px;text-align: left;padding: 0 20px;}span{font-size: 16px;color: #000;font-size: 10px;font-family: 微软雅黑;font-weight: 600;        }.thoto{height: 50px;border-radius: 40%;margin: 10px;}.content{width:630px;height: 240px;/* background-color: #c7d2d4; */float: right;margin: 5px;        }textarea{width:630px;height: 200px;background-color: #c6e6e8;border: none;padding: 5px;border-radius: 5px;box-shadow: 0 0 5px black;}button{background-color: #c6e6e8;height: 30px;margin-top: 5px;margin-right: 10px;border-radius: 5px;padding: 5px;box-shadow: 0 0 5px black;border: none;transition: box-shadow 0.3s;}button:hover{box-shadow: 0 0 8px rgb(132, 132, 132);}button:active{box-shadow: 0 0 10px rgb(255, 255, 255);}
</style>
9. 插槽
插槽分为三种:默认插槽,具名插槽,作用域插槽。
9.1默认插槽
先准备两个组件,一个父组件,一个是子组件Category组件,父组件中的代码如下:
<template><div class="father"><div class="content"><!-- 组件可以复用 --><Category title="热门游戏列表"/>       <Category title="今日美食推荐"/>       <Category title="今日影视推荐"/>  </div></div>
</template><script setup lang="ts" name="Father">
import Category from './Category.vue'
import {ref,reactive } from 'vue'
//游戏列表数据
let games = reactive([{id:"afsdf01",name:"王者荣耀"},{id:"afsdf02",name:"和平精英"},{id:"afsdf03",name:"我的世界"},{id:"afsdf04",name:"原神"}
])
//图片url
let imgUrl = ref('https://xyyhxxx.oss-cn-beijing.aliyuncs.com/picGoImg/202406161328882.gif')
//电影url
let movieUrl = ref('https://xyyhxxx.oss-cn-beijing.aliyuncs.com/picGoImg/202406161519334.mp4')
</script><style scoped>.father{width: 800px;height: 400px;background-image: url(https://xyyhxxx.oss-cn-beijing.aliyuncs.com/picGoImg/202406161029992.gif);background-size: cover;padding: 20px;   }.content{margin-top: 30px;display: flex;justify-content: space-evenly;}
</style>
子组件Category中的代码如下:
<template><div class="category"><h2>{{title}}</h2></div>
</template><script setup lang="ts" name="Category">//接收propsdefineProps(['title'])
</script><style scoped>.category{height: 300px;width: 200px;padding: 10px;background-color:rgba(255, 255, 255, 0.1);border-radius: 5px;border: 1px solid white;box-shadow: 0 0 5px white;color: #fff;transition: box-shadow 0.3s,transform 0.5s;}.category:hover{box-shadow: 0 0 10px white;box-shadow: 0 0 20px white;transform:translateY(-5px)}h2{text-align: center;border-bottom: 1px solid white;font-size: 18px;font-weight: 800;}
</style>
以上代码是把子组件复用三次,并利用props传递title属性,然后在子组件中接收props并在页面呈现,本次写一些CSS样式,效果如下:

接下来需要把父组件中的游戏列表、图片、视频分别呈现在子组件中。
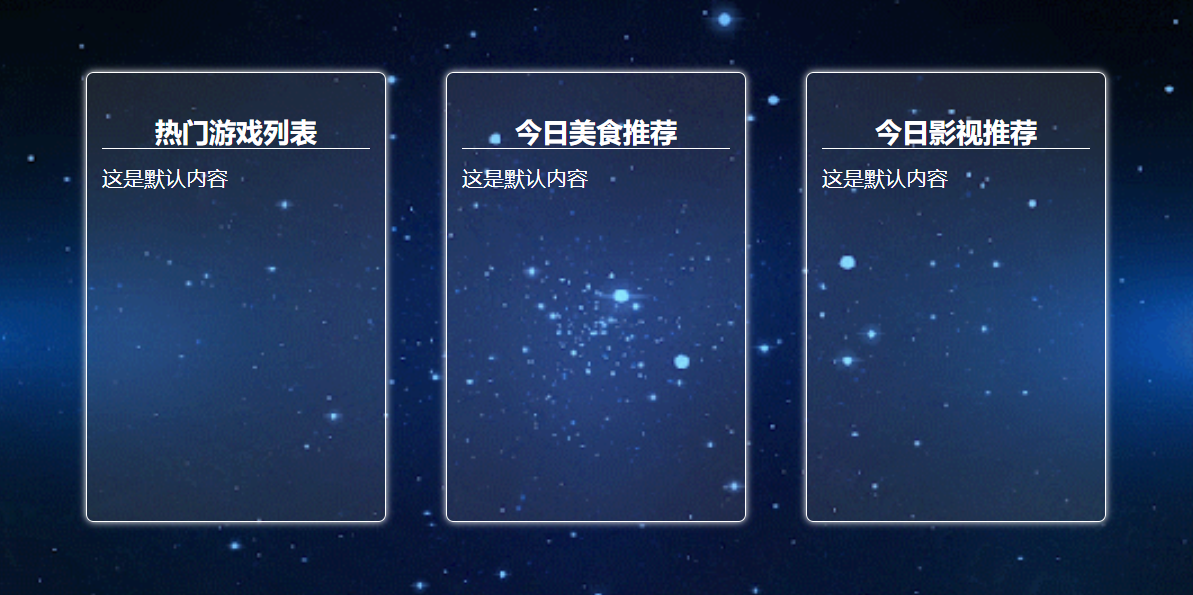
首先要在子组件中写slot标签用来站位,标签中夹着的内容为默认内容,如果父组件没有传递内容,则会显示默认内容,如果父组件传递内容,则显示传递的内容。如下代码:
<slot>这是默认内容</slot>
此时页面呈现效果如下:
在父组件中首先要把组件标签由单标签改成双标签,如下代码:
<div class="content"><!-- 组件可以复用 --><Category title="热门游戏列表"></Category><Category title="今日美食推荐"></Category><Category title="今日影视推荐"></Category>
</div>
然后在两个标签中添加页面元素,添加的内容便会呈现在子组件插槽的位置,如下代码:
<div class="content"><!-- 组件可以复用 --><Category title="热门游戏列表"><ul><li v-for="g in games" :key="g.id">{{ g.name }}</li></ul></Category><Category title="今日美食推荐"><div class="slot"><img :src="imgUrl" alt=""></div></Category><Category title="今日影视推荐"><div class="slot"><video :src="movieUrl" controls></video></div></Category>
</div>
再给一些样式:
.slot{height: 240px;width: 180px;opacity:0.2;transition:opacity 0.3s
}
.slot:hover{opacity:1
}
img,video{text-align: center;width: 100%;
}
最终页面呈现的效果如下:

以上便是默认插槽的用法。
以下是完整代码:
父组件
<template><div class="father"><div class="content"><!-- 组件可以复用 --><Category title="热门游戏列表"><ul><li v-for="g in games" :key="g.id">{{ g.name }}</li></ul></Category><Category title="今日美食推荐"><div class="slot"><img :src="imgUrl" alt=""></div></Category><Category title="今日影视推荐"><div class="slot"><video :src="movieUrl" controls></video></div></Category></div></div>
</template><script setup lang="ts" name="Father">
import Category from './Category.vue'
import {ref,reactive } from 'vue'
//游戏列表数据
let games = reactive([{id:"afsdf01",name:"王者荣耀"},{id:"afsdf02",name:"和平精英"},{id:"afsdf03",name:"我的世界"},{id:"afsdf04",name:"原神"}
])
//图片url
let imgUrl = ref('https://xyyhxxx.oss-cn-beijing.aliyuncs.com/picGoImg/202406161328882.gif')
//电影url
let movieUrl = ref('https://xyyhxxx.oss-cn-beijing.aliyuncs.com/picGoImg/202406161519334.mp4')
</script><style scoped>.father{width: 800px;height: 400px;background-image: url(https://xyyhxxx.oss-cn-beijing.aliyuncs.com/picGoImg/202406161029992.gif);background-size: cover;padding: 20px;   }.content{margin-top: 30px;display: flex;justify-content: space-evenly;} .slot{height: 240px;width: 180px;opacity:0.2;transition:opacity 0.3s}.slot:hover{opacity:1} img,video{text-align: center;width: 100%;}
</style>
子组件
<template><div class="category"><h2>{{title}}</h2><!-- 插槽 --><slot>这是默认内容</slot></div>
</template><script setup lang="ts" name="Category">//接收propsdefineProps(['title'])
</script><style scoped>.category{height: 300px;width: 200px;padding: 10px;background-color:rgba(255, 255, 255, 0.1);border-radius: 5px;border: 1px solid white;box-shadow: 0 0 5px white;color: #ffffff;transition: box-shadow 0.3s,transform 0.5s;}.category:hover{box-shadow: 0 0 10px white;box-shadow: 0 0 20px white;transform:translateY(-5px)}h2{text-align: center;border-bottom: 1px solid white;font-size: 18px;font-weight: 800;}
</style>
9.2 具名插槽
具名插槽顾名思义就是具有名称的插槽,在前一小节中我们在使用插槽的时候没有指定名称,为默认插槽。
使用具名插槽可以使用多个插槽,前面小节中的title数据是用props传递的,有了具名插槽就可以不使用props,全采用插槽传递。子组件中代码改成如下:
<template><div class="category"><!-- 插槽1 --><slot name="title">这是默认内容</slot><!-- 插槽2 --><slot name="content">这是默认内容</slot></div>
</template>
父组件中需要传递的数据要用template标签包一下,并添加v-slot属性。如下代码示意:
<template><div class="father"><div class="content"><!-- 组件可以复用 --><Category><!-- v-slot后面是冒号,冒号后面对应插槽名称 --><template v-slot:title><h2>热门游戏列表</h2></template><template v-slot:content><ul><li v-for="g in games" :key="g.id">{{ g.name }}</li></ul></template></Category><Category><template v-slot:title><h2>今日美食推荐</h2></template><template v-slot:content><div class="slot"><img :src="imgUrl" alt=""></div></template></Category><Category title="今日影视推荐"><template v-slot:title><h2>今日影视推荐</h2></template><template v-slot:content><div class="slot"><video :src="movieUrl" controls></video></div></template></Category></div></div>
</template>
注意由于不用props传递数据,子组件中需要删除defineProps代码,并且由于h2标签由原来的在子组件中挪到了父组件代码中了,所以CSS样式也要同时粘贴过去。
注意,v-slot:有个小的语法糖,可以简写为#。
以上便是具名插槽的用法,完整代码如下:
父组件
<template><div class="father"><div class="content"><!-- 组件可以复用 --><Category><!-- v-slot后面是冒号,冒号后面对应插槽名称 --><template v-slot:title><h2>热门游戏列表</h2></template><template v-slot:content><ul><li v-for="g in games" :key="g.id">{{ g.name }}</li></ul></template></Category><Category><!-- v-slot:可以简写为# --><template #title><h2>今日美食推荐</h2></template><template #content><div class="slot"><img :src="imgUrl" alt=""></div></template></Category><Category><template #title><h2>今日影视推荐</h2></template><template #content><div class="slot"><video :src="movieUrl" controls></video></div></template></Category></div></div>
</template><script setup lang="ts" name="Father">
import Category from './Category.vue'
import {ref,reactive } from 'vue'
//游戏列表数据
let games = reactive([{id:"afsdf01",name:"王者荣耀"},{id:"afsdf02",name:"和平精英"},{id:"afsdf03",name:"我的世界"},{id:"afsdf04",name:"原神"}
])
//图片url
let imgUrl = ref('https://xyyhxxx.oss-cn-beijing.aliyuncs.com/picGoImg/202406161328882.gif')
//电影url
let movieUrl = ref('https://xyyhxxx.oss-cn-beijing.aliyuncs.com/picGoImg/202406161519334.mp4')
</script><style scoped>.father{width: 800px;height: 400px;background-image: url(https://xyyhxxx.oss-cn-beijing.aliyuncs.com/picGoImg/202406161029992.gif);background-size: cover;padding: 20px;   }.content{margin-top: 30px;display: flex;justify-content: space-evenly;} .slot{height: 240px;width: 180px;opacity:0.2;transition:opacity 0.3s}.slot:hover{opacity:1} img,video{text-align: center;width: 100%;}h2{text-align: center;border-bottom: 1px solid white;font-size: 18px;font-weight: 800;}
</style>
子组件
<template><div class="category"><!-- 插槽1 --><slot name="title">这是默认内容</slot><!-- 插槽2 --><slot name="content">这是默认内容</slot></div>
</template><script setup lang="ts" name="Category"></script><style scoped>.category{height: 300px;width: 200px;padding: 10px;background-color:rgba(255, 255, 255, 0.1);border-radius: 5px;border: 1px solid white;box-shadow: 0 0 5px white;color: #ffffff;transition: box-shadow 0.3s,transform 0.5s;}.category:hover{box-shadow: 0 0 10px white;box-shadow: 0 0 20px white;transform:translateY(-5px)}</style>
9.3 作用域插槽
作用域插槽与前面的默认插槽和具名插槽有很大的不同,默认插槽和具名插槽都是用于父传子,数据在父组件中。作用域插槽用于子传父,数据在子组件中,但是数据生成的结构由父组件决定。
如下代码在子组件中定义游戏列表数据,但是数据的呈现方式在组件中可以是无序列表,也可以是有序列表,也可以是普通文本。
如下代码是子组件的数据:
<script setup lang="ts" name="Games">
import {reactive } from 'vue'
//游戏列表数据
let games = reactive([{id:"afsdf01",name:"王者荣耀"},{id:"afsdf02",name:"和平精英"},{id:"afsdf03",name:"我的世界"},{id:"afsdf04",name:"原神"}
])
</script>
使用slot标签来传递数据,此处用法与props用法相同,也可以同时传递多个数据。
<template><div class="games"><h2>游戏列表</h2><!-- 给slot组件传递props --><slot :games="games"></slot></div>
</template>
在父组件中接收数据用v-slot=“XXX”接收数据,接收的数据是一个对象。
<Games><!-- v-slot=""用来接收props --><template v-slot="params"><ul><li v-for="g in params.games" :key="g.id">{{ g.name }}</li></ul></template>
</Games>
作用域插槽也可以用带有名称,如果插槽没有命名,默认的名字为default,包括前面小节的默认插槽,它的名字也是default。
<Games><!-- default为插槽的名称,未命名的插槽默认名称是default --><template v-slot:default="params"><ol><li v-for="g in params.games" :key="g.id">{{ g.name }}</li></ol></template>
</Games>
v-slot:也可以用简写的形式(在UI组件库中会大量应用作用域插槽,所以经常会看到#default)
<Games><!-- #是 v-slot: 的语法糖--><template #default="params"><h4 v-for="g in params.games" :key="g.id">{{ g.name }}</h4></template>
</Games>
在接收数据的时候也可以解构赋值,如下:
<Games><!-- 在接收的时候进行了解构赋值--><template #default="{games}"><h5 v-for="g in games" :key="g.id">{{ g.name }}</h5></template>
</Games>
最终呈现的效果如下:

完整代码如下:
父组件
<template><div class="father"><div class="content"><Games><!-- v-slot=""用来接收props --><template v-slot="params"><ul><li v-for="g in params.games" :key="g.id">{{ g.name }}</li></ul></template></Games><Games><!-- default为插槽的名称,未命名的插槽默认名称是default --><template v-slot:default="params"><ol><li v-for="g in params.games" :key="g.id">{{ g.name }}</li></ol></template></Games><Games><!-- #是 v-slot: 的语法糖--><template #default="params"><h4 v-for="g in params.games" :key="g.id">{{ g.name }}</h4></template></Games><Games><!-- 在接收的时候进行了解构赋值--><template #default="{games}"><h5 v-for="g in games" :key="g.id">{{ g.name }}</h5></template></Games></div></div>
</template><script setup lang="ts" name="Father">
import Games from './Games.vue';</script><style scoped>.father{width: 800px;height: 400px;background-image: url(https://xyyhxxx.oss-cn-beijing.aliyuncs.com/picGoImg/202406161029992.gif);background-size: cover;padding: 20px;   }.content{margin-top: 30px;display: flex;justify-content: space-evenly;}
</style>
子组件
<template><div class="games"><h2>游戏列表</h2><!-- 给slot组件传递props --><slot :games="games"></slot></div>
</template><script setup lang="ts" name="Games">
import {reactive } from 'vue'
//游戏列表数据
let games = reactive([{id:"afsdf01",name:"王者荣耀"},{id:"afsdf02",name:"和平精英"},{id:"afsdf03",name:"我的世界"},{id:"afsdf04",name:"原神"}
])
</script><style scoped>
.games{height: 300px;width: 180px;padding: 10px;background-color:rgba(255, 255, 255, 0.1);border-radius: 5px;border: 1px solid white;box-shadow: 0 0 5px white;color: #fff;transition: box-shadow 0.3s,transform 0.5s;
}
.games:hover{box-shadow: 0 0 10px white;box-shadow: 0 0 20px white;transform:translateY(-5px)
}
h2{text-align: center;border-bottom: 1px solid white;font-size: 18px;font-weight: 800;
}
</style>
总结
以上便是vue3中常见的组件通信,不同的通信方式应用场景不同。在使用的时候需要结合自己的习惯选用。


![[leetcode]add-strings 字符串相加](https://img-blog.csdnimg.cn/direct/e377a66a3ada4e9c922bdefa558f40b2.png)


![[RPI4] 树莓派4b安装istoreos及使用 -- 1. 系统安装](https://img-blog.csdnimg.cn/direct/55d8c7eaba514c77a772d3754112865b.png)