@RequestMapping 作用 :用来匹配客户端发送的请求(用来处理URL映射,将请求映射到处理方法中),可以在类或者方法上使用。 用在类上,可以将请求模块化,避免请求方法中的映射重复。表示为当前控制器类中的所有方法添加一个前置路径。 用在方法上,表示用来匹配要处理的请求(注意:在整个项目的不同方法上不能出现URL重复的情况)。 相关属性 : value :要匹配的请求路径method :显示发送请求的方式(GET、POST、PUT、DELETE)params :表示请求要接收的参数,如果定义了该属性,那么发送请求时必须要携带该参数;headers :填写请求头信息;consumers :设置接收的请求的内容类型,相当于指定Content-type;produces :设置返回的内容类型; @RequestMapping ( value = "/test" , method = RequestMethod . GET , params = "entname" , headers = { "User‐Agent=Mozilla/5.0 (Windows NT 10.0;" } ) public String test ( ) { return "/index.jsp" ; }
@RequestParam @RequestHeader @CookieValue @PathVariable 作用 :获取请求路径中的参数如果是单个参数接收,必须使用@PathVariable来声明获取对应的参数占位符的值; 如果是JavaBean,则可以省略@PathVariable,但要保证各个占位符的参数名与JavaBean中的属性名一致;@RequestMapping ( "/user/{id}/{username}" )
public String path01 ( @PathVariable ( "id" ) Integerid , @PathVariable ( "username" ) String name) { System . out. println ( id) ; System . out. println ( name) ; return "/index.jsp" ;
} @RequestMapping ( "/user02/{id}/{name}" )
public String path02 ( User user) { System . out. println ( user) ; return "/index.jsp" ;
}
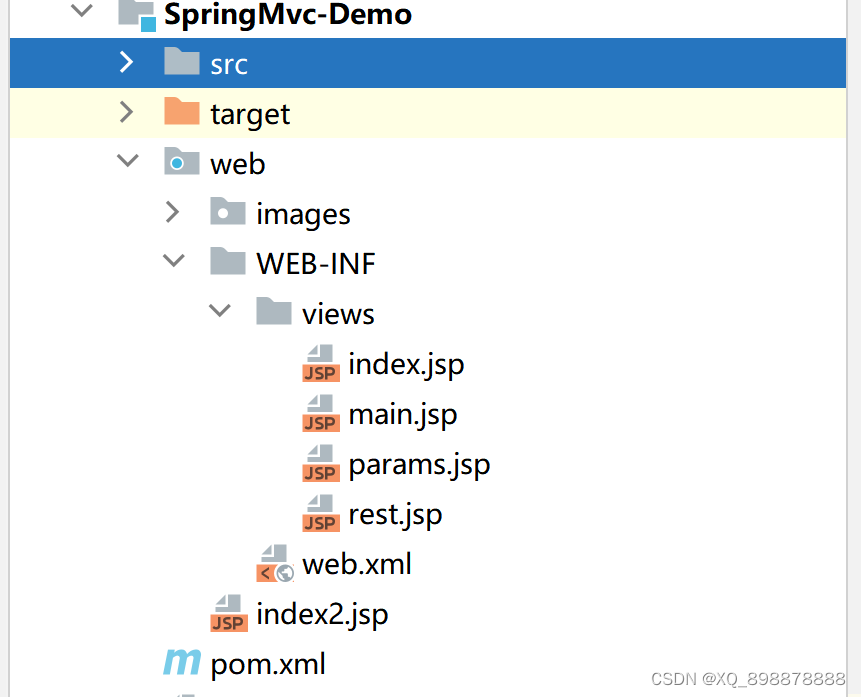
当页面中直接使用静态资源时,是没办法直接获取到的,是因为找不到对应的mapping映射,DispatcherServlet会拦截所有的请求,而此时我们没有对应图片的请求处理方法。此时只需要在springmvc.xml中添加如下配置即可: < mvc: annotation-driven/> < mvc: resourcesmapping = " /images/**" location = " /images/" /> < mvc: default-servlet-handler/> < beanid = " viewResolver" class = " org.springframework.web.servlet.view.InternalResourceViewResolver" > < propertyname = " prefix" value = " /WEB-INF/views/" /> < propertyname = " suffix" value = " .jsp" /> </ bean> < mvc: view-controllerpath = " /" view-name = " index" > </ mvc: view-controller> 当使用以下三种方式设置之后,所有的参数值都设置到了request的作用域中; ${requestScope.type} @RequestMapping ( "/servlet" ) public String servletApi ( HttpServletRequest request) { request. setAttribute ( "type" , "servletAPI" ) ; return "main" ; } @RequestMapping ( "/model" ) public String modelAttribute ( Model model) { model. addAttribute ( "type" , "modelAttribute" ) ; return "main" ; } @RequestMapping ( "/modelMap" ) public String modelMapAttribute ( ModelMap modelMap) { modelMap. addAttribute ( "type" , "modelMapAttribute" ) ; return "main" ; } @RequestMapping ( "/map" ) public String map ( Map map) { map. put ( "type" , "map" ) ; return "main" ; }
使用ModelAndView对象时,返回值类型也是该对象,可以将要跳转的页面设置为view的名称,来完成跳转功能,同时,数据也是存放到了request作用域中; springmvc还会隐式的将请求绑定的参数自动设置到request域中; @RequestMapping ( "/modelAndView" ) public ModelAndView modelAndView ( ) { ModelAndView modelAndView = new ModelAndView ( "main" ) ; modelAndView. addObject ( "type" , "modelAndView" ) ; return modelAndView; }
方式一:通过Servlet API的方式读写session 通过参数绑定的方式去获取Servlet API 通过自动注入的方式去获取Servlet API(推荐使用这种方式) ${sessionScope.type} @RequestMapping ( "/session" ) public String session ( HttpSession session) { session. setAttribute ( "type" , "servletApi-session" ) ; return "main" ; } @Autowired private HttpSession session; @RequestMapping ( "/autoSession" ) public String autoSession ( ) { session. setAttribute ( "type" , "auto-session" ) ; return "main" ; }
方式二:通过注解的方式读取session @SessionAttributes 用在类上,表示当前控制器类下的所有方法,都会将model指定的属性写入session。 它会从model中获取指定的属性写入session中。即:底层会从model中找一个叫type的属性写到session中,这种方式是依赖model的。 @SessionAttribute 用在参数上,读取session。 model和session是互通的:session可以通过model中去获取写入指定的属性, model也会从session中自动写入指定的属性。 @Controller @SessionAttributes ( "type" ) public class DTVController { @RequestMapping ( "/getSession" ) public String getSession ( @SessionAttribute ( value= "type" , required = false ) String type) { System . out. println ( type) ; return "main" ; } }
转发的特点 : a、地址栏的url从始至终都不会变 b、请求次数,仅只有一次 c、请求域中的数据不会丢失 d、根目录包含了项目的访问地址,所以,不用写完成的访问地址,只需要写明转发的视图即可:/index2.jsp 重定向的特点 : a、地址栏的url会发生变化,第一次:初识地址(localhost:8080/springmvc/);第二次:重定向地址(localhost:8080/springmvc/index2.jsp) b、请求次数,两次 c、请求域中的数据会丢失,因为是不同的请求 d、根目录不包含项目的访问地址 @RequestMapping ( "/Hello" ) public String helloWorld ( @RequestParam ( value = "name" , defaultValue = "开发者" , required = false ) String name) { System . out. println ( "hello springmvc:" + name) ; return "redirect:/index2.jsp" ; }
< dependency> < groupId> </ groupId> < artifactId> </ artifactId> < version> </ version> </ dependency> < dependency> < groupId> </ groupId> < artifactId> </ artifactId> < version> </ version> </ dependency> < dependency> < groupId> </ groupId> < artifactId> </ artifactId> < version> </ version> </ dependency> 1、加入jackjson依赖 2、将jackjson的jar包加入WEB-INF的lib文件夹中 3、在对应处理方法上加上@ResponseBody注解,用于标记该处理方法返回json 4、或者将类上的@Controller改为@RestController注解,表示标记该类中所有的方法都返回json 5、@RestController相当于 @Controller + @ResponseBody @Controller
public class JsonController { @RequestMapping ( "/testJson01" ) @ResponseBody public String responseJson01 ( ) { System . out. println ( "testJson" ) ; return "json" ; } @RequestMapping ( "/testJson02" ) @ResponseBody public User responseJson02 ( ) { User user = new User ( ) ; user. setId ( 1001 ) ; user. setName ( "张三" ) ; user. setAlias ( new String [ ] { "张三丰" , "张无忌" } ) ; user. setBirthday ( new Date ( ) ) ; return user; }
使用@RequestBody来接收前端发送的json数据 @RequestMapping ( "/testJson03" ) @ResponseBody public User responseJson03 ( @RequestBody User user) { User user2 = new User ( ) ; user. setId ( 1002 ) ; user. setName ( "张三" ) ; user. setAlias ( new String [ ] { "张三丰" , "张无忌" } ) ; user. setBirthday ( new Date ( ) ) ; System . out. println ( user) ; return user2; }
@RequestMapping ( "/download" ) public void downLoad ( HttpServletRequest request, HttpServletResponse response) throws IOException { String realPath = request. getServletContext ( ) . getRealPath ( "/images/123.png" ) ; File tmpFile= new File ( realPath) ; String fileName = tmpFile. getName ( ) ; response. setHeader ( "content-disposition" , "attachment;filename=" + URLEncoder . encode ( fileName, "UTF-8" ) ) ; InputStream in = Files . newInputStream ( Paths . get ( realPath) ) ; int len = 0 ; byte [ ] buffer = new byte [ 1024 ] ; OutputStream out = response. getOutputStream ( ) ; while ( ( len = in. read ( buffer) ) > 0 ) { out. write ( buffer, 0 , len) ; } in. close ( ) ; }
Spring MVC 为文件上传提供了直接的支持,这种支持是通过 MultipartResolver 实现的。Spring 用 Jakarta Commons FileUpload 技术实现了一个 MultipartResolver 实现类:CommonsMultipartResovler。 Spring MVC 上下文中默认没有装配 MultipartResovler,因此默认情况下不能处理文件的上传工作,如果想使用 Spring 的文件上传功能,需现在上下文中配置 MultipartResolver。 添加Jakarta Commons FileUpload的依赖支持 < dependency> < groupId> </ groupId> < artifactId> </ artifactId> < version> </ version> </ dependency> 配置MultipartResolver文件上传解析器 < beanclass = " org.springframework.web.multipart.commons.CommonsMultipartResolver" id = " multipartResolver" > < propertyname = " defaultEncoding" value = " UTF-8" /> < propertyname = " maxUploadSize" value = " #{1024*1024*10}" /> </ bean> @RequestMapping ( "/upload" ) public String upload ( @RequestParam ( "desc" ) String desc, @RequestParam ( "uploadFile" ) MultipartFile multipartFile) throws IOException { System . out. println ( "des:" + desc) ; System . out. println ( "uploadFile:" + multipartFile. getOriginalFilename ( ) ) ; if ( ! multipartFile. isEmpty ( ) ) { String realPath = "C:\\Users\\TRS\\Desktop\\Out" ; String fileName = multipartFile. getOriginalFilename ( ) ; File tmpFile; if ( fileName != null ) { tmpFile = new File ( realPath, fileName) ; multipartFile. transferTo ( tmpFile) ; } } return "Success" ; }
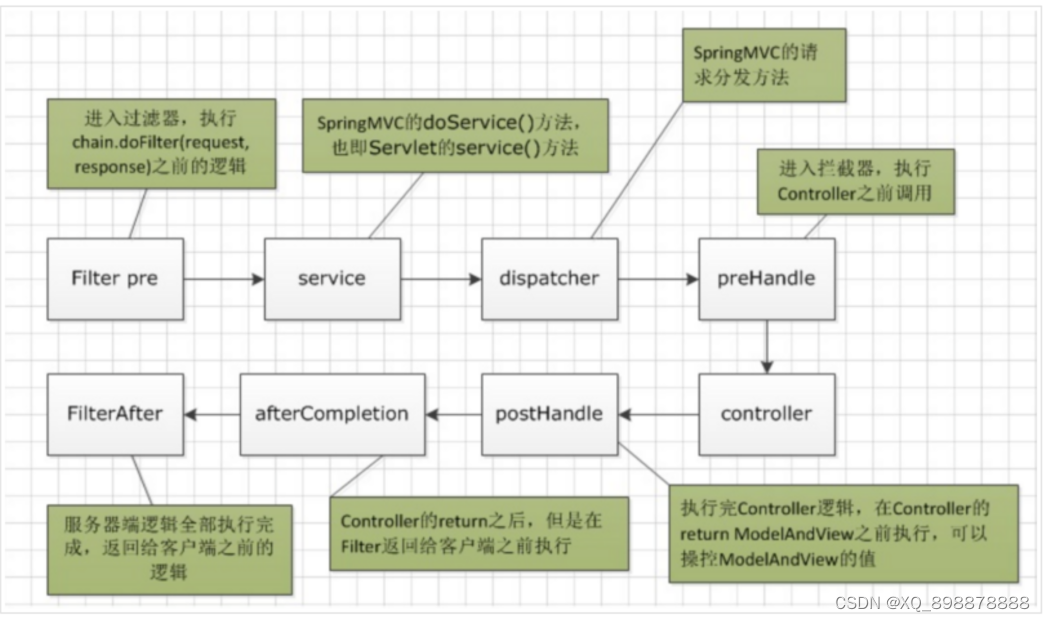
SpringMVC拦截器采用AOP的设计思想,它跟过滤器类似,用来拦截处理方法在之前或者之后执行一些跟主业务没有关系的公共功能。 比如:权限控制、日志记录、异常记录等 实现拦截器的步骤: 1、实现接口:HandlerInterceptor 2、重写三个方法:preHandle、postHandle、afterCompletion 3、在springmvc.xml的配置文件中装配拦截器 preHandle(HttpServletRequest request, HttpServletResponse response, Object handler) 预处理回调方法,实现处理器方法的预处理(如:登录检查); 第三个参数为响应的处理器返回值; true 表示放行,继续向下执行(如调用下一个拦截器或处理器);false 表示拦截(如登录检查失败),终止执行。此时我们需要通过response来产生响应;postHandle(HttpServletRequest request, HttpServletResponse response, Object handler, ModelAndView modelAndView) 后处理回调方法,实现处理器的后处理(但在渲染视图之前); 此时我们可以通过modelAndView(模型和视图对象)对模型数据进行处理或对 afterCompletion(HttpServletRequest request, HttpServletResponse response, Object handler, Exception ex) 请求处理完毕后回调方法,在视图渲染完后执行; 如性能监控中我们可以在此记录结束时间并输出消耗时间,还可以进行一些资源清 自定义拦截器 @Component
public class MyInterceptor implements HandlerInterceptor { public boolean preHandle ( HttpServletRequest request, HttpServletResponse response, Object handler) { System . out. println ( "============>>>>preHandle()方法执行" ) ; HandlerMethod handlerMethod = ( HandlerMethod ) handler; System . out. println ( "处理方法所在类:" + handlerMethod. getBean ( ) . getClass ( ) . getName ( ) ) ; System . out. println ( "处理方法的方法名:" + handlerMethod. getMethod ( ) . getName ( ) ) ; System . out. println ( "处理方法的参数:" + Arrays . toString ( handlerMethod. getMethod ( ) . getParameters ( ) ) ) ; return true ; } public void postHandle ( HttpServletRequest request, HttpServletResponse response, Object handler, @Nullable ModelAndView modelAndView) throws Exception { System . out. println ( "=========>>>postHandle()方法执行" ) ; } public void afterCompletion ( HttpServletRequest request, HttpServletResponse response, Object handler, @Nullable Exception ex) throws Exception { System . out. println ( "==========>>>afterCompletion()方法执行" ) ; }
}
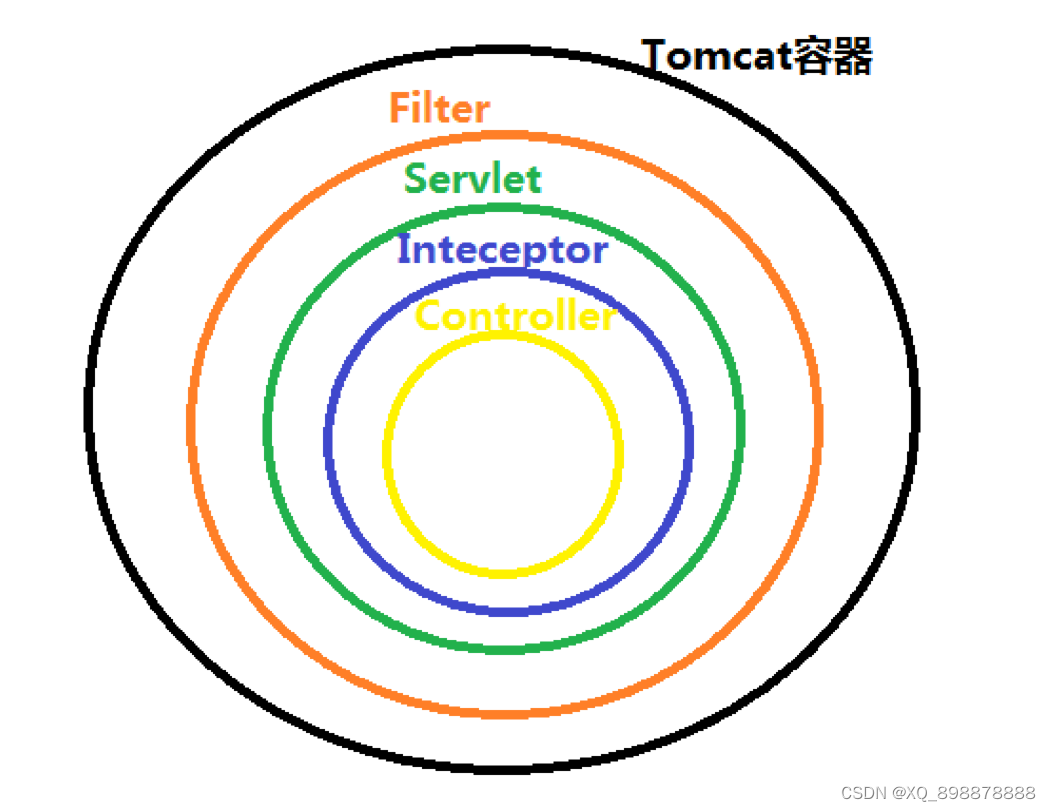
< mvc: interceptors> < beanclass = " org.example.interceptor.MyInterceptor" > </ bean> </ mvc: interceptors> 过滤器是基于函数回调的,而拦截器是基于java反射的; 过滤器依赖于servlet容器,而拦截器不依赖与Servlet容器,依赖于SpringMVC; 过滤器几乎对所有的请求都可以起作用,而拦截器只能对SpringMVC请求起作用; 拦截器可以访问处理方法的上下文,而过滤器不可以; public class UserInterceptor implements HandlerInterceptor { @Override public boolean preHandle ( HttpServletRequest request, HttpServletResponse response, Object handler) throws Exception { HttpSession session = request. getSession ( ) ; System . out. println ( "当前用户名:" + session. getAttribute ( "username" ) ) ; if ( ! "张三" . equals ( session. getAttribute ( "username" ) ) ) { response. sendRedirect ( request. getContextPath ( ) + "/login" ) ; return false ; } else { return true ; } } } < mvc: interceptors> < beanclass = " org.example.interceptor.MyInterceptor" > </ bean> < mvc: interceptor> < mvc: mappingpath = " /**" /> < mvc: exclude-mappingpath = " /login" /> < beanclass = " org.example.interceptor.UserInterceptor" > </ bean> </ mvc: interceptor> </ mvc: interceptors> 在SpringMVC中拥有一套非常强大的异常处理机制,SpringMVC通过HandlerExceptionResolver处理程序的异常,包括请求映射、数据绑定以及目标方法执行时发生的异常。 通过@ExceptionHandler可以在方法中记录日志,并转发到一个友好的界面进行提示; @Controller
public class ExceptionController { @RequestMapping ( "/hello" ) public String testException ( @RequestParam ( value = "name" ) String name) { System . out. println ( "方法执行中..." ) ; return "index" ; } @ExceptionHandler ( value = { Exception . class } ) public ModelAndView handleException ( Exception e) { ModelAndView mv = new ModelAndView ( ) ; mv. setViewName ( "exception" ) ; mv. addObject ( "ex" , e) ; System . out. println ( e. getMessage ( ) ) ; return mv; }
}
如果想要对所有的控制器类进行统一异常处理,可以通过@ControllerAdvice注解来实现。 @ControllerAdvice 是Spring3.2提供的新注解,它是对Controller的增强,可对Controller中被 @RequestMapping注解标识的方法加一些逻辑处理: 全局异常处理、全局数据绑定、全局数据预处理;全局异常处理的实现步骤: 添加@ControllerAdvice注解 添加@ExceptionHandler注解 处理器中自己的异常处理器优先级高于全局异常处理 如果处理器类中存在异常处理方法,则优先使用处理器异常处理方法,否则,使用全局异常处理中的异常(精准异常 > 全局异常) 统一异常处理:同时处理普通请求和ajax请求 普通请求:返回ModelAndView对象,跳转到指定页面 ajax请求:返回json数据 @ControllerAdvice public class GolablExceptionController { @ExceptionHandler ( value = { Exception . class } ) public ModelAndView handleException ( HttpServletRequest request, HttpServletResponse response, HandlerMethod handler, Exception e) { System . out. println ( "全局异常处理" ) ; ModelAndView mv = new ModelAndView ( ) ; RestController restAnnotation = handler. getClass ( ) . getAnnotation ( RestController . class ) ; ResponseBody resAnnotation = handler. getMethod ( ) . getAnnotation ( ResponseBody . class ) ; if ( restAnnotation != null || resAnnotation != null ) { mv = new ModelAndView ( new MappingJackson2JsonView ( ) ) ; mv. addObject ( "方法名" , handler. getMethod ( ) . getName ( ) ) ; mv. addObject ( "ex" , e. getMessage ( ) ) ; mv. addObject ( "code" , HttpStatus . INTERNAL_SERVER_ERROR . value ( ) ) ; } else { mv. setViewName ( "exception" ) ; mv. addObject ( "ex" , e) ; StringWriter stringWriter = new StringWriter ( ) ; PrintWriter printWriter = new PrintWriter ( stringWriter) ; e. printStackTrace ( printWriter) ; System . out. println ( stringWriter) ; } return mv; }
