微服务架构理念
关于微服务的概念、理念及设计相关内容,并没有特别严格的边界和定义,某种意义上说,适合的就是最好的,在之前的文章中有过详细的阐述,微服务[v1.0.0][Spring生态概述]、微服务[设计与运行]、微服务[v1.0.0][服务调用]、微服务[开发生命周期]、微服务[面临的挑战]、架构师修炼系列【微服务】
Spring Cloud基础架构和概念
构建微服务架构其实是一件很复杂的事情,很多企业都不具备这个能力,这不只是技术能力的问题,往往并非因为技术问题导致的困难,在实际工作中时间、人力、成本、各维度的压力都有可能导致微服务体系的建设并不是很顺利,更无法做到彻底,即便是技术驱动的公司也存在诸多困难
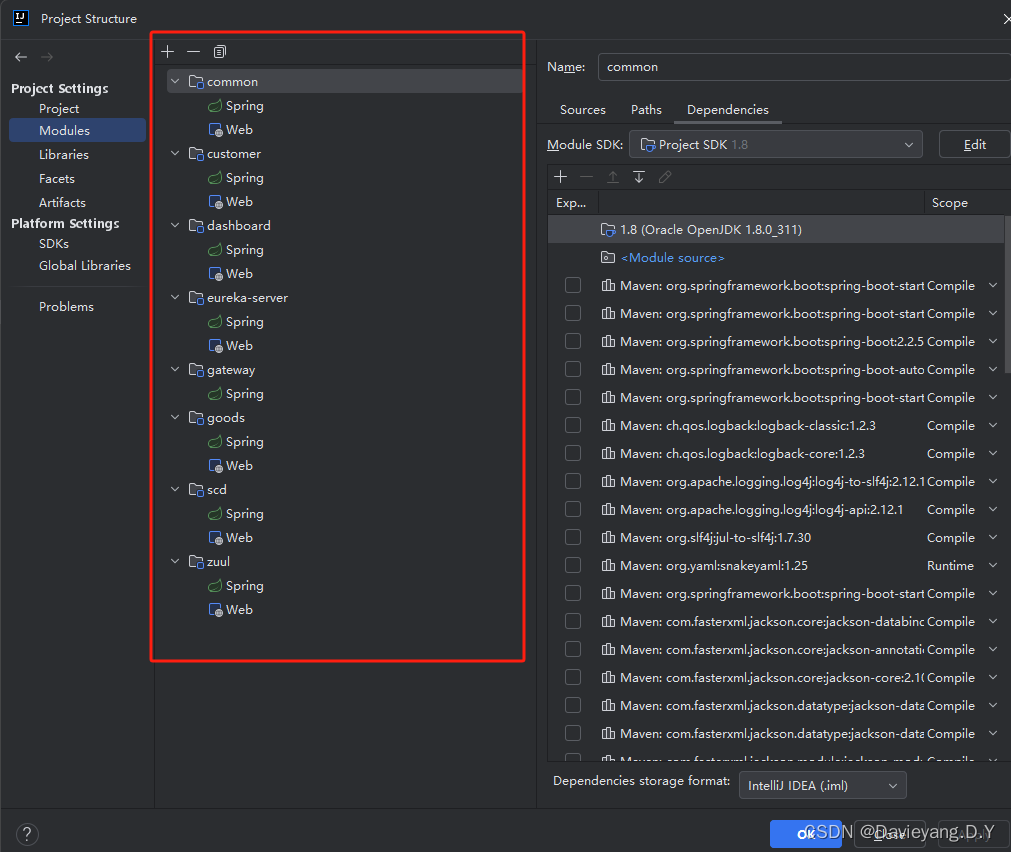
为了构建微服务体系,业内有不少的组件可以使用,Spring Cloud就是其中典型之一,它是有Pivotal团队维护的,而这个团队并没有自己造轮子,而是借鉴当前若干企业在长期实践中经过考验的优秀的分布式产品,将这些产品以Spring Boot的形式进行了封装,因此学习Spring Cloud的基础是Spring Boot
在Spring Cloud封装的分布式产品中,是以Netflix为核心的,该公司有大量的分布式经验,也有很多优秀的产品,但随着时代的发展,该公司很多组件都停止了更新,或者更新缓慢,因此Pivotal开始从Spring Cloud中去除Netflix组件,但耗费巨大,只是无论用的组件借鉴了哪里,其包含的思想确是相似的,学好一种或者一套,例如Netflix组件,明确他们的设计思想和应用场景,再看其他的同类组件也是大同小异
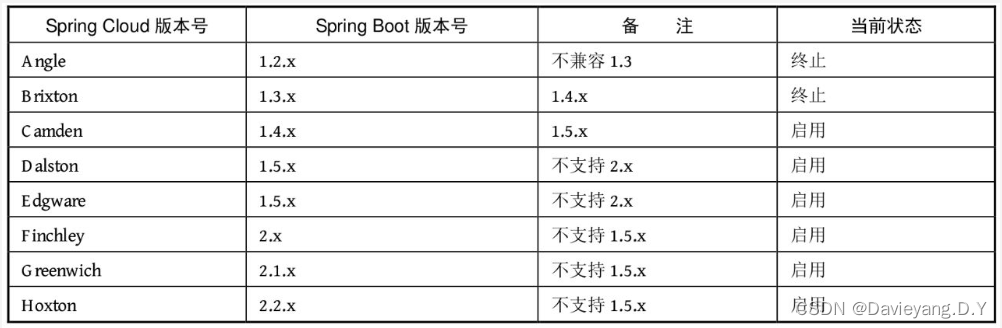
Spring Cloud融入了很多组件,而这些组件由各个公司进行开发和维护,版本十分凌乱,且更新不一致,为了对这些组件进行统一管理,Pivotal团队决定使用伦敦地铁站的站名作为版本名,如下表格所示
Spring Cloud架构和组件
Spring Cloud最重要的是其架构和组件,架构是方向,组件是细节
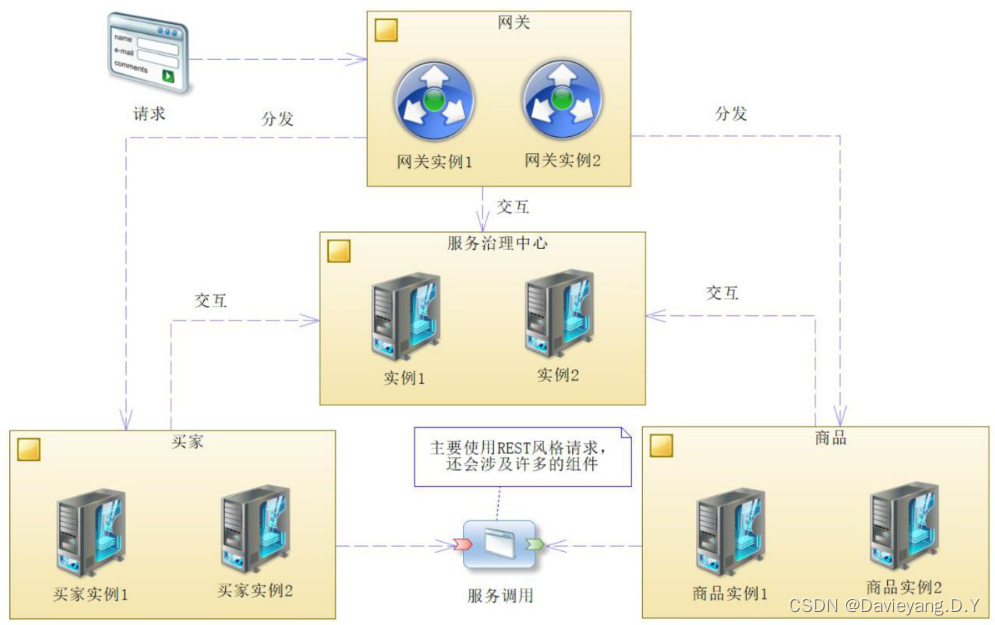
服务治理和服务发现
在Spring Cloud中,服务治理一般是通过Netflix Eureka完成,Pivotal团队将其以Spring Boot的形式封装为Spring Cloud Netflix Eureka,以便能够快速简单的使用,为了展示微服务治理和服务发现,创建如下项目

微服务治理中心-Eureka
首先引入相关依赖(因为Eureka是在Web环境下运行的因此也会引入spring-boot-starter-web),如下所示
<!-- 引入Spring Boot的Webstarter依赖,它为构建Web应用程序提供了必需的组件,包括Servlet容器和Spring Web MVC。 --><dependency><groupId>org.springframework.boot</groupId><artifactId>spring-boot-starter-web</artifactId></dependency><!-- 引入Spring Cloud的Eureka Server starter依赖,用于实现服务注册与发现的功能。 --><!-- 它基于Netflix Eureka,提供了微服务架构中服务之间互相发现和通信的能力。 --><dependency><groupId>org.springframework.cloud</groupId><artifactId>spring-cloud-starter-netflix-eureka-server</artifactId></dependency>
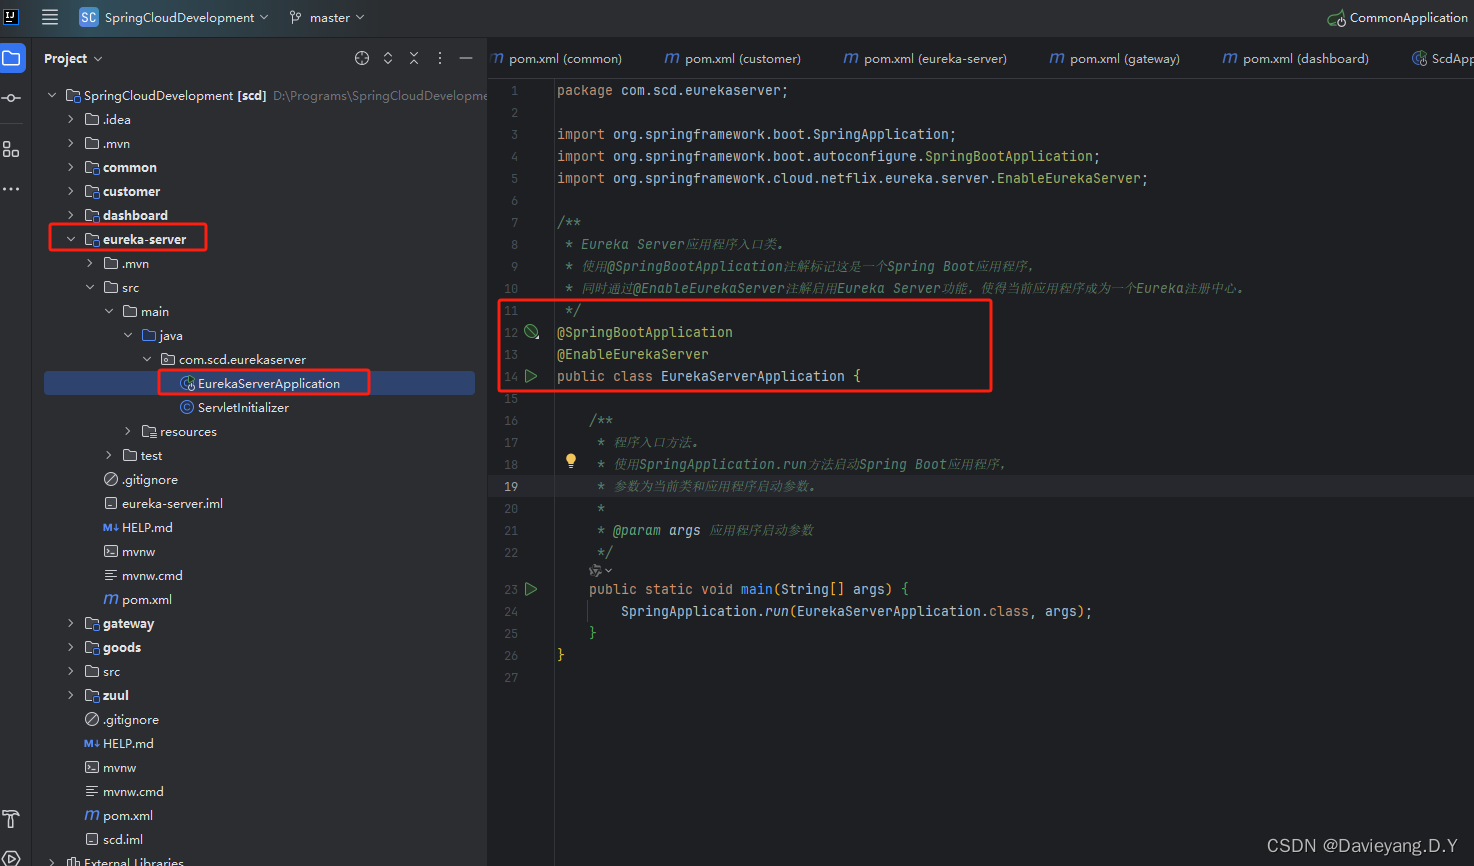
然后修改eureka-server模块的启动类,代码如下
package com.scd.eurekaserver;import org.springframework.boot.SpringApplication;
import org.springframework.boot.autoconfigure.SpringBootApplication;
import org.springframework.cloud.netflix.eureka.server.EnableEurekaServer;/*** Eureka Server应用程序入口类。* 使用@SpringBootApplication注解标记这是一个Spring Boot应用程序,* 同时通过@EnableEurekaServer注解启用Eureka Server功能,使得当前应用程序成为一个Eureka注册中心。*/
@SpringBootApplication
@EnableEurekaServer
public class EurekaServerApplication {/*** 程序入口方法。* 使用SpringApplication.run方法启动Spring Boot应用程序,* 参数为当前类和应用程序启动参数。** @param args 应用程序启动参数*/public static void main(String[] args) {SpringApplication.run(EurekaServerApplication.class, args);}
}
添加相关配置到eureka-server模块的配置文件,如下所示
# 定义Spring应用名称,它是一个服务的名称,一个服务可拥有多个实例
spring:application:name:  eureka-server
# 启动端口
server:port: 1001
eureka:client:# 服务自身就是治理中心,所以这里设置为false,取消注册register-with-eureka: false# 取消服务获取,至于服务获取,后续会进行讨论fetch-registry: falseinstance:# 服务治理中心服务器IPhostname: 192.168.3.115
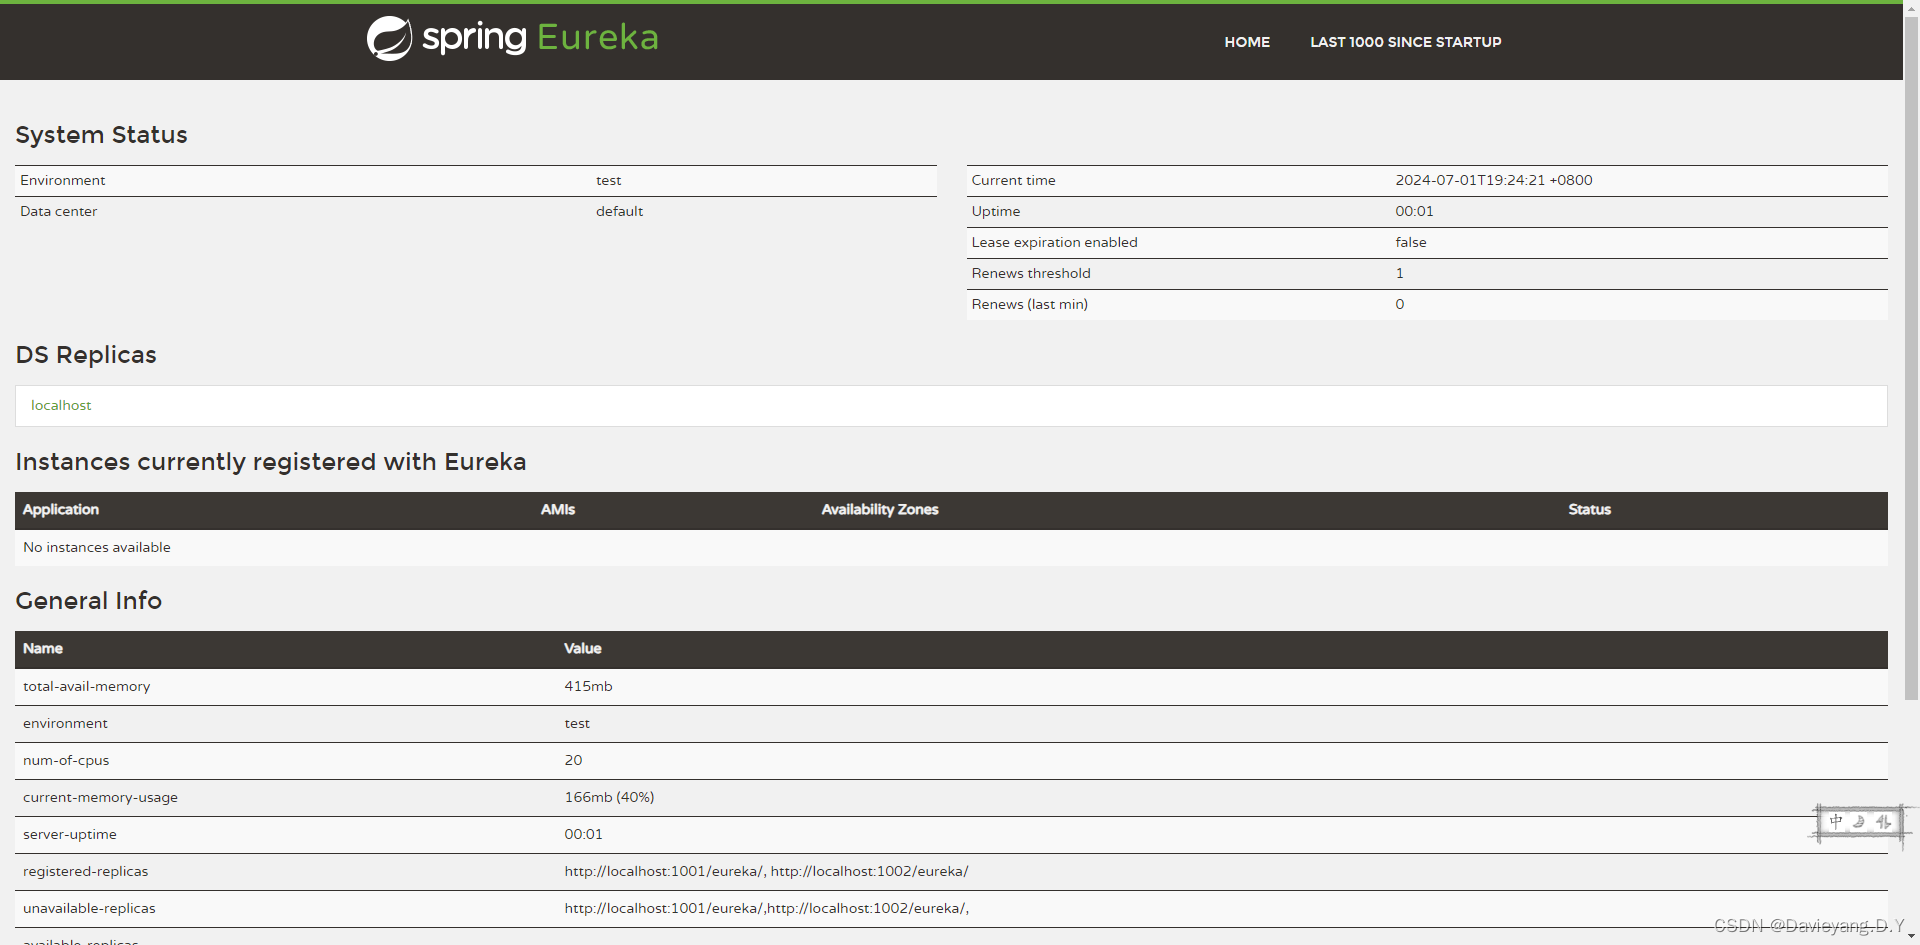
启动eureka-server模块

然后浏览器访问http://localhost:1001/即可看到如下页面
服务发现
Eureka服务治理中心是不会主动发现服务的,具体的服务实例会通过发送REST请求去Eureka服务治理中心进行注册、续约和下线等操作,接下来将Customer和Goods模块注册给Eureka服务治理中心,首先引入Eureka客户端依赖
<!-- 引入Eureka客户端依赖,用于实现服务发现功能 --><dependency><groupId>org.springframework.cloud</groupId><artifactId>spring-cloud-starter-netflix-eureka-client</artifactId></dependency>
Eureka的服务治理中心相当于服务端,eureka-client相当于客户端,具体的服务实例添加了eureka-client依赖之后,通过发送REST请求到服务端,建立联系,然后修改这两个模块的的配置文件
# Spring应用名称(服务名称)
spring:application:name: customer
# 请求URL,指向Eureka服务治理中心
eureka:client:serviceUrl:defaultZone: http://localhost:1001/eureka/instance:# 服务实例主机hostname: 192.168.3.115# 服务端口
server:port: 3001
# Spring应用名称(服务名称)
spring:application:name: goods
# 请求URL,指向Eureka服务治理中心
eureka:client:serviceUrl:defaultZone: http://localhost:1001/eureka/instance:# 服务实例主机hostname: 192.168.3.115# 服务端口
server:port: 2001
在旧版本的Spring Cloud中还需要使用注解@EnableEurekaClient来驱动Eureka客户端,在新版本中已经不需要,只需要依赖spring-cloud-starter-netflix-eureka-client即可,也就是说并不需要修改任何启动类的内容,启动模块大概30s即可完成服务注册,启动Goods模块和Customer模块后,访问页面http://localhost:1001/,如下所示
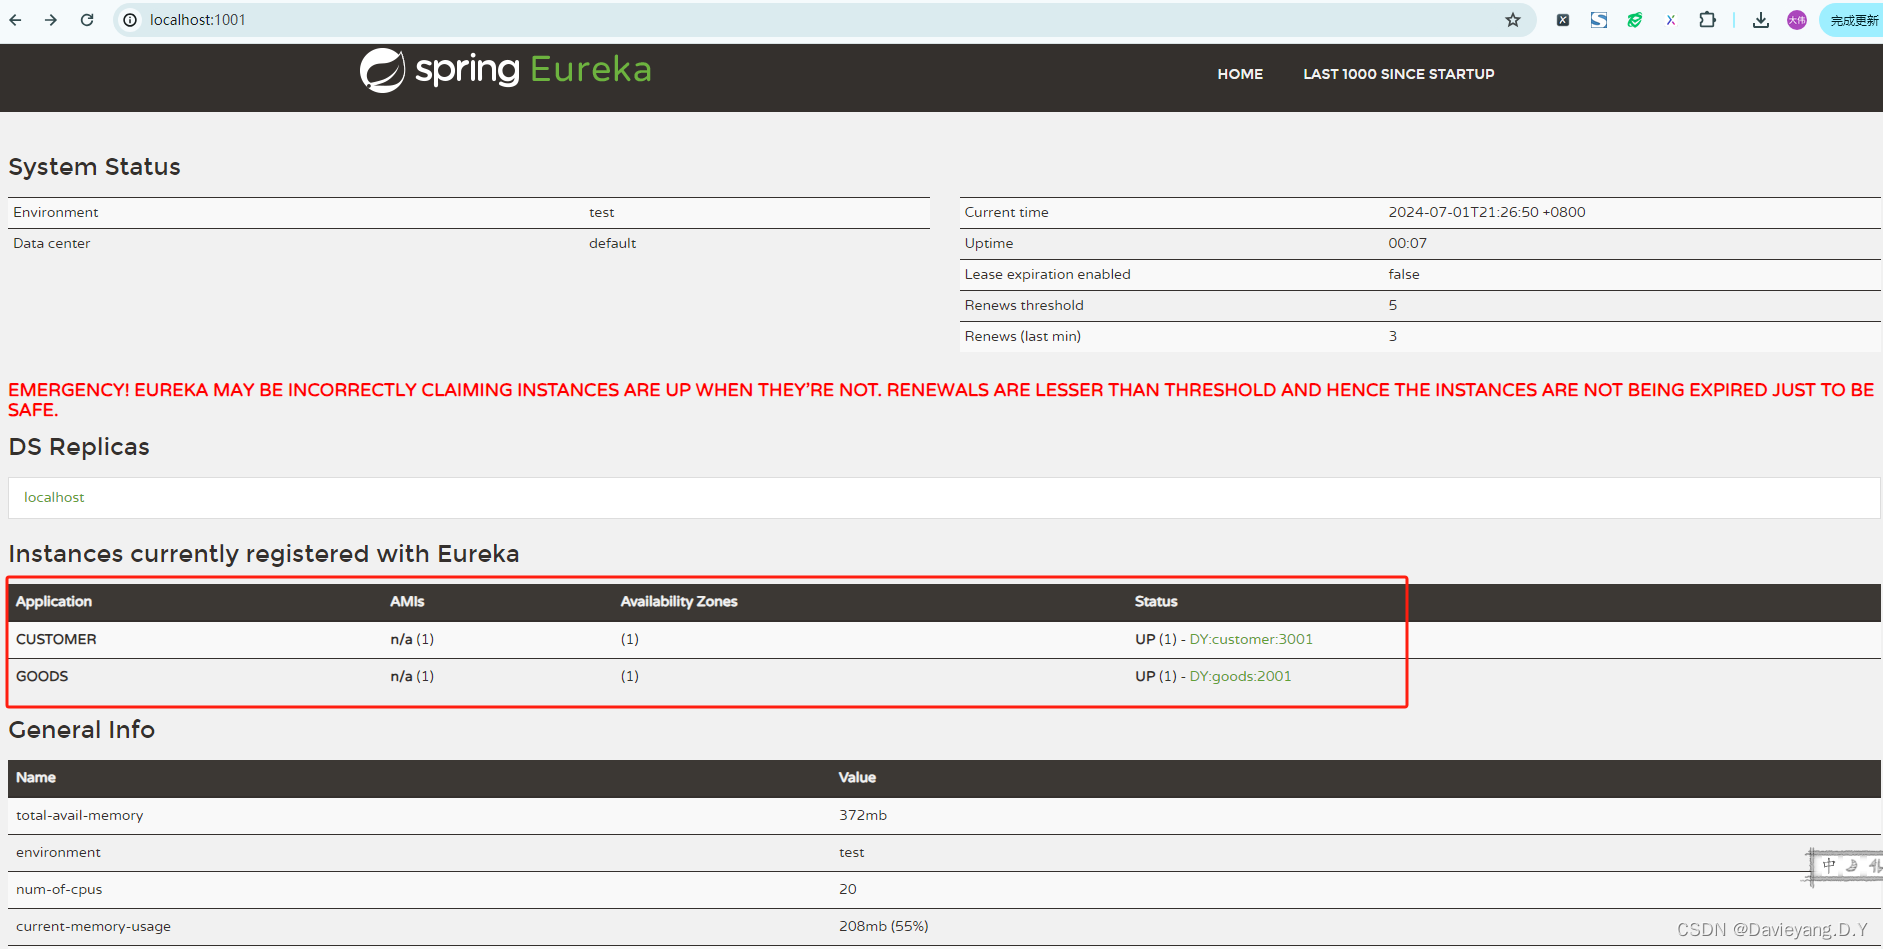
页面上出的红色警告是Eureka服务端做的自我保护机制,如果要去掉需要在Eureka Server模块添加配置项enable-self-preservation: false, 默认为true
# 定义Spring应用名称,它是一个服务的名称,一个服务可拥有多个实例
spring:application:name:  eureka-server# 启动端口
server:port: 1001eureka:# 服务器配置段,用于定义服务器的行为和特性server:# 是否启用自我保护模式# 自我保护模式是一种机制,用于在服务器负载过高时自动限制某些操作,以保护服务器免于崩溃enable-self-preservation: falseclient:# 服务自身就是治理中心,所以这里设置为false,取消注册register-with-eureka: false# 取消服务获取,至于服务获取,后续会进行讨论fetch-registry: falseinstance:# 服务治理中心服务器IPhostname: 192.168.3.115
服务高可用
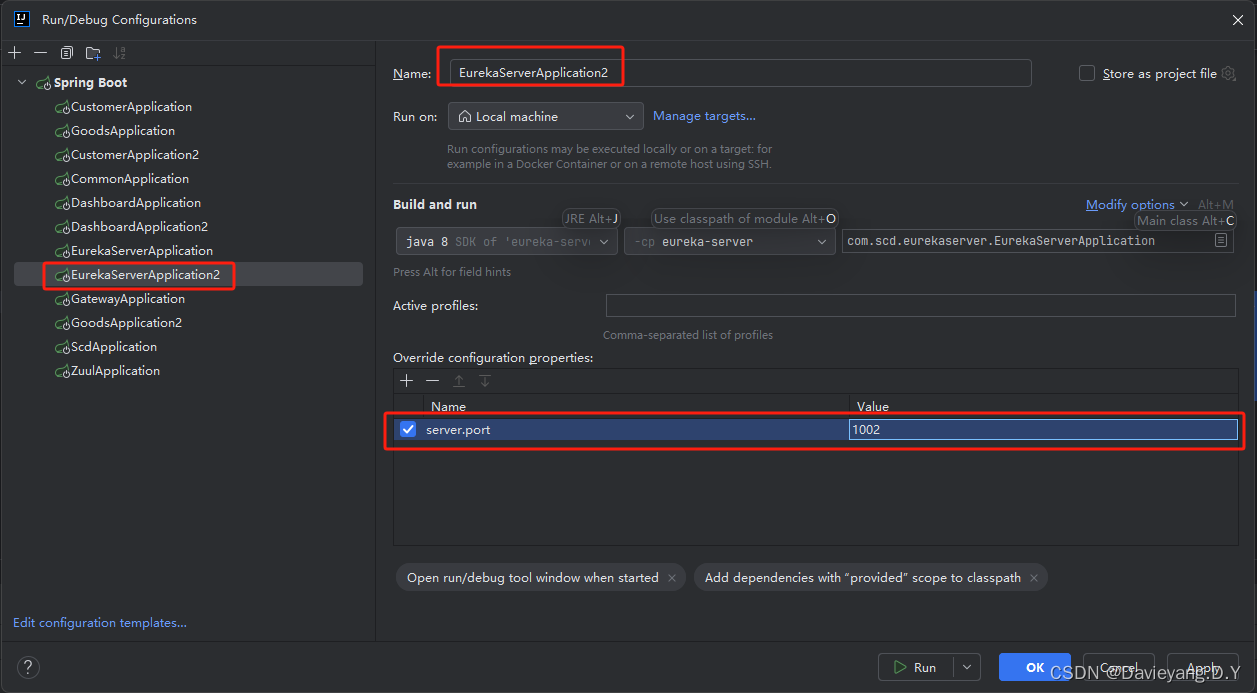
一个服务可能存在多个服务实例,服务治理中心也可能存在多个实例,多个服务治理中心加上一个服务多个实例将大大提升服务能力,加下来看如何操作,首先使用IDEA的功能,通过不同的端口启动同一个服务的多个服务实例
首先给这个运行的实例添加运行端口,如图所示

软后复制另一个运行配置

将运行端口改为1002
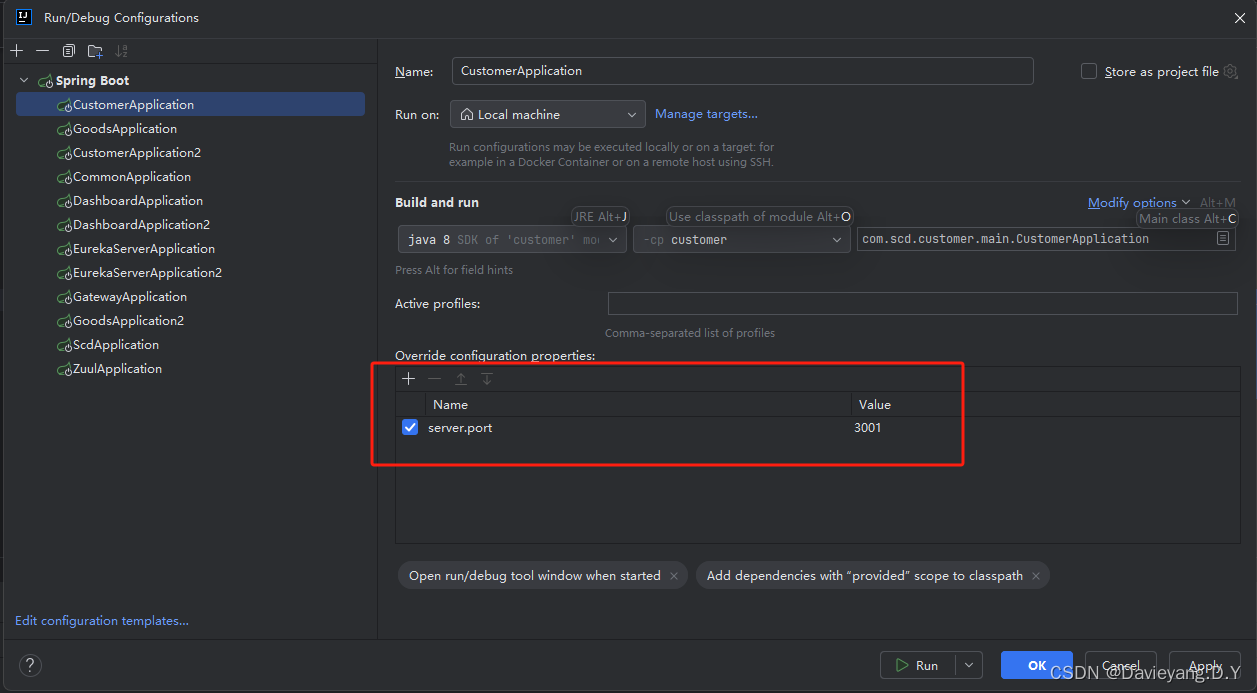
然后用相同的方法,将Goods和Customer服务都复制两个运行实例出来

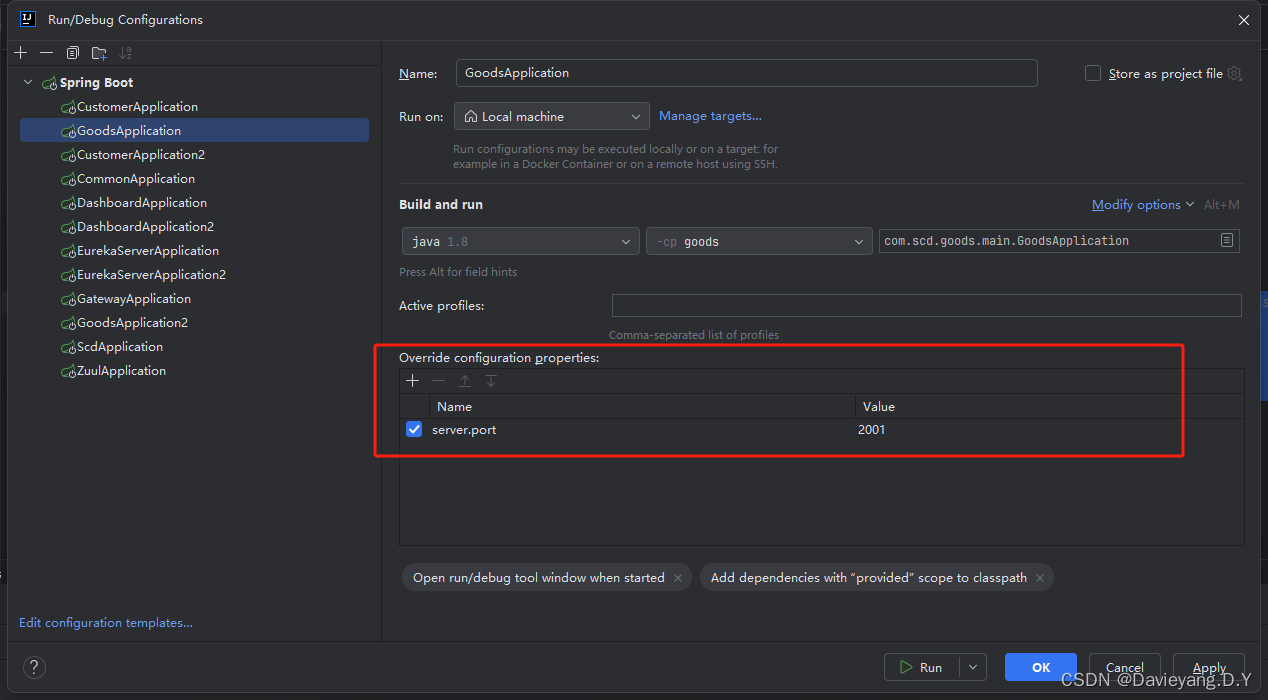
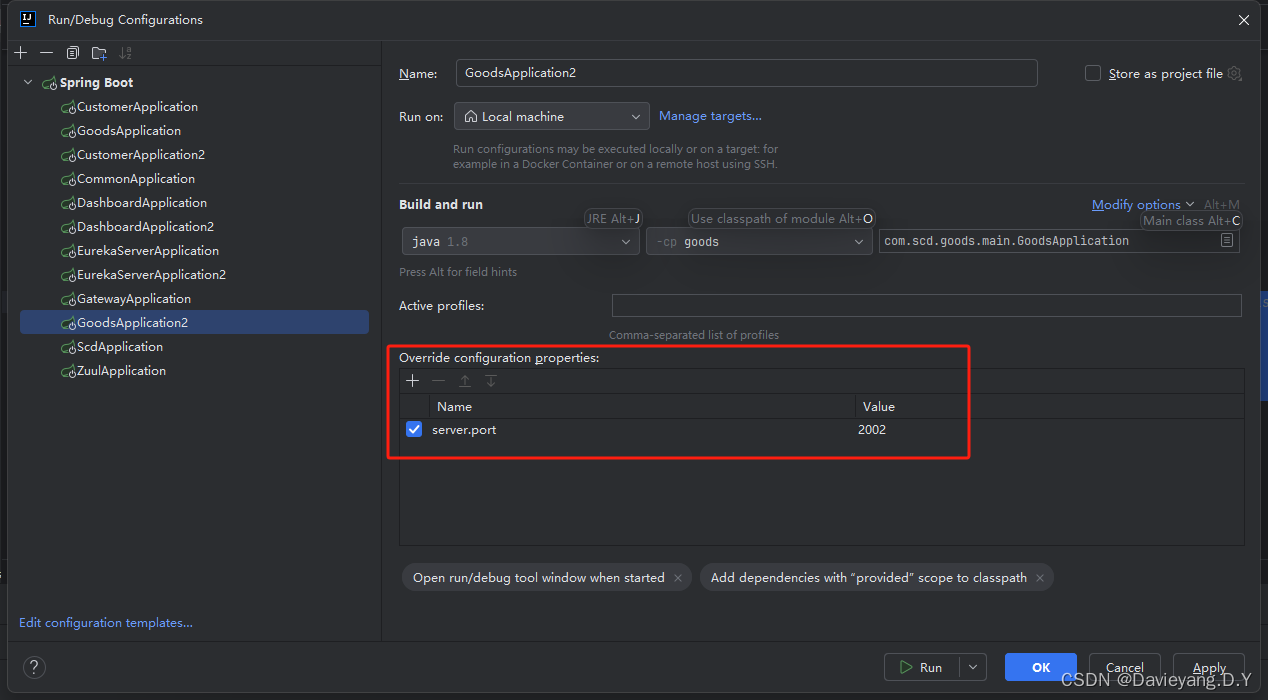
这样配置完后,server.port就会作为命令行参数输入到Spring Boot项目,它将覆盖application.yml配置文件里的端口配置,还没完还需要修改服务治理中的配置,如下所示
# 定义Spring应用名称,它是一个服务的名称,一个服务可拥有多个实例
spring:application:name:  eureka-server# 启动端口
# server:
#   port: 1001eureka:# 服务器配置段,用于定义服务器的行为和特性server:# 是否启用自我保护模式# 自我保护模式是一种机制,用于在服务器负载过高时自动限制某些操作,以保护服务器免于崩溃enable-self-preservation: falseclient:# 服务自身就是治理中心,所以这里设置为false,取消注册register-with-eureka: false# 取消服务获取,至于服务获取,后续会进行讨论fetch-registry: falseserviceUrl:# Eureka服务端相互注册defaultZone: http://localhost:1001/eureka/,http://localhost:1002/eureka/instance:# 服务治理中心服务器IPhostname: 192.168.3.115
注释掉了端口配置,实际上不注释掉也会被命令行覆盖,添加了defaultZone: http://localhost:1001/eureka/,http://localhost:1002/eureka/两个地址分别指向两个Eureka服务治理中心,这两个服务治理中心可相互注册 还要修改两个服务的配置如下所示
# Spring应用名称(服务名称)
spring:application:name: goods# 请求URL,指向Eureka服务治理中心
eureka:client:serviceUrl:defaultZone: http://localhost:1001/eureka/,http://localhost:1002/eureka/instance:# 服务实例主机hostname: 192.168.3.115# 服务端口
server:port: 2001
# Spring应用名称(服务名称)
spring:application:name: customer# 请求URL,指向Eureka服务治理中心
eureka:client:serviceUrl:defaultZone: http://localhost:1001/eureka/,http://localhost:1002/eureka/instance:# 服务实例主机hostname: 192.168.3.115# 服务端口
server:port: 3001
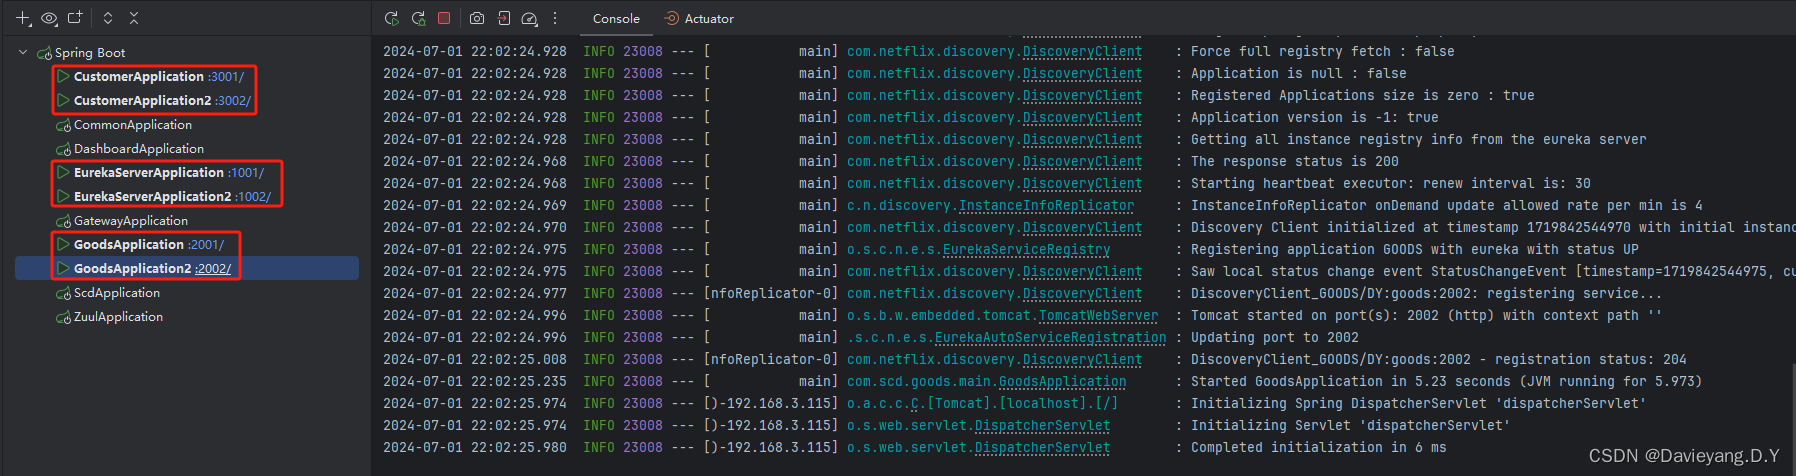
然后重新启动各模块,如下所示
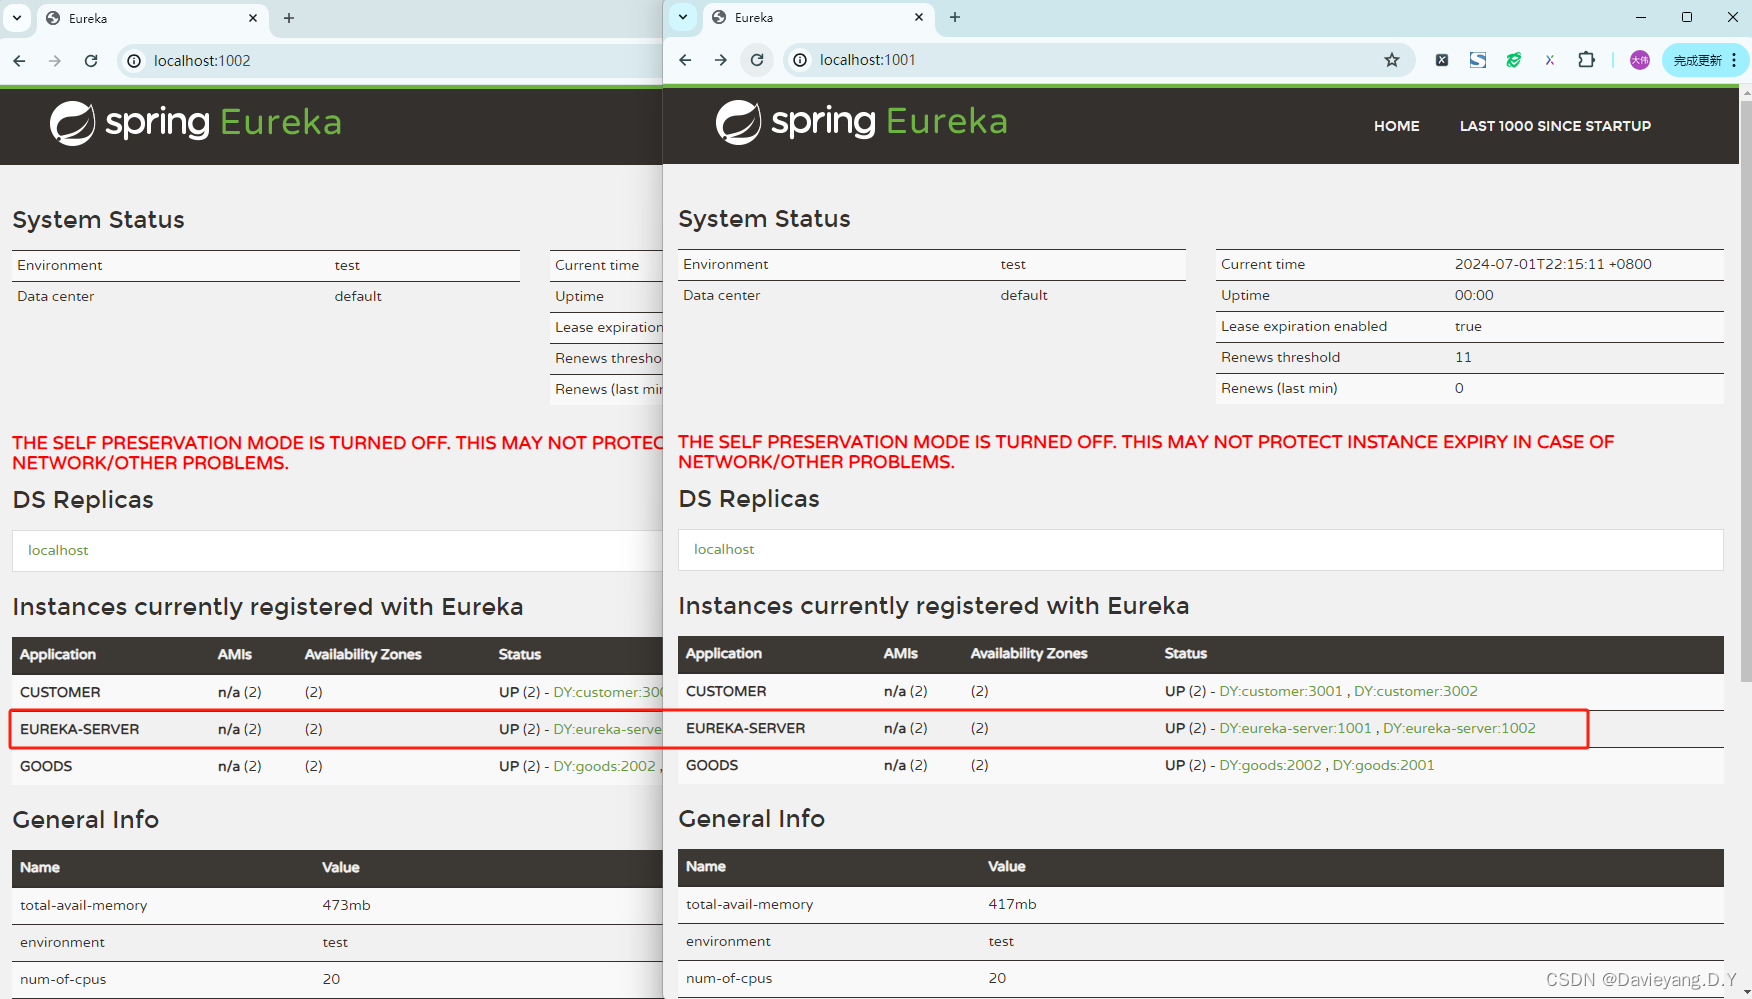
再访问页面http://localhost:1002/和http://localhost:1001/如下页面所示
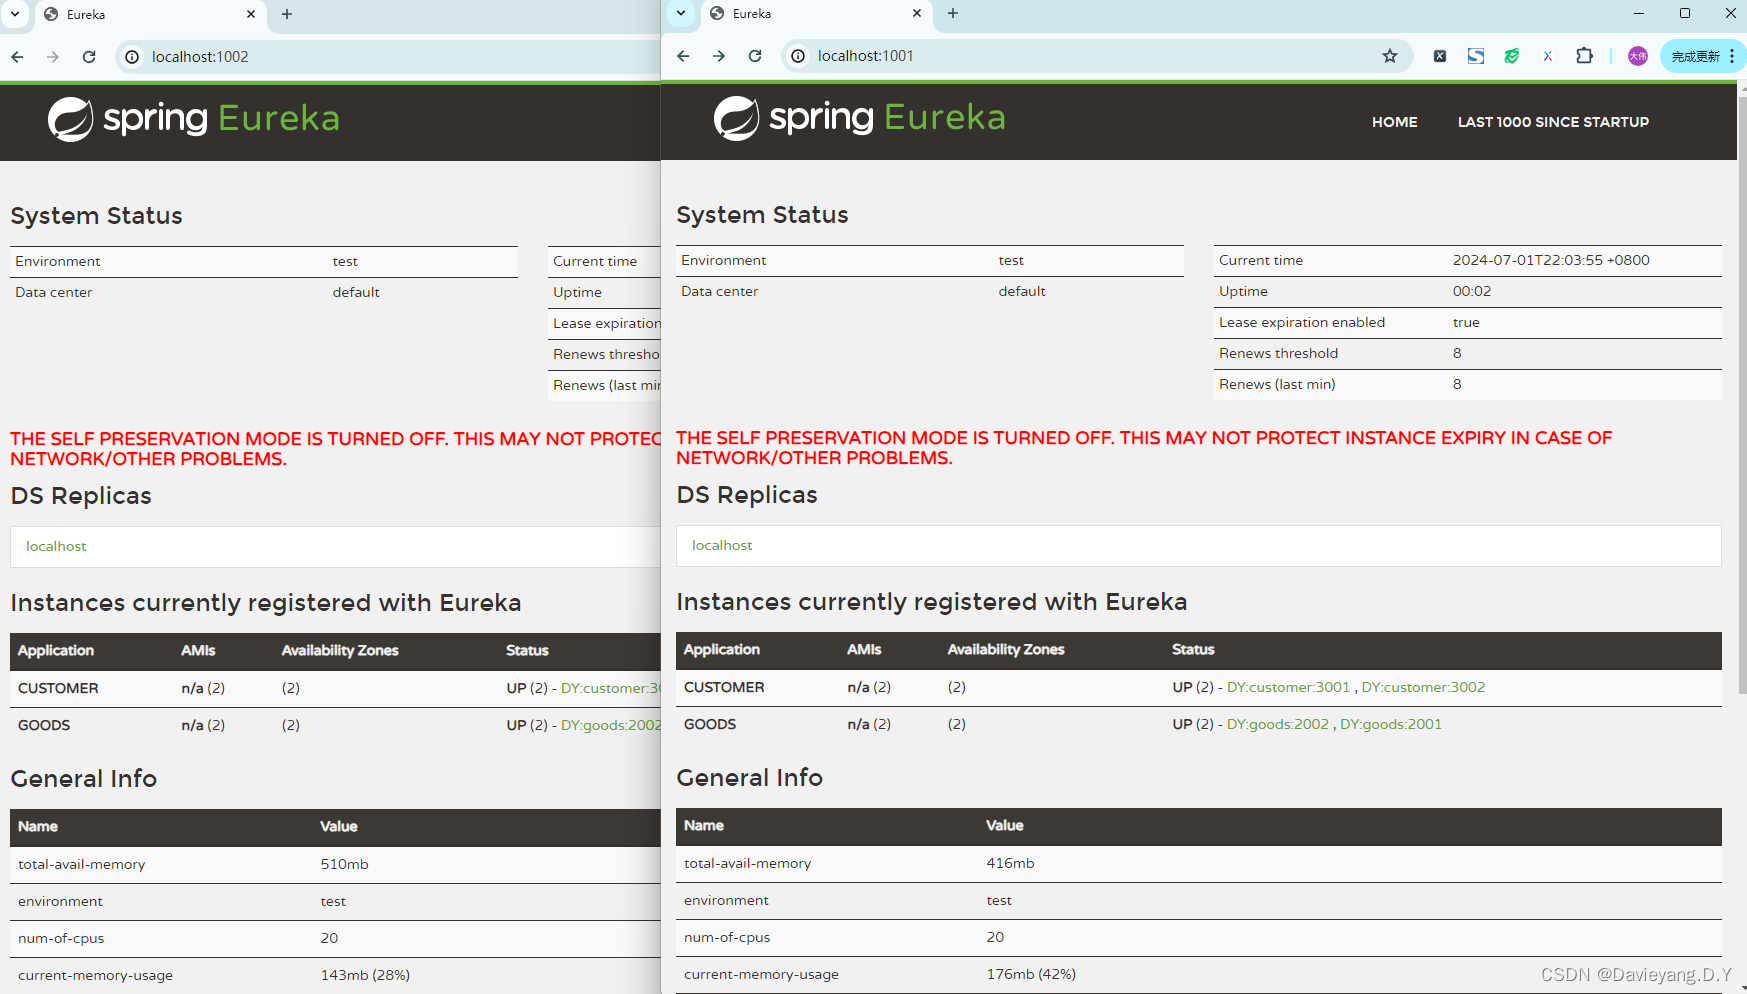
如此便实现了高可用,注册到服务治理中心的服务实例,当服务治理中心判断有挂掉的就会自动将其踢掉,但再次前提是服务治理中本身没有挂掉,因此它本身也需要是高可用的,因此还需要让他们之间能够互相发现,就需要将配置
register-with-eureka: true设置为true
然后重启服务治理中心模块,便能看到他们之间互相注册为服务实例,如此当一个挂掉,另一个也能监控到
Eureka工作原理

Eureka服务端和客户端由客户端发送Rest请求完成服务注册、续约、下线等操作的,发送请求的是Eureka的客户端,而不是服务端,Rest请求的地址是通过
eureka.client.serviceUrl.defaultZone生成;两个服务治理中心之间是对等关系,不是主从关系
-
服务注册:一个服务实例要被服务治理中心发现,首先需要注册,客户端把相关的信息以REST请求的方式注册到服务治理中心,这里值得注意的配置项是
spring.application.name,Eureka会通过这个配置项去区分服务实例属于哪个服务,相同的服务实例应该有相同的业务能力;服务注册不是服务启动后就注册,默认情况下服务启动后40s才会发起注册,如果需要改变它,需要通过配置项eureka.client.initial-instance-info-replication-interval-seconds:40来改变 -
服务续约:在服务实例启动后,可能会出现下线、故障等不可用的情况,Eureka为了监测这些实例是否可用,要求实例每隔一段时间对Eureka发送请求,以告知服务治理中心是否可用状态,这个过程被称为续约(Renew),如果迟迟没有续约,那么服务治理中心会认为该实例不可用,然后Eureka就会将其剔除。默认情况下30s一次续约,90s不续约就会被剔除,如果需要改变它,则需要通过配置项
eureka.instance.lease-expiration-duration-in-seconds:90和eureka.instance.lease-renewal-interval-in-seconds:30来改变 -
服务下线:当一个服务正常下线时,会向Eureka发送Rest请求,告知下线然后Eureka会将其剔除
服务调用Ribbon
在系统整个体系中看,各服务之间是需要通过写作来完成某一个任务的,在Spring Cloud中是以Rest请求作为主要的服务调用方式的,Spring Cloud将Netflix Ribbon封装成Spring Cloud Netflix Ribbon作为服务调用的组件,并将Spring Cloud Netflix Ribbon和第三方开源工具OpenFeign(也是Netflix Ribbon开发的)结合,封装成为Spring Cloud OpenFeign作为声明式服务调用,以简化开发过程
Ribbon也被称为客户端负载均衡,这里的客户端是相对于Eureka服务端而言的,主要有如下几个特点:
- 将单机服务变为多机服务,从而降低单机压力,提高系统的吞吐和服务能力
- 当发现一些故障实例时,可以屏蔽这些故障实例,让系统继续工作
- 通过负载均衡来实现实例的伸缩性,在业务膨胀时增加实例,在业务缩减时减少实例
- 负载均衡器可以度量服务的质量,在执行服务调用时,剔除故障多、服务性能差的实例,侧面提升服务调用感知上的成功率和性能
负载均衡的基础有两点:一个是服务实例清单,也就是从哪里选取服务实例执行服务调用;另一个是负载均衡策略,也就是如何从服务实例清单里选取可用的服务实例
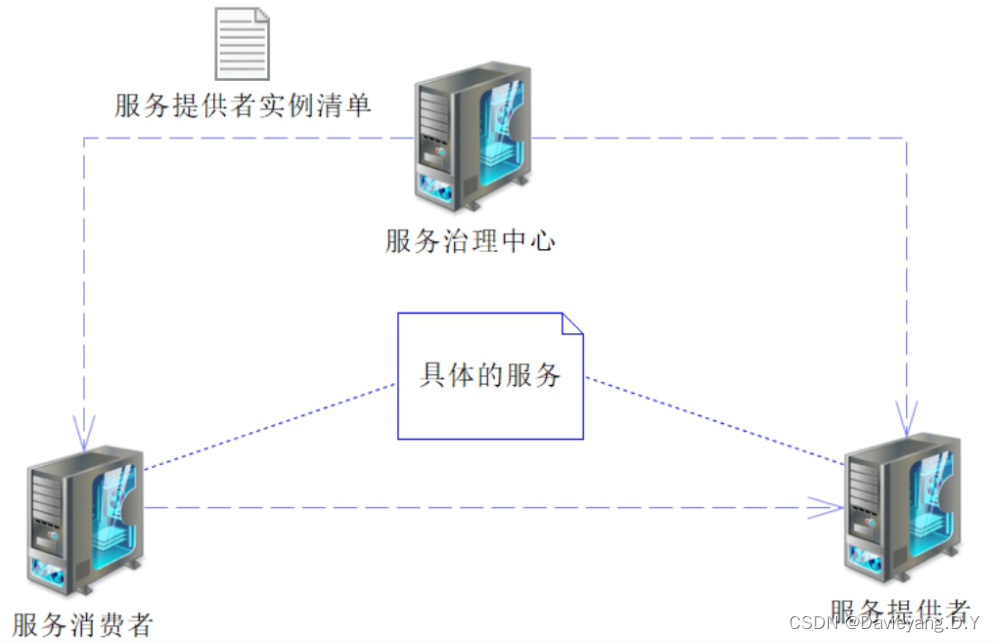
在服务调用过程中存在三个角色即服务提供者、服务消费者、服务治理中心
Ribbon实例
引入相关依赖spring-cloud-starter-netflix-ribbon,实际上在引入了spring-cloud-starter-netflix-eureka-client时,项目会自动依赖,无需单独在pom文件中单独添加spring-cloud-starter-netflix-ribbon
在Customer模块中编写controller代码如下所示:
package com.scd.customer.controller;import com.scd.common.pojo.CustomerPojo;
import org.springframework.web.bind.annotation.*;import javax.servlet.http.HttpServletRequest;@RestController
@RequestMapping("/customer")
public class CustomerController {@GetMapping("/name/{id}")public String getCustomerName(@PathVariable("id") Long id, HttpServletRequest request) {String customerName = "customer_name_" + id;System.out.println("服务端口:" +request.getServerPort());return customerName;}
}
修改Goods模块的启动类
package com.scd.goods.main;
import org.springframework.boot.SpringApplication;
import org.springframework.boot.autoconfigure.SpringBootApplication;
import org.springframework.cloud.client.loadbalancer.LoadBalanced;
import org.springframework.context.annotation.Bean;
import org.springframework.web.client.RestTemplate;import java.time.Duration;// 定义扫描包
@SpringBootApplication(scanBasePackages = "com.scd.goods")
public class GoodsApplication {// 执行负载均衡,启动Ribbon默认的负载均衡策略来选择可用的服务实例完成服务调用@LoadBalanced// 装配为Bean,方便之后注入@Beanpublic RestTemplate restTemplate() {return new RestTemplate();}public static void main(String[] args) {SpringApplication.run(GoodsApplication.class, args);}
}
然后编写服务接口和服务类
package com.scd.goods.facade;public interface CustomerFacade {public String getCustomerName(Long id);public String timeout(Long id);public String exception(Long id);
}
package com.scd.goods.facade.impl;import com.scd.goods.facade.CustomerFacade;
import org.springframework.beans.factory.annotation.Autowired;
import org.springframework.stereotype.Service;
import org.springframework.web.client.RestTemplate;
/*** 定义一个服务类,该类用于处理特定的业务逻辑。* 使用@Service注解表明该类是一个服务层对象,通常由Spring框架管理其生命周期,* 并可以进行依赖注入。这个类的设计是为了提供一系列的服务操作,以支持应用程序的运行。*/
@Service
public class CustomerFacadeImpl implements CustomerFacade {@Autowiredprivate RestTemplate restTemplate = null;@Overridepublic String getCustomerName(Long id) {// 这里的BUYER代表客户服务,此时RestTemplate会自动负载均衡String url="http://CUSTOMER/customer/name/{id}";// 服务REST风格调用String name = restTemplate.getForObject(url, String.class, id);return name;}
}
然后写一个控制器来验证
package com.scd.goods.controller;import com.scd.goods.facade.CustomerFacade;
import org.springframework.beans.factory.annotation.Autowired;
import org.springframework.web.bind.annotation.GetMapping;
import org.springframework.web.bind.annotation.PathVariable;
import org.springframework.web.bind.annotation.RequestMapping;
import org.springframework.web.bind.annotation.RestController;@RestController
@RequestMapping("/goods")
public class CustomerCallController {@Autowiredprivate CustomerFacade customerFacade = null;@GetMapping("/customer/name/{id}")public String getCustomerName(@PathVariable("id") Long id) {return customerFacade.getCustomerName(id);}
}
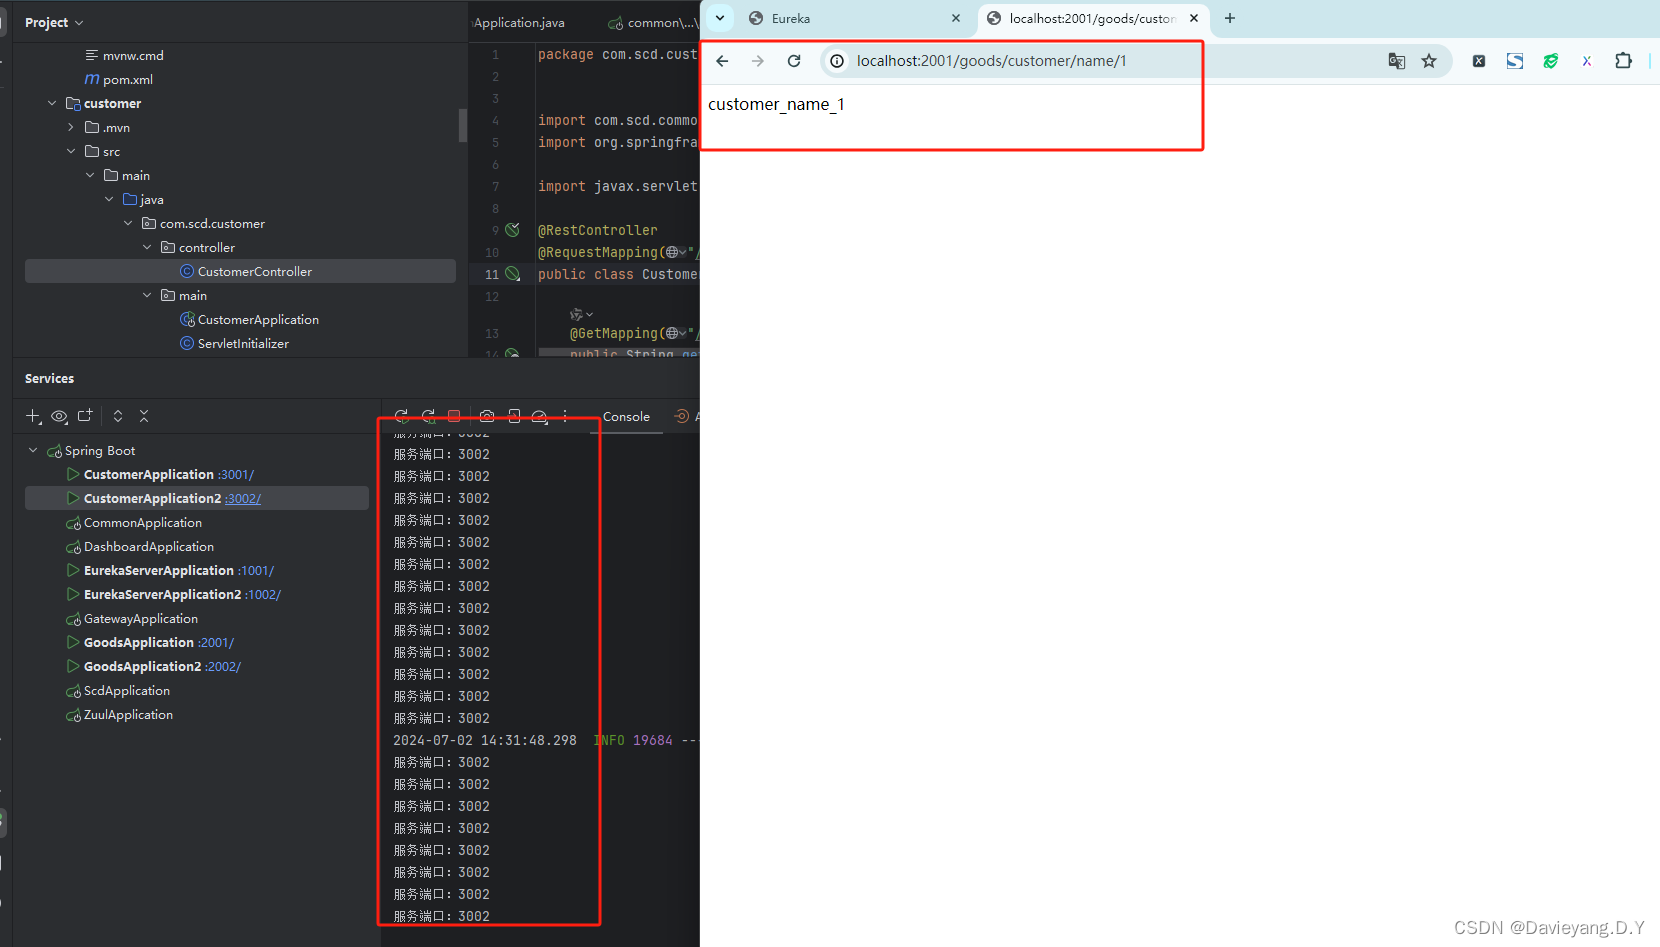
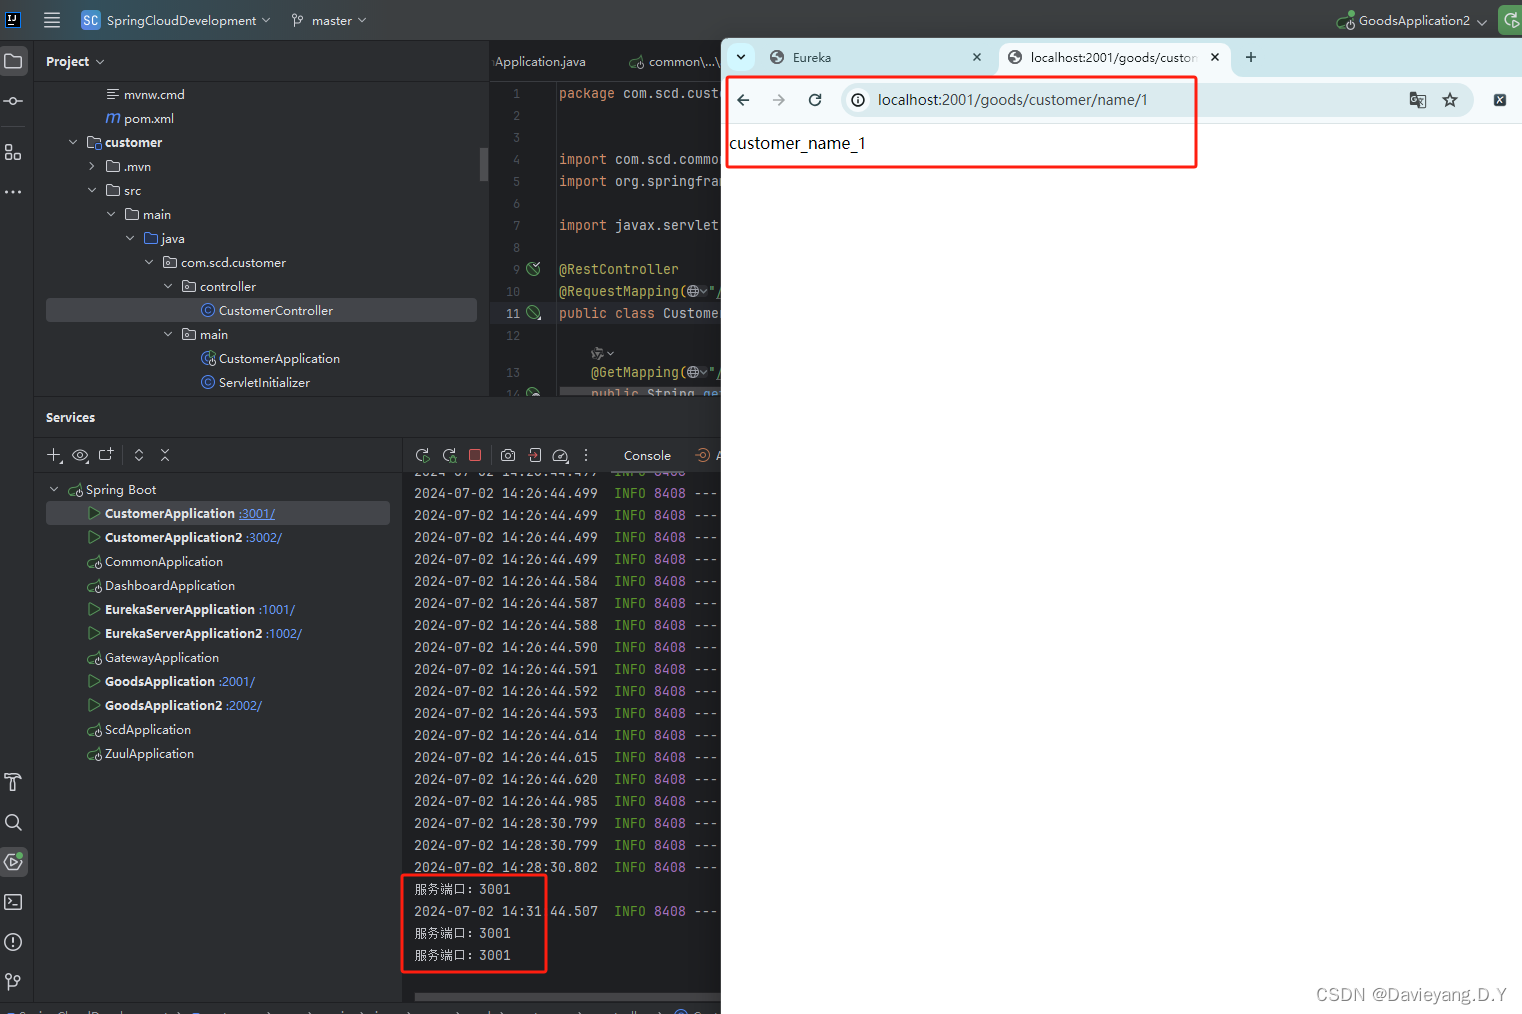
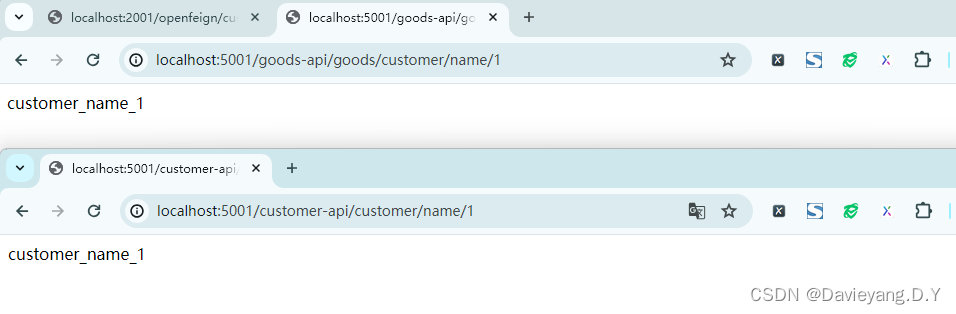
然后重启Goods和Customer服务,访问地址http://localhost:2001/goods/customer/name/1,如下所示被负载均衡了
Ribbon工作原理
前面说到负载均衡需要处理的两个问题一个是从哪里选取服务实例,另一个问题是如何从可选的服务实例中选取,第一个问题很好解释Eureka服务端有可用的服务实例的清单,在Eureka的机制中,客户端默认会每隔30s向Eureka发送请求获取其他服务的实例清单,并将其副本保存在本地,这样就获得了服务清单,也可以通过配置修改eureka.client.fetch-registry:true和eureka.client.registry-fetch-interval-seconds:30每隔30秒获取一次Eureka服务端的服务实例清单,其中包括了可用和不可用的
第二个问题就是如何选取实例的策略问题了,Ribbon中定义了几个主要的接口
IClientConfig:提供客户端配置功能,默认实现类DefaultClientConfigImplIRule:提供具体的负载均衡策略,默认实现类ZoneAvoidanceRuleIPing:通过PING命令验证服务实例是否可用,默认实现类DummyPingServerList<T extends Server>:用于获取服务实例清单,默认实现类ConfigurationBasedServerListServerListFilter<T extends Server>:根据服务的可用性和性能排除一些有故障的和性能低的服务实例,然后得到一个可用性较高的服务实例清单,默认实现类ZonePreferenceServerListFilterILoadBalancer:按照策略选取服务实例,默认实现类ZoneAwareLoadBalancerServerListUpdater: 它会根据一定的策略来更新服务实例清单,默认实现类PollingServerListUpdater
其中大部分是无需定制化的,常变动的是IRule接口,该接口的结构大致如下
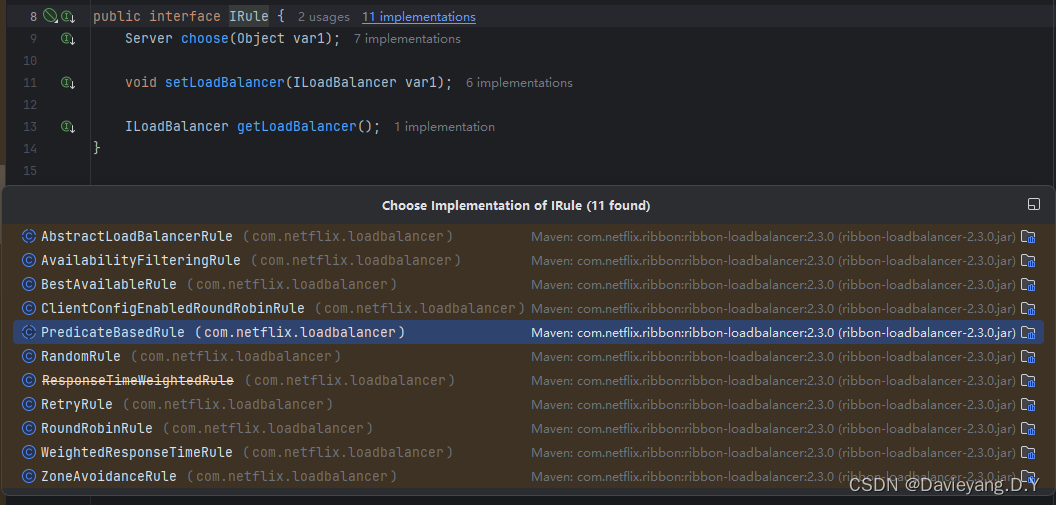
可以看到该接口下有若干策略,其中常用几个如下:
- BestAvailableRule:先探测服务实例是否可用,如果可用,则选择当前被分配请求最少的那个
- WeightedResponseTimeRule:根据数据统计,分析服务实例响应时间,并分配一个权重值(weight),对于响应时间短的服务实例,有更大的概率被分配请求,反之则被分配请求的概率会减少
- RetryRule:重试服务策略,在一个特定的时间戳内,如果当前被分配的服务实例不可用,则通过子策略(默认是轮询)来选定可用的服务实例
- RoundRobinRule:轮询选择服务实例,通过下标,轮询服务实例列表,从而选择一个服务实例
- ZoneAvoidanceRule:默认实现策略,它会通过可用性和性能两重过滤选择可用且性能较高的服务实例
在抽象类CommonClientConfigKey定义了大量配置项,部分代码如下
/*** 定义了与负载均衡相关的配置键。* <p>* NFLoadBalancerClassName: 负载均衡器的类名。* NFLoadBalancerRuleClassName: 负载均衡规则的类名。* NFLoadBalancerPingClassName: 负载均衡器ping的类名。* NFLoadBalancerPingInterval: 负载均衡器ping的间隔时间(单位:秒)。* NFLoadBalancerMaxTotalPingTime: 负载均衡器ping的最大总时间(单位:毫秒)。* NFLoadBalancerStatsClassName: 负载均衡器统计信息的类名。* NIWSServerListClassName: Netty服务器列表的类名。* ServerListUpdaterClassName: 服务器列表更新器的类名。* NIWSServerListFilterClassName: Netty服务器列表过滤器的类名。** @author Unknown*/
public class ConfigurationKeys {/*** 负载均衡器的类名配置键。*/public static final IClientConfigKey<String> NFLoadBalancerClassName = new CommonClientConfigKey<>("NFLoadBalancerClassName") {};/*** 负载均衡规则的类名配置键。*/public static final IClientConfigKey<String> NFLoadBalancerRuleClassName = new CommonClientConfigKey<>("NFLoadBalancerRuleClassName") {};/*** 负载均衡器ping的类名配置键。*/public static final IClientConfigKey<String> NFLoadBalancerPingClassName = new CommonClientConfigKey<>("NFLoadBalancerPingClassName") {};/*** 负载均衡器ping的间隔时间配置键(单位:秒)。*/public static final IClientConfigKey<Integer> NFLoadBalancerPingInterval = new CommonClientConfigKey<>("NFLoadBalancerPingInterval") {};/*** 负载均衡器ping的最大总时间配置键(单位:毫秒)。*/public static final IClientConfigKey<Integer> NFLoadBalancerMaxTotalPingTime = new CommonClientConfigKey<>("NFLoadBalancerMaxTotalPingTime") {};/*** 负载均衡器统计信息的类名配置键。*/public static final IClientConfigKey<String> NFLoadBalancerStatsClassName = new CommonClientConfigKey<>("NFLoadBalancerStatsClassName") {};/*** Netty服务器列表的类名配置键。*/public static final IClientConfigKey<String> NIWSServerListClassName = new CommonClientConfigKey<>("NIWSServerListClassName") {};/*** 服务器列表更新器的类名配置键。*/public static final IClientConfigKey<String> ServerListUpdaterClassName = new CommonClientConfigKey<>("ServerListUpdaterClassName") {};/*** Netty服务器列表过滤器的类名配置键。*/public static final IClientConfigKey<String> NIWSServerListFilterClassName = new CommonClientConfigKey<>("NIWSServerListFilterClassName") {};
例如商品Goods服务调用客户Customer服务,可以在商品Goods服务中配置如下负载均衡策略
# CUSTOMER为Eureka服务端的另外一个服务名称
CUSTOMER:ribbon:# 配置负载均衡策略为BestAvailableRuleNFLoadBalancerRuleClassName: com.netflix.loadbalancer.BestAvailableRule
配置单个客户端可以这样,也可以进行全局配置,编写一个Ribbon配置类,如下代码所示
package com.scd.goods.config;import com.netflix.loadbalancer.BestAvailableRule;
import com.netflix.loadbalancer.IPing;
import com.netflix.loadbalancer.IRule;
import com.netflix.loadbalancer.PingUrl;
import org.springframework.context.annotation.Bean;
import org.springframework.context.annotation.Configuration;/*** Ribbon配置类,用于设置Ribbon客户端的负载均衡策略和服务器健康检查规则。*/
@Configuration
public class RibbonConfig {/*** 配置负载均衡策略,使用{@link BestAvailableRule},该规则会选择最少连接的服务器。* @return 返回一个BestAvailableRule实例*/@Beanpublic IRule rule() {return new BestAvailableRule();}/*** 配置Ribbon的服务器心跳监测策略,使用{@link PingUrl},通过HTTP GET请求检测服务器是否可用。* @return 返回一个PingUrl实例*/@Beanpublic IPing ribbonPing() {return new PingUrl();}
}这样就可以配置全局性的Ribbon了,而且这个方式比使用yaml文件的配置级别高,会覆盖yaml文件的相同配置项的配置;Ribbon还提供了注解@RibbonClients
/*** 组件扫描并配置多个Ribbon客户端,指定不同的服务名及其对应的自定义配置类,* 同时设定默认的全局Ribbon配置类。* @RibbonClients 注解用于批量配置RibbonClient,可以为不同的服务定制化负载均衡策略等配置。* - value:数组,包含多个@RibbonClient注解,分别定义不同服务的配置,name属性指定了微服务的名称,configuration属性指定了该服务专用的配置类。* - defaultConfiguration:指定所有RibbonClient共用的默认配置类。*/
@RibbonClients(value={@RibbonClient(name="CUSTOMER", configuration=CustomerRibbonConfig.class), // 定义CUSTOMER服务的特定配置@RibbonClient(name="USER", configuration=UserRibbonConfig.class),       // 定义USER服务的特定配置},defaultConfiguration=RibbonConfig.class // 设置所有RibbonClient的默认全局配置类
)
这样微服务调用就会按照自定义的负载均衡策略来路由服务实例执行服务调用了
断路器Hystrix
Hystrix的使用
通常情况下一个服务调用另一个服务完成某个业务功能,他们之间便产生了依赖,而且是一个普遍现象,系统在运转过程中无法完全保证一个服务实例一直是可用的状态
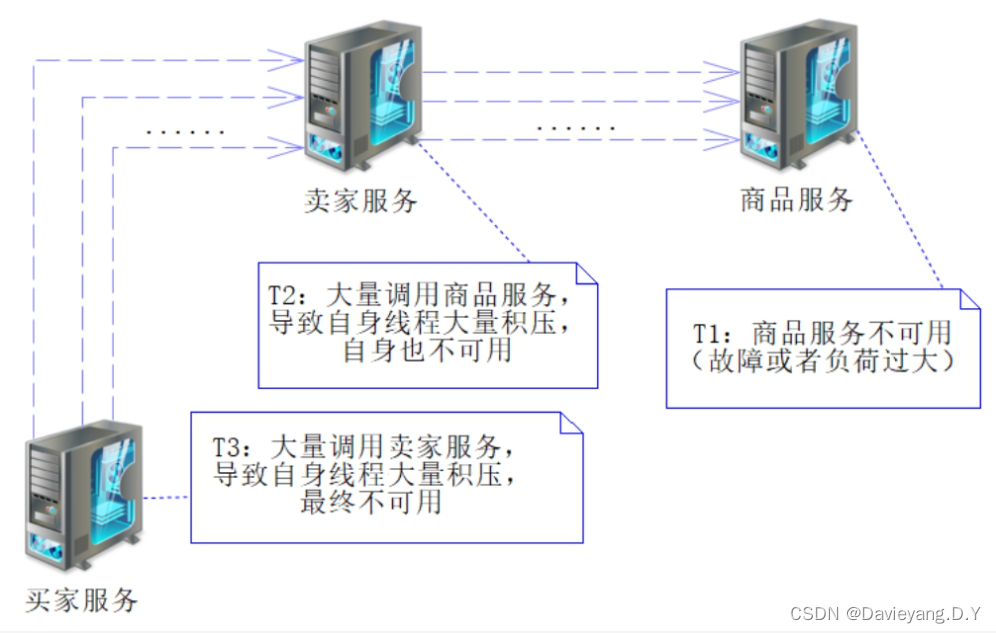
而且如果调用关系设计或者服务划分不合理,往往还会出现因为某一个服务不可用,导致整条调用链路上的服务均出现不可用,再严重一些就是整个服务架构不可用,导致服务器雪崩效应
当服务提供者不可用,而服务消费者仍旧进行大量的调用势必会出现很多请求超时,此时断路器的作用就会将服务熔断,从而阻止服务消费者对服务提供者进行调用,从而避免大量线程积压导致服务消费者自身也变成不可用,从而断路器起到了保护服务消费者的作用
Hystrix的作用之一就是熔断,此外还包括服务降级、缓存、线程池、异步等等
首先在服务消费者(Goods)模块,引入该断路器的依赖
<!-- 引入Spring Cloud Netflix Hystrix,提供断路器功能,用于容错管理 --><dependency><groupId>org.springframework.cloud</groupId><artifactId>spring-cloud-starter-netflix-hystrix</artifactId></dependency>
引入了该依赖后,便可以使用注解@EnableCircuitBreaker驱动断路器工作
package com.scd.goods.main;import io.github.resilience4j.timelimiter.TimeLimiterConfig;
import io.github.resilience4j.timelimiter.TimeLimiterRegistry;
import org.springframework.boot.SpringApplication;
import org.springframework.boot.autoconfigure.SpringBootApplication;
import org.springframework.cloud.client.circuitbreaker.EnableCircuitBreaker;
import org.springframework.cloud.client.loadbalancer.LoadBalanced;
import org.springframework.cloud.openfeign.EnableFeignClients;
import org.springframework.context.annotation.Bean;
import org.springframework.web.client.RestTemplate;import java.time.Duration;// 定义扫描包
@SpringBootApplication(scanBasePackages = "com.scd.goods")
// 驱动断路器工作(Hystrix)
@EnableCircuitBreaker
public class GoodsApplication {... ...
}
这样就可以驱动Hystrix的工作,在Goods模块使用了Hystrix了,只需要加入一个注解@HystrixCommand即可使用Hystrix,这个注解通过Spring AOP技术将方法包装为一个Hystrix命令然后执行
在服务调用过程中常出现的两种故障一个是超时一个是异常,看一下断路器如何使用,首先在Customer模块的CustomerController中加入超时和异常两个方法代码如下
// 最大休眠时间,为3秒private static Long MAX_SLEEP_TIME = 3000L;@GetMapping("/timeout/{id}")public String testTimeout(@PathVariable("id") Long id) {try {// 随机产生不超过3秒的时间戳long sleepTime = (long) (Math.random()*MAX_SLEEP_TIME);// 线程休眠Thread.sleep(sleepTime);} catch (Exception ex) {ex.printStackTrace();}return "test timeout";}@GetMapping("/exception/{id}")public String testException(@PathVariable("id") Long id) {throw new RuntimeException("当前尚未开发该方法");}
在Hystrix中默认超时时间为1s,因此Goods模块在经过Hystrix调用Customer会很大概率出现超时,然后修改Goods模块的调用代码,添加调用方法,如下代码所示
package com.scd.goods.facade.impl;import com.scd.goods.facade.CustomerFacade;
import com.netflix.hystrix.contrib.javanica.annotation.HystrixCommand;
import org.springframework.beans.factory.annotation.Autowired;
import org.springframework.stereotype.Service;
import org.springframework.web.client.RestTemplate;/*** 定义一个服务类,该类用于处理特定的业务逻辑。* 使用@Service注解表明该类是一个服务层对象,通常由Spring框架管理其生命周期,* 并可以进行依赖注入。这个类的设计是为了提供一系列的服务操作,以支持应用程序的运行。*/
@Service
public class CustomerFacadeImpl implements CustomerFacade {@Autowiredprivate RestTemplate restTemplate = null;@Overridepublic String getCustomerName(Long id) {//这里的CUSTOMER代表客户服务,此时RestTemplate会自动负载均衡String url="http://CUSTOMER/customer/name/{id}";// 服务REST风格调用String name = restTemplate.getForObject(url, String.class, id);return name;}/*** 测试超时调用* 使用Hystrix,通过Spring AOP将方法捆绑为一个Hystrix命令去执行,并指定了降级方法* @param id 参数* @return  服务调用结果或者降级结果* */@HystrixCommand( fallbackMethod = "fallback", threadPoolKey = "customer-pool-1")@Overridepublic String timeout(Long id) {//这里的CUSTOMER代表客户服务,此时RestTemplate会自动负载均衡String url="http://CUSTOMER/customer/timeout/{id}";// 服务REST风格调用String name = restTemplate.getForObject(url, String.class, id);return name;}/*** 测试异常调用* @param id 参数* @return 调用结果或者降级结果*/@HystrixCommand(fallbackMethod = "fallback")@Overridepublic String exception(Long id) {//这里的CUSTOMER代表客户服务,此时RestTemplate会自动负载均衡String url="http://CUSTOMER/customer/exception/{id}";// 服务REST风格调用String name = restTemplate.getForObject(url, String.class, id);return name;}/*** 降级方法* @param id 参数* @param ex 异常对象* @return 降级结果*/public String fallback(Long id, Throwable ex) {System.out.println("服务调用失败,参数为:" + id);System.out.println("异常信息是:" + ex.getMessage());return "服务调用失败,我是降级服务";}
}
代码中使用了@HystrixCommand注解,它会使用Spring AOP技术将方法包装为一个Hystrix命令去执行,同时还配置了一个fallback属性,执行了fallback方法,fallback方法有两个参数,id和ex,因为被注解方法都有id参数,因此fallback也必须有id参数,而ex不是必须的。
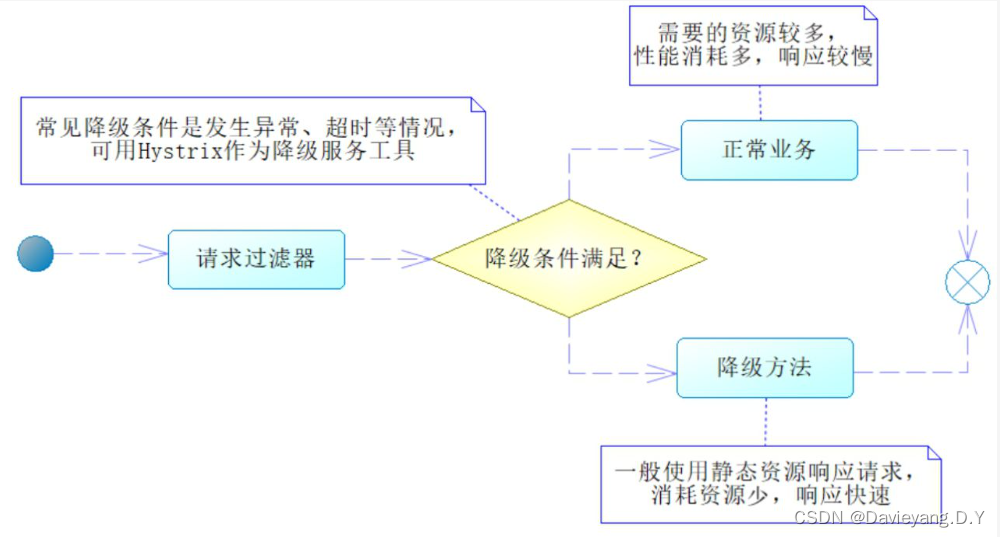
通常情况下,当我们时间紧迫、资源不足难以完成任务时,会选择去做最主要的任务,而不是全做,在微服务中,这样的思想就叫做服务降级,而fallback方法就是降级方法,服务降级的过程如下图所示
然后在控制器代码中加入调用方法,如下所示
package com.scd.goods.controller;import com.scd.goods.facade.CustomerFacade;
import org.springframework.beans.factory.annotation.Autowired;
import org.springframework.web.bind.annotation.GetMapping;
import org.springframework.web.bind.annotation.PathVariable;
import org.springframework.web.bind.annotation.RequestMapping;
import org.springframework.web.bind.annotation.RestController;@RestController
@RequestMapping("/goods")
public class CustomerCallController {@Autowiredprivate CustomerFacade customerFacade = null;@GetMapping("/customer/name/{id}")public String getCustomerName(@PathVariable("id") Long id) {return customerFacade.getCustomerName(id);}@GetMapping("/customer/timeout/{id}")public String timeout(@PathVariable("id") Long id) {return customerFacade.timeout(id);}@GetMapping("/customer/exception/{id}")public String exception(@PathVariable("id") Long id) {return customerFacade.exception(id);}
}
重启客户端服务,并访问地址http://localhost:2001/goods/customer/timeout/1和http://localhost:2001/goods/customer/exception/1便有可能的到如下页面


在Hystrix中有三种状态,默认为CLOSED状态,在此状态下会放心服务调用;OPEN状态下当执行服务调用失败比率达到50%时,或者10s内超过20次请求时,断路器的状态就会从CLOSED变为OPEN,熔断服务调用,执行降级方法;HALF_OPEN状态,断路器保持OPEN状态5s后会将断路器修改为此状态,在此状态下允许尝试一次服务调用如果成功,则将断路器状态修改为CLOSED放行服务调用,否则继续保持OPEN状态,熔断服务调用
在进行调用时候,Hystrix会自动分配资源给用户执行服务调用,默认是一个大小为10的线程池,当然也可以使用信号量,有时候不想用默认配置,例如默认超时时间1s、失败率50%才将断路器改为OPEN状态等等,可以通过@HystrixCommand的配置项进行配置如下所示
import org.springframework.cloud.netflix.hystrix.HystrixCommand;
import org.springframework.cloud.netflix.hystrix.HystrixCommandGroupKey;
import org.springframework.cloud.netflix.hystrix.HystrixThreadPoolKey;
import org.springframework.stereotype.Component;@Component
public class MyService {/*** 示例方法,展示HystrixCommand的高级配置。* 包括自定义线程池、超时设置、断路器配置等。** @return 服务调用的结果或降级响应*/@HystrixCommand(commandKey = "MyServiceCommand",groupKey = HystrixCommandGroupKey.Factory.asKey("MyServiceGroup"),threadPoolKey = HystrixThreadPoolKey.Factory.asKey("MyServiceThreadPool"),threadPoolProperties = {@HystrixProperty(name = "coreSize", value = "20"), // 自定义线程池核心线程数@HystrixProperty(name = "maxQueueSize", value = "100") // 队列最大长度},commandProperties = {@HystrixProperty(name = "execution.isolation.thread.timeoutInMilliseconds", value = "2000"), // 超时时长@HystrixProperty(name = "circuitBreaker.requestVolumeThreshold", value = "5"), // 断路器触发请求阈值@HystrixProperty(name = "circuitBreaker.errorThresholdPercentage", value = "50"), // 错误百分比阈值,超过则打开断路器@HystrixProperty(name = "circuitBreaker.sleepWindowInMilliseconds", value = "5000") // 断路器休眠时间窗},fallbackMethod = "fallbackMethod")public String advancedConfiguredCall() {// 远程服务调用逻辑...return "Advanced configured remote service response";}/*** 降级处理方法。** @return 降级返回信息*/private String fallbackMethod() {return "Advanced config: Service unavailable, fallback response.";}
}
import org.springframework.cloud.netflix.hystrix.HystrixCommand;
import org.springframework.cloud.netflix.hystrix.HystrixCommandGroupKey;
import org.springframework.cloud.netflix.hystrix.HystrixThreadPoolKey;
import org.springframework.stereotype.Component;@Component
public class MyService {/*** 示例方法,展示如何使用Hystrix信号量进行并发限制。** @return 服务调用的结果或降级响应*/@HystrixCommand(commandKey = "MyServiceSemaphoreCommand",groupKey = HystrixCommandGroupKey.Factory.asKey("MyServiceGroup"),commandProperties = {@HystrixProperty(name = "execution.isolation.strategy", value = "SEMAPHORE"), // 使用信号量进行并发控制@HystrixProperty(name = "execution.isolation.semaphore.maxConcurrentRequests", value = "100"), // 最大并发请求数@HystrixProperty(name = "execution.timeout.enabled", value = "false"), // 信号量模式下通常禁用超时,因为它是非阻塞的@HystrixProperty(name = "circuitBreaker.requestVolumeThreshold", value = "5"), // 断路器触发请求阈值@HystrixProperty(name = "circuitBreaker.errorThresholdPercentage", value = "50"), // 错误百分比阈值,超过则打开断路器@HystrixProperty(name = "circuitBreaker.sleepWindowInMilliseconds", value = "5000") // 断路器休眠时间窗},fallbackMethod = "semaphoreFallbackMethod")public String semaphoreControlledCall() {// 远程服务调用逻辑...return "Semaphore controlled remote service response";}/*** 适用于信号量控制方法的降级处理。** @return 降级返回信息*/private String semaphoreFallbackMethod() {return "Semaphore limit reached, fallback response.";}
}
设置了
execution.isolation.strategy为SEMAPHORE,这意味着Hystrix将使用信号量而非线程池来控制并发。同时,还设置了execution.isolation.semaphore.maxConcurrentRequests来定义最大的并发请求数。此外,因为信号量模式通常用于非阻塞操作,所以我们也禁用了执行超时(execution.timeout.enabled=false),以避免不必要的复杂性
舱壁隔离
舱壁隔离(Bulkhead Isolation)也有称作隔板隔离的,例如这样一个调用关系
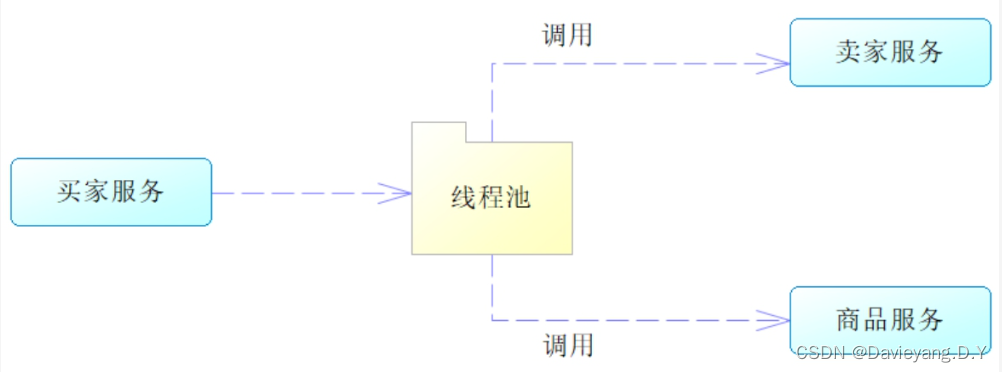
例如这样一个调用关系,所有的服务调用都共享一个线程池就会出现线程池被占满了,再有服务调用的时候,就会挂起或者拒绝,这样虽然服务提供者是可用状态,但仍然无法完成调用,于是改设计为
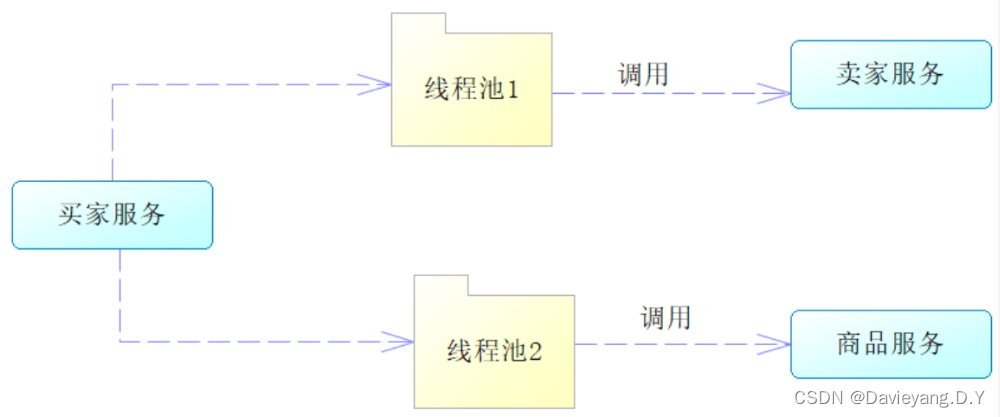
这样即便线程池1被占满了,也不会影响调用商品服务
引入舱壁隔离也会带来问题,就是大量线程的交互 ,切换线程状态会消耗性能,相对而言Hystrix的舱壁隔离性能还算不错,它还是通过注解@HystrixCommand来支持舱壁隔离的,@HystrixCommand存在三个配置项
commandKey = "MyServiceCommand",
groupKey = HystrixCommandGroupKey.Factory.asKey("MyServiceGroup"),
threadPoolKey = HystrixThreadPoolKey.Factory.asKey("MyServiceThreadPool"),
可以通过这3个配置项修改服务调用的线程池路径
通常一个服务类可以存在一个或者多个标注@HystrixCommand的方法,一般都在同一个组别里,同一个线程池下,要改变这个情况只需要通过这3个配置,配置多个组别和线程池
commandKey = "MyServiceCommand1",
groupKey = HystrixCommandGroupKey.Factory.asKey("MyServiceGroup1"),
threadPoolKey = HystrixThreadPoolKey.Factory.asKey("MyServiceThreadPool-1"),
Hystrix仪表盘
先建个Dashboard模块,引入如下依赖
<dependency><groupId>org.springframework.boot</groupId><artifactId>spring-boot-starter-web</artifactId></dependency><dependency><groupId>org.springframework.cloud</groupId><artifactId>spring-cloud-starter-netflix-eureka-client</artifactId></dependency><dependency><groupId>org.springframework.cloud</groupId><artifactId>spring-cloud-starter-netflix-hystrix-dashboard</artifactId></dependency>
然后修改一下该模块的配置文件
# Spring应用名称(微服务名称)
spring:application:name: dashboard# 请求URL指向Eureka服务治理中心
eureka:client:serviceUrl:defaultZone : http://localhost:1001/eureka/,http://localhost:1002/eureka/instance:# 实例服务器名称hostname: 192.168.3.115
修改该模块的启动类,驱动仪表盘工作
/*** com.scd.dashboard包下的主类,用于启动Spring Boot应用并启用Hystrix仪表板功能。* 此类利用Spring Boot的自动配置特性以及Spring Cloud的Hystrix Dashboard支持,* 提供了一个监控微服务中Hystrix命令执行情况的可视化界面。*/
package com.scd.dashboard;import org.springframework.boot.SpringApplication; // 引入Spring Boot的启动器
import org.springframework.boot.autoconfigure.SpringBootApplication; // 标记为自动配置的Spring Boot应用
import org.springframework.cloud.netflix.hystrix.dashboard.EnableHystrixDashboard; // 启用Hystrix仪表板功能@SpringBootApplication
@EnableHystrixDashboard
public class DashboardApplication {/*** 应用的主入口点,使用SpringApplication.run方法启动Spring Boot应用。* 参数:args - 应用启动时传入的命令行参数*/public static void main(String[] args) {SpringApplication.run(DashboardApplication.class, args); // 运行Spring Boot应用}}Hystrix仪表盘只是一个平台,还需要给它添加监控指标,为此在Goods模块也就是服务消费者模块,引入spring boot actuator
<dependency><groupId>org.springframework.boot</groupId><artifactId>spring-boot-starter-actuator</artifactId></dependency>
这样仪表盘就有了监控指标的数据来源,然后将actuator的端点暴露(默认是不暴露的监控不到),修改Goods模块的配置文件
management:endpoints:web:exposure:# 暴露的端点,如果配置为“*”,则代表全部暴露include : "*"
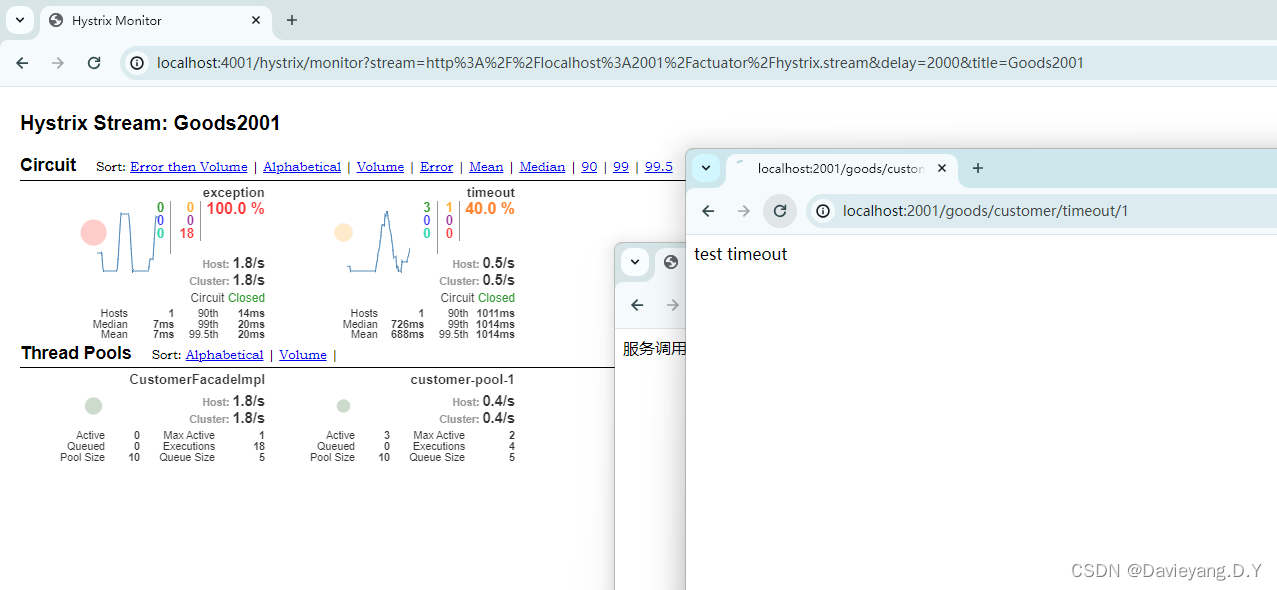
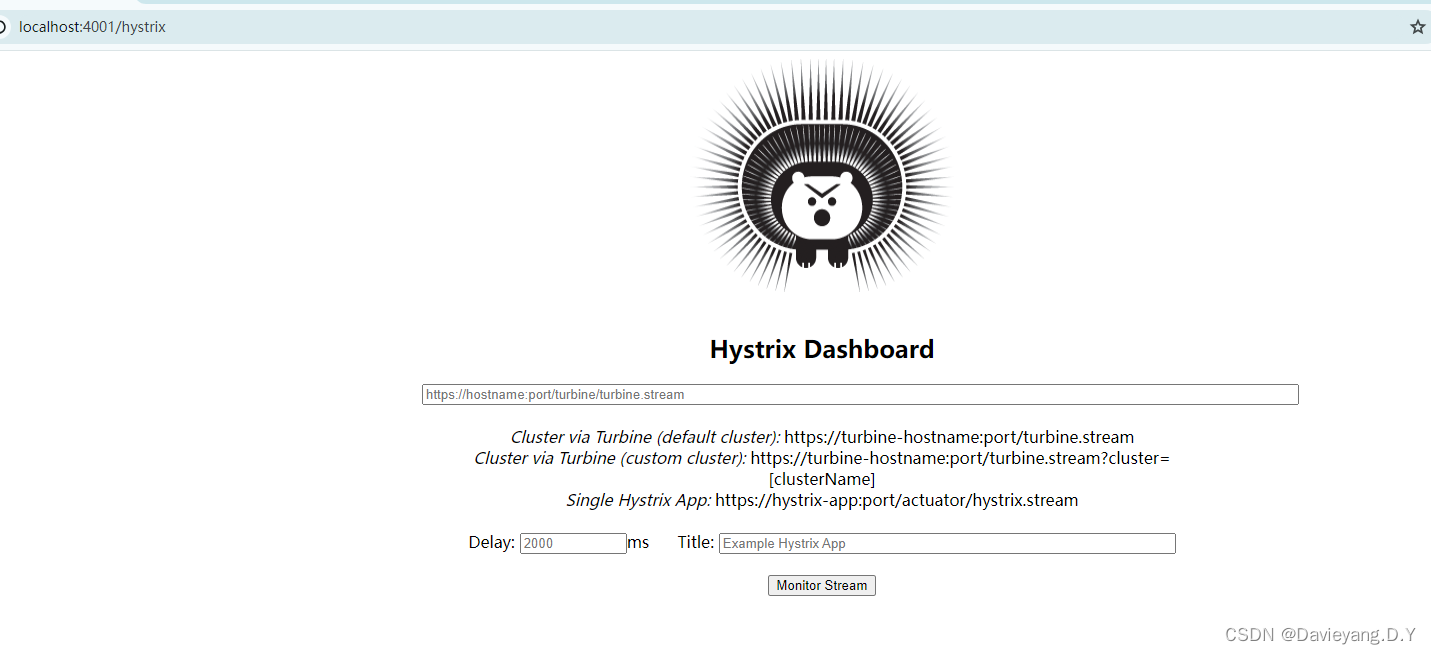
然后重启Goods的两个模块,同时用相同的方法使用4001和4002两个端口启动两个DashBoard模块,启动完成后,访问地址http://localhost:4001/hystrix,如下页面所示

在第一个输入框中输入http://localhost:2001/actuator/hystrix:stream,后边两个输入框一个是延迟可以输入2000,另一个输入Goods2001即可,然后点击Monitor Stream按钮即可进入监控页面,然后不停的刷新Goods服务在2001端口的两个服务请求,即可看到监控上的数据变化
然而这只是能监控到一个服务实例,还不能监控多个服务实例,Netflix提供了工具Turbine,通过它可以聚集各个服务的监测数据,首先在DashBoard模块引入依赖
<dependency><groupId>org.springframework.cloud</groupId><artifactId>spring-cloud-starter-netflix-turbine</artifactId></dependency>
然后在该模块的启动类添加这个工具的注解,驱动工具
/*** com.scd.dashboard包下的主类,用于启动Spring Boot应用并启用Hystrix仪表板功能。* 此类利用Spring Boot的自动配置特性以及Spring Cloud的Hystrix Dashboard支持,* 提供了一个监控微服务中Hystrix命令执行情况的可视化界面。*/
package com.scd.dashboard;import org.springframework.boot.SpringApplication; // 引入Spring Boot的启动器
import org.springframework.boot.autoconfigure.SpringBootApplication; // 标记为自动配置的Spring Boot应用
import org.springframework.cloud.netflix.hystrix.dashboard.EnableHystrixDashboard; // 启用Hystrix仪表板功能
import org.springframework.cloud.netflix.turbine.EnableTurbine;@SpringBootApplication
@EnableHystrixDashboard
@EnableTurbine
public class DashboardApplication {/*** 应用的主入口点,使用SpringApplication.run方法启动Spring Boot应用。* 参数:args - 应用启动时传入的命令行参数*/public static void main(String[] args) {SpringApplication.run(DashboardApplication.class, args); // 运行Spring Boot应用}}
在DashBoard模块配置文件中添加该工具的配置
turbine:# 配置聚合服务名称app-config: GOODS# 指定集群名称,表达式(注意不是字符串)cluster-name-expression: new String("default")# 设置为true,可以让同一主机上的服务通过主机名与端口号的组合进行区分。# 如果它为false,则会以host来区分不同的服务,默认值为truecombine-host-port: true
然后重启DashBoard模块的两个实例,再次访问地址http://localhost:4001/hystrix
在第一个输入框中添加http://localhost:4001/turbine.stream,另外两个分别输入2000和Goods即可,然后不停的刷新Goods服务的几个请求:http://localhost:2002/goods/customer/exception/1、http://localhost:2001/goods/customer/exception/1、http://localhost:2001/goods/customer/timeout/1和http://localhost:2002/goods/customer/timeout/1便可看到监控到两个端口的数据了

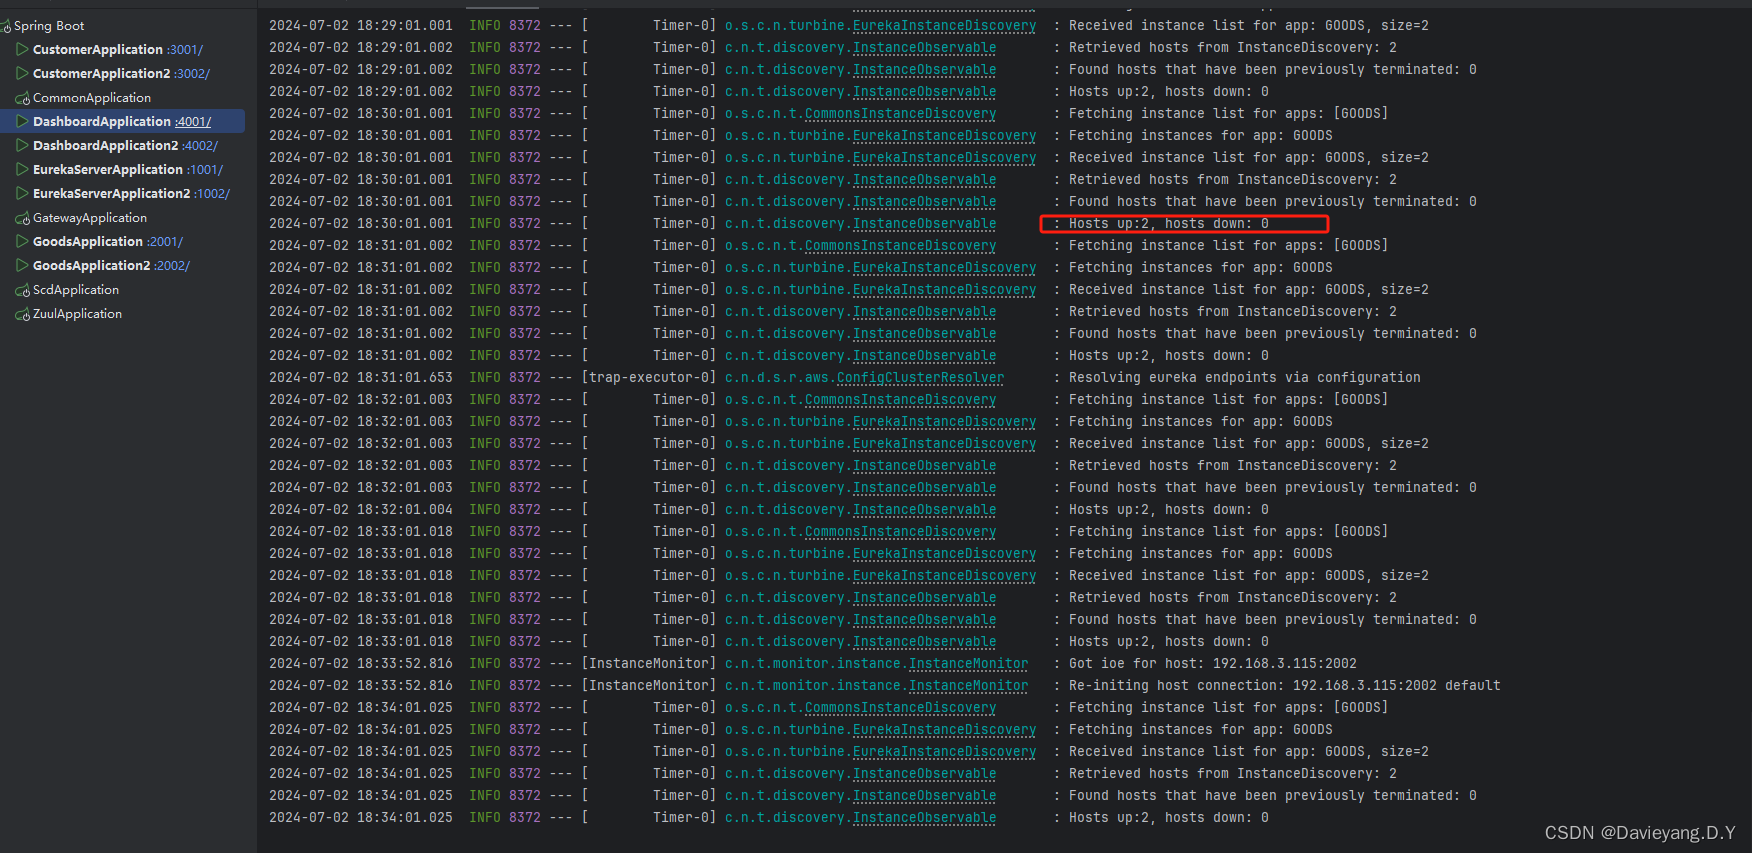
在DashBoard的日志中也能看到
服务调用OpenFeign
Ribbon在服务调用时,以使用RestTemplate为主,并以编码的形式完成,为了简化开发,Spring Cloud还提供了Spring Cloud OpenFeign这样的声明式调用,Spring Cloud OpenFeign是基于Github OpenFeign开发的,而Github OpenFeign使用的是自己的注解,为了更为简单,Spring Cloud OpenFeign在封装Github OpenFeign的同时提供了基于Spring MVC的注解来支持声明式服务调用。
首先在Goods模块中引入Spring Cloud OpenFeign的依赖
<dependency><groupId>org.springframework.cloud</groupId><artifactId>spring-cloud-starter-openfeign</artifactId></dependency>
然后在Customer模块的CustomerController中添加一个POST请求
    /*** 新增客户信息,POST请求,带请求体* @param customer 客户信息(请求体)* @return 信息*/@PostMapping("/info")public String newCustomer(@RequestBody CustomerPojo customer) {return "创建成功";}
}
这个方法使用了请求体@RequestBody,CustomerPojo是Common模块的pojo,代码如下
package com.scd.common.pojo;public class CustomerPojo {private Long id;private String name;private String note;public Long getId() {return id;}public void setId(Long id) {this.id = id;}public String getName() {return name;}public void setName(String name) {this.name = name;}public String getNote() {return note;}public void setNote(String note) {this.note = note;}
}
然后就可以使用OpenFeign进行声明式调用了,代码如下
package com.scd.goods.facade;import com.scd.common.pojo.CustomerPojo;
import com.scd.goods.facade.impl.CustomerOpenFeignFacadeImpl;
import org.springframework.cloud.openfeign.FeignClient;
import org.springframework.web.bind.annotation.GetMapping;
import org.springframework.web.bind.annotation.PathVariable;
import org.springframework.web.bind.annotation.PostMapping;
import org.springframework.web.bind.annotation.RequestBody;/*** 定义了对客户服务的远程调用接口。* 使用OpenFeign框架来代理对"customer"服务的HTTP请求。声明为OpenFeign客户端(即服务消费者)*/
@FeignClient(value="customer"
public interface CustomerOpenFeignFacade {/*** 根据客户ID获取客户名称。* @param id 客户的唯一标识ID。* @return 客户的名称。*/@GetMapping("/customer/name/{id}")public String getCustomerName(@PathVariable("id") Long id);/*** 模拟一个因为超时而可能失败的请求。* @param id 客户的唯一标识ID。* @return 客户的相关信息。*/@GetMapping("/customer/timeout/{id}")public String timeout(@PathVariable("id") Long id);/*** 模拟一个因为异常而可能失败的请求。* @param id 客户的唯一标识ID。* @return 客户的相关信息。*/@GetMapping("/customer/exception/{id}")public String exception(@PathVariable("id") Long id);/*** 创建一个新的客户。* @param customer 客户的详细信息。* @return 创建成功的提示信息。*/@PostMapping("/customer/info")public String newCustomer(@RequestBody CustomerPojo customer);
}
package com.scd.goods.facade.impl;
import com.scd.common.pojo.CustomerPojo;
import com.scd.goods.facade.CustomerOpenFeignFacade;
import org.springframework.stereotype.Component;/*** 客户OpenFeign接口的实现类。* 该类实现了CustomerOpenFeignFacade接口,提供了与客户相关的远程服务调用功能。*/
@Component
public class CustomerOpenFeignFacadeImpl implements CustomerOpenFeignFacade {/*** 根据客户ID获取客户名称。* @param id 客户的唯一标识ID。* @return 客户的名称或者错误信息。*/@Overridepublic String getCustomerName(Long id) {return "获取客户名称失败";}/*** 模拟一个超时的接口调用。** @param id 客户的唯一标识ID,用于标识具体的客户。* @return 超时后的错误信息。*/@Overridepublic String timeout(Long id) {return "服务调用超时了";}/*** 模拟一个发生异常的接口调用。* @param id 客户的唯一标识ID,用于指定相关的客户。* @return 异常发生后的错误信息。*/@Overridepublic String exception(Long id) {return "服务调用异常";}/*** 创建一个新的客户。* @param customer 客户的信息,包括名称等。* @return 创建结果或者错误信息。*/@Overridepublic String newCustomer(CustomerPojo customer) {return "创建客户信息失败";}
}
在接口代码里都加了注解,很像Spring MVC,但并不是在开发Spring MVC的控制器,只是在声明服务调用,首先在接口上标注了@FeignClient,并且设置值customer,这是一个服务名称,指向客户服务,很显然这是为了调用客户服务所做的的声明式调用,紧接着就是GetMapping和PostMapping分别对应GET请求和POST请求的服务调用
修改启动类添加注解驱动OpenFeign,代码如下
package com.scd.goods.main;import org.springframework.boot.SpringApplication;
import org.springframework.boot.autoconfigure.SpringBootApplication;
import org.springframework.cloud.client.circuitbreaker.EnableCircuitBreaker;
import org.springframework.cloud.openfeign.EnableFeignClients;// 定义扫描包
@SpringBootApplication(scanBasePackages = "com.scd.goods")
// 驱动断路器工作(Hystrix)
@EnableCircuitBreaker
@EnableFeignClients(//扫描装配OpenFeign接口到IoC容器中basePackages="com.scd.goods")
public class GoodsApplication {......
}
然后再编写一个控制器,代码如下
package com.scd.goods.controller;import com.scd.common.pojo.CustomerPojo;
import com.scd.goods.facade.CustomerOpenFeignFacade;
import org.springframework.beans.factory.annotation.Autowired;
import org.springframework.beans.factory.annotation.Qualifier;
import org.springframework.web.bind.annotation.GetMapping;
import org.springframework.web.bind.annotation.PathVariable;
import org.springframework.web.bind.annotation.RequestMapping;
import org.springframework.web.bind.annotation.RestController;@RestController
@RequestMapping("/openfeign")
public class CustomerOpenFeignController {@Qualifier("com.scd.goods.facade.CustomerOpenFeignFacade")@Autowiredprivate CustomerOpenFeignFacade customerOpenFeignFacade = null;@GetMapping("/customer/name/{id}")public String getCustomerName(@PathVariable("id") Long id) {return customerOpenFeignFacade.getCustomerName(id);}@GetMapping("/customer/timeout/{id}")public String timeout(@PathVariable("id") Long id) {return customerOpenFeignFacade.timeout(id);}@GetMapping("/customer/exception/{id}")public String exception(@PathVariable("id") Long id) {return customerOpenFeignFacade.exception(id);}@GetMapping("/customer/info")public String newCustomer() {CustomerPojo customerPojo = new CustomerPojo();customerPojo.setId(1L);customerPojo.setName("customer_name_1");customerPojo.setNote("note_1");return customerOpenFeignFacade.newCustomer(customerPojo);}
}然后重启项目,并访问地址http://localhost:2001/openfeign/customer/info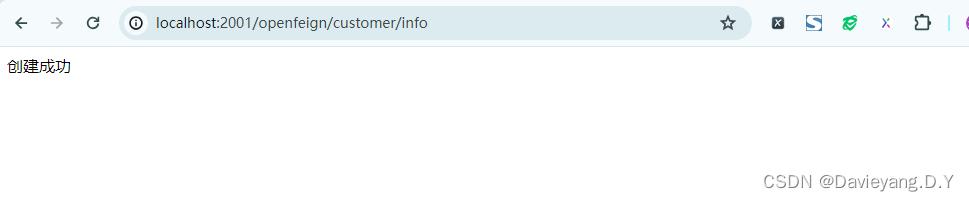
代码相对更清晰一些相比Ribbon而言
OpenFeign中使用Hystrix
在OpenFeign中使用Hystrix非常简单,只需要在Goods模块的配置文件中设置feign.hystrix.enabled:true即可
# 配置Feign的熔断器功能
feign:circuitbreaker:enabled: true# 启用熔断器功能,以提供对服务故障的保护# 设置为true表示熔断器功能启用,false表示禁用# 配置Hystrix的熔断器功能hystrix:enabled: true# 启用Hystrix熔断器功能,以提供对服务故障的保护# 设置为true表示Hystrix熔断器功能启用,false表示禁用
这样OpenFeign就会将所有的OpenFeign加入到Hystrix机制中,这个配置项默认为false,避免造成Hystrix的滥用,当将该配置项设置为true时实现服务降级,首先要有一个OpenFeign客户端接口的实现类来作为降级逻辑的提供者,如下代码所示
package com.scd.goods.facade.impl;import com.scd.common.pojo.CustomerPojo;
import com.scd.goods.facade.CustomerOpenFeignFacade;
import org.springframework.stereotype.Component;/*** 客户OpenFeign接口的实现类。* 该类实现了CustomerOpenFeignFacade接口,提供了与客户相关的远程服务调用功能。*/
@Component
public class CustomerOpenFeignFacadeImpl implements CustomerOpenFeignFacade {/*** 根据客户ID获取客户名称。* @param id 客户的唯一标识ID。* @return 客户的名称或者错误信息。*/@Overridepublic String getCustomerName(Long id) {return "获取客户名称失败";}/*** 模拟一个超时的接口调用。** @param id 客户的唯一标识ID,用于标识具体的客户。* @return 超时后的错误信息。*/@Overridepublic String timeout(Long id) {return "服务调用超时了";}/*** 模拟一个发生异常的接口调用。* @param id 客户的唯一标识ID,用于指定相关的客户。* @return 异常发生后的错误信息。*/@Overridepublic String exception(Long id) {return "服务调用异常";}/*** 创建一个新的客户。* @param customer 客户的信息,包括名称等。* @return 创建结果或者错误信息。*/@Overridepublic String newCustomer(CustomerPojo customer) {return "创建客户信息失败";}
}
要使这个实现类成为降级逻辑类,需要满足以下三个条件
- 这个降级实现类可以实现OpenFeign客户端接口的各个方法
- 将当前类装配到Spring IoC容器中
- 在OpenFeign客户端接口的
@FeignClient中指明降级逻辑类
改造一下OpenFeign的客户端接口,添加降级逻辑类
package com.scd.goods.facade;import com.scd.common.pojo.CustomerPojo;
import com.scd.goods.facade.impl.CustomerOpenFeignFacadeImpl;
import org.springframework.cloud.openfeign.FeignClient;
import org.springframework.web.bind.annotation.GetMapping;
import org.springframework.web.bind.annotation.PathVariable;
import org.springframework.web.bind.annotation.PostMapping;
import org.springframework.web.bind.annotation.RequestBody;/*** 定义了对客户服务的远程调用接口。* 使用OpenFeign框架来代理对"customer"服务的HTTP请求。声明为OpenFeign客户端(即服务消费者)* 当"customer"服务不可用时,会自动切换到降级处理类CustomerOpenFeignFacadeImpl。*/
@FeignClient(value="customer",fallback = CustomerOpenFeignFacadeImpl.class)
public interface CustomerOpenFeignFacade {/*** 根据客户ID获取客户名称。* @param id 客户的唯一标识ID。* @return 客户的名称。*/@GetMapping("/customer/name/{id}")public String getCustomerName(@PathVariable("id") Long id);/*** 模拟一个因为超时而可能失败的请求。* @param id 客户的唯一标识ID。* @return 客户的相关信息。*/@GetMapping("/customer/timeout/{id}")public String timeout(@PathVariable("id") Long id);/*** 模拟一个因为异常而可能失败的请求。* @param id 客户的唯一标识ID。* @return 客户的相关信息。*/@GetMapping("/customer/exception/{id}")public String exception(@PathVariable("id") Long id);/*** 创建一个新的客户。* @param customer 客户的详细信息。* @return 创建成功的提示信息。*/@PostMapping("/customer/info")public String newCustomer(@RequestBody CustomerPojo customer);
}重启Goods模块,然后在访问http://localhost:2001/openfeign/customer/timeout/1, 刷新几次就会出现如下页面,即走到了降级处理类中

网关Zuul
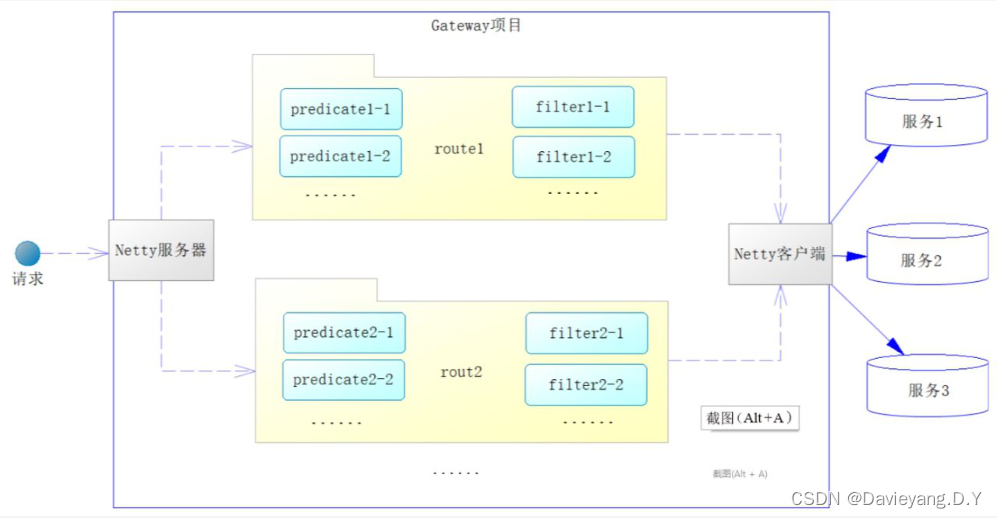
网关是请求各个服务实例的入口,通过它可以实现对请求的过滤和转发,在微服务体系中,可以称之为服务端负载均衡;网关分为硬件网关和软件网关,软件网关又分为传统网关和API网关,传统网关类似于Nginx,可以通过配置即可使用,如果要用到比较复杂的场景中,就需要引入OpenResty(Nginx+Lua), 而API网关比传统网关功能更强大更便利,Spring Cloud Netflix Zuul就是一种API网关,它以Spring Boot的形式封装了Netflix Zuul,采用Java实现网关的各种功能
新建一个模块,名为Zuul,并引入如下依赖
<!-- Spring Boot Web Starter:提供Web应用程序的基础支持,包括Spring MVC和TomcatWeb服务器 --><dependency><groupId>org.springframework.boot</groupId><artifactId>spring-boot-starter-web</artifactId></dependency><!-- Spring Cloud Netflix Eureka Client:使应用程序能够作为Eureka服务注册表的客户端进行注册和发现 --><dependency><groupId>org.springframework.cloud</groupId><artifactId>spring-cloud-starter-netflix-eureka-client</artifactId></dependency><!-- Spring Cloud Netflix Zuul:提供边缘服务和路由功能,作为进入微服务架构的统一入口 --><dependency><groupId>org.springframework.cloud</groupId><artifactId>spring-cloud-starter-netflix-zuul</artifactId></dependency>
然后改造启动类,代码如下
/*** ZuulApplication 类作为Spring Boot应用程序的入口点。* 启用了Zuul网关代理功能,用于路由和过滤微服务请求。*/
package com.scd.zuul;import org.springframework.boot.SpringApplication;
import org.springframework.boot.autoconfigure.SpringBootApplication;
import org.springframework.cloud.netflix.zuul.EnableZuulProxy;@SpringBootApplication(scanBasePackages = "com.scd.zuul")
@EnableZuulProxy
public class ZuulApplication {/*** 程序的入口方法,使用SpringApplication.run()启动Spring Boot应用。* @param args 命令行参数*/public static void main(String[] args) {SpringApplication.run(ZuulApplication.class, args);}
}
添加@EnableZuulProxy来驱动Zuul工作,然后修改Zuul模块的配置文件,如下所示
# 定义Spring应用名称,它是一个服务的名称,一个服务可拥有多个实例
spring:application:name: zuul# 向端口为1001和1002的Eureka服务治理中心注册
eureka:client:serviceUrl:defaultZone: http://localhost:1001/eureka, http://localhost:1002/eureka# Zuul的配置
zuul:# 路由配置routes:# 买家服务customer-service:# 请求拦截路径配置(使用ANT风格)path: /customer-api/**# 通过一个URL配置url: http://localhost:3001/# 商品服务配置goods-service:# 请求拦截路径配置(使用ANT风格)path: /goods-api/**service-id: goods
zuul.routes.xxx配置项是配置路由的,也就是请求地址的转发规则,它所要配置的是一个Map<String, ZuulProperties.ZuulRoute>对象,所以必然有key和对应的内容,配置里存在两个key,一个是customer-service另一个是goods-service,而path配置的是请求所拦截的路径,而url便是转发路径,也就是说假如启动Zuul的端口是5001,然后访问的地址是http://localhost:5001/goods-api/goods/customer/name/1时,它将会路由转发到http://localhost:3001/goods/customer/name/1上这样便可访问到真实的服务实例,但这样做没办法实现负载均衡,因为除了3001端口还有3002端口的实例,为了解决这个问题,可以参考zuul.routes.goods-service的配置,path依旧是请求的拦截路径,而service-id将服务名配置为goods,指向商品服务,此时zuul会自动实现负载均衡
自动Zuul模块并访问地址http://localhost:5001/customer-api/customer/name/1和http://localhost:5001/goods-api/goods/customer/name/1,会得到如下页面
网关过滤器
Zuul作为Netflix开源的微服务网关,其核心功能之一就是通过过滤器(Filter)来实现请求的预处理和后处理。Zuul过滤器主要分为以下几种类型,每种类型在请求处理的不同阶段执行特定的任务:
- Pre(前置)过滤器:在请求被路由到目标服务之前执行,用于身份验证、请求校验、日志记录、添加或修改请求头等操作。
- Routing(路由)过滤器:负责将请求路由到正确的后端服务,这个过程包括构建请求、发送请求到后端服务,并接收响应。
- Post(后置)过滤器:在收到后端服务的响应后执行,但在响应被发送回客户端之前,可用于响应数据的处理、修改响应头、日志记录、收集统计信息等
- Error(错误)过滤器:当在处理请求过程中发生任何错误时执行,用于捕获异常、进行错误处理、记录日志或向客户端返回友好的错误信息。
Route(路由相关)过滤器:虽然有时会单独提及,但其实可以看作是Routing和Post两类过滤器的综合,专注于处理与路由直接相关的逻辑,包括成功路由后的处理及路由失败的错误处理。
每个过滤器都具有明确的执行顺序,由其filterType和filterOrder属性共同决定。开发者可以根据需求自定义过滤器,灵活地扩展Zuul的功能
Zuul内部有很多过滤器,它们之间形成了责任链
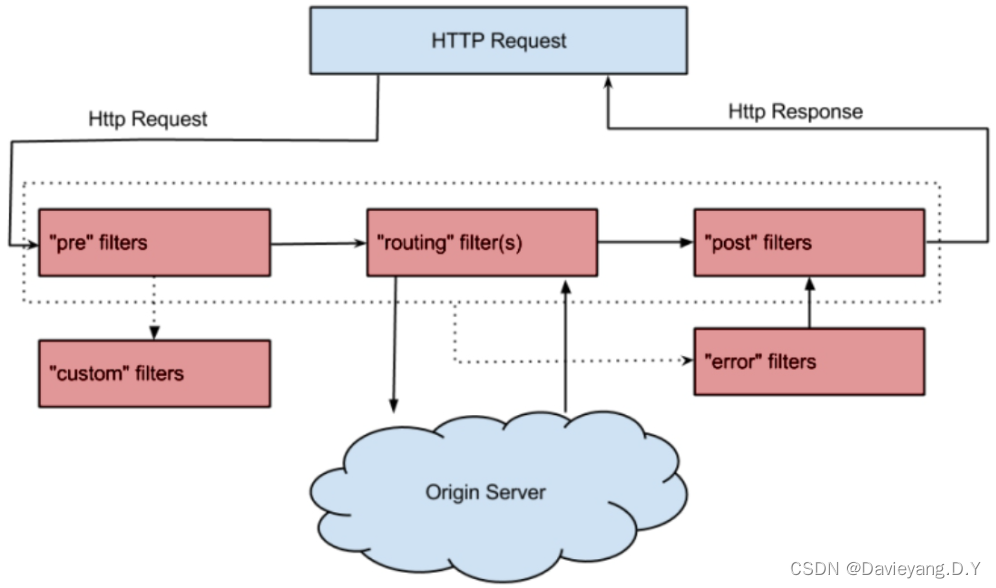
其中pre过滤器在路由到源服务器之前进行,route过滤器路由到源服务器执行,post过滤器在源服务器之后执行,error过滤器在路由到源服务器错误时执行,其中error是post过滤器的一种
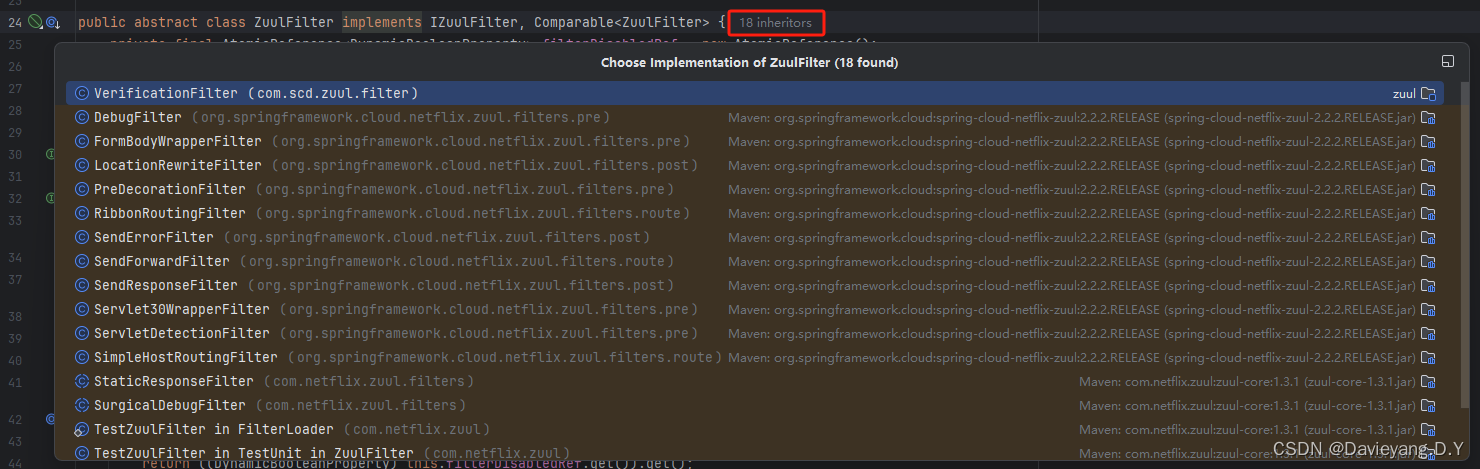
在Zuul中,提供了抽象类ZuulFilter来定义过滤器,这个抽象类有几个重要的方法:
- filterType:过滤器类型,可以是pre、route、post、error等
- filterOrder:返回一个整数,代表过滤器在责任链中的顺序
- shouldFilter:是否启用过滤器,可以根据条件确定过滤器是否拦截请求
- run:过滤器的具体逻辑,来自于
IZuulFilter接口它是过滤器的核心方法,返回一个Object对象,如果返回null则继续责任链后续正常逻辑
网关过滤器实例
通过继承该抽象类实现自定义过滤器,例如验证码机制,假如在redis中存了一个这样的验证码code1:123456789,为了使用redis,需要在Zuul模块引入Redis相关依赖并在配置文件中配置Redis,如下所示
<!-- 加入Spring Boot的Redis依赖 --><dependency><groupId>org.springframework.boot</groupId><artifactId>spring-boot-starter-data-redis</artifactId><!--排除同步Redis客户端Lettuce--><exclusions><exclusion><groupId>io.lettuce</groupId><artifactId>lettuce-core</artifactId></exclusion></exclusions></dependency><!--加入Redis客户端Jedis--><dependency><groupId>redis.clients</groupId><artifactId>jedis</artifactId></dependency>
# 定义Spring应用名称,它是一个服务的名称,一个服务可拥有多个实例
spring:application:name: zuuldata:redis:host: 192.168.3.115password: 123456789jedis:pool:max-active: 20max-wait: 2000min-idle: 5max-idle: 15# 向端口为1001和1002的Eureka服务治理中心注册
eureka:client:serviceUrl:defaultZone: http://localhost:1001/eureka, http://localhost:1002/eureka# Zuul的配置
zuul:# 路由配置routes:# 买家服务customer-service:# 请求拦截路径配置(使用ANT风格)path: /customer-api/**# 通过一个URL配置url: http://localhost:3001/# 商品服务配置goods-service:# 请求拦截路径配置(使用ANT风格)path: /goods-api/**service-id: goods
然后过滤器检测验证码代码如下
package com.scd.zuul.filter;import com.fasterxml.jackson.core.JsonProcessingException;
import com.fasterxml.jackson.databind.ObjectMapper;
import com.netflix.zuul.ZuulFilter;
import com.netflix.zuul.context.RequestContext;
import com.netflix.zuul.exception.ZuulException;
import org.apache.http.HttpStatus;
import org.springframework.beans.factory.annotation.Autowired;
import org.springframework.cloud.netflix.zuul.filters.support.FilterConstants;
import org.springframework.data.redis.core.StringRedisTemplate;
import org.springframework.http.MediaType;
import org.springframework.stereotype.Component;
import org.springframework.util.StringUtils;import java.util.HashMap;
import java.util.Map;// 装配过滤器,Zuul会自动加入到责任链中
@Component
public class VerificationFilter extends ZuulFilter {// 注入StringRedisTemplate@Autowiredprivate StringRedisTemplate redisTemplate = null;//验证码键和值的参数名称private final static String  VERIFICATION_KEY_PARAM_NAME = "validateKey";private final static String  VERIFICATION_CODE_PARAM_NAME = "validateCode";/*** 获取过滤器类型。* 本方法重写了父类方法,旨在明确指定当前过滤器的类型为前置过滤器。* 返回的字符串值对应于过滤器常量中的PRE_TYPE,表示该过滤器将在处理链的开始阶段被应用。* @return 过滤器类型,返回FilterConstants.PRE_TYPE表示前置过滤器。*/@Overridepublic String filterType() {return FilterConstants.PRE_TYPE;}/*** 设置过滤器的执行顺序。* 此方法定义了过滤器在过滤器链中的优先执行顺序。返回值越小,过滤器将越早被执行。* 通过返回值设置为FilterConstants.PRE_DECORATION_FILTER_ORDER减1,* 确保当前过滤器在所有预装饰过滤器之前执行,因为它的顺序比预装饰过滤器的标准顺序还要靠前。* @return 返回一个整数,表示此过滤器的执行顺序。*/@Overridepublic int filterOrder() {return FilterConstants.PRE_DECORATION_FILTER_ORDER - 1;}/*** 判断是否应该进行过滤。* 本方法用于决定是否对当前请求进行验证码验证。只有在请求参数中同时存在验证码密钥和验证码代码时,* 才会进行验证流程,否则忽略验证。* @return boolean 返回true表示需要进行过滤(即进行验证码验证),返回false表示不需要。*/@Overridepublic boolean shouldFilter() {// 获取验证码密钥参数String key = getParam(VERIFICATION_KEY_PARAM_NAME);// 获取验证码代码参数String code = getParam(VERIFICATION_CODE_PARAM_NAME);// 判断验证码密钥和验证码代码是否都不为空,不为空则表示需要进行过滤return !StringUtils.isEmpty(key) && !StringUtils.isEmpty(code);}/*** 根据参数名从请求中获取参数值。* 优先从请求参数中获取值,如果参数不存在,则尝试从请求头中获取。* 这样设计是为了确保可以从多种途径获取必要的请求数据,以提高代码的灵活性和鲁棒性。* @param name 参数名* @return 参数值。如果参数既不存在于请求参数中也不存在于请求头中,则返回空字符串。*/private String getParam(String name) {// 获取当前请求的上下文对象,用于后续从中获取请求参数或头信息RequestContext cxt = RequestContext.getCurrentContext();// 尝试从请求参数中获取指定名称的参数值String param = cxt.getRequest().getParameter(name);// 如果请求参数中不存在该参数,则尝试从请求头中获取if (StringUtils.isEmpty(param)) {param = cxt.getRequest().getHeader(name);}// 返回获取到的参数值,如果既未从参数中获取到也未从头信息中获取到,则返回空字符串return param;}/*** 覆盖父类的run方法,执行验证码验证逻辑。* 如果验证码有效,过滤器放行请求;否则,设置错误响应体并放行。* @return 如果验证码验证通过,返回null表示放行;无论验证是否通过,实际都会返回null。* @throws ZuulException 当发生与验证码验证相关的异常时抛出。*/@Overridepublic Object run() throws ZuulException {String key = getParam(VERIFICATION_KEY_PARAM_NAME); // 获取验证码键String code = getParam(VERIFICATION_CODE_PARAM_NAME); // 获取请求中的验证码String redisCode = redisTemplate.opsForValue().get(key); // 从Redis获取存储的验证码/*** 验证请求中的验证码与Redis中的验证码是否一致。* 如果一致,执行后续逻辑;如果不一致,跳过并执行错误处理。*/if (code.equals(redisCode)) {// 验证码匹配,放行请求return null;}// 验证码不匹配或验证失败,执行错误处理setErrorBody(); // 设置错误响应体return null; // 返回null,表示请求已被处理}private void setErrorBody() {// 获取请求内容对象RequestContext ctx = RequestContext.getCurrentContext();// 不再放行路由ctx.setSendZuulResponse(false);// 设置响应码为401-未签名ctx.setResponseStatusCode(HttpStatus.SC_UNAUTHORIZED);// 设置响应类型为JSON类型ctx.getResponse().setContentType(MediaType.APPLICATION_JSON_VALUE);// 设置编码类型ctx.getResponse().setCharacterEncoding("UTF-8");// 响应结果Map<String, String> result = new HashMap<>();result.put("success", "false");result.put("message", "验证码错误,请检查您的输入");// 将result转换为JSON媒体类型ObjectMapper mapper = new ObjectMapper();String body = null;try {// 转变为JSON字符串body = mapper.writeValueAsString(result);} catch (JsonProcessingException e) {e.printStackTrace();}// 设置响应体,准备响应请求ctx.setResponseBody(body);}
}
过滤器继承了抽象类ZuulFilter, 且覆盖率抽象类的方法,
@Component表示启动程序之后,将其装配到Spring IoC容器中,这样Zuul会自动识别它为过滤器,并且装载到过滤器的责任链中,其他内容注释很清楚
然后重启Zuul模块,并访问连接http://localhost:5001/customer-api/customer/name/1?validateKey=code1&validateCode=123456789
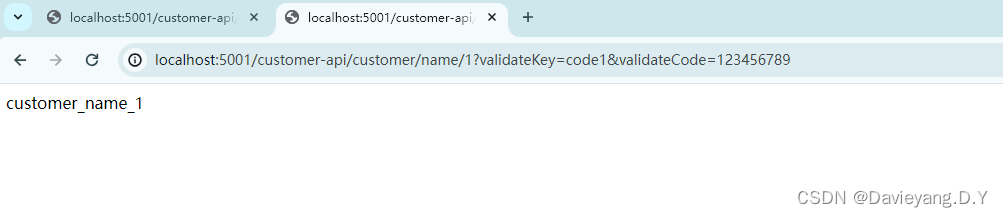
http://localhost:5001/customer-api/customer/name/1?validateKey=code1&validateCode=12345

便能看到过滤器效果
网关Gateway
Netflix的Zuul一直不能很好地支持响应式编程,后来Spring Cloud推出自己的网关Gateway,Gateway和传统的组件不同,它依赖于Spring Boot和Spring WebFlux采用的是响应式编程(Reactive Programming)
新建一个Gateway模块,并引入如下依赖
<!-- 引入Gateway --><dependency><groupId>org.springframework.cloud</groupId><artifactId>spring-cloud-starter-gateway</artifactId></dependency><!-- 引入服务发现 --><dependency><groupId>org.springframework.cloud</groupId><artifactId>spring-cloud-starter-netflix-eureka-client</artifactId></dependency>
需要注意的几点:
- Gateway用的是Spring WebFlux技术,它和
spring-boot-starter-web的会产生冲突,因此只能引入其一 - Gateway只支持Netty容器,引入Tomcat或者Jetty等同期,在运行期间会引发异常
- 如果在新建模块或者项目的时候选择了war模式,则需要删除
spring-boot-starter-web和IDE生成的ServletInitializer.java并将打包形式改为jar,否则会引发错误
通过代码配置路由
然后修改启动类,添加路由规则,代码如下
package com.scd.gateway;import org.springframework.boot.SpringApplication;
import org.springframework.boot.autoconfigure.SpringBootApplication;
import org.springframework.cloud.gateway.route.RouteLocator;
import org.springframework.cloud.gateway.route.builder.RouteLocatorBuilder;
import org.springframework.context.annotation.Bean;@SpringBootApplication
public class GatewayApplication {public static void main(String[] args) {SpringApplication.run(GatewayApplication.class, args);}/*** 创建路由规则* @param builder -- 路由构造器* @return 路由规则*/@Beanpublic RouteLocator customRouteLocator(RouteLocatorBuilder builder) {return builder.routes()// 配置路由// route方法两个参数:第一个是id;第二个断言.route("customer", r -> r.path("/customer-api/**")// 过滤器,删除一个层级再匹配地址.filters(f->f.stripPrefix(1))// 转发到具体的URI.uri("http://localhost:3001"))// 基于服务发现的路由.route("goods", r->r.path("/goods-api/**")// 过滤器,删除一个层级再匹配地址.filters(f->f.stripPrefix(1)// 约定以“lb://{service-id}”为格式.uri("lb://goods"))// 创建.build();}
}
customRouteLocator方法回返回一个RouteLocator对象,这是Gateway的路由对象,将其装配到Spring IoC容器后,Gateway就会将其加载并作为路由规则customRouteLocator方法中有两个路由规则,都是以.route()方法开头,每个route()方法代表一个路由,它有两个参数一个是字符串参数,作为路由id,另一个是断言,代码中是一个lambda表达式,这里的断言作用是路由匹配,判断哪些请求和这个路由匹配,path方法表示采用路径匹配,当出现了与ANT风格表达式"/customer-api/**"匹配的路径时,就会启用这个路由;接着是filters方法,它代表过滤器,也就是在Gateway执行路由之前,或者之后可以加入一些逻辑,这里的stripPrefix方法表示删除匹配地址中的一个层级,如果配置的匹配路径是/customer-api/**,那么请求地址是http://localhost:6001/customer-api/customer/name/1,通过Gateway的路由源服务器地址就是http://localhost:3001/customer-api/customer/name/1显然这是不能匹配到源服务器里的,而这里的stripPrefix方法代表删除一个层级,就是删除了路径中的/customer-api,这样路由到源服务器的地址就是http://localhost:3001/customer/name/1了,这才是能找到服务的地址;uri方法配置的则是源服务器的路径,是真实的源服务器地址customRouteLocator方法中第二个route方法和第一个不同的是uri方法配置的内容,这里配置的是lb://goods,在Gateway中约定格式lb://{service-id}为服务发现的路由,通过它就可以将请求匹配到商品(Goods)服务的各个可用实例,从而实现负载均衡,在注册服务治理中心的环境中,经常会用到服务发现的路由方式
通过配置文件配置路由
除了这种编码路由的方式,Gateway还提供了配置的方法,在Gateway项目的application.yml文件写入如下配置,和上面的代码等价
# Spring应用(微服务)名称
spring:application:name: gatewaycloud:gateway:# 开始配置路径routes:# 路径匹配- id: customer# 转发URIuri: http://localhost:3001# 断言配置predicates:- Path=/customer-api/**# 过滤器配置filters:- StripPrefix=1# 路径匹配- id: goods# 转发URIuri: lb://goods# 断言配置predicates:- Path=/goods-api/**# 过滤器配置filters:- StripPrefix=1# 向端口为1001和1002的Eureka服务治理中心注册
eureka:client:serviceUrl:defaultZone: http://localhost:1001/eureka, http://localhost:1002/eureka# 配置启动端口
server:port: 6001logging:level:root: info
路由断言工厂
Gateway中几个比较重要的概念:
- 断言(Predicate):断言用于检查请求是否与路由匹配,只有在相互匹配时才会使用路由
- 过滤器(Filter):通过过滤器,我们可以在执行路由前后加入自己的逻辑,Gateway存在全局过滤器和局部过滤器
- 路由(Route):路由是一个最基本的组件,它由ID、目标URI、断言集合和过滤器集合等组成,当断言判断为true时,才会匹配到路由,一个路由可以存在多个断言也可以存在多个过滤器
在Gateway的源码中已经提供了很多过滤器和断言供我们使用,例如之前代码中的path和stripPrefix都是Gateway提供的断言和过滤器.
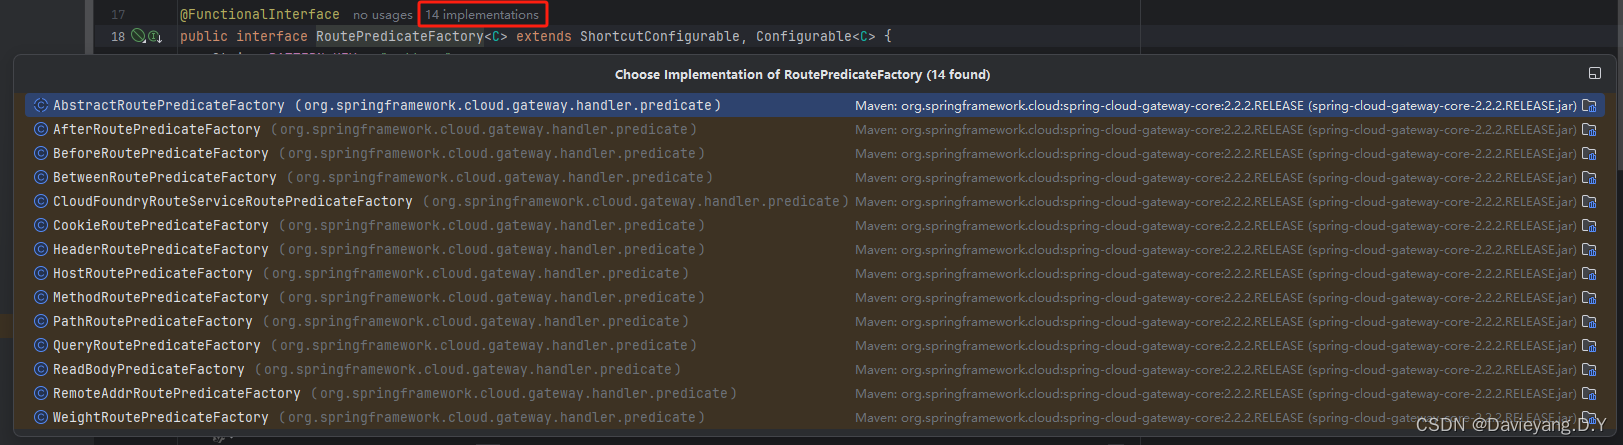
Gateway的断言是通过它的路由断言工厂提供的,这些断言工厂都实现了接口RoutePredicateFactory<C>,源码如下所示
package org.springframework.cloud.gateway.handler.predicate;import java.util.function.Consumer;
import java.util.function.Predicate;
import org.springframework.cloud.gateway.handler.AsyncPredicate;
import org.springframework.cloud.gateway.support.Configurable;
import org.springframework.cloud.gateway.support.NameUtils;
import org.springframework.cloud.gateway.support.ServerWebExchangeUtils;
import org.springframework.cloud.gateway.support.ShortcutConfigurable;
import org.springframework.web.server.ServerWebExchange;/*** 路由断言工厂接口,用于创建匹配网关中路由的断言。* 它扩展了ShortcutConfigurable与Configurable接口,支持配置快捷方式及带有泛型C的可配置功能。* @param <C> 配置类型,用于断言的特定配置。*/
@FunctionalInterface
public interface RoutePredicateFactory<C> extends ShortcutConfigurable, Configurable<C> {/*** 断言配置中的模式键。*/String PATTERN_KEY = "pattern";/*** 应用给定的配置来创建一个断言。* @param consumer 配置断言语句的消费者。* @return 基于给定配置匹配路由的断言。*/default Predicate<ServerWebExchange> apply(Consumer<C> consumer) {C config = this.newConfig();consumer.accept(config);this.beforeApply(config);return this.apply(config);}/*** 应用给定的配置来创建一个异步断言。* @param consumer 配置异步断言语句的消费者。* @return 基于给定配置异步匹配路由的AsyncPredicate。*/default AsyncPredicate<ServerWebExchange> applyAsync(Consumer<C> consumer) {C config = this.newConfig();consumer.accept(config);this.beforeApply(config);return this.applyAsync(config);}/*** 获取配置类的类型。* @return 配置类的类型。* @throws UnsupportedOperationException 如果此方法未实现。*/default Class<C> getConfigClass() {throw new UnsupportedOperationException("getConfigClass() 方法未实现");}/*** 创建配置的新实例。* @return 配置的新实例。* @throws UnsupportedOperationException 如果此方法未实现。*/default C newConfig() {throw new UnsupportedOperationException("newConfig() 方法未实现");}/*** 在应用配置前调用的钩子方法。* @param config 将要应用的配置。*/default void beforeApply(C config) {}/*** 根据给定的配置创建一个断言。* @param config 用于断言的配置。* @return 基于给定配置匹配路由的断言。*/Predicate<ServerWebExchange> apply(C config);/*** 根据给定的配置创建一个异步断言。* @param config 用于AsyncPredicate的配置。* @return 基于给定配置异步匹配路由的AsyncPredicate。*/default AsyncPredicate<ServerWebExchange> applyAsync(C config) {return ServerWebExchangeUtils.toAsyncPredicate(this.apply(config));}/*** 返回断言的名称,该名称已规范化,适用于路由中使用。* @return 断言的名称。*/default String name() {return NameUtils.normalizeRoutePredicateName(this.getClass());}
}
它有很多实现类,通过这些实现类实现了多种断言
这些类的命名非常关键,其规则都是XXXRoutePredicateFactory,这个规则很重要,例如之前的用到的path方法,就意味着它是使用PathRoutePredicateFactory生成的断言,在配置文件中的- Path=/customer-api/**也是使用PathRoutePredicateFactory生成的断言
如果想使用Query断言,可以这样改造代码,如下所示
package com.scd.gateway;import org.springframework.boot.SpringApplication;
import org.springframework.boot.autoconfigure.SpringBootApplication;
import org.springframework.cloud.gateway.route.RouteLocator;
import org.springframework.cloud.gateway.route.builder.RouteLocatorBuilder;
import org.springframework.context.annotation.Bean;@SpringBootApplication
public class GatewayApplication {public static void main(String[] args) {SpringApplication.run(GatewayApplication.class, args);}/*** 创建路由规则* @param builder -- 路由构造器* @return 路由规则*/@Beanpublic RouteLocator customRouteLocator(RouteLocatorBuilder builder) {return builder.routes()// 配置路由// route方法两个参数:第一个是id;第二个断言.route("customer", r -> r.path("/customer-api/**")// 需要存在请求参数“id” ,才匹配路由.and().query("id")// 需要存在请求参数“id” ,且是数字才匹配路由.and().query("id", "^[0-9]*$")// 过滤器,删除一个层级再匹配地址.filters(f->f.stripPrefix(1))// 转发到具体的URI.uri("http://localhost:3001"))// 基于服务发现的路由.route("goods", r->r.path("/goods-api/**")// 过滤器,删除一个层级再匹配地址.filters(f->f.stripPrefix(1)// 添加响应头.addResponseHeader("response-header", "response-value"))// 约定以“lb://{service-id}”为格式.uri("lb://goods"))// 创建.build();}
}
通过query()添加了一个参数断言,判断存在参数id才会匹配路由,而第二个query()又判断了存在参数id且是一个数字才会匹配路由,在配置文件中也可以做同样的事情
# Spring应用(微服务)名称
spring:application:name: gatewaycloud:gateway:# 开始配置路径routes:# 路径匹配- id: customer# 转发URIuri: http://localhost:3001# 断言配置predicates:- Path=/customer-api/**- Query=id- Query=id, ^[0-9]*$# 过滤器配置filters:- StripPrefix=1# 路径匹配- id: goods# 转发URIuri: lb://goods# 断言配置predicates:- Path=/goods-api/**# 过滤器配置filters:- StripPrefix=1# 向端口为1001和1002的Eureka服务治理中心注册
eureka:client:serviceUrl:defaultZone: http://localhost:1001/eureka, http://localhost:1002/eureka# 配置启动端口
server:port: 6001logging:level:root: info
过滤器工厂
过滤器允许在路由前后执行自己的逻辑,Gateway提供了许多过滤器工厂来产生过滤器,这些过滤器工厂都实现了接口GatewayFilterFactory<C>,源码如下
package org.springframework.cloud.gateway.filter.factory;import java.util.function.Consumer;
import org.springframework.cloud.gateway.filter.GatewayFilter;
import org.springframework.cloud.gateway.support.Configurable;
import org.springframework.cloud.gateway.support.HasRouteId;
import org.springframework.cloud.gateway.support.NameUtils;
import org.springframework.cloud.gateway.support.ShortcutConfigurable;
import org.springframework.http.server.reactive.ServerHttpRequest;/*** GatewayFilter工厂接口,用于创建GatewayFilter实例。* 提供了配置GatewayFilter的灵活性,支持通过函数式接口进行配置。** @param <C> 配置类型的参数化类型。*/
@FunctionalInterface
public interface GatewayFilterFactory<C> extends ShortcutConfigurable, Configurable<C> {/*** 配置名称的键。*/String NAME_KEY = "name";/*** 配置值的键。*/String VALUE_KEY = "value";/*** 根据给定的routeId和配置消费者创建并应用GatewayFilter。** @param routeId 路由ID,用于配置GatewayFilter。* @param consumer 配置消费者,用于定制GatewayFilter的配置。* @return 应用了配置的GatewayFilter实例。*/default GatewayFilter apply(String routeId, Consumer<C> consumer) {C config = this.newConfig();consumer.accept(config);return this.apply(routeId, config);}/*** 创建并应用GatewayFilter,使用配置消费者进行配置。** @param consumer 配置消费者,用于定制GatewayFilter的配置。* @return 应用了配置的GatewayFilter实例。*/default GatewayFilter apply(Consumer<C> consumer) {C config = this.newConfig();consumer.accept(config);return this.apply(config);}/*** 获取配置类的Class对象。* 默认实现抛出UnsupportedOperationException异常,表明该方法未实现。** @return 配置类的Class对象。*/default Class<C> getConfigClass() {throw new UnsupportedOperationException("getConfigClass() not implemented");}/*** 创建一个新的配置实例。* 默认实现抛出UnsupportedOperationException异常,表明该方法未实现。** @return 配置的实例。*/default C newConfig() {throw new UnsupportedOperationException("newConfig() not implemented");}/*** 根据给定的配置创建并应用GatewayFilter。** @param config 配置实例,用于定制GatewayFilter。* @return 应用了配置的GatewayFilter实例。*/GatewayFilter apply(C config);/*** 根据当前工厂类的名称生成并返回标准化的过滤器名称。** @return 标准化的过滤器名称。*/default String name() {return NameUtils.normalizeFilterFactoryName(this.getClass());}/*** 修改ServerHttpRequest的构建器。* 默认实现抛出UnsupportedOperationException异常,表明该方法未实现。** @param request 原始请求。* @return 修改后的请求构建器。* @deprecated 该方法已过时。*/@Deprecateddefault ServerHttpRequest.Builder mutate(ServerHttpRequest request) {return request.mutate();}
}
这些过滤器工厂类都继承了接口,同样的也需要特别注意这些工厂的命名规则XXXGatewayFilterFactory,以AddResponseHeaderGatewayFilterFactory为例,修改之前的代码如下
package com.scd.gateway;import org.springframework.boot.SpringApplication;
import org.springframework.boot.autoconfigure.SpringBootApplication;
import org.springframework.cloud.gateway.route.RouteLocator;
import org.springframework.cloud.gateway.route.builder.RouteLocatorBuilder;
import org.springframework.context.annotation.Bean;@SpringBootApplication
public class GatewayApplication {public static void main(String[] args) {SpringApplication.run(GatewayApplication.class, args);}/*** 创建路由规则* @param builder -- 路由构造器* @return 路由规则*/@Beanpublic RouteLocator customRouteLocator(RouteLocatorBuilder builder) {return builder.routes()// 配置路由// route方法两个参数:第一个是id;第二个断言.route("customer", r -> r.path("/customer-api/**")// 需要存在请求参数“id” ,才匹配路由.and().query("id")// 需要存在请求参数“id” ,且是数字才匹配路由.and().query("id", "^[0-9]*$")// 过滤器,删除一个层级再匹配地址.filters(f->f.stripPrefix(1))// 转发到具体的URI.uri("http://localhost:3001"))// 基于服务发现的路由.route("goods", r->r.path("/goods-api/**")// 过滤器,删除一个层级再匹配地址.filters(f->f.stripPrefix(1)// 添加响应头.addResponseHeader("response-header", "response-value"))// 约定以“lb://{service-id}”为格式.uri("lb://goods"))// 创建.build();}}
也可以通过配置文件实现,如下所示
# Spring应用(微服务)名称
spring:application:name: gatewaycloud:gateway:# 开始配置路径routes:# 路径匹配- id: customer# 转发URIuri: http://localhost:3001# 断言配置predicates:- Path=/customer-api/**- Query=id- Query=id, ^[0-9]*$# 过滤器配置filters:- StripPrefix=1# 路径匹配- id: goods# 转发URIuri: lb://goods# 断言配置predicates:- Path=/goods-api/**# 过滤器配置filters:- AddResponseHeader=response-header, response-value- StripPrefix=1# 向端口为1001和1002的Eureka服务治理中心注册
eureka:client:serviceUrl:defaultZone: http://localhost:1001/eureka, http://localhost:1002/eureka# 配置启动端口
server:port: 6001logging:level:root: info
主要用来给客户端响应的时候添加一个响应头
自定义过滤器
在Gateway中,过滤器分为全局过滤器和局部过滤器,全局过滤器对所有路由有效,局部过滤器对指定的路由有效,局部过滤器只需要实现GateFilter接口即可,而全局过滤器需要实现GlobalFilter接口, 并将其装配到Spring IoC容器中
改造一下之前的customRouteLocator方法,加入自定义局部过滤器,如下所示
package com.scd.gateway;import org.springframework.boot.SpringApplication;
import org.springframework.boot.autoconfigure.SpringBootApplication;
import org.springframework.cloud.gateway.filter.GatewayFilter;
import org.springframework.cloud.gateway.filter.GlobalFilter;
import org.springframework.cloud.gateway.route.RouteLocator;
import org.springframework.cloud.gateway.route.builder.RouteLocatorBuilder;
import org.springframework.context.annotation.Bean;
import org.springframework.http.MediaType;
import org.springframework.http.server.reactive.ServerHttpRequest;
import org.springframework.http.server.reactive.ServerHttpResponse;
import reactor.core.publisher.Mono;@SpringBootApplication
public class GatewayApplication {public static void main(String[] args) {SpringApplication.run(GatewayApplication.class, args);}/*** 创建路由规则* @param builder -- 路由构造器* @return 路由规则*/@Beanpublic RouteLocator customRouteLocator(RouteLocatorBuilder builder) {return builder.routes()// 配置路由// route方法两个参数:第一个是id;第二个断言.route("customer", r -> r.path("/customer-api/**")// 需要存在请求参数“id” ,才匹配路由.and().query("id")// 需要存在请求参数“id” ,且是数字才匹配路由.and().query("id", "^[0-9]*$")// 过滤器,删除一个层级再匹配地址.filters(f->f.stripPrefix(1))// 转发到具体的URI.uri("http://localhost:3001"))// 基于服务发现的路由.route("goods", r->r.path("/goods-api/**")// 过滤器,删除一个层级再匹配地址.filters(f->f.stripPrefix(1).filter(myGatewayFilter()))// 约定以“lb://{service-id}”为格式.uri("lb://goods"))// 创建.build();}// 开发局部过滤器private GatewayFilter myGatewayFilter() {return (exchange, chain) -> {System.out.println("我是局部过滤器逻辑");// 获取请求对象ServerHttpRequest request = exchange.getRequest();// 增加请求头信息request = request.mutate().header("request-header", "my-request-header").build();/**错误增加请求头的代码,因为request.getHeaders()返回的是只读请求头,不可修改*/// request.getHeaders().add("header", "myheader");// 获取请求参数String id = request.getQueryParams().getFirst("id");// 调用filter方法,让过滤器责任链向下继续执行Mono<Void> mono = chain.filter(exchange);// 获取应答对象ServerHttpResponse response = exchange.getResponse();// 响应类型为JSONresponse.getHeaders().setContentType(MediaType.APPLICATION_JSON);// 添加响应头response.getHeaders().add("response-header", "my-response-header");return mono;};}
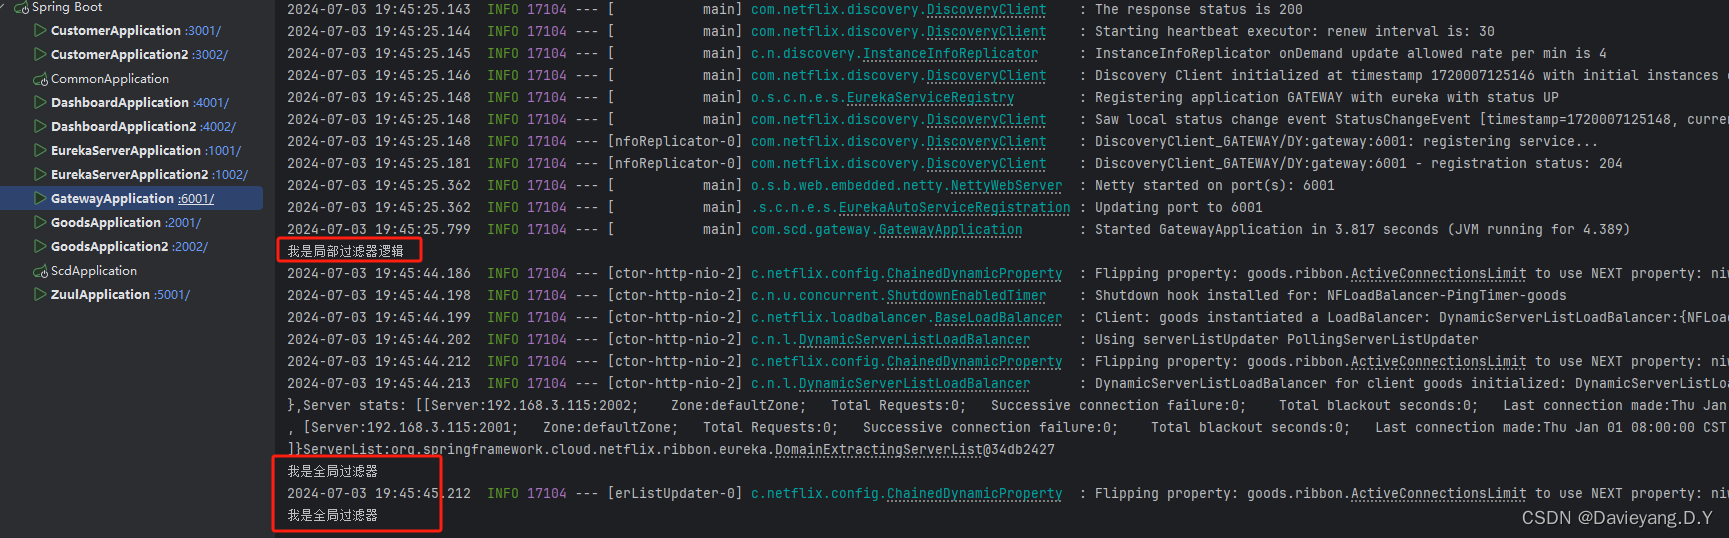
}
.filter(myGatewayFilter())):filter方法调用了自定义的myGatewayFilter()局部过滤器方法返回的过滤器,通过这样给路由添加过滤器- 在
myGatewayFilter()方法中,使用了正则表达式,创建局部过滤器,它需要实现的方法是Mono<Void> filter(ServerWebExchange exchange, GatewayFilterChain chain);,其中参数exchange是一个请求交互对象,我们可以通过它来获取请求对象(ServerHttpRequest),正如代码中用它设置了请求头并获取了参数;当然也可以通过参数exchange获取应答对象(ServerHttpResponse),正如代码中用它设置了响应类型和响应头;而chain是一个过滤器责任链,通过它的filter方法继续执行下一层次的过滤器 // request.getHeaders().add("header", "myheader");注释掉的这个方法,在运行中会出现问题,request.getHeaders()返回的是一个只读的请求头对象,不可以写入,这个写法设置请求头会抛异常表示不支持该方法
在Gateway中还可以使用全局过滤器,全局过滤器对所有路由有效,使用它非常简单,在启动类中添加如下全局过滤器代码,如下所示
// 定义全局过滤器@Beanpublic GlobalFilter globalFilter() {return (exchange, chain) -> {System.out.println("我是全局过滤器");Mono<Void> mono = chain.filter(exchange);return mono;};}
方法标注了@Bean, 代表会将其返回的全局过滤器(GlobalFilter接口对象)装配到SpringIoC容器中,此时Gateway会自动识别,将其装配到过滤器的责任链中;在globalFilter方法中,通过Lambda表达式创建了GlobalFilter接口对象,其参数和局部过滤器GatewayFilter接口一致
最终启动类如下代码所示
package com.scd.gateway;import org.springframework.boot.SpringApplication;
import org.springframework.boot.autoconfigure.SpringBootApplication;
import org.springframework.cloud.gateway.filter.GatewayFilter;
import org.springframework.cloud.gateway.filter.GlobalFilter;
import org.springframework.cloud.gateway.route.RouteLocator;
import org.springframework.cloud.gateway.route.builder.RouteLocatorBuilder;
import org.springframework.context.annotation.Bean;
import org.springframework.http.MediaType;
import org.springframework.http.server.reactive.ServerHttpRequest;
import org.springframework.http.server.reactive.ServerHttpResponse;
import reactor.core.publisher.Mono;@SpringBootApplication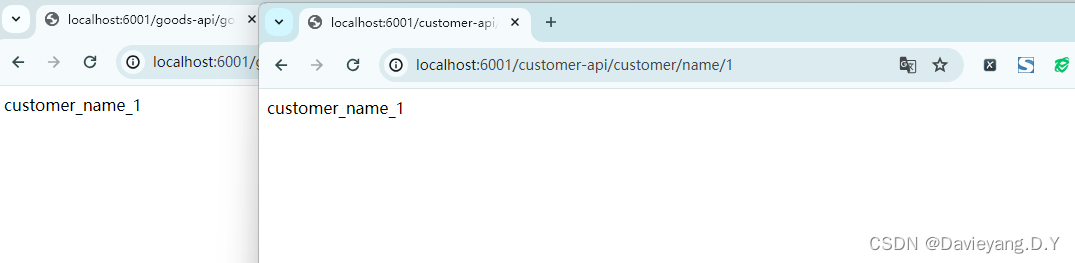
public class GatewayApplication {public static void main(String[] args) {SpringApplication.run(GatewayApplication.class, args);}/*** 创建路由规则* @param builder -- 路由构造器* @return 路由规则*/@Beanpublic RouteLocator customRouteLocator(RouteLocatorBuilder builder) {return builder.routes()// 配置路由// route方法两个参数:第一个是id;第二个断言.route("customer", r -> r.path("/customer-api/**")// 过滤器,删除一个层级再匹配地址.filters(f->f.stripPrefix(1))// 转发到具体的URI.uri("http://localhost:3001"))// 基于服务发现的路由.route("goods", r->r.path("/goods-api/**")// 过滤器,删除一个层级再匹配地址.filters(f->f.stripPrefix(1).filter(myGatewayFilter()))// 约定以“lb://{service-id}”为格式.uri("lb://goods"))// 创建.build();}// 开发局部过滤器private GatewayFilter myGatewayFilter() {return (exchange, chain) -> {System.out.println("我是局部过滤器逻辑");// 获取请求对象ServerHttpRequest request = exchange.getRequest();// 增加请求头信息request = request.mutate().header("request-header", "my-request-header").build();/**错误增加请求头的代码,因为request.getHeaders()返回的是只读请求头,不可修改*/// request.getHeaders().add("header", "myheader");// 获取请求参数String id = request.getQueryParams().getFirst("id");// 调用filter方法,让过滤器责任链向下继续执行Mono<Void> mono = chain.filter(exchange);// 获取应答对象ServerHttpResponse response = exchange.getResponse();//响应类型为JSONresponse.getHeaders().setContentType(MediaType.APPLICATION_JSON);// 添加响应头response.getHeaders().add("response-header", "my-response-header");return mono;};}// 定义全局过滤器@Beanpublic GlobalFilter globalFilter() {return (exchange, chain) -> {System.out.println("我是全局过滤器");Mono<Void> mono = chain.filter(exchange);return mono;};}}用6001端口启动Gateway模块,然后访问http://localhost:6001/customer-api/customer/name/1和http://localhost:6001/goods-api/goods/customer/name/1会得到如下页面
并且在Gateway的控制台能够看到如下输出,说明网关配置生效
断路器Resilience4j
Netflix公司已经不再维护Netflix Hystrix,Spring Cloud推荐使用Resilience4j、Alibaba Sentinel。其中Resilience4j是Spring Cloud推荐的主流熔断器,它是一款参考Netflix Hystrix开发的容错工具,且更为强大和灵活,当前Spring Cloud官方提供了spring-cloud-starter-circuitbreaker-resilience4j包,不过功能还是算强大,Resilience4j自己提供的resilience4j-spring-boot2包更强一些
在Goods模块引入该依赖
<dependency><groupId>io.github.resilience4j</groupId><artifactId>resilience4j-spring-boot2</artifactId><version>1.2.0</version></dependency>
Resilience4j包含了Hystrix的各种功能,还给出了Hystrix的限速器,resilience4j-spring-boot2会依赖resilience4j各种包,如下所示

在Resilience4j内部,使用环形数组,统计和分析请求,环形数组存在两个指针,头(header)和尾(tail),当header = (tail + 1) mod buffer.length 时,说明环形数组已满,此时它会丢弃旧的请求,当header=tail时,说明环形数组为空,可以自由操作
一个环形数组可以放1024个二进制单位,当服务调用成功时Resilience4j就会在对应的位存放0,失败则存放1,因此Resilience4j可以通过这些数据分析服务调用情况
Resilience4j采用注册机的形式,各个组件可以注册在注册机里,比如断路器注册机(CircuitBreakerRegistry)可以注册多个断路器(CircuitBreaker), 同样限速器注册机(RateLimiterRegistry)可以注册多个限速器(RateLimiter)
断路器CircuitBreaker
resilience4j-spring-boot2中可以通过配置使用断路器注册机,如下所示
# 配置Resilience4J的断路器模块
resilience4j:# 配置断路器,配置的断路器会注册到断路器注册机(CircuitBreakerRegistry)中# 配置特定后端服务的断路器设置circuitbreaker:backends:# 针对名为“customer”的后端服务配置断路器customer:# 在断路器打开状态下,需要等待的时间间隔,之后会尝试进入半打开状态 默认为60秒wait-duration-in-open-state: 5s# 当错误率超过此阈值时,断路器将打开# 当请求失败比例达到30%时,打开断路器,默认为50%failure-rate-threshold: 30# 在半打开状态下,允许通过的请求数量,用于判断是否应该关闭断路器# 在半打开状态下,至少尝试5次,才重新关闭断路器permitted-number-of-calls-in-half-open-state: 5
resilience4j.circuitbreaker.*代表配置resilience4j的断路器注册机,resilience4j.circuitbreaker.backends.*配置的是一个注册机下的断路器,它是一个Map<String, InstanceProperties>类型,customer是其中一个键,后面的内容就是InstanceProperties对象的属性
在讲到Hystrix的时候知道它有3中状态,Open、HALF-OPEN、ClOSED,resilience4j也大体适用这三种状态,只是条件不同,具体的看配置中的注释即可
然后编写服务调用类,代码如下
package com.scd.goods.facade;public interface R4jCustomerFacade {public String exception(Long id);public String getCustomerName(Long id);public String timeout(Long id);public String getCustomerNameWithBulkhead(Long id);
}
package com.scd.goods.facade.impl;import com.scd.goods.facade.CustomerOpenFeignFacade;
import com.scd.goods.facade.R4jCustomerFacade;
import io.github.resilience4j.bulkhead.Bulkhead;
import io.github.resilience4j.bulkhead.BulkheadRegistry;
import io.github.resilience4j.circuitbreaker.CircuitBreaker;
import io.github.resilience4j.circuitbreaker.CircuitBreakerRegistry;
import io.github.resilience4j.ratelimiter.RateLimiter;
import io.github.resilience4j.ratelimiter.RateLimiterRegistry;
import io.github.resilience4j.timelimiter.TimeLimiter;
import io.github.resilience4j.timelimiter.TimeLimiterRegistry;
import io.vavr.CheckedFunction0;
import io.vavr.control.Try;
import org.springframework.beans.factory.annotation.Autowired;
import org.springframework.beans.factory.annotation.Qualifier;
import org.springframework.stereotype.Service;import java.util.concurrent.Callable;
import java.util.concurrent.ExecutorService;
import java.util.concurrent.Executors;
import java.util.concurrent.Future;
import java.util.function.Supplier;@Service
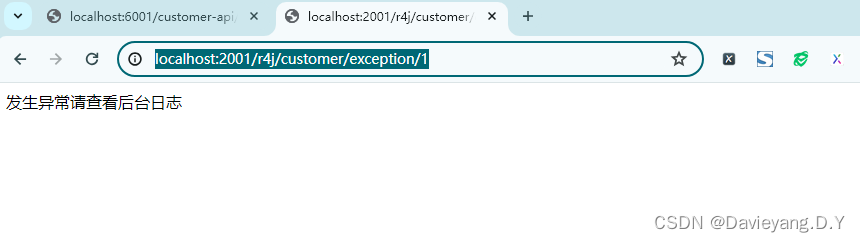
public class R4jCustomerFacadeImpl implements R4jCustomerFacade {// 注入OpenFeign客户端接口@Qualifier("com.scd.goods.facade.CustomerOpenFeignFacade")@Autowiredprivate CustomerOpenFeignFacade customerOpenFeignFacade = null;// 注入断路器注册机@Autowiredprivate CircuitBreakerRegistry circuitBreakerRegistry = null;@Overridepublic String exception(Long id) {// 获取名为“customer”的断路器,在application.yml中配置的CircuitBreaker customerCb = circuitBreakerRegistry.circuitBreaker("customer");// 描述事件,并捆绑断路器,准备发送CheckedFunction0<String> decoratedSupplier =CircuitBreaker.decorateCheckedSupplier(customerCb, () -> {return customerOpenFeignFacade.exception(id);});// 尝试获取结果Try<String> result = Try.of(decoratedSupplier)// 服务降级.recover(ex->{System.out.println("发生异常了,请查看异常信息:" + ex.getMessage());return "发生异常请查看后台日志";});return result.get();}
}为了避免冲突要将配置文件中的feign.hystrix.enabled和feign.circuitbreaker.enabled设置为false,禁用Hystrix,然后编写一个控制器代码如下
package com.scd.goods.controller;import com.scd.goods.facade.R4jCustomerFacade;
import org.springframework.beans.factory.annotation.Autowired;
import org.springframework.web.bind.annotation.GetMapping;
import org.springframework.web.bind.annotation.PathVariable;
import org.springframework.web.bind.annotation.RequestMapping;
import org.springframework.web.bind.annotation.RestController;@RestController
@RequestMapping("/r4j")
public class R4jController {@Autowiredprivate R4jCustomerFacade r4JCustomerFacade = null;@GetMapping("/customer/exception/{id}")public String exception(@PathVariable("id") Long id) {return r4JCustomerFacade.exception(id);}
}
然后重启Goods模块并访问http://localhost:2001/r4j/customer/exception/1,得到如下页面
限速器RateLimiter
限速器在微服务体系中常用,任何服务都有并发上限,从而避免请求高于服务的承受能力,大致路线跟断路器相似,首先在Goods模块的配置文件中添加限速器的注册配置,如下所示
# 配置限速器ratelimiter:instances:# 配置命名为“customer”的限速器customer:# 时间戳内限制通过的请求数,默认为50limit-for-period: 1# 配置时间戳(单位毫秒)。默认值为500 nslimit-refresh-period: 1s# 超时时间timeout-duration: 1s
然后添加调用限速器方法,如下代码所示
package com.scd.goods.facade.impl;import com.scd.goods.facade.CustomerOpenFeignFacade;
import com.scd.goods.facade.R4jCustomerFacade;
import io.github.resilience4j.bulkhead.Bulkhead;
import io.github.resilience4j.bulkhead.BulkheadRegistry;
import io.github.resilience4j.circuitbreaker.CircuitBreaker;
import io.github.resilience4j.circuitbreaker.CircuitBreakerRegistry;
import io.github.resilience4j.ratelimiter.RateLimiter;
import io.github.resilience4j.ratelimiter.RateLimiterRegistry;
import io.github.resilience4j.timelimiter.TimeLimiter;
import io.github.resilience4j.timelimiter.TimeLimiterRegistry;
import io.vavr.CheckedFunction0;
import io.vavr.control.Try;
import org.springframework.beans.factory.annotation.Autowired;
import org.springframework.beans.factory.annotation.Qualifier;
import org.springframework.stereotype.Service;import java.util.concurrent.Callable;
import java.util.concurrent.ExecutorService;
import java.util.concurrent.Executors;
import java.util.concurrent.Future;
import java.util.function.Supplier;@Service
public class R4jCustomerFacadeImpl implements R4jCustomerFacade {// 注入OpenFeign客户端接口@Qualifier("com.scd.goods.facade.CustomerOpenFeignFacade")@Autowiredprivate CustomerOpenFeignFacade customerOpenFeignFacade = null;// 注入断路器注册机@Autowiredprivate CircuitBreakerRegistry circuitBreakerRegistry = null;@Overridepublic String exception(Long id) {// 获取名为“customer”的断路器,在application.yml中配置的CircuitBreaker customerCb = circuitBreakerRegistry.circuitBreaker("customer");// 描述事件,并捆绑断路器,准备发送CheckedFunction0<String> decoratedSupplier =CircuitBreaker.decorateCheckedSupplier(customerCb, () -> {return customerOpenFeignFacade.exception(id);});// 尝试获取结果Try<String> result = Try.of(decoratedSupplier)// 服务降级.recover(ex->{System.out.println("发生异常了,请查看异常信息:" + ex.getMessage());return  "发生异常请查看后台日志";});return result.get();}// 注入限速器注册机@Autowiredprivate RateLimiterRegistry rateLimiterRegistry = null;@Overridepublic String getCustomerName(Long id) {// 获取名称为“customer"的限速器,在配置文件application.yml中配置的RateLimiter customerRl = rateLimiterRegistry.rateLimiter("customer");// 描述事件,并且绑定限速器,准备发送CheckedFunction0<String> decoratedSupplier =RateLimiter.decorateCheckedSupplier(customerRl, () -> {return  customerOpenFeignFacade.getCustomerName(1L);});// 尝试获取结果Try<String> result = Try.of(decoratedSupplier)// 服务降级.recover(ex->{System.out.println("超速了:" + ex.getMessage());return  "超速了,请观察后台日志";});return result.get();}
}
在控制器中添加对应方法,代码如下
package com.scd.goods.controller;import com.scd.goods.facade.R4jCustomerFacade;
import org.springframework.beans.factory.annotation.Autowired;
import org.springframework.web.bind.annotation.GetMapping;
import org.springframework.web.bind.annotation.PathVariable;
import org.springframework.web.bind.annotation.RequestMapping;
import org.springframework.web.bind.annotation.RestController;@RestController
@RequestMapping("/r4j")
public class R4jController {@Autowiredprivate R4jCustomerFacade r4JCustomerFacade = null;@GetMapping("/customer/name/{id}")public String getCustomerName(Long id) {return r4JCustomerFacade.getCustomerName(id);}@GetMapping("/customer/exception/{id}")public String exception(@PathVariable("id") Long id) {return r4JCustomerFacade.exception(id);}}然后重启服务,并访问地址http://localhost:2001/r4j/customer/name/1
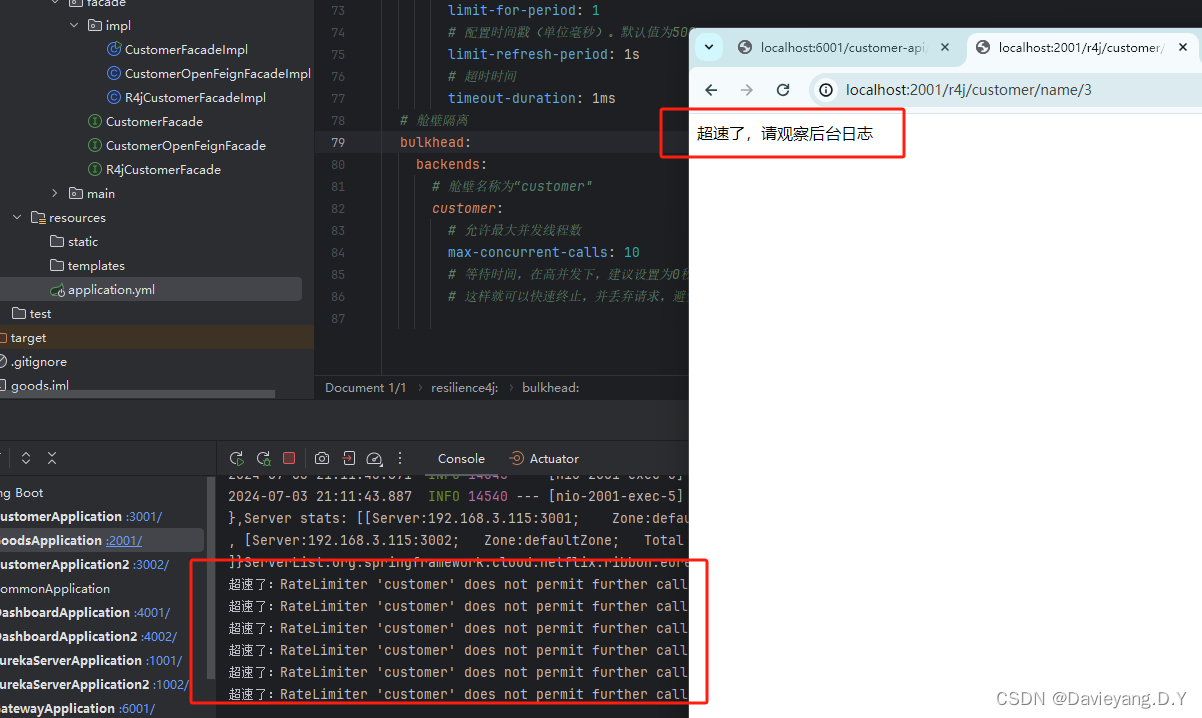
舱壁隔离
和Hystrix一样,Resilience4j也提供了舱壁隔离,只是Resilience4j提供的是基于信号量的方式,舱壁隔离是一些微服务调用可以被隔离到一个线程池或者信号量中,从而防止错误向外蔓延缩小故障范围,同时还可以独立优化线程池或信号量,更具灵活性
首先添加舱壁隔离的配置
# 舱壁隔离bulkhead:backends:# 舱壁名称为“customer"customer:# 允许最大并发线程数max-concurrent-calls: 10# 等待时间,在高并发下,建议设置为0秒,# 这样就可以快速终止,并丢弃请求,避免线程积压,导致系统崩溃max-wait-duration: 0s
和断路器和限速器一样,舱壁隔离也是注册机机制,Spring Boot会创建舱壁注册机并将配置的舱壁注册到注册机内,所以只需要注入舱壁注册机,通过名称获取舱壁即可,添加服务调用类代码如下
// 舱壁注册机@Autowiredprivate BulkheadRegistry bulkheadRegistry = null;@Overridepublic String getCustomerNameWithBulkhead(Long id) {// 获取名为“customer”的舱壁,在application.yml中配置的名称Bulkhead bulkhead = bulkheadRegistry.bulkhead("customer");// 描述事件,且绑定舱壁CheckedFunction0<String> decoratedSupplier= Bulkhead.decorateCheckedSupplier(bulkhead,() -> {return customerOpenFeignFacade.getCustomerName(id);});// 发送请求Try<String> result = Try.of(decoratedSupplier).recover(ex -> { // 降级服务return "线程错误";});return result.get();}
然后在控制器中添加对应的方法,代码如下
package com.scd.goods.controller;import com.scd.goods.facade.R4jCustomerFacade;
import org.springframework.beans.factory.annotation.Autowired;
import org.springframework.web.bind.annotation.GetMapping;
import org.springframework.web.bind.annotation.PathVariable;
import org.springframework.web.bind.annotation.RequestMapping;
import org.springframework.web.bind.annotation.RestController;@RestController
@RequestMapping("/r4j")
public class R4jController {@Autowiredprivate R4jCustomerFacade r4JCustomerFacade = null;@GetMapping("/customer/name/{id}")public String getCustomerName(Long id) {return r4JCustomerFacade.getCustomerName(id);}@GetMapping("/customer/bulkhead/name/{id}")public String getCustomerNameWithBulkhead(@PathVariable("id") Long id) {return r4JCustomerFacade.getCustomerNameWithBulkhead(id);}@GetMapping("/customer/exception/{id}")public String exception(@PathVariable("id") Long id) {return r4JCustomerFacade.exception(id);}}
其他的和前面的组件一样测试
限时器TimeLimiter
首先引入依赖,如下所示
<dependency><groupId>io.github.resilience4j</groupId><artifactId>resilience4j-timelimiter</artifactId><version>1.2.0</version></dependency>
一些长期得不到响应的服务调用往往会占用资源,所以对服务调用加入限时十分必要,Resilience4j也提供了限时器(TimeLimiter),但是在resilience4j-spring-boot2包的1.2.0版本还不支持像之前那样的配置方式,但是可以通过编码来实现,首先改造一下启动类代码,创建限时器注册机,如下所示
package com.scd.goods.main;import io.github.resilience4j.timelimiter.TimeLimiterConfig;
import io.github.resilience4j.timelimiter.TimeLimiterRegistry;
import org.springframework.boot.SpringApplication;
import org.springframework.boot.autoconfigure.SpringBootApplication;
import org.springframework.cloud.client.circuitbreaker.EnableCircuitBreaker;
import org.springframework.cloud.client.loadbalancer.LoadBalanced;
import org.springframework.cloud.openfeign.EnableFeignClients;
import org.springframework.context.annotation.Bean;
import org.springframework.web.client.RestTemplate;import java.time.Duration;// 定义扫描包
@SpringBootApplication(scanBasePackages = "com.scd.goods")
// 驱动断路器工作(Hystrix)
@EnableCircuitBreaker
@EnableFeignClients(//扫描装配OpenFeign接口到IoC容器中basePackages="com.scd.goods")
public class GoodsApplication {// 执行负载均衡,启动Ribbon默认的负载均衡策略来选择可用的服务实例完成服务调用@LoadBalanced// 装配为Bean,方便之后注入@Beanpublic RestTemplate restTemplate() {return new RestTemplate();}/*** 创建时间限制器注册机(TimeLimiterRegistry)* @return 时间限制器注册机*/@Beanpublic TimeLimiterRegistry timeLimiterRegistry() {// 限时器配置TimeLimiterConfig timeLimiterConfig = TimeLimiterConfig.custom()// 设置超时时间为1s,超时就取消服务调用避免积压.timeoutDuration(Duration.ofSeconds(1))// 一旦超时则将来不再运行,默认值也为true.cancelRunningFuture(true).build();return TimeLimiterRegistry.of(timeLimiterConfig);}public static void main(String[] args) {SpringApplication.run(GoodsApplication.class, args);}}
然后编写限时器代码,在服务类中添加限时器代码如下所示
// 限时器注册机@Autowiredprivate TimeLimiterRegistry timeLimiterRegistry = null;@Overridepublic String timeout(Long id) {// 单线程池ExecutorService executorService = Executors.newSingleThreadExecutor();// 获取或者创建命名为“customer”限时器TimeLimiter timeLimiter = timeLimiterRegistry.timeLimiter("customer");// 描述事件Supplier<Future<String>> supplier= ()-> executorService.submit(()-> customerOpenFeignFacade.timeout(id));// 将事件和限时器绑定Callable<String> call = TimeLimiter.decorateFutureSupplier(timeLimiter, supplier);return Try.ofCallable(call) // 执行事件,尝试获取结果.recover(ex->{ // 降级逻辑return "服务调用,超时了";}).get(); // 获取结果}
然后在控制器中添加调用代码,如下所示
package com.scd.goods.controller;import com.scd.goods.facade.R4jCustomerFacade;
import org.springframework.beans.factory.annotation.Autowired;
import org.springframework.web.bind.annotation.GetMapping;
import org.springframework.web.bind.annotation.PathVariable;
import org.springframework.web.bind.annotation.RequestMapping;
import org.springframework.web.bind.annotation.RestController;@RestController
@RequestMapping("/r4j")
public class R4jController {@Autowiredprivate R4jCustomerFacade r4JCustomerFacade = null;@GetMapping("/customer/name/{id}")public String getCustomerName(Long id) {return r4JCustomerFacade.getCustomerName(id);}@GetMapping("/customer/bulkhead/name/{id}")public String getCustomerNameWithBulkhead(@PathVariable("id") Long id) {return r4JCustomerFacade.getCustomerNameWithBulkhead(id);}@GetMapping("/customer/timeout/{id}")public String timeout(@PathVariable("id") Long id) {return r4JCustomerFacade.timeout(id);}@GetMapping("/customer/exception/{id}")public String exception(@PathVariable("id") Long id) {return r4JCustomerFacade.exception(id);}
}
重启服务并访问连接http://localhost:2001/r4j/customer/timeout/1即可测试