随着3D传感器(如激光雷达、深度相机)的广泛应用,点云数据已成为计算机视觉和机器人领域的重要数据形式。点云是一组在三维空间中具有 (x, y, z) 坐标的离散点的集合,用于表示物体的形状或场景。然而,由于点云的无序性、不规则性和稀疏性,传统的深度学习算法难以直接处理点云数据。
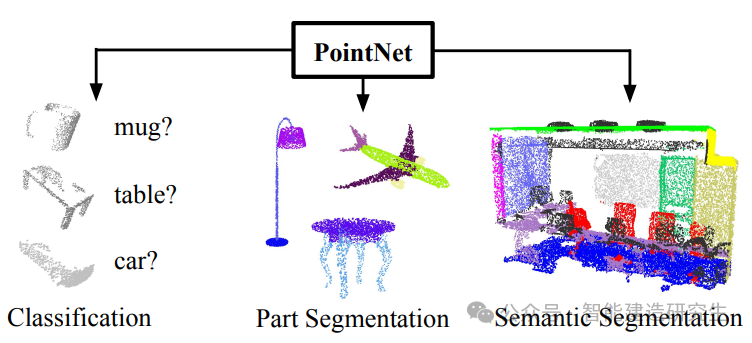
PointNet 是第一个能够直接对原始点云进行处理的深度学习模型,突破了点云数据处理的瓶颈,为点云深度学习领域开辟了新方向。
一、发展历史
在 PointNet 提出之前,处理点云数据的主要方法有:
-
体素化(Voxelization):将三维空间划分为规则的网格(体素),将点云映射到三维体素网格中,然后使用三维卷积神经网络(3D CNN)进行处理。缺点是计算量大,内存占用高,分辨率受限。
-
多视图方法(Multi-view):从多个角度渲染点云为二维图像,然后使用成熟的二维卷积神经网络进行处理。这种方法利用了图像处理的优势,但可能丢失重要的三维结构信息。
2017年,Charles R. Qi 等人提出了 PointNet 模型,直接对点云的三维坐标进行端到端的学习,解决了点云数据的无序性和排列不变性问题。这一工作发表在 CVPR 2017 上,论文标题为 PointNet: Deep Learning on Point Sets for 3D Classification and Segmentation。
二、数学原理
挑战
点云数据具有以下特点,需要模型加以应对:
-
无序性:点云是无序的集合,点的排列顺序不应影响模型的输出。这意味着模型需要对点的排列具有不变性。
-
不变性:点云可能经历各种刚性变换(如旋转、平移),模型需要具备对这些变换的鲁棒性。
-
局部特征捕获:点云中的局部结构和邻域信息对于理解整体形状至关重要。
解决方案
PointNet 的核心思想是:
-
使用对称函数实现对点集的排列不变性:通过对所有点的特征应用一个对称函数(如最大值 Max Pooling),聚合为全局特征,消除点的排列顺序对结果的影响。
-
逐点特征提取与共享权重:对每个点使用共享参数的多层感知机(MLP)提取特征,捕获每个点的特征信息。
-
空间变换网络(T-Net):学习点云的空间变换矩阵,对输入和特征空间进行对齐,增强模型对刚性变换的鲁棒性。
网络结构
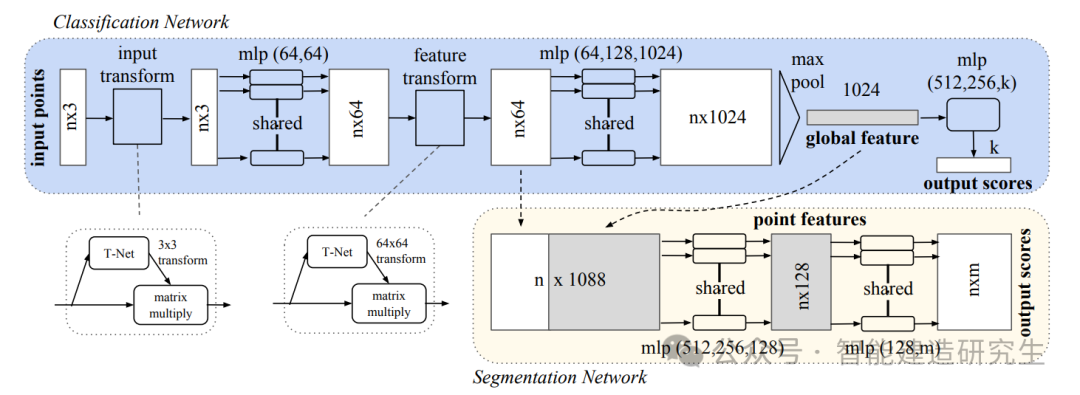
网络主要模块:
-
输入转换网络(Input T-Net):
-
学习一个 的变换矩阵,对输入点云进行对齐。
-
通过对点云的整体变换,减小姿态变化对模型的影响。
-
-
逐点特征提取:
-
使用共享参数的 MLP,将每个点的坐标映射到高维特征空间。
-
公式表示为:。
-
-
特征转换网络(Feature T-Net):
-
类似于输入转换网络,学习一个高维特征空间的对齐变换。
-
学习 的变换矩阵, 是特征维度。
-
-
全局特征聚合:
-
对所有点的特征使用对称函数(如最大池化)聚合,得到全局特征。
-
公式表示为:。
-
-
分类和分割模块:
-
分类任务:将全局特征输入全连接层,输出类别概率分布。
-
分割任务:将全局特征与逐点特征拼接,对每个点进行逐点分类。
-
数学公式
-
输入空间变换:
其中, 是通过输入 T-Net 学习得到的变换矩阵。
-
逐点特征提取:
-
特征空间变换:
其中, 是通过特征 T-Net 学习得到的变换矩阵。
-
全局特征聚合:
-
分类预测:
-
语义分割预测:
三、PointNet的工作原理形象解释
1. 逐点特征提取
想象每个点都是一个独立的个体,PointNet 对每个点施加相同的“函数”(共享的 MLP),就像给每个人做相同的测量,提取出各自的特征。这些特征包括该点的位置以及其在空间中的属性。
2. 特征聚合
将所有点的特征收集起来,通过最大池化的方式,找到各个维度上的最大值。这就像是在一群人中,找到每个特征(如身高、体重、年龄)的最大值。这一步提取了整个点云的全局特征,代表了整体的形状信息。
3. 不变性
由于使用了最大池化,对点的顺序和数量具有不变性。这意味着,无论点云如何排列,只要整体形状不变,模型的输出就不变。
4. 空间变换
PointNet 还学习了如何调整点云,使其对齐到一个标准的姿态。这类似于在比较不同物体时,先将它们摆正,以便进行公平的比较。
四、应用领域与场景
1. 3D物体分类
-
应用:对单个物体的点云进行分类,判断其所属的类别,如飞机、椅子、桌子等。
-
场景:自动驾驶中对路边物体的识别,仓库机器人对物品的分类。
2. 3D语义分割
-
应用:对场景中的每个点进行分类,标注其所属的类别,如建筑、道路、行人、车辆等。
-
场景:城市三维建模,环境感知,增强现实(AR)应用。
3. 点云配准
-
应用:将来自不同视角的点云对齐,生成完整的三维模型。
-
场景:三维重建,机器人导航,医学影像中的器官建模。
4. 其他应用
-
人体姿态估计:根据人体点云,估计骨骼和姿态信息。
-
医学影像分析:处理三维医学数据,如CT或MRI扫描。
-
增强现实和虚拟现实:实时处理三维空间中的点云数据。
五、模型优缺点
优点
-
直接处理原始点云
-
无需将点云转换为体素或网格,避免了数据量膨胀和信息损失。
-
保留了完整的三维空间信息。
-
-
对点的排列不敏感
-
使用对称函数(如最大池化)实现了对点云无序性的处理。
-
模型对点的输入顺序和数量具有鲁棒性。
-
-
网络结构简单
-
相比于复杂的三维卷积网络,PointNet 的结构更为简单。
-
易于实现和训练,计算效率高。
-
-
良好的扩展性
-
PointNet 为后续的点云深度学习模型(如 PointNet++、DGCNN 等)奠定了基础。
-
可以与其他模型和方法结合,提升性能。
-
缺点
-
无法有效捕获局部特征
-
PointNet 对每个点独立处理,缺乏对点与点之间局部关系的建模。
-
对于需要细粒度特征的任务,可能性能不足。
-
-
对点云密度变化敏感
-
在点云密度不均匀的情况下,模型可能无法正确捕获重要的特征。
-
-
对噪声和异常值的鲁棒性不足
-
极端值可能对最大池化产生较大影响,导致全局特征偏差。
-
六、后续发展
为了解决 PointNet 的不足,研究者们提出了改进的模型:
-
PointNet++
-
在 PointNet 的基础上,增加了对局部特征的提取。
-
使用分层聚类的方式,逐级提取局部到全局的特征。
-
-
DGCNN(Dynamic Graph CNN)
-
将点云表示为动态构建的图,使用图神经网络(GNN)提取特征。
-
能够更好地捕获点之间的关系和局部结构。
-
七、PointNet可视化案例
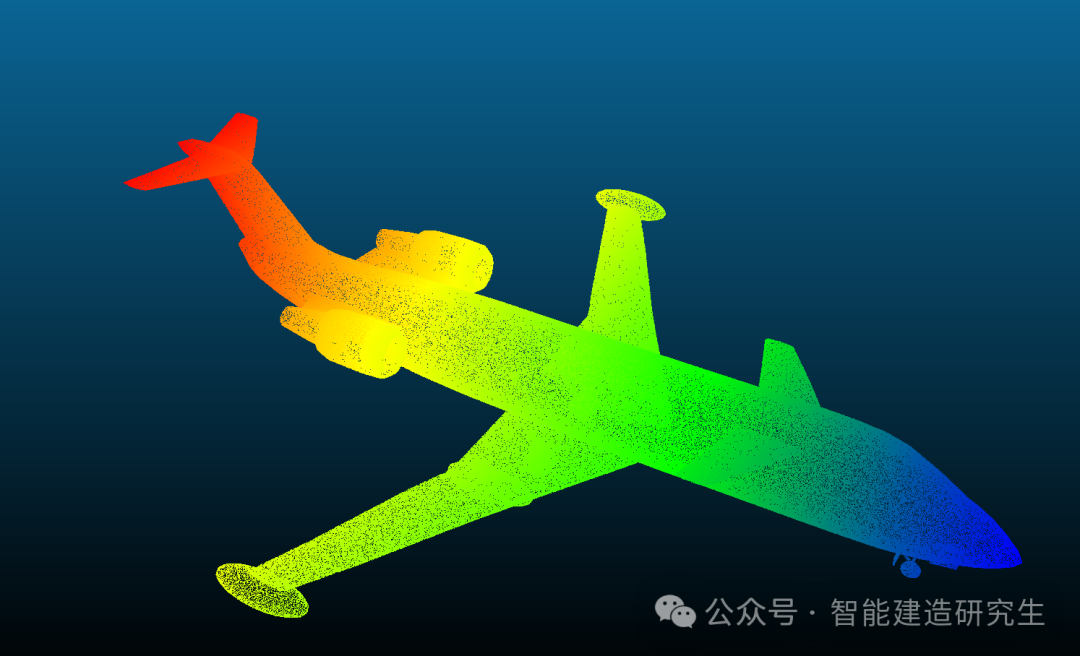
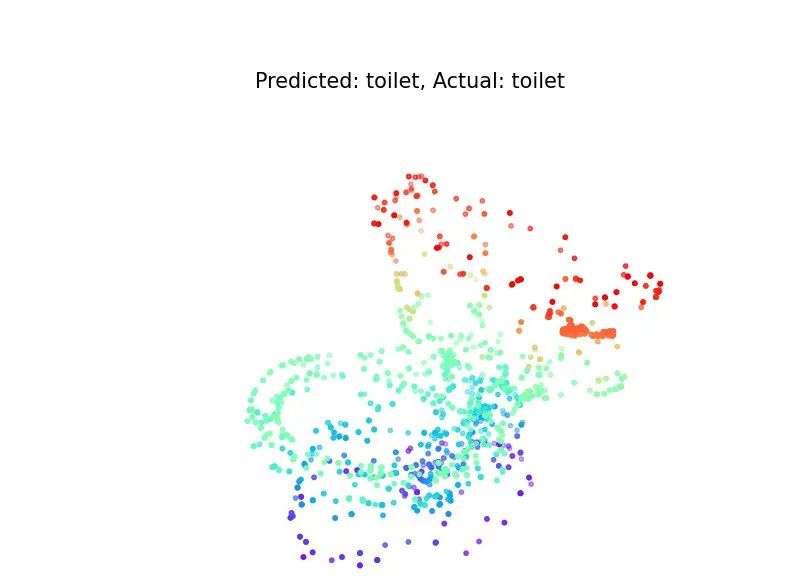
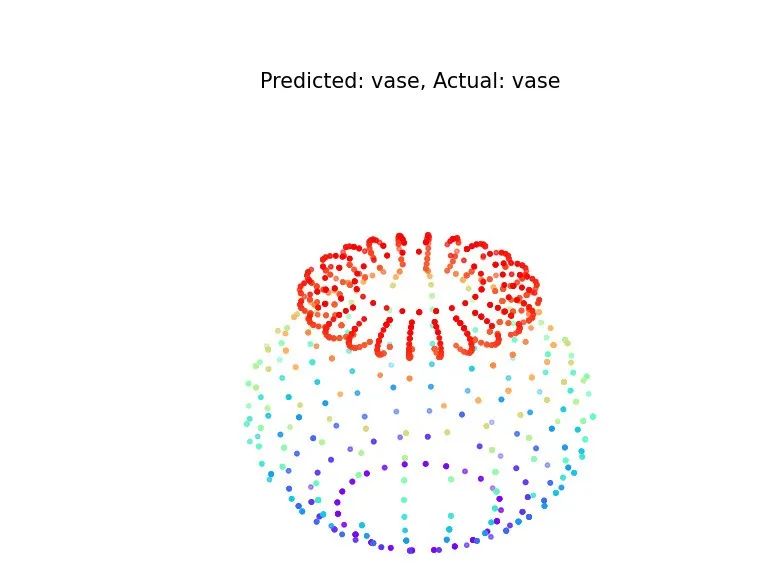
PointNet模型主要可以实现三维点云的分类和分割网络,分割网络可以使用S3DIS数据集。我们使用ModelNet40数据集实现PointNet点云分类网络。ModelNet40 数据集是一个广泛用于三维物体分类和识别的标准数据集,由普林斯顿大学创建。它包含了40个日常物体类别的三维CAD模型,总计12,311个样本,其中包括9,843个训练样本和2,468个测试样本。类别涵盖了飞机、椅子、桌子、床、汽车等常见物品。每个模型都以三维点云或网格的形式提供,适用于评估和比较不同的三维深度学习算法。下面是其中一个模型的点云可视化:
ModelNet40数据集预处理脚本:
import os
import numpy as np
import h5py
from tqdm import tqdm
import multiprocessing as mpdef parse_off(filepath):try:with open(filepath, 'r') as f:lines = f.readlines()# 去除空行和注释行lines = [line.strip() for line in lines if line.strip() and not line.strip().startswith('#')]if lines[0] != 'OFF':print(f"File {filepath} is not a valid OFF file.")return None# 读取顶点数、面数、边数header = lines[1].split()while len(header) < 3:# 如果读取的行不足3个元素,继续读取下一行lines = lines[1:]header = lines[1].split()n_verts, n_faces, n_edges = map(int, header)# 读取顶点坐标vertex_lines = lines[2:2 + n_verts]vertices = []for line in vertex_lines:vertex = list(map(float, line.strip().split()))vertices.append(vertex)vertices = np.array(vertices)# 忽略面片信息,只返回顶点return verticesexcept Exception as e:print(f"Error parsing {filepath}: {e}")return Nonedef process_split(split, root_dir, output_dir, num_points=1024):data = []labels = []for category in categories:category_dir = os.path.join(root_dir, category, split)if not os.path.exists(category_dir):print(f"Directory not found: {category_dir}")continuefiles = [f for f in os.listdir(category_dir) if f.endswith('.off')]if len(files) == 0:print(f"No .off files found in {category_dir}")continuelabel = category_to_label[category]print(f"Processing {category} ({split}), {len(files)} files.")for f in tqdm(files, desc=f'Processing {category} ({split})'):file_path = os.path.join(category_dir, f)pointcloud = parse_off(file_path)if pointcloud is None:continue# 下采样或上采样到固定数量的点if pointcloud.shape[0] >= num_points:indices = np.random.choice(pointcloud.shape[0], num_points, replace=False)else:indices = np.random.choice(pointcloud.shape[0], num_points, replace=True)pointcloud = pointcloud[indices]data.append(pointcloud)labels.append(label)if data:data = np.array(data)labels = np.array(labels)# 保存为 h5 文件h5_filename = os.path.join(output_dir, f'modelnet40_{split}.h5')with h5py.File(h5_filename, 'w') as hf:hf.create_dataset('data', data=data)hf.create_dataset('label', data=labels)print(f"Saved {split} data to {h5_filename}, total samples: {len(data)}")else:print(f"No data for split {split}, skipping.")if __name__ == '__main__':root_dir = 'modelnet40'  # 请确保此路径正确output_dir = 'modelnet40_hdf5'os.makedirs(output_dir, exist_ok=True)categories = [d for d in os.listdir(root_dir) if os.path.isdir(os.path.join(root_dir, d))]categories.sort()category_to_label = {category: i for i, category in enumerate(categories)}# 保存类别名称with open(os.path.join(output_dir, 'shape_names.txt'), 'w') as f:for category in categories:f.write(f'{category}\n')# 处理训练集和测试集for split in ['train', 'test']:process_split(split, root_dir, output_dir)
PointNet点云分类网络主程序:
import os# 解决 OpenMP 错误(可选,根据需要)
os.environ['KMP_DUPLICATE_LIB_OK'] = 'TRUE'import h5py
import numpy as np
import torch
import torch.nn as nn
import torch.optim as optim
import torch.nn.functional as F
from torch.utils.data import Dataset, DataLoader
import matplotlib.pyplot as plt
from tqdm import tqdm# 数据集类定义
class ModelNet40Dataset(Dataset):def __init__(self, data_dir, split='train', num_points=1024, data_augmentation=True):self.data, self.labels = self.load_data(data_dir, split)self.num_points = num_pointsself.data_augmentation = data_augmentationdef load_data(self, data_dir, split):h5_name = f'modelnet40_{split}.h5'with h5py.File(os.path.join(data_dir, h5_name), 'r') as hf:data = hf['data'][:]labels = hf['label'][:]return data, labels.squeeze().astype(np.int64)  # 确保标签为 int64def __len__(self):return self.data.shape[0]def __getitem__(self, idx):pointcloud = self.data[idx]  # (N, 3)label = self.labels[idx]# 随机采样 num_points 个点if pointcloud.shape[0] >= self.num_points:indices = np.random.choice(pointcloud.shape[0], self.num_points, replace=False)else:indices = np.random.choice(pointcloud.shape[0], self.num_points, replace=True)pointcloud = pointcloud[indices]# 数据归一化pointcloud = pointcloud - np.mean(pointcloud, axis=0)pointcloud = pointcloud / np.max(np.linalg.norm(pointcloud, axis=1))if self.data_augmentation:# 随机旋转theta = np.random.uniform(0, 2 * np.pi)rotation_matrix = np.array([[np.cos(theta), -np.sin(theta), 0],[np.sin(theta),  np.cos(theta), 0],[0,             0,             1]])pointcloud = pointcloud @ rotation_matrix# 随机抖动pointcloud += np.random.normal(0, 0.02, size=pointcloud.shape)return pointcloud.astype(np.float32), label# PointNet 模型定义
class TNet(nn.Module):def __init__(self, k=3):super(TNet, self).__init__()self.k = kself.conv1 = nn.Conv1d(k, 64, 1)self.conv2 = nn.Conv1d(64, 128, 1)self.conv3 = nn.Conv1d(128, 1024, 1)self.bn1 = nn.BatchNorm1d(64)self.bn2 = nn.BatchNorm1d(128)self.bn3 = nn.BatchNorm1d(1024)self.fc1 = nn.Linear(1024, 512)self.bn4 = nn.BatchNorm1d(512)self.fc2 = nn.Linear(512, 256)self.bn5 = nn.BatchNorm1d(256)self.fc3 = nn.Linear(256, k * k)# 初始化权重nn.init.constant_(self.fc3.weight, 0)nn.init.constant_(self.fc3.bias, 0)def forward(self, x):batch_size = x.size(0)x = F.relu(self.bn1(self.conv1(x)))  # (B, 64, N)x = F.relu(self.bn2(self.conv2(x)))  # (B, 128, N)x = F.relu(self.bn3(self.conv3(x)))  # (B, 1024, N)x = torch.max(x, 2)[0]               # (B, 1024)x = F.relu(self.bn4(self.fc1(x)))    # (B, 512)x = F.relu(self.bn5(self.fc2(x)))    # (B, 256)x = self.fc3(x)                      # (B, k*k)x = x.view(-1, self.k, self.k)       # (B, k, k)identity = torch.eye(self.k, requires_grad=True).repeat(batch_size, 1, 1).to(x.device)x = x + identityreturn xclass PointNetClassifier(nn.Module):def __init__(self, num_classes=40):super(PointNetClassifier, self).__init__()self.input_transform = TNet(k=3)self.feature_transform = TNet(k=64)self.conv1 = nn.Conv1d(3, 64, 1)self.conv2 = nn.Conv1d(64, 64, 1)self.conv3 = nn.Conv1d(64, 64, 1)self.conv4 = nn.Conv1d(64, 128, 1)self.conv5 = nn.Conv1d(128, 1024, 1)self.bn1 = nn.BatchNorm1d(64)self.bn2 = nn.BatchNorm1d(64)self.bn3 = nn.BatchNorm1d(64)self.bn4 = nn.BatchNorm1d(128)self.bn5 = nn.BatchNorm1d(1024)self.fc1 = nn.Linear(1024, 512)self.bn6 = nn.BatchNorm1d(512)self.fc2 = nn.Linear(512, 256)self.bn7 = nn.BatchNorm1d(256)self.dropout = nn.Dropout(p=0.3)self.fc3 = nn.Linear(256, num_classes)def forward(self, x):batch_size = x.size(0)x = x.transpose(2, 1)  # (B, 3, N)# 输入特征变换trans = self.input_transform(x)x = torch.bmm(x.transpose(1, 2), trans).transpose(1, 2)  # (B, 3, N)x = F.relu(self.bn1(self.conv1(x)))  # (B, 64, N)x = F.relu(self.bn2(self.conv2(x)))  # (B, 64, N)# 特征变换trans_feat = self.feature_transform(x)x = torch.bmm(x.transpose(1, 2), trans_feat).transpose(1, 2)  # (B, 64, N)x = F.relu(self.bn3(self.conv3(x)))  # (B, 64, N)x = F.relu(self.bn4(self.conv4(x)))  # (B, 128, N)x = self.bn5(self.conv5(x))          # (B, 1024, N)x = torch.max(x, 2)[0]               # (B, 1024)x = F.relu(self.bn6(self.fc1(x)))    # (B, 512)x = F.relu(self.bn7(self.dropout(self.fc2(x))))  # (B, 256)x = self.fc3(x)                      # (B, num_classes)return F.log_softmax(x, dim=1)# 模型训练函数
def train():# 数据集路径data_dir = 'modelnet40_hdf5'  # 确保此路径正确num_epochs = 20batch_size = 32learning_rate = 0.001num_points = 1024# 创建数据集和数据加载器train_dataset = ModelNet40Dataset(data_dir, split='train', num_points=num_points, data_augmentation=True)test_dataset = ModelNet40Dataset(data_dir, split='test', num_points=num_points, data_augmentation=False)# 设置 num_workers,根据需要调整 batch_sizetrain_loader = DataLoader(train_dataset, batch_size=batch_size, shuffle=True, num_workers=0)test_loader = DataLoader(test_dataset, batch_size=batch_size, shuffle=False, num_workers=0)# 模型、损失函数、优化器device = torch.device("cuda" if torch.cuda.is_available() else "cpu")print(f'Using device: {device}')model = PointNetClassifier(num_classes=40).to(device)optimizer = optim.Adam(model.parameters(), lr=learning_rate)scheduler = optim.lr_scheduler.StepLR(optimizer, step_size=10, gamma=0.5)# 用于记录损失和准确率train_losses = []test_accuracies = []# 训练循环for epoch in range(num_epochs):model.train()total_loss = 0for data, label in tqdm(train_loader, desc=f'Epoch {epoch+1}/{num_epochs}'):data = data.to(device)label = label.to(device).long()optimizer.zero_grad()output = model(data)loss = F.nll_loss(output, label)loss.backward()optimizer.step()total_loss += loss.item()scheduler.step()avg_loss = total_loss / len(train_loader)train_losses.append(avg_loss)print(f'Epoch {epoch+1}, Loss: {avg_loss:.4f}')# 测试模型model.eval()correct = 0total = 0with torch.no_grad():for data, label in test_loader:data = data.to(device)label = label.to(device).long()output = model(data)pred = output.max(1)[1]correct += pred.eq(label).sum().item()total += label.size(0)accuracy = correct / total * 100test_accuracies.append(accuracy)print(f'Test Accuracy: {accuracy:.2f}%')# 保存模型torch.save(model.state_dict(), 'pointnet_model.pth')print('Model saved as pointnet_model.pth')# 绘制损失和准确率曲线epochs = range(1, num_epochs + 1)plt.figure(figsize=(12, 5))plt.subplot(1, 2, 1)plt.plot(epochs, train_losses, 'b-', label='Training Loss')plt.xlabel('Epoch')plt.ylabel('Loss')plt.title('Training Loss vs. Epoch')plt.legend()plt.subplot(1, 2, 2)plt.plot(epochs, test_accuracies, 'r-', label='Test Accuracy')plt.xlabel('Epoch')plt.ylabel('Accuracy (%)')plt.title('Test Accuracy vs. Epoch')plt.legend()plt.tight_layout()plt.savefig('training_curves.png')plt.show()# 结果可视化函数
def visualize():# 加载模型device = torch.device("cuda" if torch.cuda.is_available() else "cpu")model = PointNetClassifier(num_classes=40).to(device)model.load_state_dict(torch.load('pointnet_model.pth', map_location=device))model.eval()# 加载测试数据data_dir = 'modelnet40_hdf5'  # 确保此路径正确num_points = 10240  # 增加点数到原来的5倍test_dataset = ModelNet40Dataset(data_dir, split='test', num_points=num_points, data_augmentation=False)test_loader = DataLoader(test_dataset, batch_size=1, shuffle=True, num_workers=0)shape_names = [line.rstrip() for line in open(os.path.join(data_dir, 'shape_names.txt'))]# 可视化部分样本num_visualize = 5for i, (data, label) in enumerate(test_loader):if i >= num_visualize:breakdata = data.to(device)label = label.to(device).long()output = model(data)pred = output.max(1)[1]pointcloud = data[0].cpu().numpy()fig = plt.figure(figsize=(8, 8))ax = fig.add_subplot(111, projection='3d')ax.scatter(pointcloud[:, 0], pointcloud[:, 1], pointcloud[:, 2],c=pointcloud[:, 2], cmap='rainbow', s=1)  # 减小点的大小以适应更多的点ax.set_title(f'Predicted: {shape_names[pred]}, Actual: {shape_names[label]}', fontsize=15)ax.axis('off')# 设置视角ax.view_init(elev=30, azim=-45)plt.savefig(f'visualization_{i+1}.png')plt.show()# 主函数
if __name__ == '__main__':# 训练模型train()# 可视化结果visualize()
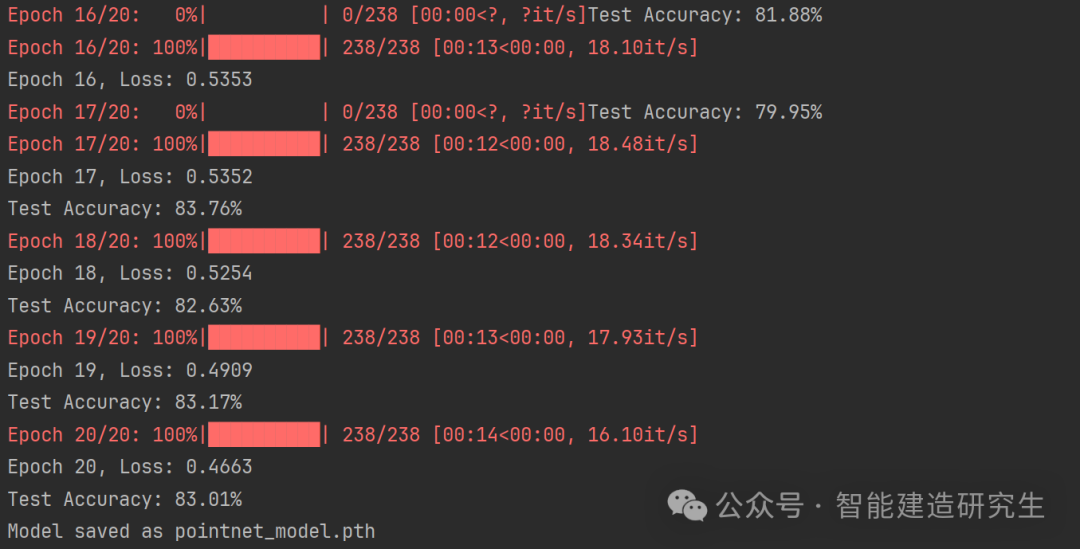
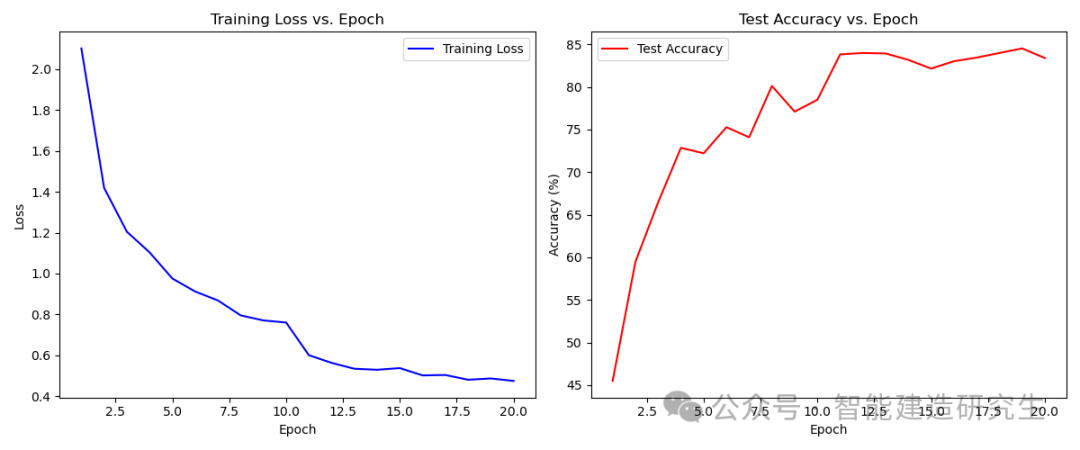
使用GPU训练结果(5min):
损失函数与准确率随epoch的变化:
部分预测结果:
使用cpu训练的结果(共计3h):

总结
PointNet 开创了直接对点云数据进行深度学习的先河,通过巧妙地利用对称函数和空间变换网络,实现了对点云无序性和排列不变性的处理。尽管存在一些局限性,但其简洁高效的结构和创新的思想对点云深度学习领域产生了深远的影响。
参考资料
-
Charles R. Qi, Hao Su, Kaichun Mo, Leonidas J. Guibas. PointNet: Deep Learning on Point Sets for 3D Classification and Segmentation. CVPR 2017.
-
Charles R. Qi, Li Yi, Hao Su, Leonidas J. Guibas. PointNet++: Deep Hierarchical Feature Learning on Point Sets in a Metric Space. NIPS 2017.
以上内容总结自网络,如有帮助欢迎转发,我们下次再见!点击阅读全文下载ModelNet40数据~


![[C++]使用纯opencv部署yolov8-cls图像分类onnx模型](https://i-blog.csdnimg.cn/direct/9baa1cb73ac048cea1cbac6fd15232e9.jpeg)


