1、视频效果
小爱同学桌面显示器
学会烧录软件到开发板,会改代码修改wifi信息,我在添加一下你的信息,就可以玩了。
2、实现原理

3、实现步骤:
购买开发板=》烧录代码=》连接大白服务器(服务器对接小爱同学开放平台过程较为复杂我已对接完成)
3.1、购买硬件材料
esp8266开发板:淘宝链接
oled显示屏:淘宝链接
杜邦线:淘宝链接
micro充电线+充电器(安卓充电线+5v充电器或者充电宝、电脑usb供电均可)
小爱同学音箱
3.2、安装arduino ide软件
下载安装arduino ide软件
我用的是苹果mac系统安装步骤如下:
1、下载软件 arduino
2、IDE配置:
在您的Arduino IDE中,转到“文件” > “首选项”
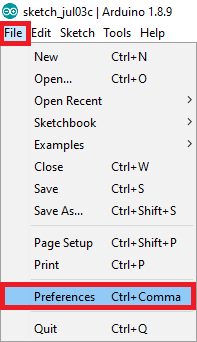
在Arduino IDE打开首选项中安装ESP8266 Board插件
如下图所示,将
http://arduino.esp8266.com/stable/package_esp8266com_index.json输入到“其他板管理器URL”字段中。然后,单击“确定”按钮:

在Arduino IDE中安装ESP8266 Board插件输入URL
注意:如果您已经拥有ESP32板子URL,可以使用逗号分隔URL,如下所示:
https://dl.espressif.com/dl/package_esp32_index.json, http://arduino.esp8266.com/stable/package_esp8266com_index.json
3、安装开发板


windows系统安装软件参考
3.3、烧录代码
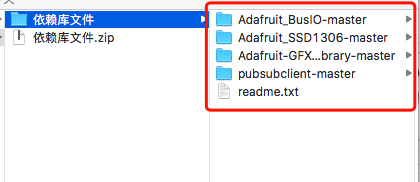
3.3.1、拷贝依赖库到lib目录

我的lib库的位置 : /Users/chenhaohao/Documents/Arduino
将代码中依赖的库文件拷贝到该目录libraries下

依赖库压缩包,下载解压后放在你自己的libraries
下载压缩包
3.3.2、烧录代码
新建文件8266oledChSubList.ino
拷贝如下代码
#include <ESP8266WiFi.h>
#include <PubSubClient.h>
#include <ArduinoJson.h>
#include <Adafruit_GFX.h>
#include <Adafruit_SSD1306.h>
#define SCREEN_WIDTH 128 // OLED display width, in pixels
#define SCREEN_HEIGHT 64 // OLED display height, in pixels// Change the credentials below, so your ESP8266 connects to your router
const char* ssid = "tianwanggaidihu"; //修改此处 你的wifi名
const char* password = "dabingjiayiqie"; //修改此处 你的wifi密码// Change the variable to your Raspberry Pi IP address, so it connects to your MQTT broker
const char* mqtt_server = "www.huaibeishi.net";// Initializes the espClient. You should change the espClient name if you have multiple ESPs running in your home automation system
WiFiClient espClient;
PubSubClient client(espClient);const int readly = 2;// Timers auxiliar variables
long now = millis();
long lastMeasure = 0;Adafruit_SSD1306 display(SCREEN_WIDTH, SCREEN_HEIGHT, &Wire, -1);
// byte * strTmp;
// unsigned char  strTmp[32] = {0x00};
// byte strTmp[32] = {0x40};
byte strTmp[32] = {0x40};
// byte strTmp[32];void readlyLed() {digitalWrite(readly, HIGH);delay(200); digitalWrite(readly, LOW);delay(200); digitalWrite(readly, HIGH);delay(200);digitalWrite(readly, LOW);delay(200);digitalWrite(readly, HIGH);
}// Don't change the function below. This functions connects your ESP8266 to your router
void setup_wifi() {delay(10);// We start by connecting to a WiFi networkSerial.println();Serial.print("Connecting to ");Serial.println(ssid);WiFi.begin(ssid, password);while (WiFi.status() != WL_CONNECTED) {delay(500);Serial.print(".");}Serial.println("");Serial.print("WiFi connected - ESP IP address: ");Serial.println(WiFi.localIP());
}void callback(String topic, byte* message, unsigned int length) {Serial.print("Message arrived on topic: ");Serial.print(topic);Serial.print(". Message: ");String messageTemp;display.clearDisplay();for (int i = 0; i < length; i++) {Serial.print((char)message[i]);messageTemp += (char)message[i];}display.clearDisplay();Serial.println(length);// 遍历汉字for(int i=0;i<length/32;i++){// strTmp = message[i*32,(i+1)*32];// strTmp[0,32] = message[i*32,(i+1)*32];for(int j=0;j<32;j++){strTmp[j] = message[i*32+j];}display.drawBitmap(i*16, 10, strTmp, 16, 16,1); }display.display();Serial.println();Serial.println(messageTemp);Serial.println();
}void reconnect() {while (!client.connect("arduinoClient", "user1", "user1")) {Serial.print("Attempting MQTT connection...");if (client.connect("arduinoClient", "user1", "user1")) {Serial.println("connected");  // Subscribe or resubscribe to a topic// You can subscribe to more topics (to control more LEDs in this example)client.subscribe("oled2");} else {Serial.print("failed, rc=");Serial.print(client.state());Serial.println(" try again in 5 seconds");// Wait 5 seconds before retryingdelay(5000);}}
}// The setup function sets your ESP GPIOs to Outputs, starts the serial communication at a baud rate of 115200
// Sets your mqtt broker and sets the callback function
// The callback function is what receives messages and actually controls the LEDs
void setup() {pinMode(readly, OUTPUT);Serial.begin(115200);setup_wifi();client.setServer(mqtt_server, 1883);client.setCallback(callback);if (client.connect("arduinoClient", "testuser", "testpass")) {client.publish("oled2","oled2:hello world");client.subscribe("oled2");Serial.println("mqtt connect successfully");readlyLed();}if(!display.begin(SSD1306_SWITCHCAPVCC, 0x3C)) { // Address 0x3D for 128x64Serial.println(F("SSD1306 allocation failed"));for(;;);}delay(2000);display.clearDisplay();display.setTextSize(1);display.setTextColor(WHITE);display.setCursor(0, 10);// Display static textdisplay.println("Hello, world!");display.display(); }// For this project, you don't need to change anything in the loop function. Basically it ensures that you ESP is connected to your broker
void loop() {if (!client.connect("arduinoClient", "user1", "user1")) {reconnect();}if(!client.loop())client.connect("arduinoClient","user1","user1");
}
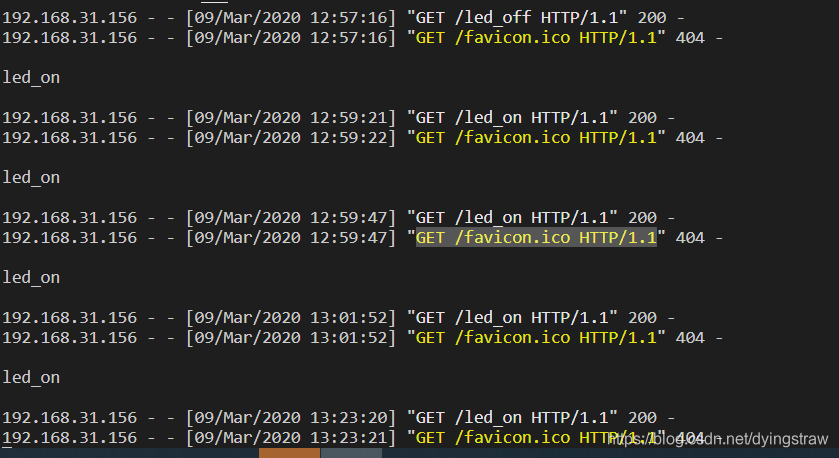
需修改ssid 、和password 为你家的wifi密码使他能够连接服务器。然后对小爱音箱说“让大白显示账号”,我在服务器后台加一下你的账号,屏幕上就可以显示你说的内容了。
最新代码
/*****
oled增加换行显示*****/#include <ESP8266WiFi.h>
#include <PubSubClient.h>
#include <ArduinoJson.h>
#include <Adafruit_GFX.h>
#include <Adafruit_SSD1306.h>
#define SCREEN_WIDTH 128 // OLED display width, in pixels
#define SCREEN_HEIGHT 64 // OLED display height, in pixels// Change the credentials below, so your ESP8266 connects to your router
const char* ssid = "tianwanggaidihu9";
const char* password = "dabingjiayiqie";// Change the variable to your Raspberry Pi IP address, so it connects to your MQTT broker
const char* mqtt_server = "www.huaibeishi.net";
const char* mqtt_user = "****";
const char* mqtt_password = "****";
const char* mqtt_topic = "****";// Initializes the espClient. You should change the espClient name if you have multiple ESPs running in your home automation system
WiFiClient espClient;
PubSubClient client(espClient);const int readly = 2;// Timers auxiliar variables
long now = millis();
long lastMeasure = 0;Adafruit_SSD1306 display(SCREEN_WIDTH, SCREEN_HEIGHT, &Wire, -1);
// byte * strTmp;
// unsigned char  strTmp[32] = {0x00};
// byte strTmp[32] = {0x40};
byte strTmp[32] = {0x40};
// byte strTmp[32];void readlyLed() {digitalWrite(readly, HIGH);delay(200); digitalWrite(readly, LOW);delay(200); digitalWrite(readly, HIGH);delay(200);digitalWrite(readly, LOW);delay(200);digitalWrite(readly, HIGH);
}// Don't change the function below. This functions connects your ESP8266 to your router
void setup_wifi() {delay(10);// We start by connecting to a WiFi networkSerial.println();Serial.print("Connecting to ");Serial.println(ssid);WiFi.begin(ssid, password);while (WiFi.status() != WL_CONNECTED) {delay(500);Serial.print(".");}Serial.println("");Serial.print("WiFi connected - ESP IP address: ");Serial.println(WiFi.localIP());
}void callback(String topic, byte* message, unsigned int length) {Serial.print("Message arrived on topic: ");Serial.print(topic);Serial.print(". Message: ");String messageTemp;display.clearDisplay();for (int i = 0; i < length; i++) {Serial.print((char)message[i]);messageTemp += (char)message[i];}display.clearDisplay();Serial.println(length);// 遍历汉字for(int i=0;i<length/32;i++){// strTmp = message[i*32,(i+1)*32];// strTmp[0,32] = message[i*32,(i+1)*32];for(int j=0;j<32;j++){strTmp[j] = message[i*32+j];}display.drawBitmap(i*16, 10, strTmp, 16, 16,1); }display.display();Serial.println();Serial.println(messageTemp);Serial.println();
}void reconnect() {while (!client.connect("arduinoClient", mqtt_user, mqtt_password)) {Serial.print("Attempting MQTT connection...");if (client.connect("arduinoClient", mqtt_user, mqtt_password)) {Serial.println("connected");  // Subscribe or resubscribe to a topic// You can subscribe to more topics (to control more LEDs in this example)client.subscribe(mqtt_topic);} else {Serial.print("failed, rc=");Serial.print(client.state());Serial.println(" try again in 5 seconds");// Wait 5 seconds before retryingdelay(5000);}}
}// The setup function sets your ESP GPIOs to Outputs, starts the serial communication at a baud rate of 115200
// Sets your mqtt broker and sets the callback function
// The callback function is what receives messages and actually controls the LEDs
void setup() {pinMode(readly, OUTPUT);Serial.begin(115200);setup_wifi();client.setServer(mqtt_server, 1883);client.setCallback(callback);if (client.connect("arduinoClient", mqtt_user, mqtt_password)) {client.publish(mqtt_topic,"oled:hello world");client.subscribe(mqtt_topic);Serial.println("mqtt connect successfully");readlyLed();}if(!display.begin(SSD1306_SWITCHCAPVCC, 0x3C)) { // Address 0x3D for 128x64Serial.println(F("SSD1306 allocation failed"));for(;;);}delay(2000);display.clearDisplay();display.setTextSize(1);display.setTextColor(WHITE);display.setCursor(0, 10);// Display static textdisplay.println("Hello, world!");display.display(); }// For this project, you don't need to change anything in the loop function. Basically it ensures that you ESP is connected to your broker
void loop() {if (!client.connect("arduinoClient", mqtt_user, mqtt_password)) {reconnect();}if(!client.loop())client.connect("arduinoClient",mqtt_user,mqtt_password);
}