Spring
1.1 Spring 简介
1.1.1 Spring 概念
- Spring是一个轻量级Java开发框架,最早有Rod Johnson创建
- 为了解决企业级应用开发的业务逻辑层和其他各层的耦合问题
- Spring最根本的使命是解决企业级应用开发的复杂性,即简化Java开发。
- 使现有的技术更加容易使用,本身是一个大杂烩,整合了现有的技术框架!
spring 官网链接:Spring
spring 官网源码下载链接:Spring Framework
GitHub 下载地址:Spring源码 GitHub 下载地址
1.1.2 Spring 优点
- Spring是一个开源的免费的框架(容器)
- Spring是一个轻量级的、非入侵式的框架
- 控制反转(IOC),面向切面编程(AOP)
- 支持事务的处理,对框架整合的支持!
- 总的来说:Spring就是一个轻量级的控制反转(IOC)和面向切面编程的框架!
1.1.3 Spring 使用的 jar 包
- 使用 Spring 之前,需要导入两个 jar 包
- 将以下代码粘入 maven 即可
<!-- https://mvnrepository.com/artifact/org.springframework/spring-webmvc -->
<dependency><groupId>org.springframework</groupId><artifactId>spring-webmvc</artifactId><version>5.2.0.RELEASE</version>
</dependency>
<!-- 这个包用于之后与 mybatis 做整合 -->
<dependency><groupId>org.springframework</groupId><artifactId>spring-jdbc</artifactId><version>5.2.0.RELEASE</version>
</dependency>
1.2 IOC 理论推导
1.2.1 什么是 IOC 理论推导
- IOC : 控制反转,将创建对象的权利交给用户
- 是面向对象编程中的一种设计原则,是一种想法
- 可以用来减低计算机代码之间的耦合度
- 其中最常见的方式叫做依赖注入
1.2.2 IOC 理论推导 代码演示
-
正常编写一个业务需要
-
UserDao接口
-
UserDaolmpl实现类
-
UserService 业务接口
-
UserServicelmpl 业务实现类
-
-
例如下面所示
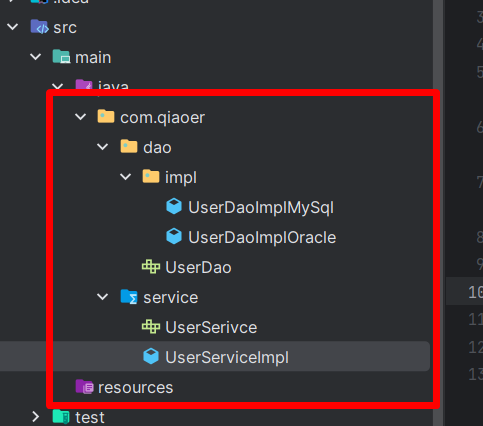
- 我们在 service 层调用 userdao 层的方法
package com.qiaoer.service;import com.qiaoer.dao.UserDao;
import com.qiaoer.dao.impl.UserDaoImplMySql;public class UserServiceImpl implements UserSerivce{private UserDao userDao=new UserDaoImplMySql();@Overridepublic void getAllUser() {userDao.getAllUser();}
}
- 正常是这样调用的,但是这样同时存在着一个问题
- 当我们相应 dao 层的 Oracle 实现类时,就需要修改 new 的实现类,例如这样
package com.qiaoer.service;import com.qiaoer.dao.UserDao;
import com.qiaoer.dao.impl.UserDaoImplMySql;
import com.qiaoer.dao.impl.UserDaoImplOracle;public class UserServiceImpl implements UserSerivce{private UserDao userDao=new UserDaoImplOracle();@Overridepublic void getAllUser() {userDao.getAllUser();}
}
- 如果有好几种实现类,那用户每次需要修改时,都需要修改源代码
- 这里就需要利用 set 动态实现值的注入
- 具体代码如下
package com.qiaoer.service;import com.qiaoer.dao.UserDao;
import com.qiaoer.dao.impl.UserDaoImplMySql;
import com.qiaoer.dao.impl.UserDaoImplOracle;public class UserServiceImpl implements UserSerivce{private UserDao userDao;public void setUserDao(UserDao userDao) {this.userDao = userDao;}@Overridepublic void getAllUser() {userDao.getAllUser();}
}
- 刚刚是程序控制创建和调用对象
- 增加了 set 方法后,则是用户去选择实现,直接调用即可
1.2.3 IOC 理论推导总结
- 在我们之前的业务中,用户的需求可能会影响我们原来的代码,我们需要根据用户的需求去修改原代码!
- 如果程序代码量十分大,修改一次的成本代价十分昂贵!
- 当我们使用 set 方法实现了动态的注入后
- 之前,程序是主动创建对象!控制权在程序员手上
- 使用了set注入后,程序不再具有主动性,而是变成了被动的接受对象
- 这种思想,从本质上解决了问题,程序员不用再去管理对象的创建了
- 系统的耦合性大大降低~,可以更加专注的在业务的实现上!这是IOC的原型
1.3 IOC 容器
1.3.1 IOC 容器简介
- IOC (Inversion of Control,控制反转) 容器是一种用于管理和组织应用程序中组件(或对象)的框架
- 它是一种软件设计模式,旨在实现应用程序的松耦合,提高可维护性和可测试性
- IOC 容器通过控制对象的创建、依赖解析和生命周期管理,将对象的控制权从应用程序代码转移到容器中。
- IOC 容器是一个重要的软件设计工具,可以帮助开发者实现可维护、可扩展和可测试的应用程序
1.3.2 使用 Spring 创建对象
- 使用 Spring 之前,优先导入 Spring 的 jar 包
- 将以下代码复制进 maven 即可
<dependency><groupId>org.springframework</groupId><artifactId>spring-webmvc</artifactId><version>6.0.9</version></dependency>
- 在资源文件夹 resources 下创建一个名为 applicationContext.xml 的文件

-
在 spring 官网找到 ioc容器的元数据
-
**在官网的 ico容器概述内可以找到 网站:Container Overview :: Spring Framework **
-
网址: https://docs.spring.io/spring-framework/reference/core/beans/basics.html
-
进入官网下滑找到
<beans>标签的内容复制

- 或者直接复制我下方的代码
<?xml version="1.0" encoding="UTF-8"?>
<beans xmlns="http://www.springframework.org/schema/beans"xmlns:xsi="http://www.w3.org/2001/XMLSchema-instance"xsi:schemaLocation="http://www.springframework.org/schema/beanshttps://www.springframework.org/schema/beans/spring-beans.xsd"><bean id="..." class="..."><!-- collaborators and configuration for this bean go here --></bean><bean id="..." class="..."><!-- collaborators and configuration for this bean go here --></bean><!-- more bean definitions go here --></beans>
- 直接将这段代码放入刚刚创建的 applicationContext.xml 文件当中

- 这里的
<bean></bean>标签实际上就类似于 new 了一个对象 <bean>标签的 属性 id 代表对象的对象吗<bean>标签的属性 class 则代表引用的哪个类,要加上包名- Spring 使用示例 (applicationContext.xml 文件内容)
<?xml version="1.0" encoding="UTF-8"?>
<beans xmlns="http://www.springframework.org/schema/beans"xmlns:xsi="http://www.w3.org/2001/XMLSchema-instance"xsi:schemaLocation="http://www.springframework.org/schema/beanshttps://www.springframework.org/schema/beans/spring-beans.xsd"><bean id="hello" class="com.qiaoer.entity.Hello"></bean>
</beans>
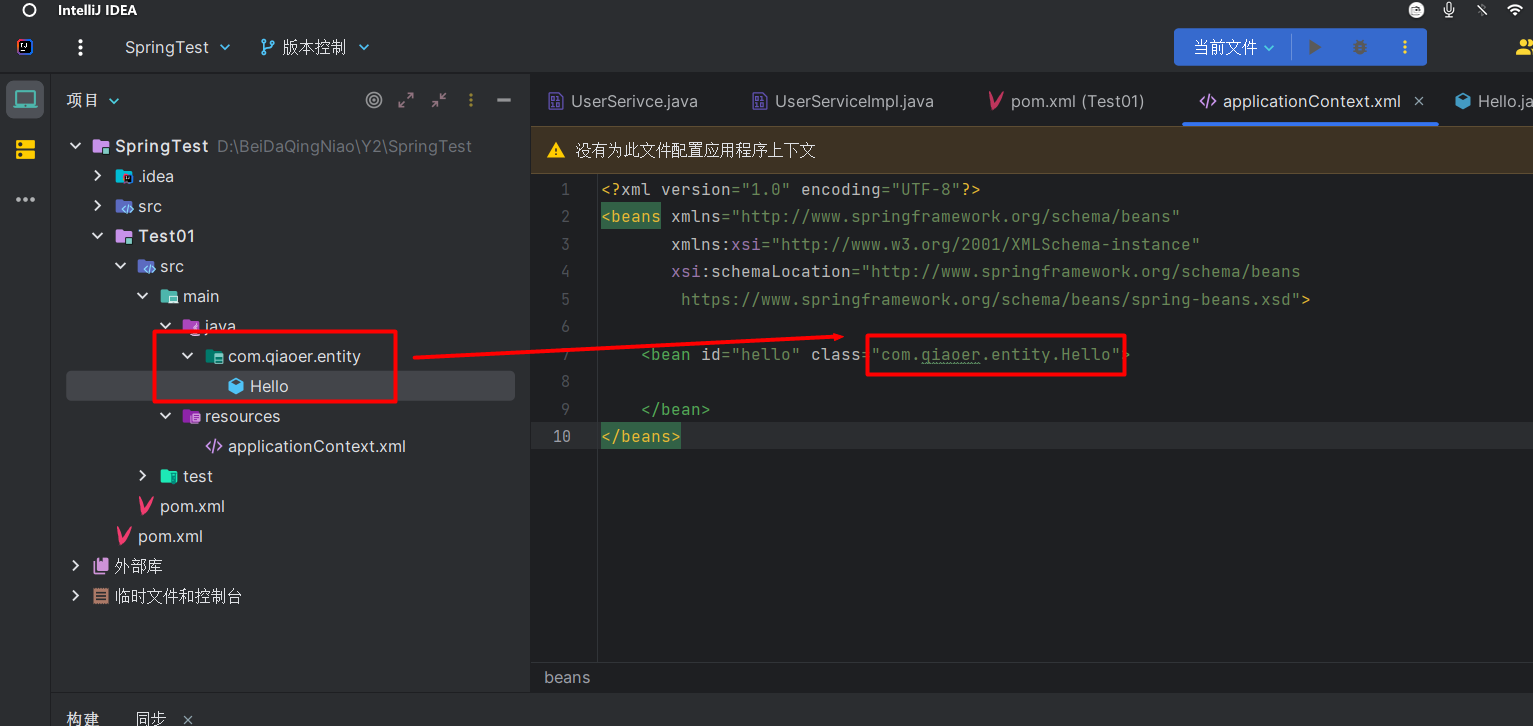
- 使用 ClassPathXmlApplicationContext 对象可以获取 Spring 的上下文
ApplicationContext classPathXmlApplicationContext = new ClassPathXmlApplicationContext("applicationContext.xml");
- 括号内的构造函数参数为 applicationContext.xml 即 Spring 配置文件的路径
- 使用
getBean(String id)方法可以获取具体的对象,括号内的参数对应 xml 文件当中为<bean>标签的 id 属性 - 示例,获取 Hello 类的对象
import com.qiaoer.entity.Hello;
import org.springframework.context.ApplicationContext;
import org.springframework.context.support.ClassPathXmlApplicationContext;public class Test {public static void main(String[] args) {ApplicationContext classPathXmlApplicationContext = new ClassPathXmlApplicationContext("applicationContext.xml");Hello hello = (Hello)classPathXmlApplicationContext.getBean("hello");System.out.println(hello);}
}
1.3.3 使用 Spring 为对象当中的属性赋值
- 使用
<bean>标签内的 子标签<property>来赋值 <property>标签语法
<property name="属性名" value="具体值"/>
<property>标签的 name 属性为对象中要赋值的属性名,value 属性是为属性赋的值- 使用
<property>赋值必须在类中为属性写有对应的 get 和 set 方法来赋值和取值 - 示例
<?xml version="1.0" encoding="UTF-8"?>
<beans xmlns="http://www.springframework.org/schema/beans"xmlns:xsi="http://www.w3.org/2001/XMLSchema-instance"xsi:schemaLocation="http://www.springframework.org/schema/beanshttps://www.springframework.org/schema/beans/spring-beans.xsd"><bean id="hello" class="com.qiaoer.entity.Hello"><property name="name" value="你好"/></bean>
</beans>
import com.qiaoer.entity.Hello;
import org.springframework.context.ApplicationContext;
import org.springframework.context.support.ClassPathXmlApplicationContext;public class Test {public static void main(String[] args) {ApplicationContext classPathXmlApplicationContext = new ClassPathXmlApplicationContext("applicationContext.xml");Hello hello = (Hello)classPathXmlApplicationContext.getBean("hello");System.out.println(hello.getName());}
}
- 如果我们要给属性赋的值是一个对象的引用的话 应使用
<property>标签的 ref 属性 而不是 value 属性 - 示例,现在新建一个 HelloSpring 的类,该为为 Hello 类的属性
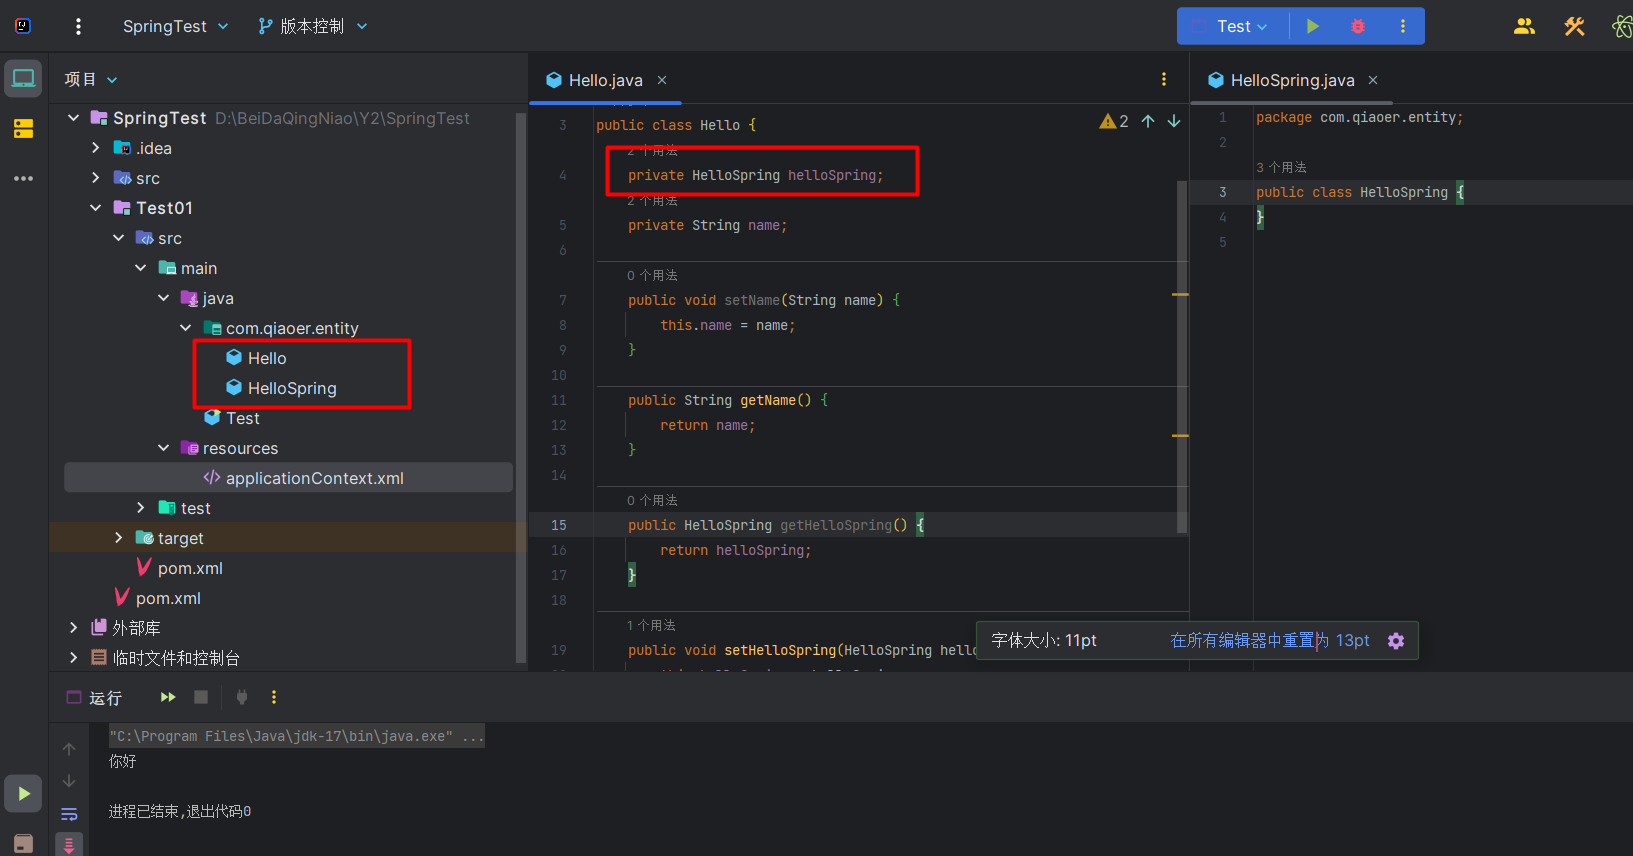
- 在 applicationContext.xml 当中,应事先创建好 HelloSpring 的对象,然后使用 ref 属性指向该对象的应用
- 示例
<?xml version="1.0" encoding="UTF-8"?>
<beans xmlns="http://www.springframework.org/schema/beans"xmlns:xsi="http://www.w3.org/2001/XMLSchema-instance"xsi:schemaLocation="http://www.springframework.org/schema/beanshttps://www.springframework.org/schema/beans/spring-beans.xsd">
<!--    创建 HelloSpring 对象--><bean id="helloSpring" class="com.qiaoer.entity.HelloSpring"/><bean id="hello" class="com.qiaoer.entity.Hello">
<!--        将该属性的引用指向 HelloSpring 对象--><property name="helloSpring" ref="helloSpring"/></bean>
</beans>
- ref 属性的值为要执行对象的 id 的值
- 这样就将 HelloSpring 对象赋给了 Hello 内的 HelloSpring 类型的属性
1.3.4 IOC 创建对象方式
- spring 默认创建对象时会调用类的无参构造
- 也可以通过自己给构造器赋值,来调用有参构造,主要有 3 种方式
- 需要使用
<bean>标签中的子标签<constructor-arg>来给构造器赋值 - 实体类 Hello 示例
package com.qiaoer.entity;public class Hello {private String name;private int age;public Hello(String name, int age) {this.name = name;this.age = age;System.out.println("name:"+this.name);System.out.println("age:"+this.age);}public Hello(String name) {this.name = name;System.out.println("name:"+this.name);}public Hello() {}public String getName() {return name;}public void setName(String name) {this.name = name;}public int getAge() {return age;}public void setAge(int age) {this.age = age;}
}-
1、使用下标创建
- 示例
<?xml version="1.0" encoding="UTF-8"?> <beans xmlns="http://www.springframework.org/schema/beans"xmlns:xsi="http://www.w3.org/2001/XMLSchema-instance"xsi:schemaLocation="http://www.springframework.org/schema/beanshttps://www.springframework.org/schema/beans/spring-beans.xsd"><bean id="hello" class="com.qiaoer.entity.Hello"><constructor-arg index="0" value="巧克力"/><constructor-arg index="1" value="17"/></bean> </beans>- 下标 0 表示构造器第一个参数 String name ,以此类推
- 通过下标赋值不用注意顺序
- 在创建此对象时则会直接调用有两个参数的有参构造
import com.qiaoer.entity.Hello; import org.springframework.context.ApplicationContext; import org.springframework.context.support.ClassPathXmlApplicationContext;public class Test {public static void main(String[] args) {ApplicationContext classPathXmlApplicationContext = new ClassPathXmlApplicationContext("applicationContext.xml");Hello hello = (Hello)classPathXmlApplicationContext.getBean("hello");} } -
2、使用类型创建
- 示例
<?xml version="1.0" encoding="UTF-8"?> <beans xmlns="http://www.springframework.org/schema/beans"xmlns:xsi="http://www.w3.org/2001/XMLSchema-instance"xsi:schemaLocation="http://www.springframework.org/schema/beanshttps://www.springframework.org/schema/beans/spring-beans.xsd"><bean id="hello" class="com.qiaoer.entity.Hello"><constructor-arg type="int" value="17"/><constructor-arg type="java.lang.String" value="巧克力"/></bean> </beans>- 通过类型赋值时,当用相同类型的参数时,需要按照参数的顺序来赋值
- 类型赋值不建议使用,因为当有相同类型时,容易混淆
- 基本类型的可以直接写
- 引用类型需要加上包名
-
3、参数名创建
- 示例
<?xml version="1.0" encoding="UTF-8"?> <beans xmlns="http://www.springframework.org/schema/beans"xmlns:xsi="http://www.w3.org/2001/XMLSchema-instance"xsi:schemaLocation="http://www.springframework.org/schema/beanshttps://www.springframework.org/schema/beans/spring-beans.xsd"><bean id="hello" class="com.qiaoer.entity.Hello"><constructor-arg name="age" value="17"/><constructor-arg name="name" value="巧克力"/></bean> </beans>- 使用参数名创建也不需要注意顺序
- 直接使用参数的名字便可赋值,推荐使用
a/beans"
xmlns:xsi=“http://www.w3.org/2001/XMLSchema-instance”
xsi:schemaLocation=“http://www.springframework.org/schema/beans
https://www.springframework.org/schema/beans/spring-beans.xsd”>
- 使用参数名创建也不需要注意顺序
- 直接使用参数的名字便可赋值,推荐使用

