Vue组件库
Vite+Vue3+Typescript+TSX
1、项目搭建
1.1、创建项目(yarn)
D:\WebstromProject>yarn create vite
yarn create v1.22.19
[1/4] Resolving packages...
[2/4] Fetching packages...
[3/4] Linking dependencies...
[4/4] Building fresh packages...success Installed "create-vite@4.4.1" with binaries:- create-vite- cva
√ Project name: ... chenxing
√ Select a framework: » Vue
√ Select a variant: » TypeScriptScaffolding project in D:\WebstromProject\chenxing...Done. Now run:cd chenxingyarnyarn devDone in 6.95s.
1.2、基础依赖
1、@types/node
# @types/node
yarn add -D @types/node
2、Jsx
# @vitejs/plugin-vue-jsx
yarn add -D @vitejs/plugin-vue-jsx
3、eslint
# eslint、vite-plugin-eslint(vite运行的时候自动检测eslint规范)
yarn add -D eslint
yarn add -D vite-plugin-eslint
4、prettier
# prettier、eslint-config-prettier(关掉所有和Prettier冲突的ESLint的配置)、eslint-plugin-prettier(将Prettier的rules以插件的形式加入到 ESLint里面)
yarn add -D prettier eslint-config-prettier eslint-plugin-prettier
5、sass
# sass
yarn add -D sass
1.3、项目配置
1、关闭Option Api
import {defineConfig} from 'vite'
import vue from '@vitejs/plugin-vue'// https://vitejs.dev/config/
export default defineConfig({define: {// 关闭Vue Options Api__VUE_OPTIONS_API__: false},plugins: [vue()],
})
2、Jsx配置
import {defineConfig} from 'vite'
import vue from '@vitejs/plugin-vue'
import vueJsxPlugin from "@vitejs/plugin-vue-jsx";// https://vitejs.dev/config/
export default defineConfig({define: {// 关闭Vue Options Api__VUE_OPTIONS_API__: false},plugins: [vue(),vueJsxPlugin({})],
})
3、路径别名
src修改为examples,新增examples同级文件夹packages作为UI组件位置
import { defineConfig } from "vite";
import vue from "@vitejs/plugin-vue";
import vueJsxPlugin from "@vitejs/plugin-vue-jsx";
import * as path from "path";// https://vitejs.dev/config/
export default defineConfig({base: "./",define: {// 关闭Vue Options Api__VUE_OPTIONS_API__: false,},plugins: [vue(), vueJsxPlugin({})],resolve: {// 配置路径别名alias: {"@": path.resolve(__dirname, "./examples"),},},
});
1.4、eslint
1、初始化eslint
PS D:\WebstromProject\chenxing> npx eslint --init
You can also run this command directly using 'npm init @eslint/config'.
? How would you like to use ESLint? ...To check syntax only
> To check syntax and find problems
√ How would you like to use ESLint? · problems
√ What type of modules does your project use? · esm
√ Which framework does your project use? · vue
√ Does your project use TypeScript? · No / Yes
√ Where does your code run? · browser, node
√ What format do you want your config file to be in? · JavaScript
The config that you've selected requires the following dependencies:@typescript-eslint/eslint-plugin@latest eslint-plugin-vue@latest @typescript-eslint/parser@latest
√ Would you like to install them now? · No / Yes
√ Which package manager do you want to use? · yarn
Installing @typescript-eslint/eslint-plugin@latest, eslint-plugin-vue@latest, @typescript-eslint/parser@latest
2、.eslintrc.cjs
module.exports = {"env": {"browser": true,"es2021": true,"node": true},"extends": ["eslint:recommended","plugin:@typescript-eslint/recommended","plugin:vue/vue3-essential"],"overrides": [{"env": {"node": true},"files": [".eslintrc.{js,cjs}"],"parserOptions": {"sourceType": "script"}}],"parserOptions": {"ecmaVersion": "latest","parser": "@typescript-eslint/parser","sourceType": "module"},"plugins": ["@typescript-eslint","vue"],"rules": {}
}
3、package.json
{"name": "chenxing","private": true,"version": "0.0.0","type": "module","scripts": {"dev": "vite","build": "vue-tsc && vite build","preview": "vite preview","lint": "eslint . --ext .vue,.js,.ts,.jsx,.tsx --fix"},"dependencies": {"vue": "^3.3.4"},"devDependencies": {"@typescript-eslint/eslint-plugin": "^6.3.0","@typescript-eslint/parser": "^6.3.0","@vitejs/plugin-vue": "^4.2.3","@vitejs/plugin-vue-jsx": "^3.0.1","eslint": "^8.46.0","eslint-plugin-vue": "^9.17.0","typescript": "^5.0.2","vite": "^4.4.5","vite-plugin-eslint": "^1.8.1","vue-tsc": "^1.8.5"}
}
4、webstrom配置
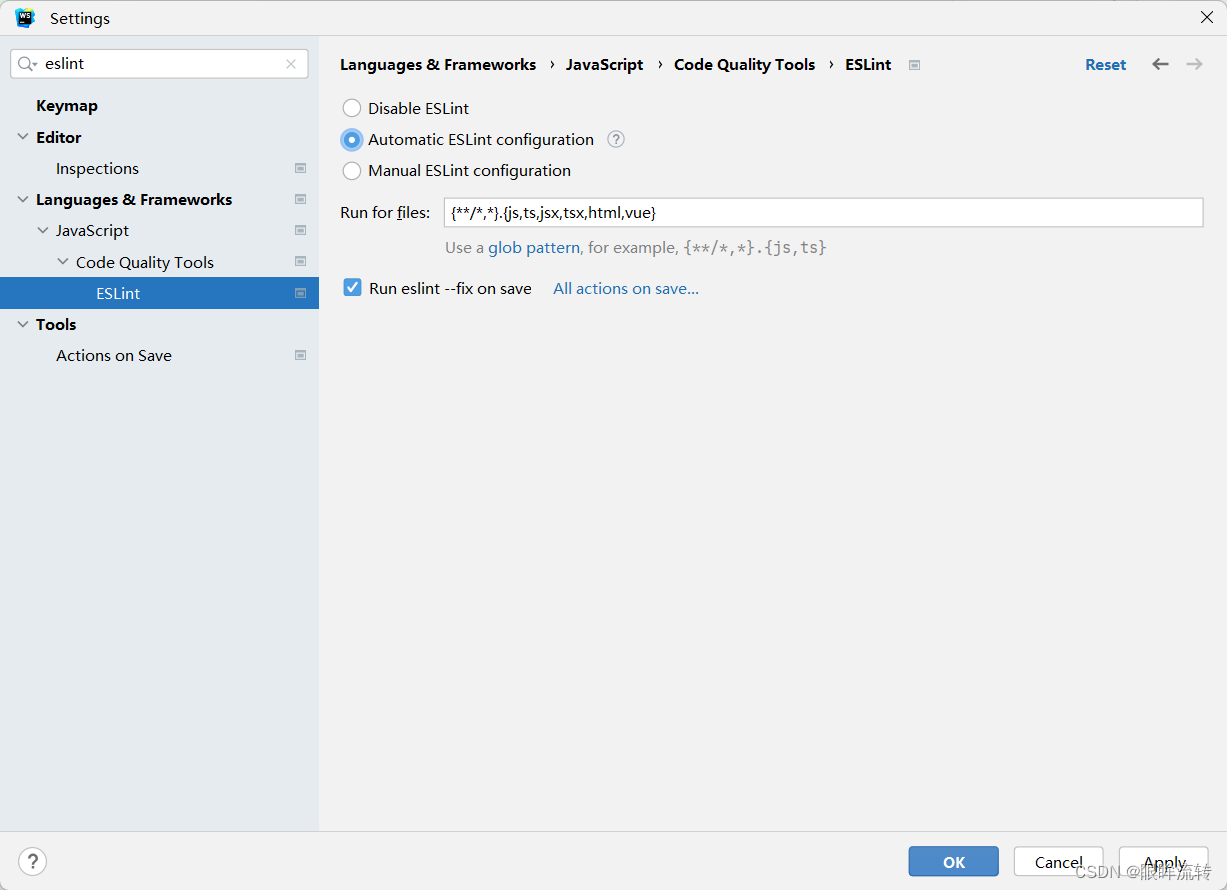
1.5、prettier
1、.prettierrc.cjs
module.exports = {printWidth: 80, // 单行长度tabWidth: 2, // 缩进长度useTabs: false, // 使用空格代替tab缩进semi: true, // 句末使用分号singleQuote: false, // 使用单引号
}
2、.eslintrc.cjs
module.exports = {"env": {"browser": true,"es2021": true,"node": true},"extends": ["eslint:recommended","plugin:@typescript-eslint/recommended","plugin:vue/vue3-essential",'plugin:prettier/recommended','eslint-config-prettier'],"overrides": [{"env": {"node": true},"files": [".eslintrc.{js,cjs}"],"parserOptions": {"sourceType": "script"}}],"parserOptions": {"ecmaVersion": "latest","parser": "@typescript-eslint/parser","sourceType": "module"},"plugins": ["@typescript-eslint","vue"],"rules": {}
}
3、package.json
{"name": "chenxing","private": true,"version": "0.0.0","type": "module","scripts": {"dev": "vite","build": "vue-tsc && vite build","preview": "vite preview","lint": "eslint . --ext .vue,.js,.ts,.jsx,.tsx","prettier": "prettier --write ./**/*.{vue,ts,tsx,js,jsx,css,less,scss,json,md}"},"dependencies": {"vue": "^3.3.4"},"devDependencies": {"@types/node": "^20.4.10","@typescript-eslint/eslint-plugin": "^6.3.0","@typescript-eslint/parser": "^6.3.0","@vitejs/plugin-vue": "^4.2.3","@vitejs/plugin-vue-jsx": "^3.0.1","eslint": "^8.47.0","eslint-config-prettier": "^9.0.0","eslint-plugin-prettier": "^5.0.0","eslint-plugin-vue": "^9.17.0","prettier": "^3.0.1","sass": "^1.65.1","typescript": "^5.0.2","vite": "^4.4.5","vite-plugin-eslint": "^1.8.1","vue-tsc": "^1.8.5"}
}
4、webstrom配置

2、Button组件
2.1、基础组件
在package下新建components目录,components下新建button目录,button下新建src目录和index.ts文件,src目录下新建button.tsx和type.ts
1、button.tsx
import { defineComponent, toRefs } from "vue";
import { PropsType, propsType } from "./type";
import "../style/index.scss";export default defineComponent({name: "XButton",props: propsType,setup(props: PropsType, { slots }) {const { type } = toRefs(props);console.log(type);return () => {return (<div class={`button button-${type.value}`}>{slots.default ? slots.default() : "Button"}</div>);};},
});
2、type.ts
import { ExtractPropTypes, PropType } from "vue";// buttonType
type type = "default" | "success" | "warning" | "fail";// props参数类型
export const propsType = {type: {type: String as PropType<type>,default: "default",},
};export type PropsType = ExtractPropTypes<typeof propsType>;
3、index.ts
import XButton from "./src/button";
import { App } from "vue";export default {install(app: App) {app.component(XButton.name, XButton);},
};
2.2、样式
src同级新建chenxing.scss(通用样式抽离),src同级新建style目录,style下新建index.scss
1、chenxing.scss
$fontSize: var(--font-size, 14px);
$fontColor: #3c3c3c;
$lineHeight: 1.2rem;
$border-radius: var(--border-radius, 2px);// 基础样式
* {margin: 0; // 清除所有元素外边距padding: 0; // 清除所有元素内边距outline: none; // 清除所有元素轮廓线box-sizing: border-box !important; // 规定盒子模型。content-box:宽度和高度分别应用到元素的内容框。在宽度和高度之外绘制元素的内边距和边框;border-box:为元素指定的任何内边距和边框都将在已设定的宽度和高度内进行绘制。font-family: system-ui; // html基准字体font-size: $fontSize; // html基准字体大小color: $fontColor; // html基准字体颜色line-height: $lineHeight; // html基准行高
}:not(i) {&:before,&:after {margin: 0; // 清除所有元素外边距padding: 0; // 清除所有元素内边距outline: none; // 清除所有元素轮廓线box-sizing: border-box !important; // 规定盒子模型。content-box:宽度和高度分别应用到元素的内容框。在宽度和高度之外绘制元素的内边距和边框;border-box:为元素指定的任何内边距和边框都将在已设定的宽度和高度内进行绘制。}
}html,
body {position: relative; // html,body相对定位,防止body直接子节点乱飞
}
2、index.scss
@import "packages/components/chenxing";$button-types: (success: var(--button-success, green),warning: var(--button-warning, yellow),fail: var(--button-fail, red));.button {display: inline-block;border-radius: 5px;padding: .75rem 1rem;@each $type, $color in $button-types {&.button-#{$type} {background-color: $color;color: #ffffff;}}
}
2.3、尺寸
1、index.tsx
import { defineComponent, toRefs } from "vue";
import { PropsType, propsType } from "./type";
import "../style/index.scss";export default defineComponent({name: "XButton",props: propsType,setup(props: PropsType, { slots }) {const { type, size } = toRefs(props);console.log(type, size);return () => {return (<div class={`button button-${type.value} button-${size.value}`}>{slots.default ? slots.default() : "Button"}</div>);};},
});
2、type.ts
import { ExtractPropTypes, PropType } from "vue";// buttonType
type type = "default" | "success" | "warning" | "fail";// buttonSize
type size = "small" | "proper" | "large";// props参数类型
export const propsType = {type: {type: String as PropType<type>,default: "default",},size: {type: String as PropType<size>,default: "proper",},
};export type PropsType = ExtractPropTypes<typeof propsType>;
3、index.scss
@import "packages/components/chenxing";$buttonTypes: (success: green,warning: yellow,fail: red
);$buttonSizes: (small: .25rem .75rem,proper: .75rem 1rem,large: 1rem 1.25rem,
);.button {display: inline-block;border-radius: 5px;// default typebackground-color: blue;color: #ffffff;// default sizefont-size: $fontSize;padding: .75rem 1rem;margin: .25rem .5rem;// $button-types@each $type, $color in $buttonTypes {&.button-#{$type} {background-color: $color;color: #ffffff;}}// $button-sizes@each $size, $padding in $buttonSizes {&.button-#{$size} {padding: $padding;}}
}
2.4、块/行内
1、index.tsx
import { defineComponent, toRefs } from "vue";
import { PropsType, propsType } from "./type";
import "../style/index.scss";export default defineComponent({name: "XButton",props: propsType,setup(props: PropsType, { slots }) {const { type, size, disable, display } = toRefs(props);console.log(type, size, disable, display);return () => {return (<divclass={`button button-${type.value} button-${size.value} button-${display.value}>{slots.default ? slots.default() : "Button"}</div>);};},
});
2、type.ts
import { ExtractPropTypes, PropType } from "vue";type type = "default" | "success" | "warning" | "fail";type size = "small" | "proper" | "large";type display = "inline" | "block";// props参数类型
export const propsType = {type: {type: String as PropType<type>,default: "default",},size: {type: String as PropType<size>,default: "proper",},display: {type: String as PropType<display>,default: "inline-block",},
};export type PropsType = ExtractPropTypes<typeof propsType>;
3、index.scss
@import "packages/components/chenxing";$buttonTypes: (success: green,warning: yellow,fail: red
);$buttonSizes: (small: .25rem .75rem,proper: .75rem 1rem,large: 1rem 1.25rem,
);$buttonDisplay: (inline: inline-block, block: block);.button {border-radius: 5px;// default typebackground-color: blue;color: #ffffff;// default sizefont-size: $fontSize;padding: .75rem 1rem;margin: .25rem .5rem;// default displaydisplay: inline-block;// type@each $type, $color in $buttonTypes {&.button-#{$type} {background-color: $color;color: #ffffff;}}// size@each $size, $padding in $buttonSizes {&.button-#{$size} {padding: $padding;}}// display@each $display, $displayItem in $buttonDisplay {&.button-#{$display} {display: $displayItem;}}
}
2.5、禁用
1、index.tsx
import { defineComponent, toRefs } from "vue";
import { PropsType, propsType } from "./type";
import "../style/index.scss";export default defineComponent({name: "XButton",props: propsType,setup(props: PropsType, { slots }) {const { type, size, disable, display } = toRefs(props);console.log(type, size, disable, display);const Display = disable.value ? "disable" : "";return () => {return (<divclass={`button button-${type.value} button-${size.value} button-${display.value} ${Display}`}>{slots.default ? slots.default() : "Button"}</div>);};},
});
2、type.ts
import { ExtractPropTypes, PropType } from "vue";type type = "default" | "success" | "warning" | "fail";type size = "small" | "proper" | "large";type display = "inline" | "block";// props参数类型
export const propsType = {type: {type: String as PropType<type>,default: "default",},size: {type: String as PropType<size>,default: "proper",},display: {type: String as PropType<display>,default: "inline-block",},disable: {type: Boolean,default: false,},
};export type PropsType = ExtractPropTypes<typeof propsType>;
3、index.scss
@import "packages/components/chenxing";$buttonTypes: (success: green,warning: yellow,fail: red
);$buttonSizes: (small: .25rem .75rem,proper: .75rem 1rem,large: 1rem 1.25rem,
);$buttonDisplay: (inline: inline-block, block: block);.button {border-radius: 5px;// default typebackground-color: blue;color: #ffffff;// default sizefont-size: $fontSize;padding: .75rem 1rem;margin: .25rem .5rem;// default displaydisplay: inline-block;// type@each $type, $color in $buttonTypes {&.button-#{$type} {background-color: $color;color: #ffffff;}}// size@each $size, $padding in $buttonSizes {&.button-#{$size} {padding: $padding;}}// display@each $display, $displayItem in $buttonDisplay {&.button-#{$display} {display: $displayItem;}}// disable&.disable {pointer-events: none;opacity: .3;}
}
2.6、使用
main.ts
import { createApp } from "vue";
import "./style.css";
import App from "./App.vue";
// import XButton from "../packages/components/button";
import Chenxing from "../packages/components";createApp(App).use(Chenxing).mount("#app");
App.vue
<script setup lang="ts">
import XButton from "../packages/components/button/src";
</script><template><XButton>按钮</XButton><XButton type="success">按钮</XButton><XButton type="warning">按钮</XButton><XButton type="fail">按钮</XButton><br /><XButton type="success" size="small">按钮</XButton><XButton type="warning" size="proper">按钮</XButton><XButton type="fail" size="large">按钮</XButton><br /><XButton disable type="success">按钮</XButton><XButton :disable="true" type="warning">按钮</XButton><XButton :disable="false" type="fail">按钮</XButton><br /><XButton :disable="false" type="fail" display="block">按钮</XButton>
</template><style scoped></style>
3、组件统一注册
components下新建index.ts
3.1、index.ts
// 导入button组件
import { App } from "vue";
import XButton from "./button/src/button";// 组件列表
const components = [XButton];export default {install(app: App) {components.forEach((component) => {app.component(component.name, component);});},
};
3.2、使用
1、main.ts
import { createApp } from "vue";
import "./style.css";
import App from "./App.vue";
// import XButton from "../packages/components/button";
import Chenxing from "../packages/components";createApp(App).use(Chenxing).mount("#app");
2、App.vue
<script setup lang="ts">
import XButton from "../packages/components/button/src/button";
</script><template><XButton></XButton>
</template><style scoped></style>


