文章目录
- 一、SpringMVC
- 1.1 引言
- 1.2 MVC架构
- 1.2.1 概念
- 1.2.2 好处
- 二、开发流程
- 2.1 导入依赖
- 2.2 配置核心(前端)控制器
- 2.3 后端控制器
- 2.4 配置文件
- 2.5 访问
- 三、接收请求参数
- 3.1 基本类型参数
- 3.2 实体收参【`重点`】
- 3.3 数组收参
- 3.4 集合收参 【了解】
- 3.5 路径参数
- 3.6 中文乱码
- 四、跳转
- 4.1 转发
- 4.2 重定向
- 4.3 跳转细节
- 五、传值
- 5.1 Request和Session
- 5.2 JSP中取值
- 5.3 Model
- 5.4 ModelAndView
- 5.5 @SessionAttributes
- 六、静态资源
- 6.1 静态资源问题
- 6.2 解决方案1
- 6.3 解决方案2
- 6.4 解决方案3
- 七、Json处理
- 7.1 导入依赖
- 7.2 使用@ResponseBody
- 7.3 使用@RestController
- 7.4 使用@RequestBody
- **@RequestBody**, 接收Json参数
- 7.4.1 定义Handler
- 7.4.2 Ajax发送json
- 7.5 Jackson常用注解
- 7.5.1 日期格式化
- 7.5.2 属性名修改
- 7.5.3 属性忽略
- 7.5.4 null和empty属性排除
- 7.5.5 自定义序列化
- 7.6 FastJson
- 7.6.1 导入依赖
- 7.6.2 安装FastJson
- 7.6.3 使用
- 7.6.4 常用注解
- 八、异常解析器
- 8.1 现有方案,分散处理
- 8.2 异常解析器,统一处理
- 九、拦截器
- 9.1 作用
- 9.2 定义拦截器
- 9.3 配置拦截路径
- 十、上传
- 10.1 导入jar
- 10.2 表单
- 10.3 上传解析器
- 10.4 Handler
- 十一、下载
- 11.1 超链
- 11.2 Handler
- 十二、验证码
- 12.1 作用
- 12.2 导入jar
- 12.3 声明验证码组件
- 12.4 Page
- 十三、REST
- 13.1 开发风格
- 13.2 优点
- 13.3 使用
- 13.3.1 定义Rest风格的 Controller
- 13.3.2 Ajax请求
- 十四、跨域请求
- 14.1 域
- 14.2 Ajax跨域问题
- 14.3 解决方案
- 十五、SpringMVC执行流程
- 十六、Spring整合
- 16.1 整合思路
- 16.2 整合技巧
一、SpringMVC
1.1 引言
java开源框架,Spring Framework的一个独立模块。
MVC框架,在项目中开辟MVC层次架构
对控制器中的功能 包装 简化 扩展践行工厂模式,功能架构在工厂之上
1.2 MVC架构
1.2.1 概念
| 名称 | 职责 |
|---|---|
| Model | 模型:即业务模型,负责完成业务中的数据通信处理,对应项目中的 service和dao |
| View | 视图:渲染数据,生成页面。对应项目中的Jsp |
| Controller | 控制器:直接对接请求,控制MVC流程,调度模型,选择视图。对应项目中的Servlet |
1.2.2 好处
MVC是现下软件开发中的最流行的代码结构形态;
人们根据负责的不同逻辑,将项目中的代码分成 M V C 3个层次;
层次内部职责单一,层次之间耦合度低;
符合低耦合 高内聚的设计理念。也实际有利于项目的长期维护。
二、开发流程
2.1 导入依赖
<dependency><groupId>org.springframework</groupId><artifactId>spring-webmvc</artifactId><version>5.1.6.RELEASE</version>
</dependency>
2.2 配置核心(前端)控制器
作为一个MVC框架,首先要解决的是:如何能够收到请求!
所以MVC框架大都会设计一款前端控制器,选型在 Servlet 或 Filter两者之一,在框架最前沿率先工作,接收所有请求。
此控制器在接收到请求后,还会负责springMVC的核心的调度管理,所以既是前端又是核心。
<servlet><servlet-name>mvc</servlet-name><servlet-class>org.springframework.web.servlet.DispatcherServlet</servlet-class><!-- 局部参数:声明配置文件位置 --><init-param><param-name>contextConfigLocation</param-name><param-value>classpath:mvc.xml</param-value></init-param><!-- Servlet启动时刻:可选 --><load-on-startup>1</load-on-startup>
</servlet>
<servlet-mapping><servlet-name>mvc</servlet-name><url-pattern>/</url-pattern>
</servlet-mapping>
2.3 后端控制器
等价于之前定义的Servlet
@Controller //声明这是一个控制器
@RequestMapping("/hello")  //访问路径 ,等价于url-pattern
public class HelloController {@RequestMapping("/test1")  //访问路径public String hello1(){System.out.println("hello world");return "index"; // 跳转:/index.jsp  }@RequestMapping("/test2") //访问路径public String hello2(){System.out.println("hello c9");return "views/users";//  跳转:/views/user.jsp}
}
2.4 配置文件
默认名称:核心控制器名-servet.xml 默认位置:WEB-INF
随意名称:mvc.xml 随意位置:resources 但需要配置在核心控制器中
<beans 	xmlns="http://www.springframework.org/schema/beans"xmlns:context="http://www.springframework.org/schema/context"xmlns:mvc="http://www.springframework.org/schema/mvc" xmlns:xsi="http://www.w3.org/2001/XMLSchema-instance" xsi:schemaLocation="http://www.springframework.org/schema/beanshttp://www.springframework.org/schema/beans/spring-beans.xsdhttp://www.springframework.org/schema/contexthttp://www.springframework.org/schema/context/spring-context.xsdhttp://www.springframework.org/schema/mvchttp://www.springframework.org/schema/mvc/spring-mvc.xsd"><!-- 告知springmvc  哪些包中 存在 被注解的类 --><context:component-scan base-package="com.qf.controller"></context:component-scan><!-- 注册注解开发驱动 --><mvc:annotation-driven></mvc:annotation-driven><!-- 视图解析器作用:1.捕获后端控制器的返回值="index"2.解析: 在返回值的前后 拼接 ==> "/index.jsp"--><bean class="org.springframework.web.servlet.view.InternalResourceViewResolver"><!-- 前缀 --><property name="prefix" value="/"></property><!-- 后缀 --><property name="suffix" value=".jsp"></property></bean>
</beans>
2.5 访问
http://localhost:8989/hello/test1
http://localhost:8989/hello/test2
接口方法的返回值:
- 没有返回值
- 返回逻辑视图名
- 返回字符串
- 返回 JSON
三、接收请求参数
3.1 基本类型参数
请求参数和方法的形参 同名即可
springMVC默认可以识别的日期字符串格式为: yyyy/MM/dd HH:mm:ss
通过@DateTimeFormat可以修改默认日志格式
// id  name gender
// http://localhost:8989/xxx/../test1?id=1&name=zzz&gender=false&birth=2018-12-12 12:20:30
@RequestMapping("/test1")
public String testParam1(Integer id,String name,Boolean gender,@DateTimeFormat(pattern="yyyy-MM-dd HH:mm:ss")Date birth){System.out.println("test param1");return "index";
}
3.2 实体收参【重点】
请求参数和实体的属性 同名即可
public class User {private Integer id;private String name;@DateTimeFormat(pattern="yyyy-MM-dd")private Date birth;private Boolean gender;//set/get ...
}//http://localhost:8989/.../test2?id=1&name=zzz&gender=false&birth=2018-12-12 12:20:30
@RequestMapping("/test2")
public String testParam2(User user){System.out.println("test param2");System.out.println("user:"+user);return "index";
}
3.3 数组收参
简单类型的 数组
<form>......<input type="checkbox" name="hobby" value="fb"/>足球 <input type="checkbox" name="hobby" value="bb"/>篮球 <input type="checkbox" name="hobby" value="vb"/>排球</form>
//http://localhost:8989/.../test3?hobby=football&hobby=basketball
@RequestMapping("/test3")
public String testParam3(String[] hobby){for(String h:hobby){System.out.print(h+" ");}return "index";
}
3.4 集合收参 【了解】
public class UserList {//private User[] users;private List<User> users;//set/get..
}// <input type="text" name="users[0].id"/>
// post请求:http://...?users[0].id=1&users[0].name=zhangsan&users[0].birth=2018-12-12&users[1].id=2&....
@RequestMapping("/test4")
public String testParam4(UserList userList){for(User user:userList.getUsers()){System.out.println(user);}return "index";
}
3.5 路径参数
// {id} 定义名为id的路径;【/hello/{id}】的匹配能力和【/hello/*】等价
// http://localhost:8989/.../hello/10   {id}匹配到10
@RequestMapping("/hello/{id}")
// @PathVariable将{id}路径匹配到值赋给id参数
// 路径名和参数名相同则@PathVariable("id")可简写为 @PathVariable
public String testParam5(@PathVariable("id") Integer id){System.out.println("id:"+id);            return "index";
}// http://localhost:8989/.../hello/tom   {username}匹配到tom
@RequestMapping("/hello/{username}")
public String testParam6(@PathVariable("username") String name){//将{username}路径匹配到的值赋给name参数System.out.println("username:"+name);return "index";
}
3.6 中文乱码
首先,页面中字符集统一
JSP : <%@page  pageEncoding="utf-8" %>
HTML : <meta charset="UTF-8">
其次,tomcat中字符集设置,对get请求中,中文参数乱码有效
Tomcat配置:URIEncoding=utf-8
最后,设置此filter,对post请求中,中文参数乱码有效
<!-- 此过滤器会进行:request.setCharactorEncoding("utf-8"); -->
<filter><filter-name>encoding</filter-name><filter-class>org.springframework.web.filter.CharacterEncodingFilter</filter-class><init-param><param-name>encoding</param-name><param-value>utf-8</param-value></init-param>
</filter>
<filter-mapping><filter-name>encoding</filter-name><url-pattern>/*</url-pattern>
</filter-mapping>
四、跳转
4.1 转发
@RequestMapping("/forw")
class ForwardController{@RequestMapping("/test1")public String testForward(){System.out.println("test forward1");// 转发跳转 /views/users.jsp// return "views/users";//和下一行等价return "forward:/views/users.jsp";}@RequestMapping("/test2")public String testForward2(){System.out.println("test forward2");//转发到  /forw/test1//return "forward:test1";//相对路径(转发到本类中的test1)//转发到  /forw/test1return "forward:/forw/test1"; //绝对路径}
}
4.2 重定向
@RequestMapping("/redir")
class RedirectController{@RequestMapping("/test1")public String testRedirect1(){System.out.println("test redirect1");//重定向到 /redir/test1//return "redirect:test1"; //相对路径(转发到本类中的test1)return "redirect:/redir/test1";//绝对路径}@RequestMapping("/test2")public String testRedirect2(){System.out.println("test redirect2");//重定向到 /views/users.jspreturn "redirect:/view/user.jsp";}
}
4.3 跳转细节
在增删改之后,为了防止请求重复提交,重定向跳转
在查询之后,可以做转发跳转
五、传值
从处理器往页面传值的四种方式:
- 传统的 HttpServletRequest、HttpSession。
- 返回逻辑视图名,则可以通过 Model 参数传参。
- 返回 ModelAndView。
- SessionAttribute(可以用在重定向的场景下)
C得到数据后,跳转到V,并向V传递数据。进而V中可以渲染数据,让用户看到含有数据的页面
转发跳转:Request作用域
重定向跳转:Session作用域
5.1 Request和Session
//形参中 即可获得 request 和 session对象
@RequestMapping("/test1")
public String testData(HttpSession session,HttpServletRequest req,Integer id){session.setAttribute("user",new User());req.setAttribute("age", 18);req.setAttribute("users",Arrays.asList(new User(),new User()));//return "test2";return "forward:/WEB-INF/test2.jsp";
}
5.2 JSP中取值
建议:重点复习 EL JSTL
//jsp中用EL表达式 取值即可
<fmt:formatDate value="${sessionScope.user.birth}" pattern="yyyy-MM-dd"/> <br/>
${sessionScope.user.birth} <br>
${requestScope.age}
5.3 Model
//model中的数据,会在V渲染之前,将数据复制一份给request
@RequestMapping("/test")
public String testData(Model model){model.addAttribute("name", "张三");return "index";
}//jsp中用EL表达式 取值即可
${requestScope.name}
5.4 ModelAndView
//modelandview 可以集中管理 跳转和数据
@RequestMapping("/test")
public ModelAndView testData(){//返回值类型为ModelAndView//新建ModelAndView对象ModelAndView mv = new ModelAndView();// 设置视图名,即如何跳转mv.setViewName("forward:/index.jsp");// 增加数据mv.addObject("age",18);return mv;
}//jsp中用EL表达式 取值即可
${requestScope.age}
5.5 @SessionAttributes
@SessionAttributes({“gender”,“name”}) :model中的 name和gender 会存入session中
SessionStatus 移除session
@Controller
@SessionAttributes({"gender","name"}) // model中的 name和gender 会存入session中
public class UserController {@RequestMapping("/hello")public String hello(Model m){m.addAttribute("gender",true); // 会存入sessionmv.addObject("name","zhj"); // 会存入sessionreturn "index";}@RequestMapping("/hello2")public String hello(SessionStatus status){// 移除通过SessionAttributes存入的sessionstatus.setComplete();return "index";}
}
六、静态资源
6.1 静态资源问题
静态资源:html,js文件,css文件,图片文件
静态文件没有url-pattern,所以默认是访问不到的,之所以可以访问,是因为,tomcat中有一个全局的servlet:org.apache.catalina.servlets.DefaultServlet,它的url-pattern是 “/”,是全局默认的Servlet. 所以每个项目中不能匹配的静态资源的请求,有这个Servlet来处理即可。
但,在SpringMVC中DispatcherServlet也采用了 “/” 作为url-pattern, 则项目中不会再使用全局的Serlvet,则静态资源不能完成访问。
6.2 解决方案1
DispathcerServlet采用其他的url-pattern
此时,所有访问handler的路径都要以 action结尾!!
<servlet><servlet-name>mvc9</servlet-name><servlet-class>org.springframework.web.servlet.DispatcherServlet</servlet-class>
</servlet>
<servlet-mapping><servlet-name>mvc9</servlet-name><url-pattern>*.action</url-pattern>
</servlet-mapping>
6.3 解决方案2
DispathcerServlet的url-pattern依然采用 “/”,但追加配置
<!-- 额外的增加一个handler,且其requestMapping:  "/**" 可以匹配所有请求,但是优先级最低所以如果其他所有的handler都匹配不上,请求会转向 "/**" ,恰好,这个handler就是处理静态资源的处理方式:将请求转会到tomcat中名为default的Servlet-->
<mvc:default-servlet-handler/>
6.4 解决方案3
- mapping是访问路径,location是静态资源存放的路径
- 将/html/** 中 /**匹配到的内容,拼接到 /hhh/后
http://…/html/a.html 访问 /hhh/a.html
<mvc:resources mapping="/html/**" location="/hhh/"/>
七、Json处理
主流处理方案三种:
- jackson(推荐)
- gson
- fastjson(了解)
SpringMVC 中,默认提供了对 jackson 和 gson 的支持。
7.1 导入依赖
<!-- Jackson springMVC默认的Json解决方案选择是 Jackson,所以只需要导入jackson的jar,即可使用。-->
<dependency><groupId>com.fasterxml.jackson.core</groupId><artifactId>jackson-databind</artifactId><version>2.9.8</version>
</dependency>
7.2 使用@ResponseBody
@Controller
public class JsonController{    @RequestMapping("/test1")@ResponseBody //将handler的返回值,转换成json(jackson),并将json响应给客户端。public User hello1(){System.out.println("hello world");User user = new User();return user;}// @ResponseBody还可以用在handler的返回值上@RequestMapping("/test2")public @ResponseBody List<User> hello2(){System.out.println("hello world");List<User> users = Arrays.asList(new User(),new User());return users;}// 如果返回值已经是字符串,则不需要转json,直接将字符串响应给客户端 @RequestMapping(value="/test3",produces = "text/html;charset=utf-8") //produces 防止中文乱码@ResponseBody public String hello2(){System.out.println("hello world");return "你好";}
}
7.3 使用@RestController
Controller类上加了@RestController注解,等价于在类中的每个方法上都加了@ResponseBody
@Controller
@RestController
public class JsonController{@RequestMapping("/test1")public User hello1(){System.out.println("hello world");User user = new User();return user;}//@ResponseBody还可以用在handler的返回值上@RequestMapping("/test2")public List<User> hello2(){System.out.println("hello world");List<User> users = Arrays.asList(new User(),new User());return users;}
}
7.4 使用@RequestBody
@RequestBody, 接收Json参数
7.4.1 定义Handler
class User{private Integer id;private String name;private Boolean gender;//set get
}
@RequestMapping("/users")
public String addUser(@RequestBody User user){//@RequestBody将请求体中的json数据转换为java对象System.out.println("cap2");System.out.println("Post user :"+user);return "index";
}
7.4.2 Ajax发送json
var xhr = new XMLHttpRequest();
xhr.open("post","${pageContext.request.contextPath}/users?"+new Date().getTime());
xhr.setRequestHeader("content-type","application/json");//设置请求头
xhr.send('{"id":1,"name":"shine","gender":"true"}');//传递json串
//ajax
var user = {id:1,name:"shine"};
$.ajax({url:'${pageContext.request.contextPath}/json2/test4',type:'post',contentType:"application/json",//声明请求参数类型为 jsondata:JSON.stringify(user),// 转换js对象成jsonsuccess:function(ret){console.log(ret);}
});
7.5 Jackson常用注解
7.5.1 日期格式化
@JsonFormat(pattern=“yyyy-MM-dd HH:mm:ss”,timezone = “GMT+8”)
public class User{private Integer id;private String name;@JsonFormat(pattern="yyyy-MM-dd HH:mm:ss",timezone = "GMT+8")private Date birth;....get/set
}
7.5.2 属性名修改
@JsonProperty(“new_name”)
public class User{@JsonProperty("new_id") //不再使用原属性名,而是 "new_id"private Integer id;private String name;....get/set
}
输出的json:{“new_id”:xx,"name":"xx"}
7.5.3 属性忽略
@JsonIgnore
public class User{private Integer id;@JsonIgnore // 生成json时,忽略此属性private String name;....get/set
}
输出json时: {"id":xx}
7.5.4 null和empty属性排除
Jackson 默认会输出null值的属性,如果不需要,可以排除。
@JsonInclude(JsonInclude.Include.NON_NULL) //null值 属性不输出
@JsonInclude(value= JsonInclude.Include.NON_EMPTY) // empty属性不输出( 空串,长度为0的集合,null值)
public class User{private Integer id;@JsonInclude(JsonInclude.Include.NON_NULL) // 若"name==null" 忽略此属性private String name;@JsonInclude(value= JsonInclude.Include.NON_EMPTY)  // 若hobby长度为0或==null 忽略此属性private List<String> hobby;....get/set
}
如果name=null,且 hobby长度为0,则输出json时:{"id":xx}
7.5.5 自定义序列化
@JsonSerialize(using = MySerializer.class) // 使用MySerializer输出某属性
public class User {private Integer id;private String name;@JsonSerialize(using = MySerializer.class)private Double salary = 10000.126;//在输出此属性时,使用MySerializer输出....get/set
}
则输出json时:{"id":xx,"name":"xxx","salary":10000.13}
public class MySerializer extends JsonSerializer<Double> {// value即 Double salary的值@Override public void serialize(Double value, JsonGenerator gen, SerializerProvider serializers) throws IOException {// 将Double salary的值 四舍五入String number = BigDecimal.valueOf(value).setScale(2, BigDecimal.ROUND_HALF_UP).toString();// 输出 四舍五入后的值gen.writeNumber(number);}
}
7.6 FastJson
7.6.1 导入依赖
<!-- FastJson -->
<dependency><groupId>com.alibaba</groupId><artifactId>fastjson</artifactId><version>1.2.54</version>
</dependency>
7.6.2 安装FastJson
<mvc:annotation-driven><!-- 安装FastJson,转换器 --><mvc:message-converters><bean class="com.alibaba.fastjson.support.spring.FastJsonHttpMessageConverter"><!-- 声明转换类型:json --><property name="supportedMediaTypes"><list><value>application/json</value></list></property></bean></mvc:message-converters>
</mvc:annotation-driven>
7.6.3 使用
@ResponseBody @RequestBody @RestController 使用方法不变
7.6.4 常用注解
- 日期格式化:@JSONField(format=“yyyy/MM/dd”)
- 属性名修改:@JSONField(name=“birth”)
- 忽略属性:@JSONField(serialize = false)
- 包含null值:@JSONField(serialzeFeatures = SerializerFeature.WriteMapNullValue) 默认会忽略所有null值,有此注解会输出null
- @JSONField(serialzeFeatures = SerializerFeature.WriteNullStringAsEmpty) null的String输出为""
- 自定义序列化:@JSONField(serializeUsing = MySerializer2.class)
public class User implements Serializable{@JSONField(serialize = false)private Integer id;@JSONField(name="NAME",serialzeFeatures = SerializerFeature.WriteNullStringAsEmpty)private String name;@JSONField(serialzeFeatures = SerializerFeature.WriteMapNullValue) private String city;@JSONField(format="yyyy/MM/dd")private Date birth;@JSONField(serializeUsing = MySerializer2.class)private Double salary;...
}
public class MySerializer2 implements ObjectSerializer {@Overridepublic void write(JSONSerializer serializer, Object object, Object fieldName, Type fieldType,int features) throws IOException {Double value = (Double) object; // salary属性值String text = value + "元";// 在salary后拼接 “元”serializer.write(text); // 输出拼接后的内容}
}
new User(1,null,null,new Date(),100.5);
// 如上对象,转换json:
{NAME:"",city:null,"birth":"2020/12/12","salary":"100.5元"}
八、异常解析器
两种方式:
- 实现 HandlerExceptionResolver
- 通过 @ExceptionHandler 注解定义
- SimpleMappingExceptionResolver
8.1 现有方案,分散处理
Controller中的每个Handler自己处理异常
此种处理方案,异常处理逻辑,分散在各个handler中,不利于集中管理
public String xxx(){try{...}catch(Exception1 e){e.printStackTrace();return "redirect:/xx/error1";}catch(Exception2 e){e.printStackTrace();return "redirect:/xx/error2";}
}
8.2 异常解析器,统一处理
Controller中的每个Handler不再自己处理异常,而是直接throws所有异常。
定义一个“异常解析器” 集中捕获处理 所有异常
此种方案,在集中管理异常方面,更有优势!
public class MyExResolver implements HandlerExceptionResolver{/*** 异常解析器:主体逻辑* 执行时刻:当handler中抛出异常时,会执行:捕获异常,并可以跳到错误页面*/@Overridepublic ModelAndView resolveException(HttpServletRequest request,HttpServletResponse response, Object handler, Exception ex) {ex.printStackTrace();//打印异常栈//创建一个ModelAndViewModelAndView mv = new ModelAndView();//识别异常if (ex instanceof Exception1) {mv.setViewName("redirect:/xxx/error1");}else if(ex instanceof Exception2){mv.setViewName("redirect:/xxx/error2");}else{mv.setViewName("redirect:/xxx/error");}return mv;}
}
<!-- 声明异常解析器 -->
<bean class="com.baizhi.exception.resolver.MyExResolver"></bean>
九、拦截器
和过滤器的区别:
- 执行时机:拦截器晚于过滤器。
- 拦截器是一种 AOP 风格的过滤器。
9.1 作用
作用:抽取handler中的冗余功能
9.2 定义拦截器
执行顺序: preHandle–postHandle–afterCompletion
public class MyInter1 implements HandlerInterceptor{//主要逻辑:在handler之前执行:抽取handler中的冗余代码@Overridepublic boolean preHandle(HttpServletRequest request,HttpServletResponse response, Object handler) throws Exception {System.out.println("pre~~~");/*response.sendRedirect("/springMVC_day2/index.jsp");//响应return false;//中断请求*/return true;//放行,后续的拦截器或handler就会执行}//在handler之后执行:进一步的响应定制@Overridepublic void postHandle(HttpServletRequest request,HttpServletResponse response, Object handler,ModelAndView modelAndView) throws Exception {System.out.println("post~~");}//在页面渲染完毕之后,执行:资源回收@Overridepublic void afterCompletion(HttpServletRequest request,HttpServletResponse response, Object handler, Exception ex)throws Exception {System.out.println("after~~");}
}
9.3 配置拦截路径
<mvc:interceptors><mvc:interceptor><mvc:mapping path="/inter/test1"/><mvc:mapping path="/inter/test2"/><mvc:mapping path="/inter/test*"/> <!-- test开头 --><mvc:mapping path="/inter/**"/> <!-- /** 任意多级任意路径 --><mvc:exclude-mapping path="/inter/a/**"/>   <!--不拦截此路径--><bean class="com.baizhi.interceptor.MyInter1"></bean>   <!--拦截器类--></mvc:interceptor>
</mvc:interceptors>
十、上传
10.1 导入jar
<dependency><groupId>commons-io</groupId><artifactId>commons-io</artifactId><version>2.4</version>
</dependency><dependency><groupId>commons-fileupload</groupId><artifactId>commons-fileupload</artifactId><version>1.3.3</version><exclusions><exclusion><groupId>javax.servlet</groupId><artifactId>servlet-api</artifactId></exclusion></exclusions>
</dependency>
10.2 表单
<form action="${pageContext.request.contextPath }/upload/test1" method="post" enctype="multipart/form-data">file: <input type="file" name="source"/> <br><input type="submit" value="提交"/>
</form>
10.3 上传解析器
<!-- 上传解析器 id必须是:“multipartResolver”-->
<bean id="multipartResolver" class="org.springframework.web.multipart.commons.CommonsMultipartResolver"><!-- 最大可上传的文件大小  单位:byte  超出后会抛出MaxUploadSizeExceededException异常,可以异常解析器捕获 --><property name="maxUploadSize" value="1048576"></property>
</bean>
10.4 Handler
@RequestMapping("/test1")
public String hello1(String username,MultipartFile source,HttpSession session) {//文件的原始名称String filename = source.getOriginalFilename();//定制全局唯一的命名String unique = UUID.randomUUID().toString();//获得文件的后缀String ext = FilenameUtils.getExtension(filename);//abc.txt   txt    hello.html  html//定制全局唯一的文件名String uniqueFileName = unique+"."+ext;System.out.println("唯一的文件名:"+uniqueFileName);//文件的类型String type = source.getContentType();System.out.println("filename:"+filename+" type:"+type);//获得 upload_file的磁盘路径 ==> 在webapp目录下创建一个目录"upload_file",且此目录初始不要为空,否则编译时被忽略String real_path = session.getServletContext().getRealPath("/upload_file");System.out.println("real_path:"+real_path);//将上传的文件,存入磁盘路径中//source.transferTo(new File("d:/xxxx/xxxx/xx.jpg"))source.transferTo(new File(real_path+"\\"+uniqueFileName));return "index";
}
十一、下载
11.1 超链
<a href="${pageContext.request.contextPath}/download/test1?name=Koala.jpg">下载</a>
11.2 Handler
@RequestMapping("/test1")
public void hello1(String name,HttpSession session,HttpServletResponse response){System.out.println("name:"+name);//获得要下载文件的绝对路径String path = session.getServletContext().getRealPath("/upload_file");//文件的完整路径String real_path = path+"\\"+name;//设置响应头  告知浏览器,要以附件的形式保存内容   filename=浏览器显示的下载文件名response.setHeader("content-disposition","attachment;filename="+name);//读取目标文件,写出给客户端IOUtils.copy(new FileInputStream(real_path), response.getOutputStream());//上一步,已经是响应了,所以此handler直接是void
}
十二、验证码
12.1 作用
防止暴力攻击,前端安全保障
12.2 导入jar
<!-- Kaptcha -->
<dependency><groupId>com.github.penggle</groupId><artifactId>kaptcha</artifactId><version>2.3.2</version><exclusions><exclusion><groupId>javax.servlet</groupId><artifactId>javax.servlet-api</artifactId></exclusion></exclusions>
</dependency>
12.3 声明验证码组件
<servlet><servlet-name>cap</servlet-name><servlet-class>com.google.code.kaptcha.servlet.KaptchaServlet</servlet-class><init-param><param-name>kaptcha.border</param-name><param-value>no</param-value></init-param><init-param><param-name>kaptcha.textproducer.char.length</param-name><param-value>4</param-value></init-param><init-param><param-name>kaptcha.textproducer.char.string</param-name><param-value>abcdefghijklmnopqrstuvwxyzABCDEFGHIJKLMNOPQRSTUVWXYZ0123456789</param-value></init-param><init-param><param-name>kaptcha.background.clear.to</param-name><param-value>211,229,237</param-value></init-param><init-param><!-- session.setAttribute("captcha","验证码") --><param-name>kaptcha.session.key</param-name><param-value>captcha</param-value></init-param></servlet><servlet-mapping><servlet-name>cap</servlet-name><url-pattern>/captcha</url-pattern></servlet-mapping>
12.4 Page
<img src="${pageContext.request.contextPath}/captcha" style="width:85px" id="cap"/>
<script>$(function(){$("#cap").click(function(){//刷新验证码path = $(this).attr("src")+"?"+new Date().getTime();$(this).attr("src",path);});});
</script>
十三、REST
13.1 开发风格
是一种开发风格,遵从此风格开发软件,符合REST风格,则RESTful。
两个核心要求:
- 每个资源都有唯一的标识(URL)
- 不同的行为,使用对应的http-method
| 访问标识 | 资源 |
|---|---|
| http://localhost:8989/xxx/users | 所有用户 |
| http://localhost:8989/xxx/users/1 | 用户1 |
| http://localhost:8989/xxx/users/1/orders | 用户1的所有订单 |
| 请求方式 | 标识 | 意图 |
|---|---|---|
| GET(查询) | http://localhost:8989/xxx/users | 查询所有用户 |
| POST(添加) | http://localhost:8989/xxx/users | 在所有用户中增加一个 |
| PUT(更新) | http://localhost:8989/xxx/users | 在所有用户中修改一个 |
| DELETE(删除) | http://localhost:8989/xxx/users/1 | 删除用户1 |
| GET | http://localhost:8989/xxx/users/1 | 查询用户1 |
| GET | http://localhost:8989/xxx/users/1/orders | 查询用户1的所有订单 |
| POST | http://localhost:8989/xxx/users/1/orders | 在用户1的所有订单中增加一个 |
13.2 优点
- **输出json:
13.3 使用
13.3.1 定义Rest风格的 Controller
@RequestMapping(value=“/users”,method = RequestMethod.GET)
等价
@GetMapping(“/users”)
@RestController
public class RestController {@GetMapping("/users")public List<User> queryAllUsers(){System.out.println("get");List<User> users = ....return users;}@PostMapping("/users")public String addUser(@RequestBody User user){System.out.println("Post user :"+user);return "{status:1}";}@PutMapping("/users")public String updateUser(@RequestBody User user){System.out.println("Put user" user:"+user);return "{status:1}";}@GetMapping("/users/{id}")public String queryOneUser(@PathVariable Integer id){//@PathVariable 接收路径中的值System.out.println("Get user id:"+id);return "{status:1}";}@DeleteMapping("/users/{id}")public String deleteOneUser(@PathVariable Integer id){//@PathVariable 接收路径中的值System.out.println("delete user id:"+id);return "{status:1}";}
}
13.3.2 Ajax请求
<script>    function putUser(){ // 发送更新请求 (增加请求发送方式也是如此)var xhr = new XMLHttpRequest();//定义 put,delete,get,post方式 即可,不用定义_methodxhr.open("put","${pageContext.request.contextPath}/rest04/users");// 设置请求头xhr.setRequestHeader("content-type","application/json");// 设置请求参数var user = {id:1,NAME:"shine",city:"bj","birth":"2020/12/12","salary":100.5};xhr.send(JSON.stringify(user));xhr.onreadystatechange=function(){if(xhr.readyState==4 && xhr.status==200){var ret = xhr.responseText;// 解析json,并输出console.log(JSON.parse(ret));}}/*$.ajax({url:'${pageContext.request.contextPath}/rest04/users',type:'put',contentType:"application/json",//声明请求参数类型为 jsondata:JSON.stringify(user),// 转换js对象成jsonsuccess:function(ret){console.log(JSON.parse(ret));}});*/}function delUser(){  // 发送删除请求var xhr = new XMLHttpRequest();//定义 put,delete,get,post方式 即可,不用定义_methodxhr.open("delete","${pageContext.request.contextPath}/rest04/users/1");xhr.send();xhr.onreadystatechange=function(){if(xhr.readyState==4 && xhr.status==200){var ret = xhr.responseText;console.log(JSON.parse(ret));}}}
</script>
十四、跨域请求
14.1 域
域:协议+IP(域名)+端口
http://localhost:8989
http://localhost:8080
http://www.baidu.com:80
14.2 Ajax跨域问题
Ajax发送请求时,不允许跨域,以防用户信息泄露。
当Ajax跨域请求时,响应会被浏览器拦截(同源策略),并报错。即浏览器默认不允许ajax跨域得到响应内容。
互相信任的域之间如果需要ajax访问,(比如前后端分离项目中,前端项目和后端项目之间),则需要额外的设置才可正常请求。
14.3 解决方案
允许其他域访问
在被访问方的Controller类上,添加注解
@CrossOrigin("http://localhost:8080") //允许此域发请求访问
public class SysUserController {....
}
携带对方cookie,使得session可用
在访问方,ajax中添加属性:withCredentials: true
$.ajax({type: "POST",url: "http://localhost:8989/web/sys/login",...,xhrFields: {// 跨域携带cookiewithCredentials: true}
});
或
var xhr = new XMLHttpRequest();
// 跨域携带cookie
xhr.withCredentials=true;
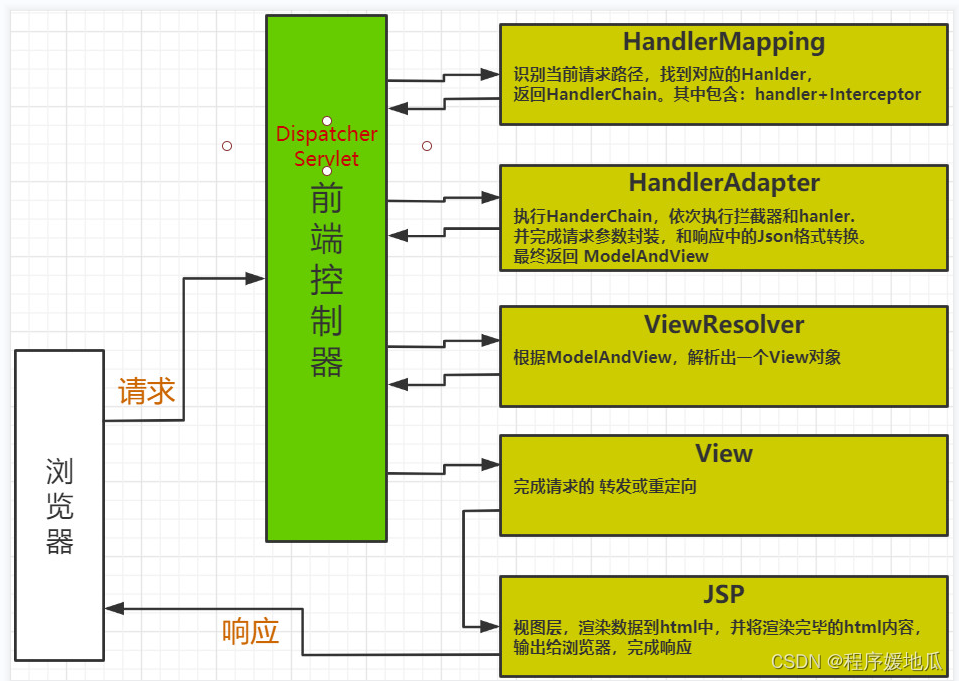
十五、SpringMVC执行流程
 |
十六、Spring整合
16.1 整合思路
此时项目中有两个工厂
- DispatcherServlet 启动的springMVC工厂==负责生产C及springMVC自己的系统组件
- ContextLoaderListener 启动的spring工厂==负责生产其他所有组件
- springMVC的工厂会被设置为spring工厂的子工厂,可以随意获取spring工厂中的组件
- 整合过程,就是累加:代码+依赖+配置。然后将service注入给controller即可
16.2 整合技巧
Spring 是一个父容器,SpringMVC 是一个子容器,子容器中可以访问父容器的组件,父容器不可以访问子容器的组件。
例如,我们将 Service、Dao、Component 都注册到 Spring 容器中,将 Controller 注册到 SpringMVC 容器中,则在 Controller 中,可以注入 Service、Dao、Component ;但是 Service、Dao、Component 中无法注入 Controller。
两个工厂不能有彼此侵入,即,生产的组件不能有重合。
<!-- 告知SpringMVC  哪些包中 存在 被注解的类use-default-filters=true 凡是被 @Controller @Service  @Repository注解的类,都会被扫描use-default-filters=false 默认不扫描包内的任何类, 只扫描include-filter中指定的类只扫描被@Controller注解的类
-->
<context:component-scan base-package="com.zhj" use-default-filters="false"><context:include-filter type="annotation" expression="org.springframework.stereotype.Controller"/>
</context:component-scan>
<!-- 告知Spring唯独不扫描@Controller注解的类 -->
<context:component-scan base-package="com.zhj" use-default-filters="true"><context:exclude-filter type="annotation" expression="org.springframework.stereotype.Controller"/>
</context:component-scan>
服务端数据校验:http://springmvc.javaboy.org/2019/1112/validation