👨💻个人主页:@元宇宙-秩沅
👨💻 hallo 欢迎 点赞👍 收藏⭐ 留言📝 加关注✅!
👨💻 本文由 秩沅 原创
👨💻 收录于专栏:Unity游戏demo
⭐🅰️Unity3D赛车游戏⭐
文章目录
- ⭐🅰️Unity3D赛车游戏⭐
- ⭐前言⭐
- ⭐常见问题⭐
- 🎶(==A==)车辆模型——绘制发动机马力与转速曲线
- 😶🌫️添加并绘制AnimationCurve 动画曲线
- 😶🌫️AnimationCurve .EvaluateAPI
- 🎶(==B==)车辆模型——发动机和手动挡位的初步实现
- 😶🌫️添加发动机相关的属性
- 😶🌫️更新输入控制脚本增添换挡输入
- 😶🌫️换挡管理,挡位比率
- 🎶(==C==)车辆模型——脚本记录
- 😶🌫️CarMoveControl
- 😶🌫️CameraContorl
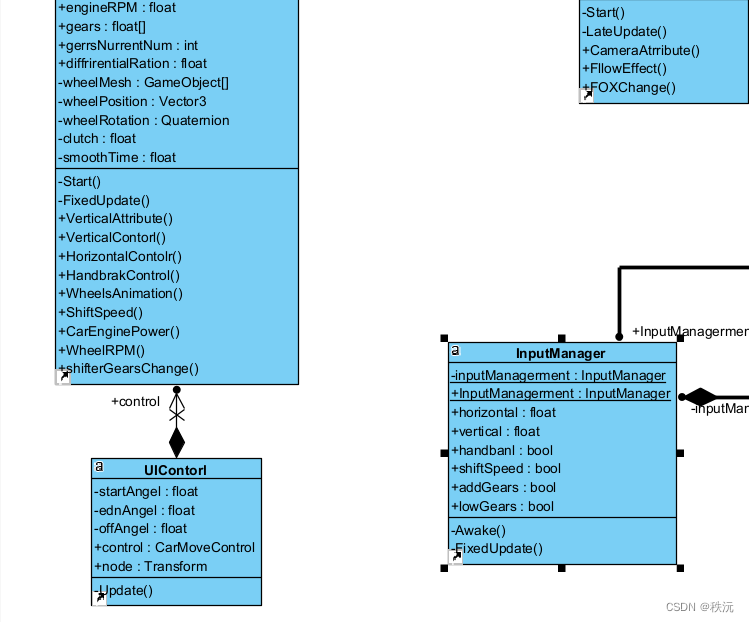
- 😶🌫️UIContorl
- 😶🌫️ InputManager
⭐前言⭐
–
😶🌫️版本: Unity2021
😶🌫️适合人群:Unity初学者
😶🌫️学习目标:3D赛车游戏的基础制作
😶🌫️技能掌握:
⭐常见问题⭐
🎶(A)车辆模型——绘制发动机马力与转速曲线
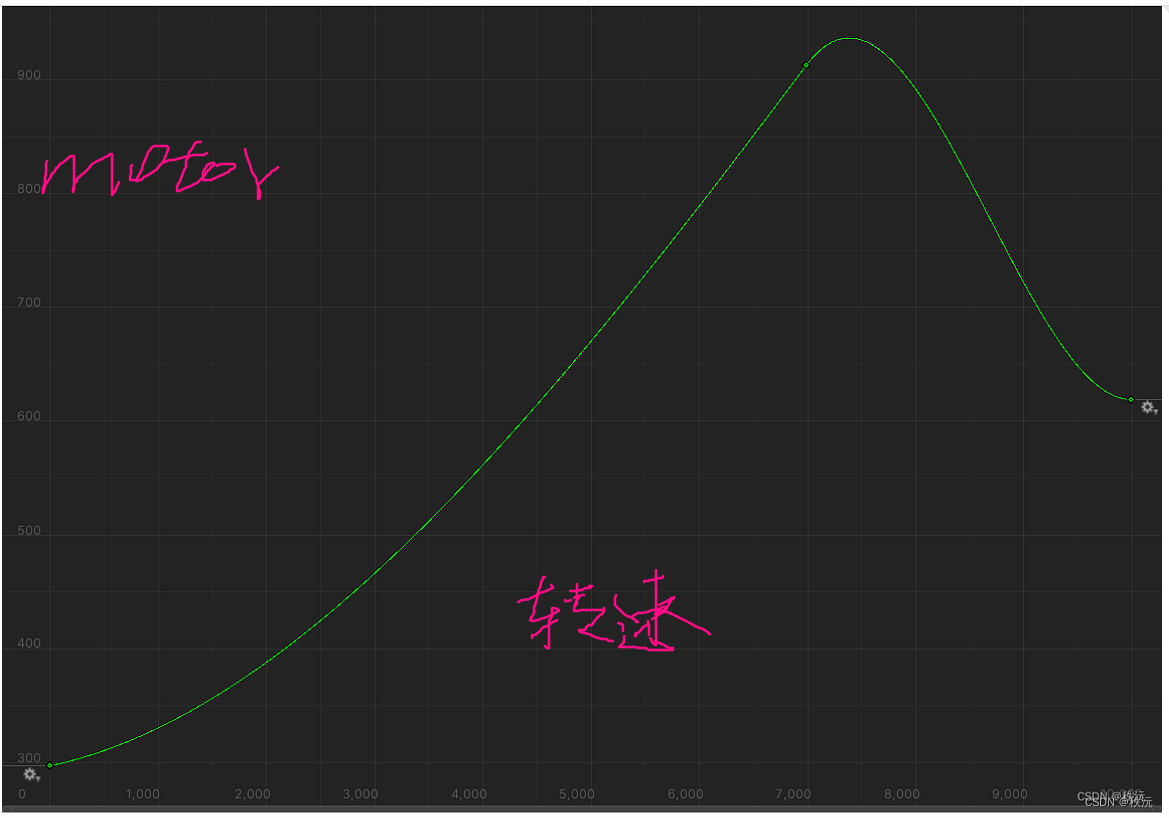
😶🌫️添加并绘制AnimationCurve 动画曲线
shift控制Y轴伸缩,ctrl控制x轴伸缩

- 跑车发动机一般是7百左右,我们就按照跑车的最大功率来做
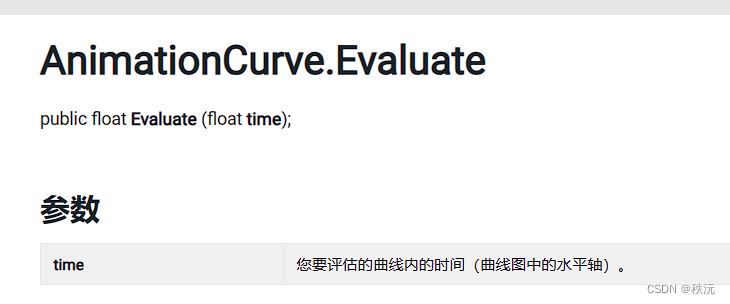
😶🌫️AnimationCurve .EvaluateAPI
通过X轴获取Y轴值
🎶(B)车辆模型——发动机和手动挡位的初步实现
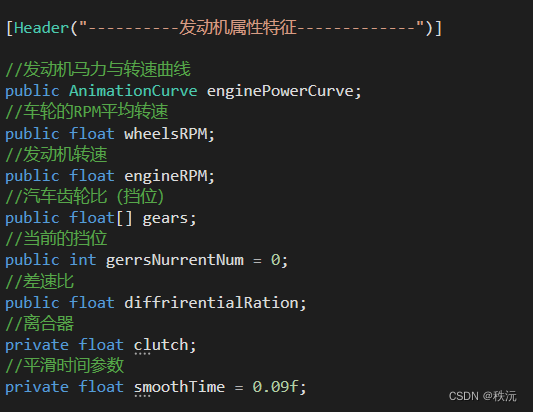
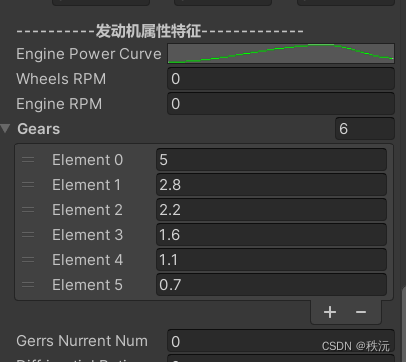
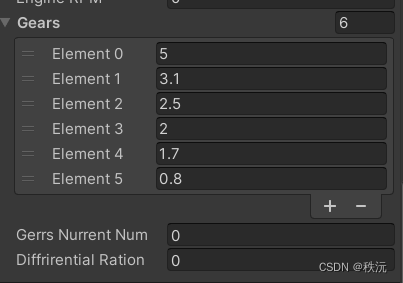
😶🌫️添加发动机相关的属性
发动机功率=扭矩转速n
知识百科:说到汽车发动机,要了解几个参数。排量,功率,扭矩,转速。那么这里和参数之间的关系如何,
排量,就是发动机气缸排出气体的多少。因此说到排量,不管四缸,三缸,二缸,一缸,只要大小一样,排量就相同。
功率,单位时间内做功的多少。那么排量越大,单位时间做功就会越多,因此,排量越大,功率也会越大。
扭矩,它的单位是N·M,所以它是力运动单位距离的结果。它反应的是加速度。扭矩越大,加速能力就越强。
转速,它是单位时间内齿轮转动的圈数。齿轮转的越快,传输给轮胎的转速就越高,车子就跑的越快。
- 关键代码
//汽车引擎发动机相关public void CarEnginePower(){WheelRPM();//将轮轴的转速获取// 扭矩力(发动机功率) = 功率=扭矩*转速*nmotorflaot = -enginePowerCurve.Evaluate(engineRPM)* gears[gerrsNurrentNum] * InputManager.InputManagerment.vertical;float velocity = 0.0f;//发动机的转速 与 车轮转速 和 挡位比率 成比例engineRPM = Mathf.SmoothDamp(engineRPM, 1000 + Mathf.Abs(wheelsRPM) * 3.6f * (gears[gerrsNurrentNum]), ref velocity, smoothTime);print(engineRPM);VerticalContorl(); //驱动管理}
😶🌫️更新输入控制脚本增添换挡输入
using System.Collections;
using System.Collections.Generic;
using UnityEngine;
//-------------------------------------
//—————————————————————————————————————
//___________项目:
//___________功能: 输入控制管理器
//___________创建者:秩沅_______________
//_____________________________________
//-------------------------------------
public class InputManager : MonoBehaviour
{//单例模式管理static private InputManager inputManagerment;static public InputManager InputManagerment => inputManagerment;public float horizontal;  //水平方向动力值public float vertical;    //垂直方向动力值public bool  handbanl;    //手刹动力值public bool shiftSpeed;   //加速shift键//public float clutch;    //离合器public bool addGears;     //升档public bool lowGears;     //降档void Awake(){inputManagerment = this;}void FixedUpdate(){//与Unity中输入管理器的值相互对应horizontal = Input.GetAxis("Horizontal");vertical = Input.GetAxis("Vertical");handbanl = Input.GetAxis("Jump")!= 0 ? true :false ; //按下空格键时就是1,否则为0shiftSpeed = Input.GetKey(KeyCode.LeftShift) ? true : false;//clutch   = Input.GetKey(KeyCode.LeftShift) ? 0 : Mathf.Lerp(clutch ,1,Time .deltaTime);addGears   = Input.GetKeyDown(KeyCode.E ) ? true : false;lowGears   = Input.GetKeyDown(KeyCode.Q ) ? true : false;}
}😶🌫️换挡管理,挡位比率
//换挡管理public void shifterGearsChange(){if(InputManager.InputManagerment .addGears ) //如果按下E键,加挡{if(gerrsNurrentNum < gears.Length - 1 )gerrsNurrentNum++;}if(InputManager.InputManagerment.lowGears ) //如果按下Q键,减档{if (gerrsNurrentNum > 0)gerrsNurrentNum--;}}
🎶(C)车辆模型——脚本记录
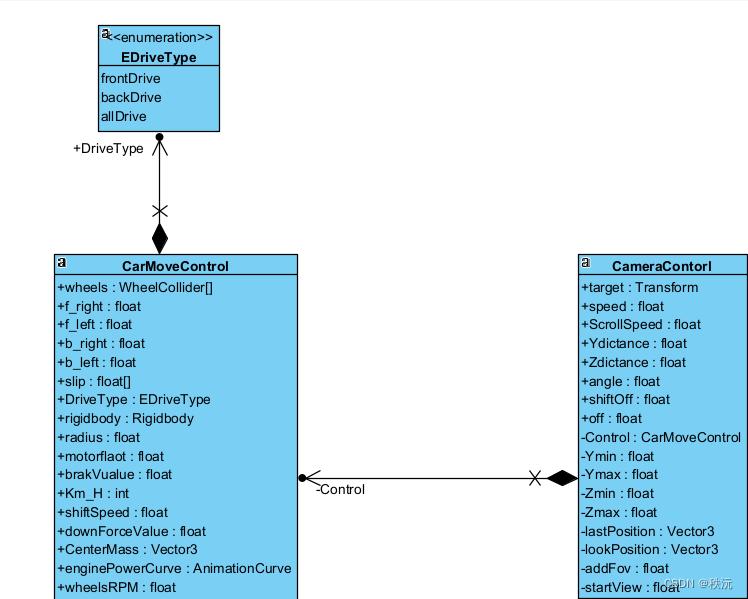
😶🌫️CarMoveControl
using System.Collections;
using System.Collections.Generic;
using UnityEngine;
//-------------------------------------
//—————————————————————————————————————
//___________项目: ______________
//___________功能: 车轮的运动
//___________创建者:_______秩沅________
//_____________________________________
//-------------------------------------//驱动模式的选择
public enum EDriveType
{frontDrive, //前轮驱动backDrive, //后轮驱动allDrive //四驱
}public class CarMoveControl : MonoBehaviour
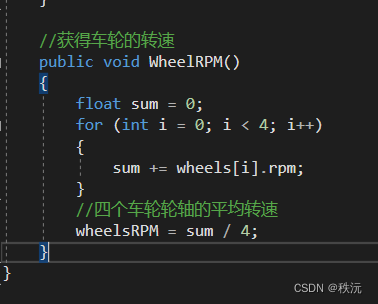
{//-------------------------------------------[Header("----------轮碰撞器特征-------------")]//四个轮子的碰撞器public WheelCollider[] wheels;[SerializeField]//网格的获取private GameObject[] wheelMesh;//四个轮胎扭矩力的大小public float f_right;public float f_left;public float b_right;public float b_left;//车轮打滑参数识别public float[] slip;//初始化三维向量和四元数private Vector3 wheelPosition = Vector3.zero;private Quaternion wheelRotation = Quaternion.identity;//-------------------------------------------//驱动模式选择 _默认前驱public EDriveType DriveType = EDriveType.frontDrive;[Header("----------车辆属性特征-------------")]//车刚体public Rigidbody rigidbody;//轮半径public float radius = 0.25f;//扭矩力度public float motorflaot = 8000f;//刹车力public float brakVualue = 800000f;//速度:每小时多少公里public int Km_H;//加速的速度增量public float shiftSpeed = 4000;//下压力public float downForceValue = 1000f;//质心public Vector3 CenterMass;[Header("----------发动机属性特征-------------")]//发动机马力与转速曲线public AnimationCurve enginePowerCurve;//车轮的RPM平均转速public float wheelsRPM;//发动机转速public float engineRPM;//汽车齿轮比(挡位)public float[] gears;//当前的挡位public int gerrsNurrentNum = 0;//差速比public float diffrirentialRation;//离合器private float clutch;//平滑时间参数private float smoothTime = 0.09f;//一些属性的初始化private void Start(){rigidbody = GetComponent<Rigidbody>();slip = new float[4];}private void FixedUpdate(){VerticalAttribute();//车辆物理属性管理WheelsAnimation(); //车轮动画CarEnginePower(); //汽车发动机HorizontalContolr(); //转向管理HandbrakControl(); //手刹管理ShiftSpeed();//加速相关}//车辆物理属性相关public void VerticalAttribute(){//---------------速度实时---------------//1m/s = 3.6km/hKm_H = (int)(rigidbody.velocity.magnitude * 3.6);Km_H = Mathf.Clamp(Km_H, 0, 200); //油门速度为 0 到 200 Km/H之间//--------------扭矩力实时---------------//显示每个轮胎的扭矩f_right = wheels[0].motorTorque;f_left = wheels[1].motorTorque;b_right = wheels[2].motorTorque;b_left = wheels[3].motorTorque;//-------------下压力添加-----------------//速度越大,下压力越大,抓地更强rigidbody.AddForce(-transform.up * downForceValue * rigidbody.velocity.magnitude);//-------------质量中心同步----------------//质量中心越贴下,越不容易翻rigidbody.centerOfMass = CenterMass;}//垂直轴方向运动管理(驱动管理)public void VerticalContorl(){switch (DriveType){case EDriveType.frontDrive://选择前驱if (InputManager.InputManagerment.vertical != 0) //当按下WS键时生效{for (int i = 0; i < wheels.Length - 2; i++){//扭矩力度wheels[i].motorTorque = InputManager.InputManagerment.vertical * (motorflaot / 2); //扭矩马力归半}}else{for (int i = 0; i < wheels.Length - 2; i++){//扭矩力度wheels[i].motorTorque = 0;}}break;case EDriveType.backDrive://选择后驱if (InputManager.InputManagerment.vertical != 0) //当按下WS键时生效{for (int i = 2; i < wheels.Length; i++){//扭矩力度wheels[i].motorTorque = InputManager.InputManagerment.vertical * (motorflaot / 2); //扭矩马力归半}}else{for (int i = 2; i < wheels.Length; i++){//扭矩力度wheels[i].motorTorque = 0;}}break;case EDriveType.allDrive://选择四驱if (InputManager.InputManagerment.vertical != 0) //当按下WS键时生效{for (int i = 0; i < wheels.Length; i++){//扭矩力度wheels[i].motorTorque = InputManager.InputManagerment.vertical * (motorflaot / 4); //扭矩马力/4}}else{for (int i = 0; i < wheels.Length; i++){//扭矩力度wheels[i].motorTorque = 0;}}break;default:break;}}//水平轴方向运动管理(转向管理)public void HorizontalContolr(){if (InputManager.InputManagerment.horizontal > 0){//后轮距尺寸设置为1.5f ,轴距设置为2.55f ,radius 默认为6,radius 越大旋转的角度看起来越小wheels[0].steerAngle = Mathf.Rad2Deg * Mathf.Atan(2.55f / (radius + (1.5f / 2))) * InputManager.InputManagerment.horizontal;wheels[1].steerAngle = Mathf.Rad2Deg * Mathf.Atan(2.55f / (radius - (1.5f / 2))) * InputManager.InputManagerment.horizontal;}else if (InputManager.InputManagerment.horizontal < 0){wheels[0].steerAngle = Mathf.Rad2Deg * Mathf.Atan(2.55f / (radius - (1.5f / 2))) * InputManager.InputManagerment.horizontal;wheels[1].steerAngle = Mathf.Rad2Deg * Mathf.Atan(2.55f / (radius + (1.5f / 2))) * InputManager.InputManagerment.horizontal;}else{wheels[0].steerAngle = 0;wheels[1].steerAngle = 0;}}//手刹管理public void HandbrakControl(){if (InputManager.InputManagerment.handbanl){//后轮刹车wheels[2].brakeTorque = brakVualue;wheels[3].brakeTorque = brakVualue;}else{wheels[2].brakeTorque = 0;wheels[3].brakeTorque = 0;}//------------刹车效果平滑度显示------------for (int i = 0; i < slip.Length; i++){WheelHit wheelhit;wheels[i].GetGroundHit(out wheelhit);slip[i] = wheelhit.forwardSlip; //轮胎在滚动方向上打滑。加速滑移为负,制动滑为正}}//车轮动画相关public void WheelsAnimation(){for (int i = 0; i < wheels.Length; i++){//获取当前空间的车轮位置 和 角度wheels[i].GetWorldPose(out wheelPosition, out wheelRotation);//赋值给wheelMesh[i].transform.position = wheelPosition;wheelMesh[i].transform.rotation = wheelRotation * Quaternion.AngleAxis(90, Vector3.forward);}}//加速以及动画相关public void ShiftSpeed(){//按下shift加速键时if (InputManager.InputManagerment.shiftSpeed){//向前增加一个力rigidbody.AddForce(-transform.forward * shiftSpeed);}else{rigidbody.AddForce(transform.forward * 0);}}//汽车引擎发动机相关public void CarEnginePower(){WheelRPM();//将轮轴的转速获取// 扭矩力(发动机功率) = 功率=扭矩*转速*nmotorflaot = -enginePowerCurve.Evaluate(engineRPM) * gears[gerrsNurrentNum];float velocity = 0.0f;//发动机的转速 与 车轮转速 和 挡位比率 成比例engineRPM = Mathf.SmoothDamp(engineRPM, 1000 + Mathf.Abs (wheelsRPM) * 3.6f * (gears[gerrsNurrentNum]), ref velocity, smoothTime);print(engineRPM);VerticalContorl(); //驱动管理shifterGearsChange(); //换挡管理}//获得车轮的转速public void WheelRPM(){float sum = 0;for (int i = 0; i < 4; i++){sum += wheels[i].rpm;}//四个车轮轮轴的平均转速wheelsRPM = sum / 4;}//换挡管理public void shifterGearsChange(){if(InputManager.InputManagerment .addGears ) //如果按下E键,加挡{if(gerrsNurrentNum < gears.Length - 1 )gerrsNurrentNum++;}if(InputManager.InputManagerment.lowGears ) //如果按下Q键,减档{if (gerrsNurrentNum > 0)gerrsNurrentNum--;}}
}😶🌫️CameraContorl
using System.Collections;
using System.Collections.Generic;
using UnityEngine;
//-------------------------------------
//—————————————————————————————————————
//___________项目:       ______________
//___________功能: 相机的管理
//___________创建者:秩沅_______________
//_____________________________________
//-------------------------------------
public class CameraContorl : MonoBehaviour
{//目标物体public Transform target;private CarMoveControl Control;public float speed;[Header("----------相机基础属性-------------")]//鼠标滑轮的速度public float ScrollSpeed = 45f;public float Ydictance = 0f;private float Ymin = 0f;private float Ymax = 4f;public float Zdictance = 4f;private float Zmin = 4f;private float Zmax = 15f;//相机看向的角度 和最終位置public float angle = -25 ;private Vector3 lastPosition;private Vector3 lookPosition;[Header("----------加速时相机属性-------------")]//加速时的跟随力度[Range(1, 5)]public float shiftOff;//目标视野 (让其显示可见)[SerializeField ]private float addFov;//当前视野private float startView;public float off = 20;//为一些属性初始化private void Start(){startView = Camera.main.fieldOfView; //将相机的开始属性赋入addFov = 30;}void LateUpdate(){FllowEffect(); //相机属性显示CameraAtrribute(); //相机跟随功能FOXChange(); //加速时相机视野的变化}//相机属性显示public void CameraAtrribute(){//实时速度Control = target.GetComponent<CarMoveControl>();speed = Mathf .Lerp (speed , Control.Km_H / 4 ,Time.deltaTime ) ;speed = Mathf.Clamp(speed, 0, 55); //对应最大200公里每小时}//相机跟随功能public void FllowEffect() {//Z轴和Y轴的距离和鼠标滑轮联系Ydictance += Input.GetAxis("Mouse ScrollWheel") * ScrollSpeed * Time.deltaTime;//平滑效果Zdictance += Input.GetAxis("Mouse ScrollWheel") * ScrollSpeed * Time.deltaTime*2;//設置Y軸和x轴的滚轮滑动范围 Ydictance = Mathf.Clamp(Ydictance, Ymin, Ymax);Zdictance = Mathf.Clamp(Zdictance, Zmin, Zmax);//确定好角度,四元数 * 三维向量 = 三维向量 和最终位置lookPosition = Quaternion.AngleAxis(angle, target.right) * -target.forward;lastPosition = target.position + Vector3.up * Ydictance - lookPosition * Zdictance;差值更新位置,速度越快镜头跟随越快,速度越慢镜头跟随越慢transform.position = lastPosition; //更新角度transform.rotation = Quaternion.LookRotation(lookPosition);}//加速时相机视野的变化public void FOXChange(){if(Input.GetKey(KeyCode.LeftShift) ) //按下坐标shift键生效{Camera.main.fieldOfView = Mathf.Lerp(Camera.main.fieldOfView , startView + addFov ,Time .deltaTime * shiftOff );}else{Camera.main.fieldOfView = Mathf.Lerp(Camera.main.fieldOfView, startView, Time.deltaTime * shiftOff);}}}😶🌫️UIContorl
using System.Collections;
using System.Collections.Generic;
using UnityEngine;
//-------------------------------------
//—————————————————————————————————————
//___________项目:       ______________
//___________功能:  UI相关的脚本管理
//___________创建者:_______秩沅________
//_____________________________________
//-------------------------------------
public class UIContorl : MonoBehaviour
{//------------------仪表盘----------------//速度指针开始角度和最终角度private float startAngel = 215, ednAngel = -35;//速度指针偏差角度private float offAngel;//获取速度的对象public CarMoveControl control;//速度指针组件public Transform node;//----------------------------------------void Update(){//偏差角度 = 每度(速度)旋转的角度 * 速度offAngel = (startAngel - ednAngel) / 180 * control.Km_H;//offAngel = (startAngel - ednAngel)  * control.engineRPM /10000;//仪表盘的管理,与速度同步node.eulerAngles = new Vector3 (0, 0, startAngel -offAngel);}
}😶🌫️ InputManager
using System.Collections;
using System.Collections.Generic;
using UnityEngine;
//-------------------------------------
//—————————————————————————————————————
//___________项目:       ______________
//___________功能: 输入控制管理器
//___________创建者:秩沅_______________
//_____________________________________
//-------------------------------------
public class InputManager : MonoBehaviour
{//单例模式管理static private InputManager inputManagerment;static public InputManager InputManagerment => inputManagerment;public float horizontal;  //水平方向动力值public float vertical;    //垂直方向动力值public bool  handbanl;    //手刹动力值public bool shiftSpeed;   //加速shift键//public float clutch;    //离合器public bool addGears;     //升档public bool lowGears;     //降档void Awake(){inputManagerment = this;}void FixedUpdate(){//与Unity中输入管理器的值相互对应horizontal = Input.GetAxis("Horizontal");vertical = Input.GetAxis("Vertical");handbanl = Input.GetAxis("Jump")!= 0 ? true :false ; //按下空格键时就是1,否则为0shiftSpeed = Input.GetKey(KeyCode.LeftShift) ? true : false;//clutch   = Input.GetKey(KeyCode.LeftShift) ? 0 : Mathf.Lerp(clutch ,1,Time .deltaTime);addGears   = Input.GetKeyDown(KeyCode.E ) ? true : false;lowGears   = Input.GetKeyDown(KeyCode.Q ) ? true : false;}
}
⭐【Unityc#专题篇】之c#进阶篇】
⭐【Unityc#专题篇】之c#核心篇】
⭐【Unityc#专题篇】之c#基础篇】
⭐【Unity-c#专题篇】之c#入门篇】
⭐【Unityc#专题篇】—进阶章题单实践练习
⭐【Unityc#专题篇】—基础章题单实践练习
⭐【Unityc#专题篇】—核心章题单实践练习
你们的点赞👍 收藏⭐ 留言📝 关注✅是我持续创作,输出优质内容的最大动力!、