Gazebo仿真环境下的强化学习实现
主体源码参照《Goal-Driven Autonomous Exploration Through Deep Reinforcement Learning》
文章目录
- Gazebo仿真环境下的强化学习实现
- 1. 源码拉取
- 2. 强化学习实现
- 2.1 环境
- 2.2 动作空间
- 2.3 状态空间
- 2.4 奖励空间
- 2.5 TD3训练
- 3. 总结
1. 源码拉取
git clone https://github.com/reiniscimurs/DRL-robot-navigation
笔者采用其强化学习方法,但是对于仿真环境以及机器人模型仍然用自己的包,源码中采用了与论文强相关的用法
2. 强化学习实现
2.1 环境
源码:
class GazeboEnv:"""Superclass for all Gazebo environments."""def __init__(self, launchfile, environment_dim):self.environment_dim = environment_dimself.odom_x = 0self.odom_y = 0self.goal_x = 1self.goal_y = 0.0self.upper = 5.0self.lower = -5.0self.velodyne_data = np.ones(self.environment_dim) * 10self.last_odom = Noneself.set_self_state = ModelState()self.set_self_state.model_name = "r1"self.set_self_state.pose.position.x = 0.0self.set_self_state.pose.position.y = 0.0self.set_self_state.pose.position.z = 0.0self.set_self_state.pose.orientation.x = 0.0self.set_self_state.pose.orientation.y = 0.0self.set_self_state.pose.orientation.z = 0.0self.set_self_state.pose.orientation.w = 1.0self.gaps = [[-np.pi / 2 - 0.03, -np.pi / 2 + np.pi / self.environment_dim]]for m in range(self.environment_dim - 1):self.gaps.append([self.gaps[m][1], self.gaps[m][1] + np.pi / self.environment_dim])self.gaps[-1][-1] += 0.03port = "11311"subprocess.Popen(["roscore", "-p", port])print("Roscore launched!")# Launch the simulation with the given launchfile namerospy.init_node("gym", anonymous=True)if launchfile.startswith("/"):fullpath = launchfileelse:fullpath = os.path.join(os.path.dirname(__file__), "assets", launchfile)if not path.exists(fullpath):raise IOError("File " + fullpath + " does not exist")subprocess.Popen(["roslaunch", "-p", port, fullpath])print("Gazebo launched!")# Set up the ROS publishers and subscribersself.vel_pub = rospy.Publisher("/r1/cmd_vel", Twist, queue_size=1)self.set_state = rospy.Publisher("gazebo/set_model_state", ModelState, queue_size=10)self.unpause = rospy.ServiceProxy("/gazebo/unpause_physics", Empty)self.pause = rospy.ServiceProxy("/gazebo/pause_physics", Empty)self.reset_proxy = rospy.ServiceProxy("/gazebo/reset_world", Empty)self.publisher = rospy.Publisher("goal_point", MarkerArray, queue_size=3)self.publisher2 = rospy.Publisher("linear_velocity", MarkerArray, queue_size=1)self.publisher3 = rospy.Publisher("angular_velocity", MarkerArray, queue_size=1)self.velodyne = rospy.Subscriber("/velodyne_points", PointCloud2, self.velodyne_callback, queue_size=1)self.odom = rospy.Subscriber("/r1/odom", Odometry, self.odom_callback, queue_size=1)强化学习中环境用于产生状态输入,并通过智能体的动作产生新的状态,在类中设定了目标和里程计的私有域,代表了自己当前的目标点和位姿信息。
初始化方法中设置了若干发布者和订阅者
/gazebo/unpause_physics 用于在Gazebo仿真环境中取消暂停物理模拟。当Gazebo仿真环境处于暂停状态时,物理模拟会停止,仿真中的物体将不再移动或交互。通过调用 /gazebo/unpause_physics 服务,你可以使仿真环境恢复到正常运行状态,允许物理模拟继续进行。
/gazebo/pause_physics 是一个ROS服务,用于在Gazebo仿真环境中暂停物理模拟。通过调用 /gazebo/pause_physics 服务,你可以将仿真环境的物理模拟暂停,这将导致仿真中的物体停止运动,仿真时间暂停。
注意,在初始化方法中可以看出,roslaunch也是通过程序启动,节点一并启动(在本机有Anaconda的情况下会有麻烦)
2.2 动作空间
由发布者可以看出强化学习的策略的动作空间:
linear_velocity:输出线速度
angular_velocity:输出角速度
2.3 状态空间
如图,作者的强化学习架构为
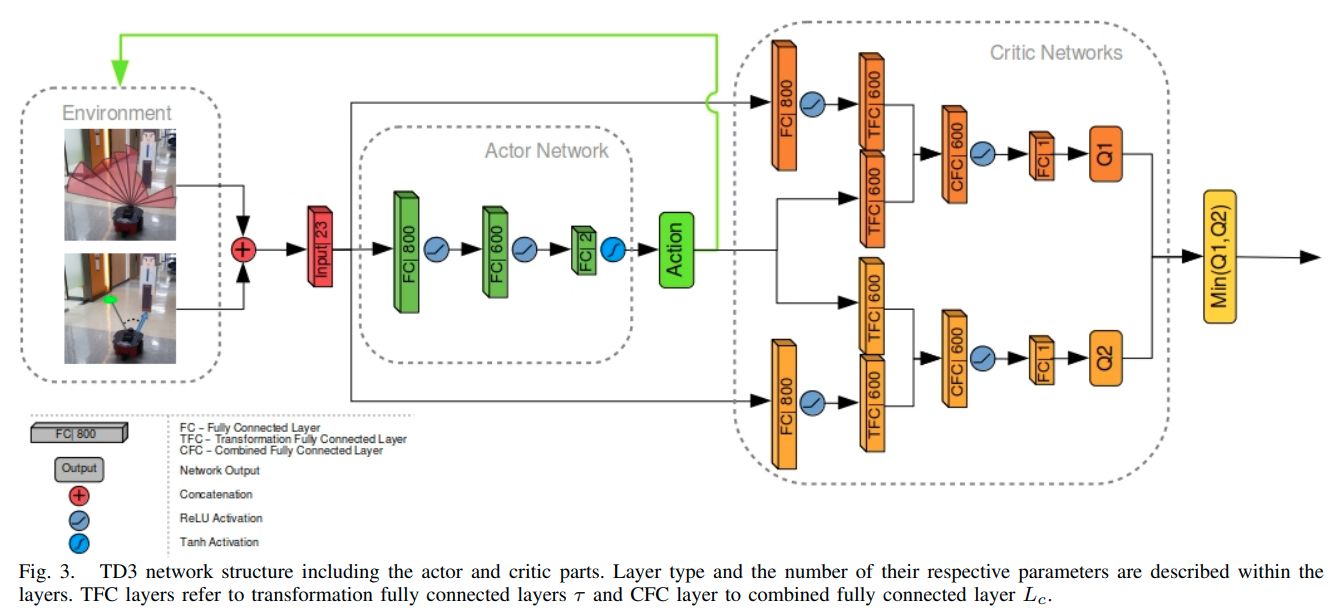 其输入空间为24维向量,其中,180度扫描的激光点进行了20等分,选取每个等分区域的最小值作为显著性代表值,剩下的4维为与目标的距离、与目标的转角差、机器人的线速度、机器人的角速度
distance = np.linalg.norm([self.odom_x - self.goal_x, self.odom_y - self.goal_y])
theta = beta - angleif theta > np.pi:theta = np.pi - thetatheta = -np.pi - thetaif theta < -np.pi:theta = -np.pi - thetatheta = np.pi - theta
vel_cmd = Twist()vel_cmd.linear.x = action[0]vel_cmd.angular.z = action[1]
robot_state = [distance, theta, action[0], action[1]]
def velodyne_callback(self, v):data = list(pc2.read_points(v, skip_nans=False, field_names=("x", "y", "z")))self.velodyne_data = np.ones(self.environment_dim) * 10for i in range(len(data)):if data[i][2] > -0.2:dot = data[i][0] * 1 + data[i][1] * 0mag1 = math.sqrt(math.pow(data[i][0], 2) + math.pow(data[i][1], 2))mag2 = math.sqrt(math.pow(1, 2) + math.pow(0, 2))beta = math.acos(dot / (mag1 * mag2)) * np.sign(data[i][1])dist = math.sqrt(data[i][0] ** 2 + data[i][1] ** 2 + data[i][2] ** 2)for j in range(len(self.gaps)):if self.gaps[j][0] <= beta < self.gaps[j][1]:self.velodyne_data[j] = min(self.velodyne_data[j], dist)break
2.4 奖励空间
在每一步仿真后都会计算奖励,奖励的准则为到达目标加200分,碰撞-100分,再根据角速度和线速度以及显著性的最小激光点进行动态调整,引导机器人
def step(self, action):...reward = self.get_reward(target, collision, action, min_laser)return state, reward, done, targetdef get_reward(target, collision, action, min_laser):if target:return 100.0elif collision:return -100.0else:r3 = lambda x: 1 - x if x < 1 else 0.0return action[0] / 2 - abs(action[1]) / 2 - r3(min_laser) / 2
2.5 TD3训练
采用Actor-Critic的方法进行训练,训练为常规的强化学习架构,本文按照读者有强化学习基础行进,重要的是输入的参数,要定义好维度问题。
import os
import timeimport numpy as np
import torch
import torch.nn as nn
import torch.nn.functional as F
from numpy import inf
from torch.utils.tensorboard import SummaryWriterfrom replay_buffer import ReplayBuffer
from velodyne_env import GazeboEnvdef evaluate(network, epoch, eval_episodes=10):avg_reward = 0.0col = 0for _ in range(eval_episodes):count = 0state = env.reset()done = Falsewhile not done and count < 501:action = network.get_action(np.array(state))a_in = [(action[0] + 1) / 2, action[1]]state, reward, done, _ = env.step(a_in)avg_reward += rewardcount += 1if reward < -90:col += 1avg_reward /= eval_episodesavg_col = col / eval_episodesprint("..............................................")print("Average Reward over %i Evaluation Episodes, Epoch %i: %f, %f"% (eval_episodes, epoch, avg_reward, avg_col))print("..............................................")return avg_rewardclass Actor(nn.Module):def __init__(self, state_dim, action_dim):super(Actor, self).__init__()self.layer_1 = nn.Linear(state_dim, 800)self.layer_2 = nn.Linear(800, 600)self.layer_3 = nn.Linear(600, action_dim)self.tanh = nn.Tanh()def forward(self, s):s = F.relu(self.layer_1(s))s = F.relu(self.layer_2(s))a = self.tanh(self.layer_3(s))return aclass Critic(nn.Module):def __init__(self, state_dim, action_dim):super(Critic, self).__init__()self.layer_1 = nn.Linear(state_dim, 800)self.layer_2_s = nn.Linear(800, 600)self.layer_2_a = nn.Linear(action_dim, 600)self.layer_3 = nn.Linear(600, 1)self.layer_4 = nn.Linear(state_dim, 800)self.layer_5_s = nn.Linear(800, 600)self.layer_5_a = nn.Linear(action_dim, 600)self.layer_6 = nn.Linear(600, 1)def forward(self, s, a):s1 = F.relu(self.layer_1(s))self.layer_2_s(s1)self.layer_2_a(a)s11 = torch.mm(s1, self.layer_2_s.weight.data.t())s12 = torch.mm(a, self.layer_2_a.weight.data.t())s1 = F.relu(s11 + s12 + self.layer_2_a.bias.data)q1 = self.layer_3(s1)s2 = F.relu(self.layer_4(s))self.layer_5_s(s2)self.layer_5_a(a)s21 = torch.mm(s2, self.layer_5_s.weight.data.t())s22 = torch.mm(a, self.layer_5_a.weight.data.t())s2 = F.relu(s21 + s22 + self.layer_5_a.bias.data)q2 = self.layer_6(s2)return q1, q2# TD3 network
class TD3(object):def __init__(self, state_dim, action_dim, max_action):# Initialize the Actor networkself.actor = Actor(state_dim, action_dim).to(device)self.actor_target = Actor(state_dim, action_dim).to(device)self.actor_target.load_state_dict(self.actor.state_dict())self.actor_optimizer = torch.optim.Adam(self.actor.parameters())# Initialize the Critic networksself.critic = Critic(state_dim, action_dim).to(device)self.critic_target = Critic(state_dim, action_dim).to(device)self.critic_target.load_state_dict(self.critic.state_dict())self.critic_optimizer = torch.optim.Adam(self.critic.parameters())self.max_action = max_actionself.writer = SummaryWriter()self.iter_count = 0def get_action(self, state):# Function to get the action from the actorstate = torch.Tensor(state.reshape(1, -1)).to(device)return self.actor(state).cpu().data.numpy().flatten()# training cycledef train(self,replay_buffer,iterations,batch_size=100,discount=1,tau=0.005,policy_noise=0.2,  # discount=0.99noise_clip=0.5,policy_freq=2,):av_Q = 0max_Q = -infav_loss = 0for it in range(iterations):# sample a batch from the replay buffer(batch_states,batch_actions,batch_rewards,batch_dones,batch_next_states,) = replay_buffer.sample_batch(batch_size)state = torch.Tensor(batch_states).to(device)next_state = torch.Tensor(batch_next_states).to(device)action = torch.Tensor(batch_actions).to(device)reward = torch.Tensor(batch_rewards).to(device)done = torch.Tensor(batch_dones).to(device)# Obtain the estimated action from the next state by using the actor-targetnext_action = self.actor_target(next_state)# Add noise to the actionnoise = torch.Tensor(batch_actions).data.normal_(0, policy_noise).to(device)noise = noise.clamp(-noise_clip, noise_clip)next_action = (next_action + noise).clamp(-self.max_action, self.max_action)# Calculate the Q values from the critic-target network for the next state-action pairtarget_Q1, target_Q2 = self.critic_target(next_state, next_action)# Select the minimal Q value from the 2 calculated valuestarget_Q = torch.min(target_Q1, target_Q2)av_Q += torch.mean(target_Q)max_Q = max(max_Q, torch.max(target_Q))# Calculate the final Q value from the target network parameters by using Bellman equationtarget_Q = reward + ((1 - done) * discount * target_Q).detach()# Get the Q values of the basis networks with the current parameterscurrent_Q1, current_Q2 = self.critic(state, action)# Calculate the loss between the current Q value and the target Q valueloss = F.mse_loss(current_Q1, target_Q) + F.mse_loss(current_Q2, target_Q)# Perform the gradient descentself.critic_optimizer.zero_grad()loss.backward()self.critic_optimizer.step()if it % policy_freq == 0:# Maximize the actor output value by performing gradient descent on negative Q values# (essentially perform gradient ascent)actor_grad, _ = self.critic(state, self.actor(state))actor_grad = -actor_grad.mean()self.actor_optimizer.zero_grad()actor_grad.backward()self.actor_optimizer.step()# Use soft update to update the actor-target network parameters by# infusing small amount of current parametersfor param, target_param in zip(self.actor.parameters(), self.actor_target.parameters()):target_param.data.copy_(tau * param.data + (1 - tau) * target_param.data)# Use soft update to update the critic-target network parameters by infusing# small amount of current parametersfor param, target_param in zip(self.critic.parameters(), self.critic_target.parameters()):target_param.data.copy_(tau * param.data + (1 - tau) * target_param.data)av_loss += lossself.iter_count += 1# Write new values for tensorboardself.writer.add_scalar("loss", av_loss / iterations, self.iter_count)self.writer.add_scalar("Av. Q", av_Q / iterations, self.iter_count)self.writer.add_scalar("Max. Q", max_Q, self.iter_count)def save(self, filename, directory):torch.save(self.actor.state_dict(), "%s/%s_actor.pth" % (directory, filename))torch.save(self.critic.state_dict(), "%s/%s_critic.pth" % (directory, filename))def load(self, filename, directory):self.actor.load_state_dict(torch.load("%s/%s_actor.pth" % (directory, filename)))self.critic.load_state_dict(torch.load("%s/%s_critic.pth" % (directory, filename)))# Set the parameters for the implementation
device = torch.device("cuda" if torch.cuda.is_available() else "cpu")  # cuda or cpu
seed = 0  # Random seed number
eval_freq = 5e3  # After how many steps to perform the evaluation
max_ep = 500  # maximum number of steps per episode
eval_ep = 10  # number of episodes for evaluation
max_timesteps = 5e6  # Maximum number of steps to perform
expl_noise = 1  # Initial exploration noise starting value in range [expl_min ... 1]
expl_decay_steps = (500000  # Number of steps over which the initial exploration noise will decay over
)
expl_min = 0.1  # Exploration noise after the decay in range [0...expl_noise]
batch_size = 40  # Size of the mini-batch
discount = 0.99999  # Discount factor to calculate the discounted future reward (should be close to 1)
tau = 0.005  # Soft target update variable (should be close to 0)
policy_noise = 0.2  # Added noise for exploration
noise_clip = 0.5  # Maximum clamping values of the noise
policy_freq = 2  # Frequency of Actor network updates
buffer_size = 1e6  # Maximum size of the buffer
file_name = "TD3_velodyne"  # name of the file to store the policy
save_model = True  # Weather to save the model or not
load_model = False  # Weather to load a stored model
random_near_obstacle = True  # To take random actions near obstacles or not# Create the network storage folders
if not os.path.exists("./results"):os.makedirs("./results")
if save_model and not os.path.exists("./pytorch_models"):os.makedirs("./pytorch_models")# Create the training environment
environment_dim = 20
robot_dim = 4
env = GazeboEnv("multi_robot_scenario.launch", environment_dim)
time.sleep(5)
torch.manual_seed(seed)
np.random.seed(seed)
state_dim = environment_dim + robot_dim
action_dim = 2
max_action = 1# Create the network
network = TD3(state_dim, action_dim, max_action)
# Create a replay buffer
replay_buffer = ReplayBuffer(buffer_size, seed)
if load_model:try:network.load(file_name, "./pytorch_models")except:print("Could not load the stored model parameters, initializing training with random parameters")# Create evaluation data store
evaluations = []timestep = 0
timesteps_since_eval = 0
episode_num = 0
done = True
epoch = 1count_rand_actions = 0
random_action = []# Begin the training loop
while timestep < max_timesteps:# On termination of episodeif done:if timestep != 0:network.train(replay_buffer,episode_timesteps,batch_size,discount,tau,policy_noise,noise_clip,policy_freq,)if timesteps_since_eval >= eval_freq:print("Validating")timesteps_since_eval %= eval_freqevaluations.append(evaluate(network=network, epoch=epoch, eval_episodes=eval_ep))network.save(file_name, directory="./pytorch_models")np.save("./results/%s" % (file_name), evaluations)epoch += 1state = env.reset()done = Falseepisode_reward = 0episode_timesteps = 0episode_num += 1# add some exploration noiseif expl_noise > expl_min:expl_noise = expl_noise - ((1 - expl_min) / expl_decay_steps)action = network.get_action(np.array(state))action = (action + np.random.normal(0, expl_noise, size=action_dim)).clip(-max_action, max_action)# If the robot is facing an obstacle, randomly force it to take a consistent random action.# This is done to increase exploration in situations near obstacles.# Training can also be performed without itif random_near_obstacle:if (np.random.uniform(0, 1) > 0.85and min(state[4:-8]) < 0.6and count_rand_actions < 1):count_rand_actions = np.random.randint(8, 15)random_action = np.random.uniform(-1, 1, 2)if count_rand_actions > 0:count_rand_actions -= 1action = random_actionaction[0] = -1# Update action to fall in range [0,1] for linear velocity and [-1,1] for angular velocitya_in = [(action[0] + 1) / 2, action[1]]next_state, reward, done, target = env.step(a_in)done_bool = 0 if episode_timesteps + 1 == max_ep else int(done)done = 1 if episode_timesteps + 1 == max_ep else int(done)episode_reward += reward# Save the tuple in replay bufferreplay_buffer.add(state, action, reward, done_bool, next_state)# Update the countersstate = next_stateepisode_timesteps += 1timestep += 1timesteps_since_eval += 1# After the training is done, evaluate the network and save it
evaluations.append(evaluate(network=network, epoch=epoch, eval_episodes=eval_ep))
if save_model:network.save("%s" % file_name, directory="./models")
np.save("./results/%s" % file_name, evaluations)
3. 总结
实际上利用Gazebo进行强化学习无非是环境获取上的不同,Gazebo的环境控制需要使用ROS服务进行控制,状态可以通过Gazebo进行获取,同时某些必要数据需要从话题中获取,最重要的是组织获取 的数据(通过话题等)与控制Gazebo的仿真步骤之间的组合。
强化学习的手段与传统算法无异,强化学习方法最重要的是要确定动作空间、状态空间、奖励空间,这三个空间是work的前提。
在笔者自己的环境中,将获取里程计的话题以及获取激光点的数据替换成为了自己的本机的仿真环境匹配的话题。
self.point_cloud = rospy.Subscriber("/scan", LaserScan, self.laser_callback, queue_size=1)self.odom = rospy.Subscriber("/odom", Odometry, self.odom_callback, queue_size=1)self.frontiers_sub = rospy.Subscriber("/frontiers", Marker, self.frontiers, queue_size=1)self.center_frontiers_sub = rospy.Subscriber("/center_frontiers", Marker, self.center_frontiers, queue_size=1)
与Gazebo仿真环境相关的话题有很多,用于在ROS中与仿真环境进行通信和交互。以下是一些常见的与Gazebo相关的话题以及它们的作用:
/gazebo/model_states:这个话题发布了所有仿真中模型的状态信息,包括它们的位置、姿态、线速度、角速度等。
/gazebo/link_states:类似于 /gazebo/model_states,但是发布了模型的每个链接的状态信息,适用于多链接模型。
/gazebo/set_model_state:这是一个用于设置模型状态的话题。通过向该话题发送消息,你可以控制模型的位置、姿态等属性。
/gazebo/set_link_state:类似于 /gazebo/set_model_state,但用于设置链接的状态,允许你更精细地控制模型的不同部分。
/gazebo/unpause_physics 和 /gazebo/pause_physics:这些话题用于控制仿真的暂停和继续。通过向 /gazebo/unpause_physics 发送请求,可以取消暂停仿真物理模拟,而通过向 /gazebo/pause_physics 发送请求,可以将仿真暂停。
/gazebo/reset_world 和 /gazebo/reset_simulation:这些话题用于重置仿真环境。 /gazebo/reset_world 用于重置仿真世界的状态,而 /gazebo/reset_simulation 用于重置仿真整个仿真会话的状态。
/gazebo/delete_model:通过向这个话题发送消息,你可以请求删除指定名称的模型,从仿真环境中移除它。
/gazebo/spawn_sdf_model 和 /gazebo/spawn_urdf_model:这些话题用于在仿真环境中生成新的SDF或URDF模型。通过向这些话题发送消息,你可以在仿真环境中动态生成模型。
/gazebo/apply_body_wrench:这个话题用于对仿真环境中的物体施加力或扭矩,以模拟外部力或操作。
/gazebo/camera/*:用于模拟相机传感器,例如 /gazebo/camera/image 可以获取相机的图像数据。