目录:
- 0、文档:
- 1、在Windows上搭建Flutter开发环境
- (1)[使用中国镜像(❌详细看官方文档)](https://docs.flutter.dev/community/china)
- (2)[下载最新版Flutter SDK(已包含Dart)](https://docs.flutter.dev/release/archive?tab=windows#windows)
- (3)运行医生检查命令:`flutter doctor`
- (4)Android Studio中安装Flutter、Dart插件方便使用
- 2、新建、运行Flutter项目
- 3、项目结构+分析示例代码
- (1)几个常用小知识:
- (2)代码分析:
- 4、[必看电子书:《Flutter实战·第二版》](https://book.flutterchina.club/chapter2/first_flutter_app.html#_2-1-1-%E5%88%9B%E5%BB%BAflutter%E5%BA%94%E7%94%A8%E6%A8%A1%E6%9D%BF)
- 5、[必看官方例子❌](https://github.com/flutter/samples)
0、文档:
国外的官网(
❌科学上网):https://flutter.dev/
国外的文档:https://docs.flutter.dev/
国内的官网:https://flutter.cn
国内的文档:https://flutter.cn/docs/
其他中文版文档(
更适合新手):https://doc.flutterchina.club
1、在Windows上搭建Flutter开发环境
❌表示国内访问不了,需要科学上网。
(1)使用中国镜像(❌详细看官方文档)
将如下环境变量加入到用户环境变量中:
export PUB_HOSTED_URL=https://pub.flutter-io.cn
export FLUTTER_STORAGE_BASE_URL=https://storage.flutter-io.cn
在Windows中操作示例:

(2)下载最新版Flutter SDK(已包含Dart)
去
上面提供的官网下载,比如❌https://docs.flutter.dev/release/archive?tab=windows#windows
国外的访问不了,就国内的看看,或者科学上网。
下载完成后,解压到C盘自己新建一个目录管理(
不要放在高权限的路径如C:\Program Files\)。
这个SDK其实就是命令,所以我们需要配置环境变量方便重复调用:
在“用户变量”下“Path”:加一个flutter\bin的全路径作为它的值.
命令名为:flutter
·
第一次运行一个flutter命令(如flutter doctor等)时,它会下载它自己的依赖项并自行编译。以后再运行就会快得多。
(3)运行医生检查命令:flutter doctor
查看是否需要你的电脑是否还需要安装其他任何依赖项来完成安装,然后根据检查结果做适当调整。
- 一般Flutter SDK已经包含包括Dart的SDK之类的东西,所以不需要额外安装Dart SDK
- [!] Android toolchain - develop for Android devices (Android SDK version 34.0.0)
! Some Android licenses not accepted. To resolve this, run:flutter doctor --android-licenses
这个警告因为你没同意协议,所以你需要运行一下它提示的这个命令同意一下协议:flutter doctor --android-licenses,
如果这一块还有其他报错就是你的Android Studio的SDK里,你有些东西没勾选下载。
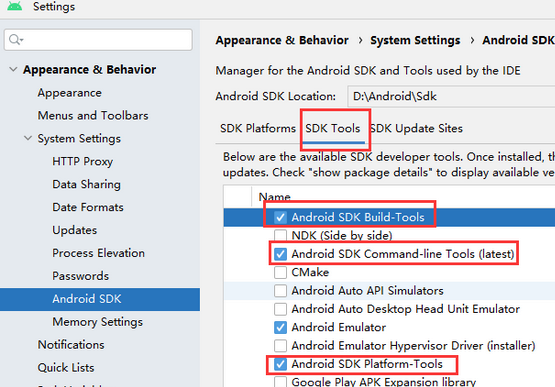
- 还有一个问题是Visual Studio - develop Windows apps,意思就是你不开发电脑PC端应用你就不需要VS,如果需要再自行下载安装。
我的最终结果示例:
 其他你可能会遇到的问题:
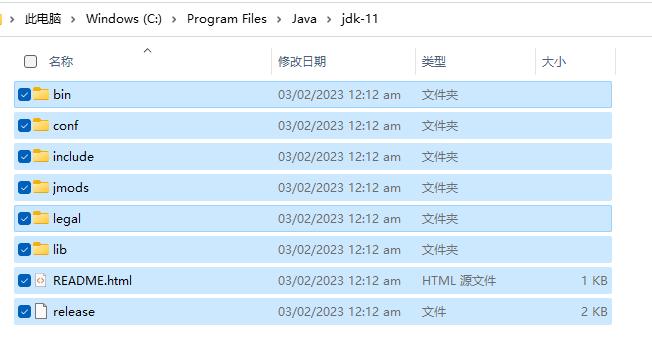
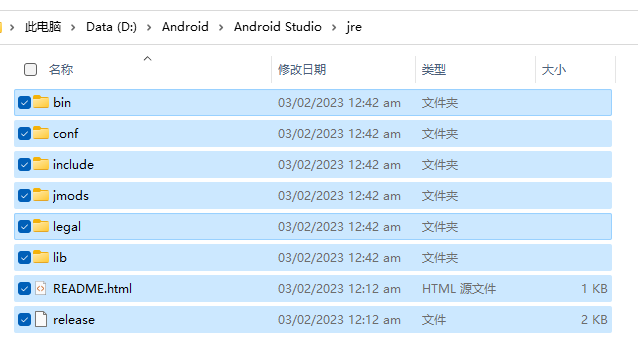
问题2:如上图,Android Studio不能找到JAVA版本(JDK版本)
解决办法:
把JDK里的文件复制到Android Studio安装目录下的jre即可:
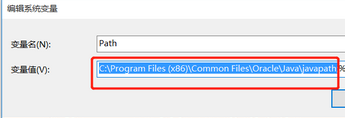
问题3:使用JDK安装程序(exe),会自动配置JDK环境变量。如果是多版本,需要删除系统变量Path下的这个。(否则会错乱)
其他常用命令:
flutter devices:验证Flutter识别您连接的Android设备。
flutter run:运行启动您的应用程序(项目)到不同的设备,所以运行这个命令之前你需要先创建Flutter项目,并导航到具体的目录下去运行。当然,也可以直接再AS中直接点击运行。
(4)Android Studio中安装Flutter、Dart插件方便使用

现在安装Flutter就会提示一起安装Dart插件,如果没提示,就自己搜索Dart插件安装。
重启AS,就可以看到可以直接使用AS新建Flutter项目了:

2、新建、运行Flutter项目
说明:我做这个记录的时候是2023年8月份,所有版本都是刚刚下载的,所以如果你使用老版本,界面可能不一样!
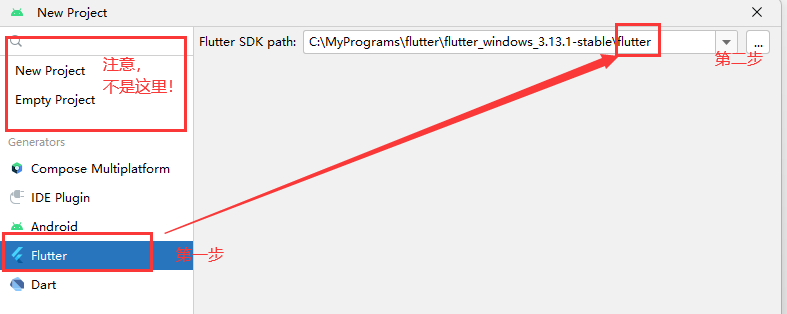
1、在Android Sudio中新建Flutter项目
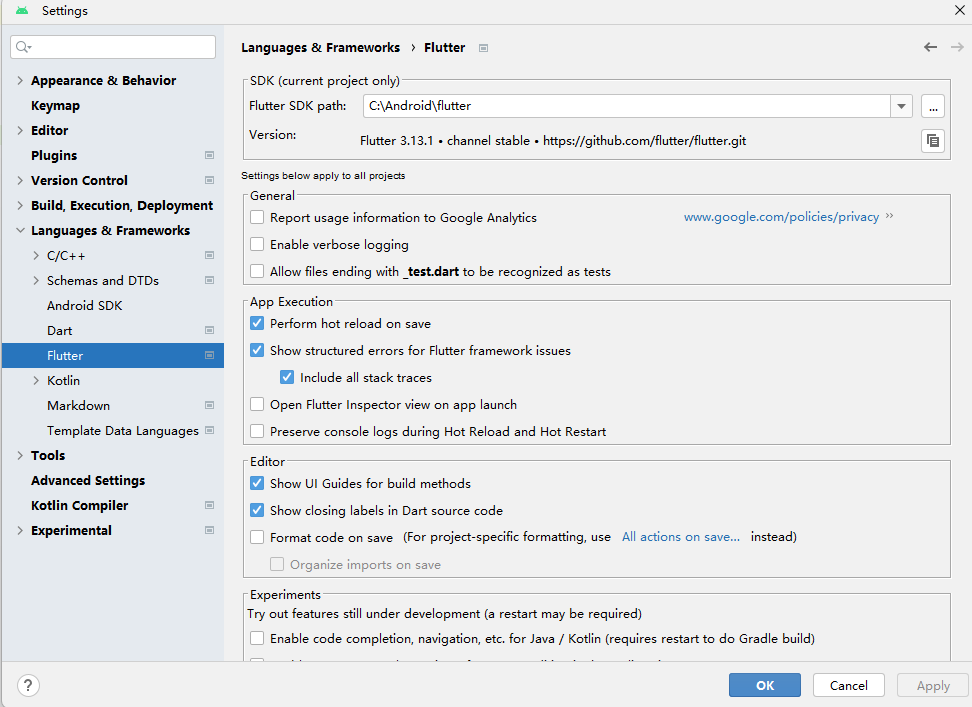
2、选择flutter,第一次需要配置flutter SDK,路径为bin目录的上一层(也就是flutter目录)
如图:
 3、自行填写项目信息,最后一句提醒的意思是:
(1)When created, the new project will run on the selected platforms (others can be added later).
创建后,新项目将在选定的平台上运行(其他平台可以稍后添加)。
(2)Create project offline
离线创建项目
4、新建项目后,代码位于 lib/main.dart.
5、运行在浏览器上是很快的,但是在手机上却很慢(构建很久)。
我第一次运行的时候出现一个问题,就是构建很久,似乎构建不出来。

所以怀疑是gradle工具出错了(可能是之前新建项目,没构建成功,也就是gradle没下载完成,就手动强制退出AS了,导致工具不完整。)
我的解决办法是瞎弄出来的。我就是在插件市场,下载一个Gradle升级的辅助插件,然后自己科学上网,每次重启它会检查然后会自动把Gradle插件升级到最新了。
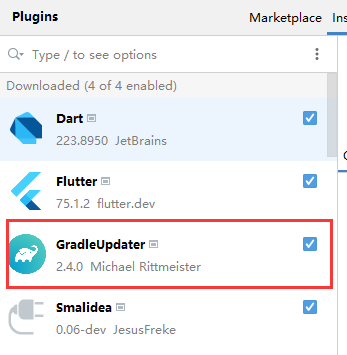
在这个过程中发生一个扯淡的问题,就是我可能不小心把其他插件禁用掉了,导致新建项目的选项里没有Flutter项目。
网上说是把这玩意给禁了,重新打开就行了:

3、项目结构+分析示例代码
(1)几个常用小知识:
1、自动对齐缩进:右键单击Dart代码区域,然后选择 Reformat Code with dartfmt.
2、
(2)代码分析:
1、引入一个库文件:
导入Material:它是一种标准的移动端和web端的视觉设计语言。
Flutter提供了一套丰富的Material widgets。
import 'package:flutter/material.dart';
2、入口函数main:
根据Dart语法,可以改成
void main() => runApp(const MyApp());
说明:main函数使用了(=>)符号, 这是Dart中单行函数或方法的简写
void main() {runApp(const MyApp());
}
3、StatelessWidget无状态和StatefulWidget有状态
StatelessWidget 是一个不可变的组件类,它表示一个静态的用户界面片段。它的特点是一旦被创建,就无法更改其属性或状态。它通常用于显示静态内容,不需要随时间变化的界面。例如,一个简单的文本标签或一个静态图片可以使用 StatelessWidget 来创建。
·
StatefulWidget(有状态组件):StatefulWidget 是一个可变的组件类,它表示一个可以根据内部状态的变化而重新渲染的用户界面片段。它的特点是可以包含可变的状态和属性,并且可以根据状态的变化来动态更新界面。StatefulWidget 通常用于需要响应用户交互、数据变化或时间变化的界面。例如,一个计数器组件可以使用 StatefulWidget 来创建,其中计数器的值可以根据用户的操作进行递增或递减。
·
注意,很多新手会误解,这个“不可变”的地方体现在哪?我们都知道,一个类,一般包含两部分:属性值+方法函数
其中属性值用来描述这个类的属性状态。所以我们说的可变不可变说的是在其中这个类中定义的变量值不可变。
举个例子,一个继承自无状态的类里有一个变量a,这个属性值a是不可变的。
但是组件是树状的,也就是组件A可能包含组件B,假设组件A是不可变的,组件B是可变的。这是可以的,因为可不可变,是某个组件的属性值,跟其他组件(就算是你包含的组件),没有啥关系。很多新手把握不了这个变化之处,就会觉得很难理解。
·
使用 StatelessWidget 和 StatefulWidget 的分离可以带来一些好处:
(1)渲染性能优化:由于 StatelessWidget 是不可变的,当界面不需要重新渲染时,Flutter 可以避免不必要的重绘操作,从而提高性能。
(2)状态管理:StatefulWidget 允许你在组件内部管理状态,当状态发生变化时,Flutter 会自动触发重新渲染。这使得你可以方便地处理用户交互或数据变化,并及时更新界面。
(3)组件复用:通过将界面的静态部分与动态部分分离,可以更好地实现组件的复用。你可以在 StatelessWidget 中定义静态的界面结构,然后在 StatefulWidget 中处理动态的逻辑和状态。
·
总而言之,StatelessWidget 用于表示静态的界面片段,而 StatefulWidget 则用于表示需要根据状态变化重新渲染的动态界面片段。这种分离使得 Flutter 的界面构建更加灵活、高效和易于维护。
// 1/3 不可变(无状态)
class MyApp extends StatelessWidget {const MyApp({super.key});// 1、变量属性值区域:此处没有。// This widget is the root of your application.// 这是一个widget(组件)// 这是你应用的根部组件(也就是第一个)// 2、函数方法区域:Widget build(BuildContext context) {return MaterialApp(title: 'Flutter Demo',theme: ThemeData(// This is the theme of your application.// 这部分是应用的主题。//// TRY THIS: // Try running your application with "flutter run". You'll see the application has a blue toolbar. // 尝试运行你的应用(使用flutter run命令),就会看到应用上有一个深紫色的导航条// Then, without quitting the app,// try changing the seedColor in the colorScheme below to Colors.green// and then invoke "hot reload" (save your changes or press the "hot reload" button // in a Flutter-supported IDE, or press "r" if you used the command line to start the app).// 它的就是想说,它支持热加载,你需要把下面的颜色改成Colors.green绿色,然后点击“热加载”按钮,也就是AS右上角的闪电按钮// 或者直接运行,就能够看到修改结果。意思就是不需要重新进行项目编译,这叫热加载。// Notice that the counter didn't reset back to zero; the application// state is not lost during the reload. To reset the state, use hot restart instead.// 注意,你在手机上点几下计数器,热加载以后,计数器并不会清零。也就是说,没有进行修改的部分在热加载过程中不会改变状态。// 如果你想改变状态,需要热重启替代。// This works for code too, not just values: Most code changes can be tested with just a hot reload.// 这也适用于代码,而不仅仅是值:大多数代码更改都可以通过热(重新)加载进行测试。热加载适合代码快速测试。colorScheme: ColorScheme.fromSeed(seedColor: Colors.deepPurple),useMaterial3: true,),home: const MyHomePage(title: 'Flutter Demo Home Page'),//这是一个有状态的组件,说明在无状态组件里,//是可以调用任何组件的,不区分有无状态。有无状态的组件说明的是,这个组件本身的属性,而别的组件的属性就不归它管了。);}
}
// 2/3 可变(有状态):其实就是需要重写一个方法。并使用这个方法来构建一个具有状态的对象。
class MyHomePage extends StatefulWidget {const MyHomePage({super.key, required this.title});/*This widget is the home page of your application. It is stateful, meaning thatit has a State object (defined below) that contains fields that affect how it looks.这个小部件是应用程序的主页。它是有状态的,也就是说它有一个State对象(定义如下),其中包含影响其外观的字段。*//*This class is the configuration for the state. It holds the values (in this case the title)provided by the parent (in this case the App widget) andused by the build method of the State. Fields in a Widget subclass are always marked "final".这个类是状态的配置。它保存值(在本例中为标题)由父组件提供(在本例中是App小部件)和由该状态的构建方法使用。Widget子类中的字段总是被标记为“final”。*/final String title;State<MyHomePage> createState() => _MyHomePageState();
}
// 3/3------------------------------------------------
class _MyHomePageState extends State<MyHomePage> {int _counter = 0;void _incrementCounter() {setState(() {/*This call to setState tells the Flutter framework that something haschanged in this State, which causes it to rerun the build method belowso that the display can reflect the updated values. If we changed_counter without calling setState(), then the build method would not becalled again, and so nothing would appear to happen.调用setState来告诉Flutter框架,此状态中有东西发生了变化,这导致它重新运行下面的构建方法,以便显示可以反映更新的值。如果我们在没有调用setState()的情况下修改了_counter,那么build方法将不会再次被调用,因此什么也不会发生。*/_counter++;});}Widget build(BuildContext context) {/*This method is rerun every time setState is called, for instance as doneby the _incrementCounter method above.每次调用setState时都会重新运行这个方法,例如上面的_incrementCounter方法。The Flutter framework has been optimized to make rerunning build methodsfast, so that you can just rebuild anything that needs updating ratherthan having to individually change instances of widgets.Flutter框架经过优化,可以快速重新运行构建方法,这样你就可以重新构建任何需要更新的东西,而不必单独更改部件实例。*/return Scaffold(appBar: AppBar(/*TRY THIS: Try changing the color here to a specific color (toColors.amber, perhaps?) and trigger a hot reload to see the AppBarchange color while the other colors stay the same.试试这个:尝试将这里的颜色更改为特定的颜色(到Colors。可能是琥珀色?),并触发热重载,以看到应用栏改变颜色,而其他颜色保持不变。*/backgroundColor: Theme.of(context).colorScheme.inversePrimary,/*Here we take the value from the MyHomePage object that was created bythe App.build method, and use it to set our appbar title.这里,我们从App.build方法创建的MyHomePage对象中获取值,并使用它来设置appbar标题。*/title: Text(widget.title),),body: Center(/*Center is a layout widget. It takes a single child and positions itin the middle of the parent.Center是一个布局部件。它接收一个子元素,并将其放置在父元素的中间。*/child: Column(/*Column is also a layout widget. It takes a list of children andarranges them vertically. By default, it sizes itself to fit itschildren horizontally, and tries to be as tall as its parent.Column也是一个布局部件。它接收一个子元素列表,并将它们垂直排列。默认情况下,它会调整自己的大小以适应它的子元素,并尽量与父元素一样高。Column has various properties to control how it sizes itself andhow it positions its children. Here we use mainAxisAlignment tocenter the children vertically; the main axis here is the verticalaxis because Columns are vertical (the cross axis would be horizontal).列有各种属性来控制它自己的大小以及子元素的位置。这里我们使用mainAxisAlignment来让子元素垂直居中;这里的主轴是纵轴,因为列是垂直的(交叉轴是水平的)。TRY THIS: Invoke "debug painting" (choose the "Toggle Debug Paint"action in the IDE, or press "p" in the console), to see thewireframe for each widget.试试这个:调用“debug painting”(在IDE中选择“Toggle debug Paint”操作,或者在控制台中按“p”),以查看每个部件的线框。*/mainAxisAlignment: MainAxisAlignment.center,children: <Widget>[const Text('You have pushed the button this many times:',),Text('$_counter',style: Theme.of(context).textTheme.headlineMedium,),],),),floatingActionButton: FloatingActionButton(onPressed: _incrementCounter,tooltip: 'Increment',child: const Icon(Icons.add),), // This trailing comma makes auto-formatting nicer for build methods。末尾的逗号使构建方法的自动格式化更好。.);}
}4、必看电子书:《Flutter实战·第二版》
5、必看官方例子❌
你可以进入github,然后搜索flutter。
你会看到:
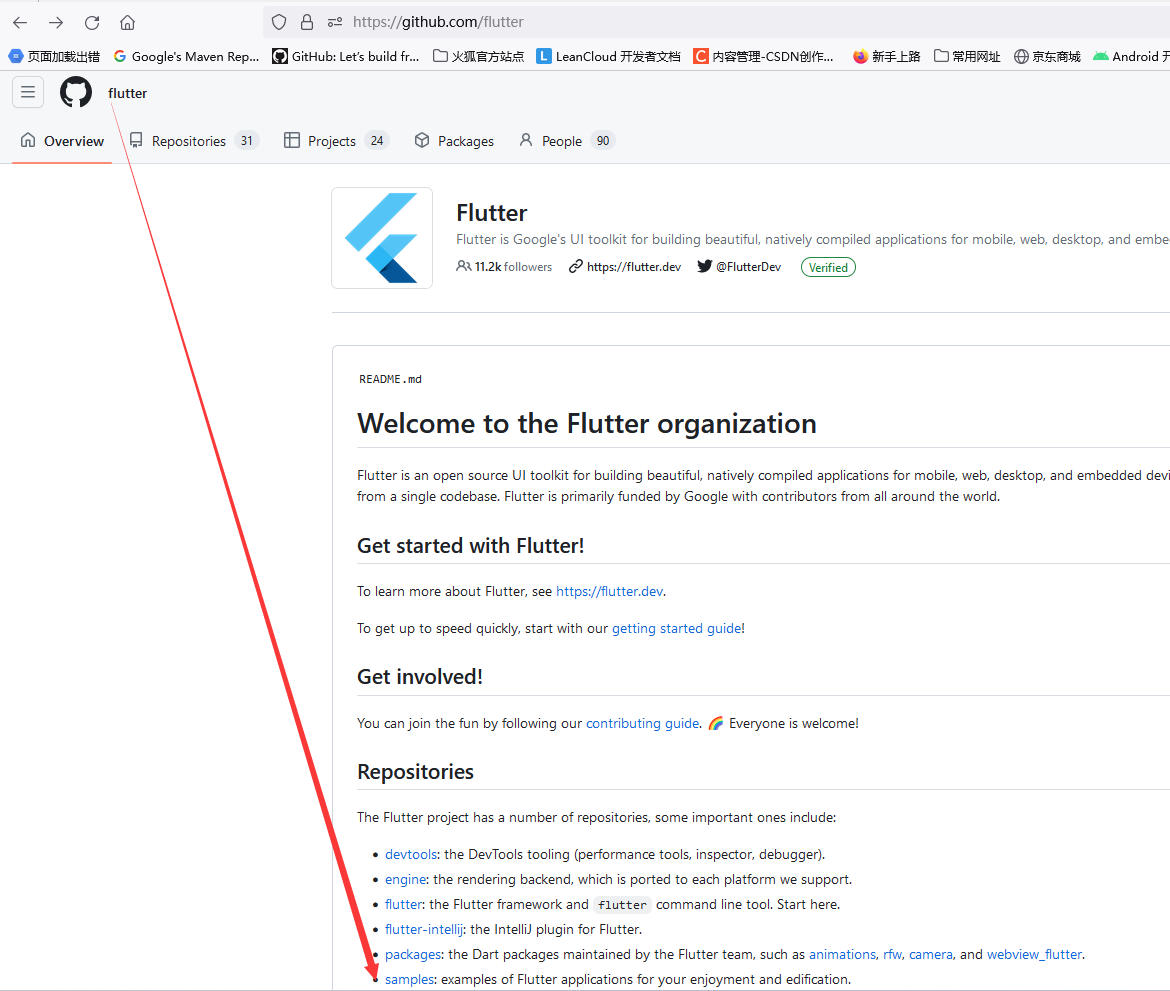 >推荐多下几个例子过来跑跑。再多看看书,多思考实践。基本就知道使用Flutter了。
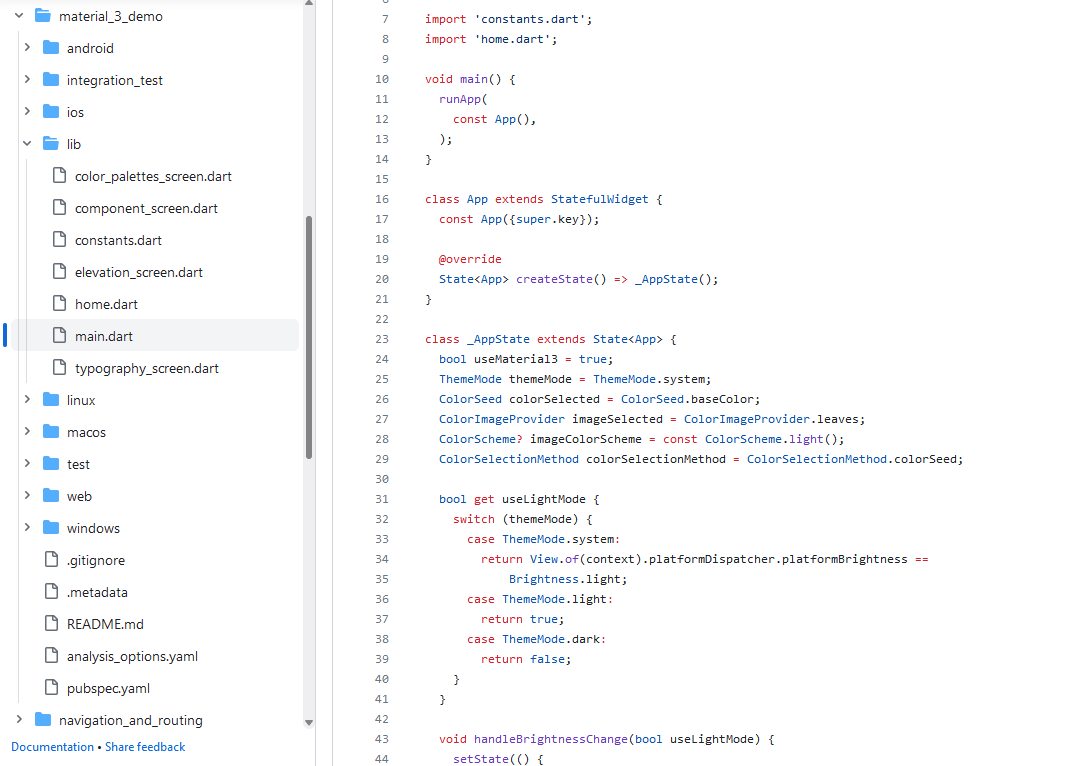
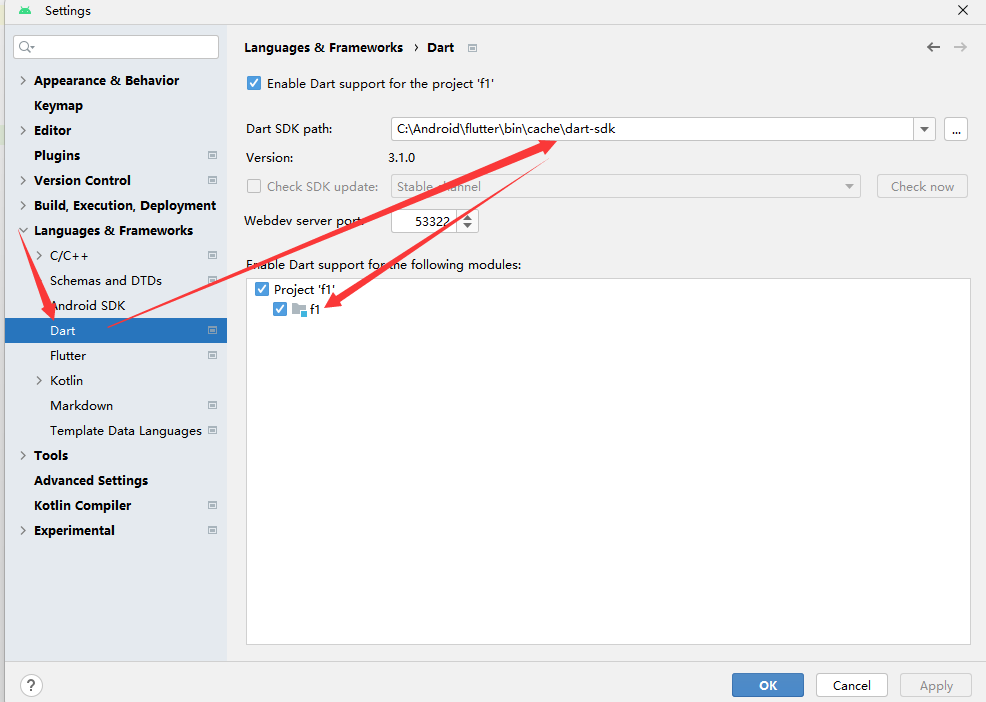
打开导入的项目,可能需要配置Dart和Flutter路径。







![利用MarkovJunior方法生成迷宫和图形的MATLAB演示[迷宫生成、贪吃蛇、地图生成、图案生成]](https://img-blog.csdnimg.cn/ad056798230c4de9ac0e28ac7eaf99ba.gif)
