起因:因为台风的原因,要居家办公,但正值公司业务最要紧的时刻,所以需要搭建远程共享,结果发现基于原有的经验,已经难以适应版本更新带来的问题,所以就解决方法,进行了一次重新总结,作为记录,也希望能帮到有类似需求的读者。
一、平台环境的搭建
1.1.Mariadb数据库的安装。
采用apt命令直接安装就可以是 10.11.3版。主要是对其进行设置,开启数据库通过远程登录进行管理的功能。
apt update
apt install mariadb-server
#安装结束,进行配置
mysql_secure_installation
root@Home:~# mysql -u root
##以下为mysql环境下的操作
mysql> select User, host from mysql.user ;   #查看一下当前的账户信息
mysql> GRANT ALL PRIVILEGES ON *.* TO root@'%'  IDENTIFIED BY '147258369' ; #设定root可远程登录
mysql> select User, host from mysql.user ; 再查看一下当前的账户信息,增加了一个 root   %
mysql> quit ;### 备注: 单独设置 root@localhost 的秘密
mysql> ALTER USER 'root'@'localhost' IDENTIFIED BY '147258369';
1.2. nginx稳定版的安装
当前nginx最常用的是1.22版,但稳定版已经发布到1.24了。对于系统没有最前沿要求的,可以继续apt直接装就可以了。要安装最新版,还是要按照官方说明进行前置环境的安装,然后才可以。
###以下命令是在debian12最小化安装环境进行,没有sudo命令,直接以root账户操作的!!!
##先安装一些必要的软件。主要是下载工具,key、验证文件、源地址文件的导入工具等apt install curl gnupg2 ca-certificates lsb-release debian-archive-keyring## 下载key文件,并导入
curl https://nginx.org/keys/nginx_signing.key | gpg --dearmor | tee /usr/share/keyrings/nginx-archive-keyring.gpg >/dev/null## 对下载的文件的验证
gpg --dry-run --quiet --no-keyring --import --import-options import-show /usr/share/keyrings/nginx-archive-keyring.gpg## 设置稳定版nginx的安装源的地址
echo "deb [signed-by=/usr/share/keyrings/nginx-archive-keyring.gpg] http://nginx.org/packages/debian `lsb_release -cs` nginx" | tee /etc/apt/sources.list.d/nginx.list## 进行声明,告诉debian11系统,按照我们所设定的安装包来进行安装
echo -e "Package: *\nPin: origin nginx.org\nPin: release o=nginx\nPin-Priority: 900\n"     | tee /etc/apt/preferences.d/99nginx## 真正的安装
apt update
apt install nginx
1.3 安装php-fpm
apt 默认安装即可。主要是安装必须的插件
apt install php-fpm php-gd php-mysql php-curl php-mbstring php-intl php-gmp php-bcmath php-xml php-imagick php-zip1.4 配置nginx和php
#location ~ \.php$ {root /usr/share/nginx/nextcloud;#fastcgi_pass 127.0.0.1:9000;fastcgi_pass unix:/run/php/php-fpm.sock; ## 这里使用的是sockt连接方式fastcgi_index index.php;fastcgi_param SCRIPT_FILENAME /usr/share/nginx/nextcloud$fastcgi_script_name;include /etc/nginx/fastcgi_params;}编写info.php
cat info.php<?php
phpinfo();
?>
二、 Nextcloud的下载和解压缩
这个比较简单。看官网介绍即可
在debian12 中, 我安装的nginx的默认路径是 /usr/share/nginx/html 这里根据配置文件的需要,将nextcloud 直接放在了和html同级别的位置,也是就是 usr/share/nginx/nextcloud
三、配置nextcloud 的nginx虚拟机
vim /etc/nginx/conf.d/cloud.conf##  内容如下  可以从官网关于nginx的设置说明中找到,这里是禁用了ssl,以便后面使用frpupstream php-handler {# server 127.0.0.1:9000;server unix:/var/run/php/php-fpm.sock;
}# Set the `immutable` cache control options only for assets with a cache busting `v` argument
map $arg_v $asset_immutable {"" "";default "immutable";
}server {listen 34567;  ## 这两段最好修改一下,因为电信运营商会封一些默认的80、8080、21等常用端口listen [::]:34567;server_name cloud.abcd.com;# Prevent nginx HTTP Server Detectionserver_tokens off;# Enforce HTTPS#  return 301 https://$server_name$request_uri;# }#    server {#    listen 443      ssl http2;#    listen [::]:443 ssl http2;#    server_name cloud.abcd.com;# Path to the root of your installationroot /usr/share/nginx/nextcloud;# Use Mozilla's guidelines for SSL/TLS settings# https://mozilla.github.io/server-side-tls/ssl-config-generator/#    ssl_certificate     /etc/ssl/certs/nginx-selfsigned.crt;#    ssl_certificate_key /etc/ssl/private/nginx-selfsigned.key;# Prevent nginx HTTP Server Detection#    server_tokens off;# HSTS settings# WARNING: Only add the preload option once you read about# the consequences in https://hstspreload.org/. This option# will add the domain to a hardcoded list that is shipped# in all major browsers and getting removed from this list# could take several months.#add_header Strict-Transport-Security "max-age=15768000; includeSubDomains; preload" always;# set max upload size and increase upload timeout:client_max_body_size 512M;client_body_timeout 300s;fastcgi_buffers 64 4K;# Enable gzip but do not remove ETag headersgzip on;gzip_vary on;gzip_comp_level 4;gzip_min_length 256;gzip_proxied expired no-cache no-store private no_last_modified no_etag auth;gzip_types application/atom+xml text/javascript application/javascript application/json application/ld+json application/manifest+json application/rss+xml application/vnd.geo+json application/vnd.ms-fontobject application/wasm application/x-font-ttf application/x-web-app-manifest+json application/xhtml+xml application/xml font/opentype image/bmp image/svg+xml image/x-icon text/cache-manifest text/css text/plain text/vcard text/vnd.rim.location.xloc text/vtt text/x-component text/x-cross-domain-policy;# Pagespeed is not supported by Nextcloud, so if your server is built# with the `ngx_pagespeed` module, uncomment this line to disable it.#pagespeed off;# The settings allows you to optimize the HTTP2 bandwitdth.# See https://blog.cloudflare.com/delivering-http-2-upload-speed-improvements/# for tunning hintsclient_body_buffer_size 512k;# HTTP response headers borrowed from Nextcloud `.htaccess`add_header Referrer-Policy                   "no-referrer"       always;add_header X-Content-Type-Options            "nosniff"           always;add_header X-Download-Options                "noopen"            always;add_header X-Frame-Options                   "SAMEORIGIN"        always;add_header X-Permitted-Cross-Domain-Policies "none"              always;add_header X-Robots-Tag                      "noindex, nofollow" always;add_header X-XSS-Protection                  "1; mode=block"     always;# Remove X-Powered-By, which is an information leakfastcgi_hide_header X-Powered-By;# Add .mjs as a file extension for javascript# Either include it in the default mime.types list# or include you can include that list explicitly and add the file extension# only for Nextcloud like below:include mime.types;types {#        text/javascript js mjs;}# Specify how to handle directories -- specifying `/index.php$request_uri`# here as the fallback means that Nginx always exhibits the desired behaviour# when a client requests a path that corresponds to a directory that exists# on the server. In particular, if that directory contains an index.php file,# that file is correctly served; if it doesn't, then the request is passed to# the front-end controller. This consistent behaviour means that we don't need# to specify custom rules for certain paths (e.g. images and other assets,# `/updater`, `/ocm-provider`, `/ocs-provider`), and thus# `try_files $uri $uri/ /index.php$request_uri`# always provides the desired behaviour.index index.php index.html /index.php$request_uri;# Rule borrowed from `.htaccess` to handle Microsoft DAV clientslocation = / {if ( $http_user_agent ~ ^DavClnt ) {return 302 /remote.php/webdav/$is_args$args;}}location = /robots.txt {allow all;log_not_found off;access_log off;}# Make a regex exception for `/.well-known` so that clients can still# access it despite the existence of the regex rule# `location ~ /(\.|autotest|...)` which would otherwise handle requests# for `/.well-known`.location ^~ /.well-known {# The rules in this block are an adaptation of the rules# in `.htaccess` that concern `/.well-known`.location = /.well-known/carddav { return 301 /remote.php/dav/; }location = /.well-known/caldav  { return 301 /remote.php/dav/; }location /.well-known/acme-challenge    { try_files $uri $uri/ =404; }location /.well-known/pki-validation    { try_files $uri $uri/ =404; }# Let Nextcloud's API for `/.well-known` URIs handle all other# requests by passing them to the front-end controller.return 301 /index.php$request_uri;}# Rules borrowed from `.htaccess` to hide certain paths from clientslocation ~ ^/(?:build|tests|config|lib|3rdparty|templates|data)(?:$|/)  { return 404; }location ~ ^/(?:\.|autotest|occ|issue|indie|db_|console)                { return 404; }# Ensure this block, which passes PHP files to the PHP process, is above the blocks# which handle static assets (as seen below). If this block is not declared first,# then Nginx will encounter an infinite rewriting loop when it prepends `/index.php`# to the URI, resulting in a HTTP 500 error response.location ~ \.php(?:$|/) {# Required for legacy supportrewrite ^/(?!index|remote|public|cron|core\/ajax\/update|status|ocs\/v[12]|updater\/.+|oc[ms]-provider\/.+|.+\/richdocumentscode\/proxy) /index.php$request_uri;fastcgi_split_path_info ^(.+?\.php)(/.*)$;set $path_info $fastcgi_path_info;try_files $fastcgi_script_name =404;include fastcgi_params;fastcgi_param SCRIPT_FILENAME $document_root$fastcgi_script_name;fastcgi_param PATH_INFO $path_info;fastcgi_param HTTPS on;fastcgi_param modHeadersAvailable true;         # Avoid sending the security headers twicefastcgi_param front_controller_active true;     # Enable pretty urlsfastcgi_pass php-handler;fastcgi_intercept_errors on;fastcgi_request_buffering off;fastcgi_max_temp_file_size 0;}# Serve static fileslocation ~ \.(?:css|js|mjs|svg|gif|png|jpg|ico|wasm|tflite|map)$ {try_files $uri /index.php$request_uri;add_header Cache-Control "public, max-age=15778463, $asset_immutable";access_log off;     # Optional: Don't log access to assetslocation ~ \.wasm$ {default_type application/wasm;}}location ~ \.woff2?$ {try_files $uri /index.php$request_uri;expires 7d;         # Cache-Control policy borrowed from `.htaccess`access_log off;     # Optional: Don't log access to assets}# Rule borrowed from `.htaccess`location /remote {return 301 /remote.php$request_uri;}location / {try_files $uri $uri/ /index.php$request_uri;}
}
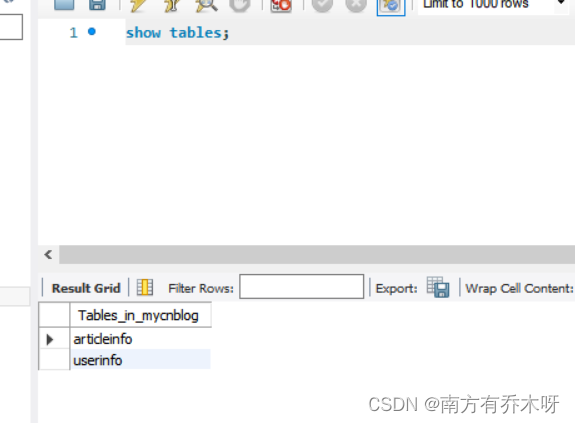
四、下载phpMyadmin,配置数据库
五、输入nextcloud所在的主机ip,进行安装
六、特殊的配置
全新安装的nextcloud时,会出现过一会,安装页面出现错误;静等到一切安装完成,输入地址,却出现404错误的问题;还有在进入登录页面后,在确定密码没有错误的情况下,无法通过web页面登录;登录次数过多后,因防暴力试错破解机制,导致延迟登录。本文将解决这几个问题
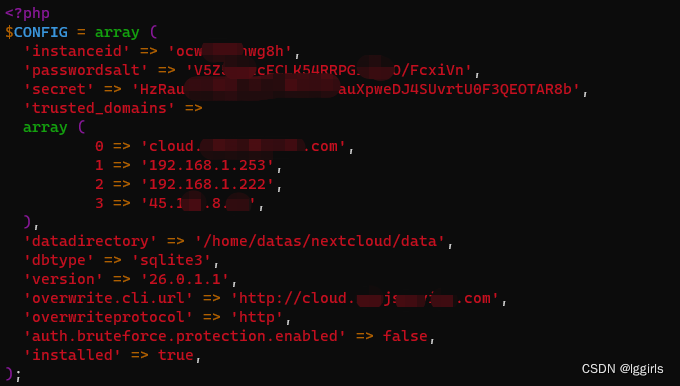
0. 修改配置文件,加入可登录系统的ip
图中有 0~3 共4个ip,注意没有证书的化,手动输入开头 http:// XXXX-ip/ 来确保非加密网页
1. /var/lib/php/session 这个文件夹及其中的文件,权限要和 nginx 、php保持一致。
目前新安装的nginx,默认使用的账户是 www-data
chown -R www-data:www-data /var/lib/php/session/2. http强制转换为https的问题
不知道从哪个版本开始,安装指导和配置文件内,都开始指向 https了,即便没有申请证书,也会指向和强制把http => https 。 修改配置文件,取消这一设定,保持 http就可以了
vim nextcloud/config/config.php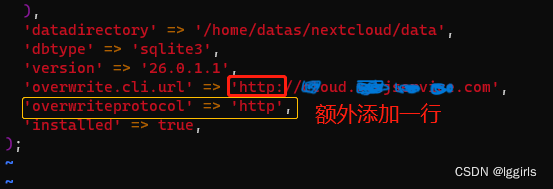
3. 如果以为自己记错了密码,反复登录,会出现IP受限的问题
也可以通过修改配置,取消试错保护的功能。 可以登录,问题解决后,再改回来
方法: 如第2步,在配置文件中添加一行:
'auth.bruteforce.protection.enabled' => false,七、frp和转发服务器nginx的配置
这一部分可以参考 Nextcloud 结合frp搭建私有网盘_frp nextcloud_lggirls的博客-CSDN博客
需要注意的是,在之前的这篇中,还没有强制使用https,比较好转发,但现在不行了。
还有关于转发代理的问题,可以参考: 使用frp结合nginx实现对https的反向代理支持_frp+nginx_lggirls的博客-CSDN博客
在本例子中,我们搭建的nextcloud使用的是http协议,在frp和nginx代理后,也是http协议
代理服务器上的配置:
这里的34567 端口,是frps服务器中的virtual_host 的端口
server {listen 80 default_server; listen [::]:80 default_server;server_name cloud.abcd.com;location / {proxy_pass http://127.0.0.1:34567; }}


