文章目录
- 前言
- 一、实现效果
- 二、折叠cell的实现原理
- 三、实现折叠cell的高度变化
- 四、实现选中点击的单元格
- 总结
前言
在暑假的3GShare中用到了折叠cell控件,特此总结博客记录
一、实现效果
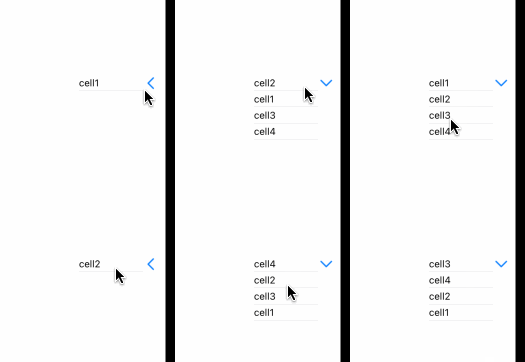
二、折叠cell的实现原理
首先我们需要知道ScrollView的是TableView的父类,我们可以通过代码来控制我们需要展示的cell的行数 ,也就是tableview的高度。
我们可以通过按钮来实现tableview的展开与关闭,并且通过- (void)tableView:(UITableView *)tableView didSelectRowAtIndexPath:(NSIndexPath *)indexPath 方法来实现我们单元格的切换
三、实现折叠cell的高度变化
既然我们已经知道实现折叠cell的关键是通过按钮控制tableview的高度,那么我们现在给出按钮点击函数
- (void)pressUp:(UIButton *)btn {if (btn.tag == 1002) {[btn setImage:[UIImage imageNamed:@"shou.png"] forState:UIControlStateNormal];_tableView.frame = CGRectMake(270, 200, 95, 20);btn.tag--;} else {[btn setImage:[UIImage imageNamed:@"fang.png"] forState:UIControlStateNormal];_tableView.frame = CGRectMake(270, 200, 95, 80);btn.tag++;}
}
如此一来便实现了我们点击按钮时我们展示的tableview高度会随按钮的点击而变化
四、实现选中点击的单元格
- (void)tableView:(UITableView *)tableView didSelectRowAtIndexPath:(NSIndexPath *)indexPath {// 从_dataArray获取被选中的项目NSString *selectedItem = _dataArray[indexPath.section];// 从_dataArray中移除被选中的项目[_dataArray removeObjectAtIndex:indexPath.section];// 将被选中的项目插入到_dataArray的开头[_dataArray insertObject:selectedItem atIndex:0];// 重新加载整个UITableView的数据[_tableView reloadData];// 调用pressUp:方法,执行按钮状态的切换[self pressUp:_zhedie];
}
当选择(点击)一个单元格时,将所对应部分的数据从_dataArray中移动到数组的顶部。这在didSelectRowAtIndexPath方法中完成。然后重新加载UITableView,并调用pressUp:方法以确保正确的布局。
总结
如此一来我们便简单实现了我们的折叠cell
以下给出完整的简单折叠cell的实现代码
- (void)viewDidLoad {[super viewDidLoad];//折叠cell=======_tableView = [[UITableView alloc] initWithFrame:CGRectMake(270, 200, 95, 80) style:UITableViewStylePlain];_tableView.delegate = self;_tableView.dataSource = self;_dataArray = [NSMutableArray arrayWithObjects:@"cell1", @"cell2", @"cell3", @"cell4", nil];[self.view addSubview:_tableView];_zhedie = [UIButton buttonWithType:UIButtonTypeSystem];_zhedie.frame = CGRectMake(270 + 95, 200, 20, 20);_zhedie.backgroundColor = [UIColor whiteColor];[_zhedie setImage:[UIImage imageNamed:@"shou.png"] forState:UIControlStateNormal];[_zhedie addTarget:self action:@selector(pressUp:)forControlEvents:UIControlEventTouchUpInside];_zhedie.tag = 1001;[self.view addSubview:_zhedie];if (_zhedie.tag == 1001) {_tableView.frame = CGRectMake(270, 200, 95, 20);}//=======折叠cell}}//====折叠cell
- (NSInteger)tableView:(UITableView *)tableView numberOfRowsInSection:(NSInteger)section {return 1;
}- (NSInteger)numberOfSectionsInTableView:(UITableView *)tableView {return 4;
}- (CGFloat)tableView:(UITableView *)tableView heightForRowAtIndexPath:(NSIndexPath *)indexPath {return 20;
}- (void)tableView:(UITableView *)tableView didSelectRowAtIndexPath:(NSIndexPath *)indexPath {NSString *selectedItem = _dataArray[indexPath.section];[_dataArray removeObjectAtIndex:indexPath.section];[_dataArray insertObject:selectedItem atIndex:0];[_tableView reloadData];[self pressUp:_zhedie];
}- (UITableViewCell *)tableView:(UITableView *)tableView cellForRowAtIndexPath:(NSIndexPath *)indexPath {NSString *strID = @"ID";//尝试获取可以复用的单元格//如果得不到,返回为nilUITableViewCell *cell = [_tableView dequeueReusableCellWithIdentifier:strID];if (cell == nil) {cell = [[UITableViewCell alloc] initWithStyle:UITableViewCellStyleDefault reuseIdentifier:strID];}//单元格文字赋值cell.textLabel.text = [_dataArray objectAtIndex:indexPath.section];cell.textLabel.font = [UIFont systemFontOfSize:12.0];cell.textLabel.textAlignment = NSTextAlignmentLeft;return cell;
}- (void)pressUp:(UIButton *)btn {if (btn.tag == 1002) {[btn setImage:[UIImage imageNamed:@"shou.png"] forState:UIControlStateNormal];_tableView.frame = CGRectMake(270, 200, 95, 20);btn.tag--;} else {[btn setImage:[UIImage imageNamed:@"fang.png"] forState:UIControlStateNormal];_tableView.frame = CGRectMake(270, 200, 95, 80);btn.tag++;}
}
折叠cell—demo

