环境介绍
同时玩cobbler3.3和cobbler2.8.5
cobbler3.3
系统CentOS8.3
VMware虚拟机
桥接到物理网络
IP: 192.168.1.33
cobbler2.8.5
系统CentOS7.9
VMWare虚拟机
桥接到物理网络
IP:192.168.1.33
安装cobbler3.3
yum源修改
cat /etc/yum.repo.d/Centos8.repo[base]
name=CentOS-$releasever - Base - mirrors.aliyun.com
baseurl=http://mirrors.aliyun.com/centos/$releasever/BaseOS/$basearch/os/http://mirrors.aliyuncs.com/centos/$releasever/BaseOS/$basearch/os/http://mirrors.cloud.aliyuncs.com/centos/$releasever/BaseOS/$basearch/os/
gpgcheck=1
gpgkey=http://mirrors.aliyun.com/centos/RPM-GPG-KEY-CentOS-Official[extras]
name=CentOS-$releasever - Extras - mirrors.aliyun.com
baseurl=http://mirrors.aliyun.com/centos/$releasever/extras/$basearch/os/http://mirrors.aliyuncs.com/centos/$releasever/extras/$basearch/os/http://mirrors.cloud.aliyuncs.com/centos/$releasever/extras/$basearch/os/
gpgcheck=1
gpgkey=http://mirrors.aliyun.com/centos/RPM-GPG-KEY-CentOS-Official[centosplus]
name=CentOS-$releasever - Plus - mirrors.aliyun.com
baseurl=http://mirrors.aliyun.com/centos/$releasever/centosplus/$basearch/os/http://mirrors.aliyuncs.com/centos/$releasever/centosplus/$basearch/os/http://mirrors.cloud.aliyuncs.com/centos/$releasever/centosplus/$basearch/os/
gpgcheck=1
enabled=0
gpgkey=http://mirrors.aliyun.com/centos/RPM-GPG-KEY-CentOS-Official[PowerTools]
name=CentOS-$releasever - PowerTools - mirrors.aliyun.com
baseurl=http://mirrors.aliyun.com/centos/$releasever/PowerTools/$basearch/os/http://mirrors.aliyuncs.com/centos/$releasever/PowerTools/$basearch/os/http://mirrors.cloud.aliyuncs.com/centos/$releasever/PowerTools/$basearch/os/
gpgcheck=1
enabled=0
gpgkey=http://mirrors.aliyun.com/centos/RPM-GPG-KEY-CentOS-Official[AppStream]
name=CentOS-$releasever - AppStream - mirrors.aliyun.com
baseurl=http://mirrors.aliyun.com/centos/$releasever/AppStream/$basearch/os/http://mirrors.aliyuncs.com/centos/$releasever/AppStream/$basearch/os/http://mirrors.cloud.aliyuncs.com/centos/$releasever/AppStream/$basearch/os/
gpgcheck=1
gpgkey=http://mirrors.aliyun.com/centos/RPM-GPG-KEY-CentOS-Officialyum clean all
yum makecache
防火墙
systemctl disable --now firewalldsetenforce 0
sed -i 's/SELINUX=enforcing/SELINUX=disabled/g' /etc/selinux/config
安装cobbler
yum -y install epel-release rsync rsync-daemon# rocky9.1上不用执行此三行
yum module list | grep cobbler
dnf module enable cobbler:3 -y
yum list all | grep cobbleryum -y install httpd dhcp-server tftp tftp-server cobbler cobbler-web pykickstart
安装cobbler2.8.5
yum源
wget -O /etc/yum.repos.d/CentOS-Base.repo https://mirrors.aliyun.com/repo/Centos-7.repo
wget -O /etc/yum.repos.d/epel.repo http://mirrors.aliyun.com/repo/epel-7.repo
防火墙
systemctl disable --now firewalldsetenforce 0
sed -i 's/SELINUX=enforcing/SELINUX=disabled/g' /etc/selinux/config
安装cobbler
yum install -y dhcp cobbler cobbler-web debmirror pykickstart syslinux
cobbler 配置
cobbler3.3和cobbler2.8.5大同小异
systemctl enable --now httpd
systemctl enable --now cobblerd
systemctl enable --now rsyncd
systemctl enable --now tftp
配置cobbler
sed -i 's/^server: 127.0.0.1/server: 192.168.1.33/' /etc/cobbler/settings.yaml
sed -i "s/next_server: 127.0.0.1/next_server: 192.168.1.33/" /etc/cobbler/settings.yaml
sed -i "s#manage_dhcp: false#manage_dhcp: true#" /etc/cobbler/settings.yaml# 检查配置问题
cobbler check# 解决 reposync is not installed, install yum-utils or dnf-plugins-core
# 解决 yumdownloader is not installed, install yum-utils or dnf-plugins-core
yum -y install yum-utils# 解决 some network boot-loaders are missing from /var/lib/cobbler/loaders
yum -y install syslinux*
cp /usr/share/syslinux/pxelinux.0 /var/lib/cobbler/loaders/
cp /usr/share/syslinux/menu.c32 /var/lib/cobbler/loaders/
ls /var/lib/cobbler/loaders/
配置dhcp
[root@localhost ~]# cat /etc/cobbler/dhcp.templateddns-update-style interim;allow booting;
allow bootp;ignore client-updates;
set vendorclass = option vendor-class-identifier;option system-arch code 93 = unsigned integer 16;subnet 192.168.0.0 netmask 255.255.0.0 {option routers             192.168.1.1;option domain-name-servers 192.168.1.33;option subnet-mask         255.255.0.0;range dynamic-bootp        192.168.32.100 192.168.32.254;default-lease-time         21600;max-lease-time             43200;next-server                $next_server;# systemctl restart httpd cobblerd
cobbler sync
安装CentOS8
导入
mkdir /centos8
mount -o loop,ro CentOS-Stream-8-20230710.0-x86_64-dvd1.iso /centos8cobbler import --path=/centos8 --name=MyC8 --arch=x86_64
cobbler list
cobbler distro report --name MyC8-x86_64# 删除
cobbler profile remove --name MyC8-x86_64
cobbler distro remove --name MyC8-x86_64
创建kickstarts自动安装脚本
# 生成密码
openssl passwd -1 'root'# cobbler profile get-autoinstall --name MyC8-x86_64 > /var/lib/cobbler/templates/centos8.ks # 适用cobbler3
# cobbler profile getks --name centos7-x86_64 > /var/lib/cobbler/kickstarts/centos7.ks # 适用cobbler2.8.5# 检查ks文件语法
cobbler validate-autoinstalls# 配置绑定ks
# cobbler profile edit --name MyC8-x86_64 --autoinstall centos8.ks # 适用cobbler3# 配置修改内核参数,以统一网卡名称
cobbler profile edit --name MyC8-x86_64 --kernel-options='net.ifnames=0 biosdevname=0'# 打印
cobbler profile report --name MyC8-x86_64# 同步
cobbler syncsystemctl restart httpd cobblerd rsyncd dhcpd
定制安装
使用https访问到cobbler的网页 https://192.168.1.33/cobbler_web/
账号密码都为cobbler
创建系统
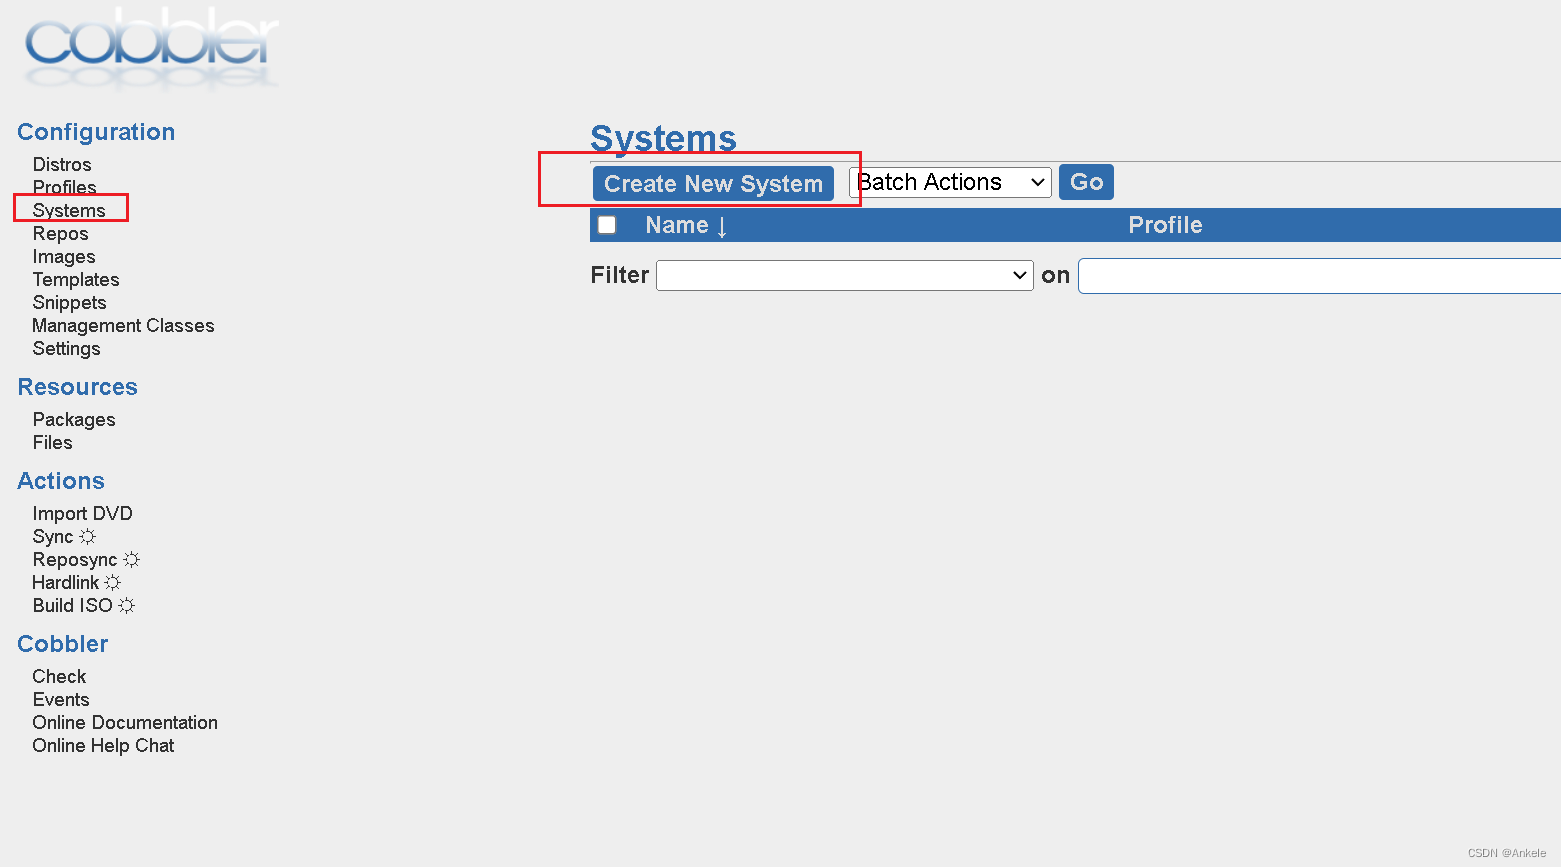
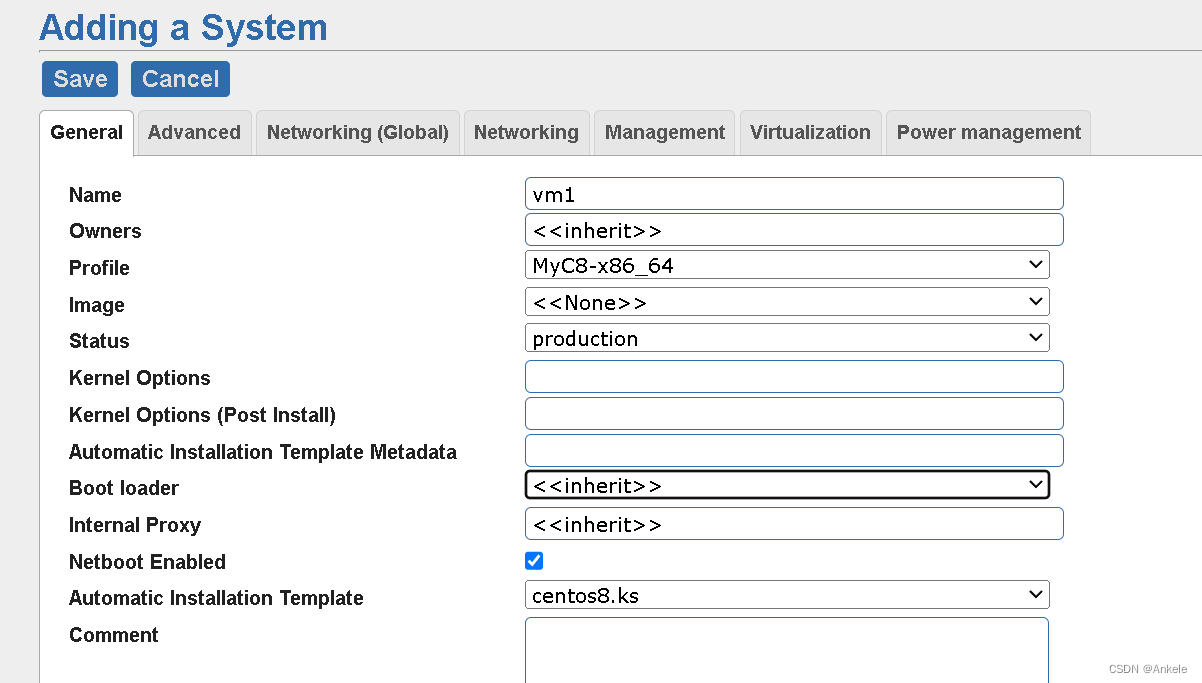
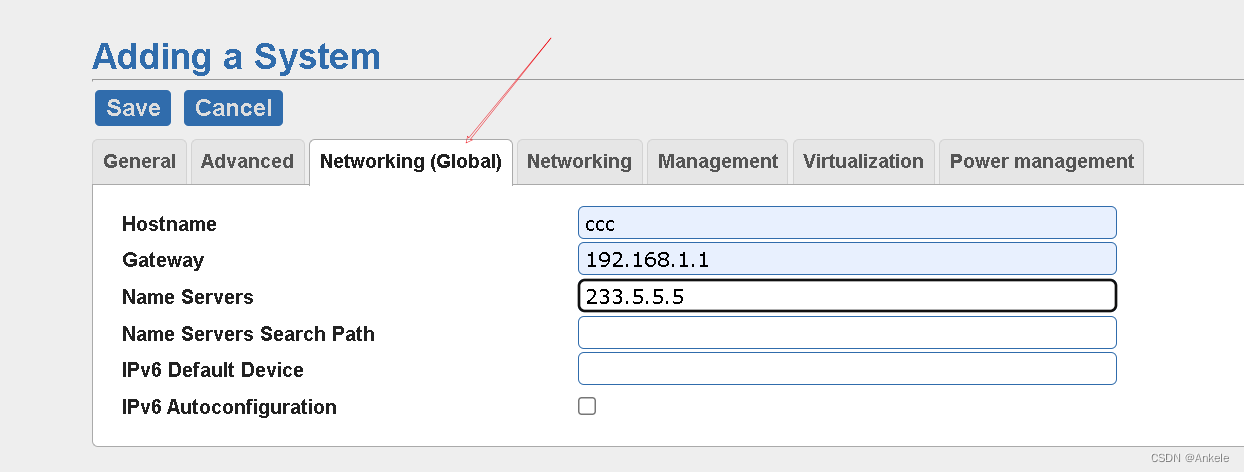
执行cobbler sync
然后便可以开启VMware虚拟机,玩一玩PXE启动虚拟机了
安装ubuntu20.04.6
以下均在cobbler2.8.5上操作
目前仅成功ubuntu-18.04.5-server-amd64.iso
安装依赖软件
yum -y install debmirror
配置debmirror
sed -i 's/@dists="sid";/#@dists="sid";/g' /etc/debmirror.conf
sed -i 's/@arches="i386";/#@arches="i386";/g' /etc/debmirror.conf
需要注意的是,如果你使用的是 cobbler,那你应该使用 ubuntu-20.04-legacy-server-amd64.iso,而不是 live-server(应该是缺少netboot),Ubuntu 20.04 已没有 server
配置ubuntu18045.seed
# ankele comment out 1 from csdn
# cd /var/lib/cobbler/kickstart/sample.seed
# Mostly based on the Ubuntu installation guide
# https://help.ubuntu.com/18.04/installation-guide/
# Debian sample
# https://www.debian.org/releases/stable/example-preseed.txt# Preseeding only locale sets language, country and locale.
d-i debian-installer/locale string en_US.UTF-8# Keyboard selection.
# Disable automatic (interactive) keymap detection.
d-i console-setup/ask_detect boolean false
d-i keyboard-configuration/xkb-keymap select us
d-i keyboard-configuration/toggle select No toggling
d-i keyboard-configuration/layoutcode string us
d-i keyboard-configuration/variantcode string# netcfg will choose an interface that has link if possible. This makes it
# skip displaying a list if there is more than one interface.
#set $myhostname = $getVar('hostname',$getVar('name','cobbler')).replace("_","-")
#d-i netcfg/choose_interface select auto
#d-i netcfg/choose_interface select ens33
#d-i netcfg/get_hostname string helmsman
#d-i netcfg/choose_interface select auto
#d-i netcfg/dhcp_failed note
#d-i netcfg/dhcp_options select Do not configure the network at this time
#d-i netcfg/get_hostname string keqi-server
#d-i netcfg/get_domain string keqi-server
# ankele comment out 1 from csdn
# d-i netcfg/enable boolea false# If non-free firmware is needed for the network or other hardware, you can
# configure the installer to always try to load it, without prompting. Or
# change to false to disable asking.
# d-i hw-detect/load_firmware boolean true# NTP/Time Setup
d-i time/zone string Asia/Shanghai
d-i clock-setup/ntp-server string ntp1.aliyun.com
d-i clock-setup/utc boolean true
d-i clock-setup/ntp boolean true# Setup the installation source
d-i mirror/country string manual
d-i mirror/http/hostname string $http_server
d-i mirror/http/directory string $install_source_directory
d-i mirror/http/proxy string#set $os_v = $getVar('os_version','')
#if $breed == "ubuntu" and $os_v and $os_v.lower() != 'precise'
# Required at least for ubuntu 12.10+ , so test os_v is not precise. Olders versions are not supported anymore
d-i live-installer/net-image string http://$http_server/cobbler/links/$distro_name/install/filesystem.squashfs
#end if# Suite to install.
# d-i mirror/suite string precise
# d-i mirror/udeb/suite string precise# Components to use for loading installer components (optional).
#d-i mirror/udeb/components multiselect main, restricted# Disk Partitioning
# Use LVM, and wipe out anything that already existsd-i partman-auto/disk string /dev/sda
d-i partman-auto/choose_recipe select atomic
d-i partman-auto/method string lvm
d-i partman-auto-lvm/guided_size string 100%
d-i partman-lvm/confirm boolean true
d-i partman-lvm/confirm_nooverwrite boolean true
d-i partman-lvm/device_remove_lvm boolean true
d-i partman-md/device_remove_md boolean true
d-i partman-partitioning/confirm_write_new_label boolean true
d-i partman/choose_partition select finish
d-i partman/confirm boolean true
d-i partman/confirm_nooverwrite boolean true
d-i partman/default_filesystem string ext4
d-i partman/mount_style select uuid
# You can choose one of the three predefined partitioning recipes:
# - atomic: all files in one partition
# - home:   separate /home partition
# - multi:  separate /home, /usr, /var, and /tmp partitions
d-i partman-auto/choose_recipe select atomic# If you just want to change the default filesystem from ext3 to something
# else, you can do that without providing a full recipe.
# d-i partman/default_filesystem string ext4# root account and password
d-i passwd/root-login boolean true
d-i passwd/root-password-crypted password $1$L2xUdTaN$J5OHlZxtjUmbA6HzD.4Iq/# skip creation of a normal user account.
d-i passwd/make-user boolean false# You can choose to install restricted and universe software, or to install
# software from the backports repository.
d-i apt-setup/restricted boolean true
d-i apt-setup/universe boolean true
d-i apt-setup/backports boolean true# Uncomment this if you don't want to use a network mirror.
# d-i apt-setup/use_mirror boolean false# Select which update services to use; define the mirrors to be used.
# Values shown below are the normal defaults.
d-i apt-setup/services-select multiselect security
d-i apt-setup/security_host string mirrors.aliyun.com
d-i apt-setup/security_path string /ubuntu$SNIPPET('preseed_apt_repo_config')# Enable deb-src lines
# d-i apt-setup/local0/source boolean true# URL to the public key of the local repository; you must provide a key or
# apt will complain about the unauthenticated repository and so the
# sources.list line will be left commented out
# d-i apt-setup/local0/key string http://local.server/key# By default the installer requires that repositories be authenticated
# using a known gpg key. This setting can be used to disable that
# authentication. Warning: Insecure, not recommended.
# d-i debian-installer/allow_unauthenticated boolean true# Package selection
# Default for minimal
tasksel tasksel/first multiselect standard
# Default for server
# tasksel tasksel/first multiselect standard, web-server
# Default for gnome-desktop
# tasksel tasksel/first multiselect standard, gnome-desktop# Individual additional packages to install
# wget is REQUIRED otherwise quite a few things won't work
# later in the build (like late-command scripts)
d-i pkgsel/include string openssh-server vim# Debian needs this for the installer to avoid any question for grub
# Please verify that it suit your needs as it may overwrite any usb stick
#if $breed == "debian"
d-i grub-installer/grub2_instead_of_grub_legacy boolean true
d-i grub-installer/bootdev string /dev/sda
#end if# Use the following option to add additional boot parameters for the
# installed system (if supported by the bootloader installer).
# Note: options passed to the installer will be added automatically.
d-i debian-installer/add-kernel-opts string $kernel_options_post# Avoid that last message about the install being complete.
d-i finish-install/reboot_in_progress note## Figure out if we're kickstarting a system or a profile
#if $getVar('system_name','') != ''
#set $what = "system"
#else
#set $what = "profile"
#end if# This first command is run as early as possible, just after preseeding is read.
# d-i preseed/early_command string [command]
d-i preseed/early_command string wget -O- \http://$http_server/cblr/svc/op/script/$what/$name/?script=preseed_early_default | \/bin/sh -s# This command is run immediately before the partitioner starts. It may be# useful to apply dynamic partitioner preseeding that depends on the state# of the disks (which may not be visible when preseed/early_command runs).# d-i partman/early_command \#       string debconf-set partman-auto/disk "\$(list-devices disk | head -n1)"# This command is run just before the install finishes, but when there is# still a usable /target directory. You can chroot to /target and use it# directly, or use the apt-install and in-target commands to easily install# packages and run commands in the target system.# d-i preseed/late_command string [command]d-i preseed/late_command string wget -O- \http://$http_server/cblr/svc/op/script/$what/$name/?script=preseed_late_default | \chroot /target /bin/sh -s
注意,seed文件中不能包含中文
file /var/lib/cobbler/kickstarts/ubuntu18045.seed
/var/lib/cobbler/kickstarts/ubuntu18045.seed: ASCII text
导入
cobbler import --path=/ubuntu1804 --name=ubuntu18045 --kickstart=/var/lib/cobbler/kickstarts/ubuntu18045.seed --arch=x86_64
导入后会自动生成两个profile,其中一个是xxx-hwe-xxx,可以干掉它,我们仅使用ubuntu18045-x86_64
安装windows系统
仅在cobbler2.8.5下测试通过
准备工作
windows ADK
windows PE add-on for ADK
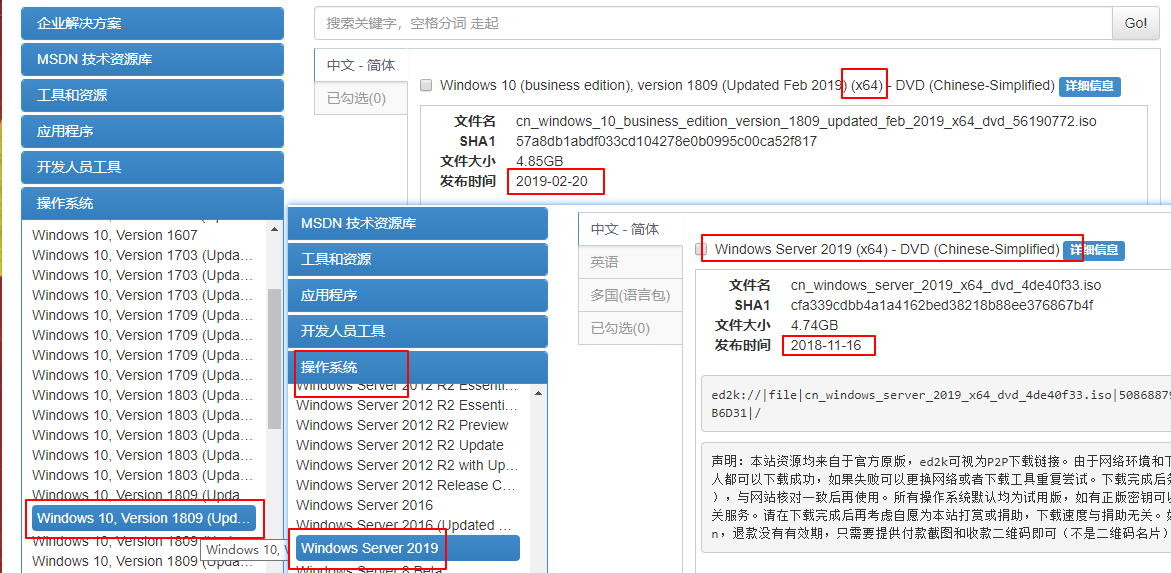
然后到msdn i tell u 下载windows ISO
安装ADK和WinPE
安装ADK时,仅用勾选部署工具即可
安装winPE时,默认勾选Windows预安装环境
安装完成后,以管理员身份运行部署和映像工具环境
定制 PE
在部署和映像工具环境交互框中执行如下命令
windows 10
copype amd64 c:\winpe # 本地生成winpe目录Dism /mount-image /imagefile:c:\winpe\media\sources\boot.wim /index:1 /mountdir:c:\winpe\mount # dism挂载WinPE的启动文件到mount目录echo net use z: \\192.168.1.33/share >> c:\winpe\mount\Windows\System32\startnet.cmd # 将启动命令硬编码写死到 winpe 的 startnet.cmd 文件里
# 此处硬编码可以改为域名,便可动态设置smb主机echo z:\win10\setup.exe /unattend:z:\win10\win10_x64_bios_auto.xml >> c:\winpe\mount\Windows\System32\startnet.cmd # 自动应答Dism /unmount-image /mountdir:c:\winpe\mount /commit # 卸载WinPE的挂载
MakeWinPEMedia /ISO c:\winpe c:\winpe\winpe_win10_amd64.iso # 生成win10 PE镜像
window server 2019
####windows 2019 winpe制作###
copype amd64 c:\winpe2019 # 本地生成winpe目录Dism /mount-image /imagefile:c:\winpe2019\media\sources\boot.wim /index:1 /mountdir:c:\winpe\mount
echo ping -n 5 -l 69 192.168.1.33>> C:\winpe2019\mount\Windows\System32\startnet.cmd
echo net use z: \\192.168.1.33/share >> c:\winpe2019\mount\Windows\System32\startnet.cmd
echo z:\win2019\setup.exe /unattend:z:\win2019\win2019_x64_bios_auto.xml >> c:\winpe2019\mount\Windows\System32\startnet.cmdDism /unmount-image /mountdir:c:\winpe2019\mount /commit
MakeWinPEMedia /ISO c:\winpe2019 c:\winpe2019\winpe_win2019_amd64.iso
报错
若在执行第二条命令时报错
Failed to load the provider: D:\tools_install\Windows Kits\10\Assessment and Deployment Kit\Deployment Tools\AMD64\DISM\MetaDeployProvider.dll. - CDISMProviderStore::Internal_GetProvider(hr:0x8007007e)
...
[4024] ImageUnmarshallHandle: Reconstituting wim at c:\winpe\media\sources\boot.wim.
[4024] [0xc1420127] WIMMountImageHandle:(1120)
[4024] [0x80070002] StateStoreRemoveMountedImage:(1124): 系统找不到指定的文件。
[4024] [0x80070002] WIMMountImageHandle:(1332): 系统找不到指定的文件。
可以执行(没啥卵用)
dism.exe /online /cleanup-image /restorehealth
换个名字
比如copype amd64 c:\winpe1 缓存 copype amd64 c:\winpe2
配置Cobbler Server
导入Cobbler
首先将上一步创建的PE文件winpe_winxx_amd64.iso传递到Cobbler服务器上
cobbler distro add --name=windows_xx_x64 --kernel=/var/lib/tftpboot/memdisk --initrd=/root/winpe_winxx_amd64.iso --kopts="raw iso"
touch /var/lib/cobbler/kickstarts/winxx_x64_bios_auto.xml
cobbler profile add --name=windows_xx_x64 --distro=windows_xx_x64 --kickstart=/var/lib/cobbler/kickstarts/winxx_x64_bios_auto.xml
做好的/var/lib/cobbler/kickstarts/winpe.xml for win10见文章末尾
配置samba
安装
yum -y install samba
配置
cat /etc/samba/smb.conf
...
[share]
comment = share directory目录
path = /iso/
directory mask = 0755
create mask = 0755
guest ok=yes
writable=yes
启动
systemctl enable --now smb
挂载winxx ISO
mkdir /iso
mkfs.xfs /dev/sdb
mount /dev/sdb /iso
mkdir /iso/winxx
mount -o loop,ro /root/cn_windows_xx_business_edition_version_1809_updated_sept_2018_x64_dvd_84ac403f.iso /mnt/
cp -r /mnt/* /iso/winxx
umount /mnt
cp winxx_x64_bios_auto.xml /iso/xx
自动化安装
从 vmware 创建一台内存 4G,cpu2 核,磁盘 60G 的空盘,win10 虚拟机,记得选 BIOS,别选 UEFI
然后开机
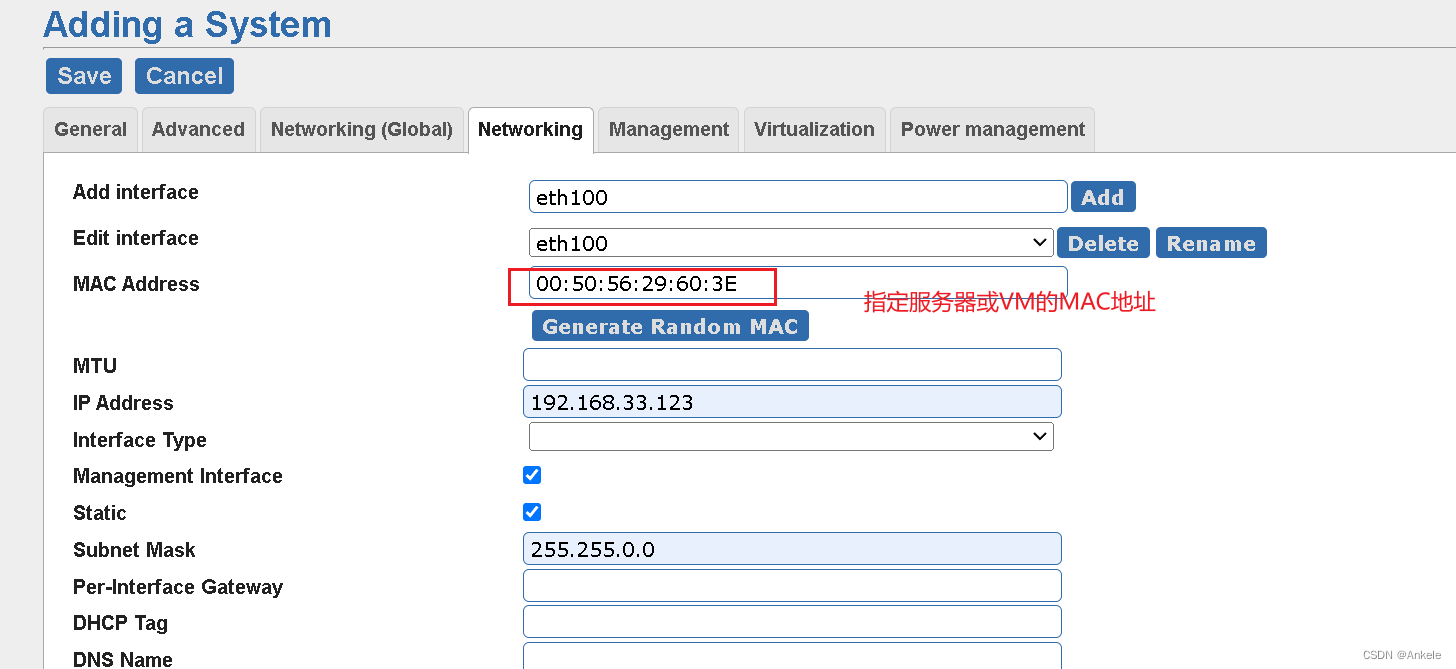
进入后选择windows_10_x64(若在cobbler_web 的system中创建指定了此system的profile,并指定了MAC地址,则不用再手动选择)
做好的win10_x64_bios_auto.xml
win10的xml中没有适配远程连接,密码zhizhizhi
<!--*************************************************
Windows 10 Answer File Generator
Created using Windows AFG found at:
;http://www.windowsafg.comInstallation Notes
Location: zh-CN
Notes: Enter your comments here...
**************************************************-->
<?xml version="1.0" encoding="utf-8"?>
<unattendxmlns="urn:schemas-microsoft-com:unattend"><settings pass="windowsPE"><component name="Microsoft-Windows-International-Core-WinPE" processorArchitecture="x86" publicKeyToken="31bf3856ad364e35" language="neutral" versionScope="nonSxS"xmlns:wcm="http://schemas.microsoft.com/WMIConfig/2002/State"xmlns:xsi="http://www.w3.org/2001/XMLSchema-instance">#### 特别注意此处,使用全中文,或许不能成功设置,会让你手动选择语言<SetupUILanguage><UILanguage>en-US</UILanguage></SetupUILanguage><InputLocale>0804:{81D4E9C9-1D3B-41BC-9E6C-4B40BF79E35E}{FA550B04-5AD7-411f-A5AC-CA038EC515D7}</InputLocale><SystemLocale>zh-CN</SystemLocale><UILanguage>zh-CN</UILanguage><UILanguageFallback>zh-CN</UILanguageFallback><UserLocale>zh-CN</UserLocale></component><component name="Microsoft-Windows-International-Core-WinPE" processorArchitecture="amd64" publicKeyToken="31bf3856ad364e35" language="neutral" versionScope="nonSxS"xmlns:wcm="http://schemas.microsoft.com/WMIConfig/2002/State"xmlns:xsi="http://www.w3.org/2001/XMLSchema-instance"><SetupUILanguage><UILanguage>en-US</UILanguage></SetupUILanguage><InputLocale>0804:{81D4E9C9-1D3B-41BC-9E6C-4B40BF79E35E}{FA550B04-5AD7-411f-A5AC-CA038EC515D7}</InputLocale><SystemLocale>zh-CN</SystemLocale><UILanguage>zh-CN</UILanguage><UILanguageFallback>zh-CN</UILanguageFallback><UserLocale>zh-CN</UserLocale></component><component name="Microsoft-Windows-Setup" processorArchitecture="x86" publicKeyToken="31bf3856ad364e35" language="neutral" versionScope="nonSxS"xmlns:wcm="http://schemas.microsoft.com/WMIConfig/2002/State"xmlns:xsi="http://www.w3.org/2001/XMLSchema-instance"><DiskConfiguration><Disk wcm:action="add"><CreatePartitions><CreatePartition wcm:action="add"><Order>1</Order><Type>Primary</Type><Size>100</Size></CreatePartition><CreatePartition wcm:action="add"><Extend>true</Extend><Order>2</Order><Type>Primary</Type></CreatePartition></CreatePartitions><ModifyPartitions><ModifyPartition wcm:action="add"><Active>true</Active><Format>NTFS</Format><Label>System Reserved</Label><Order>1</Order><PartitionID>1</PartitionID><TypeID>0x27</TypeID></ModifyPartition><ModifyPartition wcm:action="add"><Active>true</Active><Format>NTFS</Format><Label>OS</Label><Letter>C</Letter><Order>2</Order><PartitionID>2</PartitionID></ModifyPartition></ModifyPartitions><DiskID>0</DiskID><WillWipeDisk>true</WillWipeDisk></Disk></DiskConfiguration><ImageInstall><OSImage><InstallTo><DiskID>0</DiskID><PartitionID>2</PartitionID></InstallTo><InstallToAvailablePartition>false</InstallToAvailablePartition></OSImage></ImageInstall><UserData><AcceptEula>true</AcceptEula><FullName>wocao</FullName><Organization>wocao</Organization><ProductKey><Key>VK7JG-NPHTM-C97JM-9MPGT-3V66T</Key></ProductKey></UserData></component><component name="Microsoft-Windows-Setup" processorArchitecture="amd64" publicKeyToken="31bf3856ad364e35" language="neutral" versionScope="nonSxS"xmlns:wcm="http://schemas.microsoft.com/WMIConfig/2002/State"xmlns:xsi="http://www.w3.org/2001/XMLSchema-instance"><DiskConfiguration><Disk wcm:action="add"><CreatePartitions><CreatePartition wcm:action="add"><Order>1</Order><Type>Primary</Type><Size>100</Size></CreatePartition><CreatePartition wcm:action="add"><Extend>true</Extend><Order>2</Order><Type>Primary</Type></CreatePartition></CreatePartitions><ModifyPartitions><ModifyPartition wcm:action="add"><Active>true</Active><Format>NTFS</Format><Label>System Reserved</Label><Order>1</Order><PartitionID>1</PartitionID><TypeID>0x27</TypeID></ModifyPartition><ModifyPartition wcm:action="add"><Active>true</Active><Format>NTFS</Format><Label>OS</Label><Letter>C</Letter><Order>2</Order><PartitionID>2</PartitionID></ModifyPartition></ModifyPartitions><DiskID>0</DiskID><WillWipeDisk>true</WillWipeDisk></Disk></DiskConfiguration><ImageInstall><OSImage><InstallTo><DiskID>0</DiskID><PartitionID>2</PartitionID></InstallTo><InstallToAvailablePartition>false</InstallToAvailablePartition></OSImage></ImageInstall><UserData><AcceptEula>true</AcceptEula><FullName>zhizhizhi</FullName><Organization>zhizhizhi</Organization><ProductKey><Key>VK7JG-NPHTM-C97JM-9MPGT-3V66T</Key></ProductKey></UserData></component></settings><settings pass="offlineServicing"><component name="Microsoft-Windows-LUA-Settings" processorArchitecture="x86" publicKeyToken="31bf3856ad364e35" language="neutral" versionScope="nonSxS"xmlns:wcm="http://schemas.microsoft.com/WMIConfig/2002/State"xmlns:xsi="http://www.w3.org/2001/XMLSchema-instance"><EnableLUA>false</EnableLUA></component></settings><settings pass="offlineServicing"><component name="Microsoft-Windows-LUA-Settings" processorArchitecture="amd64" publicKeyToken="31bf3856ad364e35" language="neutral" versionScope="nonSxS"xmlns:wcm="http://schemas.microsoft.com/WMIConfig/2002/State"xmlns:xsi="http://www.w3.org/2001/XMLSchema-instance"><EnableLUA>false</EnableLUA></component></settings><settings pass="generalize"><component name="Microsoft-Windows-Security-SPP" processorArchitecture="x86" publicKeyToken="31bf3856ad364e35" language="neutral" versionScope="nonSxS"xmlns:wcm="http://schemas.microsoft.com/WMIConfig/2002/State"xmlns:xsi="http://www.w3.org/2001/XMLSchema-instance"><SkipRearm>1</SkipRearm></component></settings><settings pass="generalize"><component name="Microsoft-Windows-Security-SPP" processorArchitecture="amd64" publicKeyToken="31bf3856ad364e35" language="neutral" versionScope="nonSxS"xmlns:wcm="http://schemas.microsoft.com/WMIConfig/2002/State"xmlns:xsi="http://www.w3.org/2001/XMLSchema-instance"><SkipRearm>1</SkipRearm></component></settings><settings pass="specialize"><component name="Microsoft-Windows-International-Core" processorArchitecture="x86" publicKeyToken="31bf3856ad364e35" language="neutral" versionScope="nonSxS"xmlns:wcm="http://schemas.microsoft.com/WMIConfig/2002/State"xmlns:xsi="http://www.w3.org/2001/XMLSchema-instance"><InputLocale>0804:{81D4E9C9-1D3B-41BC-9E6C-4B40BF79E35E}{FA550B04-5AD7-411f-A5AC-CA038EC515D7}</InputLocale><SystemLocale>zh-CN</SystemLocale><UILanguage>zh-CN</UILanguage><UILanguageFallback>zh-CN</UILanguageFallback><UserLocale>zh-CN</UserLocale></component><component name="Microsoft-Windows-International-Core" processorArchitecture="amd64" publicKeyToken="31bf3856ad364e35" language="neutral" versionScope="nonSxS"xmlns:wcm="http://schemas.microsoft.com/WMIConfig/2002/State"xmlns:xsi="http://www.w3.org/2001/XMLSchema-instance"><InputLocale>0804:{81D4E9C9-1D3B-41BC-9E6C-4B40BF79E35E}{FA550B04-5AD7-411f-A5AC-CA038EC515D7}</InputLocale><SystemLocale>zh-CN</SystemLocale><UILanguage>zh-CN</UILanguage><UILanguageFallback>zh-CN</UILanguageFallback><UserLocale>zh-CN</UserLocale></component><component name="Microsoft-Windows-Security-SPP-UX" processorArchitecture="x86" publicKeyToken="31bf3856ad364e35" language="neutral" versionScope="nonSxS"xmlns:wcm="http://schemas.microsoft.com/WMIConfig/2002/State"xmlns:xsi="http://www.w3.org/2001/XMLSchema-instance"><SkipAutoActivation>true</SkipAutoActivation></component><component name="Microsoft-Windows-Security-SPP-UX" processorArchitecture="amd64" publicKeyToken="31bf3856ad364e35" language="neutral" versionScope="nonSxS"xmlns:wcm="http://schemas.microsoft.com/WMIConfig/2002/State"xmlns:xsi="http://www.w3.org/2001/XMLSchema-instance"><SkipAutoActivation>true</SkipAutoActivation></component><component name="Microsoft-Windows-SQMApi" processorArchitecture="x86" publicKeyToken="31bf3856ad364e35" language="neutral" versionScope="nonSxS"xmlns:wcm="http://schemas.microsoft.com/WMIConfig/2002/State"xmlns:xsi="http://www.w3.org/2001/XMLSchema-instance"><CEIPEnabled>0</CEIPEnabled></component><component name="Microsoft-Windows-SQMApi" processorArchitecture="amd64" publicKeyToken="31bf3856ad364e35" language="neutral" versionScope="nonSxS"xmlns:wcm="http://schemas.microsoft.com/WMIConfig/2002/State"xmlns:xsi="http://www.w3.org/2001/XMLSchema-instance"><CEIPEnabled>0</CEIPEnabled></component><component name="Microsoft-Windows-Shell-Setup" processorArchitecture="x86" publicKeyToken="31bf3856ad364e35" language="neutral" versionScope="nonSxS"xmlns:wcm="http://schemas.microsoft.com/WMIConfig/2002/State"xmlns:xsi="http://www.w3.org/2001/XMLSchema-instance"><ComputerName>zhizhizhi-PC</ComputerName><ProductKey>VK7JG-NPHTM-C97JM-9MPGT-3V66T</ProductKey></component><component name="Microsoft-Windows-Shell-Setup" processorArchitecture="amd64" publicKeyToken="31bf3856ad364e35" language="neutral" versionScope="nonSxS"xmlns:wcm="http://schemas.microsoft.com/WMIConfig/2002/State"xmlns:xsi="http://www.w3.org/2001/XMLSchema-instance"><ComputerName>zhizhizhi-PC</ComputerName><ProductKey>VK7JG-NPHTM-C97JM-9MPGT-3V66T</ProductKey></component></settings><settings pass="oobeSystem"><component name="Microsoft-Windows-Shell-Setup" processorArchitecture="x86" publicKeyToken="31bf3856ad364e35" language="neutral" versionScope="nonSxS"xmlns:wcm="http://schemas.microsoft.com/WMIConfig/2002/State"xmlns:xsi="http://www.w3.org/2001/XMLSchema-instance"><AutoLogon><Password><Value></Value><PlainText>true</PlainText></Password><Enabled>true</Enabled><Username>zhizhizhi</Username></AutoLogon><OOBE><HideEULAPage>true</HideEULAPage><HideOEMRegistrationScreen>true</HideOEMRegistrationScreen><HideOnlineAccountScreens>true</HideOnlineAccountScreens><HideWirelessSetupInOOBE>true</HideWirelessSetupInOOBE><NetworkLocation>Work</NetworkLocation><SkipUserOOBE>true</SkipUserOOBE><SkipMachineOOBE>true</SkipMachineOOBE><ProtectYourPC>1</ProtectYourPC></OOBE><UserAccounts><LocalAccounts><LocalAccount wcm:action="add"><Password><Value></Value><PlainText>true</PlainText></Password><Description>zhizhizhi</Description><DisplayName>zhizhizhi</DisplayName><Group>Administrators</Group><Name>zhizhizhi</Name></LocalAccount></LocalAccounts></UserAccounts><RegisteredOrganization>zhizhizhi</RegisteredOrganization><RegisteredOwner>zhizhizhi</RegisteredOwner><DisableAutoDaylightTimeSet>false</DisableAutoDaylightTimeSet><FirstLogonCommands><SynchronousCommand wcm:action="add"><Description>Control Panel View</Description><Order>1</Order><CommandLine>reg add "HKEY_CURRENT_USER\Software\Microsoft\Windows\CurrentVersion\Explorer\ControlPanel" /v StartupPage /t REG_DWORD /d 1 /f</CommandLine><RequiresUserInput>true</RequiresUserInput></SynchronousCommand><SynchronousCommand wcm:action="add"><Order>2</Order><Description>Control Panel Icon Size</Description><RequiresUserInput>false</RequiresUserInput><CommandLine>reg add "HKEY_CURRENT_USER\Software\Microsoft\Windows\CurrentVersion\Explorer\ControlPanel" /v AllItemsIconView /t REG_DWORD /d 0 /f</CommandLine></SynchronousCommand><SynchronousCommand wcm:action="add"><Order>3</Order><RequiresUserInput>false</RequiresUserInput><CommandLine>cmd /C wmic useraccount where name="zhizhizhi" set PasswordExpires=false</CommandLine><Description>Password Never Expires</Description></SynchronousCommand></FirstLogonCommands><TimeZone>China Standard Time</TimeZone></component><component name="Microsoft-Windows-Shell-Setup" processorArchitecture="amd64" publicKeyToken="31bf3856ad364e35" language="neutral" versionScope="nonSxS"xmlns:wcm="http://schemas.microsoft.com/WMIConfig/2002/State"xmlns:xsi="http://www.w3.org/2001/XMLSchema-instance"><AutoLogon><Password><Value></Value><PlainText>true</PlainText></Password><Enabled>true</Enabled><Username>zhizhizhi</Username></AutoLogon><OOBE><HideEULAPage>true</HideEULAPage><HideOEMRegistrationScreen>true</HideOEMRegistrationScreen><HideOnlineAccountScreens>true</HideOnlineAccountScreens><HideWirelessSetupInOOBE>true</HideWirelessSetupInOOBE><NetworkLocation>Work</NetworkLocation><SkipUserOOBE>true</SkipUserOOBE><SkipMachineOOBE>true</SkipMachineOOBE><ProtectYourPC>1</ProtectYourPC></OOBE><UserAccounts><LocalAccounts><LocalAccount wcm:action="add"><Password><Value></Value><PlainText>true</PlainText></Password><Description>zhizhizhi</Description><DisplayName>zhizhizhi</DisplayName><Group>Administrators</Group><Name>zhizhizhi</Name></LocalAccount></LocalAccounts></UserAccounts><RegisteredOrganization>zhizhizhi</RegisteredOrganization><RegisteredOwner>zhizhizhi</RegisteredOwner><DisableAutoDaylightTimeSet>false</DisableAutoDaylightTimeSet><FirstLogonCommands><SynchronousCommand wcm:action="add"><Description>Control Panel View</Description><Order>1</Order><CommandLine>reg add "HKEY_CURRENT_USER\Software\Microsoft\Windows\CurrentVersion\Explorer\ControlPanel" /v StartupPage /t REG_DWORD /d 1 /f</CommandLine><RequiresUserInput>true</RequiresUserInput></SynchronousCommand><SynchronousCommand wcm:action="add"><Order>2</Order><Description>Control Panel Icon Size</Description><RequiresUserInput>false</RequiresUserInput><CommandLine>reg add "HKEY_CURRENT_USER\Software\Microsoft\Windows\CurrentVersion\Explorer\ControlPanel" /v AllItemsIconView /t REG_DWORD /d 0 /f</CommandLine></SynchronousCommand><SynchronousCommand wcm:action="add"><Order>3</Order><RequiresUserInput>false</RequiresUserInput><CommandLine>cmd /C wmic useraccount where name="zhizhizhi" set PasswordExpires=false</CommandLine><Description>Password Never Expires</Description></SynchronousCommand></FirstLogonCommands><TimeZone>China Standard Time</TimeZone></component></settings>
</unattend>
做好的win2019_x64_bios_auto.xml
适配了远程连接,密码wocao
<?xml version="1.0" encoding="utf-8"?>
<unattend xmlns="urn:schemas-microsoft-com:unattend"><settings pass="windowsPE"><component name="Microsoft-Windows-International-Core-WinPE" processorArchitecture="x86"publicKeyToken="31bf3856ad364e35" language="neutral" versionScope="nonSxS"xmlns:wcm="http://schemas.microsoft.com/WMIConfig/2002/State"xmlns:xsi="http://www.w3.org/2001/XMLSchema-instance"><SetupUILanguage><UILanguage>en-US</UILanguage></SetupUILanguage><InputLocale>0c09:00000409</InputLocale><SystemLocale>zh-CN</SystemLocale><UILanguage>zh-CN</UILanguage><UILanguageFallback>zh-CN</UILanguageFallback><UserLocale>zh-CN</UserLocale></component><component name="Microsoft-Windows-International-Core-WinPE" processorArchitecture="amd64"publicKeyToken="31bf3856ad364e35" language="neutral" versionScope="nonSxS"xmlns:wcm="http://schemas.microsoft.com/WMIConfig/2002/State"xmlns:xsi="http://www.w3.org/2001/XMLSchema-instance">#### 特别注意此处,使用全中文,或许不能成功设置,会让你手动选择语言<SetupUILanguage><UILanguage>en-US</UILanguage></SetupUILanguage><InputLocale>0c09:00000409</InputLocale><SystemLocale>zh-CN</SystemLocale><UILanguage>zh-CN</UILanguage><UILanguageFallback>zh-CN</UILanguageFallback><UserLocale>zh-CN</UserLocale></component><component name="Microsoft-Windows-Setup" processorArchitecture="x86"publicKeyToken="31bf3856ad364e35" language="neutral" versionScope="nonSxS"xmlns:wcm="http://schemas.microsoft.com/WMIConfig/2002/State"xmlns:xsi="http://www.w3.org/2001/XMLSchema-instance"><DiskConfiguration><Disk wcm:action="add"><CreatePartitions><CreatePartition wcm:action="add"><Order>1</Order><Type>Primary</Type><Size>100</Size></CreatePartition><CreatePartition wcm:action="add"><Extend>true</Extend><Order>2</Order><Type>Primary</Type></CreatePartition></CreatePartitions><ModifyPartitions><ModifyPartition wcm:action="add"><Active>true</Active><Format>NTFS</Format><Label>System Reserved</Label><Order>1</Order><PartitionID>1</PartitionID><TypeID>0x27</TypeID></ModifyPartition><ModifyPartition wcm:action="add"><Active>true</Active><Format>NTFS</Format><Label>OS</Label><Letter>C</Letter><Order>2</Order><PartitionID>2</PartitionID></ModifyPartition></ModifyPartitions><DiskID>0</DiskID><WillWipeDisk>true</WillWipeDisk></Disk></DiskConfiguration><ImageInstall><OSImage><InstallFrom><MetaData wcm:action="add"><Key>/IMAGE/NAME</Key><Value>Windows Server 2019 SERVERSTANDARD</Value></MetaData></InstallFrom><InstallTo><DiskID>0</DiskID><PartitionID>2</PartitionID></InstallTo><InstallToAvailablePartition>false</InstallToAvailablePartition></OSImage></ImageInstall><UserData><AcceptEula>true</AcceptEula><FullName>wocao</FullName><Organization>wocao</Organization><ProductKey><Key>N69G4-B89J2-4G8F4-WWYCC-J464C</Key></ProductKey></UserData></component><component name="Microsoft-Windows-Setup" processorArchitecture="amd64"publicKeyToken="31bf3856ad364e35" language="neutral" versionScope="nonSxS"xmlns:wcm="http://schemas.microsoft.com/WMIConfig/2002/State"xmlns:xsi="http://www.w3.org/2001/XMLSchema-instance"><DiskConfiguration><Disk wcm:action="add"><CreatePartitions><CreatePartition wcm:action="add"><Order>1</Order><Type>Primary</Type><Size>100</Size></CreatePartition><CreatePartition wcm:action="add"><Extend>true</Extend><Order>2</Order><Type>Primary</Type></CreatePartition></CreatePartitions><ModifyPartitions><ModifyPartition wcm:action="add"><Active>true</Active><Format>NTFS</Format><Label>System Reserved</Label><Order>1</Order><PartitionID>1</PartitionID><TypeID>0x27</TypeID></ModifyPartition><ModifyPartition wcm:action="add"><Active>true</Active><Format>NTFS</Format><Label>OS</Label><Letter>C</Letter><Order>2</Order><PartitionID>2</PartitionID></ModifyPartition></ModifyPartitions><DiskID>0</DiskID><WillWipeDisk>true</WillWipeDisk></Disk></DiskConfiguration>#### 特别注意此处,需要提前指定安装镜像,否则会安装过程中会让你手动选择<ImageInstall><OSImage><InstallFrom><MetaData wcm:action="add"><Key>/IMAGE/NAME</Key><Value>Windows Server 2019 SERVERSTANDARD</Value></MetaData></InstallFrom><InstallTo><DiskID>0</DiskID><PartitionID>2</PartitionID></InstallTo><InstallToAvailablePartition>false</InstallToAvailablePartition></OSImage></ImageInstall><UserData><AcceptEula>true</AcceptEula><FullName>wocao</FullName><Organization>wocao</Organization><ProductKey><Key>N69G4-B89J2-4G8F4-WWYCC-J464C</Key></ProductKey></UserData></component></settings><settings pass="offlineServicing"><component name="Microsoft-Windows-LUA-Settings" processorArchitecture="x86"publicKeyToken="31bf3856ad364e35" language="neutral" versionScope="nonSxS"xmlns:wcm="http://schemas.microsoft.com/WMIConfig/2002/State"xmlns:xsi="http://www.w3.org/2001/XMLSchema-instance"><EnableLUA>false</EnableLUA></component></settings><settings pass="offlineServicing"><component name="Microsoft-Windows-LUA-Settings" processorArchitecture="amd64"publicKeyToken="31bf3856ad364e35" language="neutral" versionScope="nonSxS"xmlns:wcm="http://schemas.microsoft.com/WMIConfig/2002/State"xmlns:xsi="http://www.w3.org/2001/XMLSchema-instance"><EnableLUA>false</EnableLUA></component></settings><settings pass="generalize"><component name="Microsoft-Windows-Security-SPP" processorArchitecture="x86"publicKeyToken="31bf3856ad364e35" language="neutral" versionScope="nonSxS"xmlns:wcm="http://schemas.microsoft.com/WMIConfig/2002/State"xmlns:xsi="http://www.w3.org/2001/XMLSchema-instance"><SkipRearm>1</SkipRearm></component></settings><settings pass="generalize"><component name="Microsoft-Windows-Security-SPP" processorArchitecture="amd64"publicKeyToken="31bf3856ad364e35" language="neutral" versionScope="nonSxS"xmlns:wcm="http://schemas.microsoft.com/WMIConfig/2002/State"xmlns:xsi="http://www.w3.org/2001/XMLSchema-instance"><SkipRearm>1</SkipRearm></component></settings><settings pass="specialize"><component name="Microsoft-Windows-International-Core" processorArchitecture="x86"publicKeyToken="31bf3856ad364e35" language="neutral" versionScope="nonSxS"xmlns:wcm="http://schemas.microsoft.com/WMIConfig/2002/State"xmlns:xsi="http://www.w3.org/2001/XMLSchema-instance"><InputLocale>0c09:00000409</InputLocale><SystemLocale>zh-CN</SystemLocale><UILanguage>zh-CN</UILanguage><UILanguageFallback>zh-CN</UILanguageFallback><UserLocale>zh-CN</UserLocale></component><component name="Microsoft-Windows-International-Core" processorArchitecture="amd64"publicKeyToken="31bf3856ad364e35" language="neutral" versionScope="nonSxS"xmlns:wcm="http://schemas.microsoft.com/WMIConfig/2002/State"xmlns:xsi="http://www.w3.org/2001/XMLSchema-instance"><InputLocale>0c09:00000409</InputLocale><SystemLocale>zh-CN</SystemLocale><UILanguage>zh-CN</UILanguage><UILanguageFallback>zh-CN</UILanguageFallback><UserLocale>zh-CN</UserLocale></component><component name="Microsoft-Windows-Security-SPP-UX" processorArchitecture="x86"publicKeyToken="31bf3856ad364e35" language="neutral" versionScope="nonSxS"xmlns:wcm="http://schemas.microsoft.com/WMIConfig/2002/State"xmlns:xsi="http://www.w3.org/2001/XMLSchema-instance"><SkipAutoActivation>true</SkipAutoActivation></component><component name="Microsoft-Windows-Security-SPP-UX" processorArchitecture="amd64"publicKeyToken="31bf3856ad364e35" language="neutral" versionScope="nonSxS"xmlns:wcm="http://schemas.microsoft.com/WMIConfig/2002/State"xmlns:xsi="http://www.w3.org/2001/XMLSchema-instance"><SkipAutoActivation>true</SkipAutoActivation></component><component name="Microsoft-Windows-SQMApi" processorArchitecture="x86"publicKeyToken="31bf3856ad364e35" language="neutral" versionScope="nonSxS"xmlns:wcm="http://schemas.microsoft.com/WMIConfig/2002/State"xmlns:xsi="http://www.w3.org/2001/XMLSchema-instance"><CEIPEnabled>0</CEIPEnabled></component><component name="Microsoft-Windows-SQMApi" processorArchitecture="amd64"publicKeyToken="31bf3856ad364e35" language="neutral" versionScope="nonSxS"xmlns:wcm="http://schemas.microsoft.com/WMIConfig/2002/State"xmlns:xsi="http://www.w3.org/2001/XMLSchema-instance"><CEIPEnabled>0</CEIPEnabled></component><component name="Microsoft-Windows-Shell-Setup" processorArchitecture="x86"publicKeyToken="31bf3856ad364e35" language="neutral" versionScope="nonSxS"xmlns:wcm="http://schemas.microsoft.com/WMIConfig/2002/State"xmlns:xsi="http://www.w3.org/2001/XMLSchema-instance"><ComputerName>INSTCK0-PC</ComputerName><ProductKey>N69G4-B89J2-4G8F4-WWYCC-J464C</ProductKey></component><component name="Microsoft-Windows-Shell-Setup" processorArchitecture="amd64"publicKeyToken="31bf3856ad364e35" language="neutral" versionScope="nonSxS"xmlns:wcm="http://schemas.microsoft.com/WMIConfig/2002/State"xmlns:xsi="http://www.w3.org/2001/XMLSchema-instance"><ComputerName>-PC-wocao</ComputerName><ProductKey>N69G4-B89J2-4G8F4-WWYCC-J464C</ProductKey></component><component name="Networking-MPSSVC-Svc" processorArchitecture="amd64" publicKeyToken="31bf3856ad364e35" language="neutral" versionScope="nonSxS" xmlns:wcm="http://schemas.microsoft.com/WMIConfig/2002/State" xmlns:xsi="http://www.w3.org/2001/XMLSchema-instance">#### 特别注意此处,关闭防火墙<!-- WLSD Disable windows firewall --><!-- <DomainProfile_EnableFirewall>false</DomainProfile_EnableFirewall> --><PrivateProfile_EnableFirewall>false</PrivateProfile_EnableFirewall><PublicProfile_EnableFirewall>false</PublicProfile_EnableFirewall></component></settings><settings pass="oobeSystem"><component name="Microsoft-Windows-Shell-Setup" processorArchitecture="x86"publicKeyToken="31bf3856ad364e35" language="neutral" versionScope="nonSxS"xmlns:wcm="http://schemas.microsoft.com/WMIConfig/2002/State"xmlns:xsi="http://www.w3.org/2001/XMLSchema-instance"><AutoLogon><Password><Value>wocao</Value><PlainText>true</PlainText></Password><Enabled>true</Enabled><Username>wocao</Username></AutoLogon><OOBE><HideEULAPage>true</HideEULAPage><HideOEMRegistrationScreen>true</HideOEMRegistrationScreen><HideOnlineAccountScreens>true</HideOnlineAccountScreens><HideWirelessSetupInOOBE>true</HideWirelessSetupInOOBE><NetworkLocation>Work</NetworkLocation><SkipUserOOBE>true</SkipUserOOBE><SkipMachineOOBE>true</SkipMachineOOBE><ProtectYourPC>3</ProtectYourPC></OOBE><UserAccounts><LocalAccounts><LocalAccount wcm:action="add"><Password><Value>wocao</Value><PlainText>true</PlainText></Password><Description></Description><DisplayName>wocao</DisplayName><Group>Administrators</Group><Name>wocao</Name></LocalAccount></LocalAccounts></UserAccounts><RegisteredOrganization>wocao</RegisteredOrganization><RegisteredOwner>wocao</RegisteredOwner><DisableAutoDaylightTimeSet>false</DisableAutoDaylightTimeSet><FirstLogonCommands><SynchronousCommand wcm:action="add"><Description>Control Panel View</Description><Order>1</Order><CommandLine>reg add"HKEY_CURRENT_USER\Software\Microsoft\Windows\CurrentVersion\Explorer\ControlPanel"/v StartupPage /t REG_DWORD /d 1 /f</CommandLine><RequiresUserInput>true</RequiresUserInput></SynchronousCommand><SynchronousCommand wcm:action="add"><Order>2</Order><Description>Control Panel Icon Size</Description><RequiresUserInput>false</RequiresUserInput><CommandLine>reg add"HKEY_CURRENT_USER\Software\Microsoft\Windows\CurrentVersion\Explorer\ControlPanel"/v AllItemsIconView /t REG_DWORD /d 0 /f</CommandLine></SynchronousCommand><SynchronousCommand wcm:action="add"><Order>3</Order><RequiresUserInput>false</RequiresUserInput><CommandLine>cmd /C wmic useraccount where name="wocao" setPasswordExpires=false</CommandLine><Description>Password Never Expires</Description></SynchronousCommand></FirstLogonCommands><TimeZone>AUS Eastern Standard Time</TimeZone></component><component name="Microsoft-Windows-Shell-Setup" processorArchitecture="amd64"publicKeyToken="31bf3856ad364e35" language="neutral" versionScope="nonSxS"xmlns:wcm="http://schemas.microsoft.com/WMIConfig/2002/State"xmlns:xsi="http://www.w3.org/2001/XMLSchema-instance"><AutoLogon><Password><Value>wocao</Value><PlainText>true</PlainText></Password><Enabled>true</Enabled><Username>wocao</Username></AutoLogon><OOBE><HideEULAPage>true</HideEULAPage><HideOEMRegistrationScreen>true</HideOEMRegistrationScreen><HideOnlineAccountScreens>true</HideOnlineAccountScreens><HideWirelessSetupInOOBE>true</HideWirelessSetupInOOBE><NetworkLocation>Home</NetworkLocation><SkipUserOOBE>true</SkipUserOOBE><SkipMachineOOBE>true</SkipMachineOOBE><ProtectYourPC>3</ProtectYourPC></OOBE><UserAccounts><LocalAccounts><LocalAccount wcm:action="add"><Password><Value>wocao</Value><PlainText>true</PlainText></Password><Description></Description><DisplayName>wocao</DisplayName><Group>Administrators</Group><Name>wocao</Name></LocalAccount></LocalAccounts></UserAccounts><RegisteredOrganization>wocao</RegisteredOrganization><RegisteredOwner>wocao</RegisteredOwner><DisableAutoDaylightTimeSet>false</DisableAutoDaylightTimeSet>#### 特别注意此处,允许远程连接<!-- WLSD Enable RDP --><FirstLogonCommands><SynchronousCommand wcm:action="add"><CommandLine>reg add "HKEY_LOCAL_MACHINE\SYSTEM\CurrentControlSet\Control\Terminal Server" /v fDenyTSConnections /t REG_DWORD /d 0 /f</CommandLine><Order>1</Order><RequiresUserInput>false</RequiresUserInput></SynchronousCommand></FirstLogonCommands><TimeZone>AUS Eastern Standard Time</TimeZone></component></settings>
</unattend>
参考
windows answer file generator
cobbler 安装ubuntu18.04.5
cobbler批量自动化部署Windows10和Server2019
cobbler之安装windows server 2019(win10)


![八一参考文献:[八一新书]许少辉.乡村振兴战略下传统村落文化旅游设计[M]北京:中国建筑出版传媒,2022.](https://img-blog.csdnimg.cn/ac3fde24b7a44d9cb46efb72f3f85406.jpeg#pic_center)