文章目录
- 一、docker资源控制
- 1、资源控制工具
- 2、Cgroups四大功能
- 二、CPU 资源控制
- 1、设置CPU使用率上限
- 2、CPU压力测试
- 3、Cgroups限制cpu使用率
- 4、设置CPU资源占用比(设置多个容器时才有效)
- 5、设置容器绑定指定的CPU
- 三、对内存使用的限制
- 四、对磁盘IO配额控制(blkio)的限制
- 1、#清理docker占用的磁盘空间
一、docker资源控制
1、资源控制工具
Docker 通过 Cgroup 来控制容器使用的资源配额,包括 CPU、内存、磁盘三大方面, 基本覆盖了常见的资源配额和使用量控制。
Cgroup 是 ControlGroups 的缩写,是 Linux 内核提供的一种可以限制、记录、隔离进程组所使用的物理资源(如 CPU、内存、磁盘 IO 等等) 的机制,被 LXC、docker 等很多项目用于实现进程资源控制。Cgroup 本身是提供将进程进行分组化管理的功能和接口的基础结构,I/O 或内存的分配控制等具体的资源管理是通过该功能来实现的。
2、Cgroups四大功能
资源限制:可以对任务使用的资源总额进行限制
优先级分配:通过分配的cpu时间片数量以及磁盘IO带宽大小,实际上相当于控制了任务运行优先级
资源统计:可以统计系统的资源使用量,如cpu时长,内存用量等
任务控制:cgroup可以对任务执行挂起、恢复等操作
二、CPU 资源控制
1、设置CPU使用率上限
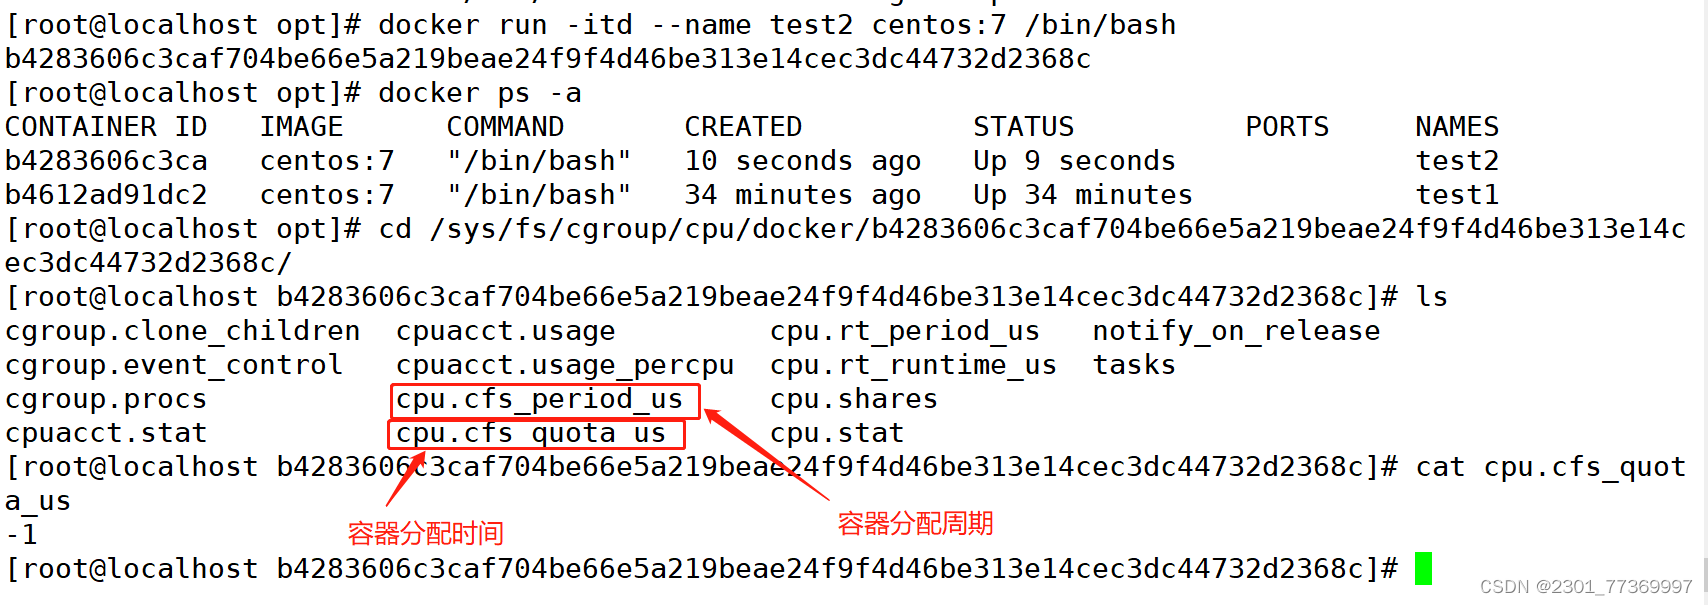
Linux通过CFS(Completely Fair Scheduler,完全公平调度器)来调度各个进程对CPU的使用。CFS默认的调度周期是100ms。
CPU周期:指的是CFS调度CPU遍历处理一次容器所有的进程时长,默认是0.1s。设置范围为1ms~1s
Cgroups限制时间:使用cpu.cfs_quota_us 即可设置在每个周期内容器能使用的CPU的时长,默认是-1即不限制。
CPU利用率:Cgroups限制时间/CPU周期,默认Cgroups是-1而CPU周期为0.1s表示用满CPU
查看CPU默认配置:

2、CPU压力测试
docker run -itd --name c1 centos:7 /bin/bash
docker ps -a
#查看docker容器id
docker exec -it 容器唯一id/容器名 /bin/bash
#进入容器中
vi cpu.sh
#!/bin/sh
i=0
while true
do
let i++
done
#编辑脚本
chmod +x /test.sh
#添加执行权限
./cpu.sh
#执行脚本
新开一个shell脚本
top查看cpu占用率,按1查看使用的那个cpu[root@localhost opt]# docker run -itd --name c1 centos:7 /bin/bash
078e66e73513524199fc489f49c37631441149bc3c78b61e520e2a98f194a49d
[root@localhost opt]# docker ps -a
CONTAINER ID IMAGE COMMAND CREATED STATUS PORTS NAMES
078e66e73513 centos:7 "/bin/bash" 7 seconds ago Up 6 seconds c1
b4283606c3ca centos:7 "/bin/bash" 24 minutes ago Up 24 minutes test2
b4612ad91dc2 centos:7 "/bin/bash" 59 minutes ago Up 59 minutes test1
[root@localhost opt]# docker exec -it 078e66e73513 /bin/bash
[root@078e66e73513 /]# vim /cpu.sh
bash: vim: command not found
[root@078e66e73513 /]# vim cpu.sh
bash: vim: command not found
[root@078e66e73513 /]# chmod +x /cpu.sh
chmod: cannot access '/cpu.sh': No such file or directory
[root@078e66e73513 /]# vi /cpu.sh
[root@078e66e73513 /]# chmod +x cpu.sh
[root@078e66e73513 /]# chmod +x /cpu.sh
[root@078e66e73513 /]# ./cpu.sh 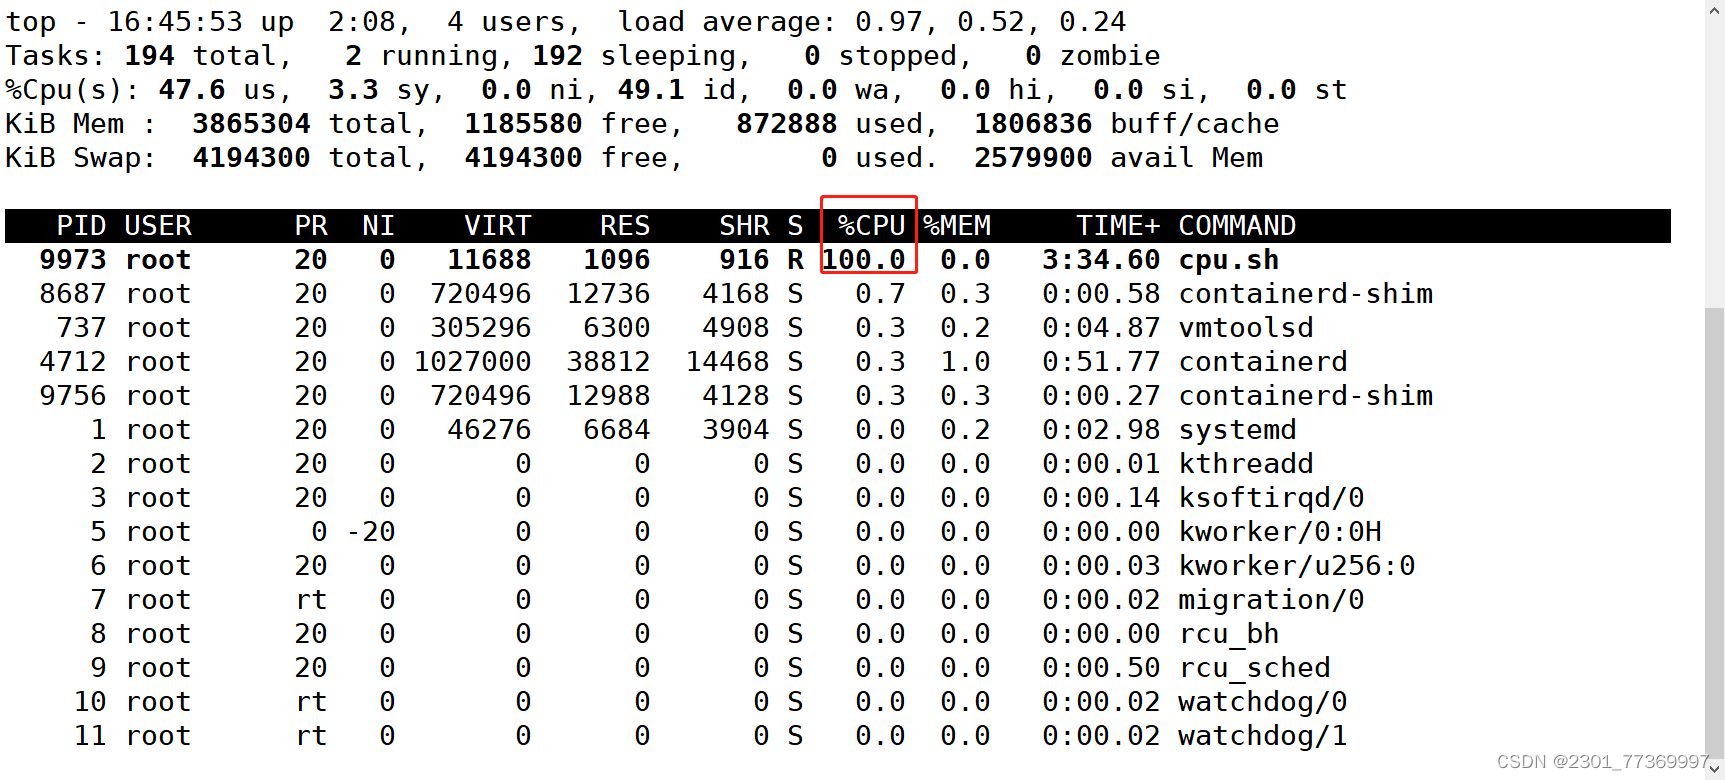
3、Cgroups限制cpu使用率
[root@localhost opt]# docker run -itd --name c2 --cpu-quota 50000 centos:7 /bin/bash
b32af889eec23e57f908d050de615334f68ccdb4bab50c478785917adc4be79e
[root@localhost opt]# docker ps -a
CONTAINER ID   IMAGE      COMMAND       CREATED             STATUS             PORTS     NAMES
b32af889eec2   centos:7   "/bin/bash"   51 seconds ago      Up 50 seconds                c2
078e66e73513   centos:7   "/bin/bash"   15 minutes ago      Up 15 minutes                c1
b4283606c3ca   centos:7   "/bin/bash"   39 minutes ago      Up 39 minutes                test2
b4612ad91dc2   centos:7   "/bin/bash"   About an hour ago   Up About an hour             test1
[root@localhost opt]# docker exec -it b32af889eec2 /bin/b
ash[root@b32af889eec2 /]# vi /cpu.sh
#!/bin/bash
i=0
while true
do
let i++
done[root@b32af889eec2 /]# chmod +x /cpu.sh
[root@b32af889eec2 /]# ./cpu.sh 
4、设置CPU资源占用比(设置多个容器时才有效)
Docker 通过 --cpu-shares 指定 CPU 份额,默认值为1024,值为1024的倍数。
创建两个容器为 c1 和 c2,若只有这两个容器,设置容器的权重,使得c1和c2的CPU资源占比为1/3和2/3。
docker run -itd --name c1 --cpu-shares 1024 centos:7
docker run -itd --name c2 --cpu-shares 2048 centos:7
分别进入容器,进行压力测试
yum install -y epel-release
yum install -y stress
stress -c 4 #产生四个进程,每个进程都反复不停的计算随机数的平方根[root@localhost opt]# docker run -itd --name test3 --cpu-shares 1024 centos:7
e73ea5e41483580cd5b818b719dd15adbaf1de39cbed98cef176fe2c40dde1db
[root@localhost opt]# docker run -itd --name test4 --cpu-shares 2048 centos:7
bf3224819662e932bfe1eb16de2cf1781c93741201108867e409b1ac52db9d80
[root@localhost opt]# yum install -y epel-release 安装EPEL软件仓库[root@localhost opt]# yum -y install stress
[root@localhost opt]# docker ps
CONTAINER ID   IMAGE      COMMAND       CREATED          STATUS          PORTS     NAMES
bf3224819662   centos:7   "/bin/bash"   19 minutes ago   Up 19 minutes             test4
e73ea5e41483   centos:7   "/bin/bash"   19 minutes ago   Up 19 minutes             test3
#进入容器写一个死循环脚本,运行起来
[root@localhost opt]# docker exec -it test4 bash
[root@bf3224819662 /]# vi /cpu.sh
#!/bin/bash
i=0
while true
do
let i++
done[root@bf3224819662 /]# chmod +x /cpu.sh
[root@bf3224819662 /]# ./cpu.sh[root@localhost ~]# docker exec -it test3 bash
[root@e73ea5e41483 /]# vi /cpu.sh
#!/bin/bash
i=0
while true
do
let i++
done[root@e73ea5e41483 /]# chmod +x /cpu.sh
[root@e73ea5e41483 /]# ./cpu.sh 另外打开一个开端使用top命令查看或者使用docker stats查看cpu占比;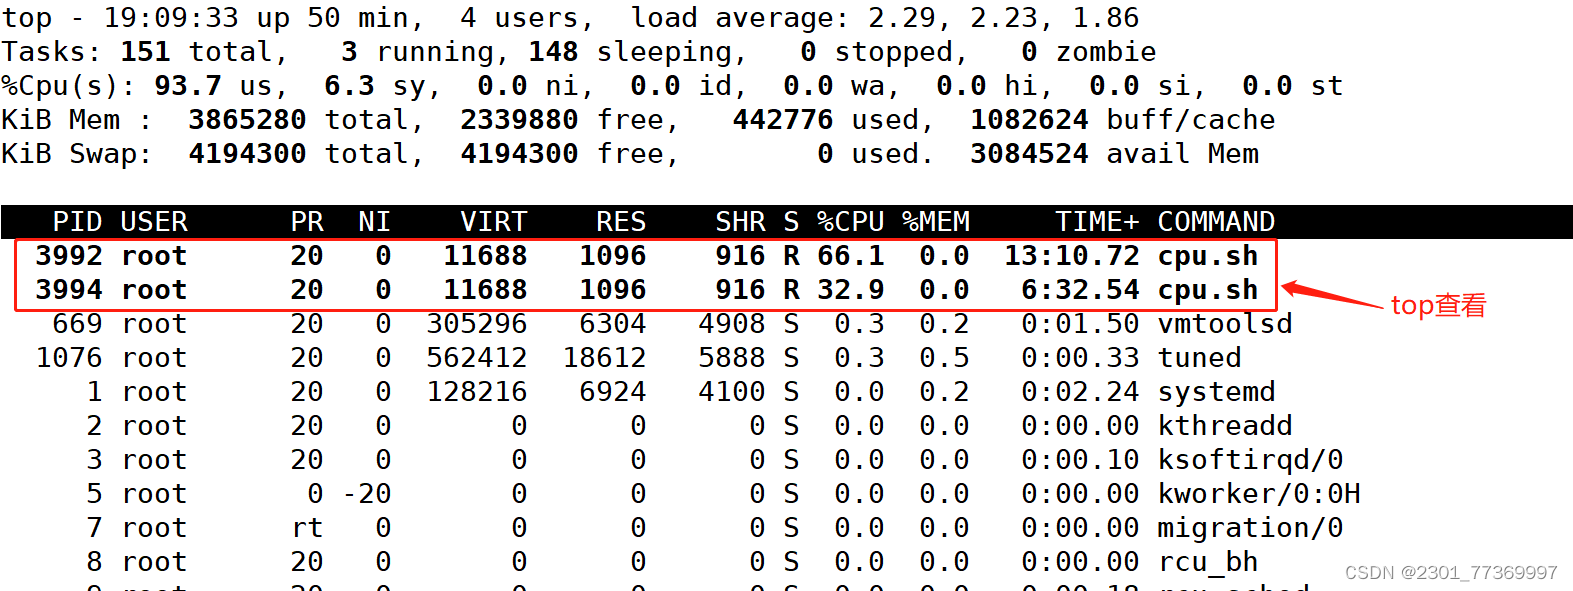

5、设置容器绑定指定的CPU
#先分配虚拟机4个CPU核数
[root@localhost opt]# docker run -itd --name test5 --cpuset-cpus 1,3 centos:7 /bin/bash
4a9fe0005c13d89411b87af79daff288953afa91237c8d02855ed8d26f0e15fb#进入容器,进行压力测试
[root@localhost opt]# docker exec -it test5 bash
[root@4a9fe0005c13 /]# yum install -y epel-release
[root@4a9fe0005c13 /]# yum -y install stress
[root@4a9fe0005c13 /]# stress -c 4
另外打开一个终端执行 top 命令再按 1 查看CPU使用情况。

三、对内存使用的限制
//-m(–memory=) 选项用于限制容器可以使用的最大内存
[root@localhost opt]# docker run -itd --name test6 -m 512m centos:7 /bin/bash
docker stats

//限制可用的 swap 大小, --memory-swap
强调一下,--memory-swap 是必须要与 --memory 一起使用的。正常情况下,--memory-swap 的值包含容器可用内存和可用 swap。
所以 -m 300m --memory-swap=1g 的含义为:容器可以使用 300M 的物理内存,并且可以使用 700M(1G - 300)的 swap。如果 --memory-swap 设置为 0 或者 不设置,则容器可以使用的 swap 大小为 -m 值的两倍。
如果 --memory-swap 的值和 -m 值相同,则容器不能使用 swap。
如果 --memory-swap 值为 -1,它表示容器程序使用的内存受限,而可以使用的 swap 空间使用不受限制(宿主机有多少 swap 容器就可以使用多少)。
四、对磁盘IO配额控制(blkio)的限制
--device-read-bps:限制某个设备上的读速度bps(数据量),单位可以是kb、mb(M)或者gb。
例:docker run -itd --name test7 --device-read-bps /dev/sda:1M centos:7 /bin/bash--device-write-bps : 限制某个设备上的写速度bps(数据量),单位可以是kb、mb(M)或者gb。
例:docker run -itd --name test8 --device-write-bps /dev/sda:1mb centos:7 /bin/bassh--device-read-iops :限制读某个设备的iops(次数)--device-write-iops :限制写入某个设备的iops(次数)

#创建容器,并限制写速度
[root@localhost opt]# docker run -itd --name test9 --device-write-bps /dev/sda:1MB centos:7 /bin/bash#通过dd来验证写速度
[root@localhost opt]# docker exec -it test9 bash #进入容器限制容器的写速度
dd if=/dev/zero of=test.out bs=1M count=10 oflag=direct				#添加oflag参数以规避掉文件系统cache
10+0 records in
10+0 records out
10485760 bytes (10 MB) copied, 10.0025 s, 1.0 MB/s

1、#清理docker占用的磁盘空间
docker system prune -a #可以用于清理磁盘,删除关闭的容器、无用的数据卷和网络
