前言
今天调试六轴陀螺仪 MPU6050
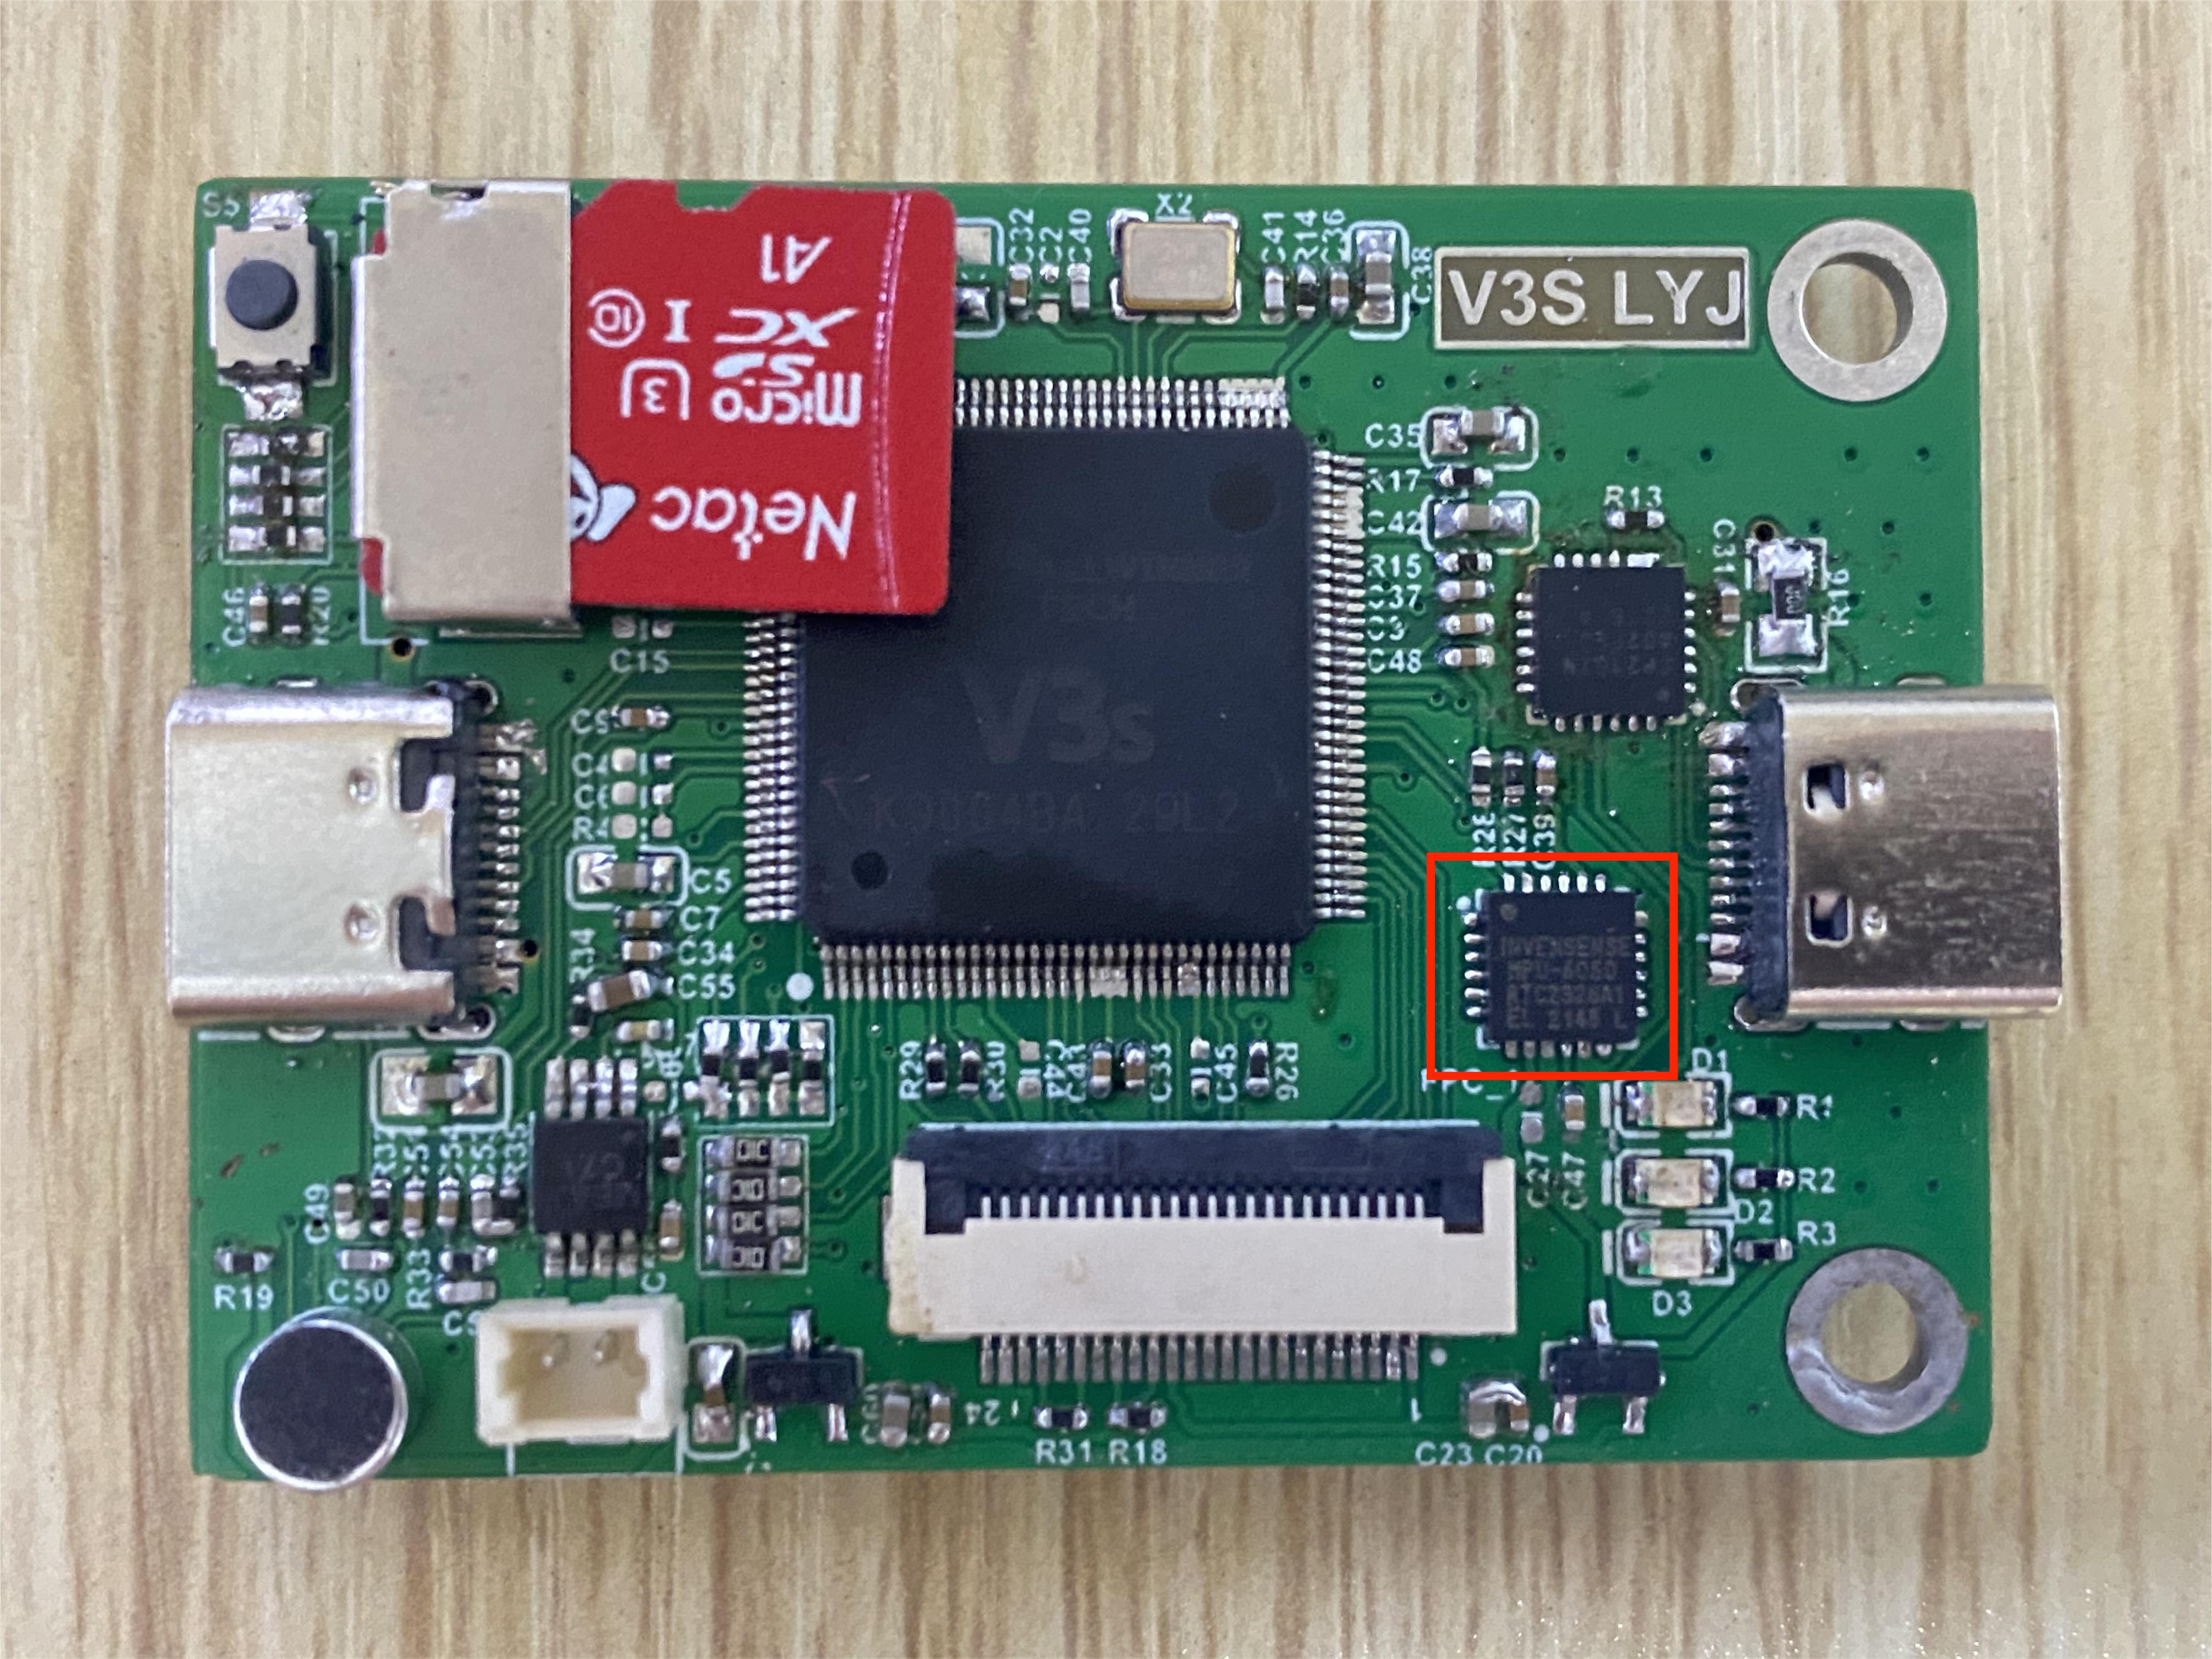
硬件
硬件很简单,使用 I2C 接口,并且没有使用中断引脚。
焊接上 MPU6050 芯片和上拉电阻、滤波电容。
检测
MPU6050 是挂在 I2C-0 上的,I2C-0 控制器的驱动已 OK,所以直接使用 I2C-0 检测 MPU6050 是否存在
# i2cdetect -y 00  1  2  3  4  5  6  7  8  9  a  b  c  d  e  f
00:                         -- -- -- -- -- -- -- --
10: -- -- -- -- -- -- -- -- -- -- -- -- -- -- -- --
20: -- -- -- -- -- -- -- -- -- -- -- -- -- -- -- --
30: -- -- -- -- -- -- -- -- -- -- -- -- -- -- -- --
40: -- -- -- -- -- -- -- -- -- -- -- -- -- -- -- --
50: -- -- -- -- -- -- -- -- -- -- -- -- -- -- -- --
60: -- -- -- -- -- -- -- -- 68 -- -- -- -- -- -- --
70: -- -- -- -- -- -- -- --
MPU6050 的地址是 0x68,在 I2C-0 总线上检测到了,说明硬件焊接 OK
读取温度
按照之前写的一篇文章《Banana Pi M1 读取 MPU6050(Shell 脚本方式)》,使用 shell 脚本方式读取温度
# ./mpu6050.sh
34.70℃
34.84℃
34.89℃
34.98℃
35.03℃
35.73℃
35.08℃
35.12℃
35.12℃
35.26℃
35.17℃
35.36℃
35.31℃
35.26℃
35.36℃
35.31℃
驱动
一开始使用内核自带的 IIO 驱动,发现只能在 /sys/ 目录下读取相应的坐标值,读取 /dev/iio:device0 有问题,并且需要配置中断引脚才能编译通过。所以就不使用内核自带的驱动了。网上找了个 6050 的驱动
arch/arm/boot/dts/sun8i-v3s-licheepi-zero-dock.dts
&i2c0 {pinctrl-0 = <&i2c0_pins>;pinctrl-names = "default";clock-frequency = <400000>;status = "okay";mpu6050_2: accelerometer@68_2 {compatible = "lyj,mpu6050";reg = <0x68>;status = "okay";};
};
i2c_mpu6050.c
#include <linux/init.h>
#include <linux/module.h>
#include <linux/fs.h>
#include <linux/cdev.h>
#include <linux/uaccess.h>
#include <linux/i2c.h>
#include <linux/types.h>
#include <linux/kernel.h>
#include <linux/delay.h>
#include <linux/ide.h>
#include <linux/errno.h>
#include <linux/gpio.h>
#include <asm/mach/map.h>
#include <linux/of.h>
#include <linux/of_address.h>
#include <linux/of_gpio.h>
#include <asm/io.h>
#include <linux/device.h>
#include <linux/platform_device.h>
#include "i2c_mpu6050.h"/*------------------字符设备内容----------------------*/
#define DEV_NAME "I2C1_mpu6050"
#define DEV_CNT (1)/*定义 led 资源结构体,保存获取得到的节点信息以及转换后的虚拟寄存器地址*/
static dev_t mpu6050_devno;				 //定义字符设备的设备号
static struct cdev mpu6050_chr_dev;		 //定义字符设备结构体chr_dev
struct class *class_mpu6050;			 //保存创建的类
struct device *device_mpu6050;			 // 保存创建的设备
struct device_node *mpu6050_device_node; //rgb_led的设备树节点结构体/*------------------IIC设备内容----------------------*/
struct i2c_client *mpu6050_client = NULL; //保存mpu6050设备对应的i2c_client结构体,匹配成功后由.prob函数带回。/*通过i2c 向mpu6050写入数据
*mpu6050_client:mpu6050的i2c_client结构体。
*address, 数据要写入的地址,
*data, 要写入的数据
*返回值,错误,-1。成功,0
*/
static int i2c_write_mpu6050(struct i2c_client *mpu6050_client, u8 address, u8 data)
{int error = 0;u8 write_data[2];struct i2c_msg send_msg; //要发送的数据结构体/*设置要发送的数据*/write_data[0] = address;write_data[1] = data;/*发送 iic要写入的地址 reg*/send_msg.addr = mpu6050_client->addr; //mpu6050在 iic 总线上的地址send_msg.flags = 0;					  //标记为发送数据send_msg.buf = write_data;			  //写入的首地址send_msg.len = 2;					  //reg长度/*执行发送*/error = i2c_transfer(mpu6050_client->adapter, &send_msg, 1);if (error != 1){printk(KERN_DEBUG "\n i2c_transfer error \n");return -1;}return 0;
}/*通过i2c 向mpu6050写入数据
*mpu6050_client:mpu6050的i2c_client结构体。
*address, 要读取的地址,
*data,保存读取得到的数据
*length,读长度
*返回值,错误,-1。成功,0
*/
static int i2c_read_mpu6050(struct i2c_client *mpu6050_client, u8 address, void *data, u32 length)
{int error = 0;u8 address_data = address;struct i2c_msg mpu6050_msg[2];/*设置读取位置msg*/mpu6050_msg[0].addr = mpu6050_client->addr; //mpu6050在 iic 总线上的地址mpu6050_msg[0].flags = 0;					//标记为发送数据mpu6050_msg[0].buf = &address_data;			//写入的首地址mpu6050_msg[0].len = 1;						//写入长度/*设置读取位置msg*/mpu6050_msg[1].addr = mpu6050_client->addr; //mpu6050在 iic 总线上的地址mpu6050_msg[1].flags = I2C_M_RD;			//标记为读取数据mpu6050_msg[1].buf = data;					//读取得到的数据保存位置mpu6050_msg[1].len = length;				//读取长度error = i2c_transfer(mpu6050_client->adapter, mpu6050_msg, 2);if (error != 2) {printk(KERN_DEBUG "\n i2c_read_mpu6050 error \n");return -1;}return 0;
}/*初始化i2c
*返回值,成功,返回0。失败,返回 -1
*/
static int mpu6050_init(void)
{int error = 0;/*配置mpu6050*/error += i2c_write_mpu6050(mpu6050_client, PWR_MGMT_1, 0X00);error += i2c_write_mpu6050(mpu6050_client, SMPLRT_DIV, 0X07);error += i2c_write_mpu6050(mpu6050_client, CONFIG, 0X06);error += i2c_write_mpu6050(mpu6050_client, ACCEL_CONFIG, 0X01);if (error < 0) {/*初始化错误*/printk(KERN_DEBUG "\n mpu6050_init error \n");return -1;}return 0;
}/*字符设备操作函数集,open函数实现*/
static int mpu6050_open(struct inode *inode, struct file *filp)
{// printk("\n mpu6050_open \n");/*向 mpu6050 发送配置数据,让mpu6050处于正常工作状态*/mpu6050_init();return 0;
}/*字符设备操作函数集,.read函数实现*/
static ssize_t mpu6050_read(struct file *filp, char __user *buf, size_t cnt, loff_t *off)
{char data_H;char data_L;int error;short mpu6050_result[6]; //保存mpu6050转换得到的原始数据// printk("\n mpu6050_read \n");i2c_read_mpu6050(mpu6050_client, ACCEL_XOUT_H, &data_H, 1);i2c_read_mpu6050(mpu6050_client, ACCEL_XOUT_L, &data_L, 1);mpu6050_result[0] = data_H << 8;mpu6050_result[0] += data_L;i2c_read_mpu6050(mpu6050_client, ACCEL_YOUT_H, &data_H, 1);i2c_read_mpu6050(mpu6050_client, ACCEL_YOUT_L, &data_L, 1);mpu6050_result[1] = data_H << 8;mpu6050_result[1] += data_L;i2c_read_mpu6050(mpu6050_client, ACCEL_ZOUT_H, &data_H, 1);i2c_read_mpu6050(mpu6050_client, ACCEL_ZOUT_L, &data_L, 1);mpu6050_result[2] = data_H << 8;mpu6050_result[2] += data_L;i2c_read_mpu6050(mpu6050_client, GYRO_XOUT_H, &data_H, 1);i2c_read_mpu6050(mpu6050_client, GYRO_XOUT_L, &data_L, 1);mpu6050_result[3] = data_H << 8;mpu6050_result[3] += data_L;i2c_read_mpu6050(mpu6050_client, GYRO_YOUT_H, &data_H, 1);i2c_read_mpu6050(mpu6050_client, GYRO_YOUT_L, &data_L, 1);mpu6050_result[4] = data_H << 8;mpu6050_result[4] += data_L;i2c_read_mpu6050(mpu6050_client, GYRO_ZOUT_H, &data_H, 1);i2c_read_mpu6050(mpu6050_client, GYRO_ZOUT_L, &data_L, 1);mpu6050_result[5] = data_H << 8;mpu6050_result[5] += data_L;// printk("AX=%d, AY=%d, AZ=%d \n",(int)mpu6050_result[0],(int)mpu6050_result[1],(int)mpu6050_result[2]);// printk("GX=%d, GY=%d, GZ=%d \n \n",(int)mpu6050_result[3],(int)mpu6050_result[4],(int)mpu6050_result[5]);/*将读取得到的数据拷贝到用户空间*/error = copy_to_user(buf, mpu6050_result, cnt);if(error != 0) {printk("copy_to_user error!");return -1;}return 0;
}/*字符设备操作函数集,.release函数实现*/
static int mpu6050_release(struct inode *inode, struct file *filp)
{// printk("\n mpu6050_release \n");/*向mpu6050发送命令,使mpu6050进入关机状态*/return 0;
}/*字符设备操作函数集*/
static struct file_operations mpu6050_chr_dev_fops = {.owner = THIS_MODULE,.open = mpu6050_open,.read = mpu6050_read,.release = mpu6050_release,
};/*----------------平台驱动函数集-----------------*/
static int mpu6050_probe(struct i2c_client *client, const struct i2c_device_id *id)
{int ret = -1; //保存错误状态码printk(KERN_EMERG "\t  match successed  \n");/*---------------------注册 字符设备部分-----------------*///采用动态分配的方式,获取设备编号,次设备号为0,//设备名称为rgb-leds,可通过命令cat  /proc/devices查看//DEV_CNT为1,当前只申请一个设备编号ret = alloc_chrdev_region(&mpu6050_devno, 0, DEV_CNT, DEV_NAME);if (ret < 0) {printk("fail to alloc mpu6050_devno\n");goto alloc_err;}//关联字符设备结构体cdev与文件操作结构体file_operationsmpu6050_chr_dev.owner = THIS_MODULE;cdev_init(&mpu6050_chr_dev, &mpu6050_chr_dev_fops);// 添加设备至cdev_map散列表中ret = cdev_add(&mpu6050_chr_dev, mpu6050_devno, DEV_CNT);if (ret < 0) {printk("fail to add cdev\n");goto add_err;}/*创建类 */class_mpu6050 = class_create(THIS_MODULE, DEV_NAME);/*创建设备 DEV_NAME 指定设备名,*/device_mpu6050 = device_create(class_mpu6050, NULL, mpu6050_devno, NULL, DEV_NAME);mpu6050_client = client;return 0;add_err:// 添加设备失败时,需要注销设备号unregister_chrdev_region(mpu6050_devno, DEV_CNT);printk("\n error! \n");
alloc_err:return -1;
}static int mpu6050_remove(struct i2c_client *client)
{/*删除设备*/device_destroy(class_mpu6050, mpu6050_devno);	  //清除设备class_destroy(class_mpu6050);					  //清除类cdev_del(&mpu6050_chr_dev);						  //清除设备号unregister_chrdev_region(mpu6050_devno, DEV_CNT); //取消注册字符设备return 0;
}/*定义ID 匹配表*/
static const struct i2c_device_id gtp_device_id[] = {{"lyj,mpu6050", 0},{},
};/*定义设备树匹配表*/
static const struct of_device_id mpu6050_of_match_table[] = {{.compatible = "lyj,mpu6050"},{/* sentinel */},
};/*定义i2c总线设备结构体*/
struct i2c_driver mpu6050_driver = {.probe = mpu6050_probe,.remove = mpu6050_remove,.id_table = gtp_device_id,.driver = {.name = "lyj,mpu6050",.owner = THIS_MODULE,.of_match_table = mpu6050_of_match_table,},
};/*
*驱动初始化函数
*/
static int __init mpu6050_driver_init(void)
{int ret;pr_info("mpu6050_driver_init\n");ret = i2c_add_driver(&mpu6050_driver);return ret;
}/*
*驱动注销函数
*/
static void __exit mpu6050_driver_exit(void)
{pr_info("mpu6050_driver_exit\n");i2c_del_driver(&mpu6050_driver);
}module_init(mpu6050_driver_init);
module_exit(mpu6050_driver_exit);MODULE_LICENSE("GPL");
test_app.c
#include <stdio.h>
#include <unistd.h>
#include <fcntl.h>
#include <string.h>
#include <stdlib.h>int main(int argc, char *argv[])
{int error;short resive_data[6]; //保存收到的 mpu6050转换结果数据,依次为 AX(x轴角度), AY, AZ 。GX(x轴加速度), GY ,GZ/*打开文件*/int fd = open(argv[1], O_RDWR);if (fd < 0) {printf("open file : %s failed !\n", argv[0]);return -1;}/*读取数据*/while (1) {error = read(fd, resive_data, 12);if (error < 0) {printf("write file error! \n");close(fd);/*判断是否关闭成功*/}/*打印数据*/printf("AX = %6d, AY = %6d, AZ = %6d", (int)resive_data[0], (int)resive_data[1], (int)resive_data[2]);printf("\t\tGX = %6d, GY = %6d, GZ = %6d\n", (int)resive_data[3], (int)resive_data[4], (int)resive_data[5]);sleep(1);}/*关闭文件*/error = close(fd);if (error < 0) {printf("close file error! \n");}return 0;
}
Makefile
obj-m = i2c_mpu6050.o
APP = test_appKDIR=/home/liyongjun/project/board/buildroot/DIY_V3S/build/linux-5.3.5
CROSS_COMPILE=/home/liyongjun/project/board/buildroot/DIY_V3S/host/bin/arm-buildroot-linux-gnueabihf-all:make -C $(KDIR) M=$(PWD) ARCH=arm CROSS_COMPILE=$(CROSS_COMPILE) modules$(CROSS_COMPILE)gcc -o $(APP) test_app.cclean:make -C $(KDIR) M=$(PWD) ARCH=arm CROSS_COMPILE=$(CROSS_COMPILE) cleanrm $(APP)
测试
安装驱动,运行 APP,转动陀螺仪
# insmod i2c_mpu6050.ko
[  127.820667] i2c_mpu6050: loading out-of-tree module taints kernel.
[  127.829072] mpu6050_driver_init
[  127.833666] 	  match successed
# ./test_app /dev/I2C1_mpu6050
AX =    574, AY =    198, AZ =  16784		GX =    -50, GY =   -189, GZ =    -38
AX =    588, AY =    188, AZ =  16768		GX =    -48, GY =   -175, GZ =    -40
AX = -10366, AY =  -4508, AZ =  11164		GX =  -9896, GY =  11097, GZ = -11451
AX = -14110, AY =   2746, AZ =   4270		GX = -27770, GY = -26383, GZ =  17776
AX =  -9850, AY =  10674, AZ =  -3436		GX =  -8408, GY =   5019, GZ =  13314
AX =  -7482, AY = -10730, AZ =  -3054		GX =   4618, GY = -32440, GZ =  17968
AX =   1320, AY =   3748, AZ =  21040		GX = -15680, GY =   8252, GZ =   3408
AX =   9350, AY =  10816, AZ =  -8042		GX =   3906, GY =    640, GZ =  12422
AX =  -8470, AY =  -5844, AZ =   6478		GX =  16069, GY = -32768, GZ =  12481
AX =  -2542, AY = -11888, AZ = -14484		GX =   8449, GY =  22099, GZ = -30254
AX =  -6590, AY =   9106, AZ =  13610		GX =  -4507, GY = -32768, GZ =  28548
AX =  -8738, AY =   6962, AZ =  -3122		GX = -27485, GY = -12743, GZ = -23153
AX =  -8436, AY =  -2534, AZ =  13078		GX =  32767, GY =  10061, GZ = -12789
AX =  -1298, AY = -12532, AZ = -12758		GX = -17934, GY =   3946, GZ =  -5478
AX =   7988, AY =  -3884, AZ =  14934		GX =   6224, GY =  -9852, GZ =  -7318
AX =   7812, AY =  -7544, AZ = -12826		GX = -32768, GY =  -3146, GZ =   3222
AX =   6158, AY =   1790, AZ = -14952		GX =    108, GY =   -324, GZ =   -209
至此,陀螺仪调试 OK