目录
1 r3live_vio.cpp简介
2 r3live_vio.cpp源码解析
1 r3live_vio.cpp简介
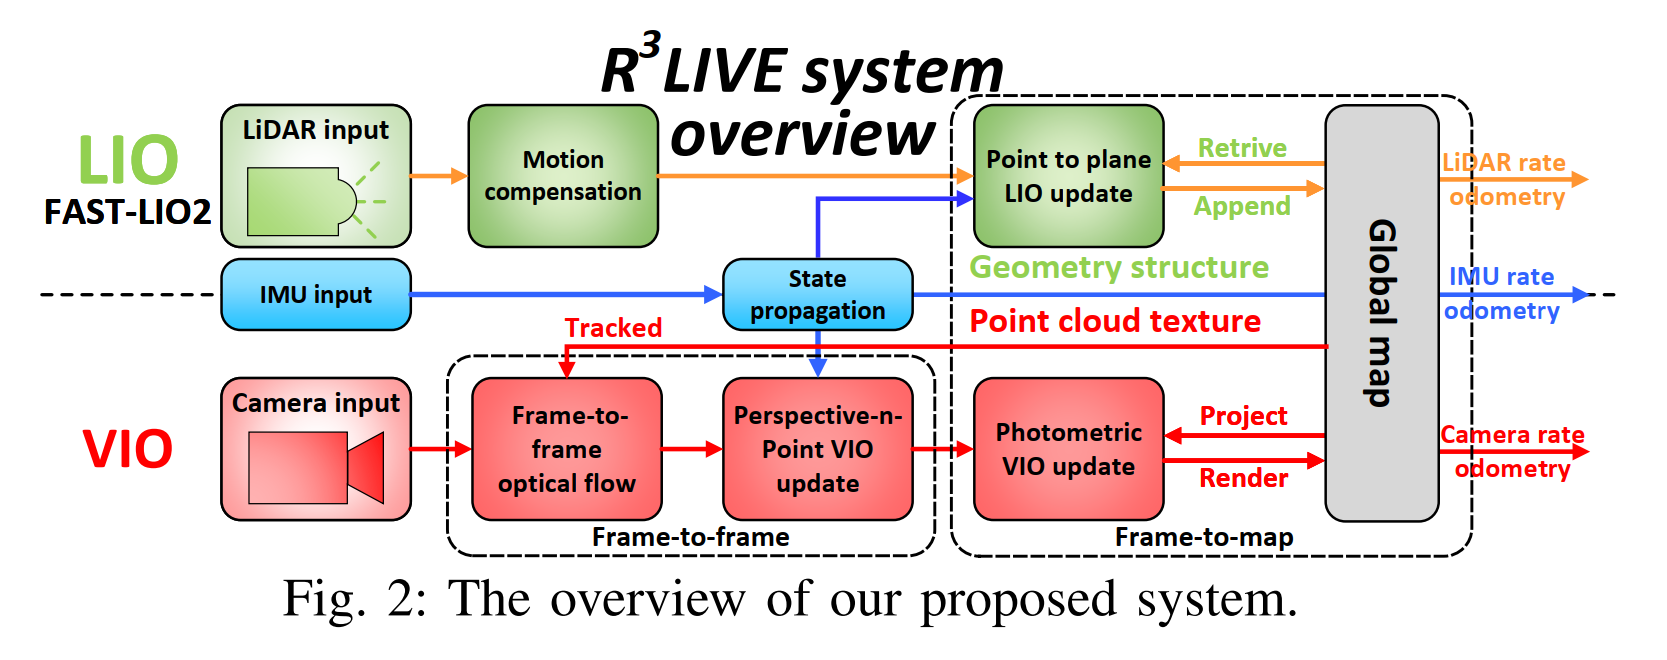
R3LIVE主要的公式推导在VIO上,所以我们来细细的分析这部分的功能。R3LIVE将VIO分成了两步,一是直接通过帧间的光流来追踪地图点,并且通过最小化追踪到的地图点的PNP投影误差来获取系统状态;二是通过这些地图点的出现的帧到地图的光度误差来优化状态。
2 r3live_vio.cpp源码解析
首先r3live_vio.cpp中,我们会先通过一个线程来获取图像的信息
void R3LIVE::image_comp_callback( const sensor_msgs::CompressedImageConstPtr &msg )
{std::unique_lock< std::mutex > lock2( mutex_image_callback );if ( sub_image_typed == 1 ){return; // Avoid subscribe the same image twice.}sub_image_typed = 2;g_received_compressed_img_msg.push_back( msg );// 如果是第一次收到图片,则启动一个线程if ( g_flag_if_first_rec_img ){g_flag_if_first_rec_img = 0;// 通过线程池k方法调用service_process_img_buffer函数来处理图像// 内部其实在循环调用process_image()函数m_thread_pool_ptr->commit_task( &R3LIVE::service_process_img_buffer, this );}return;
}// ANCHOR - image_callback
void R3LIVE::image_callback( const sensor_msgs::ImageConstPtr &msg )
{std::unique_lock< std::mutex > lock( mutex_image_callback );if ( sub_image_typed == 2 ){return; // Avoid subscribe the same image twice.}sub_image_typed = 1;// 与上面的函数相同if ( g_flag_if_first_rec_img ){g_flag_if_first_rec_img = 0;m_thread_pool_ptr->commit_task( &R3LIVE::service_process_img_buffer, this );}// 将图像消息转opencv格式cv::Mat temp_img = cv_bridge::toCvCopy( msg, sensor_msgs::image_encodings::BGR8 )->image.clone();// 图像预处理,然后保存到m_queue_image_with_pose队列process_image( temp_img, msg->header.stamp.toSec() );
}
这里面通过 m_thread_pool_ptr->commit_task线程池的方式完成了图像buffer的压入与处理。在这个函数的末尾,会调用process_image函数
void R3LIVE::service_process_img_buffer()
{while ( 1 ){// To avoid uncompress so much image buffer, reducing the use of memory.// 如果m_queue_image_with_pose队列内的数据>4,表示这些数据还没被处理,暂时挂起预处理线程(丢一些数据)if ( m_queue_image_with_pose.size() > 4 ){while ( m_queue_image_with_pose.size() > 4 ){ros::spinOnce();std::this_thread::sleep_for( std::chrono::milliseconds( 2 ) );std::this_thread::yield();}}cv::Mat image_get;double  img_rec_time;// sub_image_typed == 2,表示接收的是压缩图像格式 if ( sub_image_typed == 2 ){// 如果队列中没有数据,暂停当前线程1s,以减少CPU的使用while ( g_received_compressed_img_msg.size() == 0 ){ros::spinOnce();std::this_thread::sleep_for( std::chrono::milliseconds( 1 ) );std::this_thread::yield();}// 从队列的前端获取一个压缩图像消息msgsensor_msgs::CompressedImageConstPtr msg = g_received_compressed_img_msg.front();try{// 将压缩图像消息转换为cv::Mat类型的图像数据cv_bridge::CvImagePtr cv_ptr_compressed = cv_bridge::toCvCopy( msg, sensor_msgs::image_encodings::BGR8 );// 存储获取的时间和图像img_rec_time = msg->header.stamp.toSec();image_get = cv_ptr_compressed->image;// 释放内存cv_ptr_compressed->image.release();}catch ( cv_bridge::Exception &e ){printf( "Could not convert from '%s' to 'bgr8' !!! ", msg->format.c_str() );}mutex_image_callback.lock();g_received_compressed_img_msg.pop_front();mutex_image_callback.unlock();}else{// 如果队列中没有数据,暂停当前线程1s,以减少CPU的使用while ( g_received_img_msg.size() == 0 ){ros::spinOnce();std::this_thread::sleep_for( std::chrono::milliseconds( 1 ) );std::this_thread::yield();}// 与前面的流程类似,区别在于需要将接受的最前的图像popsensor_msgs::ImageConstPtr msg = g_received_img_msg.front();image_get = cv_bridge::toCvCopy( msg, sensor_msgs::image_encodings::BGR8 )->image.clone();img_rec_time = msg->header.stamp.toSec();mutex_image_callback.lock();g_received_img_msg.pop_front();mutex_image_callback.unlock();}process_image( image_get, img_rec_time );}
}process_image函数主要做了三件事情,分别是检测时间戳,初始化参数,并启动service_pub_rgb_maps与service_VIO_update线程,以及去畸变与图像处理。
void R3LIVE::process_image( cv::Mat &temp_img, double msg_time )
{cv::Mat img_get;// 检测图像rows是否正常if ( temp_img.rows == 0 ){cout << "Process image error, image rows =0 " << endl;return;}// 检查时间戳是否正常if ( msg_time < last_accept_time ){cout << "Error, image time revert!!" << endl;return;}// 频率控制if ( ( msg_time - last_accept_time ) < ( 1.0 / m_control_image_freq ) * 0.9 ){return;}last_accept_time = msg_time;// 如果是第一次运行if ( m_camera_start_ros_tim < 0 ){m_camera_start_ros_tim = msg_time;m_vio_scale_factor = m_vio_image_width * m_image_downsample_ratio / temp_img.cols; // 320 * 24// load_vio_parameters();// 加载vio参数set_initial_camera_parameter( g_lio_state, m_camera_intrinsic.data(), m_camera_dist_coeffs.data(), m_camera_ext_R.data(),m_camera_ext_t.data(), m_vio_scale_factor );cv::eigen2cv( g_cam_K, intrinsic );cv::eigen2cv( g_cam_dist, dist_coeffs );// 初始化畸变initUndistortRectifyMap( intrinsic, dist_coeffs, cv::Mat(), intrinsic, cv::Size( m_vio_image_width / m_vio_scale_factor, m_vio_image_heigh / m_vio_scale_factor ),CV_16SC2, m_ud_map1, m_ud_map2 );// 启动两个线程m_thread_pool_ptr->commit_task( &R3LIVE::service_pub_rgb_maps, this);m_thread_pool_ptr->commit_task( &R3LIVE::service_VIO_update, this);// 初始化数据记录器m_mvs_recorder.init( g_cam_K, m_vio_image_width / m_vio_scale_factor, &m_map_rgb_pts );m_mvs_recorder.set_working_dir( m_map_output_dir );}if ( m_image_downsample_ratio != 1.0 ){cv::resize( temp_img, img_get, cv::Size( m_vio_image_width / m_vio_scale_factor, m_vio_image_heigh / m_vio_scale_factor ) );}else{img_get = temp_img; // clone ?}std::shared_ptr< Image_frame > img_pose = std::make_shared< Image_frame >( g_cam_K );// 是否发布原始imgif ( m_if_pub_raw_img ){img_pose->m_raw_img = img_get;}// 以img_get为输入,进行去畸变,输出到img_pose->m_imgcv::remap( img_get, img_pose->m_img, m_ud_map1, m_ud_map2, cv::INTER_LINEAR );// cv::imshow("sub Img", img_pose->m_img);img_pose->m_timestamp = msg_time;img_pose->init_cubic_interpolation();   // 转灰度图img_pose->image_equalize();      // 直方图均衡化m_camera_data_mutex.lock();m_queue_image_with_pose.push_back( img_pose );   // 保存到队列m_camera_data_mutex.unlock();total_frame_count++;// 调整buffer数量if ( m_queue_image_with_pose.size() > buffer_max_frame ){buffer_max_frame = m_queue_image_with_pose.size();}// cout << "Image queue size = " << m_queue_image_with_pose.size() << endl;
}
首在进行前面的图像初始处理后,后面进行VIO的主要的处理函数。先会先默认判断是否收到激光的信息,即收到激光信息才会进入视觉VIO。如果是第一帧图像,则需要等待点云地图中的点数量大于阈值后,再选取active点云投影到图像上,作为初始跟踪点,初始化跟踪器op_track。
cv_keyboard_callback();
// 检查是否收到第一帧激光雷达扫描,没收到,则循环等待
while ( g_camera_lidar_queue.m_if_have_lidar_data == 0 )
{ros::spinOnce();std::this_thread::sleep_for( std::chrono::milliseconds( THREAD_SLEEP_TIM ) );std::this_thread::yield();continue;
}// 检查是否收到预处理后的图像
if ( m_queue_image_with_pose.size() == 0 )
{ros::spinOnce();std::this_thread::sleep_for( std::chrono::milliseconds( THREAD_SLEEP_TIM ) );std::this_thread::yield();continue;
}
m_camera_data_mutex.lock();// 如果m_queue_image_with_pose队列内的缓存数据大于buffer,则将最旧的图像帧用于track,然后pop掉
while ( m_queue_image_with_pose.size() > m_maximum_image_buffer )
{cout << ANSI_COLOR_BLUE_BOLD << "=== Pop image! current queue size = " << m_queue_image_with_pose.size() << " ===" << ANSI_COLOR_RESET<< endl;op_track.track_img( m_queue_image_with_pose.front(), -20 );m_queue_image_with_pose.pop_front();
}std::shared_ptr< Image_frame > img_pose = m_queue_image_with_pose.front();
double                             message_time = img_pose->m_timestamp;
m_queue_image_with_pose.pop_front();
m_camera_data_mutex.unlock();
g_camera_lidar_queue.m_last_visual_time = img_pose->m_timestamp + g_lio_state.td_ext_i2c;img_pose->set_frame_idx( g_camera_frame_idx );
tim.tic( "Frame" );if ( g_camera_frame_idx == 0 )
{std::vector< cv::Point2f >                pts_2d_vec;       // 选中的地图点反投影到图像上的坐标std::vector< std::shared_ptr< RGB_pts > > rgb_pts_vec;      // 选中的地图点// while ( ( m_map_rgb_pts.is_busy() ) || ( ( m_map_rgb_pts.m_rgb_pts_vec.size() <= 100 ) ) )// 检查地图点是否足够,因为LIO模块会调用Global_map::append_points_to_global_map,等待向全局地图添加点while ( ( ( m_map_rgb_pts.m_rgb_pts_vec.size() <= 100 ) ) ){ros::spinOnce();std::this_thread::sleep_for( std::chrono::milliseconds( 1 ) );}// 取此时LIO的状态,并根据外参,设置相机状态// 对于第一帧,这里假设是静止的运动状态set_image_pose( img_pose, g_lio_state ); // For first frame pose, we suppose that the motion is static.// 调用全局地图模块,根据相机状态,选择一些点m_map_rgb_pts.selection_points_for_projection( img_pose, &rgb_pts_vec, &pts_2d_vec, m_track_windows_size / m_vio_scale_factor );// 初始化跟踪模块op_track.init( img_pose, rgb_pts_vec, pts_2d_vec );   //初始化光流g_camera_frame_idx++;   //累计影像索引continue;
}
接着通过对比相机和lidar队列头的时间戳,如果lidar的时间戳更早则等待lio线程把更早的激光处理完。接着进行预积分部分,通过IMU结合图像的形式完成位置的预积分
g_camera_frame_idx++;
tim.tic( "Wait" );
// if_camera_can_process(): 当雷达有数据,并且lidar buffer中最旧的雷达数据时间 > 当前正在处理的图像时间戳,则返回true,
while ( g_camera_lidar_queue.if_camera_can_process() == false )
{// 否则,在这里循环等待处理雷达数据ros::spinOnce();std::this_thread::sleep_for( std::chrono::milliseconds( THREAD_SLEEP_TIM ) );std::this_thread::yield();cv_keyboard_callback();
}
g_cost_time_logger.record( tim, "Wait" );
m_mutex_lio_process.lock();
tim.tic( "Frame" );
tim.tic( "Track_img" );
StatesGroup state_out;
m_cam_measurement_weight = std::max( 0.001, std::min( 5.0 / m_number_of_new_visited_voxel, 0.01 ) );// body 从LIO预积分到当前帧时刻
if ( vio_preintegration( g_lio_state, state_out, img_pose->m_timestamp + g_lio_state.td_ext_i2c ) == false )
{// 如果图像帧时间戳小于当前状态g_lio_state的时间,则出问题了,直接跳过这帧图像m_mutex_lio_process.unlock();continue;
}
//将从上一LIO预积分的结果,设定为当前帧对应的pose
set_image_pose( img_pose, state_out );op_track.track_img( img_pose, -20 );
g_cost_time_logger.record( tim, "Track_img" );
// cout << "Track_img cost " << tim.toc( "Track_img" ) << endl;
tim.tic( "Ransac" );
set_image_pose( img_pose, state_out );下面介绍vio_preintegration预积分函数的详细代码,我们可以看到,在该代码中主要是拿到imu_buffer_vio的图像与IMU数据,并将buffer里面的视觉数据都传入imu_preintegration函数中完成差值的传递,并计算出state_inout的信息。
// ANCHOR - VIO preintegration
bool R3LIVE::vio_preintegration( StatesGroup &state_in, StatesGroup &state_out, double current_frame_time )
{state_out = state_in;// 检查当前帧的时间是否小于等于上一次更新的时间if ( current_frame_time <= state_in.last_update_time ){// cout << ANSI_COLOR_RED_BOLD << "Error current_frame_time <= state_in.last_update_time | " <<// current_frame_time - state_in.last_update_time << ANSI_COLOR_RESET << endl;return false;}mtx_buffer.lock();std::deque< sensor_msgs::Imu::ConstPtr > vio_imu_queue;// 遍历imu_buffer_vio容器中的元素for ( auto it = imu_buffer_vio.begin(); it != imu_buffer_vio.end(); it++ ){vio_imu_queue.push_back( *it );// 如果时间戳大于当前帧的时间,则跳出循环if ( ( *it )->header.stamp.toSec() > current_frame_time ){break;}}// 当imu_buffer_vio容器不为空时执行循环while ( !imu_buffer_vio.empty() ){// 获取imu_buffer_vio容器中第一个元素的时间戳double imu_time = imu_buffer_vio.front()->header.stamp.toSec();// imu和current_frame_time的时间差if ( imu_time < current_frame_time - 0.2 ){// 将该元素从容器中移除imu_buffer_vio.pop_front();}else{break;}}// cout << "Current VIO_imu buffer size = " << imu_buffer_vio.size() << endl;state_out = m_imu_process->imu_preintegration( state_out, vio_imu_queue, current_frame_time - vio_imu_queue.back()->header.stamp.toSec() );// state_out.rot_end的转置矩阵 * state_in.rot_endeigen_q q_diff( state_out.rot_end.transpose() * state_in.rot_end );// cout << "Pos diff = " << (state_out.pos_end - state_in.pos_end).transpose() << endl;// cout << "Euler diff = " << q_diff.angularDistance(eigen_q::Identity()) * 57.3 << endl;mtx_buffer.unlock();// 更新时间信息state_out.last_update_time = current_frame_time;return true;
}
下面介绍imu_preintegration预积分函数,我们发现这部分的内容和FAST-LIO2的代码有点相像,但是有不完全一样。所以我们单独抽出来看一下这个函数。首先完成一系列参数的初始化,包含imu加速度acc_imu,平均角速度angvel_avr,速度vel_imu,位置pos_imu。以及imu自身的旋转角,状态转移矩阵F_x,以及协方差cov_w。这一部分其实就是ESIKF的输入转化矩阵。测量更新在主函数中。
// 完成一系列的参数初始化Eigen::Vector3d acc_imu( 0, 0, 0 ), angvel_avr( 0, 0, 0 ), acc_avr( 0, 0, 0 ), vel_imu( 0, 0, 0 ), pos_imu( 0, 0, 0 );vel_imu = state_inout.vel_end;pos_imu = state_inout.pos_end;Eigen::Matrix3d R_imu( state_inout.rot_end );Eigen::MatrixXd F_x( Eigen::Matrix< double, DIM_OF_STATES, DIM_OF_STATES >::Identity() ); //状态量雅可比Eigen::MatrixXd cov_w( Eigen::Matrix< double, DIM_OF_STATES, DIM_OF_STATES >::Zero() );double dt = 0;int if_first_imu = 1;接下来其实是做了一个中值积分,并计算出两个IMU时刻之间的时间间隔。
接着就是ESIKF的初始化,在R3LIVE中是29个维度的,这29个维度分别代表:全局到imu旋转,全局到imu位置,速度,ba,bg,重力分量,imu到camera旋转,imu到camera位置,激光雷达已经与IMU同步时IMU和摄像机之间的时间偏移,内参。
![]()
/* covariance propagation */Eigen::Matrix3d acc_avr_skew;Eigen::Matrix3d Exp_f = Exp( angvel_avr, dt );acc_avr_skew << SKEW_SYM_MATRIX( acc_avr );// Eigen::Matrix3d Jr_omega_dt = right_jacobian_of_rotion_matrix<double>(angvel_avr*dt);Eigen::Matrix3d Jr_omega_dt = Eigen::Matrix3d::Identity();F_x.block< 3, 3 >( 0, 0 ) = Exp_f.transpose();// F_x.block<3, 3>(0, 9) = -Eye3d * dt;F_x.block< 3, 3 >( 0, 9 ) = -Jr_omega_dt * dt;// F_x.block<3,3>(3,0) = -R_imu * off_vel_skew * dt;F_x.block< 3, 3 >( 3, 3 ) = Eye3d; // Already the identity.F_x.block< 3, 3 >( 3, 6 ) = Eye3d * dt;F_x.block< 3, 3 >( 6, 0 ) = -R_imu * acc_avr_skew * dt;F_x.block< 3, 3 >( 6, 12 ) = -R_imu * dt;F_x.block< 3, 3 >( 6, 15 ) = Eye3d * dt;Eigen::Matrix3d cov_acc_diag, cov_gyr_diag, cov_omega_diag;cov_omega_diag = Eigen::Vector3d( COV_OMEGA_NOISE_DIAG, COV_OMEGA_NOISE_DIAG, COV_OMEGA_NOISE_DIAG ).asDiagonal();cov_acc_diag = Eigen::Vector3d( COV_ACC_NOISE_DIAG, COV_ACC_NOISE_DIAG, COV_ACC_NOISE_DIAG ).asDiagonal();cov_gyr_diag = Eigen::Vector3d( COV_GYRO_NOISE_DIAG, COV_GYRO_NOISE_DIAG, COV_GYRO_NOISE_DIAG ).asDiagonal();// cov_w.block<3, 3>(0, 0) = cov_omega_diag * dt * dt;cov_w.block< 3, 3 >( 0, 0 ) = Jr_omega_dt * cov_omega_diag * Jr_omega_dt * dt * dt;cov_w.block< 3, 3 >( 3, 3 ) = R_imu * cov_gyr_diag * R_imu.transpose() * dt * dt;cov_w.block< 3, 3 >( 6, 6 ) = cov_acc_diag * dt * dt;cov_w.block< 3, 3 >( 9, 9 ).diagonal() =Eigen::Vector3d( COV_BIAS_GYRO_NOISE_DIAG, COV_BIAS_GYRO_NOISE_DIAG, COV_BIAS_GYRO_NOISE_DIAG ) * dt * dt; // bias gyro covariancecov_w.block< 3, 3 >( 12, 12 ).diagonal() =Eigen::Vector3d( COV_BIAS_ACC_NOISE_DIAG, COV_BIAS_ACC_NOISE_DIAG, COV_BIAS_ACC_NOISE_DIAG ) * dt * dt; // bias acc covariance// cov_w.block<3, 3>(18, 18).diagonal() = Eigen::Vector3d(COV_NOISE_EXT_I2C_R, COV_NOISE_EXT_I2C_R, COV_NOISE_EXT_I2C_R) * dt * dt; // bias// gyro covariance cov_w.block<3, 3>(21, 21).diagonal() = Eigen::Vector3d(COV_NOISE_EXT_I2C_T, COV_NOISE_EXT_I2C_T, COV_NOISE_EXT_I2C_T) * dt// * dt; // bias acc covariance cov_w(24, 24) = COV_NOISE_EXT_I2C_Td * dt * dt;state_inout.cov = F_x * state_inout.cov * F_x.transpose() + cov_w;// 状态更新R_imu = R_imu * Exp_f;// 姿态acc_imu = R_imu * acc_avr - state_inout.gravity;// 加速度pos_imu = pos_imu + vel_imu * dt + 0.5 * acc_imu * dt * dt;// 位置vel_imu = vel_imu + acc_imu * dt;// 速度angvel_last = angvel_avr;acc_s_last = acc_imu;最后就是将传递的状态量作为输出,用于后面的状态更新
// 继续推算,直到激光扫描结束时刻dt = end_pose_dt;state_inout.last_update_time = v_imu.back()->header.stamp.toSec() + dt;// cout << "Last update time = " << state_inout.last_update_time - g_lidar_star_tim << endl;if ( dt > 0.1 ){scope_color( ANSI_COLOR_RED_BOLD );for ( int i = 0; i < 1; i++ ){cout << __FILE__ << ", " << __LINE__ << "dt = " << dt << endl;}dt = 0.1;}// 将状态保存给state_inout,超出IMU数据时间部分,直接按时间差和最后一个IMU数据传播state_inout.vel_end = vel_imu + acc_imu * dt;state_inout.rot_end = R_imu * Exp( angvel_avr, dt );state_inout.pos_end = pos_imu + vel_imu * dt + 0.5 * acc_imu * dt * dt;// cout <<__FILE__ << ", " << __LINE__ <<" ,diagnose lio_state = " << std::setprecision(2) <<(state_inout - StatesGroup()).transpose() << endl;// cout << "Preintegration State diff = " << std::setprecision(2) << (state_inout - state_in).head<15>().transpose()// << endl;// std::cout << __FILE__ << " " << __LINE__ << std::endl;// check_state(state_inout);if ( 0 ){if ( check_state( state_inout ) ){// printf_line;std::cout << __FILE__ << " " << __LINE__ << std::endl;state_inout.display( state_inout, "state_inout" );state_in.display( state_in, "state_in" );}// 检查预积分前后pos是否超过1m,超过认为无效,将传播后状态重置为传播前check_in_out_state( state_in, state_inout );}// cout << (state_inout - state_in).transpose() << endl;return state_inout;在了解完预积分的代码后,接着了解光流追踪,具体的操作流程如下:
- 用状态预测结果作为这帧图像的初始位姿。
- 然后调用
op_track.track_img( img_pose, -20 )跟踪特征点。 - 最后将更新的img_pose作为输出,完成相机pose和内参的校准
// 取预积分后的状态,设置img_pose
op_track.track_img( img_pose, -20 );
// 这里的track_img注意与 LK_optical_flow_kernel::track_image区分
// 光流跟踪,同时去除outliers
g_cost_time_logger.record( tim, "Track_img" );
// cout << "Track_img cost " << tim.toc( "Track_img" ) << endl;
tim.tic( "Ransac" );
set_image_pose( img_pose, state_out );
下面是根据LIO状态和外参,设置相机pose/内参的操作
/*
* @brief R3LIVE::set_image_pose
* 根据LIO状态和外参,设置相机pose/内参
* @param image_pose
* @param state
*/
void R3LIVE::set_image_pose( std::shared_ptr< Image_frame > &image_pose, const StatesGroup &state )
{mat_3_3 rot_mat = state.rot_end;vec_3   t_vec = state.pos_end;vec_3   pose_t = rot_mat * state.pos_ext_i2c + t_vec;   // 相机在世界坐标系的位置mat_3_3 R_w2c = rot_mat * state.rot_ext_i2c;    // 相机在世界坐标系的姿态image_pose->set_pose( eigen_q( R_w2c ), pose_t );image_pose->fx = state.cam_intrinsic( 0 );image_pose->fy = state.cam_intrinsic( 1 );image_pose->cx = state.cam_intrinsic( 2 );image_pose->cy = state.cam_intrinsic( 3 );image_pose->m_cam_K << image_pose->fx, 0, image_pose->cx, 0, image_pose->fy, image_pose->cy, 0, 0, 1;scope_color( ANSI_COLOR_CYAN_BOLD );// cout << "Set Image Pose frm [" << image_pose->m_frame_idx << "], pose: " << eigen_q(rot_mat).coeffs().transpose()// << " | " << t_vec.transpose()// << " | " << eigen_q(rot_mat).angularDistance( eigen_q::Identity()) *57.3 << endl;// image_pose->inverse_pose();
}在上面的track_img函数中,特征点跟踪时会先用RANSAC求基础矩阵过滤误匹配。然后调用reject_error_tracking_pts()利用预测结果过滤错误匹配。这部分的操作基本和VINS当中光流过滤的操作类似,只是使用了RANSAC而并没有使用正反光流过滤而已。
void Rgbmap_tracker::track_img( std::shared_ptr< Image_frame > &img_pose, double dis, int if_use_opencv )
{Common_tools::Timer tim;m_current_frame = img_pose->m_img;      // 取图像m_current_frame_time = img_pose->m_timestamp;m_map_rgb_pts_in_current_frame_pos.clear();     // 当前帧跟踪到的地图点if ( m_current_frame.empty() )      // 检查图像是否为空return;cv::Mat frame_gray = img_pose->m_img_gray;      // 取灰度图tim.tic( "HE" );tim.tic( "opTrack" );std::vector< uchar > status;std::vector< float > err;// 取上一帧跟踪的像素点,并检查数量是否足够// TODO: 如果跟踪到的像素点越来越少怎么办?m_current_tracked_pts = m_last_tracked_pts;int before_track = m_last_tracked_pts.size();if ( m_last_tracked_pts.size() < 30 ){m_last_frame_time = m_current_frame_time;return;}// 调用LK_optical_flow_kernel::track_image,光流跟踪,输出跟踪后的像素点m_current_tracked_ptsm_lk_optical_flow_kernel->track_image( frame_gray, m_last_tracked_pts, m_current_tracked_pts, status, 2 );// 根据跟踪的结果,对容器进行裁减reduce_vector( m_last_tracked_pts, status );        // 成功跟踪的上一帧的点reduce_vector( m_old_ids, status );     // 成功跟踪的上一帧像素点所对应的地图点idxreduce_vector( m_current_tracked_pts, status );     // 当前帧成功跟踪的点int     after_track = m_last_tracked_pts.size();cv::Mat mat_F;tim.tic( "Reject_F" );unsigned int pts_before_F = m_last_tracked_pts.size();// 求基础矩阵Fmat_F = cv::findFundamentalMat( m_last_tracked_pts, m_current_tracked_pts, cv::FM_RANSAC, 1.0, 0.997, status );unsigned int size_a = m_current_tracked_pts.size();// 根据求解F矩阵的RANSAC结果,去除outliersreduce_vector( m_last_tracked_pts, status );reduce_vector( m_old_ids, status );reduce_vector( m_current_tracked_pts, status );m_map_rgb_pts_in_current_frame_pos.clear();// 距离上一次跟踪的时间double frame_time_diff = ( m_current_frame_time - m_last_frame_time );// 遍历跟踪成功的点,保存像素点坐标以及跟踪到的速度for ( uint i = 0; i < m_last_tracked_pts.size(); i++ ){// 用于跳过靠近图像边缘的点if ( img_pose->if_2d_points_available( m_current_tracked_pts[ i ].x, m_current_tracked_pts[ i ].y, 1.0, 0.05 ) ){// m_rgb_pts_ptr_vec_in_last_frame[ m_old_ids[ i ] ]表示索引为 i 的地图点的指针// 这里将地图点转化为RGB_pts指针RGB_pts *rgb_pts_ptr = ( ( RGB_pts * ) m_rgb_pts_ptr_vec_in_last_frame[ m_old_ids[ i ] ] );// 保存当前帧跟踪到的地图点m_map_rgb_pts_in_current_frame_pos[ rgb_pts_ptr ] = m_current_tracked_pts[ i ];// 计算像素点速度cv::Point2f pt_img_vel = ( m_current_tracked_pts[ i ] - m_last_tracked_pts[ i ] ) / frame_time_diff;// 保存数据到地图点rgb_pts_ptr->m_img_pt_in_last_frame = vec_2( m_last_tracked_pts[ i ].x, m_last_tracked_pts[ i ].y );    // 成功跟踪的上一帧点rgb_pts_ptr->m_img_pt_in_current_frame =vec_2( m_current_tracked_pts[ i ].x, m_current_tracked_pts[ i ].y );    // 成功跟踪的当前帧点rgb_pts_ptr->m_img_vel = vec_2( pt_img_vel.x, pt_img_vel.y );   // 像素点移动速度}}if ( dis > 0 ){reject_error_tracking_pts( img_pose, dis );}// 保存图像帧m_old_gray = frame_gray.clone();m_old_frame = m_current_frame;// 保存当前帧跟踪到的地图点m_map_rgb_pts_in_last_frame_pos = m_map_rgb_pts_in_current_frame_pos;// 遍历当前帧跟踪到的地图点,更新如下容器:// - m_last_tracked_pts 成功跟踪的上一帧点// - m_rgb_pts_ptr_vec_in_last_frame 成功跟踪的上一帧点对应的地图点容器// - m_colors// - m_old_ids 成功跟踪的上一帧点对应的地图点索引update_last_tracking_vector_and_ids();m_frame_idx++;m_last_frame_time = m_current_frame_time;
}