🎈个人主页:🎈 :✨✨✨初阶牛✨✨✨
🐻强烈推荐优质专栏: 🍔🍟🌯C++的世界(持续更新中)
🐻推荐专栏1: 🍔🍟🌯C语言初阶
🐻推荐专栏2: 🍔🍟🌯C语言进阶
🔑个人信条: 🌵知行合一
🍉本篇简介:>:讲解C++中STL中list简单使用.
目录
- 前言
- 一、构造函数:
- (1) 无参构造
- (2) 用n个val构造
- (3) 迭代器区间构造
- (4) 拷贝构造
- 二、访问数据
- (1) 迭代器
- (2) Element access:
- 三、修改(重点)
- (1) 头插/删 && 尾插/删
- (2) insert && erase
- 🍔insert
- 🍔erase
- (3) 迭代器失效问题
前言
官方查询文档
本文的目的主要是介绍list的常用接口,从构造函数,访问数据,修改数据等接口函数介绍.帮助大家初步掌握list的使用,后续会分享list的模拟实现,从底层理解list更加深刻的理解list.
一、构造函数:

| 函数模型 | 表头 |
|---|---|
| explicit list(const allocator_type & alloc = allocator_type()); | 无参构造 |
| explicit list(size_type n, const value_type & val = value_type()) | n个val初始化 |
| list(InputIterator first, InputIterator last) | 迭代器区间初始化 |
| list(const list & x); | 拷贝构造 |
学习了string和vector这里就不过多介绍了.
(1) 无参构造
测试代码:
void test1()
{//无参构造	explicit list(const allocator_type & alloc = allocator_type());list<int> L1;cout << "L1=";for (auto it : L1){cout << it << " ";}cout << endl;
}
运行结果:
L1=
(2) 用n个val构造
//使用n个val构造 explicit list(size_type n, const value_type & val = value_type())list<int> L2(5,2);cout << "L2=";for (auto it : L2){cout << it << " ";}cout << endl;
运行结果:
L2=2 2 2 2 2
(3) 迭代器区间构造
//迭代器区间构造//template <class InputIterator>//list(InputIterator first, InputIterator last)int arr[] = { 1,2,3,4,5,6,7,8,9,10 };list<int> L3(arr, arr + 10);cout << "L3=";for (auto it : L3){cout << it << " ";}cout << endl;
运行结果:
L3=1 2 3 4 5 6 7 8 9 10
(4) 拷贝构造
//拷贝构造 list(const list & x);cout << "L4=";list<int> L4(L3);//上面的 L3=1 2 3 4 5 6 7 8 9 10for (auto it : L4){cout << it << " ";}cout << endl;
运行结果:
L4=1 2 3 4 5 6 7 8 9 10
二、访问数据
(1) 迭代器
| 接口名 | 含义 |
|---|---|
| begin() | 返回第一个有效元素位置的迭代器 |
| end() | 返回最后一个有效元素位置的迭代器 |
(2) Element access:
| 接口名 | 含义 |
|---|---|
| front() | 返回list的第一个有效结点中存储的值的引用 |
| back() | 返回list的最后一个有效节点中存储的值的引用 |
测试代码:
void test2()
{//测试迭代器list<int> L1;L1.push_back(1);L1.push_back(4);L1.push_back(6);L1.push_back(8);L1.push_back(12);L1.push_back(20);list<int>::iterator it = L1.begin();while (it != L1.end()){cout << *it << " ";++it;}cout << endl;//Element access:cout << "front()=" << L1.front() << endl;	//返回list的第一个有效结点中存储的值的引用cout << "back()=" << L1.back() << endl;		//返回list的最后一个有效节点中存储的值的引用
}
运行结果:
1 4 6 8 12 20
front()=1
back()=20
三、修改(重点)
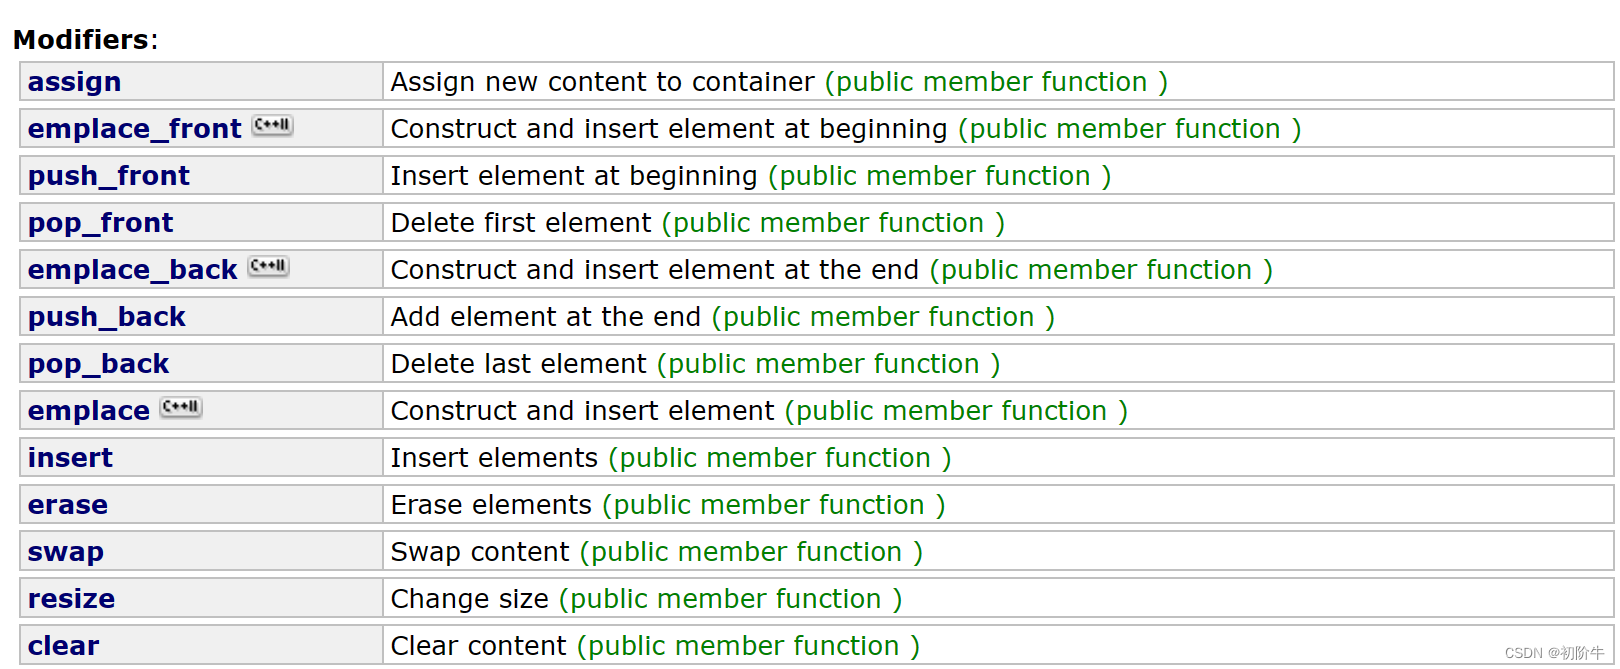
| 接口名 | 解释 |
|---|---|
| push_front | 头插 |
| pop_front | 头删 |
| push_back | 尾插 |
| pop_back | 尾删 |
| insert | 在list中的 pos 位置中插入值为val的元素 |
| erase | 删除list 中的pos位置的元素 |
| swap | 交换两个list |
| clear | 清除list中的有效数据 |
(1) 头插/删 && 尾插/删
void test3()
{list<int> L1;L1.push_back(1);L1.push_back(3);L1.push_back(4);L1.push_back(5);L1.push_back(7);L1.push_back(9);for (auto it : L1){cout << it << " ";}cout << endl;//头插	L1.push_front(0);L1.push_front(-1);cout << "依次头插0 和-1后:	";for (auto it : L1){cout << it << " ";}cout << endl;//头删L1.pop_front();cout << "头删一次后:		";for (auto it : L1){cout << it << " ";}cout << endl;//尾删L1.pop_back();L1.pop_back();cout << "尾删两次后:		";for (auto it : L1){cout << it << " ";}cout << endl;
}
运行结果:
1 3 4 5 7 9
依次头插0 和-1后:       -1 0 1 3 4 5 7 9
头删一次后:             0 1 3 4 5 7 9
尾删两次后:             0 1 3 4 5
(2) insert && erase
🍔insert

| 接口名 | 解释 |
|---|---|
| iterator insert (iterator position, const value_type& val); | 在pos位置插入值val |
| void insert (iterator position, size_type n, const value_type& val); | 在pos位置开始,插入n个val |
| void insert (iterator position, InputIterator first, InputIterator last); | 在pos位置插入,一个迭代器区间的值 |
由于list并不支持下标随机访问元素(" []"),所以,我们在使用迭代器的时候,避免使用
迭代器+ num
例如:L1.begin()+2
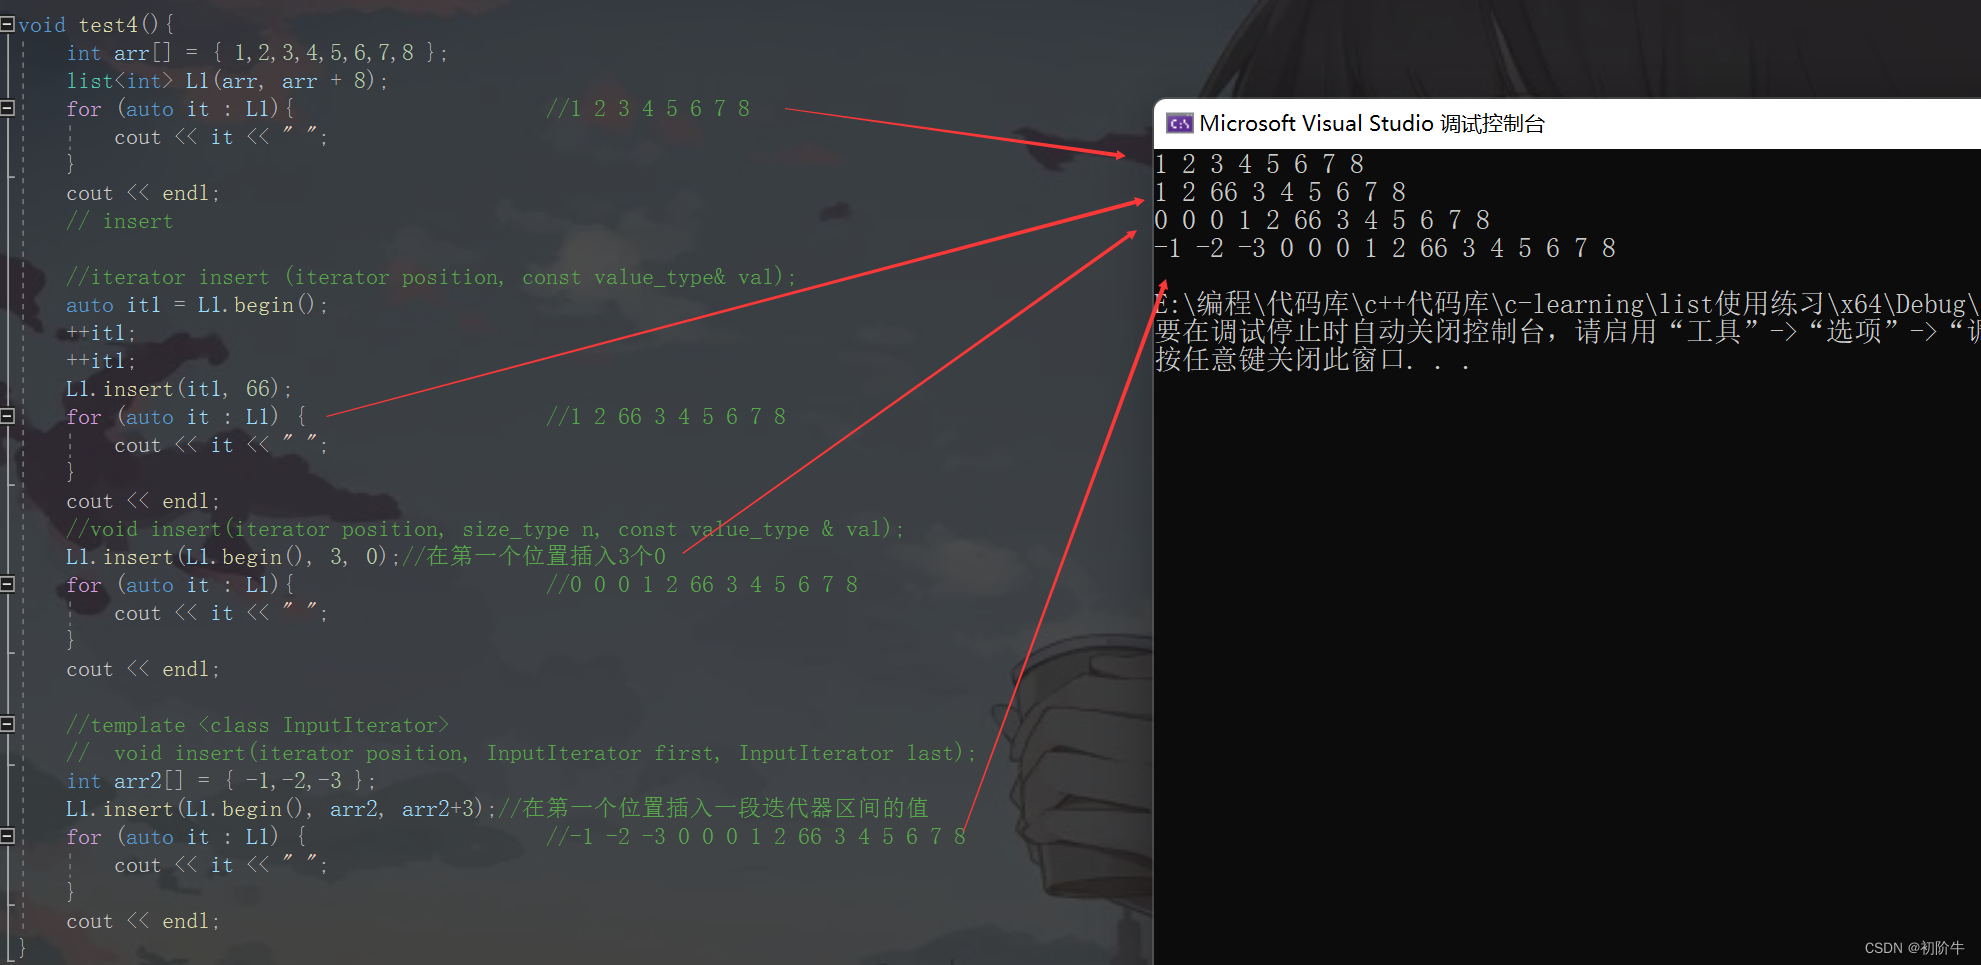
void test4()
{int arr[] = { 1,2,3,4,5,6,7,8 };list<int> L1(arr, arr + 8);for (auto it : L1)						//1 2 3 4 5 6 7 8{cout << it << " ";}cout << endl;// insert//iterator insert (iterator position, const value_type& val);\//list的迭代器不支持直接+=num//L1.insert(L1.begin()+2 ,66);	//报错auto it1 = L1.begin();++it1;++it1;L1.insert(it1, 66);for (auto it : L1)						//1 2 66 3 4 5 6 7 8{cout << it << " ";}cout << endl;//void insert(iterator position, size_type n, const value_type & val);L1.insert(L1.begin(), 3, 0);	//在第一个位置插入3个0for (auto it : L1)						//0 0 0 1 2 66 3 4 5 6 7 8{cout << it << " ";}cout << endl;//template <class InputIterator>//	void insert(iterator position, InputIterator first, InputIterator last);int arr2[] = { -1,-2,-3 };L1.insert(L1.begin(), arr2, arr2+3);	//在第一个位置插入一段迭代器区间的值for (auto it : L1)						//-1 -2 -3 0 0 0 1 2 66 3 4 5 6 7 8{cout << it << " ";}cout << endl;
}
🍔erase

| 接口名 | 解释 |
|---|---|
| iterator erase (iterator position); | 删除该迭代器位置的值 |
| iterator erase (iterator first, iterator last); | 删除迭代器区间中的值 |
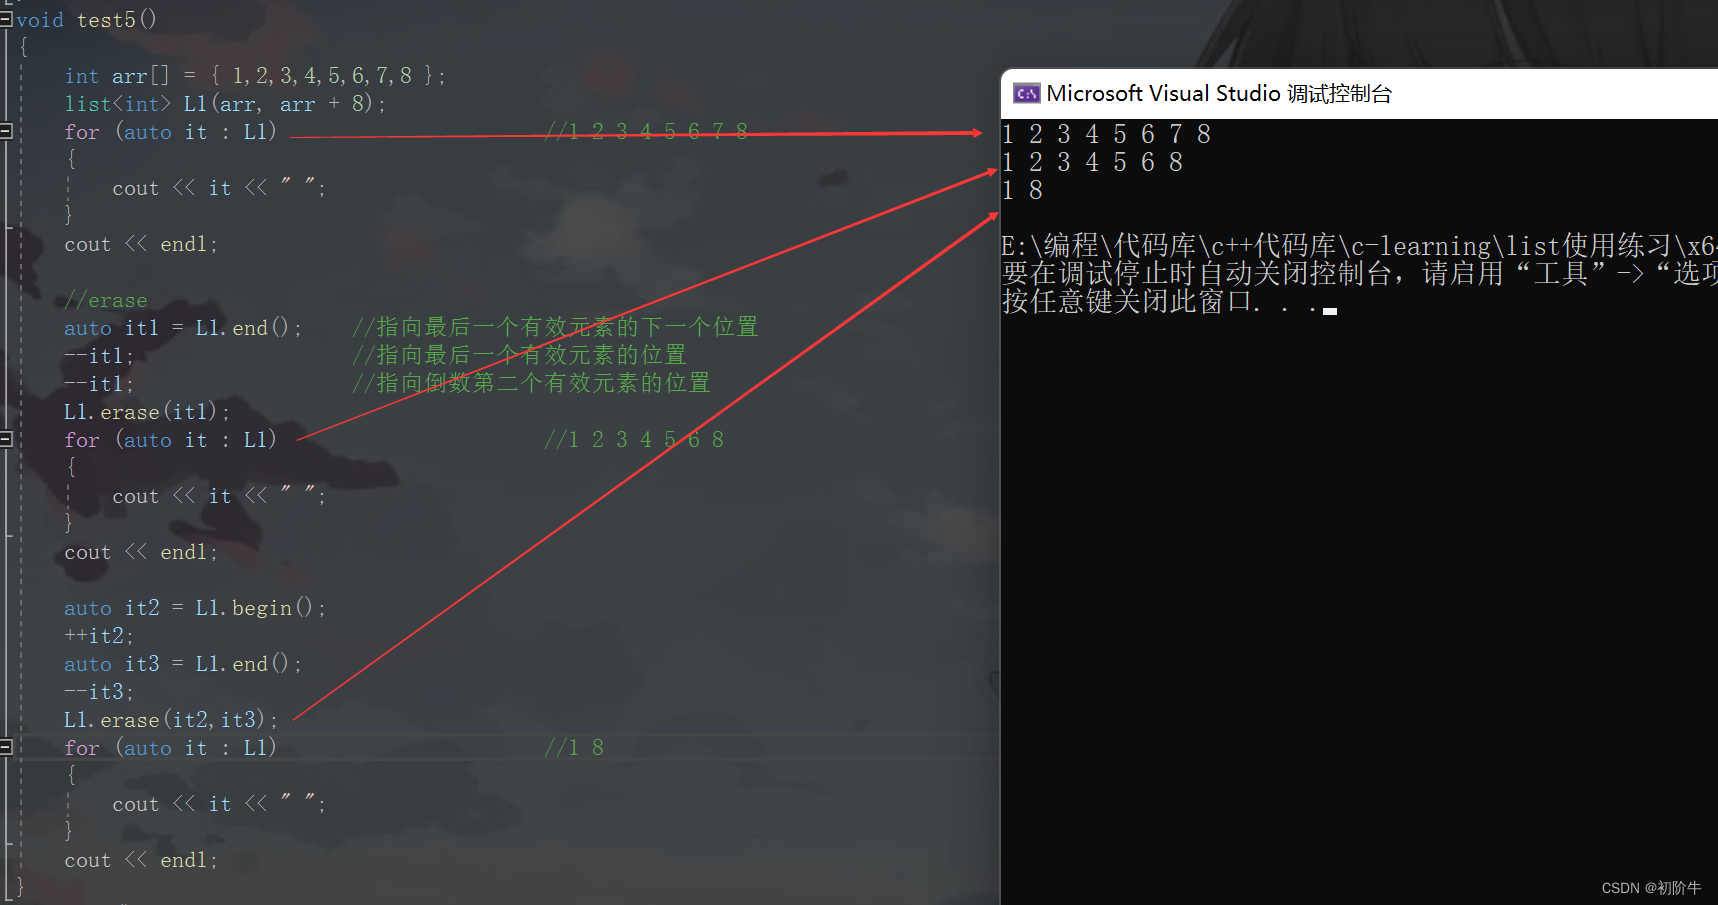
测试代码:
void test5()
{int arr[] = { 1,2,3,4,5,6,7,8 };list<int> L1(arr, arr + 8);for (auto it : L1)						//1 2 3 4 5 6 7 8{cout << it << " ";}cout << endl;//eraseauto it1 = L1.end();		//指向最后一个有效元素的下一个位置--it1;					//指向最后一个有效元素的位置--it1;					//指向倒数第二个有效元素的位置L1.erase(it1);for (auto it : L1)						//1 2 3 4 5 6 8{cout << it << " ";}cout << endl;auto it2 = L1.begin();++it2;auto it3 = L1.end();--it3;L1.erase(it2,it3);for (auto it : L1)						//1 8{cout << it << " ";}cout << endl;
}
(3) 迭代器失效问题
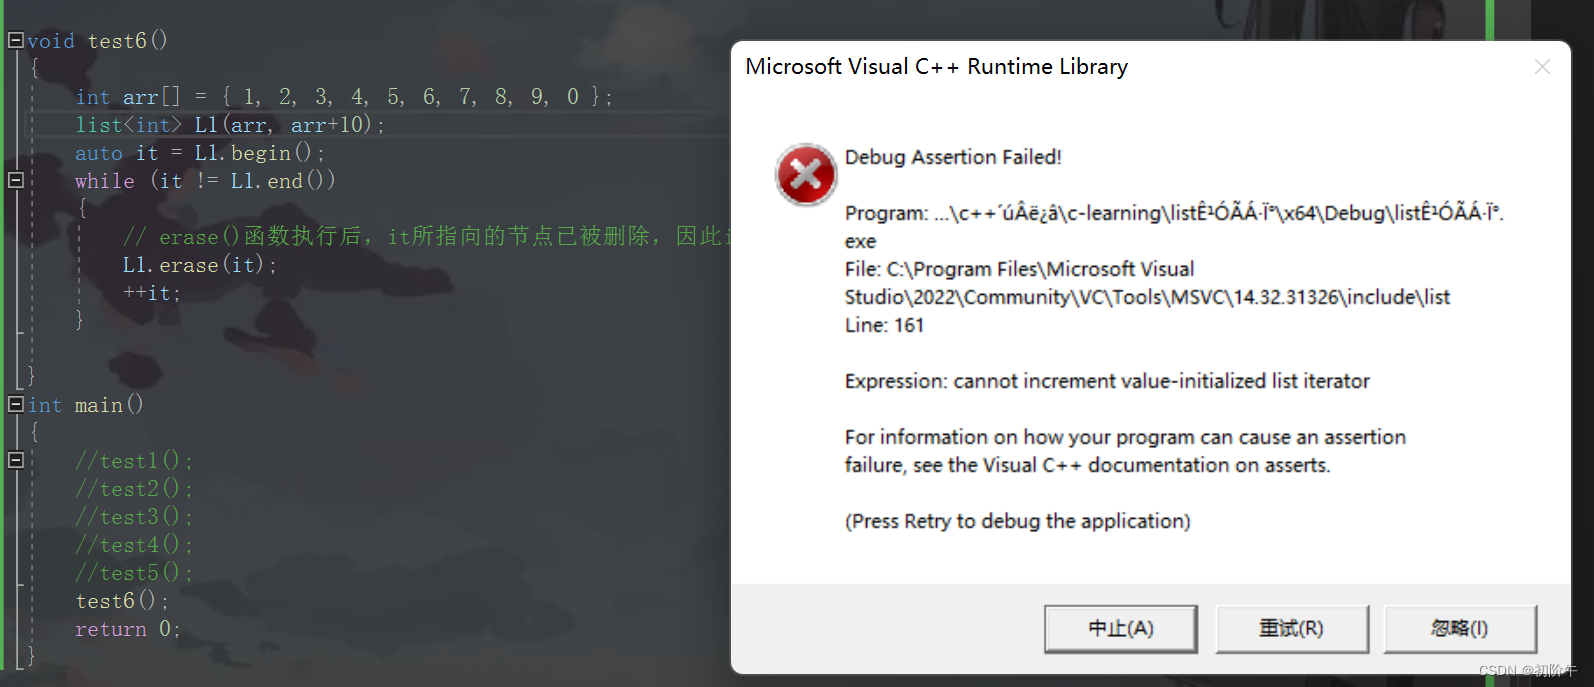
猜一猜这段代码的结果是什么?
void test6()
{int arr[] = { 1, 2, 3, 4, 5, 6, 7, 8, 9, 0 };list<int> L1(arr, arr + 10);auto it = L1.begin();auto it2 = L1.end();--it2;while (it != it2){// erase()函数执行后,it所指向的节点已被删除,因此it无效,在下一次使用it时,it就失效了L1.erase(it);++it;}cout << endl;
}

解释:
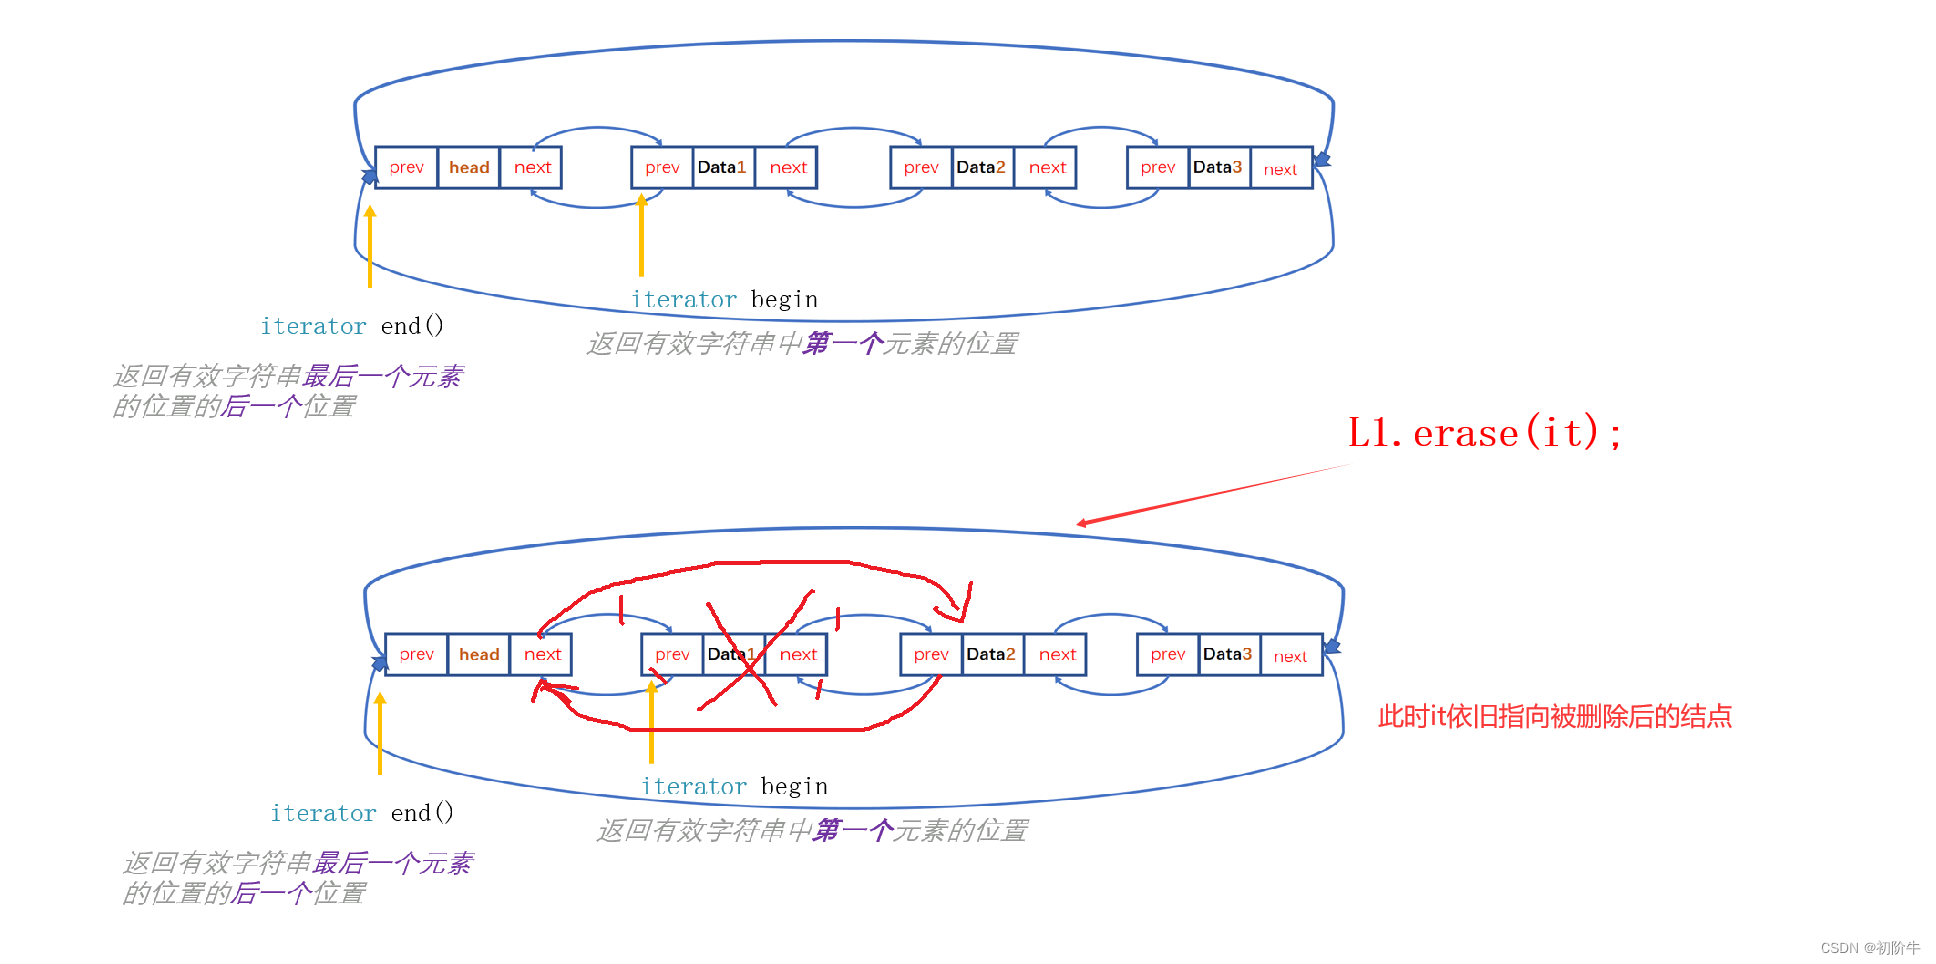
迭代器失效即迭代器所指向的节点的无效,即该节点被删除了。因为list的底层结构为带头结点的双向循环链表,插入并不会导致扩容而产生迭代器失效问题,只有在删除时才会失效,并且失效的只是指向被删除节点的迭代器,其他迭代器不会受到影响。
如下图:
那我该如何解决这个问题呢?

void test6()
{int arr[] = { 1, 2, 3, 4, 5, 6, 7, 8, 9, 10 };list<int> L1(arr, arr+10);auto it = L1.begin();auto it2 =L1.end();--it2;while (it != it2){it=L1.erase(it);}for (auto it : L1)						{cout << it << " ";}cout << endl;
}

下一篇,我们list模拟实现见吧!

