最近研究了使用 Redis 的位图功能统计日活周活等数据,特来和大家分享下,Redis 位图还可用于记录用户签到情况、判断某个元素是否存在于集合中等。
1 Redis 位图介绍
Redis 位图是一种特殊的数据结构,它由一系列位组成,每个位只能是0或1。在 Redis 中,位图可以用来存储和操作二进制数据。位图提供了一些特殊的命令,使得我们可以对位进行操作,如设置、清除、计数和查询等。
Redis位图的底层实现采用了稀疏数据结构,这意味着当位图中大部分位都是0时,Redis 只会占用很少的内存空间。这使得位图在处理大规模数据时非常高效。
简单来说,Redis 位图使用二进制减少了统计数据存储的内存,使用大用户规模的情况,理论层面就不多说了,接下来直接讲应用层面吧~
2 RedisTemplate 位图技术实现
Redis 位图操作有多种实现方式,比如 Jedis、RedisTemplate、StringRedisTemplate 等,本文主要介绍 RedisTemplate 方式,特别简单易实现,StringRedisTemplate 其实和 RedisTemplate 技术实现一致,而 Jedis 比较麻烦了。
简单介绍一下 RedisTemplate,作为 Spring Data Redis 提供的 Redis 客户端工具。它封装了 Redis 的操作流程和异常处理流程,使得 Redis 操作更加简单方便,同时也提供了 Redis 常用数据结构的操作方式。RedisTemplate 主要提供了对 String、List、Set、ZSet、Hash 数据结构的操作,支持序列化和反序列化的方式存储数据,同时支持事务操作,具有高并发性能,是开发人员使用 Redis 必不可少的组件之一。
2.1 redis 依赖
除了 spring-boot 就是下边这个依赖了,用其他的依赖也可,此处只做参考:
<dependency><groupId>org.springframework.boot</groupId><artifactId>spring-boot-starter-data-redis-reactive</artifactId>
</dependency>
2.2 添加配置
① application.yml
配置类写上 redis 地址:
spring:redis:database: 0host: 172.0.0.1port: 6379password: xxxx② FastJsonRedisSerializer
序列化配置类:
import com.alibaba.fastjson.JSON;
import com.alibaba.fastjson.parser.ParserConfig;
import com.alibaba.fastjson.serializer.SerializerFeature;
import com.fasterxml.jackson.databind.JavaType;
import com.fasterxml.jackson.databind.type.TypeFactory;
import org.springframework.data.redis.serializer.RedisSerializer;
import org.springframework.data.redis.serializer.SerializationException;import java.nio.charset.Charset;
import java.nio.charset.StandardCharsets;//Redis相关配置,Redis使用FastJson序列化
public class FastJsonRedisSerializer<T> implements RedisSerializer<T> {public static final Charset DEFAULT_CHARSET = StandardCharsets.UTF_8;private final Class<T> clazz;static {ParserConfig.getGlobalInstance().setAutoTypeSupport(true);}public FastJsonRedisSerializer(Class<T> clazz) {super();this.clazz = clazz;}@Overridepublic byte[] serialize(T t) throws SerializationException {if (t == null) {return new byte[0];}return JSON.toJSONString(t, SerializerFeature.WriteClassName).getBytes(DEFAULT_CHARSET);}@Overridepublic T deserialize(byte[] bytes) throws SerializationException {if (bytes == null || bytes.length <= 0) {return null;}String str = new String(bytes, DEFAULT_CHARSET);return JSON.parseObject(str, clazz);}protected JavaType getJavaType(Class<?> clazz) {return TypeFactory.defaultInstance().constructType(clazz);}
}
2.3 工具类实现位图操作
如下代码,省略了和位图没什么关系的方法,大家可任意使用以下方法:
import org.springframework.beans.factory.annotation.Autowired;
import org.springframework.data.redis.core.RedisCallback;
import org.springframework.data.redis.core.RedisTemplate;
import org.springframework.data.redis.core.ValueOperations;
import org.springframework.stereotype.Component;@Component
@SuppressWarnings(value = { "unchecked", "rawtypes" })
public class RedisCache {@Autowiredpublic RedisTemplate redisTemplate;/*** 缓存基本的对象,Integer、String、实体类等** @param key 缓存的键值* @param value 缓存的值*/public <T> void setCacheObject(final String key, final T value) {redisTemplate.opsForValue().set(key, value);}/*** 获得缓存的基本对象。** @param key 缓存键值* @return 缓存键值对应的数据*/public <T> T getCacheObject(final String key) {ValueOperations<String, T> operation = redisTemplate.opsForValue();return operation.get(key);}/*** 设置位图数据* @param key 键* @param id* @param bool*/public Boolean setBit(String key, long id, boolean bool){return redisTemplate.opsForValue().setBit(key, id, bool);}/*** 返回位图数据* @param key 键* @param id*/public Boolean getBit(String key, long id){return redisTemplate.opsForValue().getBit(key, id);}/*** bitCount 统计值对应位为1的数量* @param key redis key*/public Long bitCount(String key) {return (Long) redisTemplate.execute((RedisCallback<Long>) con -> con.bitCount(key.getBytes()));}/*** bitCount 统计值指定范围(范围为字节范围)对应位为1的数量* @param key redis key* @param start 开始字节位置(包含)* @param end 结束字节位置(包含)*/public Long bitCount(String key, long start, long end) {return (Long) redisTemplate.execute((RedisCallback<Long>) con -> con.bitCount(key.getBytes(), start, end));}
}
关于 redis 更多操作可参考:Docker 环境下安装 Redis 并连接 Spring 项目实现简单 CRUD
3 日活周活月活实践
3.1 日活
实现思路也是蛮简单的,第一点是确定 key,比如 20230923,那这就是该天的 key,第二点是确定 id,该 id 可以取自用户表的主键,也可用可唯一指定用户的数据替代。
以下是测试类实现:
@SpringBootTest(classes = Application.class)
@RunWith(SpringRunner.class)
public class test {@Autowiredprivate RedisCache redisCache;@Testpublic void testDayActive(){// 设置日活数据,模拟用户访问后台SimpleDateFormat dateFormat = new SimpleDateFormat("yyyyMMdd");String todayStr = dateFormat.format(new Date());//比如20230923redisCache.setBit(todayStr, 1, true);redisCache.setBit(todayStr, 5, true);// 统计当天日活数据,只会提取 true 的数量Long todayCount = redisCache.bitCount(todayStr);System.out.println(todayStr + "该天日活数据为:" + todayCount);}}
控制台输出👇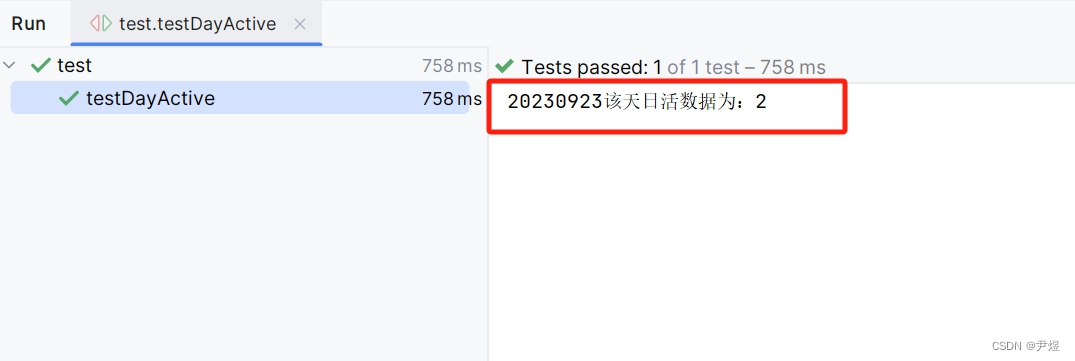
如此,日活就可实现了~
3.2 周活月活
思路就是日活的 for 循环累加,月活也可如此~
@Testpublic void testDayActive(){// 1.假设每天的数据已通过定时任务成功保存至redis// 2.获取这周的所有日期,如:[20230918, 20230919, 20230920, 20230921, 20230922, 20230923, 20230924]List<String> dateStrs = getWeekDay();long weekCount = 0L;for (String dateStr : dateStrs) {Long todayCount = redisCache.bitCount(dateStr);weekCount = weekCount + todayCount;}System.out.println("当前周日活数据为:" + weekCount);}public static List<String> getWeekDay() {Calendar calendar = Calendar.getInstance();while (calendar.get(Calendar.DAY_OF_WEEK) != Calendar.MONDAY) {calendar.add(Calendar.DAY_OF_WEEK, -1);}List<Date> dates = new ArrayList<>(7);for (int i = 0; i < 7; i++) { // i < 7 星期日dates.add(i, calendar.getTime());calendar.add(Calendar.DATE, 1);}List<String> dateStrs = new ArrayList<>();dates.forEach(date -> {SimpleDateFormat dateFormat = new SimpleDateFormat("yyyyMMdd");dateStrs.add(dateFormat.format(date));});return dateStrs;}