【 声明:版权所有,欢迎转载,请勿用于商业用途。 联系信箱:feixiaoxing @163.com】
上一篇文章我们说过,对于差速轮来说,旋转的计算很多程度上依赖于theta=tan(theta)这个公式来进行的。但是,我们也知道,如果机器人转弯很快的话,这个公式其实是不成立的。所以,对于旋转这件事情来说,我们能想到的,就是用IMU来对角度来进行补偿和计算的。

试想一下,如果在地面上,我们尚可通过电机的编码器数据计算来获取里程计数据信息,那么对于天上的飞机或者其他飞行器来说,就没有这个便利了。这个时候,IMU设备就派上用场了。IMU也称之为陀螺仪,有三轴、六轴、九轴之说。一般三轴IMU包括了三个方向的角度信息;六轴陀螺仪则在三轴的基础上,添加了三个方向的线加速度信息;九轴陀螺仪则在六轴陀螺仪的基础之上,进一步添加了三个方向的磁力计信息。对于速度不是特别高的机器人设备来说,实时获取三个方向的角度信息就可以了,简单处理就是和里程计做一个卡尔曼滤波即可。
1、ros下的imu消息格式
对于imu来说,我们可以通过index.ros.org网站,借助于关键词sensor_msgs,找到https://github.com/ros/common_msgs这个地址。进一步在sensor_msgs/msg/Imu.msg里面,就可以发现我们想找的信息。
Header headergeometry_msgs/Quaternion orientation
float64[9] orientation_covariance # Row major about x, y, z axesgeometry_msgs/Vector3 angular_velocity
float64[9] angular_velocity_covariance # Row major about x, y, z axesgeometry_msgs/Vector3 linear_acceleration
float64[9] linear_acceleration_covariance # Row major x, y z
除了通常的header之外,ros中的imu消息包还有三种数据。orientation是方向信息,不过是用四元数来表示的,orientation_covariance表示方向的协方差。angular_velocity是角速度信息,angular_velocity_vovariance是角速度的协方差。linear_acceleration是三个方向的线加速度,linear_acceleration_covariance是线加速度的协方差信息。一般来说,我们用的比较多的是orientation和angular_velocity。
2、编写测试代码imu_node.cpp
#include "ros/ros.h"
#include "sensor_msgs/Imu.h"
#include "tf/tf.h"void IMUCallback(sensor_msgs::Imu msg)
{if(msg.orientation_covariance[0] < 0){return;}tf::Quaternion quarternion(msg.orientation.x,msg.orientation.y,msg.orientation.z,msg.orientation.w);double roll;double pitch;double yaw;tf::Matrix3x3(quarternion).getRPY(roll, pitch, yaw);roll = roll*180.0f/M_PI;pitch = pitch*180.0f/M_PI;yaw = yaw*180.0f/M_PI;ROS_INFO("roll = %0.3f, pitch=%0.3f, yaw=%0.3f", roll, pitch, yaw);}int main(int argc, char* argv[])
{setlocale(LC_ALL, "");ros::init(argc, argv, "imu_node");ros::NodeHandle n;ros::Subscriber imu_sub = n.subscribe("/imu/data", 10, IMUCallback);ros::spin();return 0;
}
代码不复杂,主要是订阅/imu/data信息,回调函数是ImuCallback。在ImuCallback函数中,我们获取orientation的四元数信息。如果想要获取yaw信息,则要把quaternion转换成矩阵后,再用getRPY生成。这个时候yaw是弧度信息,如果要直观显示的话,需要进一步转成角度信息。
3、添加CMakeLists.txt内容
add_executable(imu_node src/imu_node.cpp)
target_link_libraries(imu_node ${catkin_LIBRARIES})
add_dependencies(imu_node beginner_tutorials_generate_messages_cpp)
4、编译生成imu_node
编译imu_node的方法很简单,就是直接输入catkin_make即可。
5、开始测试
测试之前,有几点需要注意。首先,利用roslaunch打开wpb_simple.launch,
roslaunch wpr_simulation wpb_simple.launch接着打开imu_node,当然在此之前最好输入./devel/setup.sh,
rosrun beginner_tutorials imu_node这个时候因为机器人还没有旋转,所以imu打印的参数中,都是信息为0。因此,我们可以继续输入rqt命令,让小车转起来,
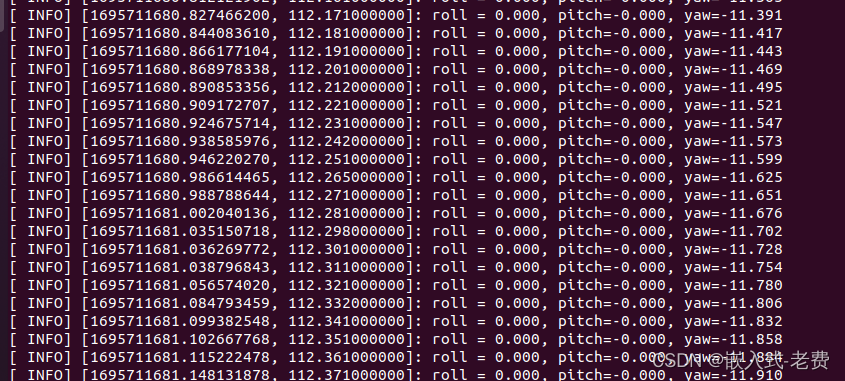
rosrun rqt_robot_steering rqt_robot_steering通过窗口输入旋转的命令,这个时候,就可以看到console的打印命令了,yaw数据也开始发生了变化。这说明我们的imu数据已经被采集到了。
