1、功能概述?
MybatisPlus框架提供了BaseMapper接口供我们使用,大大的方便了我们的基础开发,但是BaseMapper中提供的方法很多情况下不够用,这个时候我们依旧需要自定义SQL,也就是跟mybatis的用法相同,自定义xml映射文件。
本案例提供了三种比较经典的操作:查询全部数据/QueryWrapper使用方式/模糊查询
2、MyBatis-Plus概述
MyBatis-Plus (opens new window)(简称 MP)是一个 MyBatis (opens new window)的增强工具,在 MyBatis 的基础上只做增强不做改变,为简化开发、提高效率而生。
【技术储备】
拥有 Java 开发环境以及相应 IDE
熟悉 Spring Boot
熟悉 Maven
2.1、Mybatis-plus特性
无侵入:只做增强不做改变,引入它不会对现有工程产生影响,如丝般顺滑
损耗小:启动即会自动注入基本 CURD,性能基本无损耗,直接面向对象操作
强大的 CRUD 操作:内置通用 Mapper、通用 Service,仅仅通过少量配置即可实现单表大部分 CRUD 操作,更有强大的条件构造器,满足各类使用需求
支持 Lambda 形式调用:通过 Lambda 表达式,方便的编写各类查询条件,无需再担心字段写错
支持主键自动生成:支持多达 4 种主键策略(内含分布式唯一 ID 生成器 - Sequence),可自由配置,完美解决主键问题
支持 ActiveRecord 模式:支持 ActiveRecord 形式调用,实体类只需继承 Model 类即可进行强大的 CRUD 操作
支持自定义全局通用操作:支持全局通用方法注入( Write once, use anywhere )
内置代码生成器:采用代码或者 Maven 插件可快速生成 Mapper 、 Model 、 Service 、 Controller 层代码,支持模板引擎,更有超多自定义配置等您来使用
内置分页插件:基于 MyBatis 物理分页,开发者无需关心具体操作,配置好插件之后,写分页等同于普通 List 查询
分页插件支持多种数据库:支持 MySQL、MariaDB、Oracle、DB2、H2、HSQL、SQLite、Postgre、SQLServer 等多种数据库
内置性能分析插件:可输出 SQL 语句以及其执行时间,建议开发测试时启用该功能,能快速揪出慢查询
内置全局拦截插件:提供全表 delete 、 update 操作智能分析阻断,也可自定义拦截规则,预防误操作
2.2、数据库支持
任何能使用 MyBatis 进行 CRUD, 并且支持标准 SQL 的数据库,具体支持情况如下,如果不在下列表查看分页部分教程 PR 您的支持。
MySQL,Oracle,DB2,H2,HSQL,SQLite,PostgreSQL,SQLServer,Phoenix,Gauss ,ClickHouse,Sybase,OceanBase,Firebird,Cubrid,Goldilocks,csiidb,informix,TDengine,redshift
达梦数据库,虚谷数据库,人大金仓数据库,南大通用(华库)数据库,南大通用数据库,神通数据库,瀚高数据库,优炫数据库,星瑞格数据库
3、创建MybatisPlus -查询全部数据
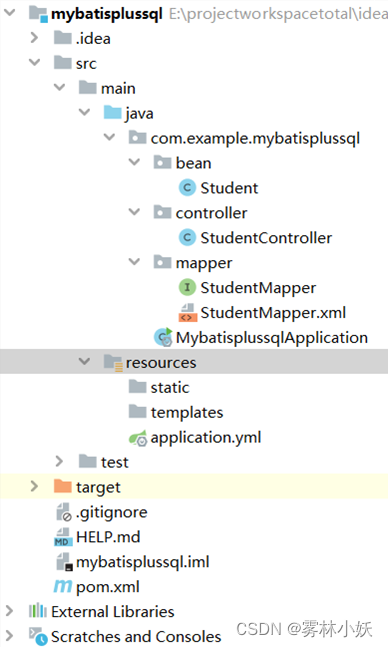
3.1、工程结构
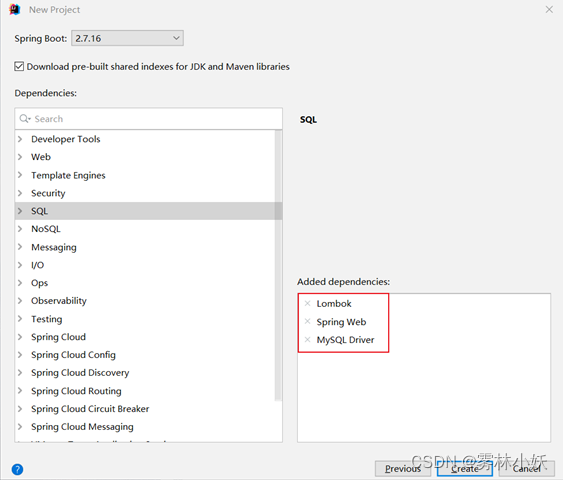
3.2、在IDEA中选择默认配置
选择默认的springboot配置+Lombok+mysql
3.3、工程的pom.xml文件
主要的包信息:springboot2.7.16+ mybatis-plus-boot-starter3.5.3.2+ mysql-connector-java5.1.42
<?xml version="1.0" encoding="UTF-8"?>
<project xmlns="http://maven.apache.org/POM/4.0.0" xmlns:xsi="http://www.w3.org/2001/XMLSchema-instance"xsi:schemaLocation="http://maven.apache.org/POM/4.0.0 https://maven.apache.org/xsd/maven-4.0.0.xsd"><modelVersion>4.0.0</modelVersion><parent><groupId>org.springframework.boot</groupId><artifactId>spring-boot-starter-parent</artifactId><version>2.7.16</version><relativePath/> <!-- lookup parent from repository --></parent><groupId>com.example</groupId><artifactId>mybatisplussql</artifactId><version>0.0.1-SNAPSHOT</version><name>mybatisplussql</name><description>mybatisplussql</description><properties><java.version>1.8</java.version></properties><dependencies><dependency><groupId>org.springframework.boot</groupId><artifactId>spring-boot-starter-web</artifactId></dependency><dependency><groupId>org.projectlombok</groupId><artifactId>lombok</artifactId><optional>true</optional></dependency><dependency><groupId>org.springframework.boot</groupId><artifactId>spring-boot-starter-test</artifactId><scope>test</scope></dependency><dependency><groupId>com.baomidou</groupId><artifactId>mybatis-plus-boot-starter</artifactId><version>3.5.3.2</version></dependency><dependency><groupId>mysql</groupId><artifactId>mysql-connector-java</artifactId><version>5.1.42</version></dependency></dependencies><build><plugins><plugin><groupId>org.springframework.boot</groupId><artifactId>spring-boot-maven-plugin</artifactId><configuration><excludes><exclude><groupId>org.projectlombok</groupId><artifactId>lombok</artifactId></exclude></excludes></configuration></plugin></plugins><resources><resource><directory>src/main/java</directory><includes><include>**/*.xml</include></includes></resource></resources></build></project>
3.4、创建数据库和表信息
CREATE DATABASE mybatisplus;USE mybatisplus;CREATE TABLE student(stu_id VARCHAR(50),stu_name VARCHAR(30),stu_sex VARCHAR(2),stu_age VARCHAR(4),stu_addr VARCHAR(50),stu_pwd VARCHAR(50))DEFAULT CHARSET=utf8;INSERT INTO student VALUES('1001','晓春','男','33','安徽合肥','1001');INSERT INTO student VALUES('1002','陈平安','男','18','安徽合肥','1002');3.5、application.yml配置信息
主要配置数据库连接和修改mybatisplus默认配置信息:
log-impl:控制台打印出mybatis执行时的具体sql、查询条件、返回值等
map-underscore-to-camel-case:mybatisplus在查询数据库的时候回默认的开启数据库下划线驼峰命名转化,我们需要关闭。
spring:datasource:driver-class-name: com.mysql.jdbc.Driverurl: jdbc:mysql://localhost:3306/mybatisplususername: rootpassword: 123456
mybatis-plus:configuration:log-impl: org.apache.ibatis.logging.stdout.StdOutImplmap-underscore-to-camel-case: false# 配置在src/main/java classpath:/com/*/*/mapper/*Mapper.xml# 配置在resource classpath:/mapper/**.xmlmapper-locations: classpath:/com/*/*/mapper/**.xml
3.6、创建bean对象
@TableId("stu_id")该属性如果不写,会导致mybatisplus中根据id查询数据的方法无法使用。
@TableName("student"):如果类名与表明相同,该属性可以不写
@Data
@AllArgsConstructor
@NoArgsConstructor
//定义映射数据表明,如果名称相同可以不写
@TableName("student")
public class Student {//定义student表主键@TableId("stu_id")private String stu_id;private String stu_name;private String stu_sex;private String stu_age;private String stu_addr;private String stu_pwd;
}
3.7、创建Mapper映射文件
MybatisPlus默认的配置文件是放在Resources下的mapper文件中。我们通过配置放在src目录下
具体配置在application.yml文件中:
mapper-locations: classpath:/com/*/*/mapper/**.xml
<?xml version="1.0" encoding="UTF-8" ?>
<!DOCTYPE mapperPUBLIC "-//mybatis.org//DTD Mapper 3.0//EN""http://mybatis.org/dtd/mybatis-3-mapper.dtd">
<mapper namespace="com.example.mybatisplussql.mapper.StudentMapper"><select id="findAll" resultType="com.example.mybatisplussql.bean.Student">select * from student</select>
</mapper>
3.8、映射文件配置注意点
如果映射文件配置在src的目录下,需要在pom文件中配置xml文件放行
<build >
<resources><resource><directory>src/main/java</directory><includes><include>**/*.xml</include></includes></resource></resources>
</build>
3.9、创建mapper接口
我们在创建接口的时候,需要遵循一些规范,规范如下:
规范1、接口的方法名称与映射文件中的id相同
规范2、接口的传入参数类型与parameterType相同,没有传入参数不写。
规范3、接口的传输参数类型与resultType类型相同,resultType中只写单条数据的数据类型。
规范4、映射文件的namespace与接口的全限定名称相同。
public interface StudentMapper extends BaseMapper<Student> {
public  List<Student>  findAll();
}
3.10、在启动类中配置扫描mapper文件
@SpringBootApplication
@MapperScan("com.example.mybatisplussql.mapper")
public class MybatisplussqlApplication {public static void main(String[] args) {SpringApplication.run(MybatisplussqlApplication.class, args);}
}
3.11、创建测试类
我这个地方的测试类直接使用的是springmvc进行测试,返回json类型的数据
@Controller
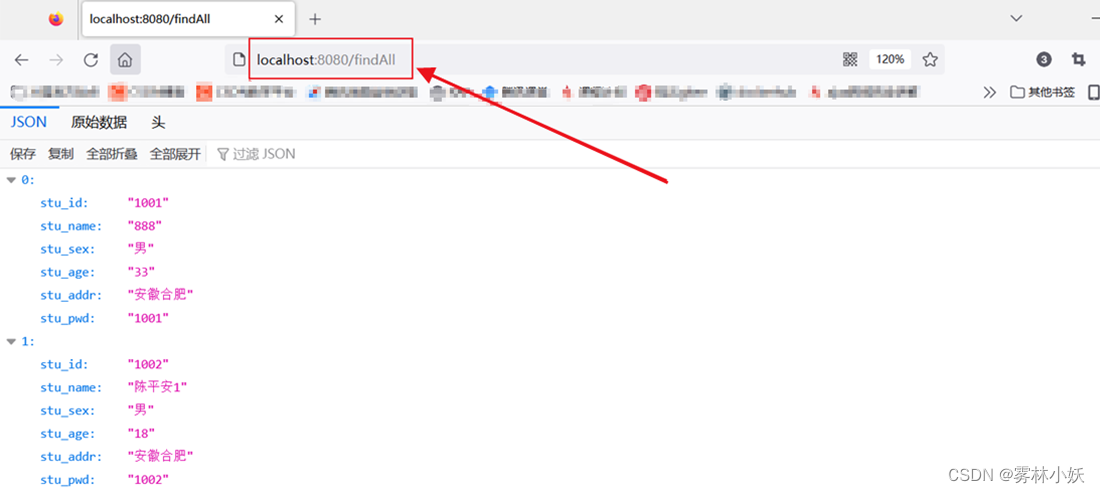
public class StudentController {@Autowired(required = false)StudentMapper studentMapper;@RequestMapping("/findAll")@ResponseBodypublic List<Student> findAll(){List<Student> list= studentMapper.findAll();return list;}
}
3.12、返回值信息信息如下
4、MybatisPlus中QueryWrapper使用方式
其他配置使用上面的即可
我们可以通过QueryWrapper定义我们需要的条件查询,映射文件中程序通过ew.customSqlSegment获取数据。
说明:本案例的优点在于,mybatisplus可以通过QueryWrapper中定义的参数,生成动态SQL
4.1、在StudentMapper.xml中创建查询
<?xml version="1.0" encoding="UTF-8" ?>
<!DOCTYPE mapperPUBLIC "-//mybatis.org//DTD Mapper 3.0//EN""http://mybatis.org/dtd/mybatis-3-mapper.dtd">
<mapper namespace="com.example.mybatisplussql.mapper.StudentMapper">
<select id="findStudentByWrapper" resultType="com.example.mybatisplussql.bean.Student">select * from student ${ew.customSqlSegment}</select>
</mapper>
4.2、在StudentMapper.java中创建接口
public interface StudentMapper extends BaseMapper<Student> {public List<Student> findStudentByWrapper(@Param(Constants.WRAPPER) QueryWrapper<Student> queryWrapper);
}
4.3、创建测试程序
QueryWrapper.eq:表示精准检索
QueryWrapper.like:表示模糊检索
@Controller
public class StudentController {@Autowired(required = false)StudentMapper studentMapper;@RequestMapping("/findStudentByWrapper")@ResponseBodypublic List<Student> findStudentByWrapper(){QueryWrapper wrapper = new QueryWrapper<Student>().eq("stu_id", "1001").like("stu_name", "晓春").eq("stu_sex","男");List<Student> list = studentMapper.findStudentByWrapper(wrapper);return list;}
}
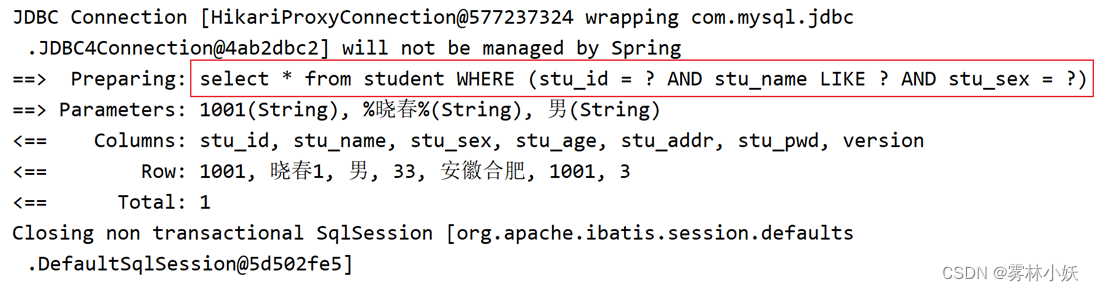
4.4、测试后,后台SQL语句生成如下
从这个生成的语句可以看出,由于我们在QueryWrapper中给了三个条件,SQL生成中的where后就是三个条件。
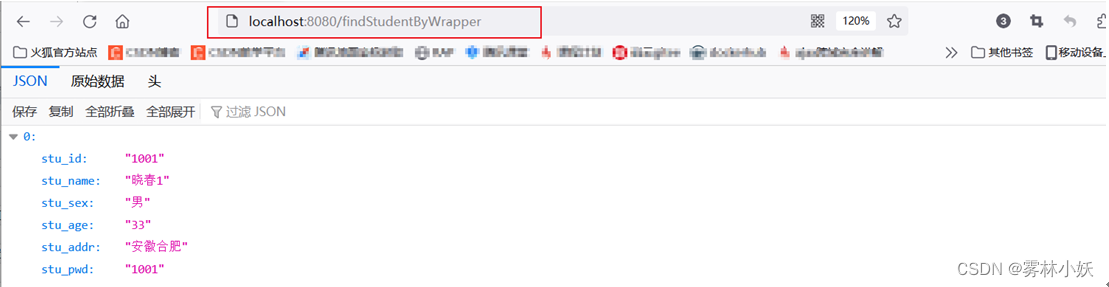
4.5、浏览器返回值
5、根据姓名模糊查询信息
5.1、在StudentMapper.xml中创建查询
<?xml version="1.0" encoding="UTF-8" ?>
<!DOCTYPE mapperPUBLIC "-//mybatis.org//DTD Mapper 3.0//EN""http://mybatis.org/dtd/mybatis-3-mapper.dtd">
<mapper namespace="com.example.mybatisplussql.mapper.StudentMapper"><select id="findStudentByName" parameterType="student" resultType="student">select *from studentwhere stu_name like concat('%',#{stu_name},'%')</select></mapper>
5.2、在StudentMapper.java中创建接口
public interface StudentMapper extends BaseMapper<Student> {//根据stu_name模糊查询数据public List<Student> findStudentByName(Student stu);
}
5.3、创建测试程序
@Controller
public class StudentController {@Autowired(required = false)StudentMapper studentMapper;@RequestMapping("/findStudentByName")@ResponseBodypublic List<Student> findStudentByName(){Student stu=new Student();stu.setStu_name("晓春");List<Student> list = studentMapper.findStudentByName(stu);return list;}
}
5.4、测试后,后台SQL语句
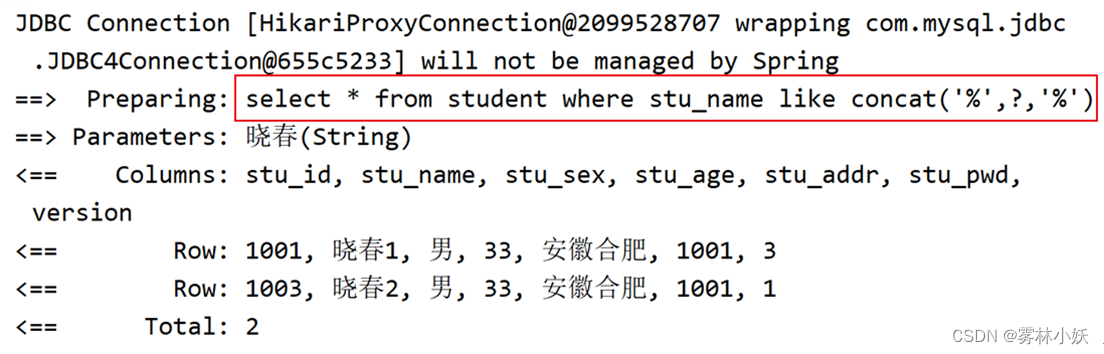
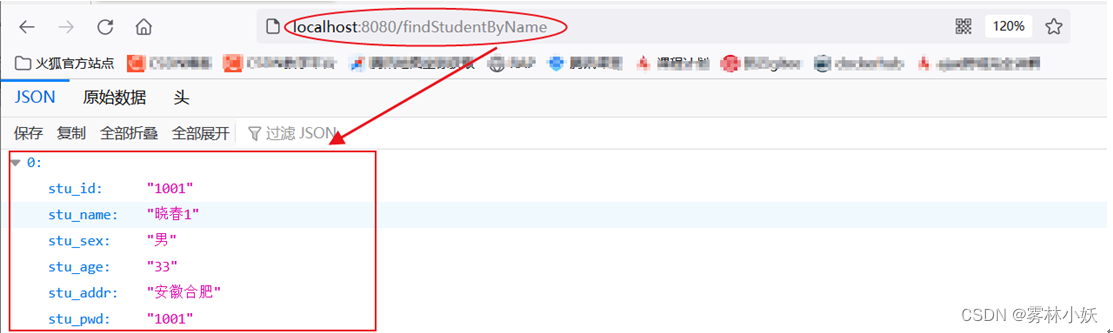
5.5、浏览器请求返回值
6、源码下载
源码下载地址:源码是vip资源,介意不要点
https://download.csdn.net/download/tangshiyilang/88380147