目录
一.Canvas元素
1.Canvas元素定义
2.使用JavaScript获取页面中的Canvas对象
二.绘制图形
1.绘制直线
2.绘制矩形
(1)rect()
(2)strokeRect()
(3)fillRect()和clearRect()函数
3.绘制圆弧
4.描边和填充
5.渐变颜色
6.透明颜色
三.绘制图像和文字
1.绘制图像
2.组合图
3.输出文字
4.图形操作
一.Canvas元素
Canvas是画布的意思,这个是HTML5中新出现的元素,可以在页面中定义一个画布,实现绘图功能
1.Canvas元素定义
语法:
<canvas id="xxx" height= width= >当浏览器不支持Canvas时,显示这里的文字</canvas>id 画布元素的标识
height 画布高
width 画布宽
例如定义一个画布:
<canvas id="canvas" width="600" height="960">浏览器不支持</canvas>2.使用JavaScript获取页面中的Canvas对象
在JavaScript中可以用document.getElementById()方法获取网页中的对象,获得对象后,通过getContext()函数获得对象的2d上下文对象,就可以在画布上进行绘画了
语法:
docment.getElementById(ObjectId)例:
<body>
<canvas id="canvas" width="600" height="960">浏览器不支持</canvas>
<script>var c=document.getElementById("canvas"); //获得画布对象var d=c.getContext("2d");  //获得2d上下文对象
</script>
</body>
二.绘制图形
1.绘制直线
beginPath() 开始绘图函数
moveTo() 该函数将坐标移动到指定坐标,函数参数为x,y
lineTo() 绘制直线
stroke() 绘制图形的边界轮廓
例如绘制三角形:
<!DOCTYPE html>
<html lang="en">
<head><meta charset="UTF-8"><title>Title</title><style></style>
</head>
<body>
<canvas id="canvas" width="600" height="960">浏览器不支持</canvas>
<script>function f() {var c=document.getElementById("canvas"); //获得画布对象var d=c.getContext("2d");  //获得2d上下文对象d.beginPath();   //开始绘图d.moveTo(100,0)     //将直线移动到绘图起点坐标d.lineTo(50,100);d.lineTo(150,100);d.lineTo(100,0);d.closePath();      //闭合路径,如果线的起点和终点连接,可以忽略这个方法d.stroke();         //绘制轮廓}window.addEventListener("load",f,false);
</script>
</body>
</html>
效果:

又例如绘制复杂图案:
<!DOCTYPE html>
<html lang="en">
<head><meta charset="UTF-8"><title>Title</title><style></style>
</head>
<body>
<canvas id="canvas" width="600" height="960">浏览器不支持</canvas>
<script>function f() {var c=document.getElementById("canvas"); //获得画布对象var d=c.getContext("2d");  //获得2d上下文对象var dx=150;var dy=150;var s=100;d.beginPath();   //开始绘图var x=Math.sin(0);var y=Math.cos(0);var dig=Math.PI/15*11;for(var i=0;i<30;i++){var x=Math.sin(i*dig);var y=Math.cos(i*dig);d.lineTo(dx+x*s,dy+y*s);}d.closePath();      //闭合路径,如果线的起点和终点连接,可以忽略这个方法d.stroke();         //绘制轮廓}window.addEventListener("load",f,true);
</script>
</body>
</html>
效果:

2.绘制矩形
可以通过rect()函数和strokeRect()函数绘制矩形,调用fillRect()填充指定矩形的区域,调用clearRect()可以擦除指定区域的矩形
(1)rect()
该函数用来绘制矩形,语法:
Rect(x,y,width,height)x,y 表示矩形的起点
width,height 表示矩形的长和宽
(2)strokeRect()
该函数和rect()函数差不多,都是绘制矩形,但该函数绘图时不需要像rect()一样调用beginPath()和closePath(),语法:
storkeRect(x,y,width,height)(3)fillRect()和clearRect()函数
fillRect()绘制有填充的矩形,语法:
fillRect(x,y,width,height)clearRect()清除矩形,语法:
clearRect(x,y,width,height)例如:
<!DOCTYPE html>
<html lang="en">
<head><meta charset="UTF-8"><title>Title</title><style></style>
</head>
<body>
<canvas id="canvas" width="600" height="960">浏览器不支持</canvas>
<script>function f() {var c=document.getElementById("canvas"); //获得画布对象var d=c.getContext("2d");  //获得2d上下文对象d.strokeRect(360,100,150,100)  //不需要调用beginPath和closePathd.beginPath();   //开始绘图d.rect(200,100,150,150);d.fillRect(200,260,150,150);  //代填充的矩形d.closePath();      //闭合路径,如果线的起点和终点连接,可以忽略这个方法d.stroke();         //绘制轮廓}window.addEventListener("load",f,true);
</script>
</body>
</html>
效果:

3.绘制圆弧
绘制圆弧函数arc(),语法:
arc(centerX,centerY,radius,startingAngle,endingAngle,antiClockwise);参数:
centerX 圆弧圆心的X坐标
centerY 圆弧圆心的Y坐标
radius 圆弧的半径
startingAngle 圆弧的起始角度
endingAngela 圆弧的结束角度
antiClockwise 是否按逆时针绘图
例如:
<!DOCTYPE html>
<html lang="en">
<head><meta charset="UTF-8"><title>Title</title><style></style>
</head>
<body>
<canvas id="canvas" width="600" height="960">浏览器不支持</canvas>
<script>function f() {var c=document.getElementById("canvas"); //获得画布对象var d=c.getContext("2d");  //获得2d上下文对象d.beginPath();   //开始绘图d.arc(150,150,100,1/3*Math.PI,2/3*Math.PI,true);// d.arc(150,450,100,0,2*Math.PI,true);d.closePath();      //闭合路径,如果线的起点和终点连接,可以忽略这个方法d.stroke();         //绘制轮廓}window.addEventListener("load",f,true);
</script>
</body>
效果:

4.描边和填充
Canvas的2d上下文对象的strokeStyle属性可以设置描边的颜色,lineWidth属性可以指定描边的宽度,fillStyle属性可以设置填充的颜色
例如绘制一个红边的圆和黄色的矩形:
<!DOCTYPE html>
<html lang="en">
<head><meta charset="UTF-8"><title>Title</title><style></style>
</head>
<body>
<canvas id="canvas" width="600" height="960">浏览器不支持</canvas>
<script>function f() {var c=document.getElementById("canvas"); //获得画布对象var d=c.getContext("2d");  //获得2d上下文对象d.lineWidth=10;d.strokeStyle="red";d.fillStyle="yellow";d.arc(300,100,60,0,2*Math.PI,false)d.fillRect(250,200,100,100);d.closePath();      //闭合路径,如果线的起点和终点连接,可以忽略这个方法d.stroke();         //绘制轮廓}window.addEventListener("load",f,true);
</script>
</body>
效果:

5.渐变颜色
CanvasGradient用于定义画布中一个渐变颜色的对象,使用渐变颜色前要创建对象,渐变颜色对象可以通过两种方式创建:
(1)以线性颜色渐变方式创建CanvasGradient对象,函数createLinearGradient()语法:
createLinearGradient(xStrat,yStrat,xEnd,yEnd)其中的参数分别是线性开始的坐标和结束的坐标
(2)以放射颜色渐变方式创建CanvasGradient对象,函数createRadiaGradient()语法:
createRadiaGradient(xStart,yStart,radiusStart,xEnd,yEnd,radiusEnd)参数:
xStart,yStart 开始圆的圆心坐标
radiusStart 开始圆的半径
xEnd,yEnd 结束圆的圆心坐标
radiusEnd 结束圆的半径
(3)为渐变对象设置颜色
创建渐变颜色对象后,可以通过CanvasGradient属性的addColorStop()方法在渐变的某个点添加一个颜色变化,语法:
addColorStop(offset,color)offset 一个范围在0到1之间的浮点值,表示渐变的开始和结束的一部分
color 表示offset到颜色
(4)设置描边样式为渐变颜色
只要将前面创建的CanvasGradient对象赋值给Canvas的上下文2d对象就可以使用渐变颜色进行描边了
例如:
<!DOCTYPE html>
<html lang="en">
<head><meta charset="UTF-8"><title>Title</title>
</head>
<body>
<canvas id="canvas" width="600" height="960">浏览器不支持</canvas>
<script>function f() {var c=document.getElementById("canvas"); //获得画布对象var d=c.getContext("2d");  //获得2d上下文对象var e=d.createRadialGradient(100,100,0,100,100,100);e.addColorStop(0,"red");e.addColorStop(0.5,"green");e.addColorStop(1,"yellow");var centerx=100;var centery=100;var radius=100;var startingAngle=0;var endingAngle=2*Math.PI;d.beginPath();d.arc(centerx,centery,radius,startingAngle,endingAngle,false);d.fillStyle=e;d.stroke(); //绘制轮廓d.fill();}window.addEventListener("load",f,true);
</script>
</body>
效果:

6.透明颜色
在指定颜色时可以使用rgba()方法定义颜色透明度,语法:
rgba(r,g,b,alpha)参数: r表示红色集合,b表示绿色集合,b表示蓝色集合,它们都是十进制数,范围在0~255
alpha表示透明度,取值范围0~1
例如:
<!DOCTYPE html>
<html lang="en">
<head><meta charset="UTF-8"><title>Title</title>
</head>
<body>
<canvas id="canvas" width="600" height="960">浏览器不支持</canvas>
<script>function f() {var canvas=document.getElementById("canvas"); //获得画布对象if(canvas == null) return false;var context=canvas.getContext("2d");// 绘制底图context.fillStyle="yellow";context.fillRect(0,0,400,350);// 循环绘制10个圆var n=0;for(var i=0;i<10;i++){context.beginPath();context.arc(i*25,i*25,i*10,0,2*Math.PI,true);context.fillStyle="rgba(255,0,0,0.5)";context.fill();  //填充图形}}window.addEventListener("load",f,true);
</script>
</body>
效果:

三.绘制图像和文字
1.绘制图像
Canvas画布绘制图像的方法是drawImage(),语法:
drawImage(image,x,y)
drawImage(image,x,y,width,height)
drawImage(image,sourceX,sourceY,sourceWidth,sourceHeight,destX,destY,destWidth,destHeight)
image 要绘制的图像
x,y 要绘制图像的左上角
width,height 绘制图像的宽和高
sourceX,sourceY 图像将要被绘制的区域的左上角
sourceWidth,sourceHeight 被绘制的原图像区域
destX,destY 要绘制图像区域的左上角的画布坐标
destWidth,destHeight 图像区域在画布上要绘制的大小
例如:
<!DOCTYPE html>
<html lang="en">
<head><meta charset="UTF-8"><title>Title</title><style></style>
</head>
<body>
<canvas id="canvas" width="2000" height="1000">浏览器不支持</canvas>
<script>function f() {var c=document.getElementById("canvas"); //获得画布对象var ctx=c.getContext("2d");  //获得2d上下文对象var ImageObj=new Image();ImageObj.src="mn1.png";ImageObj.onload=function () {ctx.drawImage(ImageObj,0,0)  //原图大小ctx.drawImage(ImageObj,980,0,480,300) //原图一半显示//  从原图(500,0)处截取一个300x300的图像大小,在(980,350)处显示,显示大小为300x300ctx.drawImage(ImageObj,500,0,300,300,980,350,300,300);};}window.addEventListener("load",f,true);
</script>
</body>
</html>
效果:

2.组合图
如果画布上已经有图形了,再放一个时,我们就要考虑图片的组合问题,Canvas的2d上下文对象的gloalCompositeOperation属性可以来设置组合方式,该属性参数如下:
| 参数 | 描述 |
| source-over | 默认值,新图会覆盖在原图上 |
| destination-over | 在原有内容之下显示图像 |
| source-in | 新图仅仅出现与原内容重复的部分,其他区域变透明 |
| destination-in | 原有内容和新图不重复的部分会被保留 |
| source-atop | 新图像中与原内容重复的部分会被绘制,并覆盖原有内容上 |
| destination-atop | 原有内容和新图像重复部分会被保留,并会在原有内容之下绘制图形 |
| source-in | 只有新图和原内容不重复的部分会被绘制出来 |
| destination-in | 原有内容和新图不重复部分会被保留 |
| lighter | 两图像中重复的部分作加色处理 |
| darker | 两图像中重复的部分作减色处理 |
| xor | 重复部分会变透明 |
| copy | 只有新图像会被保留,其他都被清除 |
例如:
<!DOCTYPE html>
<html lang="en">
<head><meta charset="UTF-8"><title>Title</title>
</head>
<body>
<canvas id="canvas" width="2000" height="1000">浏览器不支持</canvas>
<script>function draw(){var c=document.getElementById("canvas");var ctx=c.getContext("2d");ctx.fillStyle="blue";ctx.fillRect(0,0,100,100);ctx.fillStyle="red";ctx.globalCompositeOperation="source-over";var centerX=100;var centerY=100;var radius=50;var startingAngle=0;var endingAngle=2*Math.PI;ctx.beginPath();ctx.arc(centerX,centerY,radius,startingAngle,endingAngle,false);ctx.fill();}window.addEventListener("load",draw,true);
</script>
</body>
</html>
效果:

source-over

destination-over

source-in

destination-in

source-out

destination-out

source-atop

source-atop

lighter

xor

copy
3.输出文字
(1)输出
使用strokeText()方法可以在画布的指定文字输出文字,语法:
stroketText(string text,float x,float y)参数: text 文字 x,y 文字输出位置
例如:
<!DOCTYPE html>
<html lang="en">
<head><meta charset="UTF-8"><title>Title</title>
</head>
<body>
<canvas id="canvas" width="2000" height="1000">浏览器不支持</canvas>
<script>function draw(){var c=document.getElementById("canvas");var ctx=c.getContext("2d");ctx.strokeText("hello world-----hello time",200,200);}window.addEventListener("load",draw,true);
</script>
</body>
</html>
效果:

(2)设置字体
通过Context.font属性设置字符串字体,格式:
Context.font=“字体大小 字体名称”例:
var c=document.getElementById("canvas");var ctx=c.getContext("2d");ctx.font="10pt 黑体";ctx.strokeText("你好世界!你好时光!",200,200);
(3)设置边框宽度和颜色
stokeStyle设置文字的颜色
(4)填充文字内部
使用strokeText方法输出的文字是中空的,只绘制了边框,如果要填充文字内部,可以使用fillText() 方法,语法:
fillText(string text,float x,float y)也可以使用fillstyle属性来设置填充颜色
ctx.fiilStyle="blue";例如渐变填充颜色:
<!DOCTYPE html>
<html lang="en">
<head><meta charset="UTF-8"><title>Title</title>
</head>
<body>
<canvas id="canvas" width="2000" height="1000">浏览器不支持</canvas>
<script>function draw(){var c=document.getElementById("canvas");var ctx=c.getContext("2d");var Colordiagonal=ctx.createLinearGradient(100,100,900,100);Colordiagonal.addColorStop(0,"yellow");Colordiagonal.addColorStop(0.5,"green");Colordiagonal.addColorStop(1,"red");ctx.fillStyle=Colordiagonal;ctx.font="60pt 隶书";ctx.fillText("你好世界!你好时光!",100,100);}window.addEventListener("load",draw,true);
</script>
</body>
</html>
效果:

4.图形操作
(1)保持和恢复绘图状态
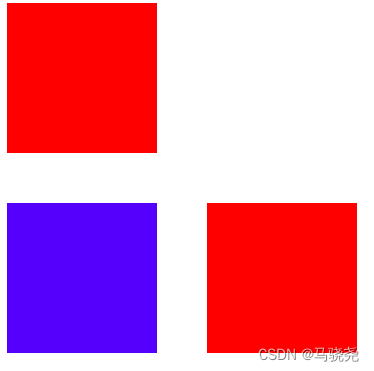
调用Context.save()方法可以保持当前的绘图状态,绘图状态是以堆的方式保存,调用Context.restoe()方法弹出之前保存的绘制状态,这两个方法没有参数
例如:
<!DOCTYPE html>
<html lang="en">
<head><meta charset="UTF-8"><title>Title</title>
</head>
<body>
<canvas id="canvas" width="2000" height="1000">浏览器不支持</canvas>
<script>function draw(){var c=document.getElementById("canvas");var ctx=c.getContext("2d");ctx.fillStyle='red';ctx.fillRect(0,0,150,150);  //红色矩形ctx.save();   //保存绘图状态ctx.fillStyle="blue";ctx.fillRect(0,200,150,150);  //蓝色的矩形ctx.restore();   //恢复之前保存的绘图状态,即红色ctx.fillRect(200,200,150,150)}window.addEventListener("load",draw,true);
</script>
</body>
</html>
效果:
(2)图形变换
a.平移translate(x,y)
参数x和y表示从原点分别平移的位移
b.缩放scale(x,y)
参数x和y表示坐标轴缩放比例
c.旋转rotate(angle)
参数angle是坐标轴旋转的角度
d.变形setTransform()
语法:
setTransform(m1,m2,m3,m4,dx,dy)表示点(x,y)变换到点(X,Y),变换过程:
X=m1*x+m3*y+dx,Y=m2*x+m4*y+dy
例如:
<!DOCTYPE html>
<html lang="en">
<head><meta charset="UTF-8"><title>Title</title>
</head>
<body>
<canvas id="canvas" width="2000" height="1000">浏览器不支持</canvas>
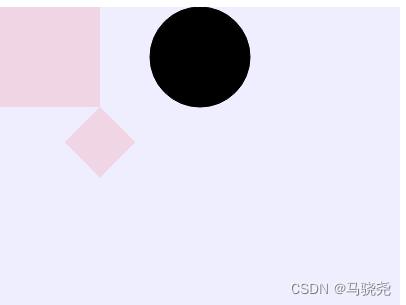
<script>function draw(){var c=document.getElementById("canvas");var context=c.getContext("2d");context.save();context.fillStyle="#EEEEFF";context.fillRect(0,0,400,300);context.fillStyle="rgba(255,0,0,0.1)";context.fillRect(0,0,100,100);context.translate(100,100);context.scale(0.5,0.5);context.rotate(Math.PI/4);context.fillRect(0,0,100,100);context.restore();context.beginPath();context.arc(200,50,50,0,2*Math.PI,false);context.stroke();context.fill();}window.addEventListener("load",draw,true);
</script>
</body>
</html>
效果:












![[杂谈]-ESP32中的无线通信协议](https://img-blog.csdnimg.cn/41084ba4c9144cf782f0c7d8d65e6457.webp#pic_center)