这里我就简单的聊几句,如何用vertx web来搞一个web项目的
1、首先先引入几个依赖,这里我就用maven了,这个是kotlin+vertx web
<?xml version="1.0" encoding="UTF-8"?>
<project xmlns="http://maven.apache.org/POM/4.0.0"xmlns:xsi="http://www.w3.org/2001/XMLSchema-instance"xsi:schemaLocation="http://maven.apache.org/POM/4.0.0 http://maven.apache.org/xsd/maven-4.0.0.xsd"><modelVersion>4.0.0</modelVersion><groupId>org.example</groupId><artifactId>kotlin-vertx</artifactId><version>1.0-SNAPSHOT</version><properties><maven.compiler.source>17</maven.compiler.source><maven.compiler.target>17</maven.compiler.target><project.build.sourceEncoding>UTF-8</project.build.sourceEncoding><kotlin.version>1.8.20</kotlin.version></properties><dependencies><dependency><groupId>io.vertx</groupId><artifactId>vertx-core</artifactId></dependency><dependency><groupId>io.vertx</groupId><artifactId>vertx-codegen</artifactId></dependency><dependency><groupId>io.vertx</groupId><artifactId>vertx-service-proxy</artifactId></dependency><dependency><groupId>io.vertx</groupId><artifactId>vertx-web</artifactId></dependency><dependency><groupId>io.vertx</groupId><artifactId>vertx-auth-common</artifactId></dependency><dependency><groupId>ch.qos.logback</groupId><artifactId>logback-classic</artifactId><version>1.2.3</version></dependency><dependency><groupId>org.jetbrains.kotlinx</groupId><artifactId>kotlinx-coroutines-core</artifactId><version>1.7.1</version></dependency><dependency><groupId>org.jetbrains.kotlin</groupId><artifactId>kotlin-stdlib-jdk8</artifactId><version>${kotlin.version}</version></dependency><dependency><groupId>org.jetbrains.kotlin</groupId><artifactId>kotlin-test</artifactId><version>${kotlin.version}</version><scope>test</scope></dependency></dependencies><build><plugins><plugin><groupId>org.jetbrains.kotlin</groupId><artifactId>kotlin-maven-plugin</artifactId><version>${kotlin.version}</version><executions><execution><id>compile</id><phase>compile</phase><goals><goal>compile</goal></goals><configuration><sourceDirs><source>src/main/java</source><source>target/generated-sources/annotations</source></sourceDirs></configuration></execution><execution><id>test-compile</id><phase>test-compile</phase><goals><goal>test-compile</goal></goals></execution></executions><configuration><jvmTarget>${maven.compiler.target}</jvmTarget></configuration></plugin><plugin><groupId>org.apache.maven.plugins</groupId><artifactId>maven-compiler-plugin</artifactId><executions><execution><id>default-compile</id><phase>none</phase></execution><execution><id>default-testCompile</id><phase>none</phase></execution><execution><id>compile</id><phase>compile</phase><goals><goal>compile</goal></goals></execution><execution><id>testCompile</id><phase>test-compile</phase><goals><goal>testCompile</goal></goals></execution></executions></plugin></plugins></build><dependencyManagement><dependencies><dependency><groupId>io.vertx</groupId><artifactId>vertx-dependencies</artifactId><version>4.4.4</version><type>pom</type><scope>import</scope></dependency></dependencies></dependencyManagement></project>
2、先创建一个简单的httpweb
package org.example.kotlin_webimport io.vertx.core.AbstractVerticle
import io.vertx.core.Vertx
import io.vertx.core.http.HttpServerOptions
import io.vertx.ext.web.Router
import kotlinx.coroutines.delayclass HttpWeb : AbstractVerticle() {override fun start() {var router = Router.router(vertx);router.get("/hello").handler { context ->context.response().end("Hello World")};vertx.createHttpServer().requestHandler(router).listen(8080)}
}
fun main(){var vertx = Vertx.vertx();vertx.deployVerticle(HttpWeb())
}
这里用了路由,也就是说访问localhost:8080/hello 它会输出Hello World,这个是get请求
3、get请求带参数
package org.example.kotlin_webimport io.vertx.core.AbstractVerticle
import io.vertx.core.Vertx
import io.vertx.ext.web.Routerclass HttpWeb : AbstractVerticle() {override fun start() {var router = Router.router(vertx);router.get("/hello").handler { ctx ->val name: String = ctx.request().getParam("name")// 处理逻辑val message = "Hello, $name!"// 返回响应ctx.response().end(message)};vertx.createHttpServer().requestHandler(router).listen(8080)}
}
fun main(){var vertx = Vertx.vertx();vertx.deployVerticle(HttpWeb())
}
可以看到非常简单

4、post请求带参数
package org.example.kotlin_webimport io.vertx.core.AbstractVerticle
import io.vertx.core.Vertx
import io.vertx.core.buffer.Buffer
import io.vertx.ext.web.Router
import io.vertx.ext.web.RoutingContext
import io.vertx.ext.web.handler.StaticHandlerclass HttpWeb : AbstractVerticle() {override fun start() {var router = Router.router(vertx);router.route().handler(StaticHandler.create("src/main/resources/static").setCachingEnabled(false).setDefaultContentEncoding("UTF-8"));router.get("/hello").handler { ctx ->val name: String = ctx.request().getParam("name")// 处理逻辑val message = "Hello, $name!"// 返回响应ctx.response().end(message)};router.post().path("/index").handler { ctx: RoutingContext ->val request = ctx.request()val response = ctx.response()response.putHeader("Content-Type", "text/plain; charset=utf-8")val formAttributes = request.formAttributes()request.bodyHandler { body: Buffer ->val formData = body.toString()println("Received form data: $formData")response.setStatusCode(200)response.end("Form submitted successfully")}}vertx.createHttpServer().requestHandler(router).listen(8080)}
}
fun main(){var vertx = Vertx.vertx();vertx.deployVerticle(HttpWeb())
}![]()
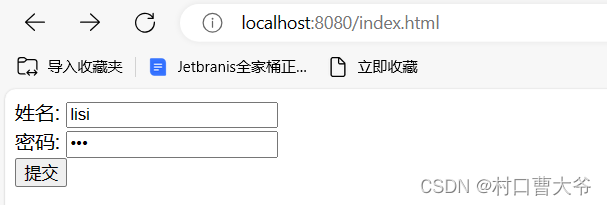
index.html
<!DOCTYPE html>
<html lang="en">
<head><meta charset="UTF-8"><title>index</title>
</head>
<body>
<form method="post" action="http://localhost:8080/index">姓名:  <input type="text" name="name" ><br>密码:  <input type="password" name="password"> <br><input type="submit">
</form>
</body>
</html>
这里的所有代码都写到了同一个文件里面,这样极其的不美观,可以优化一下

![[C国演义] 第十三章](https://img-blog.csdnimg.cn/d9080d84e70240d6b48d8a5fbd82b6f3.png)