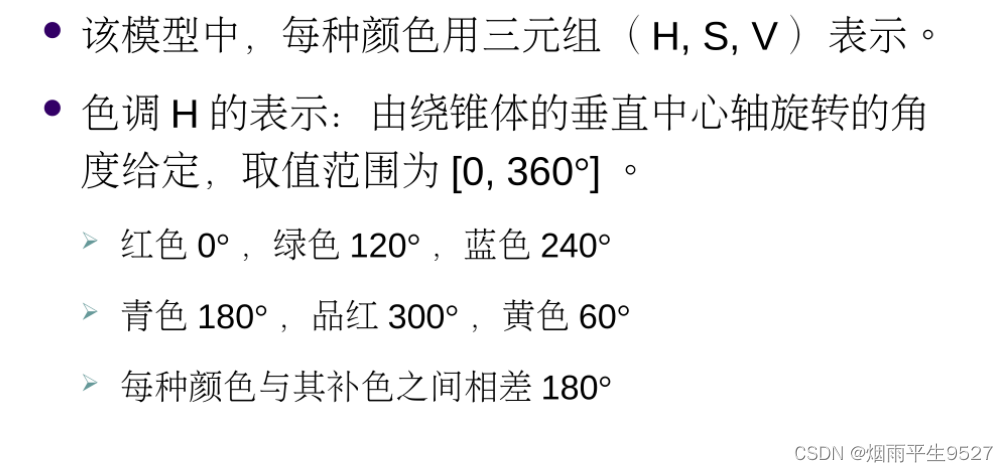
滚动列表在游戏中也很常见,比如排行榜 、充值记录等,在这些场景中,都有共同的特点, 那就是:数据量大 , 结构相同。
在cocoscreator 中,没有现成的 Listview 控件, 无奈之下, 只能自己动手 用ScrollView 来实现一个。这样,有类似需求的朋友,能专注业务功能的开发,就不用重复造轮了。
⚠️ 文末附 ListView.ts 完整源码, 可直接拿去使用。
下面以排行榜Listview 实现为例,进行详细说明。
ListView 实现效果:

ListView 实现原理:
ListView 实现方式,类似 Android的 ListView 。
采用了AbsAdapter 适配器,用于设置数据,更新视图页面,获取数据数量,计算 item 显示位置等。
采用了 ScrollView 配合 item 预制体Prefab 来实现,动态生成列表项, 支持调整 item 项的间距,支持横向和竖向滚动 。
ListView 还设计了简单的上/下拉通知, 只需要初始化时设置相应回调方法即可。
使用步骤:
step 1 ,在creator层级管理器中,新建 ScrollView 节点,并做如下配置:
这里命名为 sore_rank_listview

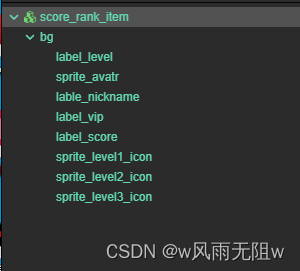
step 2 ,独立新建一个item 预制体文件
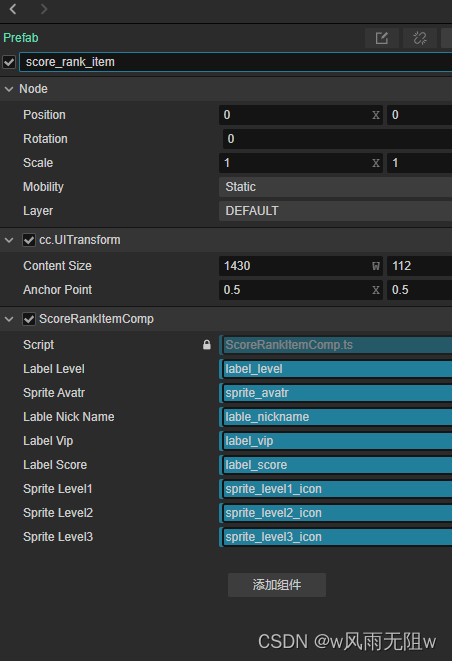
这里命名为:score_rank_item ,添加了以下属性和布局

step 3 ,在层级管理器中,选择score_rank_item 节点,然后在creator属性检查器中,挂载ScoreRankItem.ts 脚本,并做如下属性配置:
step 4 ,在层级管理器中,选择Listview 节点,然后在creator属性检查器中,挂载Listview.ts 脚本,并做如下配置:

参数解释:
- Spacing :用来约定item 之间的间距
- SpawnCount: 用来约定超过可见区域的额外显示项数,可以调整滚动时的平滑性。
- Item Template :独立的item 预制体
- scroollview : 滚动条控件,在这里和 listview 控件是同一个节点
step 5 ,根据排行榜显示内容,我们准备了一个数据结构
export class RankItemData {/** 用户ID */userid:number;/** 用户昵称 */nickName:string;/** 排行名次 */topLevel:number;/** 自定义头像id */faceid:number;/** VIP */vipLevel:number;/** 金币 */score:number;reset(){this.userid = 0;this.nickName = '';this.topLevel = 0;this.faceid = 0;this.vipLevel = 0;this.score = 0;}
}
step 6 ,我们需要准备数据列表或者是数组
// 离线测试代码let datas:Array<RankItemData>= new Array<RankItemData>;for(let i=0;i<100;i++){let itemData:RankItemData = new RankItemData();itemData.userid = 1000+i;itemData.faceid= 1;itemData.nickName="userName"+i;itemData.topLevel = i+1;itemData.vipLevel = i % 7 + 1;itemData.score = (101 - i)*10000;datas[i] = itemData; }
step 7 ,我们需要一个数据到Item的适配层, ListView 组件类中提供了一个基类AbsAdapter ,我们实现它。
只需要继承此类,重写updateView()函数,对相应索引的itemComponent进行数据设置即可:
class ScoreRankListAdapter extends AbsAdapter { updateView(item:Node, posIndex: number) {
let comp = item.getComponent(ScoreRankItemComp);
if (comp) {
let data = this.getItem(posIndex);
comp.setData(this.getItem(posIndex));
}
}
}
step 8,数据显示和更新
@property(ListView)
private scoreRankListView:ListView;private _scoreRankListAdapter: ScoreRankListAdapter | null = null;
get scoreRankListAdapter(): ScoreRankListAdapter {if (!this._scoreRankListAdapter) {this._scoreRankListAdapter = new ScoreRankListAdapter();}return this._scoreRankListAdapter;
}    this.scoreRankListAdapter.setDataSet(args);
this.scoreRankListView.setAdapter(this.scoreRankListAdapter);
step 9、ScoreRankItem.ts 源码
import { _decorator,Component,Label, Sprite} from "cc";
const { ccclass, property } = _decorator;@ccclass
export  class ScoreRankItem extends Component {@property(Label)private labelLevel!:Label;@property(Sprite)private spriteAvatr!:Sprite;@property(Label)private lableNickName!:Label;@property(Label)private labelVip!:Label;@property(Label)private labelScore!:Label;@property(Sprite)private spriteLevel1!:Sprite;@property(Sprite)private spriteLevel2!:Sprite;@property(Sprite)private spriteLevel3!:Sprite;public setData(data: any) {const itemData = data as RankItemData;this.lableNickName.string = itemData.nickName;this.labelVip.string = "VIP " + String(itemData.vipLevel);this.labelScore.string =  String(itemData.score);...}
}
step 10、ListView.ts 源码
import { _decorator,Component,Prefab,NodePool,ScrollView,Node,instantiate,UITransform, Vec3,sys} from "cc";
const { ccclass, property } = _decorator;@ccclass
export class ListView extends Component {@property(Prefab)protected itemTemplate: Prefab = null;/*** 滚动视图*/@property(ScrollView)protected scrollView:ScrollView = null;/*** 用来约定item 之间的间距*/@propertyprotected spacing: number = 1;/*** 用来约定超过可见区域的额外显示项数,可以调整滚动时的平滑性.* 比可见元素多缓存3个, 缓存越多,快速滑动越流畅,但同时初始化越慢.*/@propertyprotected spawnCount: number = 2;/*** 设置ScrollView组件的滚动方向,即可自动适配 竖向/横向滚动.*/protected horizontal: boolean = false;protected content: Node = null;protected adapter: AbsAdapter = null;protected readonly _items: NodePool = new NodePool();// 记录当前填充在树上的索引. 用来快速查找哪些位置缺少item了.protected readonly _filledIds: { [key: number]: number } = {};// 初始时即计算item的高度.因为布局时要用到.protected _itemHeight: number = 1;protected _itemWidth: number = 1;protected _itemsVisible: number = 1;protected lastStartIndex: number = -1;protected scrollTopNotifyed: boolean = false;protected scrollBottomNotifyed: boolean = false;protected pullDownCallback: () => void = null;protected pullUpCallback: () => void = null;private initialize:boolean = false;public onLoad() {this.init()}public start(): void {  }public init() {if(!this.initialize) {this.initView();this.addEvent();this.initialize = true;}}private initView(){if (this.scrollView) {this.content = this.scrollView.content;this.horizontal = this.scrollView.horizontal;const parentTransform = this.content.getParent().getComponent(UITransform);if (this.horizontal) {this.scrollView.vertical = falsethis.content.getComponent(UITransform).anchorX = 0;this.content.getComponent(UITransform).anchorY = parentTransform.anchorY;this.content.position = new Vec3(0-parentTransform.width *parentTransform.anchorX,0,0); } else {this.scrollView.vertical = true;this.content.getComponent(UITransform).anchorX = parentTransform.anchorX;this.content.getComponent(UITransform).anchorY = 1;this.content.position = new Vec3(0, parentTransform.height * parentTransform.anchorY,0); }} let itemOne = this._items.get() || instantiate(this.itemTemplate);this._items.put(itemOne);this._itemHeight = itemOne.getComponent(UITransform).height || 10;this._itemWidth = itemOne.getComponent(UITransform).width || 10;if (this.horizontal) {this._itemsVisible = Math.ceil(this.content.getParent().getComponent(UITransform).width / this._itemWidth);} else {this._itemsVisible = Math.ceil(this.content.getParent().getComponent(UITransform).height / this._itemHeight);}}public async setAdapter(adapter: AbsAdapter) {if (this.adapter === adapter) {this.notifyUpdate();return;}this.adapter = adapter;if (this.adapter == null) {console.error("adapter 为空.")return}if (this.itemTemplate == null) {console.error("Listview 未设置待显示的Item模板.");return;}this.notifyUpdate();}public getItemIndex(height: number): number {return Math.floor(Math.abs(height / ((this._itemHeight + this.spacing))));}public getPositionInView(item:Node) {let worldPos = item.getParent().getComponent(UITransform).convertToWorldSpaceAR(item.position);let viewPos = this.scrollView.node.getComponent(UITransform).convertToNodeSpaceAR(worldPos);return viewPos;}// 数据变更了需要进行更新UI显示, 可只更新某一条.public notifyUpdate(updateIndex?: number[]) {if (this.adapter == null) {console.log("notifyUpdate","this.adapter is null");return;}if(this.content ==null){  console.log("notifyUpdate","this.content is null");return;}if (updateIndex && updateIndex.length > 0) {updateIndex.forEach(i => {if (this._filledIds.hasOwnProperty(i)) {delete this._filledIds[i];}})} else {Object.keys(this._filledIds).forEach(key => {delete this._filledIds[key];})}this.recycleAll();this.lastStartIndex = -1;if (this.horizontal) {this.content.getComponent(UITransform).width = this.adapter.getCount() * (this._itemWidth + this.spacing) + this.spacing;} else {this.content.getComponent(UITransform).height = this.adapter.getCount() * (this._itemHeight + this.spacing) + this.spacing; // get total content height}this.scrollView.scrollToTop()}public scrollToTop(anim: boolean = false) {this.scrollView.scrollToTop(anim ? 1 : 0);}public scrollToBottom(anim: boolean = false) {this.scrollView.scrollToBottom(anim ? 1 : 0);}public scrollToLeft(anim: boolean = false) {this.scrollView.scrollToLeft(anim ? 1 : 0);}public scrollToRight(anim: boolean = false) {this.scrollView.scrollToRight(anim ? 1 : 0);}// 下拉事件.public pullDown(callback: () => void, this$: any) {this.pullDownCallback = callback.bind(this$);}// 上拉事件.public pullUp(callback: () => void, this$: any) {this.pullUpCallback = callback.bind(this$);}protected update(dt) {const startIndex = this.checkNeedUpdate();if (startIndex >= 0) {this.updateView(startIndex);}}// 向某位置添加一个item.protected _layoutVertical(child: Node, posIndex: number) {this.content.addChild(child);// 增加一个tag 属性用来存储child的位置索引.child["_tag"] = posIndex;this._filledIds[posIndex] = posIndex;child.setPosition(0, -child.getComponent(UITransform).height * (0.5 + posIndex) - this.spacing * (posIndex + 1));}// 向某位置添加一个item.protected _layoutHorizontal(child: Node, posIndex: number) {this.content.addChild(child);// 增加一个tag 属性用来存储child的位置索引.child["_tag"] = posIndex;this._filledIds[posIndex] = posIndex;child.setPosition(child.getComponent(UITransform).width * (child.getComponent(UITransform).anchorX + posIndex) + this.spacing * posIndex, 0);}// 获取可回收itemprotected getRecycleItems(beginIndex: number, endIndex: number): Node[] {const children = this.content.children;const recycles = []children.forEach(item => {if (item["_tag"] < beginIndex || item["_tag"] > endIndex) {recycles.push(item);delete this._filledIds[item["_tag"]];}})return recycles;}protected recycleAll() {const children = this.content.children;if(children==undefined || children==null) {return;}this.content.removeAllChildren();children.forEach(item => {this._items.put(item);})}// 填充View.protected updateView(startIndex) {let itemStartIndex = startIndex;// 比实际元素多3个.let itemEndIndex = itemStartIndex + this._itemsVisible + (this.spawnCount || 2);const totalCount = this.adapter.getCount();if (itemStartIndex >= totalCount) {return;}if (itemEndIndex > totalCount) {itemEndIndex = totalCount;if (itemStartIndex > 0 && (!this.scrollBottomNotifyed)) {this.notifyScrollToBottom()this.scrollBottomNotifyed = true;}} else {this.scrollBottomNotifyed = false;}// 回收需要回收的元素位置.向上少收一个.向下少收2个.const recyles = this.getRecycleItems(itemStartIndex - (this.spawnCount || 2), itemEndIndex);recyles.forEach(item => {this._items.put(item);})// 查找需要更新的元素位置.const updates = this.findUpdateIndex(itemStartIndex, itemEndIndex)// 更新位置.for (let index of updates) {let child = this.adapter._getView(this._items.get() || instantiate(this.itemTemplate), index);this.horizontal ?this._layoutHorizontal(child, index) :this._layoutVertical(child, index);}}// 检测是否需要更新UI.protected checkNeedUpdate(): number {if (this.adapter == null) {return -1;}let scroll = this.horizontal ?(-this.content.position.x - this.content.getParent().getComponent(UITransform).width * this.content.getParent().getComponent(UITransform).anchorX): (this.content.position.y - this.content.getParent().getComponent(UITransform).height * this.content.getParent().getComponent(UITransform).anchorY);let itemStartIndex = Math.floor(scroll / ((this.horizontal ? this._itemWidth : this._itemHeight) + this.spacing));if (itemStartIndex < 0 && !this.scrollTopNotifyed) {this.notifyScrollToTop();this.scrollTopNotifyed = true;return itemStartIndex;}// 防止重复触发topNotify.仅当首item不可见后才能再次触发if (itemStartIndex > 0) {this.scrollTopNotifyed = false;}if (this.lastStartIndex != itemStartIndex) {this.lastStartIndex = itemStartIndex;return itemStartIndex;}return -1;}// 查找需要补充的元素索引.protected findUpdateIndex(itemStartIndex: number, itemEndIndex: number): number[] {const d = [];for (let i = itemStartIndex; i < itemEndIndex; i++) {if (this._filledIds.hasOwnProperty(i)) {continue;}d.push(i);}return d;}protected notifyScrollToTop() {if (!this.adapter || this.adapter.getCount() <= 0) {return;}if (this.pullDownCallback) {this.pullDownCallback();}}protected notifyScrollToBottom() {if (!this.adapter || this.adapter.getCount() <= 0) {return;}if (this.pullUpCallback) {this.pullUpCallback();}}protected addEvent() {this.content.on(this.isMobile() ? Node.EventType.TOUCH_END : Node.EventType.MOUSE_UP, () => {this.scrollTopNotifyed = false;this.scrollBottomNotifyed = false;}, this)this.content.on(this.isMobile() ? Node.EventType.TOUCH_CANCEL : Node.EventType.MOUSE_LEAVE, () => {this.scrollTopNotifyed = false;this.scrollBottomNotifyed = false;}, this);}protected isMobile(): boolean {return (sys.isMobile)}
}// 数据绑定的辅助适配器
export abstract class AbsAdapter {private dataSet: any[] = [];public setDataSet(data: any[]) {this.dataSet = data;}public getCount(): number {return this.dataSet.length;}public getItem(posIndex: number): any {return this.dataSet[posIndex];}public _getView(item: Node, posIndex: number): Node {this.updateView(item, posIndex);return item;}public abstract updateView(item: Node, posIndex: number);
}