目录
- 一、文本显示
- 1.1 设置文本内容
- 1.2 设置文本大小
- 1.3 设置文本颜色
- 二、视图基础
- 2.1 设置视图宽高
- 2.2 设置视图间距
- 2.3 设置视图对齐方式
- 三、常用布局
- 3.1 线性布局LinearLayout
- 3.2 相对布局RelativeLayout
- 3.3 网格布局GridLayout
- 3.4 滚动视图ScrollView
- 四、按钮触控
- 4.1 按钮控件
- 4.2 点击和长按事件
- 4.3 禁用与恢复按钮
- 五、图像显示
- 5.1 图像视图ImageView
- 5.2 图像按钮ImageButton
- 5.3 同时展示文本与图像
一、文本显示
1.1 设置文本内容
android:text属性
<?xml version="1.0" encoding="utf-8"?>
<LinearLayout xmlns:android="http://schemas.android.com/apk/res/android"android:layout_width="match_parent"android:layout_height="match_parent"><TextViewandroid:id="@+id/tv_hello"android:layout_width="wrap_content"android:layout_height="wrap_content"android:text="@string/hello"/>
</LinearLayout>
1.2 设置文本大小
字体大小用sp单位
android:textSize属性
<?xml version="1.0" encoding="utf-8"?>
<LinearLayout xmlns:android="http://schemas.android.com/apk/res/android"android:layout_width="match_parent"android:layout_height="match_parent"android:orientation="vertical"><TextViewandroid:id="@+id/tv_dp"android:layout_width="wrap_content"android:layout_height="wrap_content"android:text="@string/hello"android:textSize="30sp"/>
</LinearLayout>
1.3 设置文本颜色
android:textColor属性
<?xml version="1.0" encoding="utf-8"?>
<LinearLayout xmlns:android="http://schemas.android.com/apk/res/android"android:layout_width="match_parent"android:layout_height="match_parent"android:orientation="vertical"><TextViewandroid:id="@+id/tv_code_system"android:layout_width="wrap_content"android:layout_height="wrap_content"android:text="代码设置系统自动的颜色代码"android:textSize="17sp"/><TextViewandroid:id="@+id/tv_code_eight"android:layout_width="wrap_content"android:layout_height="wrap_content"android:text="代码设置8位颜色"android:textSize="17sp"/><TextViewandroid:id="@+id/tv_code_six"android:layout_width="wrap_content"android:layout_height="wrap_content"android:text="代码设置6位颜色"android:textSize="17sp"/><TextViewandroid:id="@+id/tv_xml"android:layout_width="wrap_content"android:layout_height="wrap_content"android:text="xml设置6位颜色"android:textSize="17sp"android:textColor="#ff00ff"/><TextViewandroid:id="@+id/tv_values"android:layout_width="wrap_content"android:layout_height="wrap_content"android:text="xml设置6位颜色"android:textSize="17sp"android:textColor="@color/teal_200"/><TextViewandroid:id="@+id/tv_code_background"android:layout_width="wrap_content"android:layout_height="wrap_content"android:text="背景设置绿色"android:textSize="17sp"/><!--  android:background="@color/teal_200" -->
</LinearLayout>
二、视图基础
2.1 设置视图宽高
视图宽高和间距用dp单位
android:layout_width设置宽度
android:layout_height设置高度
wrap_content 由内容撑开,match_parent 匹配父容器
<?xml version="1.0" encoding="utf-8"?>
<LinearLayout xmlns:android="http://schemas.android.com/apk/res/android"android:layout_width="match_parent"android:layout_height="match_parent"android:orientation="vertical"><TextViewandroid:layout_width="wrap_content"android:layout_height="wrap_content"android:textColor="@color/teal_200"android:layout_marginTop="5dp"android:background="@color/black"android:textSize="17sp"/></LinearLayout>
2.2 设置视图间距
间距用dp单位
这里和前端的css属性非常类似,比如左边距margin-lfet,在安卓中就是layout_marginLeft
android:padding设置内边距
android:layout_margin设置外边距
<?xml version="1.0" encoding="utf-8"?>
<LinearLayout xmlns:android="http://schemas.android.com/apk/res/android"android:layout_width="match_parent"android:layout_height="300dp"android:orientation="vertical"android:background="#00aaff"android:padding="30dp"><!--中间层布局颜色为黄色--><LinearLayoutandroid:layout_width="match_parent"android:layout_height="match_parent"android:layout_margin="20dp"android:background="#ffff99"android:padding="60dp"><!--内层视图颜色为红色--><Viewandroid:layout_width="match_parent"android:layout_height="match_parent"android:background="#00ff00" /></LinearLayout></LinearLayout>
2.3 设置视图对齐方式
android:layout_gravity 设置父容器的对齐方式
android:gravity 设置子组件在父容器的对齐方式
<?xml version="1.0" encoding="utf-8"?>
<LinearLayout xmlns:android="http://schemas.android.com/apk/res/android"android:layout_height="300dp"android:layout_width="match_parent"android:background="#ffff99"android:orientation="horizontal"><!-- 第一个子布局背景为红色,它在上级视图中朝下对齐,它的下级视图则靠左对齐 --><LinearLayoutandroid:layout_width="0dp"android:layout_height="200dp"android:layout_weight="1"android:layout_margin="10dp"android:padding="10dp"android:background="#ff0000"android:layout_gravity="bottom"android:gravity="center"><!--内部视图的宽度和高度都是100dp,且背景色为青色--><Viewandroid:layout_width="100dp"android:layout_height="100dp"android:background="@color/teal_200"/></LinearLayout><!--第二个子布局背景为红色,它在上级视图中朝上对齐,它的下级视图则靠右对齐--><LinearLayoutandroid:layout_width="0dp"android:layout_height="200dp"android:layout_weight="1"android:layout_margin="10dp"android:padding="10dp"android:background="#ff0000"android:gravity="right"><!--内部视图的宽度和高度都是100dp,且背景色为青色--><Viewandroid:layout_width="100dp"android:layout_height="100dp"android:background="@color/teal_200"/></LinearLayout></LinearLayout>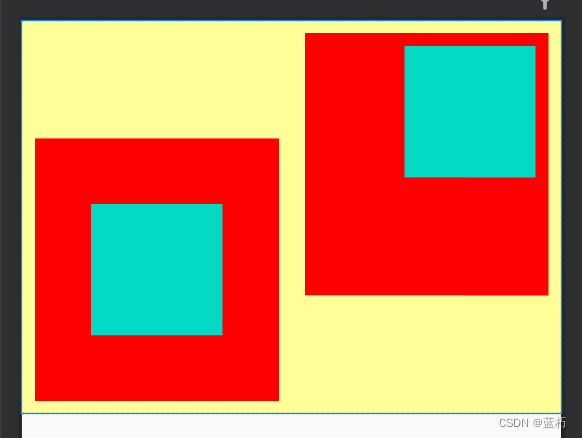
三、常用布局
3.1 线性布局LinearLayout
LinearLayout 为线性布局,它可以通过android:orientation 来设置页面的排列方向,vertical是垂直方向,horizontal是水平方向排列
代码示例:
<!--水平排列--><LinearLayoutandroid:layout_width="match_parent"android:layout_height="wrap_content"android:orientation="horizontal"><TextViewandroid:layout_width="wrap_content"android:layout_height="wrap_content"android:text="横排第一个"android:textSize="17sp"android:textColor="#000000"/><TextViewandroid:layout_width="wrap_content"android:layout_height="wrap_content"android:text="横排第二个"android:layout_marginLeft="10dp"android:textSize="17sp"android:textColor="#000000"/></LinearLayout>
3.2 相对布局RelativeLayout
相对布局可以相对某一个组件设置对齐方式,比如要让A组件在B组件的下面,就可以使用android:layout_below="@id/B"
常用属性如下:
android:layout_centerInParent="true"在父容器中间对齐android:layout_centerHorizontal="true"在父容器水平居中android:layout_centerVertical="true"在父容器垂直居中android:layout_alignParentLeft="true"在父容器左边对齐android:layout_alignParentRight="true"在父容器右边对齐android:layout_alignParentTop="true"在父容器顶部对齐android:layout_alignParentBottom="true"在父容器底部对齐android:layout_toLeftOf="@id/tv_center"在tv_center组件的左边android:layout_toRightOf="@id/tv_center"在tv_center组件的右边android:layout_above="@id/tv_center"在tv_center组件的上边android:layout_below="@id/tv_center"在tv_center组件的下方android:layout_alignTop="@id/tv_center"与tv_center组件顶部对齐android:layout_alignBottom="@id/tv_center"与tv_center组件底部对齐android:layout_alignLeft="@id/tv_center"与tv_center组件左边对齐android:layout_alignRight="@id/tv_center"与tv_center组件右边对齐
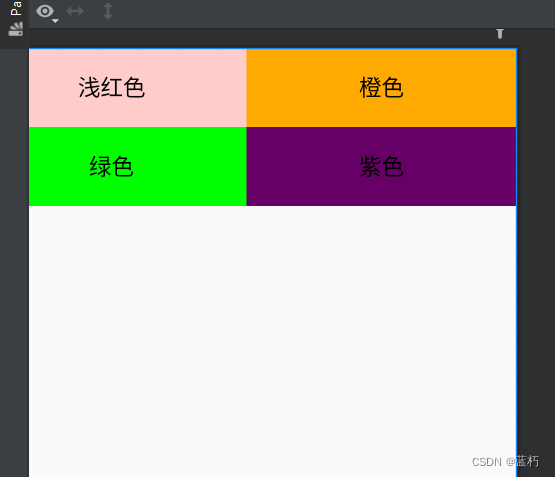
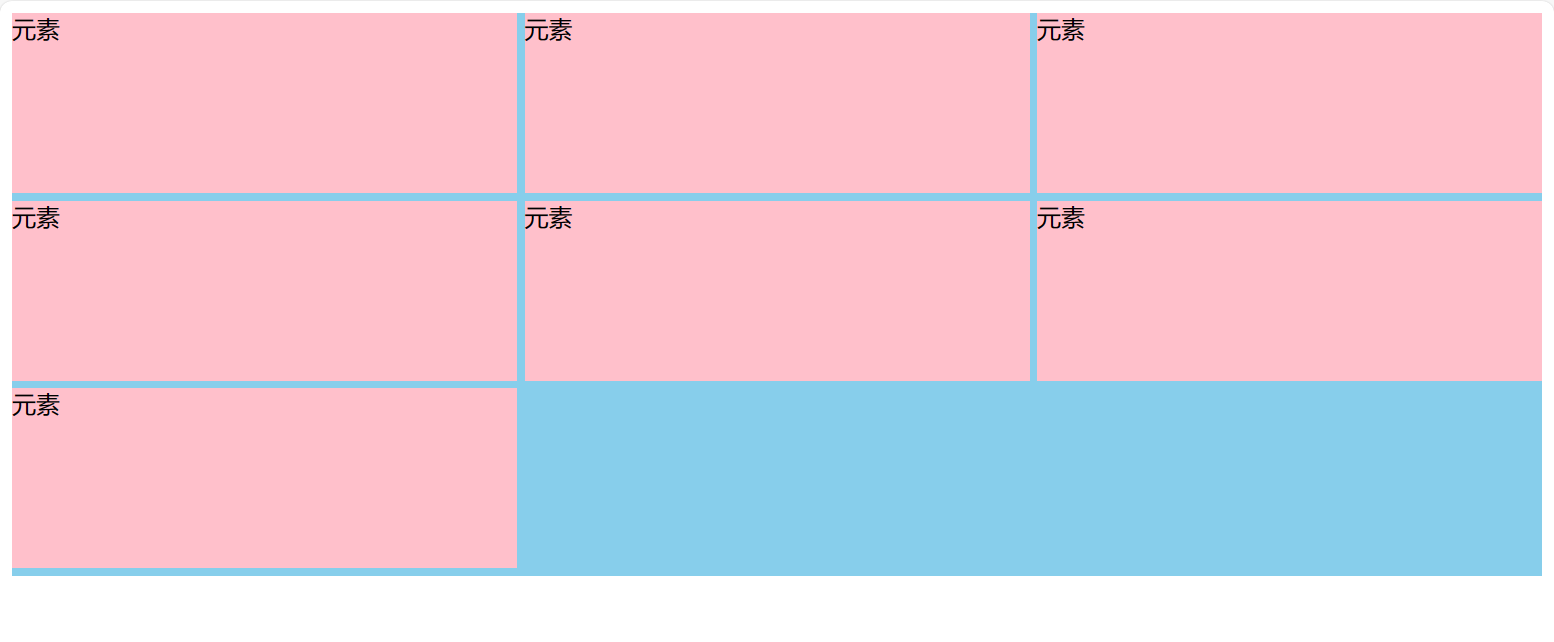
3.3 网格布局GridLayout
网格布局就是类似表格一样的布局,用起来还是很方便的
常用属性:
| 属性 | 作用 |
|---|---|
| android:columnCount | 设置列数 |
| android:rowCount | 设置行数 |
| android:layout_columnWeight | 设置列宽的权重 |
| android:layout_rowWeight | 纵向乘剩余空间分配方式 |
| android:layout_rowSpan | 横向跨几行 |
| android:layout_columnSpan | 横向跨几列 |
代码示例:
<?xml version="1.0" encoding="utf-8"?>
<GridLayout xmlns:android="http://schemas.android.com/apk/res/android"android:layout_width="match_parent"android:layout_height="match_parent"android:columnCount="2"android:rowCount="2"><TextViewandroid:layout_height="60dp"android:layout_width="0dp"android:layout_columnWeight="1"android:text="浅红色"android:background="#ffcccc"android:textColor="#000000"android:textSize="17sp"android:gravity="center"/><TextViewandroid:layout_height="60dp"android:layout_width="0dp"android:layout_columnWeight="1"android:text="橙色"android:background="#ffaa00"android:textColor="#000000"android:textSize="17sp"android:gravity="center"/><TextViewandroid:layout_height="60dp"android:layout_width="0dp"android:layout_columnWeight="1"android:text="绿色"android:background="#00ff00"android:textColor="#000000"android:textSize="17sp"android:gravity="center"/><TextViewandroid:layout_height="60dp"android:layout_width="0dp"android:layout_columnWeight="1"android:text="紫色"android:background="#660066"android:textColor="#000000"android:textSize="17sp"android:gravity="center"/>
</GridLayout>
3.4 滚动视图ScrollView
滚动视图分为垂直滚动和水平滚动
1.水平滚动HorizontalScrollView
<?xml version="1.0" encoding="utf-8"?>
<LinearLayout xmlns:android="http://schemas.android.com/apk/res/android"android:layout_width="match_parent"android:layout_height="match_parent"android:orientation="vertical"><!--水平滚动--><HorizontalScrollViewandroid:layout_width="wrap_content"android:layout_height="200dp"><!-- 水平方向的线性布局,两个于视图的颜色分别为青色和黄色--><LinearLayoutandroid:layout_width="wrap_content"android:layout_height="match_parent"android:orientation="horizontal"><Viewandroid:layout_width="300dp"android:layout_height="match_parent"android:background="#aaffff" /><Viewandroid:layout_width="300dp"android:layout_height="match_parent"android:background="#aaff00"/></LinearLayout></HorizontalScrollView></LinearLayout>

2. 垂直滚动ScrollView
<?xml version="1.0" encoding="utf-8"?>
<LinearLayout xmlns:android="http://schemas.android.com/apk/res/android"android:layout_width="match_parent"android:layout_height="match_parent"android:orientation="vertical"><!--垂直滚动--><ScrollViewandroid:layout_width="match_parent"android:layout_height="wrap_content"><LinearLayoutandroid:layout_width="wrap_content"android:layout_height="match_parent"android:orientation="vertical"><Viewandroid:layout_width="match_parent"android:layout_height="400dp"android:background="#00ff00" /><Viewandroid:layout_width="match_parent"android:layout_height="400dp"android:background="#ffffaa"/></LinearLayout></ScrollView>
</LinearLayout>

四、按钮触控
可以通过findViewById找到在xml中定义的组件,只要在xml中定义组件时指定id即可
4.1 按钮控件
按钮控件用Button标签,按钮控件自带样式,如果想要自定义样式要先修改res->values->themes.xml中的parent属性值为"Theme.MaterialComponents.DayNight.DarkActionBar.Bridge"
代码示例:
<Buttonandroid:layout_width="match_parent"android:layout_height="wrap_content"android:text="Hello world"android:textColor="@color/black"android:textSize="17sp"/>
4.2 点击和长按事件
1.点击事件
定义两个按钮,演示不同的绑定事件的方法
<Buttonandroid:id="@+id/btn_click_single"android:layout_width="match_parent"android:layout_height="wrap_content"android:text="指定点击事件监听"android:textColor="#000000"android:textSize="17sp"/><Buttonandroid:id="@+id/btn_click_public"android:layout_width="match_parent"android:layout_height="wrap_content"android:text="指定公点击事件监听"android:textColor="#000000"android:textSize="17sp"/>
在ButtonClickActivity中绑定监听事件。绑定监听事件有两种方式,第一种让本类实现View.OnClickListener接口,重写onClick方法,第二种是自定义一个类实现View.OnClickListener接口,重写onClick方法
public class ButtonClickActivity extends AppCompatActivity implements View.OnClickListener{private TextView tv_result;@Overrideprotected void onCreate(Bundle savedInstanceState) {super.onCreate(savedInstanceState);setContentView(R.layout.activity_button_click);tv_result = findViewById(R.id.tv_result);Button btn_click_single = findViewById(R.id.btn_click_single);Button btn_click_public = findViewById(R.id.btn_click_public);btn_click_single.setOnClickListener(new MyOnClickListener(tv_result));btn_click_public.setOnClickListener(this);}//第二种方式@Overridepublic void onClick(View v) {if (v.getId() == R.id.btn_click_public){String s = String.format("%s 你点击了按钮: %s", DateUtil.getNowTime(), ((Button) v).getText());tv_result.setText(s);}}//第一种方式static class MyOnClickListener implements View.OnClickListener{private final TextView tv_result;public MyOnClickListener(TextView tv_result) {this.tv_result = tv_result;}@Overridepublic void onClick(View v) {String s = String.format("%s 你点击了按钮: %s", DateUtil.getNowTime(), ((Button) v).getText());tv_result.setText(s);}}
}
4.3 禁用与恢复按钮
按钮的禁用和启动主要通过enabled属性来控制,false禁用,true启用
可以通过xml配置,也可通过java代码设置。
1.xml设置
<Buttonandroid:id="@+id/btn_test"android:layout_width="match_parent"android:layout_height="wrap_content"android:text="测试按钮"android:enabled="false"android:textColor="#888888"android:textSize="17sp"/>
2.java代码设置
public class ButtonEnableActivity extends AppCompatActivity implements View.OnClickListener{private Button btn_test;@Overrideprotected void onCreate(Bundle savedInstanceState) {super.onCreate(savedInstanceState);setContentView(R.layout.activity_button_enable);btn_test = findViewById(R.id.btn_test);//启用true|禁用falsebtn_test.setEnabled(true);}
}
五、图像显示
标签ImageView
1.android:adjustViewBounds:设置ImageView是否调整自己的边界来保持所显示图片的长宽比。
2.android:maxHeight:设置ImageView的最大高度。
3.android:maxWidth:设置ImageView的最大宽度。
5.android:src:设置ImageView所显示的Drawable对象的ID。
6.android:scaleType 图像在ImageView中的显示效果,下面是一些常用属性
- fitXY :横向、纵向独立缩放,以适应该ImageView。
- fitStart:保持纵横比缩放图片,并且将图片放在ImageView的左上角。
- fitCenter:保持纵横比缩放图片,缩放完成后将图片放在ImageView的中央。
- fitEnd:保持纵横比缩放图片,缩放完成后将图片放在ImageView的右下角。
- center:把图片放在ImageView的中央,但是不进行任何缩放。
- centerCrop:保持纵横比缩放图片,以使图片能完全覆盖ImageView。
- centerInside:保持纵横比缩放图片,以使得ImageView能完全显示该图片。
图片资源放在下图中,注意不能用数字命名开头
5.1 图像视图ImageView
代码示例:
<?xml version="1.0" encoding="utf-8"?>
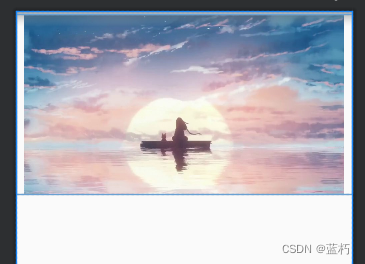
<LinearLayout xmlns:android="http://schemas.android.com/apk/res/android"android:layout_width="match_parent"android:layout_height="match_parent"android:orientation="vertical"><ImageViewandroid:id="@+id/iv_scale"android:layout_width="match_parent"android:layout_height="220dp"android:layout_marginTop="5dp"android:scaleType="centerInside"android:src="@drawable/test"/><!--android:src="@drawable/ic_launcher_background"-->
</LinearLayout>
5.2 图像按钮ImageButton
标签是ImageButton,它继承于Button类
代码示例:
<LinearLayout xmlns:android="http://schemas.android.com/apk/res/android"android:layout_width="match_parent"android:layout_height="match_parent"android:orientation="vertical"><ImageButtonandroid:layout_width="match_parent"android:layout_height="80dp"android:scaleType="centerCrop"android:src="@drawable/test" />
</LinearLayout>
5.3 同时展示文本与图像
常用属性值:
android:drawableBottom底部添加图片android:drawableEnd在末尾添加图片android:drawableLeft在左边添加图片android:drawableRight在右边添加图片android:drawabLeStart在开始位置添加图片android:drawableTop在顶部添加图片
给Button添加图片和文字
代码示例:
<?xml version="1.0" encoding="utf-8"?>
<LinearLayout xmlns:android="http://schemas.android.com/apk/res/android"android:layout_width="match_parent"android:layout_height="match_parent"android:orientation="vertical"><Buttonandroid:layout_width="wrap_content"android:layout_height="wrap_content"android:text="图标在左"android:drawableLeft="@drawable/btn"android:background="#ffffff"android:drawablePadding="5dp"/>
</LinearLayout>


![2023年中国汽车座舱行业发展现状及趋势分析:高级人机交互(HMI)系统将逐步提升[图]](https://img-blog.csdnimg.cn/img_convert/f637b1b5c70af2b2cc3a0748a2d95bfd.png)