实现截图
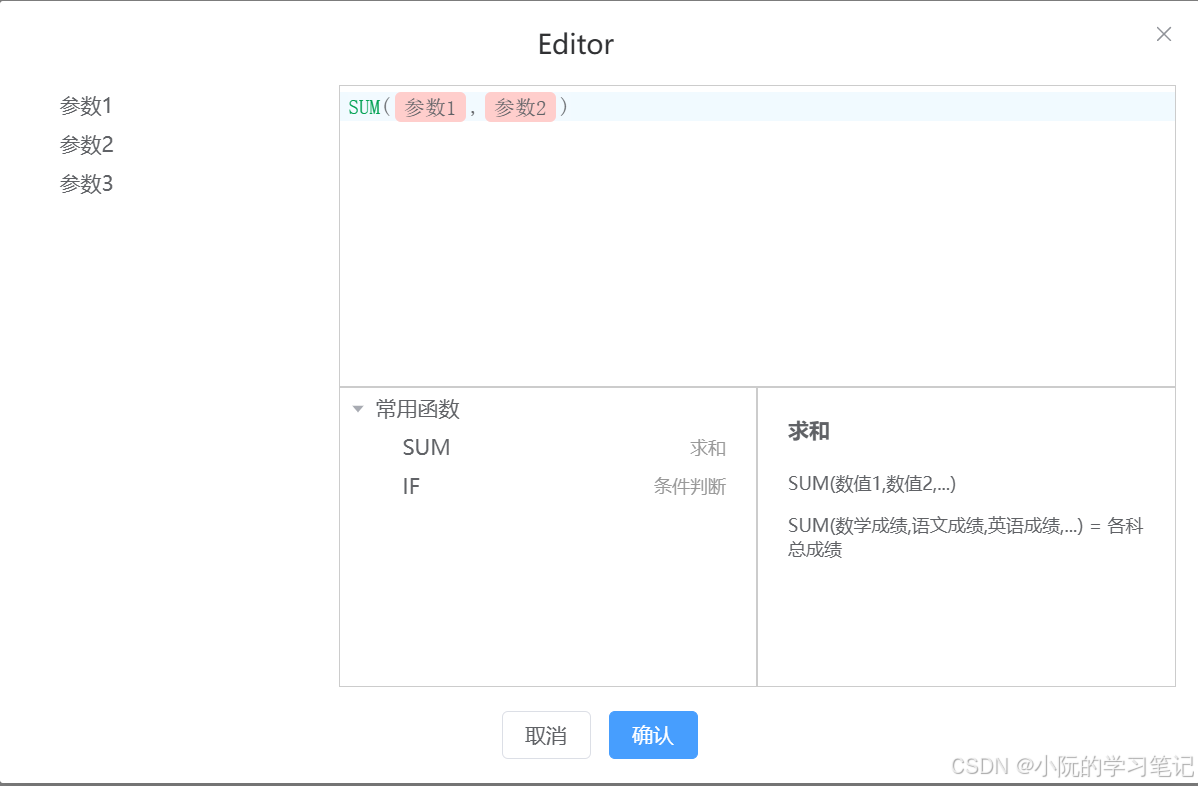
实现/带实现功能
- 插入标签
- 插入公式
- 提示补全
- 公式验证
- 公式计算
需要的依赖
"@codemirror/autocomplete": "^6.18.4","@codemirror/lang-javascript": "^6.2.2","@codemirror/state": "^6.5.2","@codemirror/view": "^6.36.2","codemirror": "^6.0.1",
初始化编辑器
// index.ts
export const useCodemirror = () => {const code = ref("");const view = shallowRef<EditorView>();const editorRef = ref<InstanceType<typeof HTMLDivElement>>();const extensions = [placeholderTag, //插入tagplaceholderFn, //插入函数baseTheme, //基础样式EditorView.lineWrapping, //换行basicSetup, //基础配置javascript(), //js语言支持autocompletion({ override: [myCompletions] }), //补全提示];/*** @description 初始化编辑器*/const init = () => {if (editorRef.value) {view.value = new EditorView({parent: editorRef.value,state: EditorState.create({doc: code.value,extensions: extensions,}),});setTimeout(() => {view.value?.focus();}, 0);}};/*** @description 销毁编辑器*/const destroyed = () => {view.value?.destroy();view.value = undefined;};/*** @description 插入文本并设置光标位置*/const insertText = (text: string, type: "fn" | "tag" = "tag") => {if (view.value) {let content = type === "tag" ? `[[${text}]]` : `{{${text}}}()`;const selection = view.value.state.selection;if (!selection.main.empty) {// 如果选中文本,则替换选中文本const from = selection.main.from;const to = selection.main.to;const anchor =type === "tag" ? from + content.length : from + content.length - 1;const transaction = view.value!.state.update({changes: { from, to, insert: content }, // 在当前光标位置插入标签selection: {anchor,}, // 指定新光标位置});view.value.dispatch(transaction);} else {// 如果没有选中文本,则插入标签const pos = selection.main.head;const anchor =type === "tag" ? pos + content.length : pos + content.length - 1;const transaction = view.value.state.update({changes: { from: pos, to: pos, insert: content }, // 在当前光标位置插入标签selection: {anchor: anchor,}, // 指定新光标位置});view.value.dispatch(transaction);}setTimeout(() => {view.value?.focus();}, 0);}};return {code,view,editorRef,init,destroyed,insertText,};
};
<template><MyDialogv-model="state.visible"title="Editor":width="800"center:close-on-click-modal="false":destroy-on-close="true"@close="close"><div class="editor-container"><TreeComclass="editor-tree":data="state.paramsData"@node-click="insertTag"></TreeCom><div class="editor-content"><div class="editor-main" ref="editorRef"></div><div class="fn"><div class="fn-list"><TreeCom:default-expand-all="true":data="state.fnData"@node-click="insertFn"@mouseenter="hoverFn"></TreeCom></div><div class="fn-desc"><DescCom v-bind="state.info"></DescCom></div></div></div></div><template #footer><div><el-button @click="close">取消</el-button><el-button type="primary" @click="submit">确认</el-button></div></template></MyDialog>
</template><script lang="ts">
export default { name: "Editor" };
</script>
<script lang="ts" setup>
import { nextTick, reactive } from "vue";
import TreeCom from "./components/tree.vue";
import DescCom from "./components/desc.vue";
import { useCodemirror, functionDescription } from ".";
import { Tree } from "@/types/common";const state = reactive({visible: false,paramsData: [{label: "参数1",id: "1",},{label: "参数2",id: "2",},{label: "参数3",id: "3",},],fnData: [{label: "常用函数",id: "1",children: [{label: "SUM",desc: "求和",id: "1-1",},{label: "IF",desc: "条件判断",id: "1-2",},],},],info: {},
});const { code, view, editorRef, init, destroyed, insertText } = useCodemirror();
/*** @description 插入标签*/
const insertTag = (data: Tree) => {if (!data.children) {insertText(`${data.id}.${data.label}`);}
};
/*** @description 插入函数*/
const insertFn = (data: Tree) => {if (!data.children) {insertText(`${data.label}`, "fn");}
};
/*** @description 鼠标悬停展示函数描述*/
const hoverFn = (data: Tree) => {const info = functionDescription(data.label);if (info) {state.info = info;}
};
/*** @description 获取数据*/
const submit = () => {const data = view.value?.state.doc;console.log(data);
};
const open = () => {state.visible = true;nextTick(() => {init();});
};
const close = () => {destroyed();state.visible = false;
};defineExpose({open,
});
</script><style lang="scss" scoped>
.editor-container {position: relative;.editor-tree {width: 200px;position: absolute;left: 0;top: 0;height: 100%;}.editor-content {margin-left: 210px;display: flex;flex-direction: column;.editor-main {border: 1px solid #ccc;height: 200px;}.fn {display: flex;height: 200px;> div {flex: 1;border: 1px solid #ccc;}}}
}
:deep(.cm-focused) {outline: none;
}
:deep(.cm-gutters) {display: none;
}
</style>
插入标签的实现
根据官网例子以及部分大佬思路改编
- 插入标签使用
[[${id}.${label}]]
/*** @description 插入文本并设置光标位置*/const insertText = (text: string, type: "fn" | "tag" = "tag") => {if (view.value) {let content = type === "tag" ? `[[${text}]]` : `{{${text}}}()`;const selection = view.value.state.selection;if (!selection.main.empty) {// 如果选中文本,则替换选中文本const from = selection.main.from;const to = selection.main.to;const anchor =type === "tag" ? from + content.length : from + content.length - 1;const transaction = view.value!.state.update({changes: { from, to, insert: content }, // 在当前光标位置插入标签selection: {anchor,}, // 指定新光标位置});view.value.dispatch(transaction);} else {// 如果没有选中文本,则插入标签const pos = selection.main.head;const anchor =type === "tag" ? pos + content.length : pos + content.length - 1;const transaction = view.value.state.update({changes: { from: pos, to: pos, insert: content }, // 在当前光标位置插入标签selection: {anchor: anchor,}, // 指定新光标位置});view.value.dispatch(transaction);}setTimeout(() => {view.value?.focus();}, 0);}};
- 然后去匹配
[[]]中的内容,取出来用span包裹
/*** @description 插入tag*/
const placeholderTagMatcher = new MatchDecorator({regexp: /\[\[(.+?)\]\]/g,decoration: (match) => {return Decoration.replace({ widget: new PlaceholderTag(match[1]) });},
});
// 定义一个 PlaceholderTag 类,继承自 WidgetType
class PlaceholderTag extends WidgetType {// 定义一个字符串类型的 id 属性,默认值为空字符串id: string = "";// 定义一个字符串类型的 text 属性,默认值为空字符串text: string = "";// 构造函数,接收一个字符串类型的 text 参数constructor(text: string) {// 调用父类的构造函数super();// 被替换的数据处理if (text) {const [id, ...texts] = text.split(".");if (id && texts.length) {this.text = texts.join(".");this.id = id;console.log(this.text, "id:", this.id);}}}eq(other: PlaceholderTag) {return this.text == other.text;}// 此处是我们的渲染方法toDOM() {let elt = document.createElement("span");if (!this.text) return elt;elt.className = "cm-tag";elt.textContent = this.text;return elt;}ignoreEvent() {return true;}
}
// 导出一个名为placeholders的常量,它是一个ViewPlugin实例,通过fromClass方法创建
const placeholderTag = ViewPlugin.fromClass(// 定义一个匿名类,该类继承自ViewPlugin的基类class {// 定义一个属性placeholders,用于存储装饰集placeholders: DecorationSet;// 构造函数,接收一个EditorView实例作为参数constructor(view: EditorView) {// 调用placeholderMatcher.createDeco方法,根据传入的view创建装饰集,并赋值给placeholders属性this.placeholders = placeholderTagMatcher.createDeco(view);}// update方法,用于在视图更新时更新装饰集update(update: ViewUpdate) {// 调用placeholderMatcher.updateDeco方法,根据传入的update和当前的placeholders更新装饰集,并重新赋值给placeholders属性this.placeholders = placeholderTagMatcher.updateDeco(update,this.placeholders);}},// 配置对象,用于定义插件的行为{// decorations属性,返回当前实例的placeholders属性,用于提供装饰集decorations: (v) => v.placeholders,// provide属性,返回一个函数,该函数返回一个EditorView.atomicRanges的提供者provide: (plugin) =>EditorView.atomicRanges.of((view) => {// 从view中获取当前插件的placeholders属性,如果不存在则返回Decoration.nonereturn view.plugin(plugin)?.placeholders || Decoration.none;}),}
);
- 设置样式
const baseTheme = EditorView.baseTheme({".cm-tag": {paddingLeft: "6px",paddingRight: "6px",paddingTop: "3px",paddingBottom: "3px",marginLeft: "3px",marginRight: "3px",backgroundColor: "#ffcdcc",borderRadius: "4px",},".cm-fn": {color: "#01a252",},
});
- 使用插件

插入公式的实现
同理,我只是把[[]]换成了{{}},然后样式也修改了
注意:我们插入标签和公式的时候要指定光标位置,不然会出现问题,使用起来也不方便
提示补全的实现
也是根据官网例子改编,注意要先下载依赖@codemirror/autocomplete
/*** @description 补全提示*/
const completions = [{label: "SUM",apply: insetCompletion,},{label: "IF",apply: insetCompletion,},
];
/*** @description 补全提示* @param {CompletionContext} context* @return {*}*/
function myCompletions(context: CompletionContext) {// 匹配到以s或su或sum或i或if开头的单词let before = context.matchBefore(/[s](?:u(?:m)?)?|[i](?:f)?/gi);if (!context.explicit && !before) return null;return {from: before ? before.from : context.pos,options: completions,};
}
/*** @description 插入补全* @param {EditorView} view* @param {Completion} completion* @param {number} from* @param {number} to*/
function insetCompletion(view: EditorView,completion: Completion,from: number,to: number
) {const content = `{{${completion.label}}}()`;const anchor = from + content.length - 1;const transaction = view.state.update({changes: { from, to, insert: content }, // 在当前光标位置插入标签selection: {anchor: anchor,}, // 指定新光标位置});view.dispatch(transaction);
}
使用插件

仓库地址
在线预览


![[开源]MaxKb+Ollama 构建RAG私有化知识库](https://i-blog.csdnimg.cn/direct/4f6a479e1d1a4923932992719490a853.png)


