目录
- 引言
- 1. Flex弹性布局介绍及使用
- 什么是Flex弹性布局?
- Flex容器与Flex项目
- Flex属性详解
- 2. 轮播图mock遍历数据
- 简述轮播图的作用和意义
- 处理mock数据的重要性
- 使用Mock模拟数据遍历
- 3. 首页布局
- 总结
引言
在现代网页开发中,灵活性和响应式布局是至关重要的。为了实现这一目标,前端开发人员需要掌握各种先进的技术。本篇博客将深入介绍和讨论三个主要主题:Flex弹性布局、轮播图mock遍历数据和首页布局。我们将逐步展示这些技术的使用方法,并提供丰富的实例和信息。
1. Flex弹性布局介绍及使用
什么是Flex弹性布局?
Flex弹性布局是一种现代的CSS布局模型,它提供了更灵活的方式来排列和对齐项目。通过使用Flex容器和Flex项目,我们可以轻松地实现自适应的布局。
Flex容器与Flex项目
Flex容器是包含Flex项目的父元素,通过设置display: flex;即可将其定义为Flex容器。而Flex项目则是容器内部的子元素,具体的布局由各个Flex项目的属性决定。
Flex属性详解
在Flex布局中,有许多属性可以用于控制Flex容器和Flex项目的行为。例如,flex-direction用于控制项目的排列方向,justify-content用于水平对齐项目,align-items用于垂直对齐项目等等。
当使用 Flex 弹性布局时,有许多属性可以用于控制 Flex 容器和 Flex 项目的行为。以下是对每个属性的详细解释:
1.flex-direction:指定 Flex 项目在 Flex 容器中的排列方向。它有四个可能的值:
-
row(默认):水平排列,左对齐。
-
row-reverse:水平排列,右对齐。
-
column:垂直排列,从上到下。
-
column-reverse:垂直排列,从下到上。
2.flex-wrap:定义 Flex 项目是否换行。它有三个可能的值: -
nowrap(默认):不换行,所有 Flex 项目在同一行/列上。
-
wrap:换行,如果空间不足则新行/列开始。
-
wrap-reverse:换行,如果空间不足则新行/列开始,但逆序排列。
3,flex-flow:是 flex-direction 和 flex-wrap 的简写形式。例如:row wrap 表示水平排列、换行。
4.justify-content:控制 Flex 项目在主轴上的对齐方式。它有五个可能的值:
-
flex-start(默认):左对齐。
-
flex-end:右对齐。
-
center:居中对齐。
-
space-between:两端对齐,项目之间的间隔相等。
-
space-around:每个项目周围的间隔相等,包括两端。
5.align-items:控制 Flex 项目在交叉轴上的对齐方式。它有五个可能的值: -
stretch(默认):拉伸填满整个交叉轴。
-
flex-start:顶部对齐。
-
flex-end:底部对齐。
-
center:居中对齐。
-
baseline:基线对齐。
6.align-content:用于多行/列的 Flex 项目,控制它们在交叉轴上的对齐方式。它有五个可能的值:
- stretch(默认):拉伸填满整个交叉轴。
- flex-start:顶部对齐。
- flex-end:底部对齐。
- center:居中对齐。
- space-between:两端对齐,项目之间的间隔相等。
- space-around:每个项目周围的间隔相等,包括两端。
这些属性可以通过在 Flex 容器或 Flex 项目上设置相应的样式来控制布局行为。灵活使用这些属性可以轻松创建各种复杂且适应性强的布局。
2. 轮播图mock遍历数据
简述轮播图的作用和意义
轮播图是一种常见且有效的网页元素,通常用于展示多张图片或内容。它可以帮助我们在有限的空间内展示更多的信息,提升用户体验。
处理mock数据的重要性
在开发过程中,使用虚拟数据进行遍历和展示非常重要。这样可以更好地模拟真实情况,并方便调试和开发。
使用Mock模拟数据遍历
app.json
{"pages":["pages/index/index","pages/meeting/list/list","pages/vote/list/list","pages/ucenter/index/index","pages/logs/logs"],"window":{"backgroundTextStyle":"light","navigationBarBackgroundColor": "#fff","navigationBarTitleText": "Weixin","navigationBarTextStyle":"black"},"tabBar": {"list": [{"pagePath": "pages/index/index","text": "首页","iconPath": "/static/tabBar/coding.png","selectedIconPath": "/static/tabBar/coding-active.png"},{"pagePath": "pages/meeting/list/list","iconPath": "/static/tabBar/sdk.png","selectedIconPath": "/static/tabBar/sdk-active.png","text": "会议"},{"pagePath": "pages/vote/list/list","iconPath": "/static/tabBar/template.png","selectedIconPath": "/static/tabBar/template-active.png","text": "投票"},{"pagePath": "pages/ucenter/index/index","iconPath": "/static/tabBar/component.png","selectedIconPath": "/static/tabBar/component-active.png","text": "设置"}]},"style": "v2","sitemapLocation": "sitemap.json"
}
config/app.js
// 以下是业务服务器API地址// 本机开发API地址var WxApiRoot = 'http://localhost:8080/demo/wx/';// 测试环境部署api地址// var WxApiRoot = 'http://192.168.0.101:8070/demo/wx/';// 线上平台api地址//var WxApiRoot = 'https://www.oa-mini.com/demo/wx/';module.exports = {IndexUrl: WxApiRoot + 'home/index', //首页数据接口SwiperImgs: WxApiRoot+'swiperImgs', //轮播图MettingInfos: WxApiRoot+'meeting/list', //会议信息};
index.wxml
<!--index.wxml-->
<view><swiper indicator-dots="true" autoplay="true">
<block wx:for="{{imgSrcs}}" wx:key="*text"><swiper-item><image src="{{item.img}}"></image></swiper-item>
</block>
</swiper>
</view>
index.js
// index.js
// 获取应用实例
const app = getApp()
const api = require("../../config/app.js")
Page({data: {imgSrcs:[]}, loadSwiperImgs(){let that=this;wx.request({url: api.SwiperImgs,dataType: 'json',success(res) {console.log(res)that.setData({imgSrcs:res.data.images})}})},// 事件处理函数bindViewTap() {wx.navigateTo({url: '../logs/logs'})},onLoad() {if (wx.getUserProfile) {this.setData({canIUseGetUserProfile: true})}this.loadSwiperImgs()},getUserProfile(e) {// 推荐使用wx.getUserProfile获取用户信息,开发者每次通过该接口获取用户个人信息均需用户确认,开发者妥善保管用户快速填写的头像昵称,避免重复弹窗wx.getUserProfile({desc: '展示用户信息', // 声明获取用户个人信息后的用途,后续会展示在弹窗中,请谨慎填写success: (res) => {console.log(res)this.setData({userInfo: res.userInfo,hasUserInfo: true})}})},getUserInfo(e) {// 不推荐使用getUserInfo获取用户信息,预计自2021年4月13日起,getUserInfo将不再弹出弹窗,并直接返回匿名的用户个人信息console.log(e)this.setData({userInfo: e.detail.userInfo,hasUserInfo: true})}
})
小程序会有HTTPS校验,http是不能通过的,所以我们要关一下

代码写好后就接着以下操作便OK
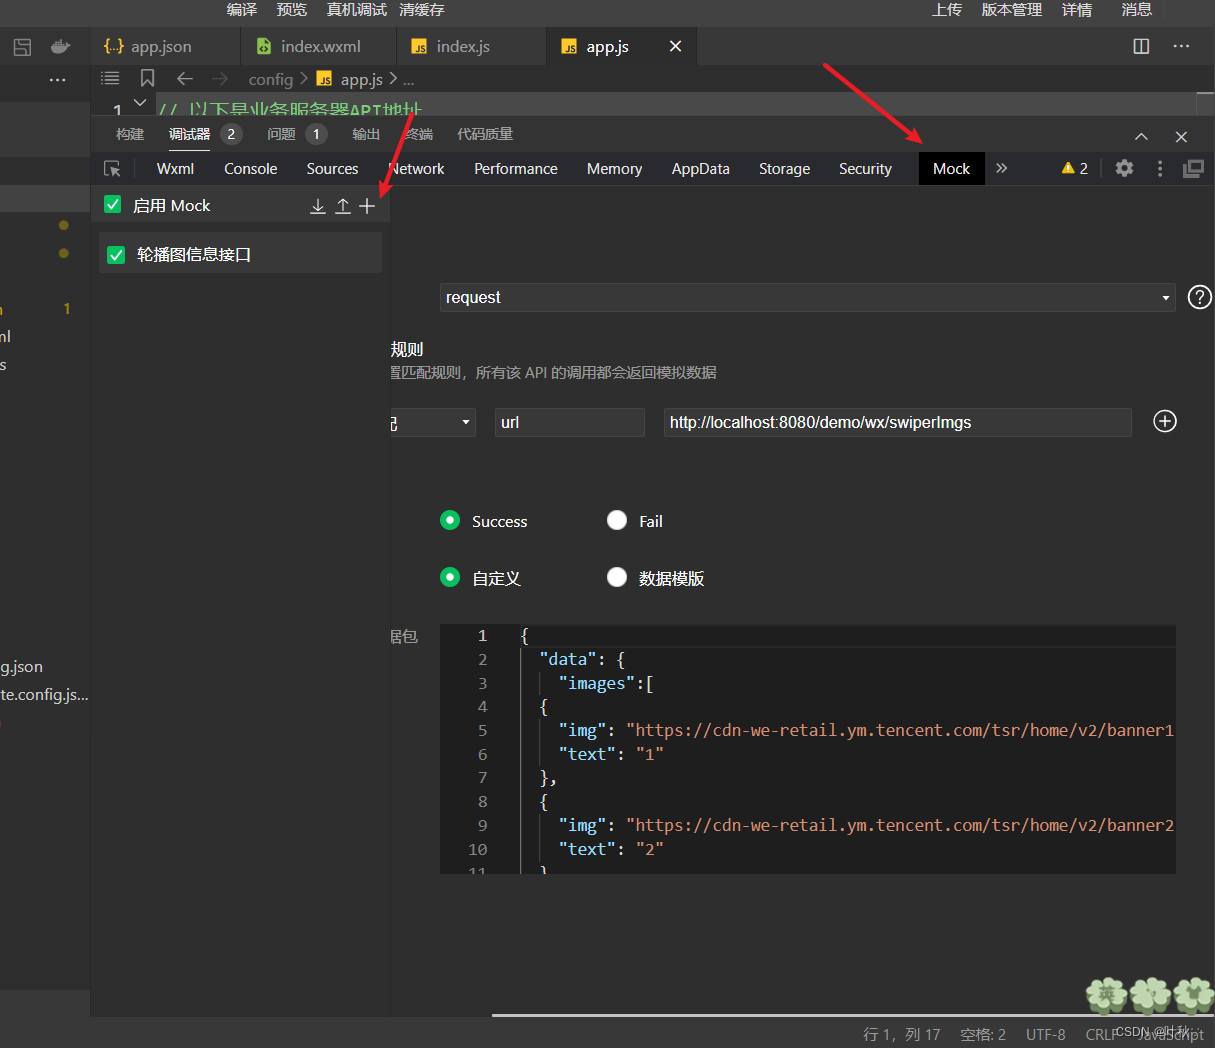
模拟数据
{"data": {"images":[{"img": "https://cdn-we-retail.ym.tencent.com/tsr/home/v2/banner1.png","text": "1"},{"img": "https://cdn-we-retail.ym.tencent.com/tsr/home/v2/banner2.png","text": "2"},{"img": "https://cdn-we-retail.ym.tencent.com/tsr/home/v2/banner3.png","text": "3"},{"img": "https://cdn-we-retail.ym.tencent.com/tsr/home/v2/banner4.png","text": "4"},{"img": "https://cdn-we-retail.ym.tencent.com/tsr/home/v2/banner5.png","text": "5"},{"img": "https://cdn-we-retail.ym.tencent.com/tsr/home/v2/banner6.png","text": "6"}
]},"statusCode": "200","header": {"content-type":"applicaiton/json;charset=utf-8"}
}
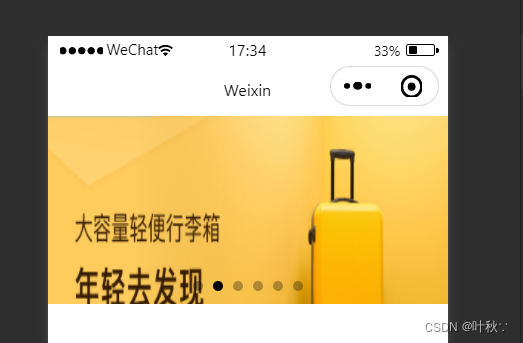
效果展示
3. 首页布局
index.wxss
/**index.wxss**/
.mobi-title{background-color: lightgray;padding: 10px;font-weight: 900;
}
.mobi-icon{border: 1rpx solid red;margin-right: 5px;
}
.list{
display: flex;
align-items: center;
border-bottom: 2px solid  silver;
}
.list-img{
padding:0 10px ;
}
.video-img{height: 50px;width: 55px;}
.list-detail{}
.list-title{
font-weight: 600;
margin: 3px 3px;
}
.list-tag{display: flex;align-items: center;
}
.list-info{}
.state{border: 1px solid lightblue;padding: 2px;color: lightblue;margin:10px 10px 10px 5px;
}
.join{
color: silver;
}
.list-num{color: red;font-weight: 700;
}
.list-info{color: silver;font-size: 12px;
}
index.wxml
<!--index.wxml-->
<view><swiper indicator-dots="true" autoplay="true">
<block wx:for="{{imgSrcs}}" wx:key="*text"><swiper-item><image src="{{item.img}}"></image></swiper-item>
</block>
</swiper>
</view>
<view class="mobi-title"><text class="mobi-icon"></text><text>会议信息</text>
</view>
<block wx:for-items="{{lists}}" wx:for-item="item" wx:key="item.id"><view class="list" data-id="{{item.id}}"><view class="list-img"><image class="video-img" mode="scaleToFill" src="{{item.image}}"></image></view><view class="list-detail"><view class="list-title"><text>{{item.title}}</text></view><view class="list-tag"><view class="state">{{item.state}}</view><view class="join"><text class="list-num">{{item.num}}</text>人报名</view></view><view class="list-info"><text>{{item.location}}</text>|<text>{{item.starttime}}</text></view></view></view>
</block>
<view class="section bottom-line"><text>到底啦</text>
</view>
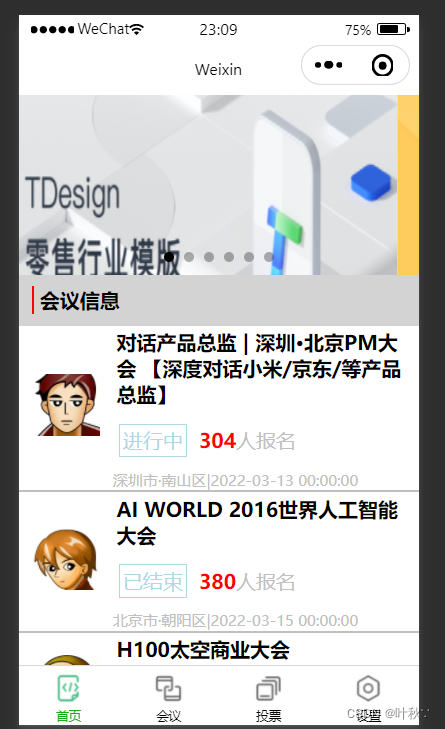
效果图
总结
本篇博客深入介绍和讨论了Flex弹性布局、轮播图mock遍历数据和首页布局这三个前端技术主题。我们通过详细的解释和实例演示,帮助读者更好地理解和应用这些技术。希望本篇博客能对您在前端开发中有所帮助!
