实现思路
- 创建SVG容器:首先,创建一个SVG容器元素,用于容纳时钟的各个部分。指定SVG的宽度、高度以及命名空间。
<svg width="200" height="200" xmlns="http://www.w3.org/2000/svg"><!-- 在此添加时钟的元素 -->
</svg>
- 绘制时钟的圆形背景:使用SVG的
<circle>(也可以用方形、椭圆)元素来绘制时钟的圆形背景。指定圆心坐标、半径和填充颜色。
<!-- 圆心为(100,100)半径为90,填充色fill这里是白色, 边框色stroke为黑色,边框宽度2px -->
<circle cx="100" cy="100" r="90" fill="white" stroke="black" stroke-width="2" />
- 绘制时钟的刻度线:绘制时钟的刻度线,包括小时刻度和分钟刻度。可以使用
<line>元素来表示每个刻度线。通过循环来创建12个小时刻度和60个分钟刻度。
<!-- 小时刻度 -->
<line x1="100" y1="10" x2="100" y2="20" stroke="black" stroke-width="2" transform="rotate(30)" /><!-- 分钟刻度 */
<line x1="100" y1="10" x2="100" y2="15" stroke="black" stroke-width="1" transform="rotate(6)" />- 绘制时钟的指针:绘制时钟的时针、分针和秒针。可以使用
<line>元素来表示每个指针,根据当前时间的小时、分钟和秒数来计算指针的角度。
<!-- 时针 */
<line x1="100" y1="100" x2="100" y2="60" stroke="black" stroke-width="4" transform="rotate(30)" /><!-- 分针 */
<line x1="100" y1="100" x2="100" y2="40" stroke="black" stroke-width="3" transform="rotate(180)" /><!-- 秒针 */
<line x1="100" y1="100" x2="100" y2="30" stroke="red" stroke-width="1" transform="rotate(90)" />
- 添加数字标识:在时钟的圆周上添加小时数字标识。你可以使用
<text>元素来添加小时数字,并使用text-anchor和dominant-baseline属性来对齐文本。
<text x="100" y="25" font-size="14" text-anchor="middle" dominant-baseline="middle">12</text>
<!-- 其他数字 */
- 更新时钟时间:要让时钟显示实际的时间,需要使用JavaScript来更新时针、分针和秒针的角度。你可以使用
setInterval或requestAnimationFrame来定期更新时钟。
function updateClock() {const now = new Date();const hours = now.getHours() % 12;const minutes = now.getMinutes();const seconds = now.getSeconds();// 计算时针、分针、秒针的角度并更新const hourAngle = (360 / 12) * (hours + minutes / 60);const minuteAngle = (360 / 60) * (minutes + seconds / 60);const secondAngle = (360 / 60) * seconds;// 更新时针、分针、秒针的变换属性hourHand.setAttribute("transform", `rotate(${hourAngle}, 100, 100)`);minuteHand.setAttribute("transform", `rotate(${minuteAngle}, 100, 100)`);secondHand.setAttribute("transform", `rotate(${secondAngle}, 100, 100)`);
}setInterval(updateClock, 1000); // 每秒更新一次
完整的代码如下:
<!DOCTYPE html>
<html><head><style>#clock {width: 200px;height: 200px;}.number {font-family: Arial, sans-serif;font-size: 12px;text-anchor: middle;}</style>
</head><body><svg id="clock" xmlns="http://www.w3.org/2000/svg"><circle cx="100" cy="100" r="90" stroke="black" stroke-width="2" fill="Lavender" /><line x1="100" y1="100" x2="100" y2="45" stroke="black" stroke-width="5" id="hour-hand" /><line x1="100" y1="100" x2="100" y2="25" stroke="black" stroke-width="3" id="minute-hand" /><line x1="100" y1="100" x2="100" y2="15" stroke="red" stroke-width="1" id="second-hand" /><circle cx="100" cy="100" r="4" stroke="black" stroke-width="2" fill="gray" /><g id="numbers" transform="translate(100,100)"><text x="0" y="-75" class="number">12</text><text x="80" y="5" class="number">3</text><text x="0" y="80" class="number">6</text><text x="-80" y="5" class="number">9</text></g><g id="ticks" transform="translate(100,100)"><!-- 刻度线,每5分钟一个 --><line x1="0" y1="-80" x2="0" y2="-90" stroke="black" stroke-width="1" transform="rotate(30)" /><line x1="0" y1="-80" x2="0" y2="-90" stroke="black" stroke-width="1" transform="rotate(60)" /><line x1="0" y1="-85" x2="0" y2="-90" stroke="black" stroke-width="1" transform="rotate(90)" /><line x1="0" y1="-80" x2="0" y2="-90" stroke="black" stroke-width="1" transform="rotate(120)" /><line x1="0" y1="-80" x2="0" y2="-90" stroke="black" stroke-width="1" transform="rotate(150)" /><line x1="0" y1="-85" x2="0" y2="-90" stroke="black" stroke-width="1" transform="rotate(180)" /><line x1="0" y1="-80" x2="0" y2="-90" stroke="black" stroke-width="1" transform="rotate(210)" /><line x1="0" y1="-80" x2="0" y2="-90" stroke="black" stroke-width="1" transform="rotate(240)" /><line x1="0" y1="-85" x2="0" y2="-90" stroke="black" stroke-width="1" transform="rotate(270)" /><line x1="0" y1="-80" x2="0" y2="-90" stroke="black" stroke-width="1" transform="rotate(300)" /><line x1="0" y1="-80" x2="0" y2="-90" stroke="black" stroke-width="1" transform="rotate(330)" /><line x1="0" y1="-85" x2="0" y2="-90" stroke="black" stroke-width="1" transform="rotate(360)" /></g></svg><script>function updateClock() {const now = new Date();const hours = now.getHours() % 12;const minutes = now.getMinutes();const seconds = now.getSeconds();const hourHand = document.getElementById('hour-hand');const minuteHand = document.getElementById('minute-hand');const secondHand = document.getElementById('second-hand');const hourDeg = (360 / 12) * hours + (360 / 12) * (minutes / 60);const minuteDeg = (360 / 60) * minutes;const secondDeg = (360 / 60) * seconds;hourHand.setAttribute('transform', `rotate(${hourDeg}, 100, 100)`);minuteHand.setAttribute('transform', `rotate(${minuteDeg}, 100, 100)`);secondHand.setAttribute('transform', `rotate(${secondDeg}, 100, 100)`);}setInterval(updateClock, 1000); // 每秒更新一次时钟updateClock(); // 初始加载时钟</script>
</body></html>
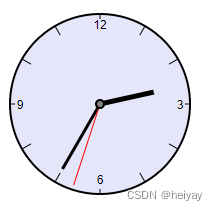
一个简单的时钟就做好了,svg还可以实现很多图形。下面将介绍svg的使用
svg详解
坐标
svg使用坐标系统来定位图形元素,这个坐标系统是基于画布的左上角为原点的坐标系。坐标以像素为单位,x 轴正方向是向右,y 轴正方向是向下。

说到像素就要介绍另一个很重要的属性viewBox。viewBox 属性的值是一个包含 4 个参数的列表 min-x, min-y, width and height,以空格或者逗号分隔开,在用户空间中指定一个矩形区域映射到给定的元素。
例如:
<svg width="200" height="200" viewBox="0 0 100 100">…</svg>
width和 height 属性定义了SVG元素的宽度和高度,即视口的尺寸。在此示例中,视口的宽度为200个用户单位,高度为200个用户单位。viewBox 属性的值 "0 0 100 100" 定义了视口的坐标系统。具体来说,它表示视口的左上角坐标为 (0, 0),视口的宽度为100个用户单位,高度为100个用户单位。
这个 100100 的区域,会放到 200200 的画布上显示。于是就形成了放大两倍的效果。
viewBox 的作用是:
- 控制可视区域:它确定了用户坐标系统中哪一部分会在视口中可见。在这个示例中,它定义了一个正方形视口,它与SVG元素的宽度和高度不同,因此可以用来控制用户坐标系统中的图形在视口中如何显示。
- 缩放和平移:
viewBox可以通过设置不同的值来实现缩放和平移效果。例如,如果将viewBox设置为"0 0 200 200",那么视口会变得较大,用户坐标系统中的内容将以更小的比例显示在视口中,实现了缩放效果。 - 实现响应式设计:
viewBox可用于实现响应式设计,允许SVG图形在不同尺寸的容器中自适应调整,而不会失真或变形。
图形
1、矩形:rect
rect常用的属性: x:左上角的x坐标,y:左上角y的坐标,width:宽。height:高,rx:圆角x方位的半径,ry:圆角y方位的半径
<rect x="10" y="10" width="30" height="30"/>
<rect x="60" y="10" rx="10" ry="10" width="30" height="30"/>
2、圆形
circle有三个基本的属性cx:圆心的x坐标,cy:圆心的y坐标,r:半径
<circle cx="100" cy="100" r="90" />
3、椭圆
ellipse 椭圆有四个基本属性 cx:圆心的x坐标,cy:圆心的y坐标,rx:x轴半径,ry:y轴半径。
<ellipse cx="75" cy="75" rx="20" ry="5"/>
4、线条
<line x1="10" x2="50" y1="110" y2="150" stroke="black" stroke-width="5"/>
x1:起点x位置,y1:起点的y位置,x2:终点的x位置,y2:终点的y位置
5、折线
<polygon points="50 180, 160 55, 180 70, 180 60, 190 65, 205 50, 195 35, 205 40, 190 30, 180 80" fill="white" stroke="black"/>
折线就是很多个点之间的连线,points属性就放各个点的坐标,用逗号隔开
路径
SVG 中的 <path> 元素用于创建复杂的路径和轮廓,它可以包括各种路径命令,每个命令都对路径的构建产生不同的影响。以下是 SVG <path> 元素中常用的路径命令及其意义:
-
**M **:移动到指定的坐标位置。
M x y:将当前点移动到(x, y)的位置,而不绘制线条。
-
**L **:从当前点绘制一条直线到指定的坐标位置。
L x y:从当前点绘制一条直线到(x, y)的位置。
-
**H **:从当前点绘制一条水平线到指定的 x 坐标位置。
H x:从当前点绘制一条水平线到(x, 当前 y)的位置。
-
V:从当前点绘制一条垂直线到指定的 y 坐标位置。
V y:从当前点绘制一条垂直线到(当前 x, y)的位置。
-
**C **:绘制三次贝塞尔曲线。
C x1 y1, x2 y2, x y:从当前点绘制一条三次贝塞尔曲线,使用控制点(x1, y1)和(x2, y2),终点为(x, y)。
-
**S **:绘制平滑的三次贝塞尔曲线。
S x2 y2, x y:从当前点绘制一条平滑的三次贝塞尔曲线,只指定一个控制点(x2, y2),终点为(x, y)。第一个控制点自动与上一次曲线的终点对称。
-
Q:绘制二次贝塞尔曲线。
Q x1 y1, x y:从当前点绘制一条二次贝塞尔曲线,使用控制点(x1, y1),终点为(x, y)。
-
**T **:绘制平滑的二次贝塞尔曲线。
T x y:从当前点绘制一条平滑的二次贝塞尔曲线,只指定一个控制点(x, y)。控制点自动与上一次曲线的终点对称。
-
**A **:绘制椭圆弧。
A rx ry x-axis-rotation large-arc-flag sweep-flag x y:绘制椭圆弧,其中(rx, ry)是椭圆的半长轴和半短轴,x-axis-rotation是椭圆的旋转角度,large-arc-flag表示大弧还是小弧,sweep-flag表示顺时针还是逆时针,(x, y)是弧的终点。
-
Z (Close Path):关闭路径,连接当前点与路径的起始点,形成封闭的形状。
这些路径命令可以组合使用,以创建各种形状和轮廓。路径命令通常以字母表示,后跟一个或多个参数,参数用逗号或空格分隔。你可以使用 <path> 元素来定义路径,将路径命令放在 d 属性中,如下所示:
<path d="M 10 10 L 50 10 L 50 50 L 10 50 Z" />
上面的示例绘制一个矩形,首先移动到 (10, 10),然后绘制四条线段,最后使用 Z 命令关闭路径。路径命令的顺序和参数的值决定了路径的形状。
边框与填充
-
边框(Stroke):
stroke属性:stroke属性用于指定图形元素的边框颜色。可以使用颜色值(如颜色名称、十六进制值或RGB值)来设置边框颜色。stroke-width属性:stroke-width属性用于指定边框的宽度,以用户单位(通常是像素)为单位。stroke-linecap属性:stroke-linecap属性定义了线段的端点样式。它可以取三个值之一:butt(默认,平直的端点)、round(圆形的端点)、square(方形的端点)。stroke-linejoin属性:stroke-linejoin属性定义了线段的连接样式。它可以取三个值之一:miter(默认,尖角连接)、round(圆角连接)、bevel(斜角连接)。stroke-dasharray属性:stroke-dasharray属性定义了虚线的模式,即一系列数字,用来交替表示实线和空白线段的长度。例如,stroke-dasharray="5,2"表示5个单位的实线和2个单位的空白线。stroke-opacity属性:stroke-opacity属性用于定义边框的透明度,其值范围从0(完全透明)到1(完全不透明)。
-
填充(Fill):
fill属性:fill属性用于指定图形元素的填充颜色。你可以使用颜色值来设置填充颜色。fill-opacity属性:fill-opacity属性用于定义填充颜色的透明度,其值范围从0(完全透明)到1(完全不透明)。
以下是一个示例,演示如何在SVG中应用边框和填充:
<svg xmlns="http://www.w3.org/2000/svg" width="100" height="100"><!-- 红色填充,蓝色边框,边框宽度为2,圆形 --><circle cx="50" cy="50" r="40" fill="red" stroke="blue" stroke-width="2" />
</svg>
文字
SVG中的文字属性允许你在图形中插入文本,并以多种方式自定义文本的外观。以下是SVG中常用的文字属性:
-
x和y属性:x和y属性用于指定文本的起始坐标,即文本的左上角(如果文本是从左到右书写,或者是文本的起点)的坐标。这些坐标值是以用户单位(通常是像素)为单位的坐标值。 -
font-family属性:font-family属性用于指定文本的字体系列。你可以设置字体系列的名称,以便SVG渲染引擎查找可用的字体。例如,font-family="Arial, sans-serif"表示首选Arial字体,如果不可用,则使用默认的sans-serif字体。 -
font-size属性:font-size属性用于指定文本的字体大小,以用户单位(通常是像素)为单位。例如,font-size="12"表示字体大小为12个用户单位。 -
font-weight属性:font-weight属性用于设置文本的粗细,可以取值如 “normal”、“bold” 或数字值(如 400 表示 normal,700 表示 bold)。 -
font-style属性:font-style属性用于设置文本的字体风格,可以取值如 “normal”、“italic” 或 “oblique”。 -
text-anchor属性:text-anchor属性定义文本的水平对齐方式。可以取值如 “start”(默认,文本的起点对齐到指定的x坐标)、“middle”(文本的中点对齐到指定的x坐标)、“end”(文本的末尾对齐到指定的x坐标)。 -
dominant-baseline属性:dominant-baseline属性定义文本的垂直对齐方式。可以取值如 “auto”(默认,文本基线对齐到y坐标)、“middle”(文本中点对齐到y坐标)、“text-before-edge”(文本的顶部对齐到y坐标)等。 -
text-decoration属性:text-decoration属性用于添加文本的装饰效果,如下划线、删除线等。可以取值如 “none”(默认,无装饰)、“underline”(下划线)。 -
fill属性:fill属性用于设置文本的填充颜色,类似于图形元素的填充属性。你可以使用颜色值来指定填充颜色。 -
fill-opacity属性:fill-opacity属性用于定义文本填充颜色的透明度,其值范围从0(完全透明)到1(完全不透明)。
以下是一个示例:
<svg xmlns="http://www.w3.org/2000/svg" width="200" height="100"><!-- 在坐标 (50, 50) 处插入红色、粗体、24像素大小的文本 --><text x="50" y="50" font-family="Arial, sans-serif" font-size="24" font-weight="bold" fill="red">Hello, SVG Text!</text>
</svg>
