文章目录
- 前言
- 一、DETR论文原理
- 1、DETR整体介绍
- 2、DETR论文贡献
- 3、DETR模型框架
- 4、DETR基于二分图匹配的LOSS
- 二、DETR环境安装
- 1、安装基础环境
- 2、pycocotools安装
- 3、其它环境安装
- 4、环境验证
- 5、训练与推理效果显示
- 三、数据准备
- 1、coco 数据格式
- 2、修改数据
- 四、DETR加载数据代码解读
- 1、数据加载(CocoDetection)代码解读
- 2、数据前处理self.prepare函数代码解读
- 3、数据变化self._transforms()函数代码解读
- 4、数据mask转换代码解读
- 五、模型主函数代码解读
- 六、CNN提取特征代码解读(self.backbone)
- 1、image特征代码解读
- 2、mask特征代码解读
- 七、Transformer编解码代码解读
- 1、encode编码代码解读
- a、TransformerEncoder代码解读
- b、TransformerEncoderLayer代码解读
- c、forward_post函数代码解读
- 2、decode解码代码解读
- a、TransformerDecoder代码解读
- b、TransformerDecoderLayer代码解读
- c、forward_post函数代码解读
- 3、模型输出结果格式
- 八、Loss的二分匹配代码解读
- 1、matcher初始化
- 2、二分匹配matcher代码解读
- 九、Loss计算代码解读
- 1、数据输入格式
- 2、labels/boxes/cardinality的loss代码解读
- 十、预测代码简单解读
- 总结
前言
本文阐明DETR论文相关原理与源码解读,其中本文将花费大量笔墨解读源码,我将从数据准备到数据加工,到CNN特征提取,到transform编解码,到解码二分匹配,到端到端设计Loss,也简要说明DETR推理过程。本文是一篇极少涵盖DETR全部内容,重点结合代码运行过程,使本文有大量内容,初步计算,文字与代码共约5万字左右,实现DETR模型完整代码解读。最重要,本篇文章与大多博客有些区别,我是将DETR所有内容,并包含细节(如:可学习query 二分匹配等)也做了解读,并非其它博客要么解读一部分LOSS或二分匹配,甚至只是理论或文字解读,而未能结合代码说明。为此,我将结合代码,一步一步解读,直击核心,使读者读完便明白原理使用代码实现是如此简单。
论文名称(DETR):End-to-End Object Detection with Transformers
论文链接:点击这里
源码链接:点击这里
一、DETR论文原理
1、DETR整体介绍
DETR 是 Facebook 团队于 2020 年提出的基于 Transformer 的端到端目标检测,没有NMS处理与 anchor设计,实现端到端的目标检测框架。该方法 结果在 COCO 数据集上效果与 Faster RCNN 相当,在大目标上效果比 Faster RCNN 好,且可以很容易地将 DETR 迁移到其他任务例如全景分割。该方法给定一组固定可学习query,使用CNN提取特征,编解码整合信息,直接并行输出最终的预测集。其整体架构如下图:
2、DETR论文贡献
- 端到端架构设计:去除NMS和anchor设计,减少超参与人工干预,使网络能
work; - 基于Transformer的编解码设计:encode全局学习,进一步提取特征,decode解码直接预测结果;
- loss计算新方式:通过二分图匹配的方法将直接预测框与label做loss,实际预测100个框,将label使用
某种方式也变成100个,在使用匈牙利匹配,计算loss; - 提出可学习object query:在decoder输入一组可学习的object query和encoder输出的全局上下文特征,直接以并行方式强制输出最终的100个预测框;
牛逼之处在于无nms和anchor,直接预测结果,且work。
3、DETR模型框架
模型框架很简单,使用CNN提取特征,然后拉直成transformer输入结构形式(还没有swin方式,像素太大了,所以用CNN降低像素(即宽高)),即将图片输入,首先经过一个CNN网络提取图片的局部特征,随后输入Transformer的Encoder,进一步学习这个特征的全局信息,可计算每个点与其它位置特征等相关依赖信息,就是trasformer老本行,继续把Encoder的输出到Decoder,且输入Object Query,并限制解码出100个框(作者认为一个图最大100框),生成100个预测框,最终将预测出的100个框和gt框做loss,通过二分图匹配的方式,确定其中哪些预测框是有物体的,哪些是没有物体的(背景),再把有物体的框和gt框一起计算分类损失和回归损失。而推理的时候更简单,直接对decoder中生成的100个预测框设置一个置信度阈值(0.7),大于保留,小于丢弃。其结构如下图:

4、DETR基于二分图匹配的LOSS
假设模型预测pre为N个预测框,gt为M个框,通常N>M,loss计算就是先将这种方式转为二分图方式,然后通过匈牙利算法匹配pre与gt对应关系,使其成本最小。我的感觉很类似追踪运动匹配方法。具体实现为: 就先对这N个预测框和M个gt框进行一个二分图的匹配,先确定每个gt框对应哪个pre预测框,确定唯一对应,最终再计算M个预测框和M个gt框的总损失。其中cost matrix使用为loss。

注:loss有更改,类别交叉熵去掉log,box的loss使用GIOU loss 与 L1 loss的合并,前者不受框大小影响。
二、DETR环境安装
1、安装基础环境
我的电脑是cuda11.3,因此使用下面安装,不同cuda版本可参考官网pytorch安装命令点击这里
conda create -n detr   python=3.8
pip install torch==1.11.0+cu113 torchvision==0.12.0+cu113 torchaudio==0.11.0 --extra-index-url https://download.pytorch.org/whl/cu113 -i https://mirrors.aliyun.com/pypi/simple/
若安装出现问题,可更换以下源尝试:
清华:https://pypi.tuna.tsinghua.edu.cn/simple
阿里云:https://mirrors.aliyun.com/pypi/simple/
中国科技大学 https://pypi.mirrors.ustc.edu.cn/simple/
华中理工大学:http://pypi.hustunique.com/
山东理工大学:http://pypi.sdutlinux.org/
豆瓣:https://pypi.douban.com/simple/
2、pycocotools安装
windows10安装(我使用此安装方式):
pip install cython  -i https://mirrors.aliyun.com/pypi/simple/
pip install pycocotools -i https://pypi.tuna.tsinghua.edu.cn/simple
ubuntu安装(这是我以前记录):
sudo apt-get install cython
get clone https://github.com/cocodataset/cocoapi
make  # 进入到pythonAPI,并输入makepython setup.py build_ext --inplace
python setup.py build_ext install
cocoapi下载:这里
3、其它环境安装
若缺少某些环境,可pip install ** -i https://mirrors.aliyun.com/pypi/simple/ 安装
4、环境验证
我已验证其环境,可正常运行,训练代码直接修改源码main.py文件的数据路径,而测试代码也可直接使用以下我修改的代码,如下:
from pathlib import Path  # pathlib路径处理库,代替了os.path
import torch
import os
from models import position_encoding
from models import build_model
from models import backbone
from models import transformer
from models import detr
from datasets import cocodef build_model():num_classes = 91device = torch.device('cuda')#搭建position embeddingN_steps = 256 // 2position_embedding = position_encoding.PositionEmbeddingSine(N_steps, normalize=True)train_backbone = False#搭建backbonetest_backbone = backbone.Backbone('resnet50',train_backbone,False,False)#组合在一起test_model = backbone.Joiner(test_backbone,position_embedding)test_model.num_channels = test_backbone.num_channels#搭建transformertest_transformer = transformer.Transformer(d_model=256,dropout=0.1,nhead=8,dim_feedforward=2048,num_encoder_layers=6,num_decoder_layers=6,normalize_before=False,return_intermediate_dec=True,)num_queries = 100aux_loss = True#搭建detrmodel = detr.DETR(test_model,test_transformer,num_classes,num_queries,aux_loss)return modeldef build_dataset(image_set):root=Path('E:/project/DATA/coco2017')assert root.exists(), f'provided COCO path {root} does not exist'PATHS = {"train": (root / "train", root / "annotations" / f'train.json'),"val": (root / "val", root / "annotations" / f'val.json'),"test": (root / "test", root / "annotations" / f'test.json'),}img_folder, ann_file = PATHS[image_set]dataset = coco.CocoDetection(img_folder, ann_file, transforms=coco.make_coco_transforms(image_set), return_masks=False)return datasetfrom PIL import Image
import datasets.transforms as T
from util.misc import nested_tensor_from_tensor_listimport cv2transformer_test=T.Compose([T.RandomResize([400], max_size=1333),T.ToTensor(),T.Normalize([0.485, 0.456, 0.406], [0.229, 0.224, 0.225])])def img_preprocess(img_path):# img_path=r'E:\project\DATA\coco2017\val\000000000139.jpg'img=Image.open(img_path).convert("RGB")img_new,_=transformer_test(img,None)img=nested_tensor_from_tensor_list([img_new])return imgdef init_model(check_pth):device = torch.device('cuda')model = build_model()model.to(device)# load model paramscheckpoint = torch.load(check_pth, map_location='cpu')model.load_state_dict(checkpoint["model"])model.eval()# postprocessreturn model,devicedef main(model,device):#postprocess# postprocessors = {'bbox': detr.PostProcess()}import timetimeArr = time.localtime()time_str = time.strftime("%Y_%m_%d-%H_%M_%S", timeArr)out_dir=os.path.join('runs/test', 'out_result_'+str(time_str))if not os.path.exists(out_dir):os.makedirs(out_dir)for img_name in os.listdir(img_root):if img_name[-3:] !='jpg':continueimg_path=os.path.join(img_root,img_name)img_data=img_preprocess(img_path)img_cv=cv2.imread(img_path)h,w=img_cv.shape[:2]img_data = img_data.to(device)output = model(img_data)orig_target_sizes =torch.tensor([[h, w]]).to(device)result = detr.PostProcess()(output, orig_target_sizes)[0]# print(res)res_index,res_score,res_lable,res_bbox = [],[],[],[]min_score = 0.9for i in range(0,100):res_tmp = result['scores']if float(res_tmp[i]) > min_score:res_score.append(float(res_tmp[i]))res_lable.append(int(result['labels'][i].cpu().numpy()))res_bbox.append(result['boxes'][i].cpu().numpy().tolist())print("result: ",res_score, res_lable, res_bbox)for bbox in res_bbox:cv2.rectangle(img_cv, (int(bbox[0]), int(bbox[1])), (int(bbox[2]), int(bbox[3])), (255, 0, 0), 1)cv2.imwrite(os.path.join(out_dir,img_name),img_cv)if __name__ == '__main__':# load_path = 'E:/project/project_tracker/code/detr-main/runs/train/checkpoint0099.pth'load_path='weights/detr-r50-e632da11.pth'model,device = init_model(load_path)img_root=r'E:\project\project_shixi\data\detr_data\val2017'main(model,device)
5、训练与推理效果显示
训练效果:

测试效果:
三、数据准备
1、coco 数据格式
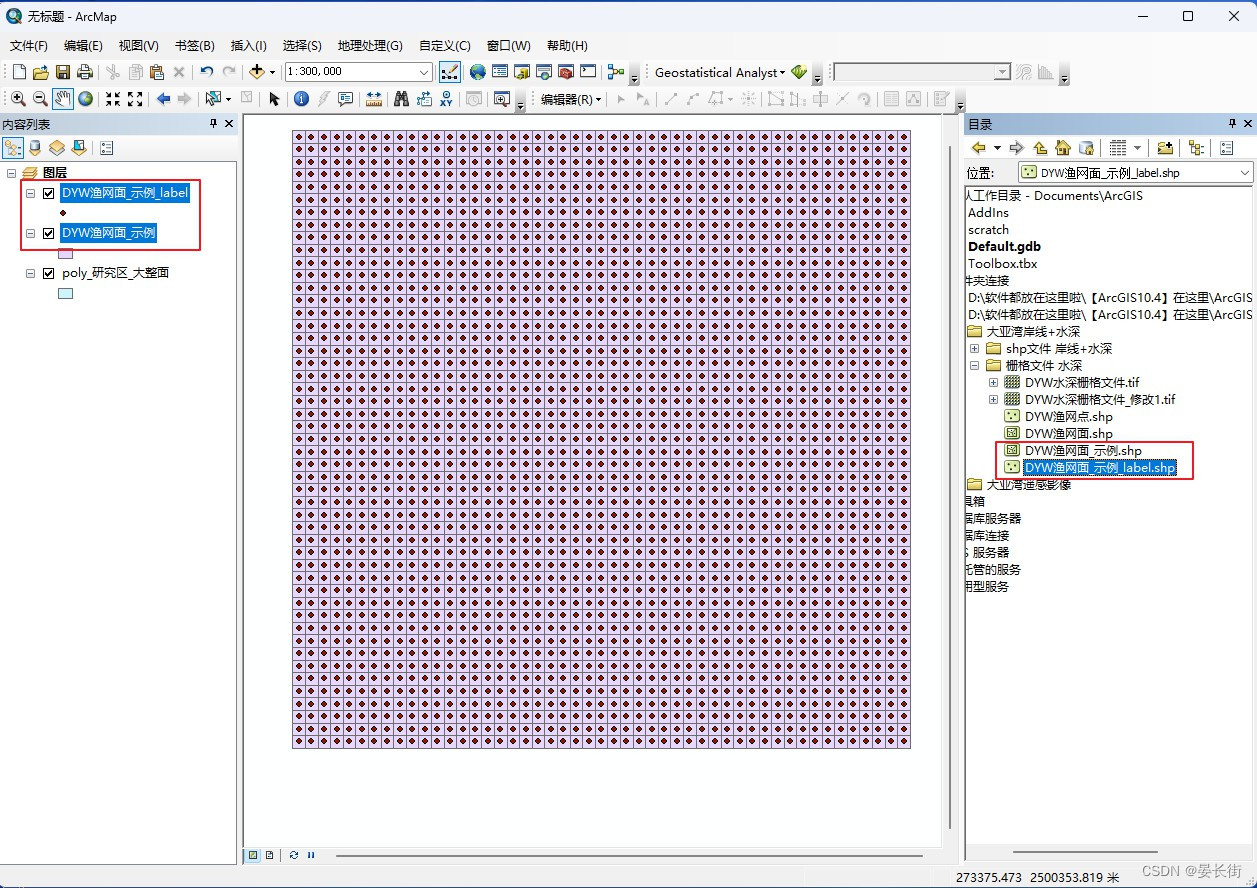
DETR源码的数据纯粹为coco数据格式,有很多博客对coco数据格式也说明,我不想过多解释,读者可按照以下图名称修改文件名称与位置(此图格式可不修改源码),如下图:

2、修改数据
当然你也能个性化修改名称,源码在coco.py文件中,可根据个人爱好修改名称等内容,代码如下:
def build(image_set, args):root = Path(args.coco_path)assert root.exists(), f'provided COCO path {root} does not exist'mode = 'instances'PATHS = {"train": (root / "train2017", root / "annotations" / f'{mode}_train2017.json'),"val": (root / "val2017", root / "annotations" / f'{mode}_val2017.json'),}img_folder, ann_file = PATHS[image_set]dataset = CocoDetection(img_folder, ann_file, transforms=make_coco_transforms(image_set), return_masks=args.masks)return dataset
以上为detr的数据格式,其过于普通,我不在细化说明。
四、DETR加载数据代码解读
本打算过滤数据加载说明,但模型出现mask数据,被迫解读数据加载,其中我将说明下,mask实际是被图像数据覆盖位置为0,否则为1的二维数据,这部分我后续代码也会详细说明。
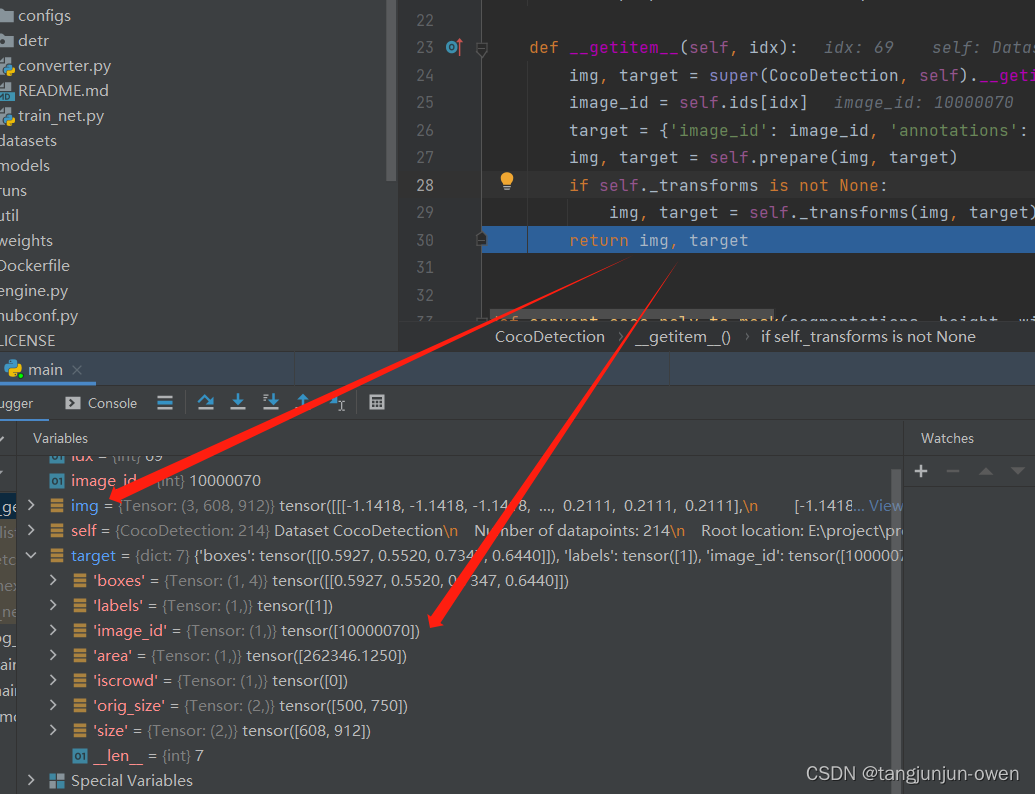
1、数据加载(CocoDetection)代码解读
数据处理主要代码,该代码来源coco.py文件,如下:
class CocoDetection(torchvision.datasets.CocoDetection):def __init__(self, img_folder, ann_file, transforms, return_masks):super(CocoDetection, self).__init__(img_folder, ann_file)self._transforms = transformsself.prepare = ConvertCocoPolysToMask(return_masks)def __getitem__(self, idx):img, target = super(CocoDetection, self).__getitem__(idx)image_id = self.ids[idx]target = {'image_id': image_id, 'annotations': target}img, target = self.prepare(img, target)if self._transforms is not None:img, target = self._transforms(img, target)return img, target
2、数据前处理self.prepare函数代码解读
我们可以发现,该函数主要将其获得label相关信息转为张量与固定格式,并对不满足需求标签做了处理,如右下角点小于左上角点的box与class需排除等。
3、数据变化self._transforms()函数代码解读
该函数就是一系列图像处理方式,我只想说原本以图像尺寸高宽为参照的box变成小于1的处理,可参考transformers.py文件的类,代码如下:
class Normalize(object):def __init__(self, mean, std):self.mean = meanself.std = stddef __call__(self, image, target=None):image = F.normalize(image, mean=self.mean, std=self.std)if target is None:return image, Nonetarget = target.copy()h, w = image.shape[-2:]if "boxes" in target:boxes = target["boxes"]boxes = box_xyxy_to_cxcywh(boxes)boxes = boxes / torch.tensor([w, h, w, h], dtype=torch.float32)target["boxes"] = boxesreturn image, target
从该处理可看出,box会转成中心点与宽高格式,最后需分别除以图像w与h(w与h是经过resize等变化,box也跟着对应变化了),其代码boxes = boxes / torch.tensor([w, h, w, h], dtype=torch.float32)。
从上图可知,最终box是除了对应图像宽高对应中心点与宽高,该结构类似yolov5的数据txt格式。
4、数据mask转换代码解读
搞了半天,你会发现数据处理并未生成mask对应代码,然却在collate_fn中生成,其代码如下:
def collate_fn(batch):batch = list(zip(*batch))batch[0] = nested_tensor_from_tensor_list(batch[0]) # 图像return tuple(batch)
batch = list(zip(*batch))该函数的batch转换为下图显示(如下)。
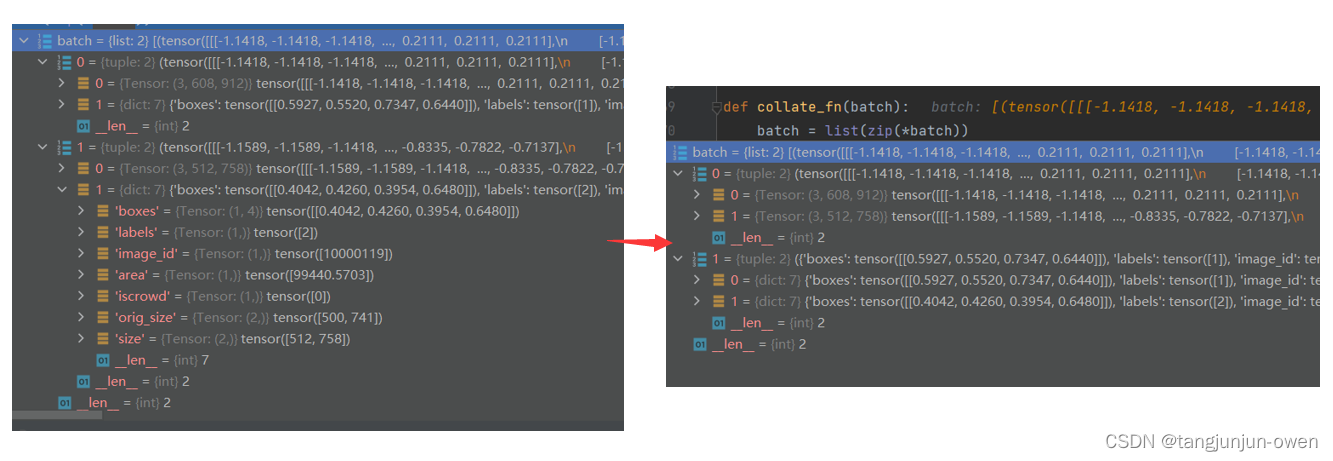
你会发现该函数nested_tensor_from_tensor_list(batch[0])才是通过图像生成mask的方法,其具体代码如下:
def nested_tensor_from_tensor_list(tensor_list: List[Tensor]):# TODO make this more generalif tensor_list[0].ndim == 3:if torchvision._is_tracing():# nested_tensor_from_tensor_list() does not export well to ONNX# call _onnx_nested_tensor_from_tensor_list() insteadreturn _onnx_nested_tensor_from_tensor_list(tensor_list)# TODO make it support different-sized imagesmax_size = _max_by_axis([list(img.shape) for img in tensor_list]) # 获取图像最大值宽高[3,608,912]# min_size = tuple(min(s) for s in zip(*[img.shape for img in tensor_list]))batch_shape = [len(tensor_list)] + max_size # 构建图像初始化,等待填充[2,3,608,912]b, c, h, w = batch_shapedtype = tensor_list[0].dtypedevice = tensor_list[0].devicetensor = torch.zeros(batch_shape, dtype=dtype, device=device) # 构建0张量,形状为[2,3,608,912]mask = torch.ones((b, h, w), dtype=torch.bool, device=device) # 构建全为True张量,[2,608,912]for img, pad_img, m in zip(tensor_list, tensor, mask):pad_img[: img.shape[0], : img.shape[1], : img.shape[2]].copy_(img) # pad_img全为0,图像左上角开始填充,这样也不影响box信息m[: img.shape[1], :img.shape[2]] = False # 有图像像素覆盖的mask值为0,否则为1else:raise ValueError('not supported')return NestedTensor(tensor, mask)
该函数大意是在所有batch图像中找到最大高宽,不足最大值高宽使用0填充,且图像放置是左上角为起点,这样并不会影响box等相关信息。每个图的mask也是最大值宽高构建的二维张量,使用1做填充,图像也是左上角为起点放置,被图像覆盖的mask为False,否则为True。
最终输入模型数据格式如下图:

五、模型主函数代码解读
DETR模型集成类为DETR(nn.Module)名称,forward已构成detr模型全部内容,其代码如下:
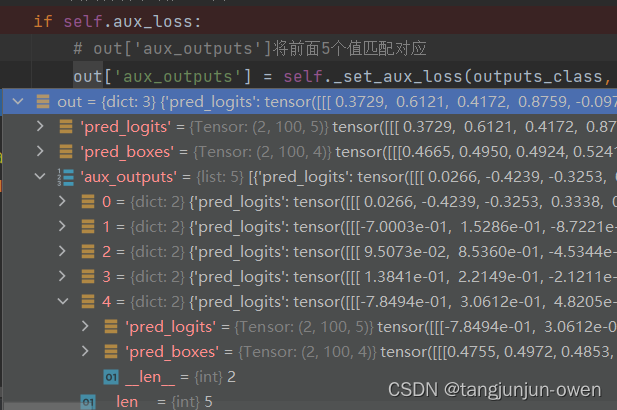
class DETR(nn.Module):""" This is the DETR module that performs object detection """def __init__(self, backbone, transformer, num_classes, num_queries, aux_loss=False):""" Initializes the model.Parameters:backbone: torch module of the backbone to be used. See backbone.pytransformer: torch module of the transformer architecture. See transformer.pynum_classes: number of object classesnum_queries: number of object queries, ie detection slot. This is the maximal number of objectsDETR can detect in a single image. For COCO, we recommend 100 queries.aux_loss: True if auxiliary decoding losses (loss at each decoder layer) are to be used."""super().__init__()self.num_queries = num_queriesself.transformer = transformerhidden_dim = transformer.d_modelself.class_embed = nn.Linear(hidden_dim, num_classes + 1)self.bbox_embed = MLP(hidden_dim, hidden_dim, 4, 3)self.query_embed = nn.Embedding(num_queries, hidden_dim)self.input_proj = nn.Conv2d(backbone.num_channels, hidden_dim, kernel_size=1)self.backbone = backboneself.aux_loss = aux_lossdef forward(self, samples: NestedTensor):""" The forward expects a NestedTensor, which consists of:- samples.tensor: batched images, of shape [batch_size x 3 x H x W]- samples.mask: a binary mask of shape [batch_size x H x W], containing 1 on padded pixelsIt returns a dict with the following elements:- "pred_logits": the classification logits (including no-object) for all queries.Shape= [batch_size x num_queries x (num_classes + 1)]- "pred_boxes": The normalized boxes coordinates for all queries, represented as(center_x, center_y, height, width). These values are normalized in [0, 1],relative to the size of each individual image (disregarding possible padding).See PostProcess for information on how to retrieve the unnormalized bounding box.- "aux_outputs": Optional, only returned when auxilary losses are activated. It is a list ofdictionnaries containing the two above keys for each decoder layer."""if isinstance(samples, (list, torch.Tensor)):samples = nested_tensor_from_tensor_list(samples)# features包含mask [2,19,29]与图像特征 [2,2048,19,29],pos为位置编码后的结果[2,256,19,29]features, pos = self.backbone(samples)src, mask = features[-1].decompose() # src, mask 实际为features内容assert mask is not None# 这一步很重要了,self.input_proj(src)使用简单1*1卷积降维将[2,2048,19,29]-->[2,256,19,29],# 使用了self.query_embed为可学习query,为[100,256],# pos[-1]为加工的位置编码,为[2,256,19,29]hs = self.transformer(self.input_proj(src), mask, self.query_embed.weight, pos[-1])[0] # [6,100,2,256]outputs_class = self.class_embed(hs) # [6,2,100,92] 92=cls_num+背景+置信度,在如三个类[person,cat,dog],则为3+1+1outputs_coord = self.bbox_embed(hs).sigmoid() # [6,2,100,4]out = {'pred_logits': outputs_class[-1], 'pred_boxes': outputs_coord[-1]} # 都是取最后一个,变成[2,100,92]和[2,100,4]# 上面内容训练与推理适用if self.aux_loss: # 训练loss计算使用所有解码结果out['aux_outputs'] = self._set_aux_loss(outputs_class, outputs_coord)return out从以上可知,该代码主要包含以下内容,我将在后续会重点解读:
features, pos = self.backbone(samples):该函数是CNN特征提取部分,detr模型使用resnet模型做特征提取;
hs = self.transformer(self.input_proj(src), mask, self.query_embed.weight, pos[-1])[0]: 该部分是encode与decode过程,特别是decode有结合可学习query方式。
六、CNN提取特征代码解读(self.backbone)
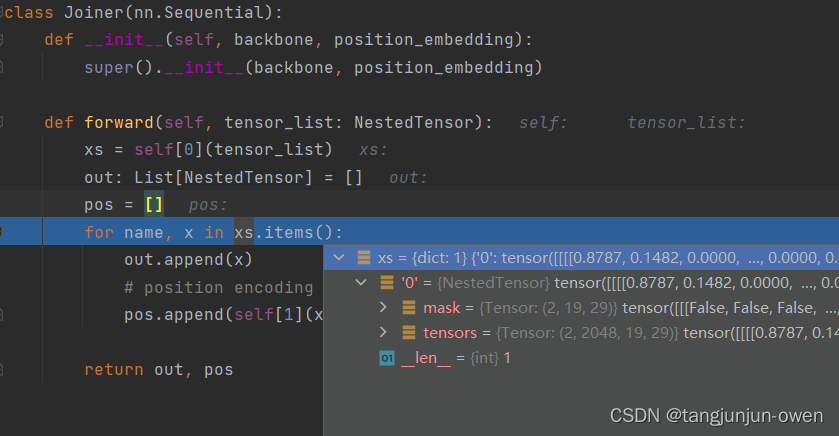
detr在使用self.backbone模块时候,使用了一层包装Joiner类,self[0]为图像特征提取,self[1]为mask处理,我将分别介绍self[0]与self[1]相关内容,其代码如下:
class Joiner(nn.Sequential):def __init__(self, backbone, position_embedding):super().__init__(backbone, position_embedding)def forward(self, tensor_list: NestedTensor):xs = self[0](tensor_list)out: List[NestedTensor] = []pos = []for name, x in xs.items():out.append(x)# position encodingpos.append(self[1](x).to(x.tensors.dtype)) # 位置进行变换return out, pos经过图像特征处理格式如下图显示:
1、image特征代码解读
detr的CNN特征提取采用resnet结构,该代码在backbone.py文件中,我已在代码中注释相应内容,该代码处理2个任务,其一对图像特征提取,其二使用插值将mask高宽变成与特征图一致,然图像特征CNN较为简单,我将不做解释,其代码如下:
class BackboneBase(nn.Module):def __init__(self, backbone: nn.Module, train_backbone: bool, num_channels: int, return_interm_layers: bool):super().__init__()for name, parameter in backbone.named_parameters():if not train_backbone or 'layer2' not in name and 'layer3' not in name and 'layer4' not in name:parameter.requires_grad_(False)if return_interm_layers:return_layers = {"layer1": "0", "layer2": "1", "layer3": "2", "layer4": "3"}else:return_layers = {'layer4': "0"}self.body = IntermediateLayerGetter(backbone, return_layers=return_layers)self.num_channels = num_channelsdef forward(self, tensor_list: NestedTensor):xs = self.body(tensor_list.tensors) # [2,2048,19,29]out: Dict[str, NestedTensor] = {}for name, x in xs.items():m = tensor_list.mask # 为mask,如[2,608,912]assert m is not Nonemask = F.interpolate(m[None].float(), size=x.shape[-2:]).to(torch.bool)[0] # 通过插值,将mask转为输出高宽[1,2,19,29]out[name] = NestedTensor(x, mask)return out从上可以看出xs = self.body为图像特征处理,随后根据图像特征获得的高宽,为mask提供依据,使用插值方式将mask高宽处理成特征对应的高宽,随后保存即可。
2、mask特征代码解读
该部分实际为位置编码,我需要提醒,mask是有图像覆盖值为0,无图像覆盖值为1,在此基础上做了插值,然后再位置编码需进行反向操作not_mask = ~mask。具体实现可参考别人博客点击这里,该编码也类似正余弦位置编码,该代码如下:
class PositionEmbeddingSine(nn.Module):"""This is a more standard version of the position embedding, very similar to the oneused by the Attention is all you need paper, generalized to work on images."""def __init__(self, num_pos_feats=64, temperature=10000, normalize=False, scale=None):super().__init__()self.num_pos_feats = num_pos_featsself.temperature = temperatureself.normalize = normalizeif scale is not None and normalize is False:raise ValueError("normalize should be True if scale is passed")if scale is None:scale = 2 * math.piself.scale = scaledef forward(self, tensor_list: NestedTensor):x = tensor_list.tensors # [2,2048,19,29]mask = tensor_list.mask # [2,19,29]assert mask is not Nonenot_mask = ~mask # 反变化,将有像素覆盖变成1,无覆盖变成0y_embed = not_mask.cumsum(1, dtype=torch.float32) # 在行方向累加#(b , h , w)x_embed = not_mask.cumsum(2, dtype=torch.float32) # 在列方向累加#(b , h , w)if self.normalize:eps = 1e-6y_embed = y_embed / (y_embed[:, -1:, :] + eps) * self.scalex_embed = x_embed / (x_embed[:, :, -1:] + eps) * self.scaledim_t = torch.arange(self.num_pos_feats, dtype=torch.float32, device=x.device)dim_t = self.temperature ** (2 * (dim_t // 2) / self.num_pos_feats)pos_x = x_embed[:, :, :, None] / dim_tpos_y = y_embed[:, :, :, None] / dim_tpos_x = torch.stack((pos_x[:, :, :, 0::2].sin(), pos_x[:, :, :, 1::2].cos()), dim=4).flatten(3)pos_y = torch.stack((pos_y[:, :, :, 0::2].sin(), pos_y[:, :, :, 1::2].cos()), dim=4).flatten(3)pos = torch.cat((pos_y, pos_x), dim=3).permute(0, 3, 1, 2)return pos # [2,256,19,29]七、Transformer编解码代码解读
该部分是模型特征提取后进一步使用transform方式学习全局信息,进一步提取特征,该结构分为encode与decode编码方式。源码的主函数中有一个transformer编解码,代码结构如下:
hs = self.transformer(self.input_proj(src), mask, self.query_embed.weight, pos[-1])[0]
说明:
self.input_proj(src)使用简单1*1卷积降维将[2,2048,19,29]–>[2,256,19,29],
使用了self.query_embed为可学习query,为[100,256],
pos[-1]为加工的位置编码,为[2,256,19,29]
而self.transformer结构代码如下:
class Transformer(nn.Module):def __init__(self, d_model=512, nhead=8, num_encoder_layers=6,num_decoder_layers=6, dim_feedforward=2048, dropout=0.1,activation="relu", normalize_before=False,return_intermediate_dec=False):super().__init__()encoder_layer = TransformerEncoderLayer(d_model, nhead, dim_feedforward,dropout, activation, normalize_before)encoder_norm = nn.LayerNorm(d_model) if normalize_before else Noneself.encoder = TransformerEncoder(encoder_layer, num_encoder_layers, encoder_norm)decoder_layer = TransformerDecoderLayer(d_model, nhead, dim_feedforward,dropout, activation, normalize_before)decoder_norm = nn.LayerNorm(d_model)self.decoder = TransformerDecoder(decoder_layer, num_decoder_layers, decoder_norm,return_intermediate=return_intermediate_dec)self._reset_parameters()self.d_model = d_modelself.nhead = nheaddef _reset_parameters(self):for p in self.parameters():if p.dim() > 1:nn.init.xavier_uniform_(p)def forward(self, src, mask, query_embed, pos_embed):# flatten NxCxHxW to HWxNxCbs, c, h, w = src.shapesrc = src.flatten(2).permute(2, 0, 1) # 图像特征变成[19*29,2,256]pos_embed = pos_embed.flatten(2).permute(2, 0, 1) # 位置变成[19*29,2,256]query_embed = query_embed.unsqueeze(1).repeat(1, bs, 1) # 可学习参数从[100,256]变成[100,2,256]mask = mask.flatten(1) # mask从[2,19,29]变成[2,19*29],该mask被图像覆盖为0tgt = torch.zeros_like(query_embed) # 生成0张量[100,2,256]memory = self.encoder(src, src_key_padding_mask=mask, pos=pos_embed) # encoder编码# tgt为生成0张量[100,2,256],memory为编码输出[19*29,2,256],pos为位置编码不变,query_embed为可学习查询参数,在解码开始学习hs = self.decoder(tgt, memory, memory_key_padding_mask=mask, pos=pos_embed, query_pos=query_embed)return hs.transpose(1, 2), memory.permute(1, 2, 0).view(bs, c, h, w)而这里面最重要为self.encoder编码与self.decoder编码,我将在下面重点说明。
1、encode编码代码解读
a、TransformerEncoder代码解读
该结构为transformer结构,只是多次遍历循环实现encode编码,可参考博客
,我将不在介绍,其代码如下:
class TransformerEncoder(nn.Module):def __init__(self, encoder_layer, num_layers, norm=None):super().__init__()self.layers = _get_clones(encoder_layer, num_layers)self.num_layers = num_layersself.norm = normdef forward(self, src,mask: Optional[Tensor] = None,src_key_padding_mask: Optional[Tensor] = None,pos: Optional[Tensor] = None):output = srcfor layer in self.layers: # 重复循环transformer结构# src_mask值为None,src_key_padding_mask为之前mask,pos为位置编码,实际该部分差不多为transformer结构output = layer(output, src_mask=mask, src_key_padding_mask=src_key_padding_mask, pos=pos)if self.norm is not None:output = self.norm(output)return outputencode编码是通过for layer in self.layers循环方式,重复了5次同样的layer层结构,其结构如下:
(0): TransformerEncoderLayer((self_attn): MultiheadAttention((out_proj): NonDynamicallyQuantizableLinear(in_features=256, out_features=256, bias=True))(linear1): Linear(in_features=256, out_features=2048, bias=True)(dropout): Dropout(p=0.1, inplace=False)(linear2): Linear(in_features=2048, out_features=256, bias=True)(norm1): LayerNorm((256,), eps=1e-05, elementwise_affine=True)(norm2): LayerNorm((256,), eps=1e-05, elementwise_affine=True)(dropout1): Dropout(p=0.1, inplace=False)(dropout2): Dropout(p=0.1, inplace=False))b、TransformerEncoderLayer代码解读
随后通过以下代码包装执行forward中self.forward_post(src, src_mask, src_key_padding_mask, pos)函数实现encode,其代码如下:
class TransformerEncoderLayer(nn.Module):def __init__(self, d_model, nhead, dim_feedforward=2048, dropout=0.1,activation="relu", normalize_before=False):super().__init__()self.self_attn = nn.MultiheadAttention(d_model, nhead, dropout=dropout)# Implementation of Feedforward modelself.linear1 = nn.Linear(d_model, dim_feedforward)self.dropout = nn.Dropout(dropout)self.linear2 = nn.Linear(dim_feedforward, d_model)self.norm1 = nn.LayerNorm(d_model)self.norm2 = nn.LayerNorm(d_model)self.dropout1 = nn.Dropout(dropout)self.dropout2 = nn.Dropout(dropout)self.activation = _get_activation_fn(activation)self.normalize_before = normalize_beforedef with_pos_embed(self, tensor, pos: Optional[Tensor]):return tensor if pos is None else tensor + posdef forward_post(self,src,src_mask: Optional[Tensor] = None,src_key_padding_mask: Optional[Tensor] = None,pos: Optional[Tensor] = None):q = k = self.with_pos_embed(src, pos) # 位置编码+输入数据,类似x+possrc2 = self.self_attn(q, k, value=src, attn_mask=src_mask,key_padding_mask=src_key_padding_mask)[0]src = src + self.dropout1(src2)src = self.norm1(src)src2 = self.linear2(self.dropout(self.activation(self.linear1(src))))src = src + self.dropout2(src2)src = self.norm2(src)return srcdef forward_pre():源码内容省略return srcdef forward(self, src,src_mask: Optional[Tensor] = None,src_key_padding_mask: Optional[Tensor] = None,pos: Optional[Tensor] = None):if self.normalize_before:return self.forward_pre(src, src_mask, src_key_padding_mask, pos)return self.forward_post(src, src_mask, src_key_padding_mask, pos)
c、forward_post函数代码解读
随后调用TransformerEncoderLayer类对应的forward_post函数,代码如下:
def forward_post(self,src,src_mask: Optional[Tensor] = None,src_key_padding_mask: Optional[Tensor] = None,pos: Optional[Tensor] = None):q = k = self.with_pos_embed(src, pos) # 位置编码+输入数据,类似x+possrc2 = self.self_attn(q, k, value=src, attn_mask=src_mask,key_padding_mask=src_key_padding_mask)[0]src = src + self.dropout1(src2)src = self.norm1(src)src2 = self.linear2(self.dropout(self.activation(self.linear1(src))))src = src + self.dropout2(src2)src = self.norm2(src)return src该代码实际是CNN输出特征x+之前位置编码pos的新x,随后按其transformer结构编码,其中mask做了填充参数,也因其简单,我不在说明。
2、decode解码代码解读
a、TransformerDecoder代码解读
该结构为transformer结构,只是多次遍历循环实现encode编码,可参考博客
,我将不在介绍,其代码如下:
class TransformerDecoder(nn.Module):def __init__(self, decoder_layer, num_layers, norm=None, return_intermediate=False):super().__init__()self.layers = _get_clones(decoder_layer, num_layers)self.num_layers = num_layersself.norm = normself.return_intermediate = return_intermediatedef forward(self, tgt, memory,tgt_mask: Optional[Tensor] = None,memory_mask: Optional[Tensor] = None,tgt_key_padding_mask: Optional[Tensor] = None,memory_key_padding_mask: Optional[Tensor] = None,pos: Optional[Tensor] = None,query_pos: Optional[Tensor] = None):output = tgt # output初始化为0,[100,2,256]intermediate = []for layer in self.layers: # 循环遍历5次,结构都一样output = layer(output, memory, tgt_mask=tgt_mask, #output初始化为0[100,2,256] memory为编码输入特征[551,2,256],tgt_mask为Nonememory_mask=memory_mask, # memory为Nonetgt_key_padding_mask=tgt_key_padding_mask, # 为Nonememory_key_padding_mask=memory_key_padding_mask, # 和编码一样[2,551]pos=pos, query_pos=query_pos) # pos为位置编码,query_pos为可学习query[100,2,256]if self.return_intermediate:intermediate.append(self.norm(output)) # 每次解码输出结果[100,2,256]# output 输出仍为[100,2,256]if self.norm is not None:output = self.norm(output)if self.return_intermediate:intermediate.pop()intermediate.append(output)if self.return_intermediate:return torch.stack(intermediate) # 将多intermediate保存[100,2,256]做拼接,输出为[6,100,2,256]return output.unsqueeze(0)
decode编码是通过for layer in self.layers循环方式,重复了5次同样的layer层结构,但结构与encode有所区别,其结构如下:
(0): TransformerDecoderLayer((self_attn): MultiheadAttention((out_proj): NonDynamicallyQuantizableLinear(in_features=256, out_features=256, bias=True))(multihead_attn): MultiheadAttention((out_proj): NonDynamicallyQuantizableLinear(in_features=256, out_features=256, bias=True))(linear1): Linear(in_features=256, out_features=2048, bias=True)(dropout): Dropout(p=0.1, inplace=False)(linear2): Linear(in_features=2048, out_features=256, bias=True)(norm1): LayerNorm((256,), eps=1e-05, elementwise_affine=True)(norm2): LayerNorm((256,), eps=1e-05, elementwise_affine=True)(norm3): LayerNorm((256,), eps=1e-05, elementwise_affine=True)(dropout1): Dropout(p=0.1, inplace=False)(dropout2): Dropout(p=0.1, inplace=False)(dropout3): Dropout(p=0.1, inplace=False))b、TransformerDecoderLayer代码解读
随后通过以下代码包装执行forward中self.forward_post(tgt, memory, tgt_mask, memory_mask, tgt_key_padding_mask, memory_key_padding_mask, pos, query_pos)函数实现encode,其代码如下:
class TransformerDecoderLayer(nn.Module):def __init__(self, d_model, nhead, dim_feedforward=2048, dropout=0.1,activation="relu", normalize_before=False):super().__init__()self.self_attn = nn.MultiheadAttention(d_model, nhead, dropout=dropout)self.multihead_attn = nn.MultiheadAttention(d_model, nhead, dropout=dropout)# Implementation of Feedforward modelself.linear1 = nn.Linear(d_model, dim_feedforward)self.dropout = nn.Dropout(dropout)self.linear2 = nn.Linear(dim_feedforward, d_model)self.norm1 = nn.LayerNorm(d_model)self.norm2 = nn.LayerNorm(d_model)self.norm3 = nn.LayerNorm(d_model)self.dropout1 = nn.Dropout(dropout)self.dropout2 = nn.Dropout(dropout)self.dropout3 = nn.Dropout(dropout)self.activation = _get_activation_fn(activation)self.normalize_before = normalize_beforedef with_pos_embed(self, tensor, pos: Optional[Tensor]):return tensor if pos is None else tensor + posdef forward_post(self, tgt, memory,tgt_mask: Optional[Tensor] = None,memory_mask: Optional[Tensor] = None,tgt_key_padding_mask: Optional[Tensor] = None,memory_key_padding_mask: Optional[Tensor] = None,pos: Optional[Tensor] = None,query_pos: Optional[Tensor] = None):q = k = self.with_pos_embed(tgt, query_pos) # tgt为0,query_pos为可学习参数,随机初始化的tgt2 = self.self_attn(q, k, value=tgt, attn_mask=tgt_mask,key_padding_mask=tgt_key_padding_mask)[0] # q k加了位置分开,而tgt是没加位置信息tgt = tgt + self.dropout1(tgt2) # 类似残差连接tgt = self.norm1(tgt)tgt2 = self.multihead_attn(query=self.with_pos_embed(tgt, query_pos), # query为自注意力后tgt+query [100,2,256]key=self.with_pos_embed(memory, pos), # key为编码后的值加位置[551,2,256]value=memory, attn_mask=memory_mask, # value为编码后的值[551,2,256]key_padding_mask=memory_key_padding_mask)[0]tgt = tgt + self.dropout2(tgt2) # tgt再次加上获得tgt2值tgt = self.norm2(tgt)tgt2 = self.linear2(self.dropout(self.activation(self.linear1(tgt))))tgt = tgt + self.dropout3(tgt2)tgt = self.norm3(tgt)return tgtdef forward_pre():源码内容省略return tgtdef forward(self, tgt, memory,tgt_mask: Optional[Tensor] = None,memory_mask: Optional[Tensor] = None,tgt_key_padding_mask: Optional[Tensor] = None,memory_key_padding_mask: Optional[Tensor] = None,pos: Optional[Tensor] = None,query_pos: Optional[Tensor] = None):if self.normalize_before:return self.forward_pre(tgt, memory, tgt_mask, memory_mask,tgt_key_padding_mask, memory_key_padding_mask, pos, query_pos)return self.forward_post(tgt, memory, tgt_mask, memory_mask,tgt_key_padding_mask, memory_key_padding_mask, pos, query_pos)c、forward_post函数代码解读
随后调用TransformerDecoderLayer类对应的forward_post函数,从如下代码可知,有几个重要模块需要解读,第一为self.with_pos_embed函数解读,
第二为self.self_attn自注意力多头函数解读,第三self.multihead_attn多头注意力解读。
def forward_post(self, tgt, memory,tgt_mask: Optional[Tensor] = None,memory_mask: Optional[Tensor] = None,tgt_key_padding_mask: Optional[Tensor] = None,memory_key_padding_mask: Optional[Tensor] = None,pos: Optional[Tensor] = None,query_pos: Optional[Tensor] = None):q = k = self.with_pos_embed(tgt, query_pos) # tgt为0,query_pos为可学习参数,随机初始化的tgt2 = self.self_attn(q, k, value=tgt, attn_mask=tgt_mask,key_padding_mask=tgt_key_padding_mask)[0] # q k加了位置分开,而tgt是没加位置信息tgt = tgt + self.dropout1(tgt2) # 类似残差连接tgt = self.norm1(tgt)tgt2 = self.multihead_attn(query=self.with_pos_embed(tgt, query_pos), # query为自注意力后tgt+query [100,2,256]key=self.with_pos_embed(memory, pos), # key为编码后的值加位置[551,2,256]value=memory, attn_mask=memory_mask, # value为编码后的值[551,2,256]key_padding_mask=memory_key_padding_mask)[0]tgt = tgt + self.dropout2(tgt2) # tgt再次加上获得tgt2值tgt = self.norm2(tgt)tgt2 = self.linear2(self.dropout(self.activation(self.linear1(tgt))))tgt = tgt + self.dropout3(tgt2)tgt = self.norm3(tgt)return tgtself.with_pos_embed:为加的操作,如self.with_pos_embed(tgt, query_pos)该表示,query为None等于tgt,否则返回tgt+query_pos
self.self_attn:该操作和编码是一样,就是执行多头自注意力方式,实际是因为q k v值不同决定的
其中value来源tgt(初始化是为0的,只有经过多次迭代该值会变化的),我的理解tgt是解码输出特征,做分类和回归等任务表征,q、v来源tgt+query_pos,
而query_pos正是作者提的可学习参数。
tgt2 = self.self_attn(q, k, value=tgt, attn_mask=tgt_mask,key_padding_mask=tgt_key_padding_mask)[0] # q k加了位置分开,而tgt是没加位置信息self.multihead_attn:该操作和self.self_attn原始代码也是一样的,也是q k v值造成不同,其实和上面类似,但query值、key值、value值来源不一样,需要留意。
tgt2 = self.multihead_attn(query=self.with_pos_embed(tgt, query_pos), # query为自注意力后tgt+query [100,2,256]key=self.with_pos_embed(memory, pos), # key为编码后的值加位置[551,2,256]value=memory, attn_mask=memory_mask, # value为编码后的值[551,2,256]key_padding_mask=memory_key_padding_mask)[0]
3、模型输出结果格式
模型输出结果格式在decode中,最终输出目标格式在TransformerDecoder(nn.Module)类的forward函数中,我已有注释其代码中,代码如下:
for layer in self.layers: # 循环遍历5次,结构都一样output = layer(output, memory, tgt_mask=tgt_mask, #output初始化为0[100,2,256] memory为编码输入特征[551,2,256],tgt_mask为Nonememory_mask=memory_mask, # memory为Nonetgt_key_padding_mask=tgt_key_padding_mask, # 为Nonememory_key_padding_mask=memory_key_padding_mask, # 和编码一样[2,551]pos=pos, query_pos=query_pos) # pos为位置编码,query_pos为可学习query[100,2,256]if self.return_intermediate:intermediate.append(self.norm(output)) # 每次解码输出结果[100,2,256]# output 输出仍为[100,2,256]if self.norm is not None:output = self.norm(output)if self.return_intermediate:intermediate.pop()intermediate.append(output)if self.return_intermediate:return torch.stack(intermediate) # 将多intermediate保存[100,2,256]做拼接,输出为[6,100,2,256]return output.unsqueeze(0)
假设类别是3个,其中5=类别3+置信度1+背景1,其结果显示如下图:
八、Loss的二分匹配代码解读
该部分就一个目的,在每张图预测100个目标寻找对应gt目标匹配对应关系,且为一一对应。detr采用二分匹配与匈牙利方法。
1、matcher初始化
源码使用下面代码进行初始化,如下代码:
matcher = build_matcher(args)
函数builder_matcher结构如下:
def build_matcher(args):return HungarianMatcher(cost_class=args.set_cost_class, cost_bbox=args.set_cost_bbox, cost_giou=args.set_cost_giou)
以上可知,传递参数为权重固定值,分别表示类权重、L1权重、giou权重,dert固定分别为1、5、2。
而调用该函数在class SetCriterion(nn.Module)类中的forward函数,主要一句调用为:
indices = self.matcher(outputs_without_aux, targets)
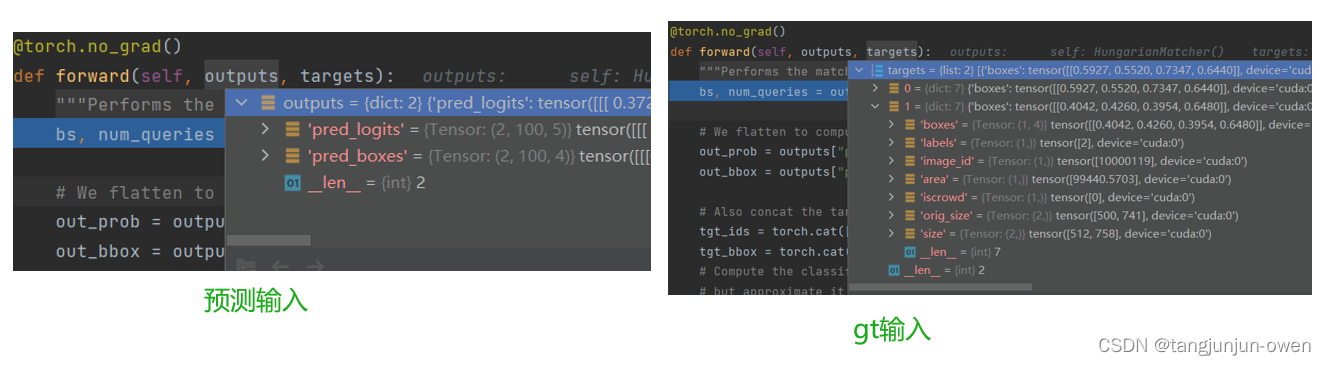
最终在这里输出匹配结果,我以2个图,每个图只有一个目标,其结果如图:

2、二分匹配matcher代码解读
该部分代码主要为预测与gt匹配方式,将所有batch图的预测按顺序拼接起来,假如每个图预测p=100,batch为b=2,预测拼接类out_prob与out_bbox,而所有gt标签共n=2,并按顺序获得所有标签类索引tgt_ids,最后使用tgt_ids对out_prob得到cost_class=[b*p,n]=[200,2],并取反便得到cost_class,最后使用out_bbox与tgt_bbox分别得到cost_bbox与cost_giou,最终将cost_class/cost_bbox/cost_giou使用权重相加得到成本矩阵,然目前是整体计算,在通过split手段将每张图与对应gt从总成本矩阵拆分,分别计算每个图与gt的对应
关系,获得最终匹配。我已在代码中有注释,直接上代码如下:
class HungarianMatcher(nn.Module):"""This class computes an assignment between the targets and the predictions of the networkFor efficiency reasons, the targets don't include the no_object. Because of this, in general,there are more predictions than targets. In this case, we do a 1-to-1 matching of the best predictions,while the others are un-matched (and thus treated as non-objects)."""def __init__(self, cost_class: float = 1, cost_bbox: float = 1, cost_giou: float = 1):"""Creates the matcherParams:cost_class: This is the relative weight of the classification error in the matching costcost_bbox: This is the relative weight of the L1 error of the bounding box coordinates in the matching costcost_giou: This is the relative weight of the giou loss of the bounding box in the matching cost"""super().__init__()self.cost_class = cost_classself.cost_bbox = cost_bboxself.cost_giou = cost_giouassert cost_class != 0 or cost_bbox != 0 or cost_giou != 0, "all costs cant be 0"@torch.no_grad()def forward(self, outputs, targets):""" Performs the matchingParams:outputs: This is a dict that contains at least these entries:"pred_logits": Tensor of dim [batch_size, num_queries, num_classes] with the classification logits"pred_boxes": Tensor of dim [batch_size, num_queries, 4] with the predicted box coordinatestargets: This is a list of targets (len(targets) = batch_size), where each target is a dict containing:"labels": Tensor of dim [num_target_boxes] (where num_target_boxes is the number of ground-truthobjects in the target) containing the class labels"boxes": Tensor of dim [num_target_boxes, 4] containing the target box coordinatesReturns:A list of size batch_size, containing tuples of (index_i, index_j) where:- index_i is the indices of the selected predictions (in order)- index_j is the indices of the corresponding selected targets (in order)For each batch element, it holds:len(index_i) = len(index_j) = min(num_queries, num_target_boxes)"""bs, num_queries = outputs["pred_logits"].shape[:2] # 获得batch数量,与每张图预测数量(一般为100)# We flatten to compute the cost matrices in a batch,最后一位是score做了softmax,直接将batch按顺序拼接out_prob = outputs["pred_logits"].flatten(0, 1).softmax(-1) # [batch_size * num_queries, num_classes]=[200,5]out_bbox = outputs["pred_boxes"].flatten(0, 1) # [batch_size * num_queries, 4]=[200,4]# Also concat the target labels and boxes,按顺序获得类索引与box,gt类无背景,类索引是从1开始的tgt_ids = torch.cat([v["labels"] for v in targets]) # 获得gt标签的类索引tgt_bbox = torch.cat([v["boxes"] for v in targets]) # 获得gt标签box# Compute the classification cost. Contrary to the loss, we don't use the NLL,# but approximate it in 1 - proba[target class].# The 1 is a constant that doesn't change the matching, it can be ommitted.# 后面所有200是因为batch为2,即有2张图,每张图有100个预测目标,共2张,因此为200,但你会发现类别是200对应2个gt类别,而每张图只有一个gt,那么# 作者统一全都做,最后在分离开就好了,这样节约计算成本cost_class = -out_prob[:, tgt_ids] # out_prob维度为[200,5],此方式获得tgt_ids对应类列的位置,最终为[100,gt_box_num个]# Compute the L1 cost between boxes,这里逻辑与类别做法类似cost_bbox = torch.cdist(out_bbox, tgt_bbox, p=1) # [out_n,tgt_m]# Compute the giou cost betwen boxes,这里再次使用gioucost_giou = -generalized_box_iou(box_cxcywh_to_xyxy(out_bbox), box_cxcywh_to_xyxy(tgt_bbox)) # [out_n,tgt_m]# Final cost matrix,这里将box的L1+CLS+box的giou为一个cost矩阵,也通过权重控制C = self.cost_bbox * cost_bbox + self.cost_class * cost_class + self.cost_giou * cost_giou # 将所有方式叠加为最终成本[200,2]C = C.view(bs, num_queries, -1).cpu() # [2,100,2],这里很关键,将通过batch分开,变成每张图100个预测与所有gt对应# 上面每张图对应所有gt显然不对,需要分开,作者通过sizes与split方式划分,最终变成每张图100个预测对应该张图所对应的gt,后使用匈牙利算法求# 最终匹配关系,匈牙利算法直接调用linear_sum_assignment(c[i])即可。sizes = [len(v["boxes"]) for v in targets]# C.split(sizes, -1) 这一步很关键,直接对每张图划分对应gt的成本矩阵,才进行匹配indices = [linear_sum_assignment(c[i]) for i, c in enumerate(C.split(sizes, -1))]return [(torch.as_tensor(i, dtype=torch.int64), torch.as_tensor(j, dtype=torch.int64)) for i, j in indices]我们以类别为3个,没张图gt只有一个目标,训练输入batch为2的所有假设。输入格式如下图:
九、Loss计算代码解读
这一小节,我将介绍DETR的loss计算方法,我们一定很好奇,无需寻找正负样本的anchor设置,一步到位预测100个目标,是如何使用loss使其有效的呢?
答案很明显,也是论文所说,实际是通过二匹配方式获得预测与gt对应关系,gt也通过这种对应关系顺势填充100个预测对应位置gt类索引,没有就为背景索引,如此达到类别正负样本,将其输入交叉熵便可求得label的loss。同样,通过对应关系找到预测框与gt框,顺势求得L1与giou的loss,这里box直接使用类似yolov5的txt格式中心点与宽高直接与预测输出结果求box的loss。最后,作者也利用每张图图数量也做了交叉熵loss。当然,作者也对每次解码预测也做了类似loss。为此,dert的loss计算到此为止。下面,我将具体展开。
假设:batch=2,每张图有一个目标,预测为100,类别=3
1、数据输入格式
数据输入格式如下图:
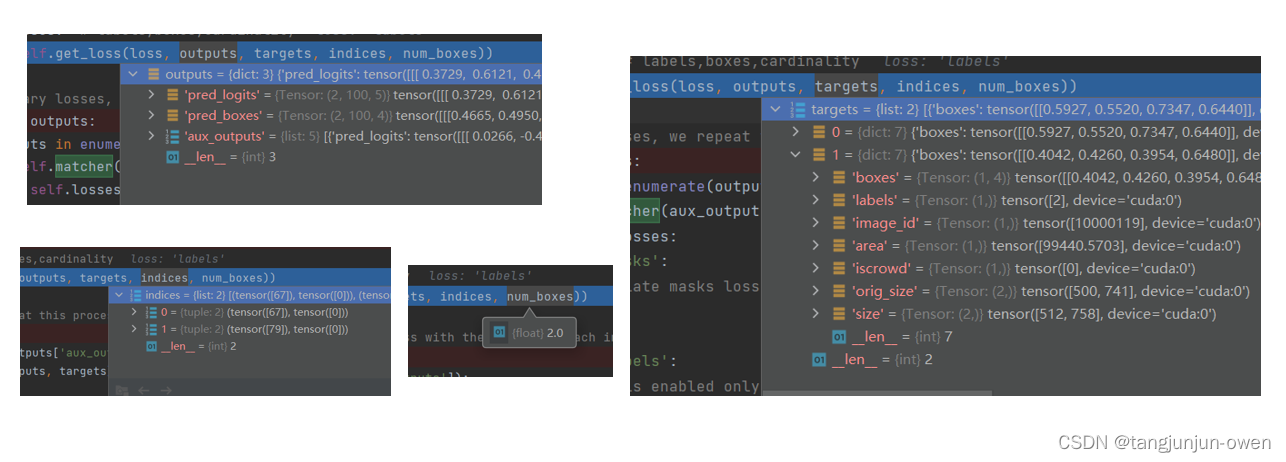
2、labels/boxes/cardinality的loss代码解读
实际我已在本节开端已大致说明,loss计算方式,然代码层是如下loss函数,我已将其注释与代码中,可从代码获得loss理解,其代码如下:
LOSS函数:
def loss_labels(self, outputs, targets, indices, num_boxes, log=True)
def loss_boxes(self, outputs, targets, indices, num_boxes)
def loss_cardinality(self, outputs, targets, indices, num_boxes)
LOSS代码:
class SetCriterion(nn.Module):""" This class computes the loss for DETR.The process happens in two steps:1) we compute hungarian assignment between ground truth boxes and the outputs of the model2) we supervise each pair of matched ground-truth / prediction (supervise class and box)"""def __init__(self, num_classes, matcher, weight_dict, eos_coef, losses):""" Create the criterion.Parameters:num_classes: number of object categories, omitting the special no-object categorymatcher: module able to compute a matching between targets and proposalsweight_dict: dict containing as key the names of the losses and as values their relative weight.eos_coef: relative classification weight applied to the no-object categorylosses: list of all the losses to be applied. See get_loss for list of available losses."""super().__init__()self.num_classes = num_classesself.matcher = matcherself.weight_dict = weight_dictself.eos_coef = eos_coefself.losses = lossesempty_weight = torch.ones(self.num_classes + 1)empty_weight[-1] = self.eos_coefself.register_buffer('empty_weight', empty_weight)def loss_labels(self, outputs, targets, indices, num_boxes, log=True):"""Classification loss (NLL)targets dicts must contain the key "labels" containing a tensor of dim [nb_target_boxes]"""assert 'pred_logits' in outputssrc_logits = outputs['pred_logits'] # 只获得类别预测结果,[2,100,5]idx = self._get_src_permutation_idx(indices) # idx为tuple(tensor([0,1]),tensor([67,79]))target_classes_o = torch.cat([t["labels"][J] for t, (_, J) in zip(targets, indices)]) # 获得对应gt的类别,为[1,2]target_classes = torch.full(src_logits.shape[:2], self.num_classes, # num_classes为4,表示3个类+1个背景dtype=torch.int64, device=src_logits.device) # 将[2,100]值全为4# 该部分就是论文所说使用某种方式将gt也变成100的方式target_classes[idx] = target_classes_o # 将对应idx赋值,即[0,67]位置为1,[1,79]位置为2,其它赋值任为4# src_logits.transpose(1, 2) 变为[2,5,100],而target_classes变为[2,100]loss_ce = F.cross_entropy(src_logits.transpose(1, 2), target_classes, self.empty_weight)losses = {'loss_ce': loss_ce}if log:# TODO this should probably be a separate loss, not hacked in this one herelosses['class_error'] = 100 - accuracy(src_logits[idx], target_classes_o)[0]return losses@torch.no_grad()def loss_cardinality(self, outputs, targets, indices, num_boxes):""" Compute the cardinality error, ie the absolute error in the number of predicted non-empty boxesThis is not really a loss, it is intended for logging purposes only. It doesn't propagate gradients"""pred_logits = outputs['pred_logits'] # 获得类别预测[2,100,5]device = pred_logits.devicetgt_lengths = torch.as_tensor([len(v["labels"]) for v in targets], device=device) # 获得每个图box数量为一维张量[1,1]# Count the number of predictions that are NOT "no-object" (which is the last class)# 最后一个值为4表示没有值card_pred = (pred_logits.argmax(-1) != pred_logits.shape[-1] - 1).sum(1) # 每张图对应预测pre=100没有目标判断card_err = F.l1_loss(card_pred.float(), tgt_lengths.float()) # 数量做了L1 losslosses = {'cardinality_error': card_err}return lossesdef loss_boxes(self, outputs, targets, indices, num_boxes):"""Compute the losses related to the bounding boxes, the L1 regression loss and the GIoU losstargets dicts must contain the key "boxes" containing a tensor of dim [nb_target_boxes, 4]The target boxes are expected in format (center_x, center_y, w, h), normalized by the image size."""assert 'pred_boxes' in outputsidx = self._get_src_permutation_idx(indices) # 这里与labels一致src_boxes = outputs['pred_boxes'][idx] # outputs['pred_boxes']为[2,100,4],通过idx索引获得对应预测box,[2,4]target_boxes = torch.cat([t['boxes'][i] for t, (_, i) in zip(targets, indices)], dim=0) # 获得对应gt box,[2,4]# 这里说明下gt box就是对应中心点与宽高(与yolov5数据txt一样),并与预测box直接求lossloss_bbox = F.l1_loss(src_boxes, target_boxes, reduction='none') # 做了L1 LOSS,输出维度[2,4]losses = {}losses['loss_bbox'] = loss_bbox.sum() / num_boxes # 求和并除以box总数# 这一步是giou lossloss_giou = 1 - torch.diag(box_ops.generalized_box_iou(box_ops.box_cxcywh_to_xyxy(src_boxes),box_ops.box_cxcywh_to_xyxy(target_boxes)))losses['loss_giou'] = loss_giou.sum() / num_boxes # 求和并除以box总数return lossesdef loss_masks(self, outputs, targets, indices, num_boxes):"""Compute the losses related to the masks: the focal loss and the dice loss.targets dicts must contain the key "masks" containing a tensor of dim [nb_target_boxes, h, w]"""assert "pred_masks" in outputssrc_idx = self._get_src_permutation_idx(indices)tgt_idx = self._get_tgt_permutation_idx(indices)src_masks = outputs["pred_masks"]src_masks = src_masks[src_idx]masks = [t["masks"] for t in targets]# TODO use valid to mask invalid areas due to padding in losstarget_masks, valid = nested_tensor_from_tensor_list(masks).decompose()target_masks = target_masks.to(src_masks)target_masks = target_masks[tgt_idx]# upsample predictions to the target sizesrc_masks = interpolate(src_masks[:, None], size=target_masks.shape[-2:],mode="bilinear", align_corners=False)src_masks = src_masks[:, 0].flatten(1)target_masks = target_masks.flatten(1)target_masks = target_masks.view(src_masks.shape)losses = {"loss_mask": sigmoid_focal_loss(src_masks, target_masks, num_boxes),"loss_dice": dice_loss(src_masks, target_masks, num_boxes),}return lossesdef _get_src_permutation_idx(self, indices):# permute predictions following indicesbatch_idx = torch.cat([torch.full_like(src, i) for i, (src, _) in enumerate(indices)]) # 获得batch,即图像索引src_idx = torch.cat([src for (src, _) in indices]) # 按顺序获得预测对应索引return batch_idx, src_idx # 输出图像索引与预测对应索引def _get_tgt_permutation_idx(self, indices):# permute targets following indicesbatch_idx = torch.cat([torch.full_like(tgt, i) for i, (_, tgt) in enumerate(indices)])tgt_idx = torch.cat([tgt for (_, tgt) in indices])return batch_idx, tgt_idxdef get_loss(self, loss, outputs, targets, indices, num_boxes, **kwargs):loss_map = {'labels': self.loss_labels,'cardinality': self.loss_cardinality,'boxes': self.loss_boxes,'masks': self.loss_masks}assert loss in loss_map, f'do you really want to compute {loss} loss?'return loss_map[loss](outputs, targets, indices, num_boxes, **kwargs) # 通过名称获得不同loss函数,但输入值都是一样的def forward(self, outputs, targets):""" This performs the loss computation.Parameters:outputs: dict of tensors, see the output specification of the model for the formattargets: list of dicts, such that len(targets) == batch_size.The expected keys in each dict depends on the losses applied, see each loss' doc"""outputs_without_aux = {k: v for k, v in outputs.items() if k != 'aux_outputs'}# outputs_without_aux获得pred_logits[2,100,5]和pred_boxes[2,100,4]# Retrieve the matching between the outputs of the last layer and the targetsindices = self.matcher(outputs_without_aux, targets)# Compute the average number of target boxes accross all nodes, for normalization purposesnum_boxes = sum(len(t["labels"]) for t in targets) # 获得所有gt目标数量num_boxes = torch.as_tensor([num_boxes], dtype=torch.float, device=next(iter(outputs.values())).device)if is_dist_avail_and_initialized():torch.distributed.all_reduce(num_boxes)num_boxes = torch.clamp(num_boxes / get_world_size(), min=1).item()# Compute all the requested losseslosses = {}for loss in self.losses: # labels,boxes,cardinalitylosses.update(self.get_loss(loss, outputs, targets, indices, num_boxes))# In case of auxiliary losses, we repeat this process with the output of each intermediate layer.if 'aux_outputs' in outputs: # 这里得到其它曾也向上面那样在做一次lossfor i, aux_outputs in enumerate(outputs['aux_outputs']):indices = self.matcher(aux_outputs, targets)for loss in self.losses:if loss == 'masks':# Intermediate masks losses are too costly to compute, we ignore them.continuekwargs = {}if loss == 'labels':# Logging is enabled only for the last layerkwargs = {'log': False}l_dict = self.get_loss(loss, aux_outputs, targets, indices, num_boxes, **kwargs)l_dict = {k + f'_{i}': v for k, v in l_dict.items()}losses.update(l_dict)return losses最后lossess输出结果如下图:
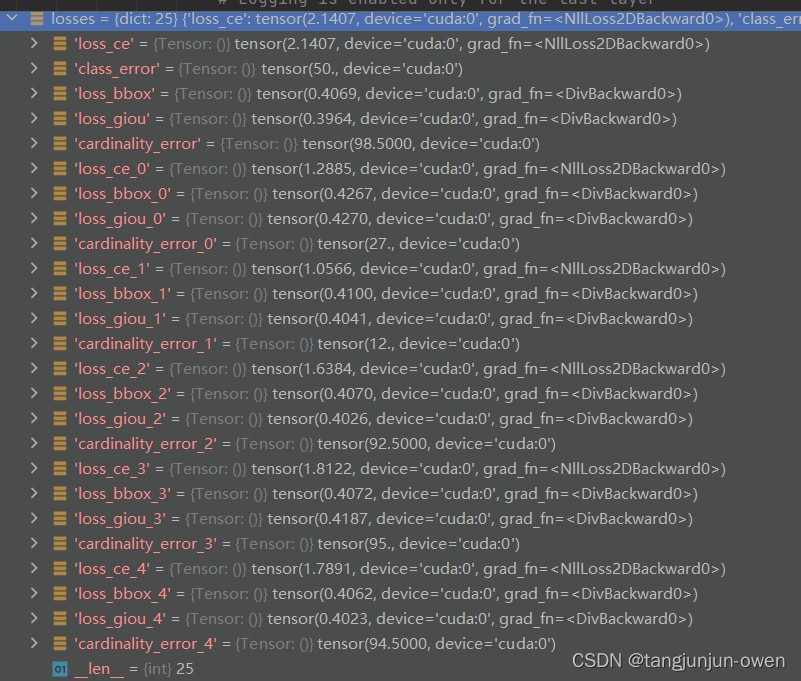
最终所有loss通过此代码,便可得到一个值的总loss,其代码如下:
losses = sum(loss_dict[k] * weight_dict[k] for k in loss_dict.keys() if k in weight_dict)
以上已完成DETR模型训练过程代码解读,我在这里需说明下,从预测代码logit的loss最后一个列维度没使用,应该是类+背景。
十、预测代码简单解读
首先声明,预测代码是我自己改写的,已在文章开头给出,可在源码文件夹下直接添加一个py文件,并复制可使用测试。
实际预测代码很简单,请看下面代码解读:
class PostProcess(nn.Module):""" This module converts the model's output into the format expected by the coco api"""@torch.no_grad()def forward(self, outputs, target_sizes):""" Perform the computationParameters:outputs: raw outputs of the modeltarget_sizes: tensor of dimension [batch_size x 2] containing the size of each images of the batchFor evaluation, this must be the original image size (before any data augmentation)For visualization, this should be the image size after data augment, but before padding"""out_logits, out_bbox = outputs['pred_logits'], outputs['pred_boxes']assert len(out_logits) == len(target_sizes)assert target_sizes.shape[1] == 2prob = F.softmax(out_logits, -1)scores, labels = prob[..., :-1].max(-1) # 从输出[..., :-1]找最大值,最后一个值不管,而对应最大值顺势为score# convert to [x0, y0, x1, y1] formatboxes = box_ops.box_cxcywh_to_xyxy(out_bbox)# and from relative [0, 1] to absolute [0, height] coordinatesimg_h, img_w = target_sizes.unbind(1)scale_fct = torch.stack([img_w, img_h, img_w, img_h], dim=1)boxes = boxes * scale_fct[:, None, :]results = [{'scores': s, 'labels': l, 'boxes': b} for s, l, b in zip(scores, labels, boxes)]return results总结
个人认为DETR相关可学习query与loss处理方式值得借鉴,毕竟提供可直接预测新范式,个人感觉更暴力更有趣!!!