golang查看CPU使用率与内存
1 psutil
1.1 概念与应用场景
psutil是业内一个用于监控OS资源的软件包,目前已经多种语言,包括但不限于Python、Go。
- gopsutil是 Python 工具库psutil 的 Golang 移植版,可以帮助我们方便地获取各种系统和硬件信息。gopsutil为我们屏蔽了各个系统之间的差异,具有非常强悍的可移植性。有了gopsutil,我们不再需要针对不同的系统使用syscall调用对应的系统方法。更棒的是gopsutil的实现中没有任何cgo的代码,使得交叉编译成为可能。
应用场景:go语言本身高并发,无环境依赖部署,轻量级,内存占用低等特点,加上gopsutil可以做性能监控,系统监控或系统信息采集,信息上报等
使用:
go get "github.com/shirou/gopsutil"
1.2 子包:CPU、disk、host、mem、net、process等
gopsutil将不同功能划分到不同的子包中,使用时直接引入子包,然后调用,子包分类如下:
- CPU 相关;
- disk 磁盘相关
- host 主机相关
- mem 内存相关
- net 网络相关
- process 进程相关
- docke docker相关
①采集CPU
info方法包含cpu整个信息,Percent方法显示cpu使用率,而load值需要引入load包
//打印cpu相关信息
info, _ := cpu.Info()
for _, ci := range info {fmt.Println(ci)
}//打印cpu使用率,每5秒一次,总共9次
for i := 1; i < 10; i++ {time.Sleep(time.Millisecond * 5000)percent, _ := cpu.Percent(time.Second, false)fmt.Printf("%v, cpu percent: %v", i, percent)
}//显示cpu load值
avg, _ := load.Avg()
fmt.Println(avg)
②采集内存
VirtualMemory方法显示物理内存信息,SwapMemory方法显示交换内存信息
//显示物理内存信息
memory, _ := mem.VirtualMemory()
fmt.Printf("Total: %v, Free:%v,UsedPercent:%f%%\n",memory.Total, memory.Free, memory.UsedPercent)
//显示交换内存信息
swapMemory, _ := mem.SwapMemory()
fmt.Println(swapMemory)
import ("github.com/shirou/gopsutil/v3/mem"
)func getMemInfo() {memInfo,err := mem.VirtualMemory()if err != nil {fmt.Println("get memory info fail. err: ", err)}// 获取总内存大小,单位GBmemTotal := memInfo.Total/1024/1024/1024// 获取已用内存大小,单位MBmemUsed := memInfo.Used/1024/1024// 可用内存大小memAva := memInfo.Available/1024/1024// 内存可用率memUsedPercent := memInfo.UsedPercentfmt.Printf("总内存: %v GB, 已用内存: %v MB, 可用内存: %v MB, 内存使用率: %.3f %% \n",memTotal,memUsed,memAva,memUsedPercent)
}
③采集主机信息
//显示机器启动时间戳
bootTime, _ := host.BootTime()
fmt.Println(bootTime)
//显示机器信息
info, _ := host.Info()
fmt.Println(info)
//显示终端用户
users, _ := host.Users()
for _,user := range users {fmt.Println(user.User)
}
④采集磁盘
Partitions方法显示所有分区信息,Usage方法显示分区使用量
//显示磁盘分区信息
partitions, _ := disk.Partitions(true)
for _,part := range partitions {fmt.Printf("part:%v\n",part.String())usage, _ := disk.Usage(part.Mountpoint)fmt.Printf("disk info:used :%v free:%v\n",usage.UsedPercent,usage.Free)
}//显示磁盘分区IO信息
counters, _ := disk.IOCounters()
for k,v := range counters {fmt.Printf("%v,%v\n",k,v)
}
⑤采集进程信息
//显示所有进程名称和PID
processes, _ := process.Processes()
for _,process := range processes {fmt.Println(process.Pid)fmt.Println(process.Name())
}
⑥采集网络信息
//为了避免和内部包net冲突,改成net2
//显示显络信息和IO
counters, _ := net2.IOCounters(true)
for k,v := range  counters{fmt.Printf("%v:%v send:%v recv:%v\n", k, v, v.BytesSent, v.BytesRecv)
}
⑦采集docker信息
//显示dockerID列表
list, _ := docker.GetDockerIDList()
for _,v := range list{fmt.Println(v)
}
使用gopsutil工具包可以简单的就获取系统相关信息,对于信息采集,系统监控等场景非常方便就可以实现
对于复杂的进程管理,process子包功能调用也比较复杂,这里推荐另一个操作系统使用systemctl管理进程的包: github.com/coreos/go-systemd
参考文章:https://juejin.cn/post/6998709615269511181
1.3 实例
①获取cpu、内存、磁盘使用率
import github.com/shirou/gopsutilfunc GetCpuPercent() float64 {percent, _:= cpu.Percent(time.Second, false)return percent[0]
}func GetMemPercent()float64 {memInfo, _ := mem.VirtualMemory()return memInfo.UsedPercent
}func GetDiskPercent() float64 {parts, _ := disk.Partitions(true)diskInfo, _ := disk.Usage(parts[0].Mountpoint)return diskInfo.UsedPercent
}func main() {fmt.Println(GetCpuPercent())fmt.Println(GetMemPercent())fmt.Println(GetDiskPercent())
}
结果:
7.8125
71
43.12042706933934
②获取本机信息
info, _ := host.Info()
fmt.Println(info)
结果:
{"hostname":"WIN-SP09TQCP1U8","uptime":25308,"bootTime":1558574107,"procs":175,"os":"windows","platform":"Microsoft Windows 10 Pro","platformFamily":"Standalone Workstation","platformVersion":"10.0.17134 Build 17134","kernelVersion":"","virtualizationSystem":"","virtualizationRole":"","hostid":。。。}
③获取CPU信息
info, _ := cpu.Info() //总体信息
fmt.Println(info)
//output:
[{"cpu":0,cores":4,"modelName":"Intel(R) Core(TM) i5-2520M CPU @ 2.50GHz","mhz":2501,。。。]
c, _ := cpu.Counts(true) //cpu逻辑数量
fmt.Println(c) //4
c, _ = cpu.Counts(false) //cpu物理核心
fmt.Println(c) //如果是2说明是双核超线程, 如果是4则是4核非超线程
用户CPU时间/系统CPU时间/空闲时间。。。等等
info, _ := cpu.Times(false)
fmt.Println(info)
//output:
[{"cpu":"cpu-total","user":1272.0,"system":1572.7,"idle":23092.3,"nice":0.0,"iowait":0.0,"irq":0.0,。。。}]
用户CPU时间:就是用户的进程获得了CPU资源以后,在用户态执行的时间。
系统CPU时间:用户进程获得了CPU资源以后,在内核态的执行时间。
CPU使用率,每秒刷新一次。
for{info, _ := cpu.Percent(time.Duration(time.Second), false)fmt.Println(info)
}
④获取内存(物理内存和交换区)信息
info, _ := mem.VirtualMemory()
fmt.Println(info)
info2, _ := mem.SwapMemory()
fmt.Println(info2)
//output:
{"total":8129818624,"available":4193423360,"used":3936395264,"usedPercent":48,"free":0,"active":0,"inactive":0,...}
{"total":8666689536,"used":4716843008,"free":3949846528,"usedPercent":0.5442496801583825,"sin":0,"sout":0,...}
总内存大小是8129818624 = 8 GB,已用3936395264 = 3.9 GB,使用了48%。而交换区大小是8666689536 = 8 GB。
⑤获取磁盘信息:分区、使用率、磁盘IO
info, _ := disk.Partitions(true) //所有分区
fmt.Println(info)
info2, _ := disk.Usage("E:") //指定某路径的硬盘使用情况
fmt.Println(info2)
info3, _ := disk.IOCounters() //所有硬盘的io信息
fmt.Println(info3)
//output:
[{"device":"C:","mountpoint":"C:","fstype":"NTFS","opts":"rw.compress"} {"device":"D:","mountpoint":"D:","fstype":"NTFS","opts":"rw.compress"} {"device":"E:","mountpoint":"E:","fstype":"NTFS","opts":"rw.compress"} ]
{"path":"E:","fstype":"","total":107380965376,"free":46790828032,"used":60590137344,"usedPercent":56.425398236866755,"inodesTotal":0,"inodesUsed":0,"inodesFree":0,"inodesUsedPercent":0}
map[C::{"readCount":0,"mergedReadCount":0,"writeCount":0,"mergedWriteCount":0,"readBytes":0,"writeBytes":4096,"readTime":0,"writeTime":0,"iopsInProgress":0,"ioTime":0,"weightedIO":0,"name":"C:","serialNumber":"","label":""} ...]
⑥获取网络信息
- 获取当前网络连接信息
info, _ := net.Connections("all") //可填入tcp、udp、tcp4、udp4等等
fmt.Println(info)
//output:
[{"fd":0,"family":2,"type":1,"localaddr":{"ip":"0.0.0.0","port":135},"remoteaddr":{"ip":"0.0.0.0","port":0},"status":"LISTEN","uids":null,"pid":668} {"fd":0,"family":2,"type":1,"localaddr":{"ip":"0.0.0.0","port":445},"remoteaddr":{"ip":"0.0.0.0","port":0},"status":"LISTEN","uids":null,"pid":4} {"fd":0,"family":2,"type":1,"localaddr":{"ip":"0.0.0.0","port":1801},"remoteaddr":{"ip":"0.0.0.0","port":0},"status":"LISTEN","uids":null,"pid":3860}
...]
- 获取网络读写字节/包的个数
info, _ := net.IOCounters(false)
fmt.Println(info)
//output:[{"name":"all","bytesSent":6516450,"bytesRecv":36991210,"packetsSent":21767,"packetsRecv":33990,"errin":0,"errout":0,"dropin":0,"dropout":0,"fifoin":0,"fifoout":0}]
⑦获取进程信息
- 获取到所有进程信息
info, _ := process.Pids() //获取当前所有进程的pid
fmt.Println(info)
//output:
[0 4 96 464 636 740 748 816 852 880 976 348 564 668 912 1048 1120 1184 1268 1288。。。]
info2,_ := process.GetWin32Proc(1120) //对应pid的进程信息
fmt.Println(info2)
//output:
[{svchost.exe 0xc00003e570 0xc00003e580 8 2019-05-23 09:15:28.444192 +0800 CST 5600 4 0xc00003e5b0 0 0 0 0 Win32_ComputerSystem WIN-SE89TTCP7U3 0xc00003e620 Win32_Process 0xc00003e650 0xc00005331e 209 6250000 0xc000053378 0xc0000533b8 Win32_OperatingSystem Microsoft Windows 10 专业版。。。}]
fmt.Println(info2[0].ParentProcessID) //获取父进程的pid
参考:https://blog.csdn.net/whatday/article/details/109620192
2 golang获取指定进程的CPU利用率与内存
2.1 代码
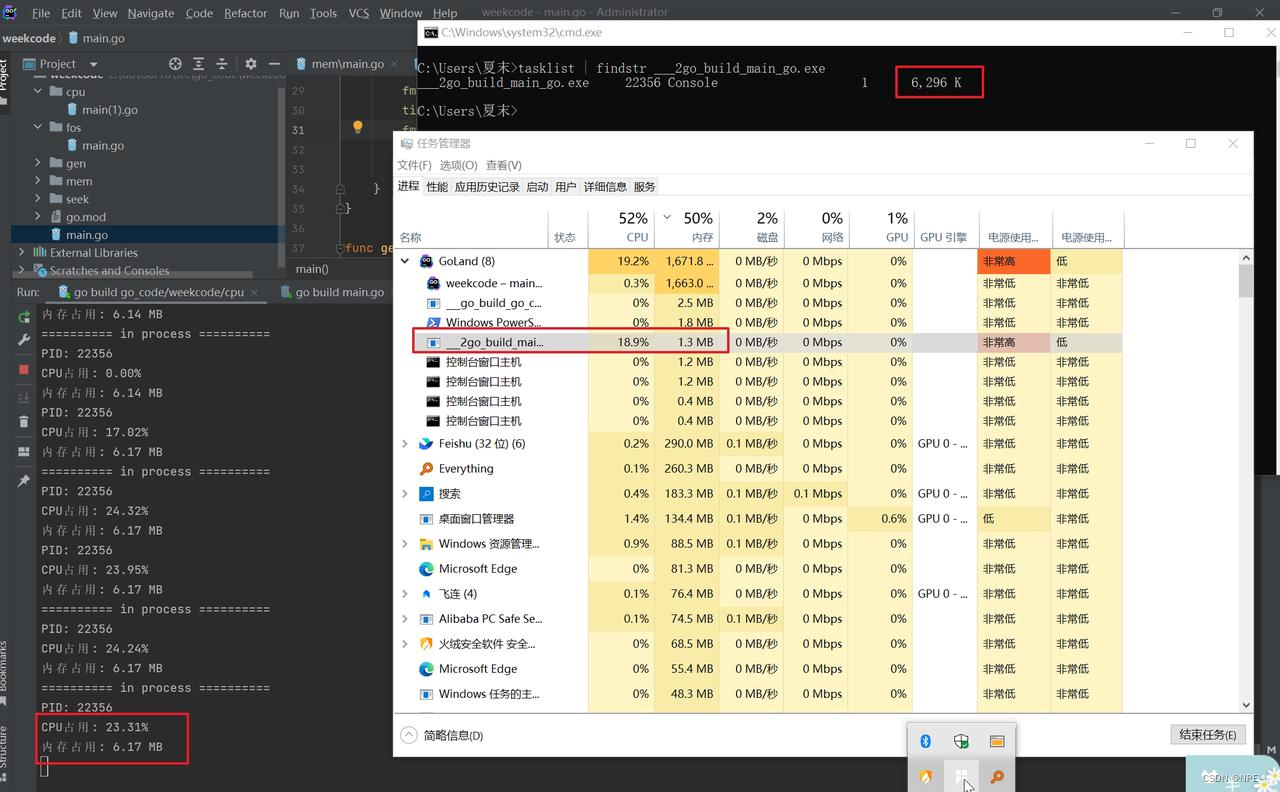
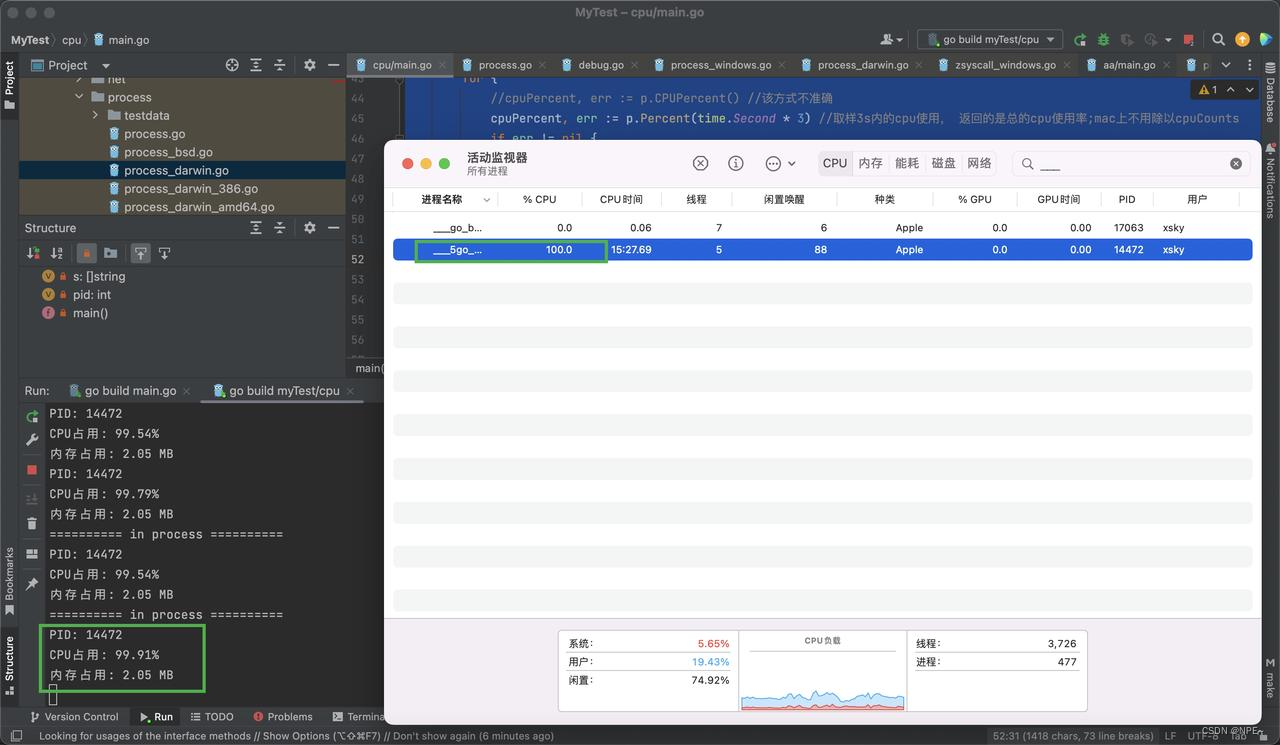
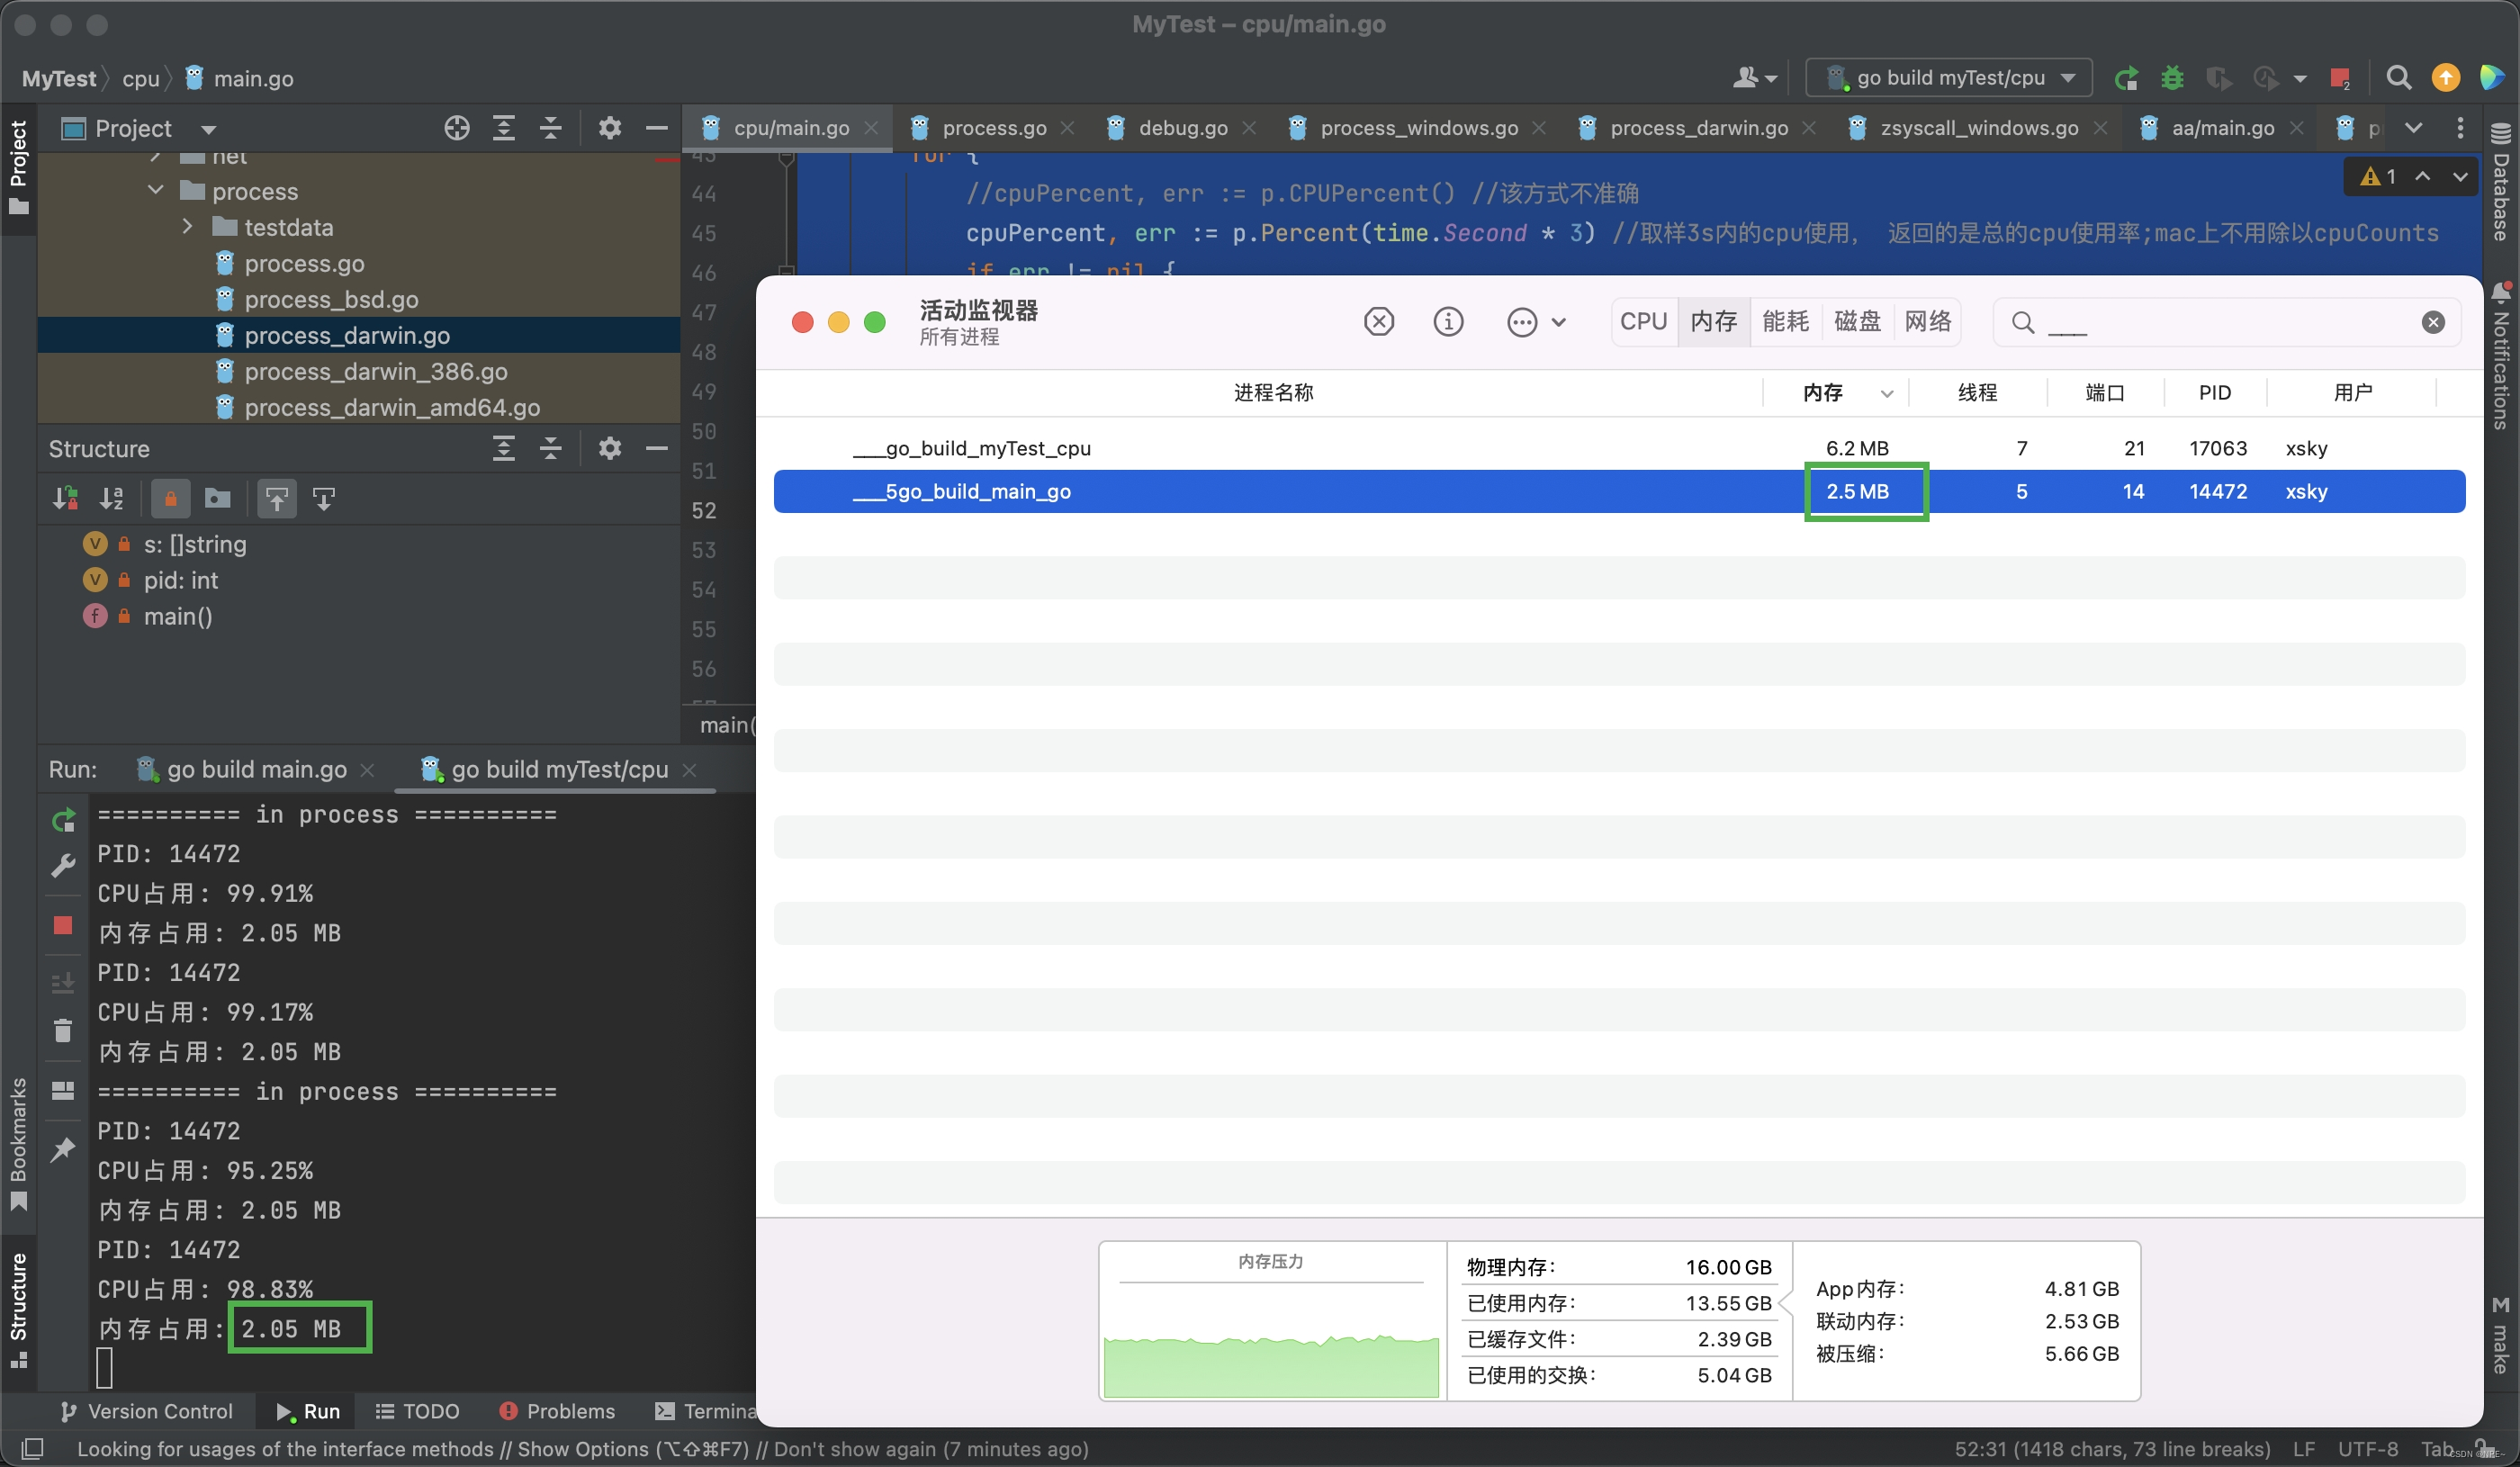
golang获取CPU利用率、内存与资源管理器保持一致
- psutil返回的cpu percent是总的占用
- mac上的活动监视器展示的cpu使用率是没有平均之后的
2. windows的资源管理器展示的是平均之后的,是占所有cpu核心的平均
package mainimport ("fmt""github.com/mitchellh/go-ps""github.com/shirou/gopsutil/cpu""github.com/shirou/gopsutil/process""log""runtime""strings""time"
)var (s   []stringpid int
)func main() {processes, err2 := ps.Processes()if err2 != nil {log.Fatalf("%v", err2)}for _, p := range processes {//将___5go_build换为自己想要监控的进程名if strings.Contains(p.Executable(), "___5go_build") {fmt.Println(p.Executable())fmt.Println(p.Pid())pid = p.Pid()}}p, err := process.NewProcess(int32(pid))if err != nil {log.Fatal(err)}counts, err2 := cpu.Counts(true)if err2 != nil {log.Fatalf("%v\n", err2)}fmt.Println("counts=", counts)go func() {for {//cpuPercent, err := p.CPUPercent() //该方式不准确cpuPercent, err := p.Percent(time.Second * 3) //取样3s内的cpu使用, 返回的是总的cpu使用率;mac上不用除以cpuCountsif err != nil {log.Fatal(err)}memInfo, err := p.MemoryInfo()if err != nil {log.Fatal(err)}fmt.Printf("PID: %d\n", pid)switch runtime.GOOS {case "darwin":fmt.Printf("CPU占用: %.2f%%\n", cpuPercent)case "windows":fmt.Printf("CPU占用: %.2f%%\n", cpuPercent/float64(counts))}//source used := processMemory.RSSfmt.Printf("内存占用: %.2f MB\n", float64(memInfo.RSS)/1024/1024)//time.Sleep(time.Second * 1)}}()for {time.Sleep(time.Second * 5)fmt.Println("========== in process ==========")}}
2.2 效果
win10:
mac:
2.3 其他
1 通过go原生runtime包获取进程占用内存
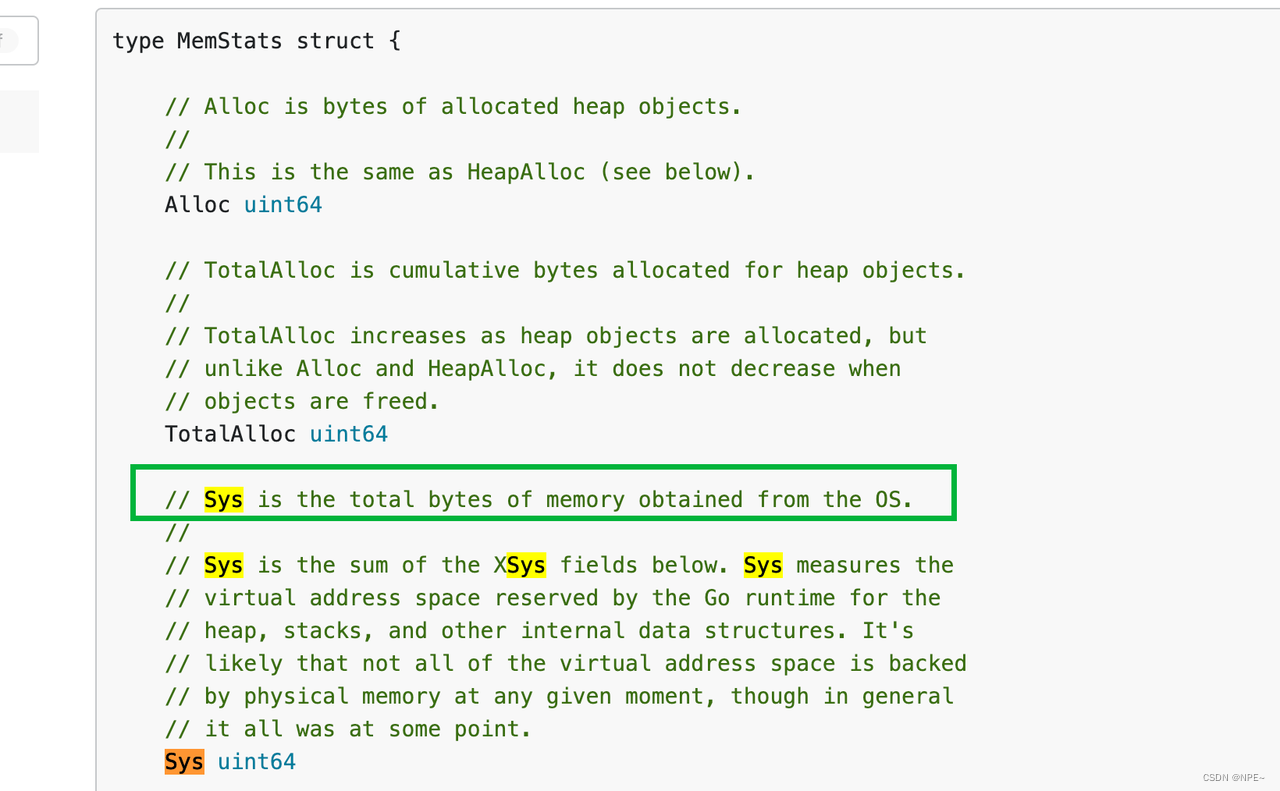
通过runtime.MemStats获取Sys字段来展示进程占用内存大小
package mainimport ("fmt""runtime""time"
)var (count = 100000000s     []string
)func main() {for {if count > 0 {s = append(s, "431431242142142142")count--if count%5000000 == 0 {collectMem()fmt.Println("count=", count)}} else {collectMem()}}
}func collectMem() {var stat runtime.MemStatsruntime.ReadMemStats(&stat)fmt.Printf("alloc:%vMB totalAlloc:%vMB sys:%vMB NumGC:%v\n", stat.Alloc/1024/1024, stat.TotalAlloc/1024/1024, stat.Sys/1024/1024, stat.NumGC)//fmt.Println("pid=", os.Getpid())time.Sleep(time.Second * 5)
}/*Alloc:已经分配但还未被释放的对象内存总量,单位为字节(heap);TotalAlloc:运行时系统已经分配的内存总量,单位为字节;Sys:程序向操作系统申请的内存总量,单位为字节;NumGC:运行时系统执行的垃圾回收次数;
*/
2 通过差值计算
如果是有用到rclone同步数据,那么可以直接通过rclone获取到的API来做差值:Sys - HeapRealeased
拓展:源码里//go:指令
1. //go:linkname 符号别名
//go:linkname localname importpath.name
该指令指示编译器使用 importpath.name 作为源代码中声明为 localname 的变量或函数的目标文件符号名称。但是由于这个伪指令,可以破坏类型系统和包模块化,只有引用了 unsafe 包才可以使用。
简单来讲,就是 importpath.name 是 localname 的符号别名,编译器实际上会调用 localname。
使用的前提是使用了 unsafe 包才能使用。
案例:
import _ "unsafe" // for go:linkname//go:linkname time_now time.now
func time_now() (sec int64, nsec int32, mono int64) {sec, nsec = walltime()return sec, nsec, nanotime() - startNano
}
2. //go:noescape 禁用逃逸分析
该指令指定下一个有声明但没有主体(意味着实现有可能不是 Go)的函数,不允许编译器对其做逃逸分析。
一般情况下,该指令用于内存分配优化。编译器默认会进行逃逸分析,会通过规则判定一个变量是分配到堆上还是栈上。
但凡事有意外,一些函数虽然逃逸分析其是存放到堆上。但是对于我们来说,它是特别的。我们就可以使用 go:noescape 指令强制要求编译器将其分配到函数栈上。
案例:
// memmove copies n bytes from "from" to "to".
// in memmove_*.s
//go:noescape
func memmove(to, from unsafe.Pointer, n uintptr)
我们观察一下这个案例,它满足了该指令的常见特性。如下:
- memmove_*.s:只有声明,没有主体。其主体是由底层汇编实现的
- memmove:函数功能,在栈上处理性能会更好
3. //go:nosplit 声明该堆栈跳出溢出检查
//go:nosplit
该指令指定文件中声明的下一个函数不得包含堆栈溢出检查。简单来讲,就是这个函数跳过堆栈溢出的检查。
案例:
//go:nosplit
func key32(p *uintptr) *uint32 {return (*uint32)(unsafe.Pointer(p))
}
4. //go:nowritebarrierrec 处理读写屏障
//go:nowritebarrierrec
该指令表示编译器遇到写屏障时就会产生一个错误,并且允许递归。也就是这个函数调用的其他函数如果有写屏障也会报错。
简单来讲,就是针对写屏障的处理,防止其死循环。
案例:
//go:nowritebarrierrec
func gcFlushBgCredit(scanWork int64) {...
}
5. //go:yeswritebarrierrec 与nowritebarrierrec相对
该指令与 go:nowritebarrierrec 相对,在标注 go:nowritebarrierrec 指令的函数上,遇到写屏障会产生错误。
而当编译器遇到 go:yeswritebarrierrec 指令时将会停止。
案例:
//go:yeswritebarrierrec
func gchelper() {...
}
6. //go:noinline 禁止内联
//go:noinline
func unexportedPanicForTesting(b []byte, i int) byte {return b[i]
}
我们观察一下这个案例,是直接通过索引取值,逻辑比较简单。如果不加上 go:noinline 的话,就会出现编译器对其进行内联优化。
显然,内联有好有坏。该指令就是提供这一特殊处理。
7. //go:norace 禁止静态检测
该指令表示禁止进行竞态检测。
常见的形式就是在启动时执行 go run -race,能够检测应用程序中是否存在双向的数据竞争,非常有用。
//go:norace
func forkAndExecInChild(argv0 *byte, argv, envv []*byte, chroot, dir *byte, attr *ProcAttr, sys *SysProcAttr, pipe int) (pid int, err Errno) {...
}
8. //go:notinheap:不允许从堆申请内存
该指令常用于类型声明,它表示这个类型不允许从 GC 堆上进行申请内存。
在运行时中常用其来做较低层次的内部结构,避免调度器和内存分配中的写屏障,能够提高性能。
案例:
// notInHeap is off-heap memory allocated by a lower-level allocator
// like sysAlloc or persistentAlloc.
//
// In general, it's better to use real types marked as go:notinheap,
// but this serves as a generic type for situations where that isn't
// possible (like in the allocators).
//
//go:notinheap
type notInHeap struct{}
