目录
一、MyBatis 简介
1、MyBatis 简介
2、工作流程
二、入门案例
1、准备工作
2、示例
三、Mapper 代理开发
1、问题简介
2、工作流程
3、注意事项
4、测试
四、核心配置文件 mybatis-config.xml
1、environment
2、typeAilases
五、基于 xml 的查询操作
1、准备环境
2、 映射列名
3、根据 id 查询( #{ id } )
4、参数传递的 6 种方式
6、动态查询
六、基于 xml 的添加操作
1、添加数据
2、事务提交
3、主键返回
七、基于 xml 的修改操作
1、修改全部字段
2、修改动态字段
八、基于 xml 的删除操作
1、根据 id 删除
2、批量删除
九、注解开发
1、简单的增删改查
一、MyBatis 简介
1、MyBatis 简介
- MyBatis 是一款优秀的持久层框架,它支持自定义 SQL、存储过程以及高级映射。MyBatis 免除了几乎所有的 JDBC 代码以及设置参数和获取结果集的工作。
- MyBatis 可以通过简单的 XML 或注解来配置和映射原始类型、接口和 Java POJO(Plain Old Java Objects,普通老式 Java 对象)为数据库中的记录。
2、工作流程
(1)每个基于 MyBatis 的应用都是以一个 SqlSessionFactory 的实例为核心的:
- SqlSessionFactory 的实例可以通过 SqlSessionFactoryBuilder 获得;
- 而 SqlSessionFactoryBuilder 则可以从 XML 配置文件或一个预先配置的 Configuration 实例来构建出 SqlSessionFactory 实例;(即 xml 方式、注解方式)
(2)SqlSessionFactory 顾名思义,我们可以从中获得 SqlSession 的实例
- SqlSession 提供了在数据库执行 SQL 命令所需的所有方法;(如:selectList、selectOne)
- 通过 SqlSession 实例来执行已映射的 SQL 语句;(根据对应 namespace + id 执行自定义的 SQL 语句)
(3)释放资源
- SqlSession.close();
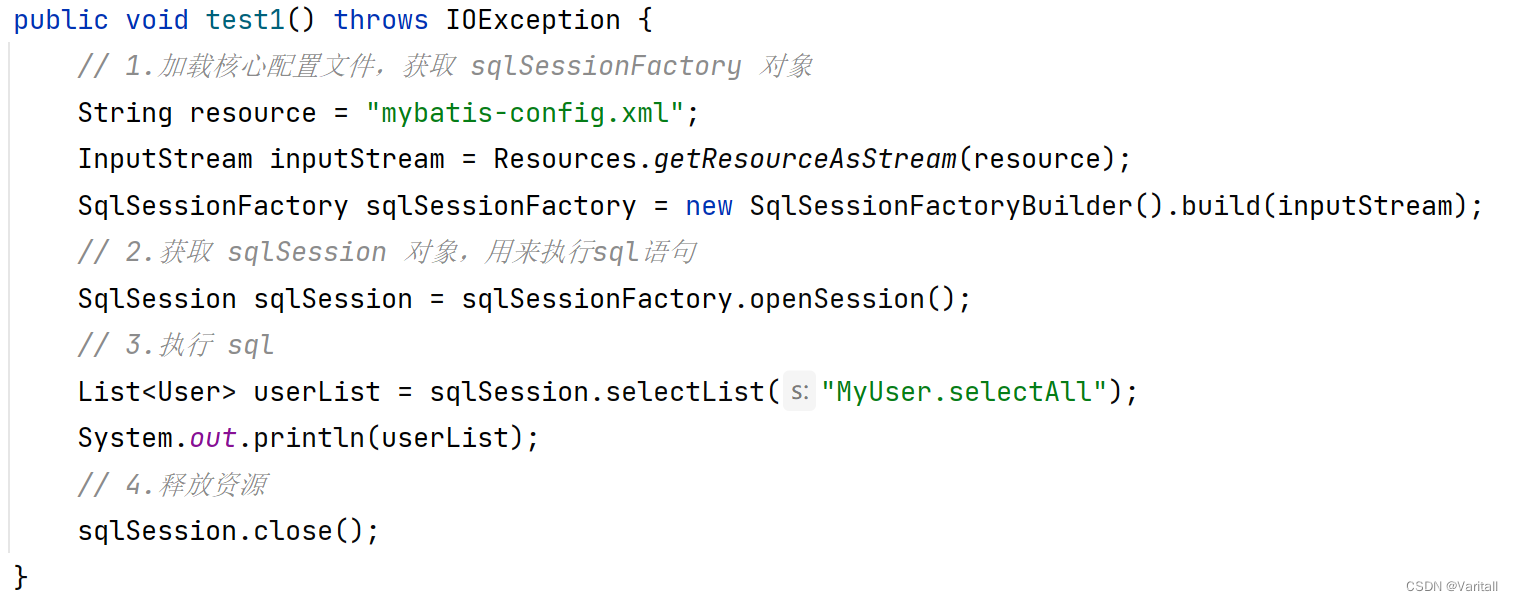
整个流程大致为:
二、入门案例
显然重点在于 MyBatis 的配置文件,以及执行相应方法所需要的 mapper 映射文件。下面通过 1 个示例来说明。
1、准备工作
(1)引入相关依赖
- 这里使用的数据库是 PostgreSQL,可以根据自己的数据库更改。
<dependencies><dependency><groupId>org.mybatis</groupId><artifactId>mybatis</artifactId><version>3.5.10</version></dependency><dependency><groupId>junit</groupId><artifactId>junit</artifactId><version>4.12</version><scope>test</scope></dependency><dependency><groupId>org.postgresql</groupId><artifactId>postgresql</artifactId><version>42.6.0</version></dependency>
</dependencies>
(2)创建一个 Pojo 实体类
- 构造函数、toString 等等方法自行添加。
package com.demo.pojo;public class User {private Integer id;private String username;private String password;private Integer gender;private String address;
}
(3)创建对应的 user 表格

2、示例
我们按照前面的大致流程完成示例。
(1)mybatis-config.xml
- 文件命名任意,在 resource 目录下创建:/mybatis-config.xml;
- 首先需要配置数据库信息,其次需要链接 mapper 映射文件;
<?xml version="1.0" encoding="UTF-8" ?>
<!DOCTYPE configurationPUBLIC "-//mybatis.org//DTD Config 3.0//EN""http://mybatis.org/dtd/mybatis-3-config.dtd"><configuration><!--设置连接数据库的环境--><environments default="development"><environment id="development"><transactionManager type="JDBC"/><dataSource type="POOLED"><property name="driver" value="org.postgresql.Driver"/><property name="url" value="jdbc:postgresql://localhost:5432/MyDatabase"/><property name="username" value="postgres"/><property name="password" value="123456"/></dataSource></environment></environments><!--引入sql映射文件--><mappers><!-- 单独引入一个 mapper  --><mapper resource="mapper/UserMapper.xml"/></mappers>
</configuration>
(2)UserMapper.xml
- 在 resource 目录下创建:/mapper/mybatis-config.xml;
- namespace:命名空间,一般可以随便写,示例一和示例二有所不同;
- id:作为当前编写语句的标识符,通常与 namespace 连用;
- resultType:顾名思义,返回类型;
<?xml version="1.0" encoding="UTF-8" ?>
<!DOCTYPE mapperPUBLIC "-//mybatis.org//DTD Mapper 3.0//EN""https://mybatis.org/dtd/mybatis-3-mapper.dtd"><mapper namespace="MyUser"><select id="selectAll" resultType="com.demo.pojo.User">select * from "MyUser"; <!-- PostgreSQL 写法 --></select>
</mapper>
(3)Java 代码
@Test
public void test1() throws IOException {// 1.加载核心配置文件,获取 sqlSessionFactory 对象String resource = "mybatis-config.xml";InputStream inputStream = Resources.getResourceAsStream(resource);SqlSessionFactory sqlSessionFactory = new SqlSessionFactoryBuilder().build(inputStream);// 2.获取 sqlSession 对象,用来执行sql语句SqlSession sqlSession = sqlSessionFactory.openSession();// 3.执行 sqlList<User> userList = sqlSession.selectList("MyUser.selectAll");System.out.println(userList);// 4.释放资源sqlSession.close();
}
三、Mapper 代理开发
1、问题简介
我们会发现上面的示例有一个大问题:当我们使用 sqlSession 对象调用指定的 SQL 语句时,传入了一个字符串常量 "MyUser.selectAll"。

这种硬编码的问题显然不利于后期的维护,并且在编写的时候也需要来回查找对应的 SQL 语句的 id。
而我们的 Mapper 代理开发的目的:
- 解决原生方式中的硬编码问题;
- 简化后期执行的 SQL;
2、工作流程
- 处理哪个 Pojo 实体类,我们就可以创建对应的 mapper 代理对象,mapper 代理对象就是一个接口;

- 使用 sqlSession 获取指定的 mapper 代理对象(通过 class),然后使用 mapper 执行目标 SQL 语句的方法;

- 目标方法的方法名,与我们在 xml 文件中设置的 id 值一致;

3、注意事项
- 使用 mapper 代理对象,需要 mapper 接口和相同文件名的 xml 在同一个目录下,因此在 resources 目录下创建软件包;(若 resource 没有软件包选项,则用 com/demo/mapper 来创建目录,或者将 resources 标记为源代码根目录)

- mapper 配置文件的 namespace 需要改成 mapper 代理对象的类路径;

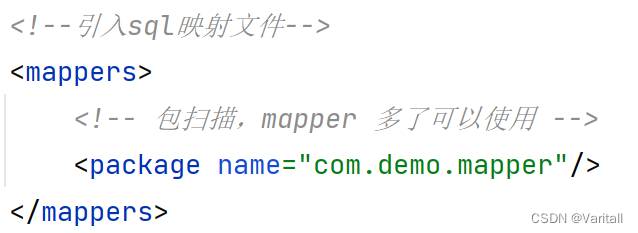
- 由于以后很肯能会有大量的 Pojo 实体类需要用到 Mapper,因此可以在 mybatis-config.xml 中使用包扫描;
4、测试
(1)Java 代码
@Test
public void test2() throws IOException {String resource = "mybatis-config.xml";InputStream inputStream = Resources.getResourceAsStream(resource);SqlSessionFactory sqlSessionFactory = new SqlSessionFactoryBuilder().build(inputStream);SqlSession sqlSession = sqlSessionFactory.openSession();// mapper 代理对象,需要 mapper 接口 和 xml 在同一个目录下,因此在 resources 目录下创建软件包// 没有软件包选项,则用 com/demo/mapper 来创建目录,或者将 resources 标记为源代码目录UserMapper userMapper = sqlSession.getMapper(UserMapper.class);List<User> userList = userMapper.selectAll();System.out.println(userList);sqlSession.close();
}
(2)Mapper 接口类
package com.demo.mapper;import com.demo.pojo.User;import java.util.List;public interface UserMapper {List<User> selectAll();
}
(3)mybatis-config.xml
<?xml version="1.0" encoding="UTF-8" ?>
<!DOCTYPE configurationPUBLIC "-//mybatis.org//DTD Config 3.0//EN""http://mybatis.org/dtd/mybatis-3-config.dtd"><configuration><!--设置连接数据库的环境--><environments default="development"><environment id="development"><transactionManager type="JDBC"/><dataSource type="POOLED"><property name="driver" value="org.postgresql.Driver"/><property name="url" value="jdbc:postgresql://localhost:5432/MyDatabase"/><property name="username" value="postgres"/><property name="password" value="123456"/></dataSource></environment></environments><!--引入sql映射文件--><mappers><mapper resource="com/demo/mapper/UserMapper.xml"/></mappers>
</configuration>
(4)UserMapper.xml
<?xml version="1.0" encoding="UTF-8" ?>
<!DOCTYPE mapperPUBLIC "-//mybatis.org//DTD Mapper 3.0//EN""https://mybatis.org/dtd/mybatis-3-mapper.dtd"><mapper namespace="com.demo.mapper.UserMapper"><select id="selectAll" resultType="com.demo.pojo.User">select * from "MyUser";</select>
</mapper>
四、核心配置文件 mybatis-config.xml
详情可以参考:https://mybatis.org/mybatis-3/zh/configuration.html
下面举两个例子。
1、environment
<environment> 用来配置数据源,因此可以在 <environments> 中配置多个数据源。通过 default 属性值,可以动态地切换数据源。
(1)<transactionManager>
事务管理方式。这个默认写 JDBC 即可,后期开发使用的是 Spring 的事务管理方式。
(2)<dataSource>
数据源信息。后期开发也是使用 Spring 来配置数据源,默认写上 POOLED 即可。
2、typeAilases
我们在 UserMapper.xml 中,需要为返回类型写上类的全路径,有一点麻烦。
使用 typeAilases 可以为 POJO 类配置一个别名,设置好包的路径后,它们的别名默认就是不区分大小写的类名。

五、基于 xml 的查询操作
1、准备环境
(1)创建表 brand

(2)创建实体类 Brand
package com.demo.pojo;public class Brand {private Integer id;private String brandName;private String companyName;private Integer order;private String description;private Integer status;
}
(3)安装 MyBatisX 插件
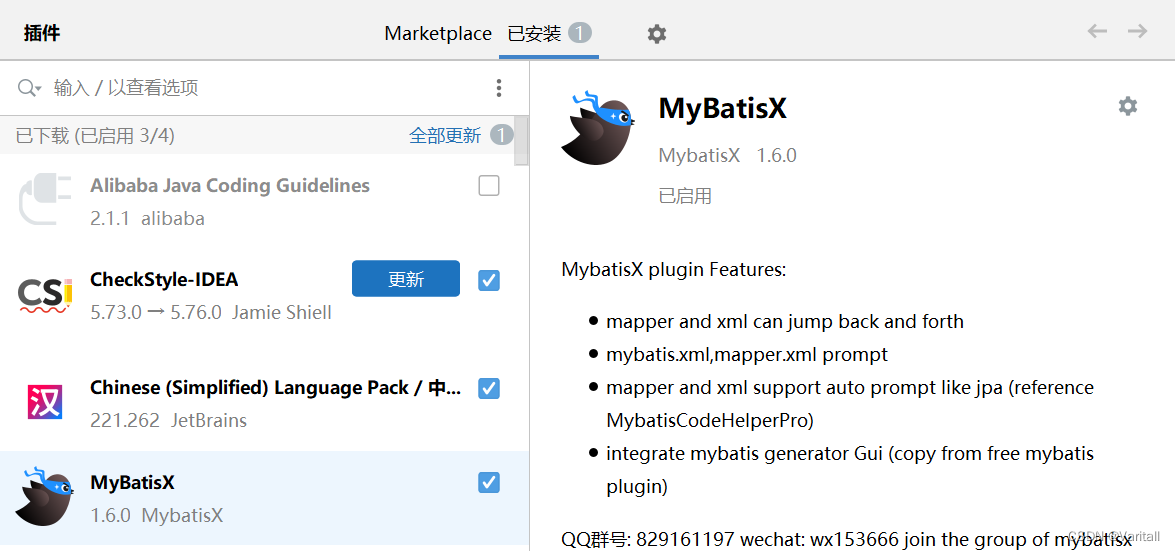
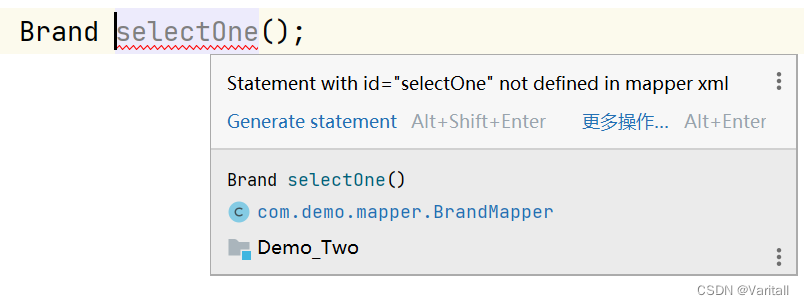
当我们在 mapper 接口中写上相应的 SQL 语句的方法名时,如果已经有很多方法了,那么对比起来就很麻烦,使用 MyBatisX 可以帮助我们快速定位。

- 蓝色头顶:代表 mapper 的接口;
- 红色头顶:代表 SQL 的映射文件;
- 点击红鸟或者蓝鸟,可以在 mapper 接口和 SQL 映射文件之间进行切换;
并且 MyBatisX 还能自动生成方法所对应的 SQL 的 id;
2、<resultMap> 映射列名
有的人习惯在创建数据库表的时候,列名使用 _ 下划线,这样就会导致 MyBatis 无法将数据注入到 POJO 实例中。
而如果给每个带有 _ 下划线的列名都取别名,写起来又非常麻烦,所以 MyBatis 提供了一个 <resultMap> 标签,用来将表的列名与 POJO 实体类的属性名做一一对应:
<resultMap id="brandResultMap" type="com.demo.pojo.Brand"><result column="brand_name" property="brandName"/><result column="company_name" property="companyName"/>
</resultMap><select id="selectAll" resultMap="brandResultMap">select * from "MyBrand";
</select>需要注意的是:<select> 中不是写 resultType,而是写 resultMap。
3、根据 id 查询( #{ id } )
显然根据 id 查询时,我们需要传入一个 Integer 类型的参数:
- 接口添加参数:

- 映射文件添加 #{id}:

MyBatis 会根据参数名与 #{ } 内的名做比较来进行注入。
<select> 有一个属性是 parameterType,用于表示参数类型,但一般都不写。
(1)${} 与 #{}
除了 #{ } 这种写法,还可以用 ${ } 这种写法,它们的区别在于:
- #{ }:会先将 #{ } 替换成 ?,然后再将传入的参数赋值给 ?;
- ${ }:直接将传入的参数替换掉 ${ };
一般情况下,我们都推荐使用 #{ },因为 #{ } 将 #{ } 替换成 ?,是为了防止 SQL 注入,而 ${ } 就不能防止 SQL 注入。
(2)特殊字符
假如我们写出如下 SQL 语句:

显然,< 会被识别为一个标签的开始,所以我们可以做如下措施:
- 转义字符:

- CDATA 区:

4、参数传递的 6 种方式
当我们希望接收如下两个参数来做查询。

(1)@Param(value)

- @Param 的 value 属性,用来将其标注的参数,按照 value 的属性值找到相同的 #{ value } 来进行注入。
- 比如 value = "brandName",就可以注入到 #{ brandName} 中。
(2)POJO 实体类

- 如果传递的参数都属于同一个 POJO 实体类,那么就可以用一个实体类的参数来接收他们。
- 这就要求 #{ } 占位符内的名称,跟 POJO 实体类的属性名一致。
(3)Map
![]()
- Map 的要求就很明显了,要求 key 的值,与 #{ } 内的名称一致。
(4)Collection
- 封装为 Map 集合,通过 #{ arg0 } 或 #{ collection } 获取
- 可以使用 @Param 注解,替换 Map 中默认的 arg 键名。
(5)List
- 封装为 Map 集合,通过 #{ arg0 } 或 #{ collection } 或 #{ list } 获取
- 可以使用 @Param 注解,替换 Map 中默认的 arg 键名。
(6)Array
- 封装为 Map 集合,通过 #{ arg0 } 或 #{ array } 获取
- 可以使用 @Param 注解,替换 Map 中默认的 arg 键名。
(7)Java 测试代码
@Test
public void testSelectByCondition() throws IOException {// 模拟从 web 接收参数Integer status = 0;String companyName = "华为";// 处理参数(模糊查询)companyName = "%" + companyName + "%";// 封装 Brand 对象Brand brand = new Brand();brand.setStatus(status);brand.setCompanyName(companyName);// 设置 map 对象Map<String, Object> map = new HashMap<>();map.put("status", status);map.put("companyName", companyName);String resource = "mybatis-config.xml";InputStream inputStream = Resources.getResourceAsStream(resource);SqlSessionFactory sqlSessionFactory = new SqlSessionFactoryBuilder().build(inputStream);SqlSession sqlSession = sqlSessionFactory.openSession();BrandMapper brandMapper = sqlSession.getMapper(BrandMapper.class);List<Brand> brandList1 = brandMapper.selectByConditions1(status, companyName);List<Brand> brandList2 = brandMapper.selectByConditions2(brand);List<Brand> brandList3 = brandMapper.selectByConditions3(map);System.out.println("第一种:" + brandList1);System.out.println("第二种:" + brandList2);System.out.println("第三种:" + brandList3);sqlSession.close();
}
(5)Mapper 配置文件
<select id="selectByConditions1" resultType="com.demo.pojo.Brand">select * from "MyBrand" wherestatus = #{ status } and"companyName" like #{ companyName } <!-- PostgreSQL 需要 “” 保证大写 -->
</select>
<select id="selectByConditions2" resultType="com.demo.pojo.Brand">select * from "MyBrand" wherestatus = #{ status } and"companyName" like #{ companyName }
</select>
<select id="selectByConditions3" resultType="com.demo.pojo.Brand">select * from "MyBrand" wherestatus = #{ status } and"companyName" like #{ companyName }
</select>
(6)输出结果

6、动态查询
上面的例子其实有 Bug,因为用户在操作的时候,有可能只希望用一个 companyName 来查询目标数据。也就是说,我们需要对原有 SQL 语句做动态修改,没有传递过来的参数就不用。
动态 SQL 是 MyBatis 的强大特性之一。如果你使用过 JDBC 或其它类似的框架,你应该能理解根据不同条件拼接 SQL 语句有多痛苦,例如拼接时要确保不能忘记添加必要的空格,还要注意去掉列表最后一个列名的逗号。利用动态 SQL,可以彻底摆脱这种痛苦。
下面通过几个标签完成动态查询:
- <if>
- <choose> and <when>
(1)<if test=""> 的多条件动态查询
test 属性值就是我们要做的逻辑判断。
- 使用 <if> 时,由于 and 关键字不好控制,所以一般都加上一个恒等式:1 = 1。
<select id="selectByDynamic" resultType="com.demo.pojo.Brand">select *from "MyBrand"where 1 = 1<if test="status != null">and status = #{ status }</if><if test="companyName != null and companyName != ''">and "companyName" like #{ companyName }</if>
</select>- 或者使用 <where> 标签,会根据判断结果来连接(也就是 and)对应的语句。
<select id="selectByDynamic" resultType="com.demo.pojo.Brand">select *from "MyBrand"<where><if test="status != null">status = #{ status }</if><if test="companyName != null and companyName != ''">"companyName" like #{ companyName }</if></where>
</select>
(2)<choose> 的单条件动态查询
有些情况下只允许根据一个的条件进行查询,但是条件可以更改。
- 如果用户只输入一个参数,所以可以不用 <where>。<otherwise> 可以用来防止用户一个都不输入。
- 如果用户真的一个都不输入,可以用 <where>,这样可以省略 <otherwise>。
<select id="selectByDynamic" resultType="com.demo.pojo.Brand">select *from "MyBrand"where <!-- 因为保证了用户只会输入一个参数,所以可以不用 <where> --><choose><when test="status != null">status = #{ status }</when><when test="companyName != null and companyName != ''">"companyName" like #{ companyName }</when><otherwise>1 = 1</otherwise></choose>
</select>
六、基于 xml 的添加操作
1、添加数据
(1)接口

(2)Mapper 映射
<insert id="addBrand">insert into "MyBrand"("brandName", "companyName", "order", description, status)values(#{brandName}, #{companyName}, #{order}, #{description}, #{status});
</insert>
(3)Java 测试代码
@Test
public void testAddBrand() throws IOException {String resource = "mybatis-config.xml";InputStream inputStream = Resources.getResourceAsStream(resource);SqlSessionFactory sqlSessionFactory = new SqlSessionFactoryBuilder().build(inputStream);SqlSession sqlSession = sqlSessionFactory.openSession();BrandMapper brandMapper = sqlSession.getMapper(BrandMapper.class);Brand brand = new Brand(null, "iphone", "Apple", 99, "iphone 8", 1);brandMapper.addBrand(brand);List<Brand> brandList = brandMapper.selectAll();System.out.println(brandList);// 提交事务sqlSession.commit();sqlSession.close();
}
2、事务提交
在刚才添加数据的例子中,我们发现多写了一句 sqlSession.commit(),用于将 SQL 语句的操作提交。如果不写,就会发现我们插入的数据没有添加到数据库。
(1)事务提交的设置方法
- sqlSession.commit():手动提交事务;
- sqlSessionFactory.openSession(true):在获取 sqlSession 的时候可以设置是否自动提交(默认false,即开启事务)
3、主键返回
有时在数据添加成功后,需要获取插入数据库的主键的值,比如 id。
因为数据刚刚添加完成,我们并不知道它的 id 值,但是此时我们马上要用到 id 作为另一个表的外键,那么就需要返回主键值。
(1)解决方法
在相应的 <insert> 标签中,添加 useGeneratedKeys 和 KeyProperty 属性即可:
- useGeneratedKeys:设置为 true;
- KeyProperty:设置为需要返回的列;
(2)示例
- 插入一个新的 brand,然后获取其 id,再次做查询验证 id。
(2-1)Mapper 映射
<insert id="addBrandBackId" useGeneratedKeys="true" keyProperty="id">insert into "MyBrand"("brandName", "companyName", "order", description, status)values(#{brandName}, #{companyName}, #{order}, #{description}, #{status});
</insert>
(2-2)Java 测试代码
@Test
public void testAddBrand() throws IOException {String resource = "mybatis-config.xml";InputStream inputStream = Resources.getResourceAsStream(resource);SqlSessionFactory sqlSessionFactory = new SqlSessionFactoryBuilder().build(inputStream);SqlSession sqlSession = sqlSessionFactory.openSession();BrandMapper brandMapper = sqlSession.getMapper(BrandMapper.class);Brand brand = new Brand(null, "iphone", "Apple", 99, "iphone 8", 1);brandMapper.addBrandBackId(brand);Integer id = brand.getId();System.out.println(id);Brand tmp = brandMapper.selectById(id);System.out.println(tmp);// 提交事务sqlSession.commit();sqlSession.close();
}
(3)输出结果

七、基于 xml 的修改操作
1、修改全部字段
传入一个 POJO 实体类,做对应的 update 操作即可。
(1)接口

(2)Mapper 映射
<update id="update">update "MyBrand"set"brandName" = #{ brandName },"companyName" = #{ companyName },"order" = #{ order},description = #{ description },status = #{ status }where id = #{ id };
</update>
(3)Java 测试代码
@Test
public void testUpdate() throws IOException {String resource = "mybatis-config.xml";InputStream inputStream = Resources.getResourceAsStream(resource);SqlSessionFactory sqlSessionFactory = new SqlSessionFactoryBuilder().build(inputStream);SqlSession sqlSession = sqlSessionFactory.openSession();BrandMapper brandMapper = sqlSession.getMapper(BrandMapper.class);int count = brandMapper.update(new Brand(9, "Iphone", "Apple", 66, "iphone 18", 1));System.out.println(count);sqlSession.commit();sqlSession.close();}
2、修改动态字段
比如 User 对象,密码的修改和其他的内容的修改一般是不会放在一起的,修改密码时只需要修改 password,其他内容不用修改。
使用 <set> 标签就可以实现动态:
- 当 update 语句中没有使用 if 标签时,如果有一个参数为 null,都会导致错误。
- 当在 update 语句中使用 if 标签时,如果前面的 if 没有执行,则会导致逗号多余错误。
- 使用 <set> 标签将动态的配置 SET 关键字,并剔除追加到条件末尾的任何不相关的逗号。
- 使用 if+set 标签修改后,如果某项为 null 则不进行更新,而是保持数据库原值。
<update id="update">update "MyBrand"<set><if test="brandName != null">"brandName" = #{ brandName },</if><if test="companyName != null">"companyName" = #{ companyName },</if><if test="order != null">"order" = #{ order },</if><if test="description != null">description = #{ description },</if><if test="status != null">status = #{ status },</if></set>where id = #{ id };
</update>
八、基于 xml 的删除操作
1、根据 id 删除
(1)Mapper 映射文件
<delete id="deleteById">delete from "MyBrand" where id = #{ id };
</delete>
(2)Java 测试代码
@Test
public void testDeleteById() throws IOException {String resource = "mybatis-config.xml";InputStream inputStream = Resources.getResourceAsStream(resource);SqlSessionFactory sqlSessionFactory = new SqlSessionFactoryBuilder().build(inputStream);SqlSession sqlSession = sqlSessionFactory.openSession();BrandMapper brandMapper = sqlSession.getMapper(BrandMapper.class);int count = brandMapper.deleteById(9);sqlSession.commit();sqlSession.close();}
2、批量删除
批量(多选)删除是我们经常遇到的需求。
实现方法就是将多个 id 封装成 id 数组,SQL 语句中用 ?占位符来接收所有的 id 值。
但是现在问题就在于,我们不能确定有多少个 id,也就是不能确定有多少个 ?占位符。
(1)foreach
为了解决 in 语句的问题,MyBatis 提供了一个 foreach 标签,可以对一个集合进行遍历:
- collection:表示传入的集合;
- item:遍历的每一个元素;
- seperator:元素之间的分隔符;
- open/close:指定开闭匹配的字符串;
其中 collection 需要特别注意,MyBatis 会将集合对象封装到一个 Map 对象,通过 key 来获取我们传入的集合。
key 的值:数组则写 array,List 实例则写 list,也可以用 @Param 起别名。
(2)示例
(2-1)Mapper 映射文件
<delete id="deleteByIds">delete from "MyBrand" where id in<foreach collection="array" item="id" separator="," open="(" close=")">#{ id }</foreach>
</delete>
九、注解开发
MyBatis 中并不一定使用完全注解开发,通常:
- 注解完成简单功能;
- 配置文件完成复杂功能;
1、简单的增删改查
(1)Mapper 映射接口
@Select("select * from \"MyBrand\"")
List<Brand> selectAll();@Insert("insert into \"MyBrand\"(\"brandName\", \"companyName\", \"order\", description, status)\n" +"        values(#{brandName}, #{companyName}, #{order}, #{description}, #{status});")
void addBrand(Brand brand);@Update("update \"MyBrand\" set status = #{ status }")
int update(Brand brand);@Delete("delete from \"MyBrand\" where id = #{ id };")
int deleteById(Integer id);
(2)Java 测试代码
@Test
public void testAnnotation() throws IOException {String resource = "mybatis-config.xml";InputStream inputStream = Resources.getResourceAsStream(resource);SqlSessionFactory sqlSessionFactory = new SqlSessionFactoryBuilder().build(inputStream);SqlSession sqlSession = sqlSessionFactory.openSession();BrandMapper brandMapper = sqlSession.getMapper(BrandMapper.class);// 增brandMapper.addBrand(new Brand(null, "iphone", "Apple", 55, "Iphone x", 0));// 删brandMapper.deleteById(2);// 改brandMapper.update(new Brand(1, "No.1", "华为No.1", 66, "遥遥领先2.0",0));// 查List<Brand> brandList = brandMapper.selectAll();System.out.println(brandList);sqlSession.commit();sqlSession.close();
}
(3)输出结果
- 运行前:

- 运行后:







![【LeetCode】94. 二叉树的中序遍历 [ 左子树 根结点 右子树 ]](https://img-blog.csdnimg.cn/a0dd44bb339a48828b562c80b25b3fe2.png)

