目录
1 File 类的使用
1.1 File类的概念
1.2 构造方法
1.3 常用方法
1.4 课后练习
2 IO流原理及流的分类
2.1 IO原理
2.2 流的分类
2.3 IO流体系
2.4 接口方法
2.4.1 InputStream & Reader相同点
2.4.2 InputStream方法详解
2.4.3 Reader方法详解
2.4.4 OutputStream & Writer相同点
2.4.5 OutputStream方法详解
2.4.6 Writer方法详解
3 节点流(或文件流)
3.1 读取文件通用步骤
3.2 FileReader read(char[] cbuf)方法读取文件
3.3 写出数据通用步骤
3.4 FileReader和FileWriter实现文本文件复制(不能实现非文本文件复制)
3.5 FileInputStream不能读取文本文件(复制操作可以)
3.6 FileInputStream和FileOutputStream读写非文本文件
3.7 FileInputStream和FileOutputStream复制文件
4 缓冲流
4.1 基本概念
4.2 原理图
4.3 缓冲流(字节型)实现非文本文件的复制
4.4 缓冲流与节点流读写速度对比
4.5 缓冲流(字符型)实现文本文件的复制
4.6 缓冲流课后练习
5 转换流
5.1 概述
5.2 原理图
5.3 转换流读取文件
5.4 转换流实现文件的读入和写出
5.5 字符编码
6 标准输入、输出流
7 打印流
8 数据流
9 对象流
9.1 对象序列化概念
9.2 对象流序列化与反序列化字符串操作
9.3 自定义类实现序列化与反序列化操作
9.3 serialVersionUID的理解
9.4 自定义类可序列化的其他要求
10 随机存取文件流
10.1 RandomAccessFile实现数据的读写操作
10.2 RandomAccessFile实现数据的插入
10.3 扩展
11 NIO.2中Path、Paths、Files类的使用
11.1 概述
10.2 Path接口
10.3 Files 类
1 File 类的使用
1.1 File类的概念
- java.io.File类:文件和文件目录路径的抽象表示形式,与平台无关
- File 能新建、删除、重命名文件和目录,但 File 不能访问文件内容本身。 如果需要访问文件内容本身,则需要使用输入/输出流。
- 想要在Java程序中表示一个真实存在的文件或目录,那么必须有一个File对 象,但是Java程序中的一个File对象,可能没有一个真实存在的文件或目录。
- File对象可以作为参数传递给流的构造器
1.2 构造方法
/*** 1. File类的一个对象,代表一个文件或一个文件目录(俗称:文件夹)* 2. File类声明在java.io包下* 3. File类中涉及到关于文件或文件目录的创建/删除重命名/修改时间、文件大小等方法.并未涉及到写入或读取文件内容的操作。如果需要读取或写入文件内容.必须使用IO流来完成。* 4. 后续File类的对象常会作为参数传递到流的构造器中,指明读取或写入的"终点"。**/
public class FileTest {/*1.如何创建File类的实例1.1 File(String filePath)以pathname为路径创建File对象,可以是绝对路径或者相对路径,如果 pathname是相对路径,则默认的当前路径在系统属性user.dir中存储。 绝对路径:是一个固定的路径,从盘符开始 相对路径:是相对于某个位置开始1.2 File(String parentPath,String childPath)以parent为父路径,child为子路径创建File对象。1.3 File(File parentFile,String childPath)根据一个父File对象和子文件路径创建File对象2.相对路径:相较于某个路径下,指明的路径。绝对路径:包含盘符在内的文件或文件目录的路径3.路径分隔符windows:\\unix:/*/@Testpublic void test01(){//构造器1File file1 = new File("hello1.txt");//相对于整个工程(即javaSE)File file2 = new File("hello.txt");//相对于整个工程(即javaSE)File file3 = new File("/data/test/hello.txt");System.out.println("file1: "+file1 +" ============ file1 exists: "+file1.exists());System.out.println("file2: "+file2 +" ============ file2 exists: "+file2.exists());System.out.println("file3: "+file3 +" ============ file3 exists: "+file3.exists());//构造器2:File file4 = new File("/data", "test");System.out.println("file4: "+file4 +" ============ file4 exists: "+file4.exists());//构造器3:File file5 = new File(file4, "hello.txt");System.out.println("file5: "+file5 +" ============ file5 exists: "+file5.exists());}
}--输出
file1: hello1.txt ============ file1 exists: false
file2: hello.txt ============ file2 exists: true
file3: /data/test/hello.txt ============ file3 exists: true
file4: /data/test ============ file4 exists: true
file5: /data/test/hello.txt ============ file5 exists: true
注意:图中hello.txt文件在javaSE下,与io文件夹同级别,可以看到hello.text在工程目录下能检索到,而hello1.txt在io模块下是检索不到的。
1.3 常用方法
-
获取文件路径/名称/大小
/*public String getAbsolutePath():获取绝对路径public String getPath() :获取路径public String getName() :获取名称public String getParent():获取上层文件目录路径。若无,返回nullpublic long length() :获取文件长度(即:字节数)。不能获取目录的长度。public long lastModified() :获取最后一次的修改时间,毫秒值如下的两个方法适用于文件目录:public String[] list() :获取指定目录下的所有文件或者文件目录的名称数组public File[] listFiles() :获取指定目录下的所有文件或者文件目录的File数组*/@Testpublic void test2(){File file1 = new File("hello.txt");File file2 = new File("/data/test/hello.txt");System.out.println("绝对路径: "+file1.getAbsolutePath());System.out.println("相对路径: "+file1.getPath());System.out.println("文件名: "+file1.getName());System.out.println("上层文件目录路径: "+file1.getParent());System.out.println("文件大小: "+file1.length());System.out.println("修改时间: "+new Date(file1.lastModified()));System.out.println();System.out.println("绝对路径: "+file2.getAbsolutePath());System.out.println("相对路径: "+file2.getPath());System.out.println("文件名: "+file2.getName());System.out.println("上层文件目录路径: "+file2.getParent());System.out.println("文件大小: "+file2.length());System.out.println("修改时间: "+new Date(file2.lastModified()));}-- 输出:
绝对路径: /Users/lizhijian/IdeaProjects/study/javaSE/hello.txt
相对路径: hello.txt
文件名: hello.txt
上层文件目录路径: null
文件大小: 5
修改时间: Sun May 08 16:41:49 CST 2022绝对路径: /data/test/hello.txt
相对路径: /data/test/hello.txt
文件名: hello.txt
上层文件目录路径: /data/test
文件大小: 5
修改时间: Sun May 08 16:41:49 CST 2022
ps: 这里之所以为null,是因为getParent() 是根据创建File对象时输入的路径字符串解析的。因为file1对象是根据相对路径创建的,故 getParent()为null。
参见源码:
public String getParent() {int index = path.lastIndexOf(separatorChar);if (index < prefixLength) {if ((prefixLength > 0) && (path.length() > prefixLength))return path.substring(0, prefixLength);return null;}return path.substring(0, index);}- 遍历文件夹
@Testpublic void test3(){File file = new File("/data/test");// 只能获取当前目录下的文件/文件夹无法递归获取String[] list = file.list();for(String s : list){System.out.println(s);}System.out.println();File[] files = file.listFiles();for(File f : files){System.out.println(f);}}--输出:
.DS_Store
hello.txt
child/data/test/.DS_Store
/data/test/hello.txt
/data/test/child
- 重命名
/*public boolean renameTo(File dest):把文件重命名为指定的文件路径(重命名或移动文件)比如:file1.renameTo(file2)为例:要想保证返回true,需要file1在硬盘中是存在的,且file2不能在硬盘中存在。*/@Testpublic void test4(){File file1 = new File("hello2.txt");File file2 = new File("/data/test/hello3.txt");boolean renameTo = file1.renameTo(file2);System.out.println(renameTo);}--输出:
true- 判断功能
/*public boolean isDirectory():判断是否是文件目录public boolean isFile() :判断是否是文件public boolean exists() :判断是否存在public boolean canRead() :判断是否可读public boolean canWrite() :判断是否可写public boolean isHidden() :判断是否隐藏*/@Testpublic void test5(){File file1 = new File("hello.txt");System.out.println("是否是文件夹: "+file1.isDirectory());System.out.println("是否是文件: " + file1.isFile());System.out.println("是否存在: " + file1.exists());System.out.println("是否可读: " +file1.canRead());System.out.println("是否可写: " +file1.canWrite());System.out.println("是否隐藏: " +file1.isHidden());System.out.println();File file2 = new File("/data/test");System.out.println("是否文件夹: "+file2.isDirectory());System.out.println("是否文件: " + file2.isFile());System.out.println("是否存在: " + file2.exists());System.out.println("是否可读: " +file2.canRead());System.out.println("是否可写: " +file2.canWrite());System.out.println("是否隐藏: " +file2.isHidden());}--输出:
是否是文件夹: false
是否是文件: true
是否存在: true
是否可读: true
是否可写: true
是否隐藏: false是否文件夹: true
是否文件: false
是否存在: true
是否可读: true
是否可写: true
是否隐藏: false- 创建功能
/*创建硬盘中对应的文件或文件目录public boolean createNewFile() :创建文件。若文件存在,则不创建,返回falsepublic boolean mkdir() :创建文件目录。如果此文件目录存在,就不创建了。如果此文件目录的上层目录不存在,也不创建。public boolean mkdirs() :创建文件目录。如果此文件目录存在,就不创建了。如果上层文件目录不存在,一并创建*/@Testpublic void test6() throws IOException {File file1 = new File("hello.txt");if(!file1.exists()){//文件的创建file1.createNewFile();System.out.println("创建成功");}else{//文件存在file1.delete();System.out.println("删除成功");}// 不能越级创建文件,至少保证上层文件夹存在才能创建,否则会报:java.io.IOException: No such file or directoryFile file2 = new File("/data/test/child3/child33/hello.txt");if(!file2.exists()){//文件的创建file2.createNewFile();System.out.println("创建成功");}else{//文件存在file2.delete();System.out.println("删除成功");}}@Testpublic void test7(){//文件目录的创建File file1 = new File("/data/test/child1/child11");// 单级创建boolean mkdir = file1.mkdir();if(mkdir){System.out.println("创建成功1");}File file2 = new File("/data/test/child1/child11");// 多级创建boolean mkdir1 = file2.mkdirs();if(mkdir1){System.out.println("创建成功2");}}- 删除功能 (找不到文件不抛异常)
/***  删除磁盘中的文件或文件目录*     public boolean delete():删除文件或者文件夹*  删除注意事项:Java中的删除不走回收站。*/@Testpublic void test8(){//要想删除成功,文件目录下不能有子目录或文件File file3 = new File("/data/test/child2");System.out.println(file3.delete());}--输出:
false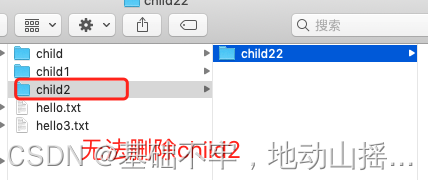
- 获取文件属性规则

1.4 课后练习
练习1
public class FileDemo {@Testpublic void test1() throws IOException {File parent = new File("/data/test");File file1 = new File(parent, "123");File file2 = new File(parent, "111.txt");file1.mkdir();file2.createNewFile();File delete1 = new File("/data/test","111.txt");File delete2 = new File("/data/test","123");delete1.delete();delete2.delete();}
}
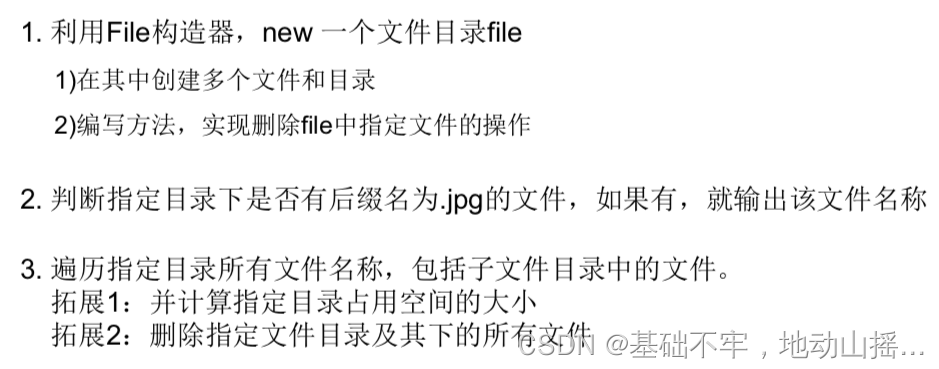
练习2
@Testpublic void test1(){File srcFile = new File("d:\\code");String[] fileNames = srcFile.list();for(String fileName : fileNames){if(fileName.endsWith(".jpg")){System.out.println(fileName);}}}练习3
public class ListFilesTest {public static void main(String[] args) {// 递归:文件目录/** 打印出指定目录所有文件名称,包括子文件目录中的文件 */// 1.创建目录对象File dir = new File("E:\\teach\\01_javaSE\\3");// 2.打印目录的子文件printSubFile(dir);}public static void printSubFile(File dir) {// 打印目录的子文件File[] subfiles = dir.listFiles();for (File f : subfiles) {if (f.isDirectory()) {// 文件目录printSubFile(f);} else {// 文件System.out.println(f.getAbsolutePath());}}}
}
2 IO流原理及流的分类
2.1 IO原理
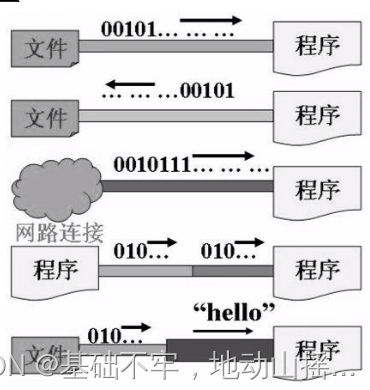
- I/O是Input/Output的缩写, I/O技术是非常实用的技术,用于处理设备之间的数据传输。如读/写文件,网络通讯等。
- Java程序中,对于数据的输入/输出操作以“流(stream)” 的 方式进行。
- java.io包下提供了各种“流”类和接口,用以获取不同种类的 数据,并通过标准的方法输入或输出数据。
- 输入input:读取外部数据(磁 盘、光盘等存储设备的数据)到 程序(内存)中。
- 输出output:将程序(内存) 数据输出到磁盘、光盘等存储设 备中。
2.2 流的分类
- 按操作数据单位不同分为:字节流(8 bit),字符流(16 bit)
- 按数据流的流向不同分为:输入流,输出流
- 按流的角色的不同分为:节点流,处理流

- Java的IO流共涉及40多个类,实际上非常规则,都是从上面4个抽象基类派生的。
- 由这四个类派生出来的子类名称都是以其父类名作为子类名后缀

2.3 IO流体系

2.4 接口方法
2.4.1 InputStream & Reader相同点
- InputStream 和 Reader 是所有输入流的基类。
- InputStream(典型实现:FileInputStream)
- int read()
- int read(byte[] b)
- int read(byte[] b, int off, int len)
- Reader(典型实现:FileReader)
- int read()
- int read(char [] c)
- int read(char [] c, int off, int len)
- 程序中打开的文件 IO 资源不属于内存里的资源,垃圾回收机制无法回收该资 源,所以应该显式关闭文件 IO 资源。
- FileInputStream 从文件系统中的某个文件中获得输入字节。FileInputStream 用于读取非文本数据之类的原始字节流。要读取字符流,需要使用 FileReader
2.4.2 InputStream方法详解
- int read() 从输入流中读取数据的下一个字节。返回 0 到 255 范围内的 int 字节值。如果因 为已经到达流末尾而没有可用的字节,则返回值 -1。
- int read(byte[] b) 从此输入流中将最多 b.length 个字节的数据读入一个 byte 数组中。如果因为已 经到达流末尾而没有可用的字节,则返回值 -1。否则以整数形式返回实际读取 的字节数。
- int read(byte[] b, int off,int len) 将输入流中最多 len 个数据字节读入 byte 数组。尝试读取 len 个字节,但读取的字节也可能小于该值。以整数形式返回实际读取的字节数。如果因为流位于 文件末尾而没有可用的字节,则返回值 -1。
- public void close() throws IOException 关闭此输入流并释放与该流关联的所有系统资源。
2.4.3 Reader方法详解
- int read() 读取单个字符。作为整数读取的字符,范围在 0 到 65535 之间 (0x00-0xffff)(2个 字节的Unicode码),如果已到达流的末尾,则返回 -1
- int read(char[] cbuf) 将字符读入数组。如果已到达流的末尾,则返回 -1。否则返回本次读取的字符数。
- int read(char[] cbuf,int off,int len) 将字符读入数组的某一部分。存到数组cbuf中,从off处开始存储,最多读len个字 符。如果已到达流的末尾,则返回 -1。否则返回本次读取的字符数。
- public void close() throws IOException 关闭此输入流并释放与该流关联的所有系统资源。
2.4.4 OutputStream & Writer相同点
- OutputStream 和 Writer 也非常相似方法如下:
- void write(int b/int c);
- void write(byte[] b/char[] cbuf);
- void write(byte[] b/char[] buff, int off, int len);
- void flush();
- void close(); 需要先刷新,再关闭此流
- 因为字符流直接以字符作为操作单位,所以 Writer 可以用字符串来替换字符数组, 即以 String 对象作为参数
- void write(String str);
- void write(String str, int off, int len);
- FileOutputStream 从文件系统中的某个文件中获得输出字节。FileOutputStream用于写出非文本数据之类的原始字节流。要写出字符流,需要使用 FileWriter
2.4.5 OutputStream方法详解
- void write(int b) 将指定的字节写入此输出流。write 的常规协定是:向输出流写入一个字节。要写 入的字节是参数 b 的八个低位。b 的 24 个高位将被忽略。 即写入0~255范围的。
- void write(byte[] b) 将 b.length 个字节从指定的 byte 数组写入此输出流。write(b) 的常规协定是:应该 与调用 write(b, 0, b.length) 的效果完全相同。
- void write(byte[] b,int off,int len) 将指定 byte 数组中从偏移量 off 开始的 len 个字节写入此输出流。
- public void flush()throws IOException 刷新此输出流并强制写出所有缓冲的输出字节,调用此方法指示应将这些字节立即写入它们预期的目标。
- public void close() throws IOException 关闭此输出流并释放与该流关联的所有系统资源。
2.4.6 Writer方法详解
- void write(int c) 写入单个字符。要写入的字符包含在给定整数值的 16 个低位中,16 高位被忽略。 即 写入0 到 65535 之间的Unicode码。
- void write(char[] cbuf) 写入字符数组。
- void write(char[] cbuf,int off,int len) 写入字符数组的某一部分。从off开始,写入len个字符
- void write(String str) 写入字符串。
- void write(String str,int off,int len) 写入字符串的某一部分。
- void flush() 刷新该流的缓冲,则立即将它们写入预期目标。
- public void close() throws IOException 关闭此输出流并释放与该流关联的所有系统资源。
3 节点流(或文件流)
3.1 读取文件通用步骤
1.建立一个流对象,将已存在的一个文件加载进流。
FileReader fr = new FileReader(new File(“Test.txt”));2.创建一个临时存放数据的数组。
char[] ch = new char[1024];
3.调用流对象的读取方法将流中的数据读入到数组中。
fr.read(ch);
4. 关闭资源。
fr.close();
FileReader read()方法读取文件
/**** 一、流的分类:* 1.操作数据单位:字节流、字符流* 2.数据的流向:输入流、输出流* 3.流的角色:节点流、处理流** 二、流的体系结构* 抽象基类         节点流(或文件流)                               缓冲流(处理流的一种)* InputStream     FileInputStream   (read(byte[] buffer))        BufferedInputStream (read(byte[] buffer))* OutputStream    FileOutputStream  (write(byte[] buffer,0,len)  BufferedOutputStream (write(byte[] buffer,0,len) / flush()* Reader          FileReader (read(char[] cbuf))                 BufferedReader (read(char[] cbuf) / readLine())* Writer          FileWriter (write(char[] cbuf,0,len)           BufferedWriter (write(char[] cbuf,0,len) / flush()***/
public class FileReaderWriterTest {public static void main(String[] args) {File file = new File("hello.txt");//相较于当前工程System.out.println(file.getAbsolutePath());File file1 = new File("day09\\hello.txt");System.out.println(file1.getAbsolutePath());}/*将hello.txt文件内容读入程序中,并输出到控制台说明点:1. read()的理解:返回读入的一个字符。如果达到文件末尾,返回-12. 异常的处理:为了保证流资源一定可以执行关闭操作。需要使用try-catch-finally处理3. 读入的文件一定要存在,否则就会报FileNotFoundException。*/@Testpublic void testFileReader(){FileReader fr = null;try {//1.实例化File类的对象,指明要操作的文件File file = new File("hello.txt");//相较于当前Module//2.提供具体的流fr = new FileReader(file);//3.数据的读入//read():返回读入的一个字符。如果达到文件末尾,返回-1//方式一:
//        int data = fr.read();
//        while(data != -1){
//            System.out.print((char)data);
//            data = fr.read();
//        }//方式二:语法上针对于方式一的修改int data;while((data = fr.read()) != -1){System.out.print((char)data);}} catch (IOException e) {e.printStackTrace();} finally {//4.流的关闭操作
//            try {
//                if(fr != null)
//                    fr.close();
//            } catch (IOException e) {
//                e.printStackTrace();
//            }//或if(fr != null){try {fr.close();} catch (IOException e) {e.printStackTrace();}}}}}
3.2 FileReader read(char[] cbuf)方法读取文件
//对read()操作升级:使用read的重载方法@Testpublic void testFileReader1()  {FileReader fr = null;try {//1.File类的实例化File file = new File("hello.txt");//2.FileReader流的实例化fr = new FileReader(file);//3.读入的操作//read(char[] cbuf):返回每次读入cbuf数组中的字符的个数。如果达到文件末尾,返回-1char[] cbuf = new char[5];int len;while((len = fr.read(cbuf)) != -1){//方式一://错误的写法
//                for(int i = 0;i < cbuf.length;i++){
//                    System.out.print(cbuf[i]);
//                }//正确的写法
//                for(int i = 0;i < len;i++){
//                    System.out.print(cbuf[i]);
//                }//方式二://错误的写法,对应着方式一的错误的写法
//                String str = new String(cbuf);
//                System.out.print(str);//正确的写法String str = new String(cbuf,0,len);System.out.print(str);}} catch (IOException e) {e.printStackTrace();} finally {if(fr != null){//4.资源的关闭try {fr.close();} catch (IOException e) {e.printStackTrace();}}}}
3.3 写出数据通用步骤
1.创建流对象,建立数据存放文件
FileWriter fw = new FileWriter(new File(“Test.txt”));2.调用流对象的写入方法,将数据写入流
fw.write(“atguigu-songhongkang”);
3.关闭流资源,并将流中的数据清空到文件中。
fw.close();
FileWriter写数据的操作
/*从内存中写出数据到硬盘的文件里。说明:1. 输出操作,对应的File可以不存在的。并不会报异常2.File对应的硬盘中的文件如果不存在,在输出的过程中,会自动创建此文件。File对应的硬盘中的文件如果存在:如果流使用的构造器是:FileWriter(file,false) / FileWriter(file):对原有文件的覆盖如果流使用的构造器是:FileWriter(file,true):不会对原有文件覆盖,而是在原有文件基础上追加内容3. 在new FileWriter();时如果文件不存在,即会创建文件*/@Testpublic void testFileWriter() {FileWriter fw = null;try {//1.提供File类的对象,指明写出到的文件File file = new File("hello1.txt");//2.提供FileWriter的对象,用于数据的写出fw = new FileWriter(file,false);//3.写出的操作fw.write("I have a dream!\n");fw.write("you need to have a dream!");} catch (IOException e) {e.printStackTrace();} finally {//4.流资源的关闭if(fw != null){try {fw.close();} catch (IOException e) {e.printStackTrace();}}}}3.4 FileReader和FileWriter实现文本文件复制(不能实现非文本文件复制)
    @Testpublic void testFileReaderFileWriter() {FileReader fr = null;FileWriter fw = null;try {//1.创建File类的对象,指明读入和写出的文件File srcFile = new File("hello.txt");File destFile = new File("hello2.txt");//不能使用字符流来处理图片等字节数据
//            File srcFile = new File("爱情与友情.jpg");
//            File destFile = new File("爱情与友情1.jpg");//2.创建输入流和输出流的对象fr = new FileReader(srcFile);fw = new FileWriter(destFile);//3.数据的读入和写出操作char[] cbuf = new char[5];int len;//记录每次读入到cbuf数组中的字符的个数while((len = fr.read(cbuf)) != -1){//每次写出len个字符fw.write(cbuf,0,len);}} catch (IOException e) {e.printStackTrace();} finally {//4.关闭流资源//方式一:
//            try {
//                if(fw != null)
//                    fw.close();
//            } catch (IOException e) {
//                e.printStackTrace();
//            }finally{
//                try {
//                    if(fr != null)
//                        fr.close();
//                } catch (IOException e) {
//                    e.printStackTrace();
//                }
//            }//方式二:try {if(fw != null)fw.close();} catch (IOException e) {e.printStackTrace();}try {if(fr != null)fr.close();} catch (IOException e) {e.printStackTrace();}}}
3.5 FileInputStream不能读取文本文件(复制操作可以)
//使用字节流FileInputStream处理文本文件,可能出现乱码。@Testpublic void testFileInputStream() {FileInputStream fis = null;try {//1. 造文件File file = new File("hello.txt");//2.造流fis = new FileInputStream(file);//3.读数据byte[] buffer = new byte[5];int len;//记录每次读取的字节的个数while((len = fis.read(buffer)) != -1){String str = new String(buffer,0,len);System.out.print(str);}} catch (IOException e) {e.printStackTrace();} finally {if(fis != null){//4.关闭资源try {fis.close();} catch (IOException e) {e.printStackTrace();}}}}错误输出:

原因:UTF-8编码下,一个字母占一个字节,一个汉字占三个字节,复制的字节数组长度是5,恰好把“中”进行了切割,无法复制全,即“中”无法正常显示。

3.6 FileInputStream和FileOutputStream读写非文本文件
@Testpublic void testFileInputOutputStream() {FileInputStream fis = null;FileOutputStream fos = null;try {//File srcFile = new File("爱情与友情.jpg");File destFile = new File("爱情与友情2.jpg");//fis = new FileInputStream(srcFile);fos = new FileOutputStream(destFile);//复制的过程byte[] buffer = new byte[5];int len;while((len = fis.read(buffer)) != -1){fos.write(buffer,0,len);}} catch (IOException e) {e.printStackTrace();} finally {if(fos != null){//try {fos.close();} catch (IOException e) {e.printStackTrace();}}if(fis != null){try {fis.close();} catch (IOException e) {e.printStackTrace();}}}}3.7 FileInputStream和FileOutputStream复制文件
//指定路径下文件的复制public void copyFile(String srcPath,String destPath){FileInputStream fis = null;FileOutputStream fos = null;try {//File srcFile = new File(srcPath);File destFile = new File(destPath);//fis = new FileInputStream(srcFile);fos = new FileOutputStream(destFile);//复制的过程byte[] buffer = new byte[1024];int len;while((len = fis.read(buffer)) != -1){fos.write(buffer,0,len);}} catch (IOException e) {e.printStackTrace();} finally {if(fos != null){//try {fos.close();} catch (IOException e) {e.printStackTrace();}}if(fis != null){try {fis.close();} catch (IOException e) {e.printStackTrace();}}}}@Testpublic void testCopyFile(){long start = System.currentTimeMillis();String srcPath = "C:\\Users\\Administrator\\Desktop\\01-视频.avi";String destPath = "C:\\Users\\Administrator\\Desktop\\02-视频.avi";//        String srcPath = "hello.txt";
//        String destPath = "hello3.txt";copyFile(srcPath,destPath);long end = System.currentTimeMillis();System.out.println("复制操作花费的时间为:" + (end - start));//618}
4 缓冲流
4.1 基本概念
- 为了提高数据读写的速度,Java API提供了带缓冲功能的流类,在使用这些流类时,会创建一个内部缓冲区数组,缺省使用8192个字节(8Kb)的缓冲区。

- 缓冲流要“套接”在相应的节点流之上,根据数据操作单位可以把缓冲流分为:
- BufferedInputStream 和 BufferedOutputStream
- BufferedReader 和 BufferedWriter
- 当读取数据时,数据按块读入缓冲区,其后的读操作则直接访问缓冲区
- 当使用BufferedInputStream读取字节文件时,BufferedInputStream会一次性从 文件中读取8192个(8Kb),存在缓冲区中,直到缓冲区装满了,才重新从文件中 读取下一个8192个字节数组。
- 向流中写入字节时,不会直接写到文件,先写到缓冲区中直到缓冲区写满, BufferedOutputStream才会把缓冲区中的数据一次性写到文件里。使用方法 flush()可以强制将缓冲区的内容全部写入输出流
- 关闭流的顺序和打开流的顺序相反。只要关闭最外层流即可,关闭最外层流也 会相应关闭内层节点流
- flush()方法的使用:手动将buffer中内容写入文件
- 如果是带缓冲区的流对象的close()方法,不但会关闭流,还会在关闭流之前刷 新缓冲区,关闭后不能再写出
4.2 原理图

4.3 缓冲流(字节型)实现非文本文件的复制
/*** 处理流之一:缓冲流的使用** 1.缓冲流:* BufferedInputStream* BufferedOutputStream* BufferedReader* BufferedWriter** 2.作用:提供流的读取、写入的速度*   提高读写速度的原因:内部提供了一个缓冲区** 3. 处理流,就是“套接”在已有的流的基础上。**/
public class BufferedTest {/*实现非文本文件的复制*/@Testpublic void BufferedStreamTest() throws FileNotFoundException {BufferedInputStream bis = null;BufferedOutputStream bos = null;try {//1.造文件File srcFile = new File("爱情与友情.jpg");File destFile = new File("爱情与友情3.jpg");//2.造流//2.1 造节点流FileInputStream fis = new FileInputStream((srcFile));FileOutputStream fos = new FileOutputStream(destFile);//2.2 造缓冲流bis = new BufferedInputStream(fis);bos = new BufferedOutputStream(fos);//3.复制的细节:读取、写入byte[] buffer = new byte[10];int len;while((len = bis.read(buffer)) != -1){bos.write(buffer,0,len);//                bos.flush();//刷新缓冲区}} catch (IOException e) {e.printStackTrace();} finally {//4.资源关闭//要求:先关闭外层的流,再关闭内层的流if(bos != null){try {bos.close();} catch (IOException e) {e.printStackTrace();}}if(bis != null){try {bis.close();} catch (IOException e) {e.printStackTrace();}}//说明:关闭外层流的同时,内层流也会自动的进行关闭。关于内层流的关闭,我们可以省略.
//        fos.close();
//        fis.close();}}
}
4.4 缓冲流与节点流读写速度对比
//实现文件复制的方法public void copyFileWithBuffered(String srcPath,String destPath){BufferedInputStream bis = null;BufferedOutputStream bos = null;try {//1.造文件File srcFile = new File(srcPath);File destFile = new File(destPath);//2.造流//2.1 造节点流FileInputStream fis = new FileInputStream((srcFile));FileOutputStream fos = new FileOutputStream(destFile);//2.2 造缓冲流bis = new BufferedInputStream(fis);bos = new BufferedOutputStream(fos);//3.复制的细节:读取、写入byte[] buffer = new byte[1024];int len;while((len = bis.read(buffer)) != -1){bos.write(buffer,0,len);}} catch (IOException e) {e.printStackTrace();} finally {//4.资源关闭//要求:先关闭外层的流,再关闭内层的流if(bos != null){try {bos.close();} catch (IOException e) {e.printStackTrace();}}if(bis != null){try {bis.close();} catch (IOException e) {e.printStackTrace();}}//说明:关闭外层流的同时,内层流也会自动的进行关闭。关于内层流的关闭,我们可以省略.
//        fos.close();
//        fis.close();}}@Testpublic void testCopyFileWithBuffered(){long start = System.currentTimeMillis();String srcPath = "C:\\Users\\Administrator\\Desktop\\01-视频.avi";String destPath = "C:\\Users\\Administrator\\Desktop\\03-视频.avi";copyFileWithBuffered(srcPath,destPath);long end = System.currentTimeMillis();System.out.println("复制操作花费的时间为:" + (end - start));//618 - 176}
4.5 缓冲流(字符型)实现文本文件的复制
    /*使用BufferedReader和BufferedWriter实现文本文件的复制*/@Testpublic void testBufferedReaderBufferedWriter(){BufferedReader br = null;BufferedWriter bw = null;try {//创建文件和相应的流br = new BufferedReader(new FileReader(new File("dbcp.txt")));bw = new BufferedWriter(new FileWriter(new File("dbcp1.txt")));//读写操作//方式一:使用char[]数组
//            char[] cbuf = new char[1024];
//            int len;
//            while((len = br.read(cbuf)) != -1){
//                bw.write(cbuf,0,len);
//    //            bw.flush();
//            }//方式二:使用StringString data;while((data = br.readLine()) != null){//方法一:
//                bw.write(data + "\n");//data中不包含换行符//方法二:bw.write(data);//data中不包含换行符bw.newLine();//提供换行的操作}} catch (IOException e) {e.printStackTrace();} finally {//关闭资源if(bw != null){try {bw.close();} catch (IOException e) {e.printStackTrace();}}if(br != null){try {br.close();} catch (IOException e) {e.printStackTrace();}}}}
4.6 缓冲流课后练习
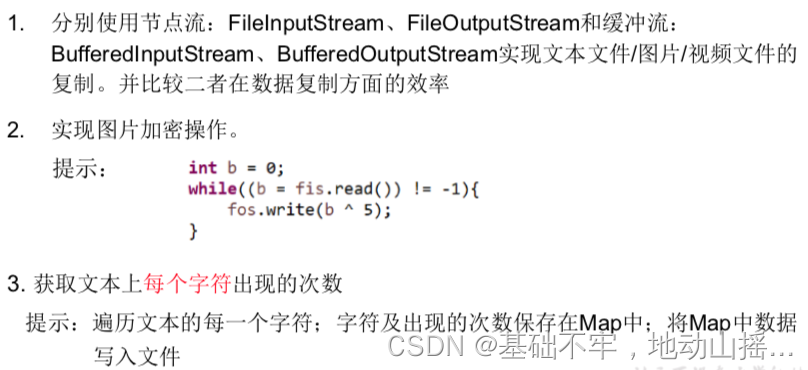
图片加密
public class PicTest {//图片的加密@Testpublic void test1() {FileInputStream fis = null;FileOutputStream fos = null;try {fis = new FileInputStream("爱情与友情.jpg");fos = new FileOutputStream("爱情与友情secret.jpg");byte[] buffer = new byte[20];int len;while ((len = fis.read(buffer)) != -1) {//字节数组进行修改//错误的//            for(byte b : buffer){//                b = (byte) (b ^ 5);//            }//正确的for (int i = 0; i < len; i++) {buffer[i] = (byte) (buffer[i] ^ 5);}fos.write(buffer, 0, len);}} catch (IOException e) {e.printStackTrace();} finally {if (fos != null) {try {fos.close();} catch (IOException e) {e.printStackTrace();}}if (fis != null) {try {fis.close();} catch (IOException e) {e.printStackTrace();}}}}//图片的解密@Testpublic void test2() {FileInputStream fis = null;FileOutputStream fos = null;try {fis = new FileInputStream("爱情与友情secret.jpg");fos = new FileOutputStream("爱情与友情4.jpg");byte[] buffer = new byte[20];int len;while ((len = fis.read(buffer)) != -1) {//字节数组进行修改//错误的//            for(byte b : buffer){//                b = (byte) (b ^ 5);//            }//正确的for (int i = 0; i < len; i++) {buffer[i] = (byte) (buffer[i] ^ 5);}fos.write(buffer, 0, len);}} catch (IOException e) {e.printStackTrace();} finally {if (fos != null) {try {fos.close();} catch (IOException e) {e.printStackTrace();}}if (fis != null) {try {fis.close();} catch (IOException e) {e.printStackTrace();}}}}
}
字符统计
/*** 练习3:获取文本上字符出现的次数,把数据写入文件** 思路:* 1.遍历文本每一个字符* 2.字符出现的次数存在Map中** Map<Character,Integer> map = new HashMap<Character,Integer>();* map.put('a',18);* map.put('你',2);** 3.把map中的数据写入文件**/
public class WordCount {/*说明:如果使用单元测试,文件相对路径为当前module如果使用main()测试,文件相对路径为当前工程*/@Testpublic void testWordCount() {FileReader fr = null;BufferedWriter bw = null;try {//1.创建Map集合Map<Character, Integer> map = new HashMap<Character, Integer>();//2.遍历每一个字符,每一个字符出现的次数放到map中fr = new FileReader("dbcp.txt");int c = 0;while ((c = fr.read()) != -1) {//int 还原 charchar ch = (char) c;// 判断char是否在map中第一次出现if (map.get(ch) == null) {map.put(ch, 1);} else {map.put(ch, map.get(ch) + 1);}}//3.把map中数据存在文件count.txt//3.1 创建Writerbw = new BufferedWriter(new FileWriter("wordcount.txt"));//3.2 遍历map,再写入数据Set<Map.Entry<Character, Integer>> entrySet = map.entrySet();for (Map.Entry<Character, Integer> entry : entrySet) {switch (entry.getKey()) {case ' ':bw.write("空格=" + entry.getValue());break;case '\t'://\t表示tab 键字符bw.write("tab键=" + entry.getValue());break;case '\r'://bw.write("回车=" + entry.getValue());break;case '\n'://bw.write("换行=" + entry.getValue());break;default:bw.write(entry.getKey() + "=" + entry.getValue());break;}bw.newLine();}} catch (IOException e) {e.printStackTrace();} finally {//4.关流if (fr != null) {try {fr.close();} catch (IOException e) {e.printStackTrace();}}if (bw != null) {try {bw.close();} catch (IOException e) {e.printStackTrace();}}}}
}
5 转换流
5.1 概述
转换流提供了在字节流和字符流之间的转换(因FileReader没有提供特定的编码设置,需要自定义编码读取文件时,需要用到转换流-InputStreamReader)
- Java API提供了两个转换流:
- InputStreamReader:将InputStream转换为Reader
- OutputStreamWriter:将Writer转换为OutputStream
- 字节流中的数据都是字符时,转成字符流操作更高效。
- 很多时候我们使用转换流来处理文件乱码问题。实现编码和 解码的功能。
InputStreamReader
- 实现将字节的输入流按指定字符集转换为字符的输入流。
- 需要和InputStream“套接”。
- 构造器
- public InputStreamReader(InputStream in)
- public InputSreamReader(InputStream in,String charsetName)
如: Reader isr = new InputStreamReader(System.in,”gbk”);
OutputStreamWriter
- 实现将字符的输出流按指定字符集转换为字节的输出流。
- 需要和OutputStream“套接”。
- 构造器
- public OutputStreamWriter(OutputStream out)
- public OutputSreamWriter(OutputStream out,String charsetName)
5.2 原理图
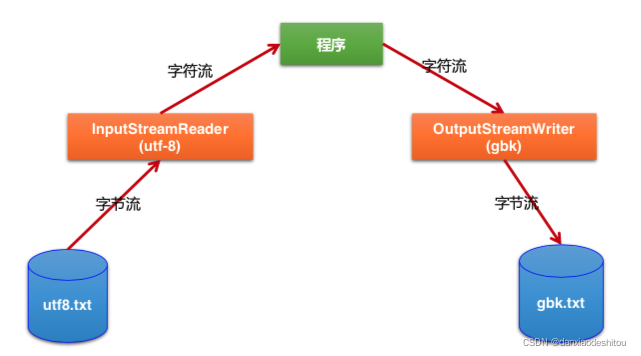
这里注意:文件用什么编码存的就要用什么编码读,否则会造成乱码
5.3 转换流读取文件
/*** 处理流之二:转换流的使用* 1.转换流:属于字符流*   InputStreamReader:将一个字节的输入流转换为字符的输入流*   OutputStreamWriter:将一个字符的输出流转换为字节的输出流** 2.作用:提供字节流与字符流之间的转换** 3. 解码:字节、字节数组  --->字符数组、字符串*    编码:字符数组、字符串 ---> 字节、字节数组***/
public class InputStreamReaderTest {/*此时处理异常的话,仍然应该使用try-catch-finallyInputStreamReader的使用,实现字节的输入流到字符的输入流的转换*/@Testpublic void test1() throws IOException {FileInputStream fis = new FileInputStream("dbcp.txt");
//        InputStreamReader isr = new InputStreamReader(fis);//使用系统默认的字符集//参数2指明了字符集,具体使用哪个字符集,取决于文件dbcp.txt保存时使用的字符集InputStreamReader isr = new InputStreamReader(fis,"UTF-8");//使用系统默认的字符集char[] cbuf = new char[20];int len;while((len = isr.read(cbuf)) != -1){String str = new String(cbuf,0,len);System.out.print(str);}isr.close();}}
5.4 转换流实现文件的读入和写出
/*此时处理异常的话,仍然应该使用try-catch-finally综合使用InputStreamReader和OutputStreamWriter*/@Testpublic void test2() throws Exception {//1.造文件、造流File file1 = new File("dbcp.txt");File file2 = new File("dbcp_gbk.txt");FileInputStream fis = new FileInputStream(file1);FileOutputStream fos = new FileOutputStream(file2);InputStreamReader isr = new InputStreamReader(fis,"utf-8");OutputStreamWriter osw = new OutputStreamWriter(fos,"gbk");//2.读写过程char[] cbuf = new char[20];int len;while((len = isr.read(cbuf)) != -1){osw.write(cbuf,0,len);}//3.关闭资源isr.close();osw.close();}5.5 字符编码
编码表的由来
计算机只能识别二进制数据,早期由来是电信号。为了方便应用计算机,让它可以识别各个国家的文字。就将各个国家的文字用数字来表示,并一一对应,形成一张表。 这就是编码表。
常见的编码表
-
ASCII:美国标准信息交换码。 用一个字节的7位可以表示。
-
ISO8859-1:拉丁码表。欧洲码表 用一个字节的8位表示。
-
GB2312:中国的中文编码表。最多两个字节编码所有字符
-
GBK:中国的中文编码表升级,融合了更多的中文文字符号。最多两个字节编码(这里用字节的高位表示用一个字节还是两个字节表示字符,即 0110 11111表示自己就是一个独立的字符,而1011 1111 表示需要与后面的字节算到一起,表示一个完成的字符。)
-
Unicode:国际标准码,融合了目前人类使用的所有字符。为每个字符分配唯一的字符码。所有的文字都用两个字节来表示。
-
UTF-8:变长的编码方式,可用1-4个字节来表示一个字符。
补充
- Unicode不完美,这里就有三个问题,一个是,我们已经知道,英文字母只用 一个字节表示就够了,第二个问题是如何才能区别Unicode和ASCII?计算机 怎么知道两个字节表示一个符号,而不是分别表示两个符号呢?第三个,如果 和GBK等双字节编码方式一样,用最高位是1或0表示两个字节和一个字节, 就少了很多值无法用于表示字符,不够表示所有字符。Unicode在很长一段时 间内无法推广,直到互联网的出现。
- 面向传输的众多 UTF(UCS Transfer Format)标准出现了,顾名思义,UTF- 8就是每次8个位传输数据,而UTF-16就是每次16个位。这是为传输而设计的 编码,并使编码无国界,这样就可以显示全世界上所有文化的字符了。
- Unicode只是定义了一个庞大的、全球通用的字符集,并为每个字符规定了唯 一确定的编号,具体存储成什么样的字节流,取决于字符编码方案。推荐的 Unicode编码是UTF-8和UTF-16。
举例
究竟Unicode是如何对应utf-8的,如下图所示,规则是将左侧16进制红框部分对应到右侧二进制红框部分,右侧红框之外的高位表示要用自己临近(后面)的哪几个字节组成一组字符。
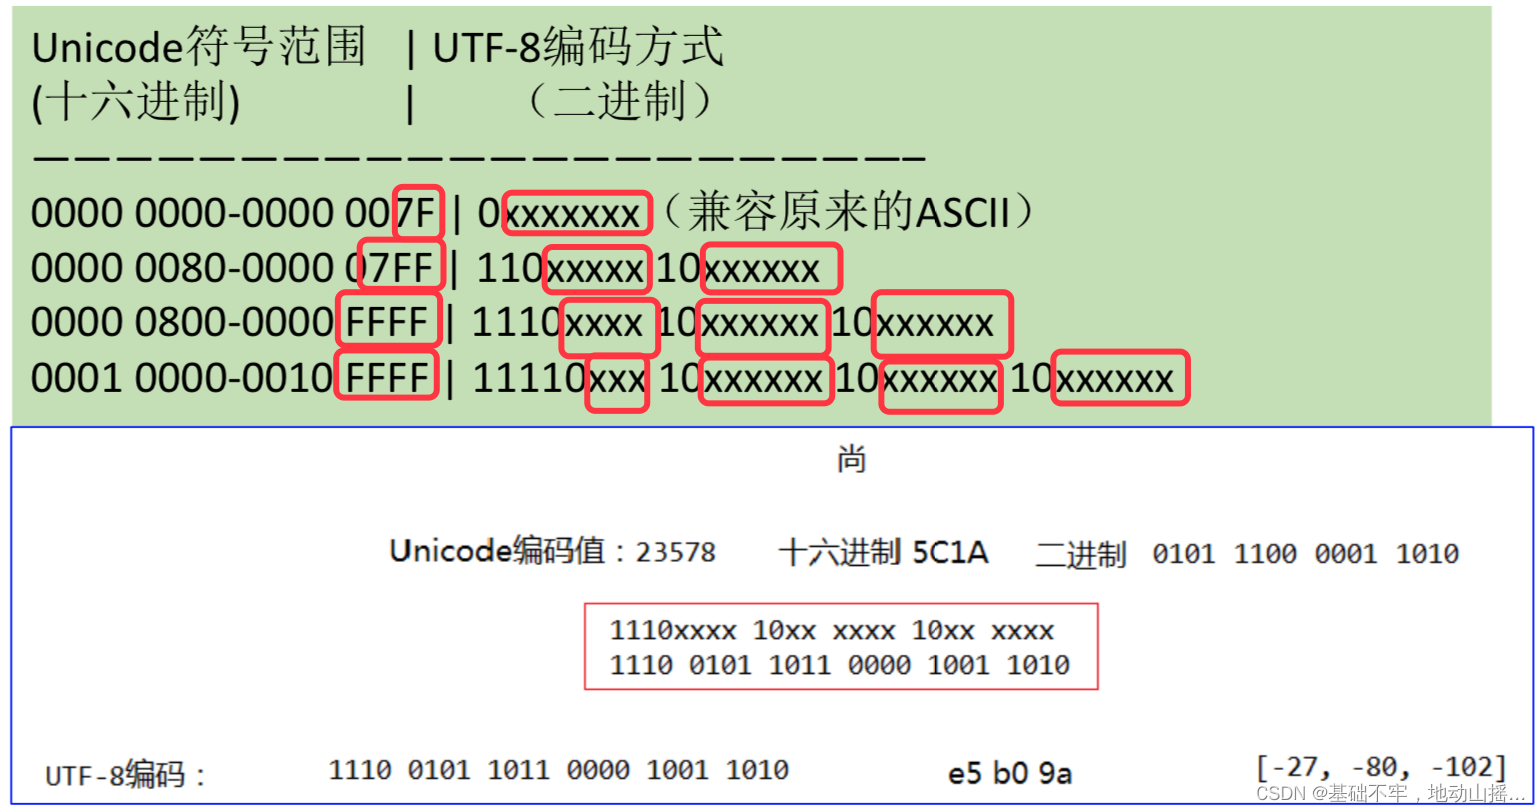
比如“尚”,按照Uniicode编码是5C1A,则对应到第三排,把5C1A转换为二进制,并把这16位二进制,对应到二进制的红框中。
ps:把字符和汉字理解为商品,Unicode规定了等价交换物,如一头牛(一个字符)等价于一两黄金(一个Unicode16进制数),具体黄金能兑换多少货币(Unicode如何存储于utf-8中)看具体汇率。还要注意的是GBK采用的并不是unicode编码规则。
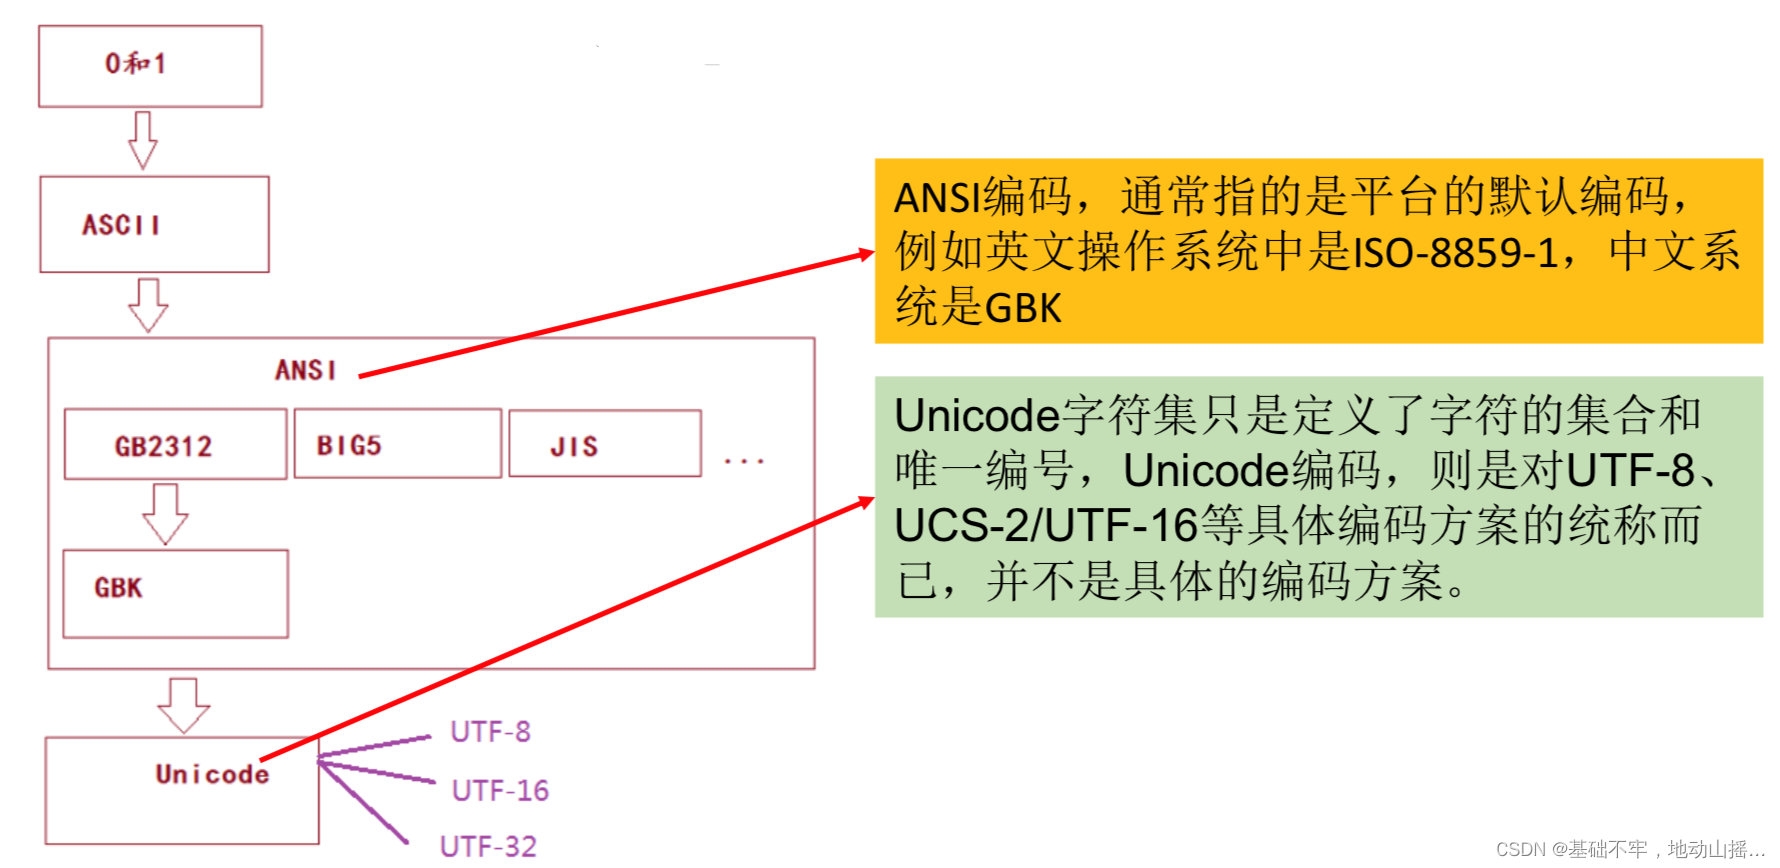
综上所述:计算机底层只能识别0和1,ASCII只适合老美,别的国家不适合,因此出现了符合ANSI标准的各种编码集。Unicode做了一个大而全的字符集编码库,utf-8或者utf-16来落地。
6 标准输入、输出流
-
System.in和System.out分别代表了系统标准的输入和输出设备
-
默认输入设备是:键盘,输出设备是:显示器
-
System.in的类型是InputStream
-
System.out的类型是PrintStream,其是OutputStream的子类、FilterOutputStream 的子类
-
重定向:通过System类的setIn,setOut方法对默认设备进行改变。
-
public static void setIn(InputStream in)
-
public static void setOut(PrintStream out)
-
例题:
import org.junit.Test;import java.io.*;/*** 其他流的使用* 1.标准的输入、输出流* 2.打印流* 3.数据流**/
public class OtherStreamTest {/*1.标准的输入、输出流1.1System.in:标准的输入流,默认从键盘输入System.out:标准的输出流,默认从控制台输出1.2System类的setIn(InputStream is) / setOut(PrintStream ps)方式重新指定输入和输出的流。1.3练习:从键盘输入字符串,要求将读取到的整行字符串转成大写输出。然后继续进行输入操作,直至当输入“e”或者“exit”时,退出程序。方法一:使用Scanner实现,调用next()返回一个字符串方法二:使用System.in实现。System.in  --->  转换流 ---> BufferedReader的readLine()*/public static void main(String[] args) {BufferedReader br = null;try {InputStreamReader isr = new InputStreamReader(System.in);br = new BufferedReader(isr);while (true) {System.out.println("请输入字符串:");String data = br.readLine();if ("e".equalsIgnoreCase(data) || "exit".equalsIgnoreCase(data)) {System.out.println("程序结束");break;}String upperCase = data.toUpperCase();System.out.println(upperCase);}} catch (IOException e) {e.printStackTrace();} finally {if (br != null) {try {br.close();} catch (IOException e) {e.printStackTrace();}}}}
7 打印流
- 实现将基本数据类型的数据格式转化为字符串输出
- 打印流:PrintStream和PrintWriter
- 提供了一系列重载的print()和println()方法,用于多种数据类型的输出
- PrintStream和PrintWriter的输出不会抛出IOException异常
- PrintStream和PrintWriter有自动flush功能
- PrintStream 打印的所有字符都使用平台的默认字符编码转换为字节。在需要写入字符而不是写入字节的情况下,应该使用 PrintWriter 类。
- System.out返回的是PrintStream的实例
/*2. 打印流:PrintStream 和PrintWriter2.1 提供了一系列重载的print() 和 println()2.2 练习:*/@Testpublic void test2() {PrintStream ps = null;try {FileOutputStream fos = new FileOutputStream(new File("D:\\IO\\text.txt"));// 创建打印输出流,设置为自动刷新模式(写入换行符或字节 '\n' 时都会刷新输出缓冲区)ps = new PrintStream(fos, true);if (ps != null) {// 把标准输出流(控制台输出)改成文件System.setOut(ps);}for (int i = 0; i <= 255; i++) { // 输出ASCII字符System.out.print((char) i);if (i % 50 == 0) { // 每50个数据一行System.out.println(); // 换行}}} catch (FileNotFoundException e) {e.printStackTrace();} finally {if (ps != null) {ps.close();}}}8 数据流
- 为了方便地操作Java语言的基本数据类型和String的数据,可以使用数据流。
- 数据流有两个类:(用于读取和写出基本数据类型、String类的数据)
- DataInputStream 和 DataOutputStream
- 分别“套接”在 InputStream 和 OutputStream 子类的流上
- DataInputStream中的方法
| boolean readBoolean() | byte readByte() |
| char readChar() | float readFloat() |
| double readDouble() | short readShort() |
| long readLong() | int readInt() |
| String readUTF() | void readFully(byte[] b) |
- DataOutputStream中的方法
- 将上述的方法的read改为相应的write即可。
/*3. 数据流3.1 DataInputStream 和 DataOutputStream3.2 作用:用于读取或写出基本数据类型的变量或字符串练习:将内存中的字符串、基本数据类型的变量写出到文件中。注意:处理异常的话,仍然应该使用try-catch-finally.*/@Testpublic void test3() throws IOException {//1.DataOutputStream dos = new DataOutputStream(new FileOutputStream("data.txt"));//2.dos.writeUTF("小李");dos.flush();//刷新操作,将内存中的数据写入文件dos.writeInt(23);dos.flush();dos.writeBoolean(true);dos.flush();//3.dos.close();}/*将文件中存储的基本数据类型变量和字符串读取到内存中,保存在变量中。注意点:读取不同类型的数据的顺序要与当初写入文件时,保存的数据的顺序一致!*/@Testpublic void test4() throws IOException {//1.DataInputStream dis = new DataInputStream(new FileInputStream("data.txt"));//2.String name = dis.readUTF();int age = dis.readInt();boolean isMale = dis.readBoolean();System.out.println("name = " + name);System.out.println("age = " + age);System.out.println("isMale = " + isMale);//3.dis.close();}9 对象流
9.1 对象序列化概念
- ObjectInputStream和OjbectOutputSteam
- 用于存储和读取基本数据类型数据或对象的处理流。它的强大之处就是可以把Java中的对象写入到数据源中,也能把对象从数据源中还原回来。
- 序列化:用ObjectOutputStream类保存基本类型数据或对象的机制
- 反序列化:用ObjectInputStream类读取基本类型数据或对象的机制
- ObjectOutputStream和ObjectInputStream不能序列化static和transient修饰的成员变量
- 对象序列化机制允许把内存中的Java对象转换成平台无关的二进制流,从 而允许把这种二进制流持久地保存在磁盘上,或通过网络将这种二进制流传 输到另一个网络节点。//当其它程序获取了这种二进制流,就可以恢复成原 来的Java对象
- 序列化的好处在于可将任何实现了Serializable接口的对象转化为字节数据, 使其在保存和传输时可被还原
- 序列化是 RMI(Remote Method Invoke – 远程方法调用)过程的参数和返 回值都必须实现的机制,而 RMI 是 JavaEE 的基础。因此序列化机制是 JavaEE 平台的基础
- 如果需要让某个对象支持序列化机制,则必须让对象所属的类及其属性是可 序列化的,为了让某个类是可序列化的,该类必须实现如下两个接口之一。 否则,会抛出NotSerializableException异常
- Serializable
- Externalizable
9.2 对象流序列化与反序列化字符串操作
public class ObjectInputOutputStreamTest {/*** 序列化过程:将内存中的java对象保存到磁盘中或通过网络传输出去* 使用ObjectOutputStream实现*/@Testpublic void test() {ObjectOutputStream oos = null;try {//创造流oos = new ObjectOutputStream(new FileOutputStream("object.dat"));//制造对象oos.writeObject(new String("北京欢迎你"));//刷新操作oos.flush();} catch (IOException e) {e.printStackTrace();} finally {if (oos != null) {//3.关闭流try {oos.close();} catch (IOException e) {e.printStackTrace();}}}}/*** 反序列化:将磁盘文件中的对象还原为内存中的一个java对象* 使用ObjectInputStream来实现*/@Testpublic void test2() {ObjectInputStream ois = null;try {ois = new ObjectInputStream(new FileInputStream("object.dat"));Object obj = ois.readObject();String str = (String) obj;System.out.println(str);} catch (IOException e) {e.printStackTrace();} catch (ClassNotFoundException e) {e.printStackTrace();} finally {if (ois != null) {try {ois.close();} catch (IOException e) {e.printStackTrace();}}}}
}
9.3 自定义类实现序列化与反序列化操作
- 若某个类实现了 Serializable 接口,该类的对象就是可序列化的:
- 创建一个 ObjectOutputStream
- 调用 ObjectOutputStream 对象的 writeObject(对象) 方法输出可序列化对象
- 注意写出一次,操作flush()一次
- 反序列化
- 创建一个 ObjectInputStream
- 调用 readObject() 方法读取流中的对象
- 强调:如果某个类的属性不是基本数据类型或 String 类型,而是另一个 引用类型,那么这个引用类型必须是可序列化的,否则拥有该类型的 Field 的类也不能序列化
Persion.java
package com.atguigu.java;import java.io.Serializable;/*** Person需要满足如下的要求,方可序列化* 1.需要实现接口:Serializable* 2.当前类提供一个全局常量:serialVersionUID* 3.除了当前Person类需要实现Serializable接口之外,还必须保证其内部所有属性*   也必须是可序列化的。(默认情况下,基本数据类型可序列化)*** 补充:ObjectOutputStream和ObjectInputStream不能序列化static和transient修饰的成员变量**/
public class Person implements Serializable{public static final long serialVersionUID = 475463534532L;private String name;private int age;private int id;public Person(String name, int age,) {this.name = name;this.age = age;}public Person(String name, int age) {this.name = name;this.age = age;}@Overridepublic String toString() {return "Person{" +"name='" + name + '\'' +", age=" + age '}';}public String getName() {return name;}public void setName(String name) {this.name = name;}public int getAge() {return age;}public void setAge(int age) {this.age = age;}public Person(String name, int age) {this.name = name;this.age = age;}public Person() {}
}
}
demo
public class ObjectInputOutputStreamTest {/*序列化过程:将内存中的java对象保存到磁盘中或通过网络传输出去使用ObjectOutputStream实现*/@Testpublic void testObjectOutputStream(){ObjectOutputStream oos = null;try {//1.oos = new ObjectOutputStream(new FileOutputStream("object.dat"));//2.oos.writeObject(new String("北京欢迎你"));oos.flush();//刷新操作oos.writeObject(new Person("张三",23));oos.flush();} catch (IOException e) {e.printStackTrace();} finally {if(oos != null){//3.try {oos.close();} catch (IOException e) {e.printStackTrace();}}}}/*反序列化:将磁盘文件中的对象还原为内存中的一个java对象使用ObjectInputStream来实现*/@Testpublic void testObjectInputStream(){ObjectInputStream ois = null;try {ois = new ObjectInputStream(new FileInputStream("object.dat"));Object obj = ois.readObject();String str = (String) obj;Person p = (Person) ois.readObject();System.out.println(str);System.out.println(p);} catch (IOException e) {e.printStackTrace();} catch (ClassNotFoundException e) {e.printStackTrace();} finally {if(ois != null){try {ois.close();} catch (IOException e) {e.printStackTrace();}}}}}9.3 serialVersionUID的理解
- 凡是实现Serializable接口的类都有一个表示序列化版本标识符的静态变量:
- private static final long serialVersionUID;
- serialVersionUID用来表明类的不同版本间的兼容性。简言之,其目的是以序列化对象 进行版本控制,有关各版本反序列化时是否兼容。
- 如果类没有显示定义这个静态常量,它的值是Java运行时环境根据类的内部细节自 动生成的。若类的实例变量做了修改,serialVersionUID 可能发生变化。故建议, 显式声明。
- 简单来说,Java的序列化机制是通过在运行时判断类的serialVersionUID来验 证版本一致性的。在进行反序列化时,JVM会把传来的字节流中的 serialVersionUID与本地相应实体类的serialVersionUID进行比较,如果相同 就认为是一致的,可以进行反序列化,否则就会出现序列化版本不一致的异 常。(InvalidCastException)
Person类
public class Person implements Serializable{public static final long serialVersionUID = 475463534532L;private String name;private int age;private int id;public Person(String name, int age, int id) {this.name = name;this.age = age;this.id = id;}public Person(String name, int age, int id) {this.name = name;this.age = age;this.id = id;}@Overridepublic String toString() {return "Person{" +"name='" + name + '\'' +", age=" + age +", id=" + id '}';}public int getId() {return id;}public void setId(int id) {this.id = id;}public String getName() {return name;}public void setName(String name) {this.name = name;}public int getAge() {return age;}public void setAge(int age) {this.age = age;}public Person(String name, int age) {this.name = name;this.age = age;}public Person() {}
}
}
demo
public class ObjectInputOutputStreamTest {/*序列化过程:将内存中的java对象保存到磁盘中或通过网络传输出去使用ObjectOutputStream实现*/@Testpublic void testObjectOutputStream(){ObjectOutputStream oos = null;try {//1.oos = new ObjectOutputStream(new FileOutputStream("object.dat"));//2.oos.writeObject(new String("我爱北京天安门"));oos.flush();//刷新操作oos.writeObject(new Person("王铭",23));oos.flush();oos.writeObject(new Person("张学良",23));oos.flush();} catch (IOException e) {e.printStackTrace();} finally {if(oos != null){//3.try {oos.close();} catch (IOException e) {e.printStackTrace();}}}}/*反序列化:将磁盘文件中的对象还原为内存中的一个java对象使用ObjectInputStream来实现*/@Testpublic void testObjectInputStream(){ObjectInputStream ois = null;try {ois = new ObjectInputStream(new FileInputStream("object.dat"));Object obj = ois.readObject();String str = (String) obj;Person p = (Person) ois.readObject();System.out.println(str);System.out.println(p);} catch (IOException e) {e.printStackTrace();} catch (ClassNotFoundException e) {e.printStackTrace();} finally {if(ois != null){try {ois.close();} catch (IOException e) {e.printStackTrace();}}}}}总结:如果不显示的指定serialVersionUID,就会生成一个隐式的serialVersionUID,在序列化到反序列化过程中,如果类发生变化,会导致反序列化失败,如果显示的进行指定了serialVersionUID,即使类发生了变化,也能反序列化成功。
9.4 自定义类可序列化的其他要求
除了当前Person类需要实现Serializable接口之外,还必须保证其内部所有属性也必须是可序列化的。(默认情况下,基本数据类型可序列化)
Person类
/*** Person需要满足如下的要求,方可序列化* 1.需要实现接口:Serializable* 2.当前类提供一个全局常量:serialVersionUID* 3.除了当前Person类需要实现Serializable接口之外,还必须保证其内部所有属性*   也必须是可序列化的。(默认情况下,基本数据类型可序列化)*** 补充:ObjectOutputStream和ObjectInputStream不能序列化static和transient修饰的成员变量**/
public class Person implements Serializable{public static final long serialVersionUID = 475463534532L;private String name;private int age;private int id;private Account acct;public Person(String name, int age, int id) {this.name = name;this.age = age;this.id = id;}public Person(String name, int age, int id, Account acct) {this.name = name;this.age = age;this.id = id;this.acct = acct;}@Overridepublic String toString() {return "Person{" +"name='" + name + '\'' +", age=" + age +", id=" + id +", acct=" + acct +'}';}public int getId() {return id;}public void setId(int id) {this.id = id;}public String getName() {return name;}public void setName(String name) {this.name = name;}public int getAge() {return age;}public void setAge(int age) {this.age = age;}public Person(String name, int age) {this.name = name;this.age = age;}public Person() {}
}// 也需要序列化
class Account implements Serializable{public static final long serialVersionUID = 4754534532L;private double balance;@Overridepublic String toString() {return "Account{" +"balance=" + balance +'}';}public double getBalance() {return balance;}public void setBalance(double balance) {this.balance = balance;}public Account(double balance) {this.balance = balance;}
}
demo
public class ObjectInputOutputStreamTest {/*序列化过程:将内存中的java对象保存到磁盘中或通过网络传输出去使用ObjectOutputStream实现*/@Testpublic void testObjectOutputStream(){ObjectOutputStream oos = null;try {//1.oos = new ObjectOutputStream(new FileOutputStream("object.dat"));//2.oos.writeObject(new String("我爱北京天安门"));oos.flush();//刷新操作oos.writeObject(new Person("王铭",23));oos.flush();oos.writeObject(new Person("张学良",23,1001,new Account(5000)));oos.flush();} catch (IOException e) {e.printStackTrace();} finally {if(oos != null){//3.try {oos.close();} catch (IOException e) {e.printStackTrace();}}}}/*反序列化:将磁盘文件中的对象还原为内存中的一个java对象使用ObjectInputStream来实现*/@Testpublic void testObjectInputStream(){ObjectInputStream ois = null;try {ois = new ObjectInputStream(new FileInputStream("object.dat"));Object obj = ois.readObject();String str = (String) obj;Person p = (Person) ois.readObject();Person p1 = (Person) ois.readObject();System.out.println(str);System.out.println(p);System.out.println(p1);} catch (IOException e) {e.printStackTrace();} catch (ClassNotFoundException e) {e.printStackTrace();} finally {if(ois != null){try {ois.close();} catch (IOException e) {e.printStackTrace();}}}}
}
10 随机存取文件流
10.1 RandomAccessFile实现数据的读写操作
- RandomAccessFile 声明在java.io包下,但直接继承于java.lang.Object类。并 且它实现了DataInput、DataOutput这两个接口,也就意味着这个类既可以读也 可以写。
- RandomAccessFile 类支持 “随机访问” 的方式,程序可以直接跳到文件的任意 地方来读、写文件
- 支持只访问文件的部分内容
- 可以向已存在的文件后追加内容
- RandomAccessFile 对象包含一个记录指针,用以标示当前读写处的位置。 RandomAccessFile 类对象可以自由移动记录指针:
- long getFilePointer():获取文件记录指针的当前位置
- void seek(long pos):将文件记录指针定位到 pos 位置
- 构造器
- public RandomAccessFile(File file, String mode)
- public RandomAccessFile(String name, String mode)
- 创建 RandomAccessFile 类实例需要指定一个 mode 参数,该参数指 定 RandomAccessFile 的访问模式:
- r: 以只读方式打开
- rw:打开以便读取和写入
- rwd:打开以便读取和写入;同步文件内容的更新
- rws:打开以便读取和写入;同步文件内容和元数据的更新
- 如果模式为只读r。则不会创建文件,而是会去读取一个已经存在的文件, 如果读取的文件不存在则会出现异常。 如果模式为rw读写。如果文件不 存在则会去创建文件,如果存在则不会创建。
/*** RandomAccessFile的使用* 1.RandomAccessFile直接继承于java.lang.Object类,实现了DataInput和DataOutput接口* 2.RandomAccessFile既可以作为一个输入流,又可以作为一个输出流** 3.如果RandomAccessFile作为输出流时,写出到的文件如果不存在,则在执行过程中自动创建。*   如果写出到的文件存在,则会对原有文件内容进行覆盖。(默认情况下,从头覆盖)** 4. 可以通过相关的操作,实现RandomAccessFile“插入”数据的效果**/
public class RandomAccessFileTest {@Testpublic void test1() {RandomAccessFile raf1 = null;RandomAccessFile raf2 = null;try {//1.raf1 = new RandomAccessFile(new File("爱情与友情.jpg"),"r");raf2 = new RandomAccessFile(new File("爱情与友情1.jpg"),"rw");//2.byte[] buffer = new byte[1024];int len;while((len = raf1.read(buffer)) != -1){raf2.write(buffer,0,len);}} catch (IOException e) {e.printStackTrace();} finally {//3.if(raf1 != null){try {raf1.close();} catch (IOException e) {e.printStackTrace();}}if(raf2 != null){try {raf2.close();} catch (IOException e) {e.printStackTrace();}}}}
}@Testpublic void test2() throws IOException {RandomAccessFile raf1 = new RandomAccessFile("hello1.txt","rw");// 覆盖操作,默认指针从0开始写,写完后,如果文件中有多余的内容仍存在,不会被擦除raf1.write("xyz".getBytes());raf1.close();}
}
10.2 RandomAccessFile实现数据的插入
/*** RandomAccessFile的使用* 1.RandomAccessFile直接继承于java.lang.Object类,实现了DataInput和DataOutput接口* 2.RandomAccessFile既可以作为一个输入流,又可以作为一个输出流** 3.如果RandomAccessFile作为输出流时,写出到的文件如果不存在,则在执行过程中自动创建。*   如果写出到的文件存在,则会对原有文件内容进行覆盖。(默认情况下,从头覆盖)** 4. 可以通过相关的操作,实现RandomAccessFile“插入”数据的效果*/
public class RandomAccessFileTest {/*使用RandomAccessFile实现数据的插入效果*/@Testpublic void test3() throws IOException {RandomAccessFile raf1 = new RandomAccessFile("hello.txt","rw");raf1.seek(3);//将指针调到角标为3的位置//保存指针3后面的所有数据到StringBuilder中StringBuilder builder = new StringBuilder((int) new File("hello.txt").length());byte[] buffer = new byte[20];int len;while((len = raf1.read(buffer)) != -1){builder.append(new String(buffer,0,len)) ;}//调回指针,写入“xyz”raf1.seek(3);raf1.write("xyz".getBytes());//将StringBuilder中的数据写入到文件中raf1.write(builder.toString().getBytes());raf1.close();//思考:将StringBuilder替换为ByteArrayOutputStream}
}
10.3 扩展
可以用RandomAccessFile这个类,来实现一个多线程断点下载的功能, 用过下载工具的朋友们都知道,下载前都会建立两个临时文件,一个是与 被下载文件大小相同的空文件,另一个是记录文件指针的位置文件,每次 暂停的时候,都会保存上一次的指针,然后断点下载的时候,会继续从上 一次的地方下载,从而实现断点下载或上传的功能。
11 NIO.2中Path、Paths、Files类的使用
11.1 概述
- Java NIO (New IO,Non-Blocking IO)是从Java 1.4版本开始引入的一套新 的IO API,可以替代标准的Java IO API。NIO与原来的IO有同样的作用和目 的,但是使用的方式完全不同,NIO支持面向缓冲区的(IO是面向流的)、基于 通道的IO操作。NIO将以更加高效的方式进行文件的读写操作。
- Java API中提供了两套NIO,一套是针对标准输入输出NIO,另一套就是网 络编程NIO。
- |-----java.nio.channels.Channel
- |-----FileChannel:处理本地文件
- |-----SocketChannel:TCP网络编程的客户端的Channel
- |-----ServerSocketChannel:TCP网络编程的服务器端的Channel
- |-----DatagramChannel:UDP网络编程中发送端和接收端的Channel
- |-----java.nio.channels.Channel
- 随着 JDK 7 的发布,Java对NIO进行了极大的扩展,增强了对 文件处理和文件系统特性的支持,以至于我们称他们为 NIO.2。 因为 NIO 提供的一些功能,NIO已经成为文件处理中越来越重要 的部分。
- 早期的Java只提供了一个File类来访问文件系统,但File类的功能比较有限,所 提供的方法性能也不高。而且,大多数方法在出错时仅返回失败,并不会提供异 常信息。
- NIO. 2为了弥补这种不足,引入了Path接口,代表一个平台无关的平台路径,描述了目录结构中文件的位置。Path可以看成是File类的升级版本,实际引用的资 源也可以不存在。
- 在以前IO操作都是这样写的:
import java.io.File;
File file = new File("index.html");- 但在Java7 中,我们可以这样写:
import java.nio.file.Path;
import java.nio.file.Paths;
Path path = Paths.get("index.html");- 同时,NIO.2在java.nio.file包下还提供了Files、Paths工具类,Files包含 了大量静态的工具方法来操作文件;Paths则包含了两个返回Path的静态 工厂方法。
- Paths 类提供的静态 get() 方法用来获取 Path 对象:
- static Path get(String first, String ... more) : 用于将多个字符串串连成路径
- static Path get(URI uri): 返回指定uri对应的Path路径
10.2 Path接口
String toString() : 返回调用 Path 对象的字符串表示形式
boolean startsWith(String path) : 判断是否以 path 路径开始
boolean endsWith(String path) : 判断是否以 path 路径结束
boolean isAbsolute() : 判断是否是绝对路径
Path getParent() :返回Path对象包含整个路径,不包含 Path 对象指定的文件路径
Path getRoot() :返回调用 Path 对象的根路径
Path getFileName() : 返回与调用 Path 对象关联的文件名
int getNameCount() : 返回Path 根目录后面元素的数量
Path getName(int idx) : 返回指定索引位置 idx 的路径名称
Path toAbsolutePath() : 作为绝对路径返回调用 Path 对象
Path resolve(Path p) :合并两个路径,返回合并后的路径对应的Path对象
File toFile(): 将Path转化为File类的对象
10.3 Files 类
常用方法:
Path copy(Path src, Path dest, CopyOption ... how) : 文件的复制
Path createDirectory(Path path, FileAttribute<?> ... attr) : 创建一个目录
Path createFile(Path path, FileAttribute<?> ... arr) : 创建一个文件
void delete(Path path) : 删除一个文件/目录,如果不存在,执行报错
void deleteIfExists(Path path) : Path对应的文件/目录如果存在,执行删除
Path move(Path src, Path dest, CopyOption...how) : 将 src 移动到 dest 位置 long size(Path path) : 返回 path 指定文件的大小用于判断:
boolean exists(Path path, LinkOption ... opts) : 判断文件是否存在
boolean isDirectory(Path path, LinkOption ... opts) : 判断是否是目录
boolean isRegularFile(Path path, LinkOption ... opts) : 判断是否是文件 boolean isHidden(Path path) : 判断是否是隐藏文件
boolean isReadable(Path path) : 判断文件是否可读
boolean isWritable(Path path) : 判断文件是否可写
boolean notExists(Path path, LinkOption ... opts) : 判断文件是否不存在用于操作内容:
SeekableByteChannel newByteChannel(Path path, OpenOption...how) : 获取与指定文件的连
接,how 指定打开方式。
DirectoryStream<Path> newDirectoryStream(Path path) : 打开 path 指定的目录
InputStream newInputStream(Path path, OpenOption...how):获取 InputStream 对象
OutputStream newOutputStream(Path path, OpenOption...how) : 获取 OutputStream 对象