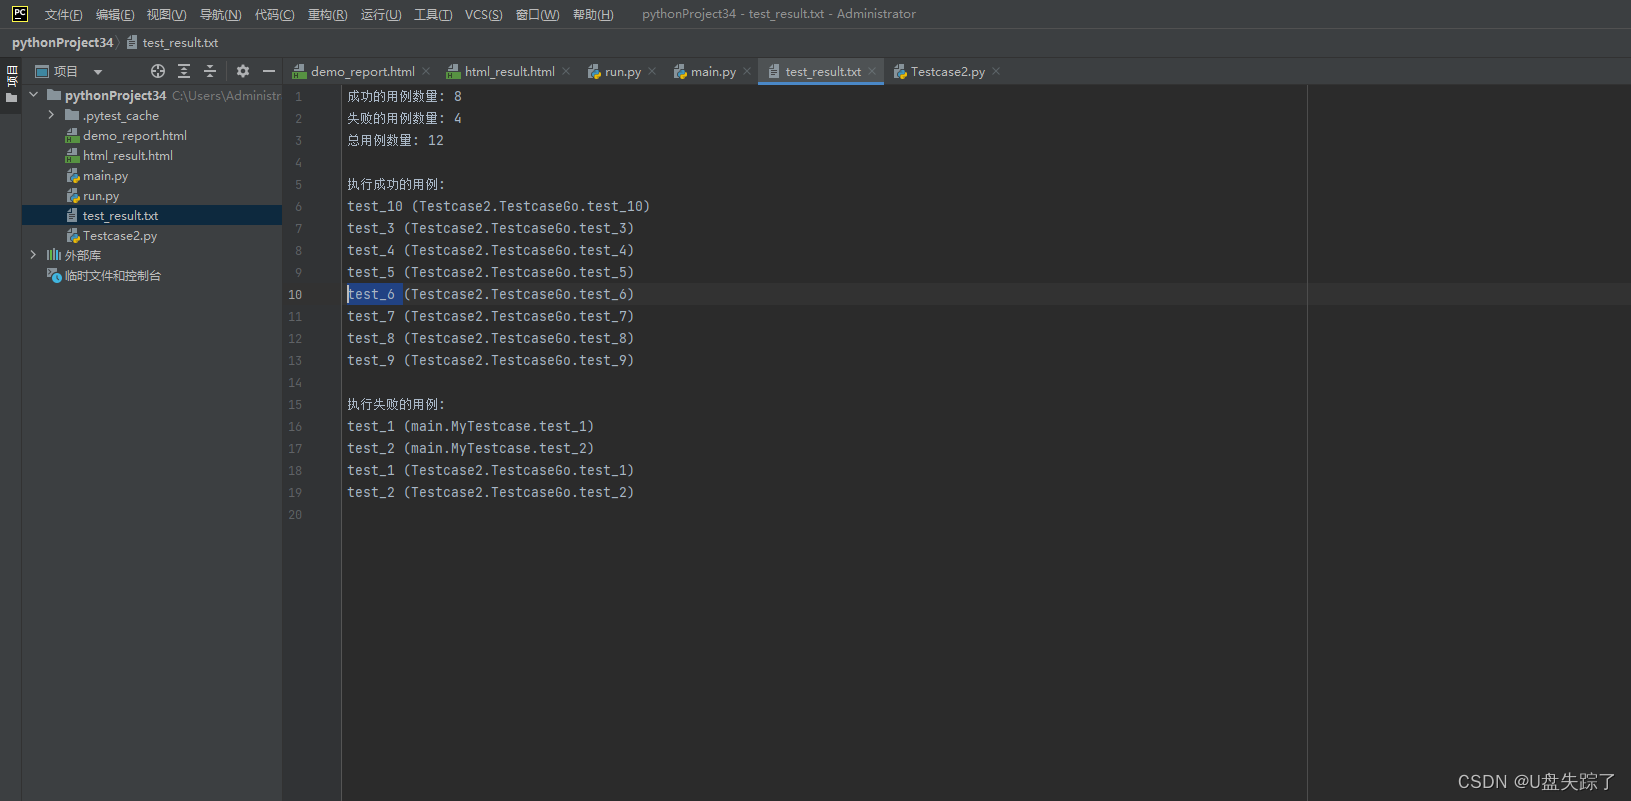
这是一个Python的单元测试框架的示例代码,主要用于执行测试用例并生成测试报告。其中,通过unittest模块创建主测试类MainTestCase,并加载其他文件中的测试用例,统计用例的执行结果并将结果写入文件,最后生成一个简单的测试报告html页面。
在执行测试时,可以根据需要添加更多的测试文件和测试用例,在自定义CustomTextTestResult类中重写addSuccess和addFailure方法,获取用例的执行结果,并在统计成功和失败的用例数量时进行累加。将用例执行成功和失败的信息分别保存到success_cases和failure_cases列表中,最后将结果写入文件。
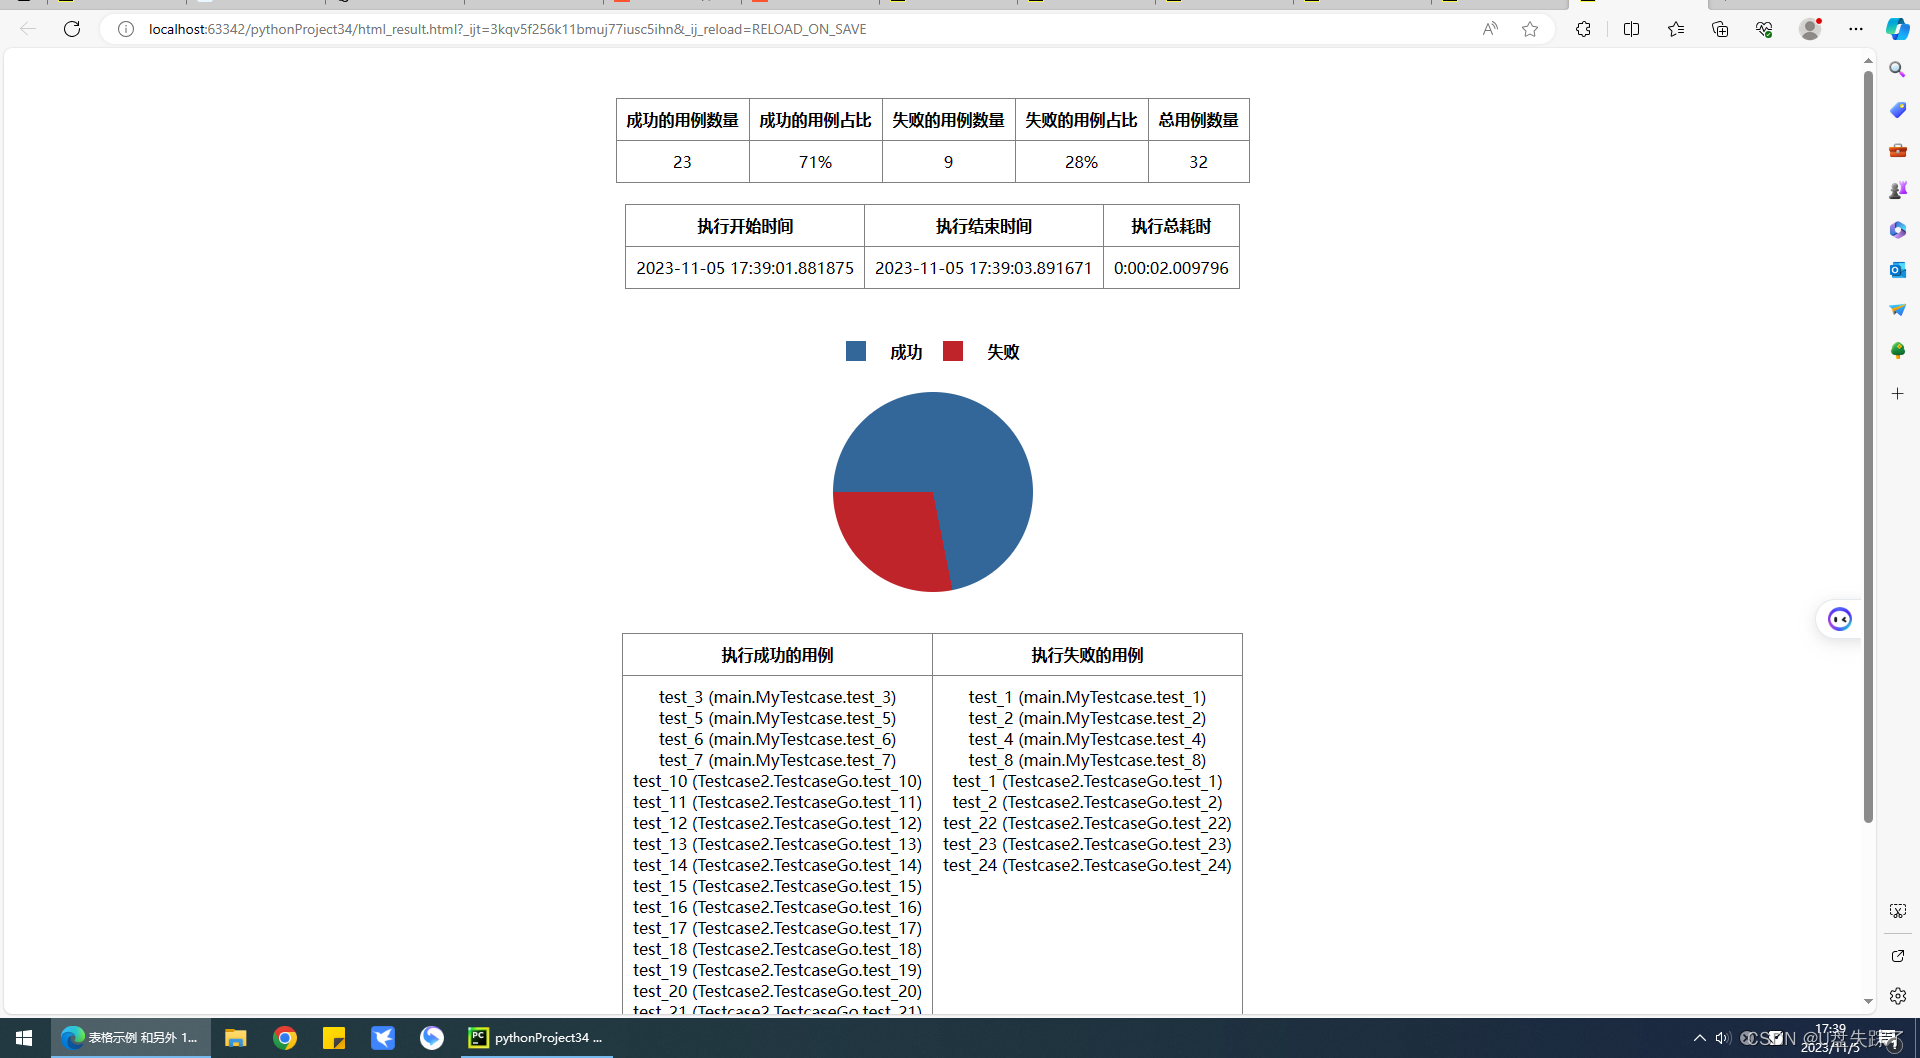
在生成测试报告时,利用HTML和CSS语言生成一个表格结构的页面,并将测试结果以文本和图表的形式展示出来。在页面中使用了一些JavaScript代码来计算成功和失败的百分比,并将其以饼状图的形式呈现出来。最终,将html代码写入到文件中,生成测试报告。
main.py
import unittest
import timeclass MyTestcase(unittest.TestCase):def test_1(self):print('main_test_1')self.assertEqual(2 - 2, 4)def test_2(self):print('main_test_2')self.assertEqual(2 - 2, 4)def test_3(self):print('test_3')time.sleep(2)self.assertEqual(2 + 2, 4)def test_4(self):print('test_4')self.assertEqual(2 - 2, 4)def test_5(self):print('test_5')self.assertEqual(2 + 2, 4)def test_6(self):print('test_6')self.assertEqual(2 + 2, 4)def test_7(self):print('test_7')self.assertEqual(2 + 2, 4)def test_8(self):print('test_8')self.assertEqual(2 + 3, 4)
Testcase2.py
import unittestclass TestcaseGo(unittest.TestCase):def test_1(self):print('TestcaseGo_test_1')self.assertEqual(2 - 2, 4)def test_2(self):print('TestcaseGo_test_2')self.assertEqual(2 - 2, 4)def test_3(self):print('TestcaseGo_test_3')self.assertEqual(2 + 2, 4)def test_4(self):print('TestcaseGo_test_3')self.assertEqual(2 + 2, 4)def test_5(self):print('TestcaseGo_test_3')self.assertEqual(2 + 2, 4)def test_6(self):print('TestcaseGo_test_3')self.assertEqual(2 + 2, 4)def test_7(self):print('TestcaseGo_test_3')self.assertEqual(2 + 2, 4)def test_8(self):print('TestcaseGo_test_3')self.assertEqual(2 + 2, 4)def test_9(self):print('TestcaseGo_test_3')self.assertEqual(2 + 2, 4)def test_10(self):print('TestcaseGo_test_3')self.assertEqual(2 + 2, 4)def test_11(self):print('TestcaseGo_test_3')self.assertEqual(2 + 2, 4)def test_12(self):print('TestcaseGo_test_3')self.assertEqual(2 + 2, 4)def test_13(self):print('TestcaseGo_test_3')self.assertEqual(2 + 2, 4)def test_14(self):print('TestcaseGo_test_3')self.assertEqual(2 + 2, 4)def test_15(self):print('TestcaseGo_test_3')self.assertEqual(2 + 2, 4)def test_16(self):print('TestcaseGo_test_3')self.assertEqual(2 + 2, 4)def test_17(self):print('TestcaseGo_test_3')self.assertEqual(2 + 2, 4)def test_18(self):print('TestcaseGo_test_3')self.assertEqual(2 + 2, 4)def test_19(self):print('TestcaseGo_test_3')self.assertEqual(2 + 2, 4)def test_20(self):print('TestcaseGo_test_3')self.assertEqual(2 + 2, 4)def test_21(self):print('TestcaseGo_test_3')self.assertEqual(2 + 2, 4)def test_22(self):print('TestcaseGo_test_3')self.assertEqual(2 + 2, 4)def test_23(self):print('TestcaseGo_test_3')self.assertEqual(2 + 2, 4)def test_24(self):print('TestcaseGo_test_3')self.assertEqual(2 + 2, 4)run.py
import unittest
import datetime# 创建主测试类
class MainTestCase(unittest.TestCase):passif __name__ == '__main__':# 统计测试用例执行开始时间today1 = datetime.date.today()current_time1 = datetime.datetime.now().time()# print("执行开始时间:" + str(today1) +" "+ str(current_time1))# 创建测试加载器loader = unittest.TestLoader()# 加载其他Python文件中的测试用例并添加到主测试类中test_cases = [loader.loadTestsFromName('main.MyTestcase'),loader.loadTestsFromName('Testcase2.TestcaseGo')# 添加更多的测试文件和测试用例]suite = unittest.TestSuite(test_cases)suite.addTests(loader.loadTestsFromTestCase(MainTestCase))# 计算总用例数量total_count = suite.countTestCases()# 定义全局的成功、失败和总数计数变量success_count = 0failure_count = 0# 保存执行成功的用例和执行失败的用例success_cases = []failure_cases = []# 重写run()方法,获取用例的执行结果class CustomTextTestResult(unittest.TextTestResult):def addSuccess(self, test):global success_countsuccess_count += 1success_cases.append(str(test))super().addSuccess(test)def addFailure(self, test, err):global failure_countfailure_count += 1failure_cases.append(str(test))super().addFailure(test, err)# 创建测试运行器并运行测试runner = unittest.TextTestRunner(verbosity=2, resultclass=CustomTextTestResult)result = runner.run(suite)#  将结果写入文件,指定编码格式为UTF-8with open("test_result.txt", "w", encoding="utf-8") as file:file.write(f"成功的用例数量: {success_count}\n")file.write(f"失败的用例数量: {failure_count}\n")file.write(f"总用例数量: {total_count}\n")file.write("\n执行成功的用例:\n")for case in success_cases:file.write(case + "\n")file.write("\n执行失败的用例:\n")for case in failure_cases:file.write(case + "\n")print("测试结果已写入文件 test_result.txt")# print(total_count)# print(success_count)# print(failure_count)# print(success_cases)# print(failure_cases)# 生成一个简单的测试报告html页面def html_report(today1, current_time1, total_count, success_count, failure_count, success_cases, failure_cases):# 用例总数量、成功数量、失败数量、百分比Success_Rate = (success_count / total_count) * 100failure_Rate = (failure_count / total_count) * 100# print(int(Success_Rate))# print(int(failure_Rate))Success_Rate_text = str(int(Success_Rate)) + '%'failure_Rate_text = str(int(failure_Rate)) + '%'# print(Success_Rate_text)# print(failure_Rate_text)Success_Rate_text_b = '{'+str(Success_Rate)+'}%'# 拼接元素# text_content1 = "\n".join(success_cases)# text_content2 = "\n".join(failure_cases)test_cases_with_br = [f"{case}<br/>" for case in success_cases]# 将带有<br>标签的元素连接成一个字符串text_content1 = "".join(test_cases_with_br)test_cases_with_br = [f"{case}<br/>" for case in failure_cases]# 将带有<br>标签的元素连接成一个字符串text_content2 = "".join(test_cases_with_br)text_content1 = text_content1text_content2 = text_content2# 统计测试用例执行时间today2 = datetime.date.today()current_time2 = datetime.datetime.now().time()# print("执行结束时间:" + str(today2) + str(current_time2))time_diff = datetime.datetime.combine(datetime.date.min, current_time2) - datetime.datetime.combine(datetime.date.min, current_time1)strat_time = str(today1) + " " + str(current_time1)over_time = str(today2) + " " + str(current_time2)# 测试报告html源码report = """<!DOCTYPE html><html><head><meta charset="utf-8"><title>表格示例</title><style>""" \+ \""".status-labels {display: flex;justify-content: space-between;margin-bottom: 10px;}.status-label {display: flex;align-items: center;text-align: center;flex-direction: column;}.status-color {width: 20px;height: 20px;margin-right: 5px;align-items: center;}.pie-chart {width: 200px;height: 200px;border-radius: 50%;background: linear-gradient(to right, green 50%, red 0);transform: rotate(-90deg);margin: 20px auto;} """ + """th, td {{text-align: center;padding: 10px;vertical-align: top;}}table {{margin-left: auto;margin-right: auto;border-collapse: collapse;margin: auto;}}</style></head><body><br/><br/><table border="1"><thead><th>成功的用例数量</th><th>成功的用例占比</th><th>失败的用例数量</th><th>失败的用例占比</th><th>总用例数量</th></thead><tbody><tr><td>{success_count}</td><td>{Success_Rate_text}</td><td>{failure_count}</td><td>{failure_Rate_text}</td><td>{total_count}</td></tr></tbody></table><br/><table border="1"><thead><tr><th>执行开始时间</th><th>执行结束时间</th><th>执行总耗时</th></tr></thead><tbody><tr><td>{strat_time}</td><td>{over_time}</td><td>{time_diff}</td></tr></tbody></table><br/><br/><table  id="my-table"><thead><tr><th><div class="status-color" style="background-color: #336699;"></div></th><th>成功</th><th><div class="status-color" style="background-color: #bf242a;"></div></th><th>失败</th></tr></thead><tbody></tbody></table><div class="pie-chart"></div><br/><table border="1"><thead><tr><th>执行成功的用例</th><th>执行失败的用例</th></tr></thead><tbody><tr><td>{text_content1}</td><td>{text_content2}</td></tr></tbody></table><br/><br/>""".format(time_diff=time_diff, strat_time=strat_time, over_time=over_time, total_count=total_count,success_count=success_count, Success_Rate_text=Success_Rate_text, failure_count=failure_count,failure_Rate_text=failure_Rate_text, text_content1=text_content1, text_content2=text_content2) \+ \"""<script>// 获取饼图元素var pieChart = document.querySelector('.pie-chart');// 设置饼图的背景渐变色pieChart.style.background = `conic-gradient(#336699 ${Success_Rate_text}, #bf242a 0)`;</script>""".format(Success_Rate_text=Success_Rate_text_b) + """</body></html>"""# ${successPercentage}%# $81%print(report)with open("html_result.html", "w", encoding="utf-8") as file:file.write(report)print("测试报告生成成功!")html_report(today1, current_time1, total_count, success_count, failure_count, success_cases, failure_cases)# html_report(total_count, success_count, failure_count, success_cases, failure_cases)