课程地址
AJAX = Asynchronous JavaScript and XML(异步的 JavaScript 和 XML)
AJAX 不是新的编程语言,而是一种使用现有标准的新方法
AJAX 最大的优点是在不重新加载整个页面的情况下,可以与服务器交换数据并更新部分网页内容
XMLHttpRequest 只是实现 Ajax 的一种方式。
XML
可扩展标记语言,用来存储和传输数据(序列化),其于 HTML 类似,但是 XML 中的标签不是预定义的,而是自定义的
var s1 = {name: "daniel",age: 18,gender: "M"
}
用 XML 表示为:
<student><name>daniel</name><age>18</age><gender>M</gender>
</student>
现在基本被 json 代替:
{"name": "daniel","age": "18","gender": "M"
}
AJAX 的优缺点
优点
- 可以不刷新页面与服务器进行通信
- 允许根据用户事件更新部分页面内容
缺点
- 没有浏览历史,不能回退
- 存在跨域问题
- SEO 不友好
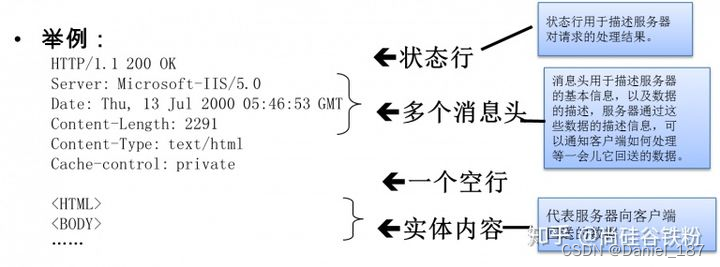
HTTP 报文格式
post 请求:

响应:
express
npm init --yes	# 初始化工程
npm install express		# 安装 express
AJAX 发送 GET 请求
服务端代码如下:
const express = require('express');
const app = express();app.get('/server', (request, response) => {// 允许跨域response.setHeader('Access-Control-Allow-Origin', '*');response.send('hello, world');
});app.listen(8000, () => {console.log("listening on 8000");
})
前端代码如下:
<!DOCTYPE html>
<html lang="en">
<head><meta charset="UTF-8"><meta name="viewport" content="width=device-width, initial-scale=1.0"><title>Document</title><style>#result{width: 200px;height: 100px;border: solid 2px red;}</style>
</head>
<body><button>发送请求</button><div id="result"></div>
</body>
<script>const btn0 = document.getElementsByTagName('button')[0];btn0.onclick = function() {// 1. 创建对象const xhr = new XMLHttpRequest();const result = document.getElementById('result')// 2. 初始化xhr.open('GET', 'http://127.0.0.1:8000/server');// 3. 发送xhr.send();/* 4. 事件绑定,处理服务端返回的结果。state 有如下 5 个值:0:未初始化1:open 方法调用完毕2:send 方法调用完毕3:服务端返回了部分结果4:服务端返回了全部结果*/xhr.onreadystatechange = function() {if (xhr.readyState === 4) { // 服务端返回了所有结果if (xhr.status >= 200 && xhr.status < 300) {result.innerHTML = xhr.response;}}}}
</script>
</html>
GET 设置请求参数
查询字符串参数以 ? 开始,以 & 分隔:
xhr.open('GET', 'http://127.0.0.1:8000/server?a=100&b=200&c=300');
AJAX 发送 POST 请求
服务端添加处理 post 请求的回调函数:
app.post('/server', (request, response) => {response.setHeader('Access-Control-Allow-Origin', '*');response.send('hello, post');
});
前端:
<!DOCTYPE html>
<html lang="en">
<head><meta charset="UTF-8"><meta name="viewport" content="width=device-width, initial-scale=1.0"><title>Document</title>
</head>
<style>#result {width: 200px;height: 100px;border: solid 2px red;}
</style>
<body><div id="result"></div>
</body>
<script>const result = document.getElementById('result');result.addEventListener('mouseover', function() {// console.log('mouseover');const xhr = new XMLHttpRequest();xhr.open('POST', 'http://localhost:8000/server');xhr.send();xhr.onreadystatechange = function() {if (xhr.readyState == 4) {if (xhr.status >= 200 && xhr.status < 300) {result.innerHTML = xhr.response;}}};});
</script>
</html>
POST 设置请求体
xhr.send('a=100&b=200&c=300');
xhr.send('a:100&b:200&c:300');
设置请求头信息
一般将身份参数信息放入请求头
xhr.setRequestHeader('Content-Type', 'application/x-www-from-urlencoded');
xhr.setRequestHeader('name', 'application/x-www-from-urlencoded');
服务端代码加入:
app.all('/server', (request, response) => {response.setHeader('Access-Control-Allow-Origin', '*');response.setHeader('Access-Control-Allow-Headers', '*');	// 允许所有请求头response.send('hello, post');
});
服务端响应 JSON 数据
服务端返回一个 json 字符串
app.all('/json-server', (request, response) => {response.setHeader('Access-Control-Allow-Origin', '*');response.setHeader('Access-Control-Allow-Headers', '*');const data = {name: 'daniel'};response.send(JSON.stringify(data));	// 序列化
});
客户端从 json 字符串中解析出 json 对象:
<script>const result = document.getElementById('result');window.onkeydown = function() {const xhr = new XMLHttpRequest();xhr.open('GET', 'http://localhost:8000/json-server');xhr.send();xhr.onreadystatechange = function() {if (xhr.readyState === 4) {if (xhr.status >= 200 && xhr.status < 300) {//result.innerHTML = xhr.response;let data = JSON.parse(xhr.response);	// 反序列化result.innerHTML = data.name;}}}}
</script>
安装 nodemon,在修改服务端代码后能够自动重启 nodejs
npm install -g nodemon
使用 nodemon 启动 nodejs:
nodemon server.js
ie 缓存问题:ie 会缓存 ajax 的请求结果,如果服务端修改了响应内容,ie 不能及时地呈现。解决方法:在请求后面加上时间戳参数,使得每次请求内容都不同
请求超时与网络异常
对 ajax 做超时设置,给用户提醒
服务端设置延时发送响应:
app.all('/timeout', (request, response) => {response.setHeader('Access-Control-Allow-Origin', '*');setTimeout(() => {  // 延时发送response.send('hello, timeout 3s');}, 3000);
});
前端代码添加超时和网络异常处理:
<script>const btn = document.getElementsByTagName('button')[0];const result = document.getElementById('result');btn.addEventListener('click', function() {// console.log('mouseover');const xhr = new XMLHttpRequest();xhr.timeout = 2000;		// 给 ajax 设置超时xhr.ontimeout = () => { // 超时回调alert("timeout!!!");}xhr.onerror = () => {   // 网络异常回调alert("bad network!!!");}xhr.open('POST', 'http://localhost:8000/timeout');xhr.send();xhr.onreadystatechange = function() {if (xhr.readyState == 4) {if (xhr.status >= 200 && xhr.status < 300) {result.innerHTML = xhr.response;}}};});
</script>
取消请求
使用 abort() 方法即可:
<body><button>点击发送请求</button><button>点击取消请求</button>
</body>
<script>const btn1 = document.getElementsByTagName('button')[0];const btn2 = document.getElementsByTagName('button')[1];let xhr = null;btn1.onclick = function() {xhr = new XMLHttpRequest();xhr.open('GET', 'http://localhost:8000/timeout');xhr.send();xhr.onreadystatechange = function() {if (xhr.readyState == 4) {if (xhr.status >= 200 && xhr.status < 300) {console.log(xhr.response);}}};};btn2.onclick = function () {xhr.abort();}
</script>
重复发送请求问题
设置标志变量,判断是否重复发送:
<script>const btn0 = document.getElementsByTagName('button')[0];const btn1 = document.getElementsByTagName('button')[1];let xhr = null;let isSending = false;btn0.onclick = function() {if (isSending) {xhr.abort();}xhr = new XMLHttpRequest();isSending = true;xhr.open('GET', 'http://localhost:8000/timeout');xhr.send();xhr.onreadystatechange = function() {if (xhr.readyState == 4) {isSending = false;  // 请求发送完成if (xhr.status >= 200 && xhr.status < 300) {console.log(xhr.response);}}};};btn1.onclick = function () {xhr.abort();}
</script>
jQuery 发送 AJAX 请求
get/post 方法
服务端:
app.all('/jquery-server', (request, response) => {response.setHeader('Access-Control-Allow-Origin', '*');const data = {name: "daniel"}response.send(JSON.stringify(data));
});
前端:
<body><div class="container"><h2 class="page-header">jQuery 发送 AJAX 请求</h2><button class="btn btn-primary">GET</button><button class="btn btn-danger">POST</button><button class="btn btn-info">通用型方法 ajax</button></div>
</body>
<script>$('button').eq(0).click(function() {$.get('http://localhost:8000/jquery-server', {a: 100, b: 200}, function(data) {console.log(data);}, 'json');     // 响应体是一个 json 格式数据,而非普通字符串});$('button').eq(1).click(function() {$.post('http://localhost:8000/jquery-server', {a: 100, b: 200}, function(data) {console.log(data);});});
</script>
通用方法
通用方法可以设置任意 http 请求字段
<script>$('button').eq(2).click(function() {$.ajax({url: 'http://localhost:8000/timeout',data: {a: 100, b: 200},type: 'GET',dataType: 'json',       // 响应体结果success: function(data) {console.log(data);},timeout: 2000,error: function(data) {console.log("error!!!")},headers: {a: 300,b: 400}});});
</script>
axios 发送 AJAX 请求
服务端:
const express = require('express');
const app = express();app.all('/server', (request, response) => {// 允许跨域response.setHeader('Access-Control-Allow-Origin', '*');response.setHeader('Access-Control-Allow-Headers', '*');response.send('hello, world');
});app.listen(8000, () => {console.log("listening on 8000");
})app.all('/axios-server', (request, response) => {// 允许跨域response.setHeader('Access-Control-Allow-Origin', '*');response.setHeader('Access-Control-Allow-Headers', '*');const data = {name: 'daniel'};response.send(JSON.stringify(data));
});
前端:
<body><button>GET</button><button>POST</button><button>AJAX</button>
</body>
<script>const btns = document.querySelectorAll('button');axios.defaults.baseURL = 'http://localhost:8000';btns[0].onclick = function() {axios.get('/axios-server', {params: {id: 100,vip: 7},headers: {name: 'daniel',age: 18}}).then(value => {console.log(value);});}btns[1].onclick = function() {axios.post('axios-server', {username: 'admin',password: '123456'}, {params: {id: 200,vip: 8},headers: {height: 180,weight: 80}});}
</script>
axios 函数发送 ajax 请求
函数语法:
// Send a POST request
axios({method: 'post',url: '/user/12345',data: {firstName: 'Fred',lastName: 'Flintstone'}
});
前端代码:
btns[2].onclick = function() {axios({method: 'POST',url: '/axios-server',params: {vip: 10,level: 30},headers: {a: 100,b: 200},data: {username: 'admin',password: '123456'}}).then(response => {console.log(response.status);console.log(response.statusText);console.log(response.headers);console.log(response.data);});}
fetch 函数发送 AJAX 请求
服务端:
app.all('/fetch-server', (request, response) => {// 允许跨域response.setHeader('Access-Control-Allow-Origin', '*');response.setHeader('Access-Control-Allow-Headers', '*');const data = {name: 'daniel'};response.send(JSON.stringify(data));
});
前端:
<body><button>ajax</button>
</body>
<script>const btn = document.querySelector('button');btn.onclick = function() {fetch('http://localhost:8000/fetch-server', {method: 'POST',headers: {name: 'daniel'},body: 'username=admin&password=admin'}).then(response => {// return response.text();return response.json();}).then(response => {console.log(response);});}
</script>
同源策略
同源策略是一种安全策略,所谓“同源”就是指协议,域名,端口号完全相同。违背同源策略的行为就是跨域
AJAX 默认是需要遵守同源策略的
多台服务器就存在跨域问题
服务端:
const express = require('express');
const app = express();app.all('/home', (request, response) => {response.sendFile(__dirname + '/home.html');
});app.all('/data', (request, response) => {response.send('userdata');
});app.listen(9000, () => {console.log("listening 9000");
});
前端:
<body><h1>daniel</h1><button onclick="">get userdata</button>
</body>
<script>const btn = document.querySelector('button');btn.onclick = function() {const x = new XMLHttpRequest();// 满足同源策略,url 可以简写x.open('GET', '/data');x.send();x.onreadystatechange = function() {if (x.readyState === 4) {if (x.status >= 200 && x.status < 300) {console.log(x.response);}}}}
</script>
JSONP
JSONP 原理
JSON with padding
JSONP 是一个非官方的跨域解决方案,只支持 get 请求
JSONP 利用网页中有一些标签天生具有跨域能力,比如 img link iframe script 等
在前端声明 handle 函数,在 script 中引用:
const data = {name: 'daniel'
};handle(data)
<!DOCTYPE html>
<html lang="en">
<head><meta charset="UTF-8"><meta name="viewport" content="width=device-width, initial-scale=1.0"><title>jsonp</title><style>#result{width: 300px;height: 100px;border: solid 5px #78a;}</style>
</head>
<body><div id="result"></div><script>function handle(data) {const result = document.getElementById('result');result.innerHTML = data.name;}</script>
</body>
<script src="jsonp.js"></script>
</html>
script 中请求到的 js 代码会立即被解释执行
使用 script 标签完成跨域请求:
<script src="http://localhost:8000/jsonp-server"></script>
服务端对应如下规则:
app.all('/jsonp-server', (request, response) => {response.send('hello, jsonp-server');
});
响应能够正常返回,但是 console 爆 jsonp-server:1 Uncaught ReferenceError: hello is not defined 错误,原因在于相应内容被当作 js 代码解释执行了
app.all('/jsonp-server', (request, response) => {response.send('console.log("hello, jsonp-server")');
});
jsonp:返回一个函数调用语句,其实参就是需要返回的数据,函数的定义在前端,函数的实参在后端传入。服务端代码如下:
app.all('/jsonp-server', (request, response) => {const data = {name: 'daniel'};let data_str = JSON.stringify(data);response.end(`handle(${data_str})`);
});
JSONP 实践
步骤:
- 创建 script 标签
- 设置 src 为跨域目标地址,向服务端请求“js代码”
- 将 script 添加到 body
前端定义 handle 函数,后端返回一个函数调用的 js 代码,其中的实参由对象的字面量得到
服务端代码:
app.all('/check-username', (request, response) => {const data = {exist: 1,msg: 'username exists'};let data_str = JSON.stringify(data);response.end(`handle(${data_str})`);
});
前端代码:
<!DOCTYPE html>
<html lang="en">
<head><meta charset="UTF-8"><meta name="viewport" content="width=device-width, initial-scale=1.0"><title>user</title>
</head>
<body>用户名:<input type="text" id="username"><p></p>
</body>
<script>const input = document.querySelector('input');const p = document.querySelector('p');function handle(data) {input.style.border= 'solid 2px #f00'p.innerHTML = data.msg;}input.onblur = function() {let uname = this.value;const script = document.createElement('script');script.src = 'http://localhost:8000/check-username';document.body.appendChild(script);}
</script>
</html>
jquery 发送 JSONP 请求
前端:
<body><button>jsonp request</button><div id="result"></div>
</body>
<script>$('button').eq(0).click(function(){$.getJSON('http://localhost:8000/jquery-jsonp-server?callback=?', function(data) {$('#result').html(`姓名:${data.name},校区:${data.city}`);});});
</script>
服务端:
app.all('/jquery-jsonp-server', (request, response) => {const data = {name: 'daniel',city: ['bj', 'sh', 'sz']};let data_str = JSON.stringify(data);let cb = request.query.callback;response.end(`${cb}(${data_str})`);
});
CORS
Cross Origin Resource Sharing,跨域资源共享。CORS 是官方的跨域解决方案,它不需要在客户端做任何特殊操作,完全在服务器中进行处理,支持 get 和 post 请求。CORS 标准新增了一组 HTTP 首部字段,允许服务器声明哪些源站通过浏览器有权访问哪些资源
服务端:
app.all('/cors-server', (request, response) => {// 允许跨域response.setHeader('Access-Control-Allow-Origin', '*');response.send('hello, cors');
});
前端:
<body><button>cors request</button><div id="result"></div>
</body>
<script>const btn = document.querySelector('button');btn.onclick = function() {const x = new XMLHttpRequest();x.open('GET', 'http://localhost:8000/cors-server');x.send();x.onreadystatechange = function() {if (x.readyState === 4) {if (x.status >= 200 && x.status < 300) {console.log(x.response);}}};}
</script>





![[RCTF 2019]nextphp](https://img-blog.csdnimg.cn/97cf5b443be548439c22ce3dc8912a17.png)
