链表的概念及结构
链表是一种物理存储结构上非连续、非顺序的存储结构,数据元素的逻辑顺序是通过链表中的指针链接次序实现的
我们在上一篇文章所学习的顺序表是连续存储的
例如:
顺序表就好比火车上的一排座位,是连续的
而链表就好比是火车的各节车厢,中间有东西将其互相连接的

链表的基本结构图如下:
有一个指针指向下一个节点

链表的概念及结构
实际中链表的结构非常多样,以下情况组合起来就有8种链表结构:
链表可以是单向和双向,循环和不循环,带头和不带头,这样一组合,就会出现八种类型的列表
单向的列表如下:

双向列表:
相比较单向,双向的增删查改较为容易,他会自带一个prev的节点,能顾标记当前节点的前一个节点

循环列表:
其实循环列表就是最后一个节点指向了开头节点

带头和不带头:
头节点我们可以称其为哨兵位,它是不会在链表中存储有效的数据的

其实八种链表我们最常用的只有两种:
无头单向非循环链表:

带头双向循环列表:

- 无头单向非循环链表:结构简单,一般不会单独用来存数据。实际中更多是作为其他数据结构的子结构
- 带头双向循环链表:结构最复杂,一般用在单独存储数据。实际中使用的链表数据结构,都是带头双向循环链表。另外这个结构虽然结构复杂,但是后面的学习中你会发现其实他是比较简单的
链表的实现
首先我们要了解的就是单链表的实现:
头文件如下:
#include<stdio.h>
#include<assert.h>
#include<ctype.h>
#include<string.h>
#include<stdlib.h>
typedef int SLTDateType;
typedef struct SListNode
{SLTDateType data;struct SListNode* next;
}SListNode;// 动态申请一个节点
SListNode* BuySListNode(SLTDateType x);
// 单链表打印
void SListPrint(SListNode* plist);
// 单链表尾插
void SListPushBack(SListNode** pplist, SLTDateType x);
// 单链表的头插
void SListPushFront(SListNode** pplist, SLTDateType x);
// 单链表的尾删
void SListPopBack(SListNode** pplist);
// 单链表头删
void SListPopFront(SListNode** pplist);
// 单链表查找
SListNode* SListFind(SListNode* plist, SLTDateType x);
// 单链表在pos位置之后插入x
void SListInsertAfter(SListNode* pos, SLTDateType x);
// 单链表删除pos位置之后的值
void SListEraseAfter(SListNode* pos);
// 单链表的销毁
void SListDestroy(SListNode** plist);
新节点的创建:
我们要创建一个节点,首先就是要为他动态开辟一个空间
然后再将这个新节点newnode的值赋予x,并且将他的next置为空,然后函数返回这个节点
SListNode* BuySListNode(SLTDateType x)
{SListNode* newnode = (SListNode*)malloc(sizeof(SListNode));if (newnode == NULL){perror("malloc");return NULL;}newnode->data = x;newnode->next = NULL;return newnode;
}
链表的打印:
打印链表是我们可以用一个符号->来代替空格,但是链表实际上是没有这个符号的
我们可以首先定义cur,从链表的第一个节点开始遍历,知道cur为空时,就不会打印了,并且打印一次cur的data,cur要等于cue的next
void SListPrint(SListNode* plist)
{SListNode* cur = plist;while (cur != NULL){printf("%d->", cur->data);cur = cur->next;}printf("NULL\n");
}
单链表的尾插:
这里我们要注意的是要记得用二级指针,因为当链表为空时,我们要改变的是节点的地址,而我们要改变地址,就要用地址的地址,也就是二级指针
首先,需要插入一个节点我们要做的就是创建一个新节点,我们之前定义了的一个函数直接使用
然后我们创建一个tail指针,让他从链表的第一个位置开始遍历,一直遍历到最后一个节点,此时令tail的next等于newnode即可
void SListPushBack(SListNode** pplist, SLTDateType x)
{assert(pplist);/*assert(*pplist);*///链表为空时可以尾插SListNode* newnode = BuySListNode(x);if (*pplist == NULL){*pplist = newnode;}else{SListNode* tail = *pplist;while (tail->next){tail = tail->next;}tail->next = newnode;}
}
单链表的头插:
头插比较简单,我们直接将新节点的next等于链表的第一个节点即可,也就是*pplist,我们传进来的是**pplist,是节点地址的地址,所以我们需要解引用一次才能将地址给newnode的next
void SListPushFront(SListNode** pplist, SLTDateType x)
{SListNode* newnode = BuySListNode(x);newnode->next = *pplist;*pplist = newnode;
}
单链表的尾删:
尾删的情况我们要分为两种:
1.只有一个节点时:
只有一个节点时我们直接free掉这个节点,其次为了防止野指针,我们要将其置空
2.当有多个节点时:
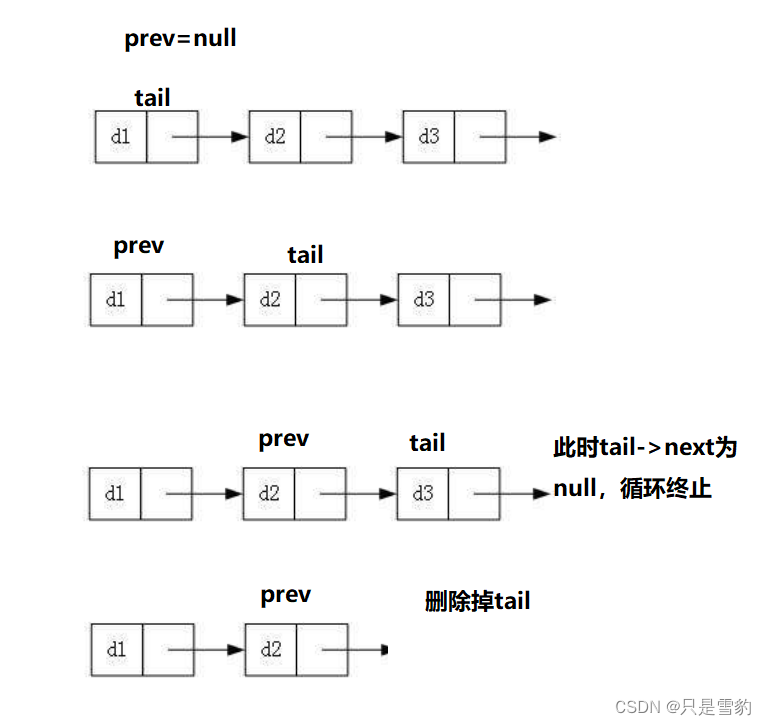
我们创建一个tail和prev,然后用循环将tail遍历到最后一个节点,循环的终止条件时tail->next为空,条件满足时就将tail赋予prev,当跳出循环时,prev就是尾节点的前一个节点,我们直接将tail给free掉,将其置空,这样尾节点就被删除了
void SListPopBack(SListNode** pplist)
{assert(*pplist);//链表为空时不能再删,暴力检查 if ((*pplist)->next == NULL){free(*pplist);*pplist = NULL;}else{SListNode* prev = NULL;SListNode* tail = *pplist;while (tail->next){prev = tail;tail = tail->next;}free(tail);prev->next = NULL;}
}
单链表的头删:
头删就很简单了,首先定义一个tail存入第一个节点的位置,然后将第一个节点的位置移动到他的next,注意记得将临时存储第一个节点位置的指针给free掉,避免出现野指针的问题
void SListPopFront(SListNode** pplist)
{assert(*pplist);//链表为空时不能再删,暴力检查SListNode* tail = *pplist;*pplist = (tail)->next;free(tail);
}
节点的查找:
节点的查找也比较容易,直接用while循环遍历,如果cur的data和x相等,就返回cur,否则就是没有这个节点,返回null
SListNode* SListFind(SListNode* plist, SLTDateType x)
{SListNode* cur = plist;while (cur->next){if (cur->data == x){return cur;//break;}cur = cur->next;}return NULL;
}
在一个节点之后插入节点:
需要插入节点首先要做的就是创建一个新节点
然后首先要做的是将newnode的next连接到要插入位置pos的next
再将pos的next置为newnode
这里注意,位置不能颠倒,不然newnode的next就找不到了

void SListInsertAfter(SListNode* pos, SLTDateType x)
{assert(pos);SListNode* newnode = BuySListNode(x);newnode->next = pos->next;pos->next = newnode;
}
删除一个节点之后的节点:
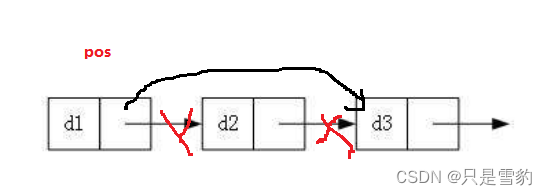
要删除节点之后的一个节点,首先这个节点之后一定要有一个节点,所以要对pos->next进行断言
我们将pos->next存储到next中,然后将pos->next直接指向next->next即可,也就是把pos->next=pos->next->next
void SListEraseAfter(SListNode* pos)
{assert(pos);assert(pos->next);//pos->next = pos->next->next;SListNode* next = pos->next;pos->next = next->next;free(next);
}
单链表的销毁:
直接将pplist置空即可
void SListDestroy(SListNode** pplist)
{SListNode* node = *pplist;node = NULL;free(node);
}
好了,今天的分享到这里就结束了,感谢大家的支持!
完整代码如下:
SListNode* BuySListNode(SLTDateType x)
{SListNode* newnode = (SListNode*)malloc(sizeof(SListNode));if (newnode == NULL){perror("malloc");return NULL;}newnode->data = x;newnode->next = NULL;return newnode;
}void SListPrint(SListNode* plist)
{SListNode* cur = plist;while (cur != NULL){printf("%d->", cur->data);cur = cur->next;}printf("NULL\n");
}void SListPushBack(SListNode** pplist, SLTDateType x)
{assert(pplist);/*assert(*pplist);*///链表为空时可以尾插SListNode* newnode = BuySListNode(x);if (*pplist == NULL){*pplist = newnode;}else{SListNode* tail = *pplist;while (tail->next){tail = tail->next;}tail->next = newnode;}
}void SListPushFront(SListNode** pplist, SLTDateType x)
{SListNode* newnode = BuySListNode(x);newnode->next = *pplist;*pplist = newnode;
}void SListPopBack(SListNode** pplist)
{assert(*pplist);//链表为空时不能再删,暴力检查 //SListNode* tail = pplist;//while (tail->next->next)//{//	tail = tail->next;//}//free(tail->next);//tail->next = NULL;if ((*pplist)->next == NULL){free(*pplist);*pplist = NULL;}else{SListNode* prev = NULL;SListNode* tail = *pplist;while (tail->next){prev = tail;tail = tail->next;}free(tail);prev->next = NULL;}
}void SListPopFront(SListNode** pplist)
{assert(*pplist);//链表为空时不能再删,暴力检查SListNode* tail = *pplist;*pplist = (tail)->next;free(tail);
}SListNode* SListFind(SListNode* plist, SLTDateType x)
{SListNode* cur = plist;while (cur->next){if (cur->data == x){return cur;//break;}cur = cur->next;}return NULL;
}void SListInsertAfter(SListNode* pos, SLTDateType x)
{assert(pos);SListNode* newnode = BuySListNode(x);newnode->next = pos->next;pos->next = newnode;
}void SListEraseAfter(SListNode* pos)
{assert(pos);assert(pos->next);//pos->next = pos->next->next;SListNode* next = pos->next;pos->next = next->next;free(next);
}void SListDestroy(SListNode** pplist)
{SListNode* node = *pplist;node = NULL;free(node);}
