【unity】网格描边方法
介绍对模型四边网格的三种描边方法:包括纯Shader方法、创建网格方法和后处理方法。于增强场景中3D模型的轮廓,使其在视觉上更加突出和清晰。这种效果可以用于增强三维场景中的物体、角色或环境,使其在视觉上更加吸引人。
网格描边方法资源
Shader方法
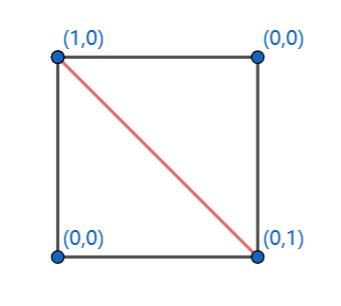
使用GeometryShader方法对三角网进行计算,目的是保留距离最短的两条边。在进行计算时,首先需要建立一个float2 dist来储存点的信息。在进行插值后,需要保留边的dist,其中一个数值为0,以此为依据来绘制边。下图展示了顶点dist的赋值情况。
这种方法可以让我们在渲染三角网时,根据点之间的距离信息来动态地调整边的绘制,从而实现更加真实和精细的渲染效果。
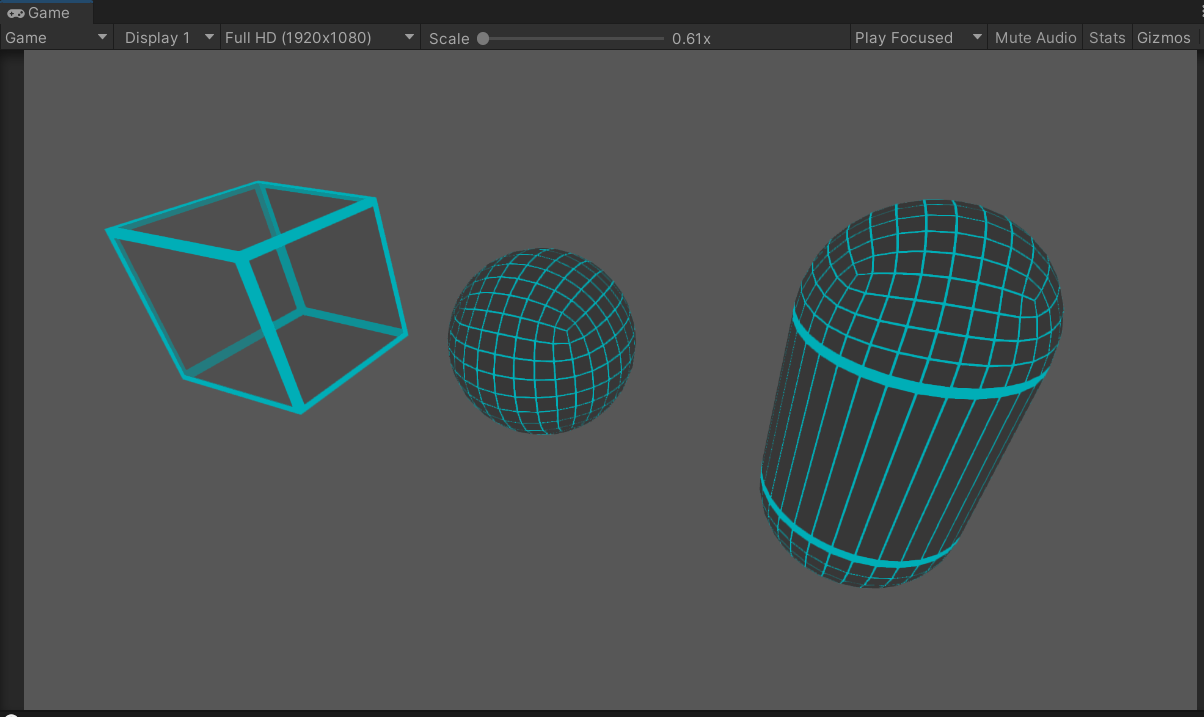
实现效果
实现shader
Shader "Unlit/WireframeMesh"
{Properties{_MainTex("Texture", 2D) = "white" { }_WireColor("WireColor", Color) = (1, 0, 0, 1)_FillColor("FillColor", Color) = (1, 1, 1, 1)_WireWidth("WireWidth", Range(0, 1)) = 1}SubShader{Tags { "RenderType" = "Transparent" "Queue" = "Transparent" }LOD 100AlphaToMask On // 为此通道启用减法混合Pass{Blend SrcAlpha OneMinusSrcAlphaCull OffCGPROGRAM#pragma vertex vert#pragma geometry geom //添加几何阶段#pragma fragment frag#include "UnityCG.cginc"struct appdata{float4 vertex: POSITION;float2 uv: TEXCOORD0;};struct v2g {float2 uv: TEXCOORD0;float4 vertex: SV_POSITION;};struct g2f{float2 uv: TEXCOORD0;float4 vertex: SV_POSITION;float2 dist: TEXCOORD1;float maxlenght : TEXCOORD2;};sampler2D _MainTex;float4 _MainTex_ST;float4 _FillColor, _WireColor;float _WireWidth, _Clip, _Lerp, _WireLerpWidth;//视口到几何v2g vert(appdata v) {v2g o;o.vertex = v.vertex;o.uv = TRANSFORM_TEX(v.uv, _MainTex);return o;}//几何到片元[maxvertexcount(3)]void geom(triangle v2g IN[3], inout TriangleStream < g2f > triStream){//读取三角网各个顶点float3 p0 = IN[0].vertex;float3 p1 = IN[1].vertex;float3 p2 = IN[2].vertex;//计算三角网每一边的长度float v0 = length(p1 - p2);float v1 = length( p2 - p0);float v2 = length( p0 - p1);//求出最长边float v_max = max(v2,max(v0, v1));//每一边减最长边,小于0时为0,等于0时为1float f0 = step(0, v0 - v_max);float f1 = step(0, v1 - v_max);float f2 = step(0, v2 - v_max);//赋值传到片元操作g2f OUT;OUT.vertex = UnityObjectToClipPos(IN[0].vertex);OUT.uv = IN[0].uv;OUT.maxlenght = v_max;OUT.dist = float2(f1, f2);triStream.Append(OUT);OUT.vertex = UnityObjectToClipPos( IN[1].vertex);OUT.uv = IN[1].uv;OUT.maxlenght = v_max;OUT.dist = float2(f2, f0);triStream.Append(OUT);OUT.vertex = UnityObjectToClipPos( IN[2].vertex);OUT.maxlenght = v_max;OUT.uv = IN[2].uv;OUT.dist = float2(f0, f1);triStream.Append(OUT);}//片元阶段fixed4 frag(g2f i) : SV_Target{fixed4 col = tex2D(_MainTex, i.uv );fixed4 col_Wire= col* _FillColor;//取dist最小值float d =  min(i.dist.x, i.dist.y);//d小于线宽是赋值线颜色,否则赋值背景颜色col_Wire = d < _WireWidth ? _WireColor : col_Wire;fixed4 col_Tex = tex2D(_MainTex, i.uv);return col_Wire;}ENDCG}}
}
该方法不支持webGL,原因webGL不支持GeometryShader。
介绍一个根据uv创建网格的方法,虽然支持webGL,但是局限性太大,不做详细介绍,附上shader
Shader "Unlit/WireframeUV"
{Properties{_MainTex ("Texture", 2D) = "white" {}_FillColor("FillColor", Color) = (1, 1, 1, 1)[HDR] _WireColor("WireColor", Color) = (1, 0, 0, 1)_WireWidth("WireWidth", Range(0, 1)) = 1}SubShader{Tags { "RenderType"="Opaque" }LOD 100AlphaToMask OnPass{Tags { "RenderType" = "TransparentCutout" }Blend SrcAlpha OneMinusSrcAlphaCull OffCGPROGRAM#pragma vertex vert#pragma fragment frag#include "UnityCG.cginc"struct appdata{float4 vertex : POSITION;float2 uv : TEXCOORD0;};struct v2f{float2 uv : TEXCOORD0;float4 vertex : SV_POSITION;};sampler2D _MainTex;float4 _MainTex_ST;fixed4 _FillColor;fixed4 _WireColor;float _WireWidth;v2f vert (appdata v){v2f o;o.vertex = UnityObjectToClipPos(v.vertex);o.uv = TRANSFORM_TEX(v.uv, _MainTex);return o;}fixed4 frag (v2f i) : SV_Target{fixed4 col = tex2D(_MainTex, i.uv);fixed2 uv2 = abs(i.uv - fixed2(0.5f, 0.5f));float minUV = max(uv2.x, uv2.y);col = minUV < 0.5- _WireWidth ? col* _FillColor : _WireColor;return col;}ENDCG}}
}
创建网格方法
这个方法支持在内置built-in管线中使用,实现原理和shader方法类似,不同的是需要构建线网格。根据原有三角网格抽取其中最短两条重新绘制。
实现效果
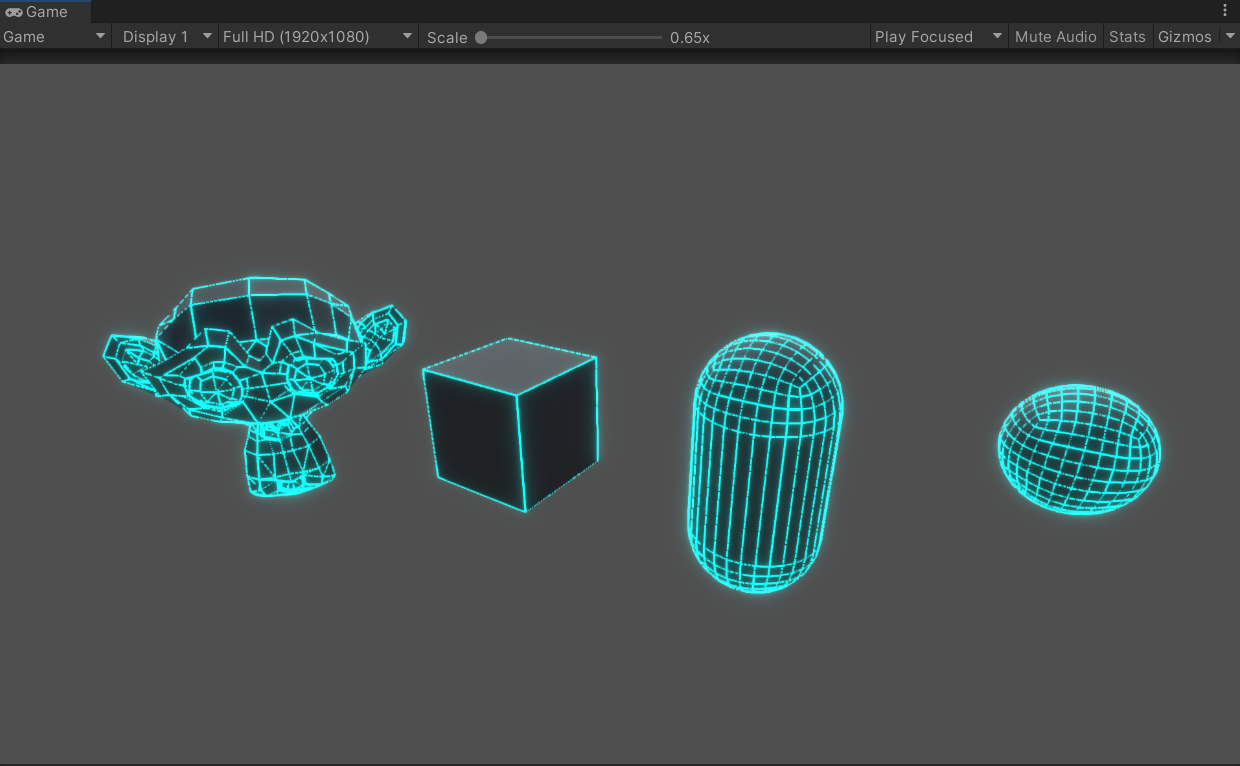
因为CommandBuffer方法暂时无法设置线宽,用了一些后处理方法
实现的方法
using System.Collections.Generic;
using UnityEngine;
using UnityEngine.Rendering;public class CamerDrawMeshDemo : MonoBehaviour
{[SerializeField]MeshFilter meshFilter;CommandBuffer cmdBuffer;[SerializeField]Material cmdMat1;// Start is called before the first frame updatevoid Start(){//创建一个CommandBuffercmdBuffer = new CommandBuffer() { name = "CameraCmdBuffer" };Camera.main.AddCommandBuffer(CameraEvent.AfterForwardOpaque, cmdBuffer);DarwMesh();}//绘制网格void DarwMesh(){cmdBuffer.Clear();Mesh  m_grid0Mesh = meshFilter.mesh;//读取原有网格,这里需要开启网格可读写cmdBuffer.DrawMesh(CreateGridMesh(m_grid0Mesh), Matrix4x4.identity, cmdMat1);}//创建网格Mesh CreateGridMesh(Mesh TargetMesh){Vector3[] vectors= getNewVec(TargetMesh.vertices);//模型坐标转换到世界坐标Vector3[] getNewVec(Vector3[] curVec){int count = curVec.Length;Vector3[] vec = new Vector3[count];for (int i = 0; i < count; i++){//坐标转型,乘上变化矩阵vec[i] =(Vector3)(transform.localToWorldMatrix* curVec[i])+transform.position;}return vec;}int[] triangles = TargetMesh.triangles;List<int> indicesList = new List<int>(2);//筛选绘制边for (int i = 0; i < triangles.Length; i+=3){Vector3 vec;int a = triangles[i];int b = triangles[i+1];int c = triangles[i+2];vec.x = Vector3.Distance(vectors[a], vectors[b]);vec.y = Vector3.Distance(vectors[b], vectors[c]);vec.z = Vector3.Distance(vectors[c], vectors[a]);addList(vec, a,b,c);}void addList(Vector3 vec,int a,int b,int c){if (vec.x< vec.y|| vec.x <vec.z){indicesList.Add(a);indicesList.Add(b);}if (vec.y < vec.x || vec.y < vec.z){indicesList.Add(b);indicesList.Add(c);}if (vec.z < vec.x || vec.z < vec.y){indicesList.Add(c);indicesList.Add(a);}}int[] indices = indicesList.ToArray();//创建网格Mesh mesh = new Mesh();mesh.name = "Grid ";mesh.vertices = vectors;mesh.SetIndices(indices, MeshTopology.Lines, 0);return mesh;}
}
后处理方法
利用深度纹理和法线纹理来比较相邻像素之间的相似性,以判断它们是否位于物体的边缘,并进而实现描边效果。具体而言,该算法会对相邻像素的深度值和法线值进行比较,若它们之间的差异超过一定阈值,则认为这两个像素位于物体的边缘上。通过这一方法,我们可以在渲染时对边缘进行特殊处理,以实现描边效果。
实现效果
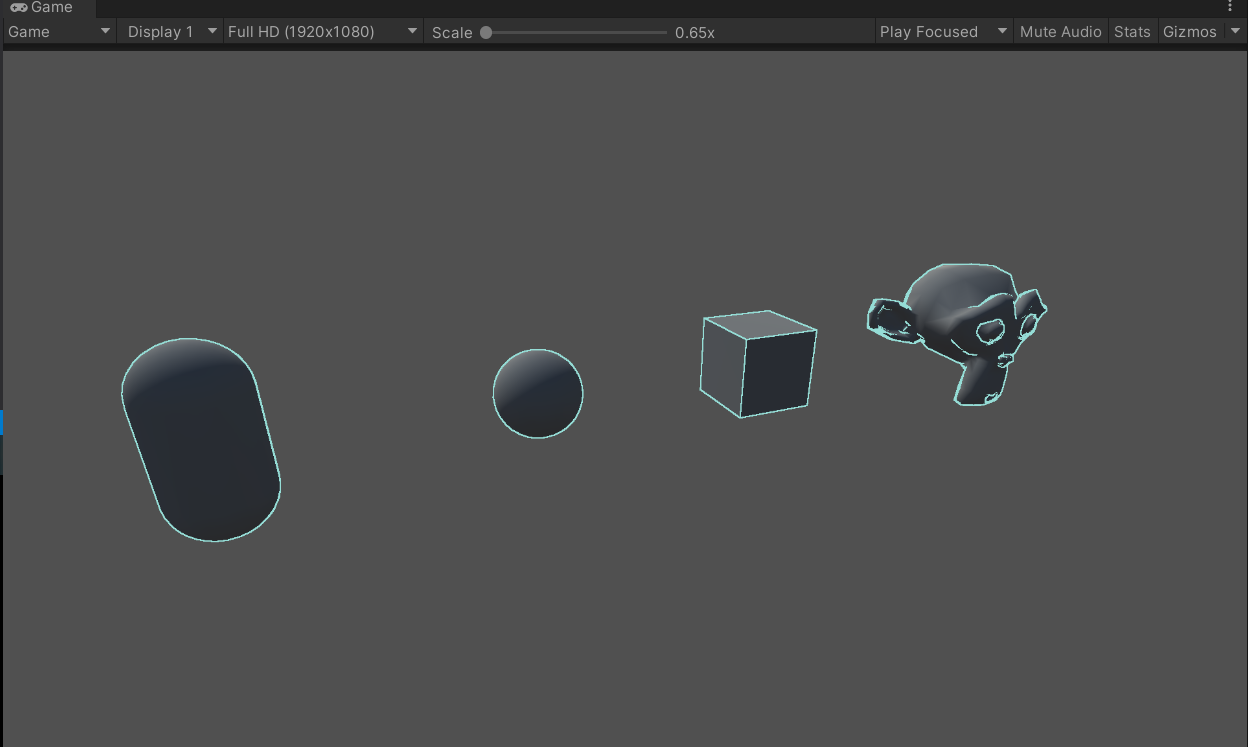
实现方法
建立后渲染脚本挂载在主相机上
using System.Collections;
using System.Collections.Generic;
using UnityEngine;public class SceneOnlineDemo : MonoBehaviour
{public  Shader OnlineShader;Material material;[ColorUsage(true, true)]public Color ColorLine;public Vector2 vector;public float LineWide;// Start is called before the first frame updatevoid Start(){material = new Material(OnlineShader);GetComponent<Camera>().depthTextureMode |= DepthTextureMode.DepthNormals;}void Update(){}void OnRenderImage(RenderTexture src, RenderTexture dest){if (material != null){material.SetVector("_ColorLine", ColorLine);material.SetVector("_Sensitivity", vector);material.SetFloat("_SampleDistance", LineWide);Graphics.Blit(src, dest, material);}else{Graphics.Blit(src, dest);}}
}
后处理shader挂载在SceneOnlineDemo 脚本上
Shader "Unlit/SceneOnlineShader"
{Properties{_MainTex ("Texture", 2D) = "white" {}[HDR] _ColorLine("ColorLine", Color) = (1,1,1,1)   //颜色,一般用fixed4_Sensitivity("Sensitivity", Vector) = (1, 1, 1, 1)    //xy分量分别对应法线和深度的检测灵敏度,zw分量没有实际用途_SampleDistance("Sample Distance", Float) = 1.0}SubShader{Tags { "RenderType" = "Opaque" }LOD 100Pass{ZTest Always Cull Off ZWrite OffCGPROGRAM#pragma vertex vert#pragma fragment frag#include "UnityCG.cginc"sampler2D _MainTex;half4 _MainTex_TexelSize;sampler2D _CameraDepthNormalsTexture;    //深度+法线纹理sampler2D _CameraDepthTexture;fixed4 _ColorLine;float _SampleDistance;half4 _Sensitivity;struct v2f{half2 uv[5]: TEXCOORD0;float4 vertex : SV_POSITION;};v2f vert (appdata_img v){v2f o;o.vertex = UnityObjectToClipPos(v.vertex);half2 uv = v.texcoord;o.uv[0] = uv;#if UNITY_UV_STARTS_AT_TOPif (_MainTex_TexelSize.y < 0)uv.y = 1 - uv.y;#endif//建立相邻向量数组o.uv[1] = uv + _MainTex_TexelSize.xy * half2(1, 1) * _SampleDistance;o.uv[2] = uv + _MainTex_TexelSize.xy * half2(-1, -1) * _SampleDistance;o.uv[3] = uv + _MainTex_TexelSize.xy * half2(-1, 1) * _SampleDistance;o.uv[4] = uv + _MainTex_TexelSize.xy * half2(1, -1) * _SampleDistance;return o;}//检查是否相似half CheckSame(half4 center, half4 sample) {half2 centerNormal = center.xy;float centerDepth = DecodeFloatRG(center.zw);half2 sampleNormal = sample.xy;float sampleDepth = DecodeFloatRG(sample.zw);// 法线相差half2 diffNormal = abs(centerNormal - sampleNormal) * _Sensitivity.x;int isSameNormal = (diffNormal.x + diffNormal.y) < 0.1;// 深度相差float diffDepth = abs(centerDepth - sampleDepth) * _Sensitivity.y;// 按距离缩放所需的阈值int isSameDepth = diffDepth < 0.1 * centerDepth;// return:// 1 - 如果法线和深度足够相似// 0 - 相反return isSameNormal * isSameDepth ? 1.0 : 0.0;}fixed4 frag (v2f i) : SV_Target{fixed4 col = tex2D(_MainTex,  i.uv[0]);half4 sample1 = tex2D(_CameraDepthNormalsTexture, i.uv[1]);half4 sample2 = tex2D(_CameraDepthNormalsTexture, i.uv[2]);half4 sample3 = tex2D(_CameraDepthNormalsTexture, i.uv[3]);half4 sample4 = tex2D(_CameraDepthNormalsTexture, i.uv[4]);half edge = 1.0;edge *= CheckSame(sample1, sample2);edge *= CheckSame(sample3, sample4);fixed4 withEdgeColor = lerp(_ColorLine, col, edge);return withEdgeColor;}ENDCG}}
}